Boulder 810 User manual
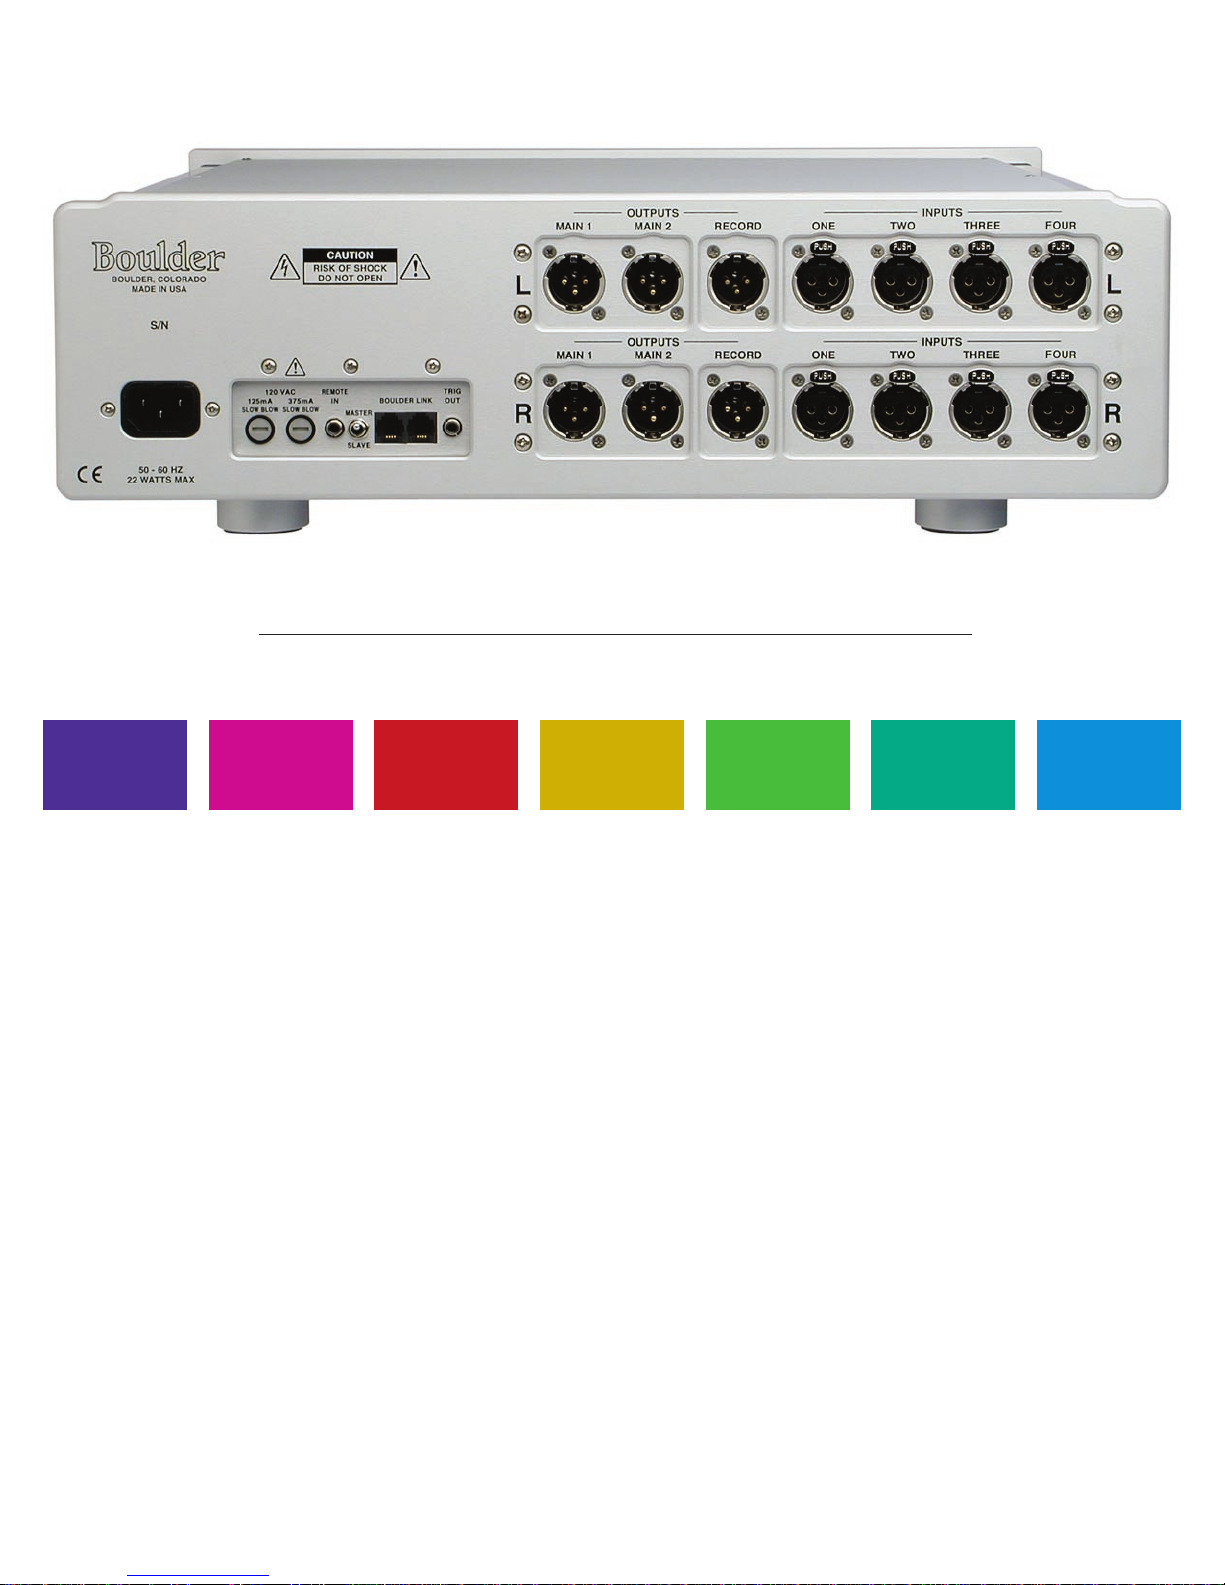

Boulder
810 Preamplifier
Owners Manual
6/8/06
Boulder Amplifiers, Inc.
3235 Prairie Ave.
Boulder, CO 80301
www.boulderamp.com
APPENDIX RECORDING
BOULDER
LINK
PROGRAMMING
REMOTE
CONTROL OPERATION
GETTING
STARTED

APPENDIX RECORDING
BOULDER
LINK
PROGRAMMING
REMOTE
CONTROL OPERATION
GETTING
STARTED
Boulder 810 Preamplifier Rear Panel

TABLE OF CONTENTS
GETTING STARTED
Introduction . . . . . . . . . . . . . . . . . . . . . . . . . . . . . . . . . . . . . . . . . . . . . . . . . . . . . . . . . . . . . . . 1-1
Quick Start . . . . . . . . . . . . . . . . . . . . . . . . . . . . . . . . . . . . . . . . . . . . . . . . . . . . . . . . . . . . . . . . 1-1
Placement of the 810 Preamplifier . . . . . . . . . . . . . . . . . . . . . . . . . . . . . . . . . . . . . . . . . . . . 1-2
Connecting to the Mains Outlet . . . . . . . . . . . . . . . . . . . . . . . . . . . . . . . . . . . . . . . . . . . . . . 1-3
Polarity . . . . . . . . . . . . . . . . . . . . . . . . . . . . . . . . . . . . . . . . . . . . . . . . . . . . . . . . . . . . . . . . . . . 1-4
Connecting a Balanced Source. . . . . . . . . . . . . . . . . . . . . . . . . . . . . . . . . . . . . . . . . . . . . . . . 1-4
Connecting an Unbalanced Source . . . . . . . . . . . . . . . . . . . . . . . . . . . . . . . . . . . . . . . . . . . . 1-5
Connecting to a Balanced Input Amplifier . . . . . . . . . . . . . . . . . . . . . . . . . . . . . . . . . . . . . 1-6
Connecting to an Unbalanced Input Amplifier . . . . . . . . . . . . . . . . . . . . . . . . . . . . . . . . . 1-7
Setting the Boulderlink Switch . . . . . . . . . . . . . . . . . . . . . . . . . . . . . . . . . . . . . . . . . . . . . . . 1-8
OPERATION
Powering Up. . . . . . . . . . . . . . . . . . . . . . . . . . . . . . . . . . . . . . . . . . . . . . . . . . . . . . . . . . . . . . . 2-1
Input Selections . . . . . . . . . . . . . . . . . . . . . . . . . . . . . . . . . . . . . . . . . . . . . . . . . . . . . . . . . . . . 2-2
Volume. . . . . . . . . . . . . . . . . . . . . . . . . . . . . . . . . . . . . . . . . . . . . . . . . . . . . . . . . . . . . . . . . . . . 2-3
Balance. . . . . . . . . . . . . . . . . . . . . . . . . . . . . . . . . . . . . . . . . . . . . . . . . . . . . . . . . . . . . . . . . . . . 2-4
Mute. . . . . . . . . . . . . . . . . . . . . . . . . . . . . . . . . . . . . . . . . . . . . . . . . . . . . . . . . . . . . . . . . . . . . . 2-5
Display. . . . . . . . . . . . . . . . . . . . . . . . . . . . . . . . . . . . . . . . . . . . . . . . . . . . . . . . . . . . . . . . . . . . 2-6
APPENDIX RECORDING
BOULDER
LINK
PROGRAMMING
REMOTE
CONTROL OPERATION
GETTING
STARTED

REMOTE CONTROL
Batteries. . . . . . . . . . . . . . . . . . . . . . . . . . . . . . . . . . . . . . . . . . . . . . . . . . . . . . . . . . . . . . . . . . . 3-1
Source Selection . . . . . . . . . . . . . . . . . . . . . . . . . . . . . . . . . . . . . . . . . . . . . . . . . . . . . . . . . . . . 3-2
Volume, Balance and Mute. . . . . . . . . . . . . . . . . . . . . . . . . . . . . . . . . . . . . . . . . . . . . . . . . . . 3-2
Polarity . . . . . . . . . . . . . . . . . . . . . . . . . . . . . . . . . . . . . . . . . . . . . . . . . . . . . . . . . . . . . . . . . . . 3-3
PROGRAMMING
Input Names. . . . . . . . . . . . . . . . . . . . . . . . . . . . . . . . . . . . . . . . . . . . . . . . . . . . . . . . . . . . . . . 4-1
Input Polarity . . . . . . . . . . . . . . . . . . . . . . . . . . . . . . . . . . . . . . . . . . . . . . . . . . . . . . . . . . . . . . 4-2
Input Level Calibration. . . . . . . . . . . . . . . . . . . . . . . . . . . . . . . . . . . . . . . . . . . . . . . . . . . . . . 4-3
Input Balance Calibration. . . . . . . . . . . . . . . . . . . . . . . . . . . . . . . . . . . . . . . . . . . . . . . . . . . . 4-4
Theater Mode . . . . . . . . . . . . . . . . . . . . . . . . . . . . . . . . . . . . . . . . . . . . . . . . . . . . . . . . . . . . . . 4-5
Start Volume . . . . . . . . . . . . . . . . . . . . . . . . . . . . . . . . . . . . . . . . . . . . . . . . . . . . . . . . . . . . . . . 4-6
Programming by the Display Button . . . . . . . . . . . . . . . . . . . . . . . . . . . . . . . . . . . . . . . . . . 4-7
Main Outputs Polarity . . . . . . . . . . . . . . . . . . . . . . . . . . . . . . . . . . . . . . . . . . . . . . . . . . . . . . 4-7
Boulderlink ID . . . . . . . . . . . . . . . . . . . . . . . . . . . . . . . . . . . . . . . . . . . . . . . . . . . . . . . . . . . . . 4-8
Remote ID . . . . . . . . . . . . . . . . . . . . . . . . . . . . . . . . . . . . . . . . . . . . . . . . . . . . . . . . . . . . . . . . . 4-8
Boulderlink Speed . . . . . . . . . . . . . . . . . . . . . . . . . . . . . . . . . . . . . . . . . . . . . . . . . . . . . . . . . . 4-8
Reset to Factory Defaults . . . . . . . . . . . . . . . . . . . . . . . . . . . . . . . . . . . . . . . . . . . . . . . . . . . . 4-9
APPENDIX RECORDING
BOULDER
LINK
PROGRAMMING
REMOTE
CONTROL OPERATION
GETTING
STARTED

BOULDERLINK
Connecting the Boulderlink . . . . . . . . . . . . . . . . . . . . . . . . . . . . . . . . . . . . . . . . . . . . . . . . . . 5-1
Connecting 800 Series to 1000 or 2000 Series with Boulderlink. . . . . . . . . . . . . . . . . . . . 5-2
Setting Boulderlink Switches . . . . . . . . . . . . . . . . . . . . . . . . . . . . . . . . . . . . . . . . . . . . . . . . . 5-3
Setting Boulderlink ID Numbers. . . . . . . . . . . . . . . . . . . . . . . . . . . . . . . . . . . . . . . . . . . . . . 5-3
Power up via Boulderlink . . . . . . . . . . . . . . . . . . . . . . . . . . . . . . . . . . . . . . . . . . . . . . . . . . . 5-4
Boulderlink Messages . . . . . . . . . . . . . . . . . . . . . . . . . . . . . . . . . . . . . . . . . . . . . . . . . . . . . . . 5-5
RECORDING
Connecting a Recording Device . . . . . . . . . . . . . . . . . . . . . . . . . . . . . . . . . . . . . . . . . . . . . . 6-1
APPENDIX
Block Diagram . . . . . . . . . . . . . . . . . . . . . . . . . . . . . . . . . . . . . . . . . . . . . . . . . . . . . . . . . . . . . 7-1
Specifications . . . . . . . . . . . . . . . . . . . . . . . . . . . . . . . . . . . . . . . . . . . . . . . . . . . . . . . . . . . . . . 7-2
Troubleshooting . . . . . . . . . . . . . . . . . . . . . . . . . . . . . . . . . . . . . . . . . . . . . . . . . . . . . . . . . . . . 7-3
Notes . . . . . . . . . . . . . . . . . . . . . . . . . . . . . . . . . . . . . . . . . . . . . . . . . . . . . . . . . . . . . . . . . . . . . 7-4
APPENDIX RECORDING
BOULDER
LINK
PROGRAMMING
REMOTE
CONTROL OPERATION
GETTING
STARTED

GETTING STARTED
INTRODUCTION
Congratulations on your selection of the Boulder 810 Preamplifier.
We at Boulder Amplifiers are certain it will provide years of listening
pleasure.
QUICK START
To get started listening, you only need to connect the 810 as you would
any other preamplifier, but you should take note of the following.
WARNING: The volume control is attractive and because it is optical
and has no stops, it is tempting to just spin it. DO THIS ONLY WITH
THE POWER OFF! It must be given the respect you would any other
volume control with the ability to get loud very quickly. By the time
you have turned it up to -40.0 dB with a source turned on, you should
be hearing some music. If not, don’t proceed any louder until you have
solved this problem. See trouble shooting section.
For the 810 to work properly, the Boulderlink’s MASTER/SLAVE
switch should be set to MASTER in most instances.
A thorough reading of this manual will definitely enhance your
enjoyment of your 810 Preamplifier.
GETTING
STARTED
1-1

PLACEMENT OF THE 810 PREAMPLIFIER
Your Boulder 810 Preamplifier is designed to reduce the effects that
external magnetic and radio fields (RF) have on its internal circuitry.
While placement is not critical, known magnetic fields should be
avoided. Line of sight from the listening position is necessary for the
remote control to function properly.
Because the preamplifier is heavy, a solid, stable surface should be
used. As it will generate some heat, there should be good air circulation
around it.
You may want to have some access to the rear panels for cable
changes.
GETTING
STARTED
1-2

CONNECTING TO THE MAINS OUTLET
Your 810 Preamplifier is supplied with a mains cord suitable to the
location where it was purchased.
The exact voltage and frequency range is indicated on the rear panel.
Make certain that the mains voltage used is within the specifications
shown. Also listed are the fuse ratings. There are two fuse holders
on the rear of the 810, one for each of the digital and analog power
transformers.
Use only specified fuses. Check with a qualified service person
first.
GETTING
STARTED
1-3

POLARITY
Please note that the 810 Preamplifier conforms to the standard of pin
2 as the positive or hot pin for all analog balanced inputs and outputs.
Because input and output polarities are handled through programming
setups and the remote control, no concern for polarity is needed while
connecting sources.
CONNECTING A BALANCED ANALOG SOURCE
To fully realize the sonic potential of your 810 Preamplifier, use
balanced connections whenever possible. Balanced cables reduce
interference from magnetic and RF sources to an absolute minimum.
Connect each line source to one of the four inputs provided. Later,
you will be able to name each input with the source’s name, so you
might want to make a list as you connect them.
GETTING
STARTED
1-4

CONNECTING AN UNBALANCED SOURCE
Although the inputs are all of the 3 pin type, an unbalanced source
is easily accommodated by using a special cable. This cable has an RCA
phono type connector on the source end and a 3 pin connector (for going
to an input) on the 810 Preamplifier.
The negative input (pin 3) should be wired to ground only at the
RCA phono connector. This brings the negative input reference of the
810 to the unbalanced source ground, thus reducing ground loops.
Another option for accommodating unbalanced sources is that of
the Boulder ABL input adapter. It converts a balanced input into a RCA
connector input right at the rear of the 810.
Like the above cable, the negative input of the 810 is connected to
the ground of the RCA connector. However, this negative side will then
share the shield wire with the chassis ground and will not have the best
hum rejection.
GETTING
STARTED
1-5
UNBALANCED INPUT CABLE
3-NEG INPUT
2-POS INPUT
1-GROUND

CONNECTING TO A BALANCED INPUT AMPLIFIER
With your 810 Preamplifier’s balanced output driving a balanced
input power amplifier, you can take sonic advantage of short speaker
cables and correspondingly longer input cables. With the 810’s
low output impedance, distances of more than 50 meters between
preamplifier and power amplifier are practical.
Connect each amplifier input to the main outputs labeled “MAIN
OUT.” If it is desired to use 2 or more amplifiers such as in bi-amping,
splitters will be required. If in doubt, consult your Boulder dealer.
GETTING
STARTED
1-6

CONNECTING TO AN UNBALANCED INPUT AMPLIFIER
A special cable is required to make this connection. This cable
connects pin 1 to the shield and pin 2 to the center pin. It leaves the
output pin 3 unconnected.
Connecting the unused output pin (usually pin 3) to ground will
cause excessive ground currents and degrade performance. Use an
ohmmeter or continuity checker to determine how a cable is wired.
GETTING
STARTED
1-7
UNBALANCED OUTPUT CABLE
3-NEG OUTPUT
2-POS OUTPUT
1-GROUND
LINE
PREAMP
INPUT

SETTING THE BOULDERLINK SWITCH
When using the 810 with only power amplifiers, the Boulderlink
MASTER / SLAVE switch should be set to MASTER.
For more information on Boulderlink, see the Boulderlink section as
indicated by the finger tab below.
GETTING
STARTED
1-8

OPERATION
POWERING UP
With all your connections made, you are ready to listen to your
Boulder 810 Preamplifier.
The power LED will cycle through a variety of colors indicating a
standby mode. Power is applied only to the microprocessor during this
mode.
Press the STANDBY button to turn on the 810. The indicator will
change to amber and power will be applied to the audio section.
During the power up sequence, the displays at left will be briefly
shown.
The front panel STANDBY button should be used for everyday turn
on and off. This switch mutes the audio, turns off all sections except the
microprocessor, and puts the preamplifier in a standby mode.
2-1
OPERATION

INPUT SELECTIONS
To select an input, press one of the pushbuttons labeled ONE, TWO,
THREE or FOUR. The respective input will be shown in the display
and that signal will be routed to both the main and record outputs. For
example, if input ONE is chosen, “1. INPUT ONE” will show in the
display.
NOTE: There will be a delay when switching from one source to
another. This is necessary to allow the circuitry to adjust to the new
input source.
OPERATION
2-2

VOLUME
Because the precise feel of the Boulder 810’s volume control may be
different than you are used to, we recommend starting the source device
so that an audio signal is fed to the 810 before increasing the volume.
The display will show “VOLUME INFINITE” to indicate maximum
attenuation or no sound. By placing a finger at the edge of the rotating
control and moving it slowly so it turns in a clockwise direction, the
volume will increase and an indication such as “VOLUME - 40.0dB” in
the display will show the respective volume.
At this point you should be listening to music. Each volume step is
a change of 0.5 dB.
WARNING: The volume control must be given the respect you
would any other volume control with the ability to get loud very
quickly.
WARNING: If the input is programmed to be in “THEATER MODE,”
then the volume control will have no effect.
For more information, see THEATER MODE in the programming
section.
OPERATION
2-3

BALANCE
To change the level balance, press the BALANCE pushbutton.
“BALANCE CENTERED” will show in the display. Now, rotating the
control will change the balance instead of the volume for as long as
“BALANCE...” is displayed.
Turning the control counterclockwise (left) will cause an indication
such as “BALANCE R -2.0dB < “ in the display. This means that the right
channel has been attenuated -2.0 dB below the left channel, regardless of
volume setting, making the left channel louder.
The range of balance offset is limited to -20.0 dB. If the control is then
rotated further counterclockwise, the “BALANCE RIGHT MUTED<”
will be displayed to indicate that only the left channel is on.
OPERATION
2-4

After several seconds of not changing the balance, the display
will return to the “VOLUME...” indication. You may also return to
controlling volume by again pressing the BALANCE pushbutton. The
balance resolution is the same as for the volume control, 0.5 dB steps.
WARNING: If the input is programmed to be in “THEATER MODE,”
then the balance control will have no effect.
For more information, see THEATER MODE in the programming
section.
MUTE
To temporarily reduce the volume, press the MUTE pushbutton.
“VOLUME MUTED” will show in the display, replacing the volume
indication. Again pressing the MUTE pushbutton will return the
volume to normal level.
While muted, the level of both channels will be set to -100 dB,
regardless of volume setting.
OPERATION
2-5

DISPLAY
The display brightness may be set to any of 4 brightness levels. To
change the brightness level, press the DISPLAY pushbutton. “DISPLAY
100%” will show in the display. Rotate the center control until the
desired brightness is obtained such as “DISPLAY 50%.” The number in
the display is the relative brightness.
After several seconds of not changing the brightness level, the
display will return to the “VOLUME...” indication. You may also return
to controlling volume by again pressing the DISPLAY pushbutton.
With the display at a brightness less than that of 100%, any operation
of a pushbutton or the volume control will cause the display to go to full
brightness for several seconds, and then return to the desired brightness.
This ensures that if a function is changed, it will be noticed whether
intentional or inadvertent.
OPERATION
2-6
Table of contents
Other Boulder Amplifier manuals

Boulder
Boulder 1008 User manual

Boulder
Boulder 860 User manual

Boulder
Boulder 850 User manual

Boulder
Boulder 2008 User manual

Boulder
Boulder 2150 User manual

Boulder
Boulder 1060 User manual

Boulder
Boulder 2010 User manual

Boulder
Boulder 1160 User manual

Boulder
Boulder 2120 User manual

Boulder
Boulder 1110 User manual

Boulder
Boulder 3050 User manual

Boulder
Boulder 3060 User manual

Boulder
Boulder 1108 User manual

Boulder
Boulder 812 User manual

Boulder
Boulder 2110 User manual

Boulder
Boulder 508 User manual

Boulder
Boulder 866 Analog User manual

Boulder
Boulder 1012 DAC Preamplifier User manual

Boulder
Boulder 1161 User manual

Boulder
Boulder 2108 User manual