Bouyer GX 2020 User manual

I - DESCRIPTION
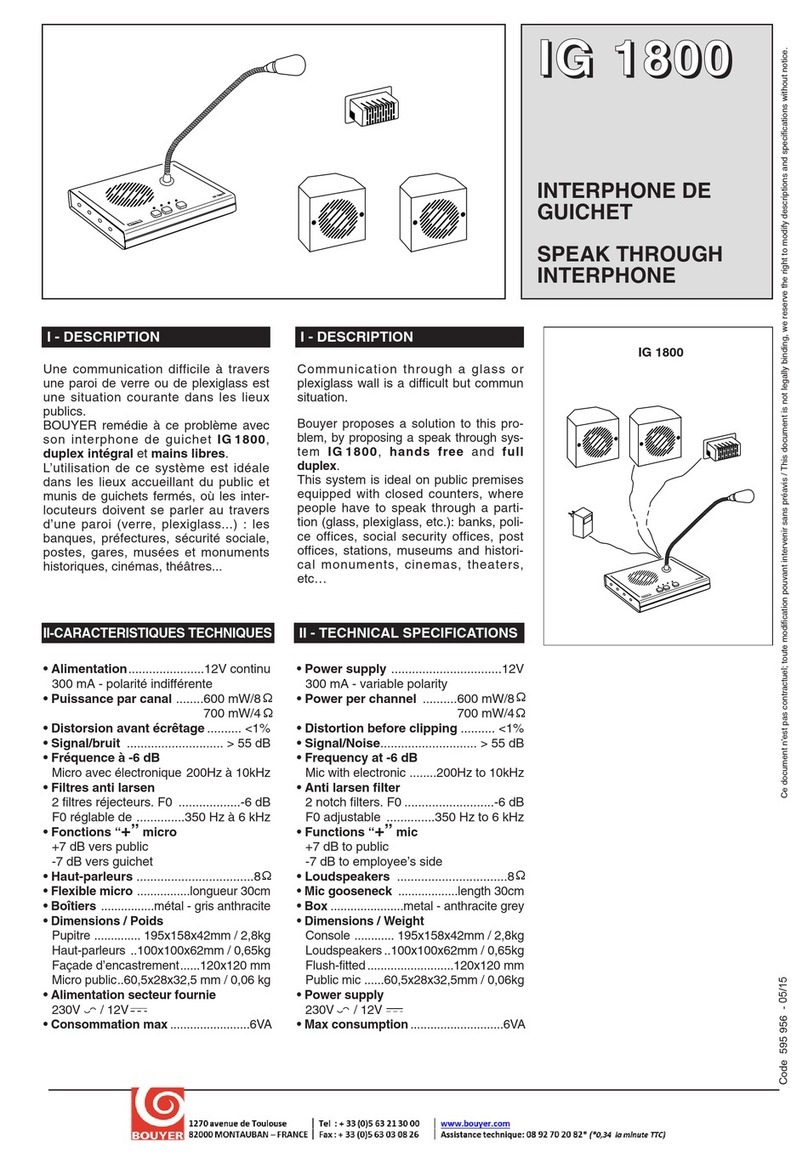
Le poste chef d’interphonie se compose
d’un pupitre de commande GX 2020 et
d’une centrale d’interphonie IZ 2020 avec
une alimentation secteur.
Cet ensemble permet de réaliser une ins-
tallation de 20 postes secondaires. Il est
possible d’associer entre eux 4 IZ 2020
pour obtenir une intallation de 80 postes.
Ce système fonctionne avec des postes
secondaires de 16Ω à 50Ω (Cf. catalogue
Bouyer).
Pour avoir 2 postes chefs sur la même ins-
tallation, il est possible d’ajouter un deuxiè-
me pupitre GX2020.
Le fonctionnement est du type “Alternat”,
c’est à dire que le poste chef dirige la
conversation.
La solution GX 2020 +IZ 2020 est com-
patible avec le système Intraparc.
II - SPECIFICATIONS TECHNIQUES
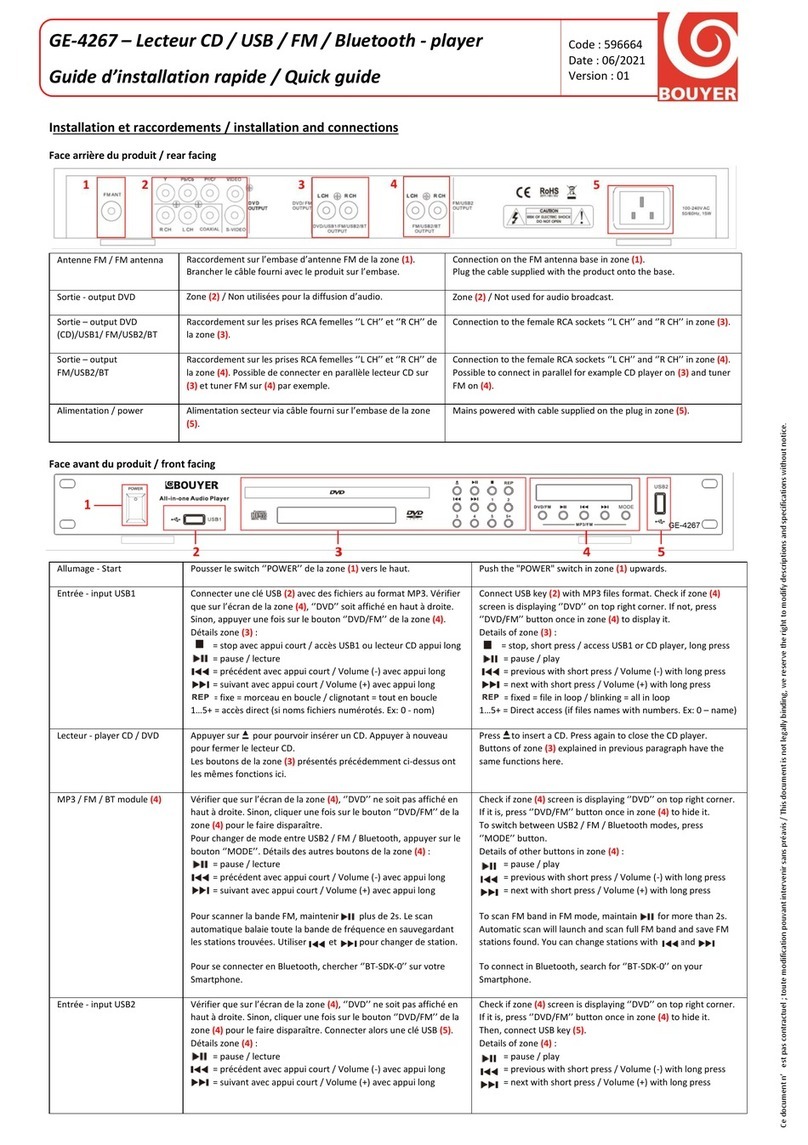
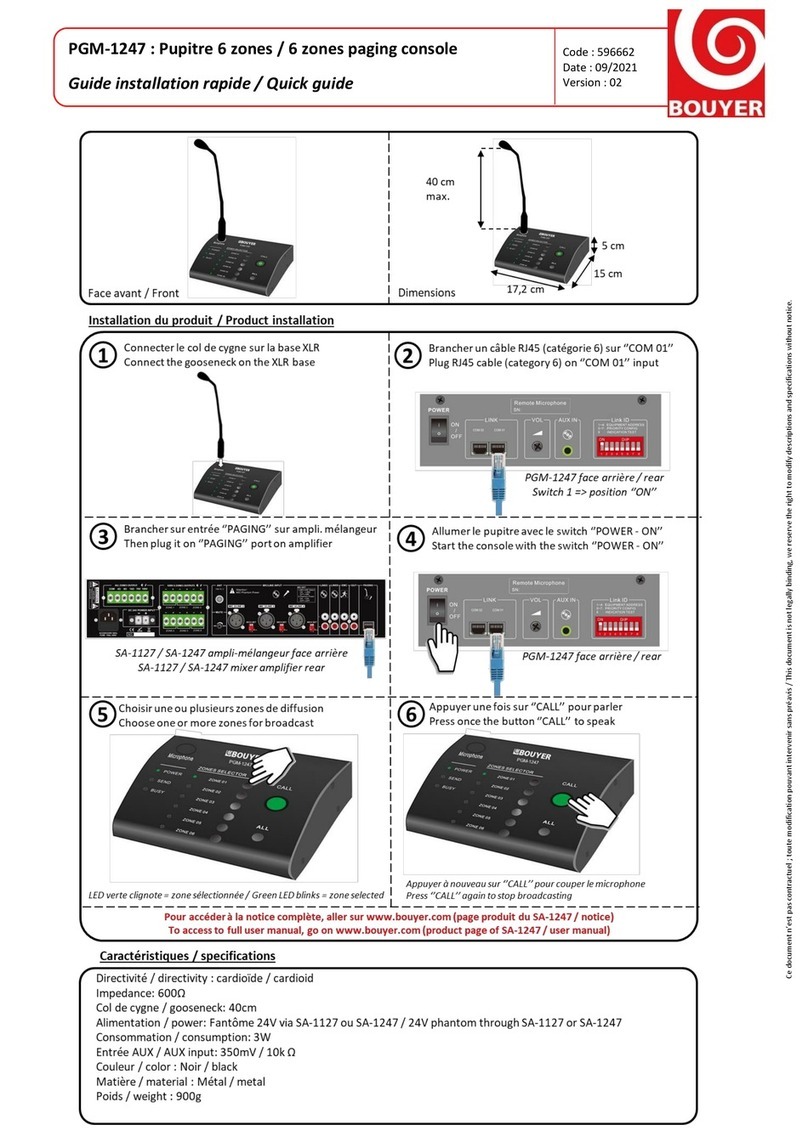
GX 2020 - Pupitre de commande
• Bus signal audio
Entrée et sortie ........ par transformateurs
Niveau nominal E. et S. ................ -10 dBu
Préampli. micro .......... avec compresseur
Ampli. haut-parleur ...................... 700 mW
Réglage des volumes................ par clavier
• Transmission et commandes
Liaison avec la centrale .......... Bus RS485
Afficheur LCD ................2 x 16 caractères
Clavier ..........................................16 touches
• Alimentation
Fournie par l’IZ 2020 ..........12V 200 mA
• Brochage de la prise RJ45
Voir Fig. VII. Livré avec un cordon RJ45
• Coffret
Matière ....................................Boîtier métal
Coloris ....................................Gris anthracite
Dimensions (Fig. I)....206 x 135 x 51 mm
Poids ..........................................................1 kg
I - DESCRIPTION
The intercom master station is composed
of a GX2020 control console and an
IZ2020 central unit with its mains power
supply.
The system can be used to produce an
installation with 20 secondary stations.
Four IZ 2020 units can be connected to
obtain an installation with 80 stations.
This system operates with 16Ω to 50Ω
secondary stations (see Bouyer cata-
logue).
In order to have 2 master stations on the
same installation, a second GX 2020 con-
sole may be added.
An “alternating” operating mode is used,
i.e. the master station controls the conver-
sation.
The solution GX 2020 +IZ 2020 is com-
patible with the Intraparc system .
II - TECHNICAL SPECIFICATIONS
GX 2020 - Control console
• Audio signal bus
Input and output ............via transformers
In/Out rated level ..........................-10 dBu
Mic. preamplifier ..........with compressor
Loudspeaker amplifier .............. 700 mW
Volume setting ................................keypad
• Transmission and controls
Link with central unit ..............RS485 bus
LCD display....................2 x 16 characters
Keypad ..............................................16 keys
• Power supply
Supplied by IZ 2020 ........12 V 200 mA
• RJ45 connector pins
See Fig. VII.Supplied with an RJ45 cable
• Housing
Material ......................................................Metal
Colour ................................................Anthracite
Dimensions (Fig. I) ..206 x 135 x 51 mm
Weight......................................................1 kg
GG
GGXX
XX
22
2200
0022
2200
00
II
IIZZ
ZZ
22
2200
0022
2200
00
PO TE CHEF D’INTERPHONIE
POUR 20 à 80 PO TE
ECONDAIRE
INTERCOM MA TER TATION
FOR 20 to 80 UB TATION
BOUYER
206mm
51mm
135mm
Ce documen n'es pas con rac uel; ou e modifica ion pouvan in ervenir sans préavis / This documen is no legally binding, we reserve he righ o modify descrip ions and specifica ions wi hou no ice.
FFiigg.. II
BOUYER
BOUYER
206mm 378mm
75mm
BOUYER
FFiigg.. IIII
Pupitre de commande GGXX 22002200
GGXX 22002200Control console
Centrale d’interphonie IIZZ 22002200
IIZZ 22002200Central unit
Code 596 270 -01-2014

IZ 2020 - Centrale d’interphonie
• ignal audio sur ligne secondaire
Entrée ligne en mode écoute .................................................. -75 dBu
Sortie ligne en mode parole ................................................2,2V/16Ω
Résistance de ligne pour détection d’appel ...................... 1kΩ max
• ignal audio Bus
Entrée et sortie ...................................................... par transformateur
Niveau nominal E. et S. ............................................................ -10dBu
• Transmission des commandes
Liaison avec le pupitre ........................................................Bus RS485
• Détection de modulation parole
Pour les applications dépourvues de commandes manuelles
Parole/Ecoute, l’IZ 2020 commute automatiquement la com-
mande Parole par détection du signal. Pour activer cette fonc-
tion, ouvrir l’IZ 2020 et sur SW2, commuter 1 sur ON pour
“PUP1” et 2 sur ON pour “PUP 2”. La sensibilité de détection est
réglable (Fig. IV).
• Entrée AUX : destinée à diffuser dans les secondaires, une sour-
ce musicale ou autre.
Prise ④(Fig.IV) .................................................................................. DIN
Type d’entrée.................................. symétrique en 1 et 3, 0 = masse
Sensibilité...................................................................................... -10dBu
Télécommande .......................................... relier 4 et 2 sur prise DIN
• Alimentation
12V par bloc alimentation secteur 110V/230V (50 z/60 z)
fourni
• Brochage de la prise RJ45 ..............................................Voir Fig. VII
(Livré avec un cordon RJ45)
• Coffret
Matière/Coloris ....................................Boîtier métal/Gris anthracite
Dimensions (Fig. II) ..............................................378 x 206 x 75 mm
Poids..................................................................................................3,4 kg
III - PRESENTATION
• GX 2020 - Pupitre (Fig. III)
1 - Microphone
2 - aut-parleur
3 - 4 voyants
4 - Prise RJ45
5 - Afficheur lumineux
6 - Clavier
• IZ 2020 - Centrale d’interphonie (Fig. IV)
Côté droit
1 - Bornier des lignes secondaires 1 à 10
2 - Bornier des lignes secondaires 11 à 20
3 - Entrée AUX
Côté gauche
4 - Fusible d’alimentation
5 - Entrée d’alimentation sur prise jack
6- Entrée d’alimentation sur bornier
7 - Voyant d’alimentation
8- Inverseur pour configurer la position de l’appareil dans
une
extension à plusieurs IZ 2020
9- Prise RJ45 pour extension de l’installation à plusieurs
IZ2020
10
- Prise RJ45 pour raccordement d’un ou deux pupitres
11
- Réglage de la sensibilité de détection
Dessous (Fig. V)
12
- Trous pour maintien par colliers des câbles secondaires
13
- 4 trous de fixation Ø 5,5 mm
2G 2020 - IZ 2020
ATTENTION !
The unit is neither water - nor splash proof.
Before any manipulation, disconnect the mains cable.
After manipulation, put back the cover and check that
the “earth” wire (yellow + green) is connected properly.
!
ATTENTION !
L’appareil ne doit pas être exposé aux chutes d’eau et
aux éclaboussures.
Avant toute intervention, déconnecter le câble secteur.
Après l’intervention, refermer l’appareil et vérifier que
le fil de terre ( aune et vert) soit bien connecté.
!
IV - INSTALLATION IV - INSTALLATION
IZ 2020 - Central unit
• Audio signal on secondary line
Line input in listening mode....................................................-75 dBu
Line output in speech mode ..............................................2.2V/16Ω
Line resistance for call detection ........................................max 1 kΩ
• Audio signal bus
Input and output ..........................................................via transformer
In/Out rated level ......................................................................-10 dBu
• Control transmission
Link with console ................................................................RS485 bus
• peech modulation detection
For applications with no manual Speak/Listen controls, the
IZ2020 automatically switches Speech control by signal
detection. To select this function, open the IZ 2020 and on
SW2, switch 1 ON for “PUP 1” and 2 ON for “PUP 2”.
Detection sensitivity is adjustable (Fig. IV)
• AUX input : intended to broadcast a musical or other source to
the secondary stations.
Connector ④(Fig.IV) ........................................................................DIN
Input type ............................................1 and 3 balanced, 0 = ground
Sensitivity......................................................................................-10dBu
Remote control ..............................connect 4 to2 on DIN connector
• Power supply
12 V mains power supply unit supplied 110V/230V (50 z/60 z)
• RJ45 connector pins ........................................................See Fig. VII
(Supplied with an RJ45 cable)
• Housing
Material/Colour ......................................................Metal/Anthracite
Dimensions (Fig. II) ............................................378 x 206 x 75 mm
Weight ............................................................................................3.4 kg
III - PRESENTATION
• GX 2020 - Console (Fig. III)
1 - Microphone
2 - Loudspeaker
3 - 4 indicators
4 - RJ45 connector
5 - Lighted display
6 - Keyboard
• IZ 2020 - Central unit (Fig. IV)
Right-hand side
1 - Terminal strip for secondary lines 1 to 10
2 - Terminal strip for secondary lines 11 to 20
3 - AUX input
Right-hand side
4 - Power supply fuse
5 - Power supply input on jack
6- Power supply input on terminal strip
7 - Power supply indicator
8-
Inverter to configure position of unit in extension to seve
ral IZ 2020 units
9-
RJ45 connector for extension of installation to several
IZ 2020 units
10
-
RJ45 connector to connect one or two consoles
11
-Detection sensitivity setting
Bottom (Fig. V)
12
-oles to secure secondary cables with clamps
13
- Four 5.5 mm diam. fixing holes

• Placer l’IZ 2020 à proximité des lignes secondaires et à moins
de 5 mètres du pupitre (cordon de liaison = 5 m)
. Fixer l’IZ 2020 13 (Fig. V)
. Poser le pupitre sur son plan d’utilisation.
. Connecter le pupitre GX 2020 en “Pup 1” de l’IZ 2020 10
(Fig. IV) avec le cordon RJ45.
• Connecter chaque ligne secondaire sur son bornier correspon-
dant. Utiliser du fil blindé, le blindage doit être relié sur IZ 2020
uniquement (Fig. VI).
• Connecter l’alimentation secteur à la prise jack 5 (Fig. IV)
• Si des parasites apparaissent en écoute, relier la borne terre
du bornier 6 à une terre (prise secteur) (Fig. IV) .
• Il est possible de connecter un 2epupitre GX 2020 en “Pup 2”
de l’IZ 2020 (Fig. VI et VIII).
Dans ce cas, configurer le pupitre n°2 comme suit :
Taper 10 fois PRO puis 1puis 2et FIN (Fig. X).
Lorsqu’un secondaire appelle, les 2 pupitres sonnent et enre-
gistrent cet appel. Le premier pupitre qui répond efface cet
appel sur le second et le désactive pendant la conversation. Le
pupitre inopérant affiche “DESACTIVE“.
Voir : IX - Menu de configuration (Fig. IX)
Poste Secondaire
• Pour appeler le poste chef, l’intervenant donne une impulsion
d’une seconde sur la touche d’appel du poste secondaire.
Immédiatement le poste chef renvoie un bip sonore
d’acquisition d’appel vers le poste secondaire.
Appels Reçus au Poste Chef
• En attente le poste chef affiche ”VEILLE”
• Lorsqu’un secondaire appelle, un bip sonore retentit au pupitre,
son numéro est mémorisé et s’affiche au pupitre à la ligne infé-
rieure; simultanément le voyant A s’allume sur le pupitre. Dix
numéros peuvent ainsi être mémorisés, l’affichage présente les 3
ou 5 premiers numéros appelants. Au delà de 10 numéros
mémorisés, les appels ne sont pas enregistrés et le bip
d’aquisition n’est pas renvoyé au poste secondaire appelant.
Réponse à un Poste Secondaire
• Appuyer et maintenir la touche P/E et parler.
L’appareil se connecte automatiquement avec les postes
secondaires en commençant par le premier poste appelant. Le
numéro du poste connecté passe à la ligne supérieure avec
l’indication : ”Parler >>> xx”
• Relâcher la touche P/E pour écouter, l’indication ”Ecouter <<<
xx” apparaît.
• Appuyer sur la touche FIN pour déconnecter la ligne.
• Si d’autres numéros sont en attente d’appel, appuyer à nou-
veau sur la touche P/E et parler. L’appareil se connecte au
poste suivant et ainsi de suite.
Appeler un Poste Secondaire
• Composer le numéro du poste à appeler, ce numéro s’affiche à
la ligne supérieure.
• Appuyer et maintenir la touche pour diffuser une tonalité
d’appel au secondaire (volume non réglable). Relâcher la
touche pour écouter.
• Appuyer ensuite sur la touche P/E pour parler et sur la
touche FIN pour déconnecter la ligne.
• L’appel d’un poste peut être obtenu directement sans bip
d’appel. Pour cela composer le numéro puis appuyer sur la
touche P/E et parler.
• Il est aussi possible de composer un numéro de poste autre que
ceux affichés en attente.
Réglage des Volu es
• Les volumes Parole/Ecoute et Bip d’appel sont réglables par le
clavier.
• Appuyer sur la touche programme PRO choisir la touche 1
pour Volume, puis 1pour Micro, ou la touche 2pour Haut-
parleur, ou la touche 3pour Bip d’appel, puis avec les touches
-et +ajuster le niveau à l’aide du vu-mètre à pavés.
• Le volume peut aussi être réglé en cours de fonctionnement
Parole ou Ecoute avec les touches -et +(sans l’affichage
du vu-mètre).
• Le réglage minimum de volume est de 1/15.
GX 2020 - IZ 2020 3
• Position the IZ 2020 close to the secondary lines and at less
than 5 metres from the console (connection cable = 5 m)
• Fix the IZ 2020 13 (Fig. V)
• Place the console on the surface on which it is to be used.
• Connect the GX 2020 console to “Pupitre 1” (Console 1) on
the IZ 2020 10 (Fig. IV) with the RJ45 cable.
• Connect each secondary line to its corresponding terminal
strip. Use shielded wire, the shielding must be connected to the
IZ 2020 only.
• Connect the mains power supply to the jack 5 (Fig. IV)
• In case of interference occurrence, connect the earth terminal
on the terminal strip 6 (Fig. IV) to earth (mains connector).
• You can connect a second
GX 2020
console to “Pup 2” of the
IZ2020 (Fig. VI and VIII).
To do so, configure Console 2 as follows:
Press PRO 10 times, then 1then 2and FIN (E D) (Fig.X).
When there is a secondary call, the two consoles ring and the call is
recorded. The first console that answers clears this call on the sec-
ond console and deactivates the second console during the conver-
sation. The disabled console displays “DESACTIVE” (disabled).
See : IX - Configuration Menu (Fig. IX)
Secondary Station
• To call the master station, the caller presses the call key on the
secondary station for one second; the master station immedi-
ately returns a call acquisition beep to the secondary station.
Calls Received at the Master Station
• When a secondary station calls, an audio beep is heard on the
console, its number is stored in memory and is displayed on the
next line on the console; at the same time, the led A is O on the
console. Ten numbers can be stored in memory in this way and
the display shows the first 3 or 5 calling numbers.
Answering a Secondary Station
• Press the P/E key and speak.
The unit is automatically connected to the secondary stations
starting with the first calling station. The number of the con-
nected set goes to the top line with the message :
”Parler >>> xx” (Speak >>> xx)
• Release the P/E key to listen, the message ”Ecouter <<< xx”
(Listen <<< xx) is displayed.
• Press the FIN (E D) key to disconnect the line.
• If other numbers are waiting for a call, press the P/E key again
and speak. The next station is automatically connected and so
on.
Calling a Secondary Set
• Key in the number of the set to call, that is displayed on the top
line.
• Press the key to broadcast a call beep to the secondary
set. The master station is in listen mode and the person using
the station can answer.
• Then press the P/E key to speak and the FIN (E D) key to dis-
connect the line.
• A station can be called directly without a call beep. Simply, key
in the number, press the P/E key and speak.
• You can also enter a set number that is different from the num-
bers displayed on hold.
Volu e setting
• The microphone (Speech) volume and the speaker (Listening)
volume are adjustable.
• Press the program key PRO select key 1for the micro-
phone and key 2for the speaker, or key 3for call beep,
and then use the -et +keys to adjust the level on the
volume meter scale.
• The volume can also be set during operation (without display-
ing the view meter). In Speech mode, while pressing the P/E
key, press +to increase or -to decrease. Same proce-
dure in Listening mode, with the P/E key released.
• The minimum volume adjustment is 1/15.
V - UTILISATION V - USE

Extension du Système à 40 - 60 ou 80 Lignes
• Pour une extension à 40, 60 ou 80 lignes, utiliser des centrales
IZ 2020 supplémentaires (Fig. VIII).
Etablir la liaison “Bus” entre chaque IZ 2020.
Dans cette configuration maximum, l’utilisation d’un deuxième
pupitre nécessite une liaison “Bus” supplémentaire entre les
IZ2020 (trait pointillé) (Fig. VIII). Ces cordons sont livrés en
option.
Les commutateurs 8 (Fig. IV) doivent respecter la configuration
(Fig. VIII).
4G 2020 - IZ 2020
En cas de panne :
• Vérifier la présence d’alimentation, voyant 7 (Fig. IV) et le
rétro-éclairage de l’afficheur 3 (Fig. III)
• Vérifier l’état du fusible 4 (Fig. IV)
• Vérifier la position des volumes (Voir § UTILISATION -
Réglage des volumes, page 3)
• Sinon retourner l’appareil en usine, ou faire appel à un
dépanneur professionnel.
!
VIII - MAINTENANCE
In the event of a failure :
• Check that the power supply is present, lamp 7 (Fig. IV)
and check the back lighting of the display 3 (Fig. III)
• Check the conditionof the fuse 4 (Fig. IV)
• Check the volume setting (See
§
USE - Volume setting
section, page 3)
• Otherwise, return the unit to the factory or contact a
professional repair service.
!
VIII - MAINTENANCE
Extension of System to 40 – 60 or 80 Lines
• Extension to 40, 60 or 80 lines is done by using additional
IZ2020 central units (Fig. VIII).
Establish the “Bus” link between each IZ 2020.
In this maximum configuration, the use of a second console
requires an extra “Bus” link between the IZ 2020 units (dotted
line) (Fig. VIII). These cables are available as an option.
The switches 8 (Fig. IV) must comply with the configuration
(Fig. VIII).
VI - EXTENSION DU SYSTEME VI - EXTENSION OF SYSTEM
Appel général
• Pour diffuser la sonnerie sur tous les postes, appuyer sur la
touche 0puis appuyer et maintenir la touche ..
• Pour parler à tous les postes, appuyer sur la touche 0puis
maintenir la touche P/E et parler.
Appel de groupe
• Pour parler à un groupe de postes, taper le numéro d’un des
postes, appuyer sur la touche + puis taper le numéro du
poste suivant et ainsi de suite. Enfin maintenir la touche P/E
pour parler.
Diffusion Auxiliaire
• L’IZ 2020 peut diffuser sur tous les postes, une modulation
auxiliaire issue par exemple d’une source musicale, connectée à
la prise DIN 3(Fig. IV).
Pour être activée, l’entrée Auxiliaire doit être télécommandée
(2et 4 de DIN reliés).
Toutefois il est possible de supprimer la modulation Auxiliaire
sur certains postes choisis. Pour cela, appuyer sur la touche
PRO puis 2et la touche P/E pour avoir l’état du secondai-
re affiché (ON = diffusion activée, OFF = désactivée) et avec la
touche 0 inverser l’état.
Avec les touches - et + aller au N° de poste précédant ou
suivant.
En diffusion auxiliaire, le poste secondaire conserve sa fonction
d’appel, la diffusion est coupée à la prise de ligne.
Le niveau de volume devra être réglé à la source.
La sensibilité d’entrée est de -10dBu pour obtenir le volume
maximum sur les secondaires.
L’appareil peut vérifier à tout moment l’état des lignes secondaires
(ligne en court circuit, ligne coupée, poste secondaire débranché).
Pour lancer le test, appuyer sur la touche PRO , 3 puis 0
Toutes les lignes sont vérifiées.
Durée du test : environ 2 secondes.
A chaque ligne en défaut, le pupitre diffuse un bip et affiche les
numéros de ligne qui sont mémorisés.
Pour relire les numéros en défaut, appuyer sur les touches FIN
PRO , 3 puis 1 et avec les touches - et + afficher les
lignes en défaut.
Pour effacer la mémorisation d’un défaut, il suffit d’appeler le
poste secondaire de la ligne concernée.
VII - TEST DES LIGNES VII - LINE TEST
General Call
To broadcast rings to all the sets, press the 0key, then press
and hold the key.
To speak to all sets, press the 0 key, then press and hold the
P/E key and speak.
Group call
• To call a sets group, press the number of the set, then press the
+ key, enter the number of the following set and so on.
Maintain the key P/E and speak.
Auxiliary Broadcasting
The IIZZ 22002200can broadcast an auxiliary modulation connected to
the DIN connector 3 (Fig. IV), for example from a single music
source, to all sets.
To activate this option, the Auxiliary input must be remote-con-
trolled (2 and 4 linked DIN).
Nevertheless, you can remove Auxiliary modulation on selected
sets. To do so, press the PRO key, then 2, and then the P/E
key to view the status of the secondary set displayed (ON = acti-
vated broadcasting, OFF = deactivated), and use the 0key to
reverse the status.
You can use the - and + keys to scroll to the previous or
next set number.
During auxiliary broadcasting, the secondary set maintains its call
function and the broadcast is cut off when the line is picked up.
The volume level must be adjusted at the source end.
The input sensitivity is –10dBu to obtain the maximum volume on
secondary sets.
The unit can check the secondary line status at any time (short-
circuited line, disconnected line, secondary set off-hook).
To launch the test, press the PRO key, then 3, then 0.
All lines will be checked.
Duration of test: approximately 2 seconds.
With each failed line, the console beeps and displays the stored
line numbers.
To review the failed numbers, press the FIN , PRO , and 3
keys, and then press 1. Use the -and +keys to display
the failed lines.
To clear the failure memory, simply call the secondary set of the
line in question.

54
2
D
C
B
A
PRO
FIN
P/E
123
456
789
-0+
GX 2020
1 6
3
Fus. T2A
+
-12V
+
-12V
On
A
B
Lignes
A
B
0 à 20
A
B
21 à 40
A
B
41 à 60
A
B
61 à 80
Sorties
Extension
Entrées
Pup 2
Pup 1
Sensibilité détection parole
4
5
6
7
8
9
10
11
L10
L9
L8
L7
L6
L5
L4
L3
L2
L1
1
2
3
4
5
-
+
AUX
L20
L19
L18
L17
L16
L15
L14
L13
L12
L11
3
2
1
Fig. IV
349
183
13 13
13 13
12
Fig. V
Fig. III
G 2020 - IZ 2020
8
7
6
5
4
3
2
1
RJ45
8
7
6
5
4
3
2
1
RJ45
Pupitre
GX2020
GX2020
Console
Centrale
IZ2020
IZ2020
central unit
Data+
Data-
+12V
0V
Signal Ecoute/ Listening signal
Signal Parole/ Speech signal
Fig. VII
Bus de Liaison entre un pupitre GX 2020 et une centrale IZ 2020
Link bus between a GX 2020 console and an IZ 2020 central Unit
Présentation pupitre GX 2020
GX 2020 console presentation
Centrale d’interphonie IZ 2020
IZ 2020 central unit
Centrale d’interphonie IZ 2020 (vue de dessous)
IZ 2020 central unit (below view)

BOUYER
BOUYERBOUYER
L20
L1
Pupitre 1
Pupitre 2
22 mF
NP
Secondaire N°1
16Ω à
50Ω
Fig. VI
BOUYER
BOUYERBOUYER
A B
A BA B
A B
A B
Lignes 61 à 80
des postes
secondaires /
Lines 61 to 80 of
secondary sets
Pupitre 1
Pupitre 2
Lignes 41 à 60
des postes
secondaires /
Lines 41 to 60 of
secondary sets
Lignes 21 à 40
des postes
secondaires /
Lines 21 to 40 of
secondary sets
Lignes 1 à 20
des postes
secondaires /
Lines 1 to 20 of
secondary sets
Bus Pupitre 1
Bus Pupitre 2
GX 2020
GX 2020 IZ 2020
IZ 2020
IZ 2020
IZ 2020
Bus Pupitre 1
Bus Pupitre 2
Bus Pupitre 1
Bus Pupitre 2
Fig. VIII
G 2020 - IZ 2020
Extension du système à 40, 60 ou 80 lignes
Extension of system to 40, 60 or 80 lines

G 2020 - IZ 2020
PRO
VEILLE /
STANDBY
1 = VOLUME 2 = AUX
3 = DEFAUT 4 = LANG
4
1 = Fra 2 = Eng
3 = Deut 4 = Esp
1
1 = MIC 2 = HP 3 = BIP
1 2 3
VOLUME HP
3
0 = Surveiller
1 = Défaut
2
POSTE : 1
+
/
-
P/E = etat
P/E
POSTE : 1 > OFF
+
/
-
0 = ON
POSTE : 2
+
/
-
P/E = etat
+
P/E
POSTE : 2 > OFF
+
/
-
0 = ON
+
(Idem pour chaque secondaire)
Au dernier poste modifié, appuyer sur la touche
(Same for each secondary set)
At the last modified set, press the (End) key.
-+
-+
-+
POSTE : 2 > ON
+
/
-
0 = OFF
0
POSTE : 1 > ON
+
/
-
0 = OFF
0
1 2 3 4
Touches / Keys
Affichage / Display
Touche pour quitter le menu.
Retour automatique après 15s /
Key for quitting the menu.
Automatic return after 15 seconds.
FIN
VOLUME MICRO VOLUME BIP
FIN
Test
Défaut ---> N°
-
= prec
+
= suiv
01
-+
Affichage des lignes en défaut /
Display of failed lines
FIN
MENU DE CONFIGURATION CONFIGURATION MENU
Fig. IX
Fig. X

G 2020 - IZ 2020
L’IZ 2020 est doté d’un système de surveillance des lignes
secondaires.
Il affiche “DEFAUT N° ligne” lorsqu’une ligne est coupée, en
court-circuit, ou que le poste secondaire est débranché.
Pour activer cette fonction :
Appuyer 10 fois sur la touche PRO Affichage 1 Adr
(Fig. X Notice) puis appuyer sur la touche 7Affichage
urveillance
Appuyer sur la touche +une ou plusieurs fois selon le cycle
de test souhaité (voir tableau ci-dessous).
L’afficheur n’indique pas la position dans le tableau des valeurs
de temps. Pour être sûr de démarrer en bas du tableau “Pas de
test”, donner 10 impulsions sur la touche puis le nombre
exact d’impulsions sur la touche +pour remonter à la position
souhaitée dans le tableau.
REMARQUE !
Lorsque certaines lignes secondaires de l’IZ 2020 ne sont pas
utilisées, connecter un condensateur (non polarié de 22µF 16V)
en série avec une résistance de 47Ω 1/2W, sur ces lignes pour
éviter d’afficher “Défaut” inutilement.
SURVEILLANCE DE LIGNES LINE SUPERVISION
Impulsions Cycle de test D35¥* D36¥*
Impulses Test cycle
9 20 secondes ON ON
8 15 mn ON OFF
7 30 mn ON OFF
Touche +6 1 h ON OFF
5 2 h ON OFF
4 3 h ON OFF
Touche -3 6 h ON OFF
2 12 h ON OFF
1 24 h ON OFF
0 Pas de test OFF OFF
No test
D35¥* et D36¥* sont 2 voyants à l’intérieur de l’IZ 2020
D35¥* and D36¥* are two indicators inside the IZ 2020.
c
a
e
The IZ 2020 includes a secondary line supervision system.
When a line is disconnected or short-circuited, or when a secon-
dary set is off-hook, it displays “DEFAUT Line number”.
To activate this function:
Pres the PRO key ten times. 1 Adr is displayed (Fig. X
Note). Then press the 7key. urveillance (Supervision) is dis-
played.
Press the +key one or several times depending on the desired
test cycle (see the table below).
The display panel does not indicate the position in the time
values table. To ensure that you start at the bottom of the “No
test” table, press the key ten times and then press the +
the exact same number of times to return to the desired position
on the table.
NOTE !
When selected IZ 2020 secondary lines are not used, connect
a serial condenser (22µF 16V unpolerized) with a resistance of
47Ω 1/2 W to these lines so that “Défaut” (Failed) is not dis-
played unnecessarily.
c
This manual suits for next models
1
Table of contents
Other Bouyer Intercom System manuals


