Brabantia 108600 User manual
UK
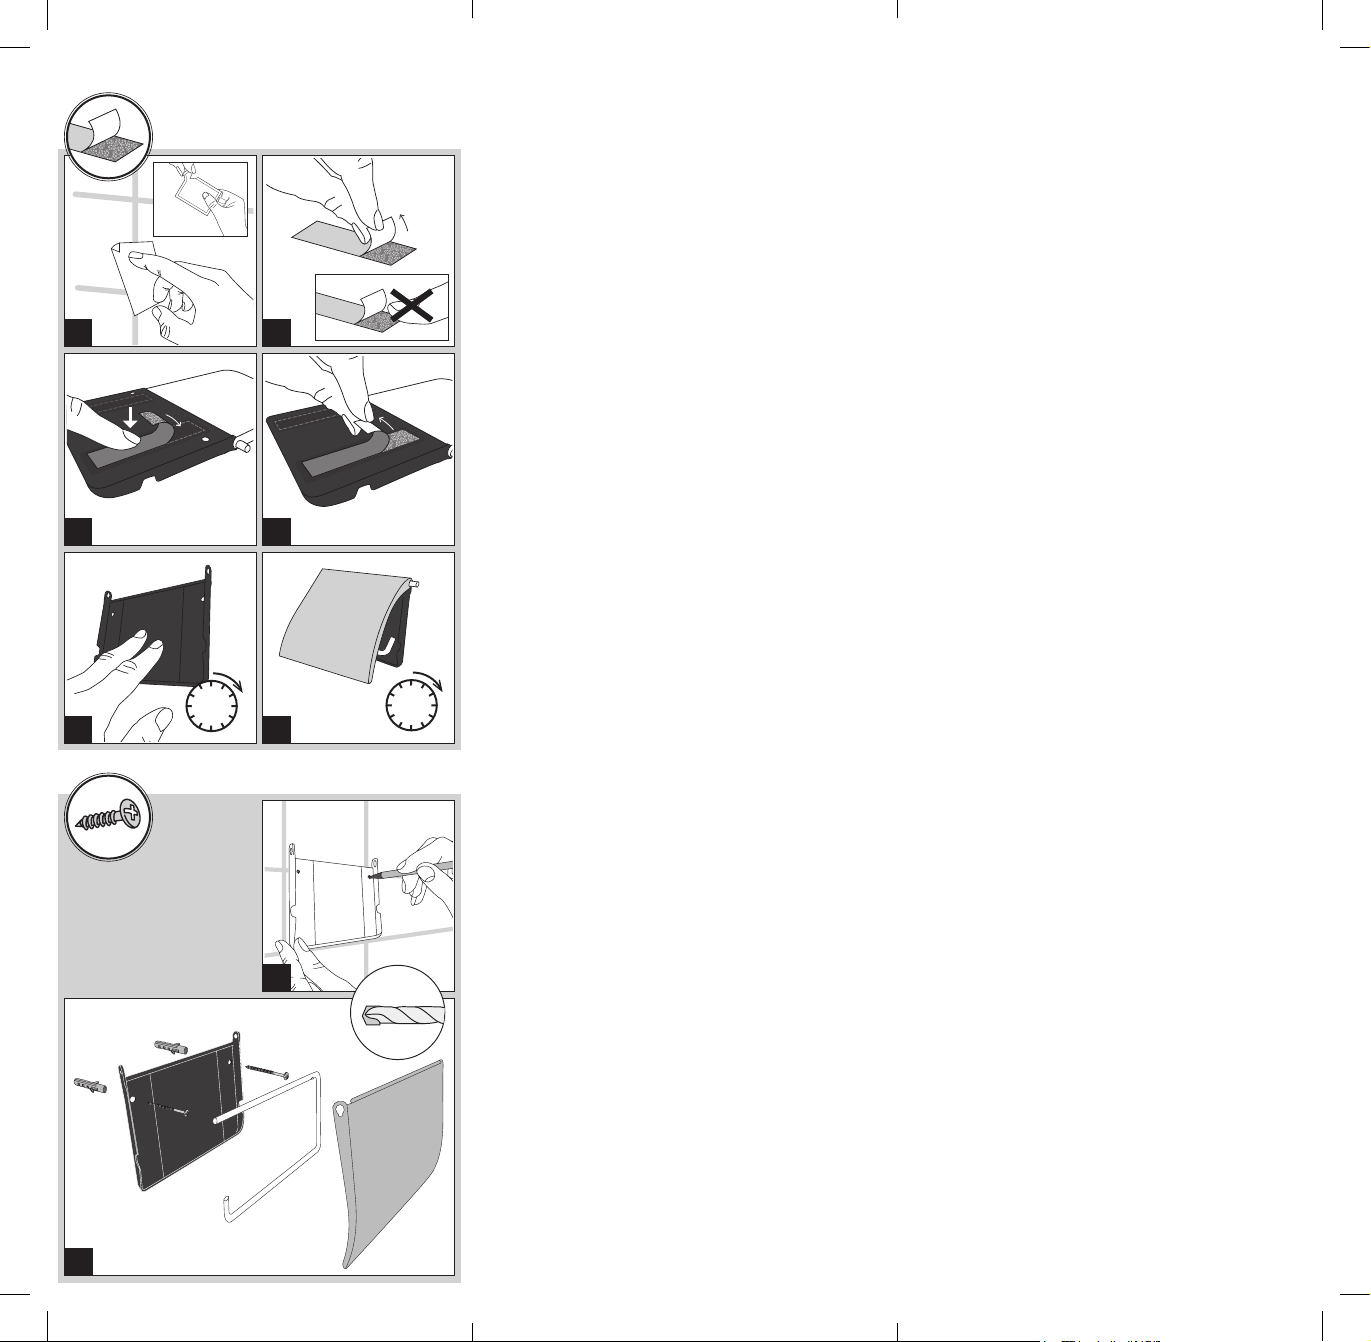
MOUNTING WITH TAPE
• Suitable for smooth surfaces such as tiles, glass, metal and most plastic surfaces
- uneven surfaces reduce weight capacity.
• Screws should be used for uneven surfaces such as wood, wallpaper, natural
stone, non-stick surfaces or porous materials.
• When removed, the tape may leave behind some adhesive.
1. Clean surface with enclosed rubbing alcohol cloth. Let the surface dry.
2. Remove one of the two tape liners. Do not touch the glue.
3. Press adhesive to product on the marked zone.
4. Remove second liner. Press to wall for 60 seconds.
5. Wait at least 24 hours (optimal is 72 hours) before use.
MOUNTING WITH SCREWS
• Beware not to drill into electric, water or gas pipes!
• Fix the product only onto a solid wall or surface.
• To reduce damage to tiles, it is better to drill into the joints where possible.
• If you attach a piece of tape over the position of the drilling hole before you
start drilling, the bit will not slip on the shiny tile surface.
1. Mark locations for drilling.
2. Only use the enclosed xing material and a ø 6 mm drill.
MAINTENANCE
Brilliant Steel, lacquered and plastic materials are easily cleaned with a damp
cloth and an all-purpose household cleaner. Matt Steel is best cleaned with
a micro-bre cloth and a glass cleaner. Never use any product that contains
chloride, hydrochloric acid or other abrasive/aggressive cleaning agents.
For questions and remarks visit www.brabantia.com
2
NL
OPHANGEN MET TAPE
• Geschikt voor gladde oppervlaktes zoals tegels, glas, metaal en de meeste
soorten kunststof. Een ongelijke ondergrond vermindert de draagkracht.
• Voor oneffen oppervlakten zoals hout, behang, natuursteen, niet-klevende
oppervlakten of poreuze materialen, moeten de schroeven gebruikt worden.
• Bij verwijderen kunnen lijmresten achterblijven.
1. Reinig het oppervlak met het bijgeleverde alcoholdoekje. Laat het oppervlak
drogen.
2. Verwijder de beschermlaag aan een kant van de tape. Raak de lijm niet aan.
3. Plak de tape op de aangegeven plaats op het product.
4. Verwijder de beschermlaag aan de andere kant. Druk het product tegen
de muur en houd 60 seconden stevig vast.
5. Wacht 24 uur voor gebruik. (72 uur is nog beter.)
OPHANGEN MET SCHROEVEN
• Boor niet in elektrische-, water- of gasleidingen!
• Bevestig het product op een stabiele, stevige ondergrond.
• Om schade aan tegels te beperken, is het beter om in de voegen te boren
indien mogelijk.
• Bevestig een stukje plakband op de plaats van het boorgat.
Dit voorkomt het wegglijden van de boorkop op de gladde tegels.
1. Teken de plaats van de gaatjes af.
2. Gebruik alleen het bijgeleverde bevestigingsmateriaal en een boor van ø 6 mm.
ONDERHOUD
Brilliant Steel, gelakt en kunststof materiaal kun je gemakkelijk reinigen met
een vochtige doek en een normale allesreiniger. Voor Matt Steel gebruik je
een microvezeldoekje met een glasreiniger. Gebruik nooit schuursponsjes en
reinigingsmiddelen die zoutzuur- of chlooroplossingen bevatten of andere
agressieve reinigingsmiddelen.
Voor vragen en opmerkingen kun je terecht op www.brabantia.com
FR
SUPPORT AVEC RUBAN ADHÉSIF DOUBLE FACE
• Convient aux surfaces lisses telles que les carreaux, le verre, le métal et
la plupart des surfaces en plastique - les surfaces inégales réduisent
la capacité de charge.
• Les vis doivent être utilisées pour les surfaces inégales telles que le bois, le
papier peint, la pierre naturelle, les surfaces antiadhésives ou les matériaux
poreux.
• En le retirant, il peut rester des traces de colle.
1. Nettoyez la surface avec le chiffon d’alcool inclus. Laissez la surface sécher.
2. Retirez l’une des deux doublures. Ne touchez pas la colle.
3. Pressez l’adhésif sur la zone marquée.
4. Retirez la deuxième doublure. Appuyez sur le mur pendant 60 secondes.
5. Attendez 24 heures (optimal 72 heures) avant utilisation.
FIXATION AVEC VIS
• Veillez à ne pas percer dans les câbles électriques, ou dans les tuyaux d’eau et
de gaz !
• Fixez l’article de salle de bains uniquement sur une surface ou un mur solide.
• An de ne pas endommager le carrelage, il est préférable de percer, si cela
est possible, dans les joints.
• Avant de percer, si vous placez un morceau d’adhésif à l’endroit du perçage,
vous éviterez de ssurer le carrelage.
1. Marquez les emplacement pour le perçage.
2. Utilisez uniquement le matériel de xation fourni et un foret de ø 6 mm.
ENTRETIEN
Les matières plastiques, laquées et acier brillant se nettoient facilement à l’aide
d’un chiffon humide et d’un nettoyant ménager multi-usage. L’acier brossé
se nettoie de préférence à l’aide d’un chiffon en microbre et d’un nettoyant
pour vitres. N’utilisez jamais de produit qui contient du chlorure, de l’acide
chlorhydrique ou d’autres agents de nettoyage abrasifs ou agressifs.
Pour toutes questions et remarques, rendez-vous sur www.brabantia.com
DE
MONTAGE MIT KLEBEBAND
• Geeignet für glatte Oberächen wie Fliesen, Glas, Metall und die meisten
Kunststoffoberächen - unebene Oberächen verringern die Tragfähigkeit.
• Schrauben sollten für unebene Flächen, wie Holz, Tapeten, Naturstein,
Antihaftoberächen oder poröse Materialien verwendet werden.
• Beim Entfernen können Kleberückstände auftreten.
1. Reinigen Sie die Oberäche mit dem beiliegenden Tuch. Lassen Sie die
Oberäche trocknen.
2. Entfernen Sie den Schutz von einen der beiden Klebestreifen.
Berühren Sie den Kleber dabei nicht.
3. Bringen Sie den Kleber auf das Produkt in der markierten Zone an.
4. Entfernen Sie den Schutz des zweiten Klebestreifen und drücken Sie ihn
60 Sekunden lang an die Wand.
5. Warten Sie mindestens 24 Stunden (optimal wären 72 Stunden) vor der
ersten Nutzung.
MONTAGE MIT SCHRAUBEN
• Bohren Sie nicht in Elektro-, Wasser- oder Gas-Leitungen!
• Befestigen Sie die Produkte nur auf einem festen Untergrund.
• Um Schäden an den Fliesen zu vermeiden, empehlt es sich in die Fugen
zu bohren.
• Wenn Sie vor dem Bohren die Bohrstelle mit einem Klebestreifen markieren,
vermeiden Sie, dass der Bohrer auf der glatten Oberäche eventuell verrutscht.
1. Markieren Sie die Stellen zum Bohren.
2. Verwenden Sie nur das beiliegende Befestigungsmaterial und einen 6 mm-Bohrer.
PFLEGE
Hochglänzender und lackierter Stahl, sowie alle Kunststoffe, lassen sich leicht mit
einem feuchten Tuch und etwas Allzweckreiniger säubern. Mattierter Stahl wird am
besten mit einem Mikrofasertuch und ein wenig Glasreiniger gereinigt. Verwenden
Sie niemals Reinigungsmittel, die Chlorid, Salzsäure oder andere abrasive/
aggressive Inhaltsstoffe enthalten.
Für Fragen und weitere Anmerkungen besuchen Sie bitte www.brabantia.com
3
6
3M
60 SEC
24 H
3M VHB 3M VHB
3M VHB
3M VHB
3M VHB 3M VHB
3M VHB
3M VHB
3M VHB
3M VHB
3M VHB 3M VHB
3M VHB
3M VHB
3M VHB
3M VHB
!
3M
60 SEC 24 H
3M VHB 3M VHB
3M VHB
3M VHB
3M VHB 3M VHB
3M VHB
3M VHB
3M VHB
3M VHB
3M VHB 3M VHB
3M VHB
3M VHB
3M VHB
3M VHB
!
3M
60 SEC 24 H
3M VHB 3M VHB
3M VHB
3M VHB
3M VHB 3M VHB
3M VHB
3M VHB
3M VHB
3M VHB
3M VHB 3M VHB
3M VHB
3M VHB
3M VHB
3M VHB
!
3M
60 SEC 24 H
3M VHB 3M VHB
3M VHB
3M VHB
3M VHB 3M VHB
3M VHB
3M VHB
3M VHB
3M VHB
3M VHB 3M VHB
3M VHB
3M VHB
3M VHB
3M VHB
!
MAX
2
KG
60 SEC
24 H
3M VHB 3M VHB
3M VHB
3M VHB
3MVHB 3M VHB
3MVHB
3MVHB
3MVHB 3M VHB
3MVHB
3MVHB
3M
60 SEC 24 H
3M VHB 3M VHB
3M VHB
3M VHB
3M VHB 3M VHB
3M VHB
3M VHB
3M VHB
3M VHB
3M VHB 3M VHB
3M VHB
3M VHB
3M VHB
3M VHB
!
3M
60 SEC 24 H
3M VHB 3M VHB
3M VHB
3M VHB
3M VHB 3M VHB
3M VHB
3M VHB
3M VHB
3M VHB
3M VHB 3M VHB
3M VHB
3M VHB
3M VHB
3M VHB
!
4
5
3M
60 SEC
24 H
3M VHB 3M VHB
3M VHB
3M VHB
3M VHB 3M VHB
3M VHB
3M VHB
3M VHB
3M VHB
3M VHB 3M VHB
3M VHB
3M VHB
3M VHB
3M VHB
!
1
1 2
3M VHB 3M VHB
3M VHB
3M VHB
3M VHB 3M VHB
3M VHB
3M VHB
3M VHB
3M VHB
6 MM
TOILET ROLL HOLDER
INSTRUCTIONS FOR USE
3M
60 SEC 24 H
3M VHB 3M VHB
3M VHB
3M VHB
3MVHB 3M VHB
3MVHB
3MVHB
3MVHB
3MVHB
3MVHB 3M VHB
3MVHB
3MVHB
3MVHB
3MVHB
!
2003-043_Toilet Roll Holder manual-v2.indd 1-32003-043_Toilet Roll Holder manual-v2.indd 1-3 30/03/2020 14:1530/03/2020 14:15
IT
FISSAGGIO CON NASTRO ADESIVO
• Adatto per superci lisce quali piastrelle, vetro, metallo e per la maggior parte
delle superci in plastica - Superci irregolari riducono la tenuta.
• Utilizzare le viti per applicazione su superci irregolari come legno, carta da
parati, pietra naturale, superci antiaderenti o materiale poroso.
• Una volta rimosso l’adesivo, potrebbero rimanere residui di colla.
1. Pulire la supercie utilizzando il panno imbevuto di alcool incluso nella
confezione, dopodiché lasciare asciugare.
2. Rimuovere dal nastro una delle due pellicole di protezione, evitando di
toccare la parte adesiva.
3. Premere l’adesivo sul prodotto nella zona contrassegnata.
4. Togliere la seconda pellicola ed appoggiare alla parete premendo per
60 secondi.
5. Attendere 24 ore (ideale 72 ore) prima dell’uso.
FISSAGGIO CON VITI
• Attenzione a non forare cavi elettrici, tubature dell’acqua o del gas!
• Fissare l’articolo solo su superci o pareti solide.
• Per evitare danni alle piastrelle, è consigliabile effettuare i fori nelle giunture.
• Appoggiare sul punto da forare una striscia di nastro adesivo per evitare che
il trapano scivoli danneggiando la piastrella.
1. Contrassegnare la zona da forare.
2. Utilizzare solo il materiale di ssaggio incluso ed una punta ø 6 mm.
MANUTENZIONE
Le parti in plastica, laccate o cromate si puliscono facilmente con un panno
inumidito con con detergente universale. Per l’acciaio inox satinato utilizzate
panni in microbra e detergente per vetri. Non usare mai prodotti per pulizia
contenenti cloruro, acidi o agenti abrasivi o aggressivi.
Per informazioni e richieste visitare il nostro sito www.brabantia.com
ES
FIJAR CON CINTA ADHESIVA
• Adecuado para supercies lisas como azulejos, cristal, metal y la mayoría
de supercies de plástico. Las supercies irregulares reducen la capacidad
de resistir el peso.
• Se deben utilizar tornillos para supercies irregulares, como madera, papel
pintado, piedra natural, supercies antiadherentes o materiales porosos.
• Pueden quedar restos de adhesivo al retirarse.
1. Limpia la supercie con la toallita impregnada en alcohol incluida. Deja que se
seque la supercie.
2. Despega uno de los lados de la cinta adhesiva. No toques el pegamento.
3. Coloca el adhesivo sobre la zona marcada del producto haciendo presión
sobre la misma.
4. Despega el otro lado de la cinta adhesiva. Pégalo a la pared haciendo
presión durante 60 segundos.
5. Espera 24 horas antes de usarlo (lo ideal son 72 horas).
FIJAR CON TORNILLOS
• ¡Ten cuidado de no taladrar cables eléctricos o conductos de agua o gas!
• Fija el artículo únicamente en una pared o supercie sólida.
• Se recomienda taladrar en las juntas para reducir el deterioro de las baldosas.
• Si colocas un trozo de cinta en el punto en el que vas a taladrar, la broca no
resbalará por la supercie lisa de la baldosa.
1. Marca los puntos a taladrar.
2. Utiliza únicamente el material de jación suministrado con el artículo y
una broca de ø 6 mm.
MANTENIMIENTO
Los materiales lacados, los de plástico y los de acero brillante se pueden limpiar
fácilmente con un paño húmedo y un limpiador doméstico universal. El acero mate
se limpia mejor con un trapo de microbra y un limpiacristales. No uses nunca
productos que contengan cloruro, ácido clorhídrico u otros agentes de limpieza
abrasivos/agresivos.
Para preguntas y observaciones visita www.brabantia.com
PT
MONTAGEM COM FITA
• Adequado para superfícies lisas, como telhas, vidro, metal e a maioria das
superfícies plásticas - superfícies irregulares reduzem a capacidade de peso.
• Os parafusos devem ser usados para superfícies irregulares, como madeira,
papel de parede, pedra natural, superfícies antiaderentes ou materiais porosos.
• Removido, podem deixar restos de adesivo.
1. Limpe a superfície com um pano embebido em álcool. Deixe a superfície secar.
2. Remova um dos dois revestimentos de ta. Não toque na cola.
3. Pressione o adesivo para o produto na zona marcada.
4. Remova o segundo revestimento. Pressione para parede por 60 segundos.
5. Aguarde 24 horas (o ideal é 72 horas) antes de usar.
MONTAGEM COM PARAFUSOS
• Tenha cuidado para não perfurar condutas de electricidade, água e gás!
• Fixe o produto apenas a uma superfície ou parede sólida.
• Para reduzir danos nos azulejos, é melhor que fure nas juntas, sempre que
possível.
• Se xar uma ta adesiva no local a perfurar antes de iniciar a perfuração,
a broca não escorregará sobre a superfície lisa do azulejo.
1. Marcar os locais para perfuração.
2. Use apenas o material de xação incluído e uma broca com um diâmetro
de 6 mm.
MANUTENÇÃO
Inox Brilhante, lacados e materiais em plástico são facilmente limpos com um
pano húmido e um produto de limpeza para todos os ns. Inox Mate ca mais
limpo com um pano microbras e limpa vidros. Nunca utilize qualquer produto que
contenha cloro, ácido clorídrico ou outros agentes de limpeza abrasivos/agressivos.
Para perguntas e comentários visite www.brabantia.com
TOILET ROLL HOLDER
INSTRUCTIONS FOR USE
NOTICE D’UTILISATION
GEBRUIKSAANWIJZING
GEBRAUCHSANWEISUNG
ISTRUZIONI D’USO
INSTRUCCIONES DE USO
INSTRUÇÕES DE UTILIZAÇÃO
使用指南
ИНСТРУКЦИЯ ПО ЭКСПЛУАТАЦИИ
CN
用胶带安装
• 适用于光滑的表面,如瓷砖、玻璃、金属和大多数塑料表面,不平
的表面会降低重量。
• 螺丝适用于不平整表面,如木头,墙纸,天然石头,防滑表面或
多孔材料。
• 取下后,可能会留下一些粘合剂。
1. 可使用带有酒精的布料清洗表面。表面干燥即可。
2.拆下两个胶带衬垫中的一个。不要碰胶水。
3.将粘合胶压到产品上的标记区域。
4.拆下第二个衬套。按住墙壁60秒。
5.使用前等待24小时(最佳为72小时)。
用螺钉安装
• 当心不要钻到电,水,气管道!
• 只在实心墙体或表面安装。
• 为了减少对瓷砖的损坏,请钻在瓷砖接缝处。
• 如果您在开始钻孔前附上一块胶布在钻孔的位置,不易打滑损伤
瓷砖表面。
1.给钻孔的地方做个标记
2.仅使用内附安装材料和直径6毫米的钻孔机。
保養
材质为抛光钢,喷漆和塑料的产品很容易用湿布和家用万能清洁剂清洗。
磨砂钢最好使用用微纤维布和玻璃清洁剂来清洁。请勿使用任何含有氯化
物、盐酸或其他磨料/腐蚀性清洗剂的产品。
若有其他问题请浏览官网www.brabantia.com
RU
КРЕПЛЕНИЕ НА КЛЕЙКУЮ ЛЕНТУ
• Подходитдлякреплениянагладкиеповерхности(плитка,стекло,металл
ибольшинствоповерхностейизпластика);прикреплениинанеровные
поверхностиснижаетсядопустимаянагрузка.
• Креплениенашурупахрекомендуетсядлядеревянныхповерхностей,
бетонныхстен,натуральногокамня,гладкихилипористыхматериалов.
• Приснятиилентаможетоставитьследынаповерхности.
1. Очиститеповерхностьспиртомидайтеейвысохнуть.
2. Снимитеоднуиздвухзащитныхпленок.Некасайтеськлеевойстороны
руками.
3. Прижмитеклеевойсторонойкизделиювуказанномместе.
4. Снимитевторуюзащитнуюпленку.Прижмитекстенеиудерживайте
втечение60секунд.
5. Пользоватьсяизделиемможнонеранеечемчерез24часа(оптимальное
времявыдержки-72часа).
УХОД
• Следитезатем,чтобынепросверлитьэлектропроводку,водопроводные
илигазовыетрубы!
• Изделиеследуеткрепитьтольконасплошнуюстенуилиповерхность.
• Прикреплениинаплиткуповозможностисверлитенашвах,неповреждая
самуплитку.
• Есливместесверлениякрепежногоотверстияналожитькусочеклипкой
ленты,сверлонебудетскользитьпоглянцевойповерхностиплитки.
1.Отметьтеместасверленияотверстий
2.Длякрепленияиспользуйтетолькопоставляемуювкомплектекрепежную
фурнитуруисверлодиаметром6мм.
ПОДДЕРЖАНИЕ
Очисткуизделийизпластикарекомендуетсяпроизводитьвлажной
тканьюсиспользованиемуниверсальногобытовогочистящегосредства.
Неиспользуйтесредства,содержащиехлор,солянуюкислоту,атакже
абразивные/агрессивныечистящиесредства.Получитьответынавопросыи
оставитькомментарииможнонанашемсайтеwww.brabantia.com
www.brabana.com
BRABANTIA INTERNATIONAL B.V., DE HAAK 14,
5555 XK VALKENSWAARD, THE NETHERLANDS
2003-043
2003-043_Toilet Roll Holder manual-v2.indd 4-62003-043_Toilet Roll Holder manual-v2.indd 4-6 30/03/2020 14:1530/03/2020 14:15
This manual suits for next models
4
Popular Bathroom Fixture manuals by other brands

Kohler
Kohler Mira Sport Max J03G Installation and user guide

Moen
Moen 186117 Series installation guide

Hans Grohe
Hans Grohe Raindance Showerpipe 27235000 Instructions for use/assembly instructions

Signature Hardware
Signature Hardware ROUND SWIVEL BODY SPRAY 948942 Install

fine fixtures
fine fixtures AC3TH installation manual

LIXIL
LIXIL HP50 Series quick start guide


