BRADEN BG4A Manual

B R A D E N
BG4A & BG4B
HYDRAULIC HOIST
INSTALLATION, MAINTENANCE AND
SERVICE MANUAL
PACR WINCH DIVISION
P . O. BOX 547 BROKEN ARROW, OK U . S.A. 74013
PHONE (918) 251-8511 FAX (918) 259-1575
www.paccarwinch.com
LIT2193 R4
3/2008
Printed in U.S.A.


TABLE OF CONTENTS
FOREWORD…...………………………………………....…........................……….…....…1
PARTSANDSERVICE…………………………………...….............................……...…...2
GENERAL SAFETY RECOMMENDATIONS…………..…...........................…….....…..3
THEORYOF OPERATION………………………………...…..........................………..….4
DIMENSIONAL DATA………………………………………...........................…………....6
HOIST AND WIRE ROPE INSTALLATION………...………..........................………...…7
PREVENTATIVEMAINTENANCE……………..……………...........................………..…8
RECOMMENDED GEAR OIL………………….……………........................…………...10
HOIST EXPLODED VIEW DRAWING…......................................................................11
PARTS KEY.................................................................................................................11
TROUBLESHOOTING……………………………………..……...........................……...13
HOISTSERVICE……………………………………………...…........................…....……16
HOIST DISASSEMBLY………………………………….…..…............................…..16
DRUM ASSEMBLY SERVICE………………………….…..……….......................…17
PLANET GEAR SERVICE………………………...........................……...................17
BRAKE CYLINDER ENDPLATE SERVICE………….............................…….…….18
HOIST ASSEMBLY………………………………….................................……....….19
REVERSING DRUM HOIST ROTATION.……………...................................….…….….8
FASTENER TORQUE CHART....................................................................................22
METRIC CONVERSION TABLE………………………..................................................24
1

FOREWORD
Read and understand this entire publication BEFORE operating or servicing your BRADEN hoist. Retain this manual for
future reference.
The minimum service intervals specied are for operating hours of the prime mover.
The following service instructions have been prepared to provide assembly, disassembly and maintenance information
for the Model BG4 series hoist. It is suggested that before doing any work on these units, all assembly and disassembly
instructions should be read and understood.
Some illustrations in this manual may show details or attachments which may be different from your hoist. Also, some
components may be removed for illustrative purposes.
Continuing product improvement may cause changes in your hoist which may not be included in this manual. When a ques-
tion arises regarding your hoist or this manual, contact your nearest BRADEN dealer or the factory Service Department.
Provide the complete hoist model number and serial number when making inquiries. The model and serial numbers are
stamped into the data plate attached to the tie plate as shown below.
Braden Technical Support Department
Phone: (918) 251-8511
08:00 to 16:30 CST
Monday thru Friday
Fax: (918) 259-1575
Internet: hoist.service@paccar.com
PARTS AND SERVICE
BRADEN provides parts and service through a network of
authorized dealers. Parts and service are not available di-
rectly from the factory. For the name of your nearest dealer,
consult your local phone directory or call us at the phone
number shown above.
Serial Number and Model Number are stamped into the data
plate located on left lower corner the motor support when
viewing hoist from motor end. Always refer to the Serial
Number and Model Number when requesting information or
service parts.
EXPLANATION OF MODEL NUMBER
BG 4 B 05 119 01 H
BRADEN
GEARMATIC
MAX
RATING
DESIGN
MODEL
GEAR
RATIO
MOTOR
SIZE
DRUM
SIZE
OPTIONAL
HIGH LINE
PULL
BG DESIGNATES BRADEN GEARMATIC
4 DESIGNATES 4,000 lb (1,810 kg) FIRST LAYER LINE PULL
B DESIGNATES THE MODEL SERIES RELATING TO DESIGN CHANGES
05 DESIGNATES TOTAL GEAR REDUCTION
119 DESIGNATES HYDRAULIC MOTOR DISPLACEMENT IN cu in./rev
DECIMAL POINT ELIMINATED (119 = 11.9 cu in./rev [195 cu cm])
01 DESIGNATES THE DRUM
H DESIGNATES 5,000 lb. (2,270 kg) FIRST LAYER LINE PULL OPTION
2

CAUTION
WARNING
! !
GENERAL SAFETY
RECOMMENDATIONS
Safety for operators and ground personnel is of prime con-
cern. Always take the necessary precautions to ensure
safety to others as well as yourself. To ensure safety, the
prime mover and hoist must be operated with care and
concern by the operator for the equipment, and a thorough
knowledge of the machine’s performance capabilities.
The following recommendations are offered as a general
safety guide. Local rules and regulations will also apply.
Safety informational callout’s used in this manual
include:
1. Read all warning tag information and become familiar with
all controls BEFORE operating hoist.
2. NEVER attempt to clean, oil or perform any maintenance
on a machine with the engine running, unless instructed to
do so in the service manual.
3. NEVER operate hoist controls unless you are properly
seated at the operators station on the prime mover and
you are sure personnel are clear of the work area.
4. Assure that personnel who are responsible for hand sig-
nals are clearly visible and that the signals to be used are
thoroughly understood by everyone.
5. Ground personnel should stay in view of the prime mover
operator and clear of hoist drum. DO NOT allow ground
personnel near hoist line under tension. A safe distance of
at least 1½ times the length of the cable should be main-
tained. NEVER allow anyone to stand beneath a suspend-
ed load
6. On machines having hydraulically, mechanically and/or
cable controlled equipment, be certain the equipment is
either lowered to the ground or blocked securely before
servicing, adjusting and/or repairing the hoist. Always ap-
ply the prime mover parking brakes and lower equipment
before dismounting the prime mover.
7. Inspect rigging, hoist and hydraulic hoses at the beginning
of each work shift. Defects should be corrected immedi-
ately.
8. Keep equipment in good operating condition. Perform
scheduled servicing and adjustments listed in the “Pre-
ventive Maintenance” section of this manual.
9. An equipment warm-up procedure is recommended for all
start-ups and is essential at ambient temperatures below
+40ºF (14°C.) Refer to “Warm-up Procedure” listed in the
“Preventive Maintenance” section of this manual.
10. Be sure of equipment stability before operating hoist.
11. The hoists described herein are neither designed nor
intended for use or application to equipment used in the
lifting or moving of persons.
12. DO NOT exceed the maximum pressure (PSI) or ow
(GPM) stated in the hoist specications.
13. Operate hoist line speeds to match job conditions.
14. Leather gloves should be used when handling hoist
cable.
15. NEVER attempt to handle hoist cable when the hook
end is not free.
16. When winding hoist cable on the hoist drum, NEVER
attempt to maintain tension by allowing hoist cable to slip
through hands. Always use “hand-over-hand” technique.
17. NEVER use hoist cable with broken strands. Replace
hoist cable.
18. DO NOT weld on any part of the hoist.
19. DO NOT use knots to secure or attach hoist cable.
20. Use recommended hydraulic oil and gear lubricant.
21. Keep hydraulic system clean and free from contamina-
tion at all times.
22. Use correct size cable anchor for cable and pocket in
cable drum.
23. The BRADEN wire rope anchors are capable of sup-
porting the rated load only when installed properly. For
additional safety, ALWAYS maintain a minimum of ve (5)
wraps of wire rope on the drum.
This emblem is used to warn against potential or unsafe
practices which COULD result in personal injury or product
or property damage if proper procedures are not followed.
CAUTION
This emblem is used to warn against hazards and unsafe
practices which COULD result in severe personal injury or
death if proper procedures are not followed.
FAILURE TO OBEY SAFETY RECOMMENDATIONS
MAY RESULT IN PROPERTY DAMAGE, PERSONAL IN-
JURY OR DEATH.
3
CAUTION
WARNING
! !

THEORY OF OPERATION
DESCRIPTION OF HOIST
The hoist has three basic assemblies:
1. Hydraulic motor, brake valve block and counter-
balance cartridges.
2. Static brake assembly.
3. Cable drum assembly.
The hydraulic motor is bolted to the motor adapter which
in turn is bolted to the brake cylinder end plate of the hoist.
The cable drum assembly is supported on the motor end by
a bronze bushing and on the support end by a roller bear-
ing. The ring gear for the single planetary reduction set is
machined into the inside of the cable drum. The cable drum
features two anchor pockets for winding cable on the drum
in either direction.
PLANETARY GEAR TRAIN
The hydraulic motor shaft is directly splined to the brake
coupling which is connected to the sun gear of the planetary
reduction set. The planet carrier is splined to the bearing
support end plate and cannot rotate. The hydraulic motor
rotates the brake coupling and sun gear, driving the planet
gears which in turn drive the ring gear/cable drum.
DUAL BRAKE SYSTEM
DYNAMIC BRAKE
The dynamic brake consists of two basic components:
1. Brake Valve block and cartridges;
2. Hydraulic motor.
The brake valve contains a counterbalance cartridge valve,
pilot-operated check valve and a shuttle valve. The check
valve opens at approximately 30 PSI (207 kPa) to allow the
hoist to rotate in the raising direction. During lowering, oil is
sent to the counterbalance cartridge which blocks the ow
of oil out of the motor until the valve cracks opens at ap-
proximately 750 PSI (5,170 kPa) with no load. After the
valve cracks open, the pilot pressure becomes ow depen-
dent modulating the cartridge valve to control the lowering
speed. The shuttle valve directs oil to the internal brake from
both directions, releasing the brake during both raising and
lowering operations.
Note: Early BG4A hoists included (2) counterbalance car-
tridges in the valve block. When servicing, one cartridge
may be replaced with the check valve cartridge currently
in use.
AB
WINCH
BRAKE
BR
2 COUNTERBALANCE CARTRIDGES
(Early BG4A Hoists)
BOTH CIRCUITS ARE WITH A SINGLE SPEED MOTOR,
BRAKE EFFECTIVE BOTH DIRECTIONS
HYDRAULIC CIRCUITS
Winch Brake
Pump
Control
Valve
Winch Assembly
W/Brake Valve
& Static Brake
Hoist
Lower
Pilot
Operated
Check
Valve
Winch Motor
Counterbalance Cartridge
1 COUNTERBALANCE CARTRIDGE
1 PILOT OPER. CHECK VALVE
4

STATIC BRAKE
The static brake consists of three basic components.
1. Spring applied, multiple friction disk brake pack.
2. Solid brake coupling.
3. Hydraulic brake cylinder and spring plate.
The brake pack consists of alternatively stacked friction
and steel brake disks. The steel brake disks are externally
splined to the motor adapter and cannot rotate. The friction
disks are internally splined to the brake coupling. When
the hoist is not being operated, spring force compresses
the brake pack and locks the brake coupling to the motor
adapter, preventing the gear train or cable drum from ro-
tating in either direction. The solid brake coupling makes
the static brake “effective both directions”. This means the
static brake must be released before the hoist can operate
in either the raise or lower direction.
The static brake is released by pilot pressure applied to the
brake cylinder. It releases at a pressure lower than that re-
quired to open the pilot operated counterbalance cartridge,
typically approx. 600 PSI (4,140 Kpa.) This sequence as-
sures that dynamic braking is done by the counterbalance
cartridge and that little, if any, heat is absorbed by the fric-
tion brake.
The static or friction brake is primarily a load holding brake
and will provide dynamic braking only during extremely slow
operation when there is insufcient ow and pressure to
open the counterbalance cartridge.
OPERATION
Since the static brake on this hoist is “effective both direc-
tions”, the brake must be hydraulically released to operate
the hoist in either the hoist or lower direction.
When the hoist is powered in either direction, the motor can-
not rotate until sufcient pilot pressure is present to open the
counterbalance cartridge or check valve. The friction brake
will completely release at a pressure lower than required to
open the counterbalance cartridge during lowering. The ex-
tent to which the cartridge opens will determine the amount
of oil that can ow through it and the speed at which the
cable drum will turn. Increasing the ow of oil to the hoist
motor will cause the pressure to rise and the opening in the
cartridge to enlarge, speeding up the cable drum. Decreas-
ing the ow causes the pressure to drop and the opening in
the cartridge to decrease, slowing down the cable drum.
During raising operations, the check valve recieves a pilot
signal from the motor inlet port opening the check valve to
allow free ow of oil through the motor. When the control
valve is returned to the neutral or center position, pressure
will rapidly drop and the counterbalance cartridge will close,
stopping the load. The friction brake will engage and hold
the load after the cartridge is closed.
HOIST AND WIRE ROPE
INSTALLATION
1. The hoist should be mounted with the centerline of the
cable drum in a horizontal position. The mounting plane of
the hoist may be rotated in any position around this cen-
terline providing the vent in the motor adapter is above the
centerline of the cable drum. The vent should be as close to
top dead center as possible.
2. When mounting the hoist, use all four (4) mounting holes
and Grade 8 bolts and nuts. Evenly tighten the nuts to the
torque in the “Recommended Torque” chart. Refer to “Di-
mensional Drawing” for bolt hole size and pattern.
It is important that the hoist is mounted on a sur face that
will not ex when the hoist is in use, and cause binding of
the gear train. Binding in the gear train will result in accel-
erated wear and heat. Also, the mounting surface should
be at with ± 0.020 inches. If necessary, install shims
under the hoist mounting pads to achieve even mounting.
3. The hydraulic lines and components that operate the hoist
should be of sufcient size to assure minimum back pres-
sure at the hoist. The back pressure at the motor must not
exceed 100 psi (690 kPa) to maintain full brake system de-
sign factor and optimum motor seal life.
The hoist directional control valve must be a three position
four way valve with a motor spool such that when the valve
is in the center position both work ports are open to tank
(open center, open port.)
4. High quality hydraulic oil is essential for satisfactory per-
formance and long hydraulic system component life. Oil hav-
ing 150 to 330 SUS viscosity at 100°F (38°C) and viscosity
index of 100 or greater will give good results under normal
temperature conditions. The use of an oil having a high
viscosity index will minimize cold start trouble and reduce
the length of warm-up periods. A high viscosity index will
minimize changes in viscosity with corresponding changes
in temperature.
Maximum cold weather start-up viscosity should not exceed
5,000 SUS with a pour point at least 20°F (11°C) lower than
the minimum ambient temperature.
Under continuous operating conditions the temperature of
the oil at any point in the system must not exceed 180ºF
(82°C). 120-140°F (49-60°C) is generally considered opti-
mum.
In general terms:
For continuous operation at ambient temperatures between
50 and 110°F (10-43°C) use ISO VG 46 – 68 (SAE20); for
continuous operation between 10 and 90°F (-12 and 32°C)
use ISO VG 32 (SAE10W); for applications colder than 10°F
(-12°C), contact the BRADEN Product Support Department.
The use of multi-viscosity oils is generally not recommend-
5
ed.
5. The hydraulic oil lter should have a 10 micron nominal
rating and be full ow type.
6. The vent plug in the motor adapter must be located as
close to top dead center as possible. If the hoist is mounted
on a pivoting surface, the vent plug must remain above the
centerline of the cable drum to prevent gear oil leakage.
7. Refer to “Dimensional Drawing” for relationship between
drum rotation and which port is pressurized.
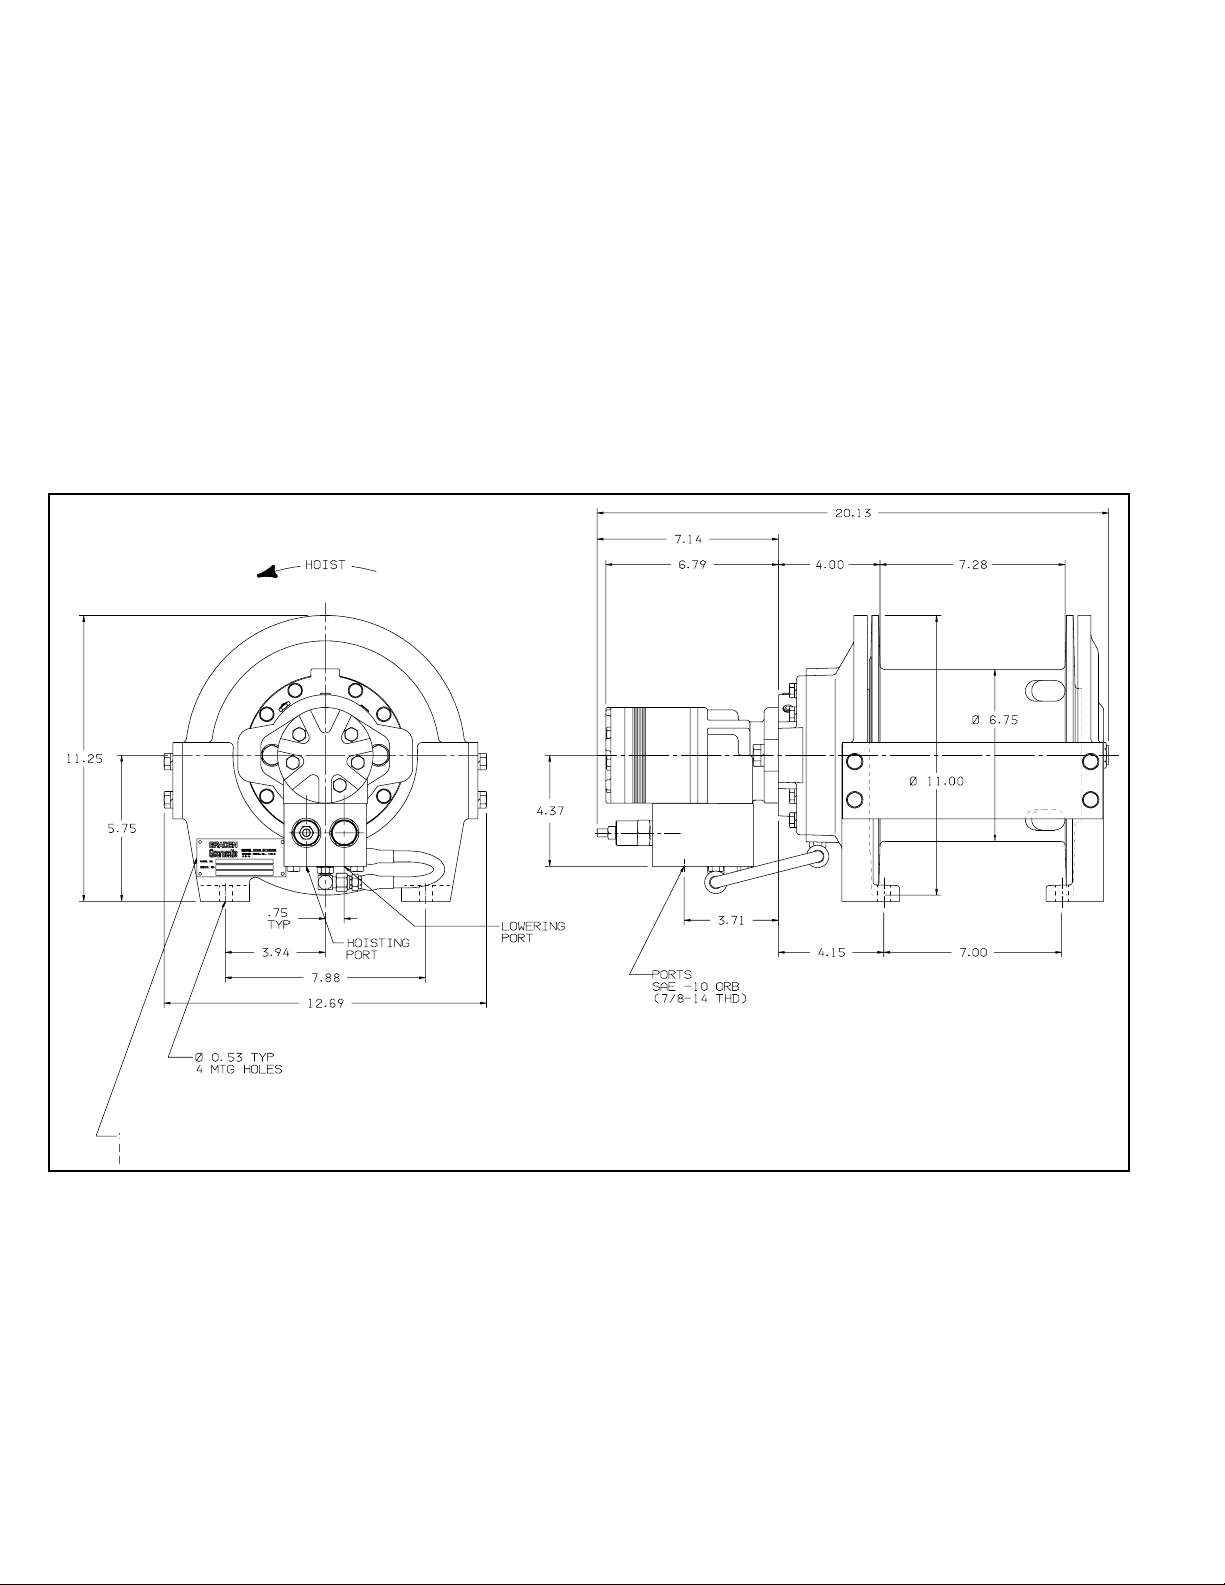
Dimensions shown in inches
6
Stamp Name Tag as Follows:
Line 1. Model Number
Line 2. Hoist Serial Number

Figure 1 Figure 2
Drive down from
this side
Correct Installations
Wedge and wire rope fully seated in pocket
Incorrect Installations
Wedge pulled too
far through anchor
pocket
Wedge not fully
seated
-Wire Rope not tight against wedge
-Wedge may be too large
-”Dead” end of wire rope and/or wedge
may interfere with proper spooling
-Wedge may be too small
THE CABLE ANCHORS ALONE ON HOISTS ARE NOT
INTENDED TO HOLD RATED LOADS.
Hoist loads applied directly to the wire rope anchor may cause
the wire rope to pull free and result in the sudden loss of load
control and cause property damage, personal injury or death. A
minimum of 5 wraps of wire rope must be left on the drum barrel
to achieve rated load.
The wedge and anchor pocket must be clean and dry. The
end of the wire rope being anchored to the drum must be clean
and dry and not frayed. Anything on the end of the wire rope
to keep it from fraying (i.e. tape or wire) must not be in contact
with the wedge when the installation is complete. Consult the
wire rope manufacturer on the proper treatment of the dead
end of the wire rope. Some rope manufacturers recommend
when using rotation resistant wire rope, that the rope end be
seized, welded or brazed before inserting the wire rope into the
wedge socket to prevent core slippage or loss of rope lay.
WIRE ROPE INSTALLATION
(ONE PIECE CABLE WEDGE)
Take the free end of the wire rope and insert it through the
small opening on the cable drum. Loop the wire rope and
push the free end about 3/4 of the way back through the
pocket. Install the wedge as shown in gure 1, then pull
the slack out of the wire rope. The “dead” end of the rope
needs to extend slightly beyond the end of the wedge as
shown in gure 2.
Using a hammer and brass drift, drive the wedge as deep
into the pocket as possible to ensure it is fully seated and
no further movement is detected. Applying a load on the
wire rope will also help seat the wedge in the pocket.
Check to ensure the wedge does not protrude from either
end of the pocket, causing it to interfere with proper spool-
ing of wire rope onto the drum (see gures 3 & 4).
If there is interference or the wedge does not seat rmly,
contact the BRADEN Product Support Department at
1-918-251-8511 to determine the proper wedge size.
It is important that the wire rope have the proper tensioning
when it is installed on the drum. When the wire rope is rst
installed, you should operate the hoist, with light to moder-
ate loads, with reeving that let’s you place these loads on
the block and the drum with all the rope off the drum except
for the last ve wraps.
7
CAUTION
WARNING
! !

1. Remove and reverse the positions of the counterbalance
and check valve cartridges in the brake valve block. For
standard rotation, the counterbalance cartridge is installed
in the left hand (LH) port when looking at the motor end of
the hoist. For opposite, or reversed, rotation, the counterbal-
ance cartridge must be installed in the right hand (RH) port.
NOTE: On early units with dual counterbalance cartridges,
skip this step.
2. Remove and reverse the positions of the hydraulic motor
lines connected to the brake valve. The line for powering the
motor in the hoisting direction must be installed in the port
that is in-line with the counterbalance cartridge.
reverse rotation
Check Valve
Counterbalance Cartridge
Hoisting Port
Lowering Port
standard rotation
Check Valve
Counterbalance Cartridge Lowering Port
Hoisting Port
REVERSING DIRECTION OF DRUM
ROTATION
For standard rotation when hoisting, the cable drum rotates
counter clock-wise (CCW) when viewed from the motor
end.
In order to reverse the direction of rotation of the cable drum,
two changes must be made on the motor end of the hoist.
PREVENTIVE MAINTENANCE
A regular program of preventive maintenance for your plan-
etary hoist is strongly recommended to minimize the need
for emergency servicing and to promote safe and reliable
hoist operation.
The user of BRADEN hoist products is responsible for hoist
inspection, testing, operator training and maintenance noted
below with the frequency dependent on the hoist duty cycle
and the thoroughness of the preventive maintenance pro-
gram. Field experience, supported by engineering testing,
indicates the three (3) service procedures listed below are
the MOST critical to safe, reliable hoist operation and MUST
be observed.
• Regular Gear Oil Changes – every 1000 hours, or six (6)
months.
• Use of Proper Gear Oil – recommended type and viscos-
ity for prevailing ambient temperatures.
•Periodic Disassembly and Inspection of All Wear Com-
ponents – for recommendations, refer to Bulletin PB-308.
Crane inspection records, as well as records of hoist preven-
tive maintenance, repairs and modications, must be avail-
able for a minimum of ve (5) years. These records should
include, but not be limited to, hoist model and serial number,
name and employer of repair technician, date of work and
description of work performed.
1. Oil Level
The gear oil level should be checked every 500 operating
hours, three (3) months, or whenever an oil leak is detect-
ed; whichever occurs rst. To check the oil level, remove
the large plug located in the center of the bearing support
endplate. The oil should be level with the bottom of this
opening. If additional oil is needed, refer to “Recommended
Planetary Gear Oil” for correct oil type.
Hoist gear oil capacity is approx. 2 pints (1 liter.)
2. Oil Change
The gear oil should be changed after the rst 100 operat-
ing hours or three (3) months, whichever occurs rst. The
gear oil should then be changed once every 1,000 operating
hours or every six (6) months, whichever occurs rst. The
gear oil must be changed to remove wear particles that im-
pede the reliable and safe operation of the brake clutch and
erode bearings, gears and seals.
Failure to change gear oil at these suggested minimum in-
tervals may contribute to intermittent brake slippage which
could result in property damage, severe personal injury or
death.
CAUTION
WARNING
! !
8

6. Mounting Bolts
Tighten all hoist base mounting bolts to recommended
torque after the rst 100 hours of operation, then every 1000
operating hours or six (6) months, whichever occurs rst.
7. Warm-up Procedure
A warm-up procedure is recommended at each start-up and
is essential at ambient temperatures below +40°F (4°C).
The prime mover should be run at its lowest recommended
RPM with the hydraulic hoist control valve in neutral allow-
ing sufcient time to warm up the system. The hoist should
then be operated at low speeds, forward and reverse, sev-
eral times to prime all lines with warm hydraulic oil, and to
circulate gear lubricant through the planetary gear sets.
8. Recommended Planetary Gear Oil
Field experience, supported by extensive engineering tests,
indicates the use of the proper planetary gear oil is essential
to reliable and safe operation of the brake and obtaining long
gear train life.
For simplicity, we have listed one (1) readily available prod-
uct in each temperature range which has been tested and
found to meet our specications. This is not to say that other
lubricant brands would not perform equally as well.
If the specied lubricant brands are not available in your
area, make certain your lubricant vendor supplies you with
oil that is equivalent to those products listed.
Failure to use the proper type and viscosity of planetary
gear oil may contribute to intermittent brake slippage which
could result in property damage, severe personal injury or
death. Some gear lubricants contain large amounts of EP
(extreme pressure) and anti-friction additives which may
contribute to brake slippage and damage to brake friction
discs or seals. Oil viscosity with regard to ambient tem-
peratures is also critical to reliable brake operation. Our
tests indicate that excessively heavy or thick gear oil may
contribute to intermittent brake slippage. Make certain that
the gear oil viscosity used in your hoist is correct for your
prevailing ambient temperature.
CAUTION
WARNING
! !
The gear oil should also be changed whenever the ambient
temperature changes signicantly and an oil from a different
temperature range would be more appropriate. Oil viscos-
ity with regard to ambient temperature is critical to reliable
brake operation. Make certain that the gear oil viscosity
used in your hoist is correct for your prevailing ambient tem-
perature. Failure to use the proper type and viscosity of
planetary gear oil may contribute to brake slippage which
could result in property damage, severe personal injury or
death. Refer to “Recommended Planetary Gear Oil” for ad-
ditional information.
3. Vent Plug
The vent plug is located in the motor adapter. It is very im-
portant to keep this vent clean and unobstructed. Whenever
gear oil is changed remove the vent plug, clean in solvent
and reinstall.
Do not paint over the vent or replace with a solid plug.
4. Hydraulic System
The original lter element should be replaced after the rst
fty (50) hours of operation, then every 500 operating hours
or three (3) months, or in accordance with the equipment
manufacturer’s recommendations.
5. Wire Rope
Inspect entire length of wire rope according to wire rope
manufacturer’s recommendations.
CAUTION
WARNING
! !
Failure to properly warm up the hoist, particularly under
low ambient temperature conditions, may result in tempo-
rary brake slippage due to high back pressures attempting
to release the brake, which could result in property dam-
age, severe personal injury or death
Oil Change
To change the gear oil, the hoist must be removed from the
platform. Remove the wire rope from the cable drum to aid
handling the hoist during oil changes. Stand the hoist on a
stable surface with the motor end up. Remove the motor
and brake valve assembly, brake release line and brake cou-
pling. Turn the hoist over and drain the oil through the brake
opening.
Stand the hoist with the motor end up and rell through the
brake opening with two (2) pints (.95 L) of the recommended
gear oil. Reinstall the brake coupling, hydraulic motor and
brake valve and brake release line as dened in the “Hoist
Assembly” section of this manual.
Position the hoist on its mounting feet and let stand for a
short time. Check the oil level as dened in “Oil Change”
(above).
9

RECOMMENDED PLANETARY GEAR OIL
PREVAILING AMBIENT TEMPERATURE
oF-40 -30 -20 -10 0 10 20 30 40 50 60 70 80 90 100 110 120 130 oF
AGMA 5 EP, ISO VG 220
AGMA 4 EP, ISO VG 150
MOBILGEAR SHC 150
SYNTHETIC OR EQUIVALENT
oC-40 -30 -20 -10 0 10 20 30 40 50 oC
NOTE: SHADED TEMPERATURE RANGE IN THE CHART ABOVE NOT RECOMMENDED FOR SEVERE APPLICATIONS SUCH AS: OFFSHORE
CRANES, SUSTAINED FAST DUTY CYCLES OR FREQUENT LIFTING.
i
TexacoShell
Meropa 150
Meropa 220
Omala150
Omala220
Chevron
Gear Compounds EP 150
Gear Compounds EP 220
RECOMMENDED PLANETARY GEAR OIL
PREVAILING AMBIENT TEMPERATURE
oF-40 -30 -20 -10 0 10 20 30 40 50 60 70 80 90 100 110 120 130 oF
AGMA 5 EP, ISO VG 220
AGMA 4 EP, ISO VG 150
SYNTHETIC OR EQUIVALENT
oC-40 -30 -20 -10 0 10 20 30 40 50 oC
NOTE: SHADED TEMPERATURE RANGE IN THE CHART ABOVE NOT RECOMMENDED FOR SEVERE APPLICATIONS SUCH AS: OFFSHORE
CRANES, SUSTAINED FAST DUTY CYCLES OR FREQUENT LIFTING.
i
TexacoShell
Meropa 150
Meropa 220
Omala150
Omala220
Chevron
Gear Compounds EP 150
Gear Compounds EP 220
TexacoMobil Shell
Meropa 150
Meropa 220
Omala150
Omala220
Chevron
Gear Compounds EP 150
Gear Compounds EP 220
MOBILGEAR 600 XP 220 OR EQUIVALENT
MOBILGEAR 600 XP 150 OR EQUIVALENT
Mobilgear 600 XP 150
Mobilgear 600 XP 220
Planetary hoists are factory filled with Mobilgear 600 XP 150, or equivalent. Consult your oil supplier for other equivalent
oils if required.
10

BG4 Components
NOTE: BG4 version “A” features splined brake discs, pictured left. The
“B” version features lobed discs as shown in explosion above. Addition-
ally spring count and brake disc count (items 27, 34, & 36) may vary from
depiction above; consult the appropriate Material List for your particualr
hoist model for accurate brake spring and brake disc quantities.
ITEM # DESCRIPTION QTY
1 Bearing Support Endplate 1
2 Brake Cylinder Endplate 1
3 Cable Drum 1
4 Tie Plate 2
5 Capscrew (3/8-16 x 1 GD8) 8
6 Lockwasher (3/8) 8
7 Sight Gauge 1
8 Oil Seal 1
9 Ball Bearing 1
10 Oil Seal 1
11 Ball Bearing 1
12 Output Planet Carrier 1
13 Ouptut Planet Gear 3
14 Output Planet Carrier Shaft 3
15 Roller Bearing 3
16 Thrust Race 6
17 Rollpin 3
27 Spring 8
28 Spring Locator 1
29 Brake Coupling 1
30 Retaining Ring 1
31 Spring Plate 1
32 Brake Piston Seal 1
ITEM # DESCRIPTION QTY
33 Brake Plate Spacer 1
34 Friction Disc 8
35 Steel Disc 9
36 O-Ring 1
37 Gasket 1
38 Motor Adaptor 1
39 Brake Valve Block 1
40 Counterbalance Cartridge 1
40A Check Valve Cartridge 1
41 Sun Gear 1
42 Vent Plug 1
43 Tube Assembly 1
44 Capscrew (5/16-18 x 3 GD8) 4
45 Elbow Fitting 2
46 O-Ring 2
47 Capscrew (5/16-18 x 1 GD8) 8
48 Lockwasher (5/16) 8
49 Hydraulic Motor 1
50 Capscrew (1/2-13 x 1 1/4) 2
51 Lockwasher (1/2) 2
52 Retaining Ring 1
53 Plug, Brake Cylinder Endplate 1
88 Allen Head Plug Brake Cylinder 2
11

TROUBLESHOOTING
The following troubleshooting section is provided as a general guide. You may also need to contact the Original Equipment
Manufacturer (OEM) for additional information.
If a hoist exhibits any sign of:
- Erratic operation such as poor load control, load creeping down or chattering.
- Unusual noise.
- Gear oil leaks
- A sudden rise in wear particles from oil analysis
The hoist MUST be removed from service until the problem has been corrected. If a hoist has been subjected to a sudden
heavy load (shock-load) or overload, the hoist must be removed from service, disassembled and all internal components
thoroughly inspected for damage. Continued operation with a defect may result in loss of load control, property damage,
injury or death.
A
The hoist will not lower the load or not
lower the load smoothly.
Remove the counterbalance cartridge
from the valve block and inspect. Clean
and reseal as required. Cartridges are
supplied pre-set to the pressure re-
quired for proper hoist operation. Fur-
ther adjustment should not be required
Check brake cylinder seal as follows:
A. Disconnect the brake release tube
from the brake release port. Connect
a hand pump with accurate 0-2000 psi
(13,800 kPa) gauge and shut-off valve
to the tting in the brake release port.
B. Apply 1000 psi (6,900 kPa) to the
brake. Close shut-off valve and let stand
for ve (5) minutes.
C. If there is any loss of pressure in ve
(5) minutes, the brake cylinder should
be disassembled for inspection of the
sealing surfaces and replacement of the
seals. Refer to “Brake Cylinder Service”
section of this manual.
Disassemble brake to inspect brake
discs. Refer to “Brake Cylinder Service”
section of this manual.
1. The counterbalance valve cartridge
may be plugged, damaged, or out of
adjustment
2. The friction brake may not be releas-
ing as a result of a defective brake cyl-
inder seal.
NOTE: If the brake cylinder seal is de-
fective you will usually nd oil leaking
from the hoist vent plug.
3. Friction brake will not release as a
result of damaged brake discs.
TROUBLE PROBABLE CAUSE REMEDY
12

B
Oil leaks from vent plug
Same as A2.
Hydraulic System back pressure must
not exceed 100 psi (690 kPa.) Inspect
hydraulic system for a restriction in the
return line to the reservoir.
Oil analysis may indicate contamination
has worn motor shaft and seal. Thor-
oughly ush entire hydraulic system
and install new lters and oil. Install new
motor seal.
1. Same as A2.
2. Motor seal may be defective as a
result of high back pressure in the mo-
tor case drain circuit or contaminated
oil. Contamination will usually cause
the seal to wear a groove in the motor
shaft.
TROUBLE PROBABLE CAUSE REMEDY
C
The brake will not hold a load with the
control lever in neutral
The pressure at the motor lowering port
is also transmitted to the brake release
pilot circuit. Inspect hydraulic circuit for
restrictions, plugged lters or control
valves not centering.
Same as Remedy of Trouble A3.
1. Excessive system back pressure
acting on the brake release port.
2. Friction brake will not hold due to
worn or damaged brake discs.
D
The hoist will not hoist the rated load
Reinforce mounting surface.
If necessary, use shim stock to level
hoist. Refer to “Hoist Installation”.
First loosen, then evenly retighten all
hoist mounting bolts to recommended
torque.
Check relief pressure as follows:
A. Install an accurate 0-5000 psi
(34,500 kPa) gauge into the inlet port of
the brake valve.
B. Apply a stall pull load on the hoist
while monitoring pressure.
C. Compare gauge reading to hoist
specications. Adjust relief valve as re-
quired.
NOTE: If pressure does not increase
in proportion to adjustment, relief valve
may be contaminated or worn out. In ei-
ther case, the relief valve may require
disassembly or replacement.
1. The hoist may be mounted on an un-
even or exible surface which causes
distortion of the hoist base and binding
of the gear train. Binding in the gear
train will absorb horsepower needed to
hoist the rated load and cause heat.
2. System relief valve may be set too
low. Relief valve needs adjustment or
repair.
13

Trouble “D” Continued From
Previous Page
Remove the counterbalance or check
valve cartridge and clean for inspection.
Reseal or replace as required.
Same as remedies for Trouble D1 &
D2.
Same as remedies for Trouble E2.
Refer to hoist performance charts for
additional information.
Perform rigging service as recommend-
ed by crane manufacturer.
3. Check valve or counterbalance valve
may be clogged or stuck. BG4 hoists
use a check valve which requires the
brake to be released while hoisting or
pulling wire rope.
4. Be certain hydraulic system tem-
perature is not more than 180°F (82°C).
Excessive hydraulic oil temperatures
increase motor internal leakage and re-
duces motor performance.
5. Hoist line pull rating is based on 1st
layer of wire rope.
6. Rigging and sheaves not operating
efciently.
TROUBLE PROBABLE CAUSE REMEDY
E
The hoist runs hot
Same as remedies for Trouble D1.
Thoroughly clean exterior and ush in-
terior.
Fill/drain to proper level.
Same as remedies for Trouble D2.
Engine low on horsepower or R.P.M.
Tune/adjust engine.
Check suction line for damage.
Pump worn. Replace pump.
Use correct hydraulic oil.
Disassemble hoist to inspect/ replace
worn parts.
1. Same as D1.
2. Be certain that the hydraulic system
temperature is not more than 180°F
(82°C). Excessive hydraulic oil temper-
atures may be caused by:
A. Plugged heat exchanger.
B. Too low or too high oil level in hy-
draulic reservoir.
C. Same as D2
D. Hydraulic pump not operating ef-
ciently.
E. Hydraulic oil is wrong viscosity for
operating conditions.
3. Excessively worn or damaged inter-
nal hoist parts.
14

G
The wire rope does not spool smoothly
on the drum.
Check mounting distance and eet
angle. Reposition hoist as required to
achieve ½ to 1½ degree eet angle.
Refer to “Hoist Installation”.
Consult wire rope manufacturer for
recommendation of wire rope that best
suits your application.
Replace wire rope and conduct opera-
tor/rigger training as required.
1. The hoist may be mounted too close
to the main sheave, causing the eet
angle to be more than 1½ degrees.
2. The hoist may not be mounted per-
pendicular to an imaginary line between
the center of the cable drum and the
rst sheave.
3. Could possibly be using the wrong
lay rope. There is a distinct advantage
in applying rope of the proper direction
of lay. When the load is slacked off,
the several wraps on the drum will stay
closer together and maintain an even
layer. If rope of improper lay is used,
the coils will spread apart each time the
load is removed. Then, when hoisting
is resumed, the rope has a tendency
to criss-cross and overlap on the drum.
The result is likely to be a attened and
crushed rope.
4. The hoist may have been overload-
ed, causing permanent set in the wire
rope.
F
Hoist “chatters” or surges while raising
rated load.
TROUBLE PROBABLE CAUSE REMEDY
Same as remedies for Trouble D2.
Same as remedies for Trouble D3
Same as remedies for Trouble E2.
Conduct operator training as required.
1. Same as D2.
2. Same as D3
3. Hydraulic oil ow to motor may be too
low.
4. Controls being operated too quickly.
15

DO NOT clean brake friction disks in solvent. Solvent may
cause damage to friction material which may result in brake
failure and loss of load control.
CAUTION
WARNING
! !
HOIST SERVICE
FOREWORD TO HOIST SERVICE
Before any part is removed from the hoist, all service instruc-
tions should be read and understood.
Work in a clean, dust free area as cleanliness is of utmost
importance when servicing hydraulic equipment.
Remove wire rope prior to removing hoist from crane.
Inspect all replacement parts, prior to installation, to detect
any damage which might have occurred in shipment.
Use only genuine BRADEN replacement parts for optimum
results. Never reuse expendable parts such as oil seals and
O-rings.
Inspect all machined surfaces for excessive wear or dam-
age…before reassembly operations are begun.
Lubricate all O-rings and oil seals with gear oil prior to instal-
lation.
Use a sealing compound on the outside surface of oil seals
and a light coat of thread sealing compound on pipe threads.
Avoid getting thread compound inside parts or passages
which conduct oil.
Thoroughly clean all parts in a good grade of non-ammable
safety solvent. Wear protective clothing as required.
Refer to exploded view drawing for item numbers used in
service procedures.
• Perform all applicable trouble shooting operations BE-
FORE disassembling hoist. To identify specic parts by part
number, refer to BG4 material list.
HOIST DISASSEMBLY
1. Disconnect all hoses and ttings from the motor.
2. Stand the hoist on the bearing support plate. Remove the
brake release tube assembly (42) between the brake valve
block and the brake cylinder end plate. Remove the cap-
screws (47) and lockwashers (48) which secure the motor
(49) to the motor adapter (38), and lift the motor out of the
motor adapter. Remove and discard the gasket installed on
the pilot of the motor.
3. Remove the brake coupling (29) and sun gear (41) from
the hoist.
4. Remove the four capscrews (5) and lockwashers (6) hold-
ing the tieplates (4) to the brake cylinder endplate. The drum
is supported on the endplate by a large bushing. Carefully
separate the endplate assembly from the drum. The end-
plate assembly includes the static brake cylinder. Remove
the brake cylinder endplate from the drum.
5. Remove the other four capscrews and lockwashers hold-
ing the tieplates to the bearing support endplate. Remove
the planet assembly from the drum and separate the drum
from the bearing support endplate.
16

DRUM ASSEMBLY SERVICE
1. Remove the bearing and seal from each end of the drum.
Check the ring gear teeth (machined into the inside surface
of the drum) for nicks, spalling or excessive wear. Replace
the drum if wear is greater than 0.015 in. (0.4 mm) when
compared to unworn area of teeth.
2. Install new bearings in the drum if replacement is neces-
sary. Apply a non-hardening sealant on the outside diameter
of each new seal and press the seals into the drum, using a
at plate to avoid distortion.
PLANET CARRIER SERVICE
1. First drive the rollpins (17) into the center of the planet
shafts (14). Now you can remove the planet shaft (14), two
thrust races (16), planet gear (13) and roller bearing (15).
Repeat this procedure for the other two planet gears. Thor-
oughly clean all parts and inspect for damage and wear. The
bearing rollers should not exhibit any irregularities. If the
rollers show any sign of spalling, corrosion, discoloration,
material displacement or abnormal wear, the bearing should
be replaced.
Likewise, the cage should be inspected for unusual wear or
deformation, particularly the cage bars. If there is any dam-
age that will impair the cage’s ability to separate, retain and
guide the rollers properly, the bearing should be replaced.
The thrust washer contact areas should be free from any
surface irregularities that may cause abrasions or friction.
The gears and shafts should be inspected for abnormal wear
or pitting. Replace if necessary.
2. Insert a bearing into a planet gear and place a thrust race
on each side of the gear. Position this assembly in the plan-
et carrier and slide the planet gear shaft through the carrier.
Align the pin hole in the shaft with the hole in the carrier and
drive a NEW rollpin into place. ALWAYS USE NEW ROLL-
PINS. When properly positioned, the rollpin will be slightly
below the surface of the carrier.
3. With a center punch, stake the carrier next to the pin hole
as shown. This will distort the hole so the pin will not back
out when in service. Repeat these steps for each of the
three planet gears.
17
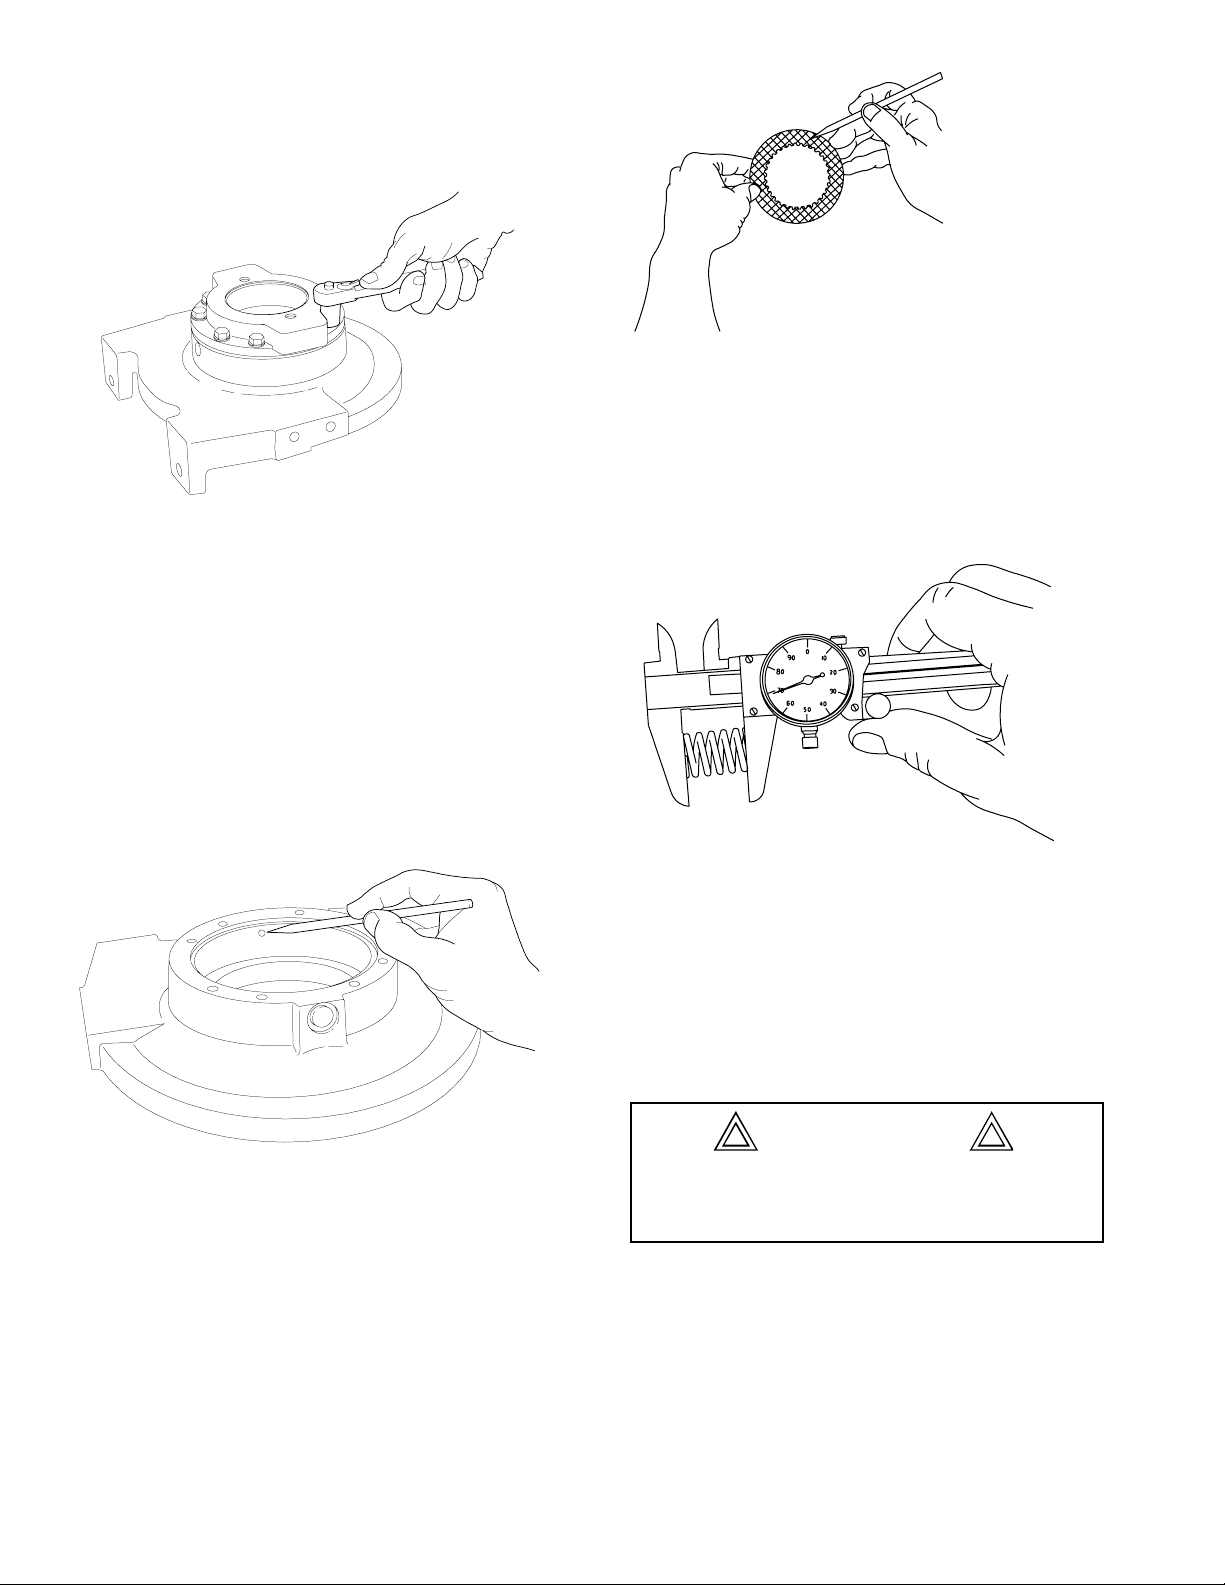
3. Place each friction disc on a at surface and check for
distortion with a straight edge. Friction material should ap-
pear even across entire surface with groove pattern visible.
Replace friction disc if splines are worn to a point, disc is dis-
torted, friction material is worn unevenly or groove pattern is
worn away. Place each steel disc on a at surface and check
for distortion with a straight edge. Check surface for signs
of material transfer or heat. Replace steel disc if splines are
worn to a point, disc is distorted or heat discolored.
4. Check free length of each brake spring. Minimum free
length is 15/16 inch (23.8 mm). Check springs for any signs
of cracking or failure. If a brake spring must be replaced for
any reason, then ALL brake springs must be replaced.
BRAKE CYLINDER ENDPLATE
SERVICE
DISASSEMBLY AND INSPECTION.
1. NOTE: The capscrews in the motor adapter should be
evenly removed in 1 or 2 turn increments since the motor
adapter is under spring tension. Remove the capscrews
(47) and lockwashers (48) holding the motor adapter (38)
to the endplate (2). Install 2 capscrews and a short piece of
chain or two 1/2-13 eyebolts into the motor mounting holes.
Using the chain as a handle, lift the motor adapter out of
the endplate. Remove and discard the O-ring (36) from the
motor adapter. Remove and discard the brake piston seal
(32). Remove brake plate spacers (33), steel discs (35),
friction discs (34), spring plate (31), springs (27) and spring
spacer (28).
2. Thoroughly clean and inspect all parts at this time. Check
brake piston sealing surfaces on motor adapter and brake
cylinder endplate. The sealing surfaces must be smooth.
Light scoring from contaminants in the gear oil may be
smoothed with an extra-ne abrasive cloth. Be sure the
brake release port in the endplate (shown above) is free of
contamination. Remove the vent plug (42) from the motor
adapter, clean in solvent and reinstall. DO NOT paint over
the vent or replace it with a solid plug.
Failure to replace brake springs as a set may result
in uneven brake application pressure and repeated
brake spring failure.
CAUTION
18
This manual suits for next models
1
Table of contents
Popular Chain Hoist manuals by other brands


CMCO
CMCO TIGRIP TAG Translated Operating Instructions

Columbus McKinnon
Columbus McKinnon CM LODESTAR A-H Operating, Maintenance & Parts Manual

little mule
little mule FEL Series Operating, Maintenance & Parts Manual

Paccar Winch
Paccar Winch Gearmatic GH30B Service and maintenance manual

Raider
Raider RD-EH01 user manual

SVERO
SVERO 20123A manual

RGC
RGC Classic Power Drive 250HG instructions

Tractel
Tractel supertirfor TU16A Operating and maintenance instruction

MW TOOLS
MW TOOLS SH125-R manual

Prolyte
Prolyte PRO LYFT AETOS PAE-250DC Series Operating and maintenance manual

Jet
Jet JWS Series Operating instructions and parts manual

Tractel
Tractel tralift 19709 Operation, maintenance and parts manual