Bradford BALBOA M3 Guide

pg. 2 File: RES_Hottub_manual_021116
BLANK

Residential Spa
pg. 3
File: RES_Hottub_manual_021116
Copyright
©2016 by Bradford Products, LLC. All rights reserved.
Trademarks
Bradford Products and Bradford Spas are registered trademarks of Bradford Products, LLC. Balboa is a
registered trademark of Balboa Instruments, Inc. All other registered trademarks and trademarks are
the property of their respective companies. All rights reserved.
Notice
The material in this document is for information only and is subject to change without notice. While
reasonable eorts have been made in the preparation of this document to ensure its accuracy, Brad-
ford Products, LLC assumes no liability resulting from errors or omissions in this document, or from
the use of the information contained herein.
Bradford Products, LLC reserves the right to make changes in the product design without reservation
and without notication to its users.
Edition
February 2015
Contact Information
Bradford Products, LLC
2101 Enterprise Drive, NE
Leland, NC 28451
Phone: 1.910.791.2202
Toll Free: 1.800.438.1669
Web site: www.bradfordproducts.com
Service email: service@bradfordproducts.com

Residential Spa
pg. 4 File: RES_Hottub_manual_021116
Index
Contents
Copyright...........................................................page 3
Trademarks .........................................................page 3
Notice ..............................................................page 3
Edition .............................................................page 3
Contact Information.................................................page 3
Introduction
About This Document ...............................................page 6
Hottub Overview....................................................page 7
Equipment pack Overview...........................................page 7
Preparing to Install Your Spa
Unpacking Your Hottub .............................................page 12
Parts List............................................................page 12
Tools and Supplies List ..............................................page 13
Preparing the Installation Site .......................................page 13
About Installation Types .............................................page 13
Selecting a Good Installation Site ....................................page 15
Preparing a Recessed or Flush Mount Installation of Spa ..............page 15
Preparing for an On Grade Mount Installation of Spa..................page 17
Preparing for an Indoor Installation of Spa............................page 17
Placing the Equipment Pack .........................................page 18
Digging a Trench for Plumbing. . . . . . . . . . . . . . . . . . . . . . . . . . . . . . . . . . . . . . .page 18
Installing the Conduit ...............................................page 19
Installing Your Spa
Connecting the Spa and Equipment Pack ............................page 19
Connecting Water Temperature Sensor...............................page 20
Installing the Freeze Sensor..........................................page 21
Connecting the Equipment Pack to Your Power Source................page 21
Making Plumbing Connections ......................................page 23
Connecting the Bonding and Light Wires.............................page 24
Installing the Spa-Side Control Panel .................................page 25

Residential Spa
pg. 5
File: RES_Hottub_manual_021116
Index
Testing Your Spa Setup
Cleaning the Spa ....................................................page 27
Filling the Spa with Water............................................page 27
Testing the Pumps ..................................................page 27
Turning On the Spa for the First Time.................................page 28
Instruction card for M2 & M3 Systems ................................page 29
System Programing .................................................page 30
Diagnostic Messages ................................................page 31
Safe Operation Instructions / Rules
Safe Operation Instructions / Rules...................................page 32
Spa Cleaning & Maintenance ........................................page 33
Winterization / Adding Shock or Chlorine ............................page 33
Water Testing & Balance .............................................page 34
Rust (Ferric Oxide)...................................................page 36
Treatment for removing Metal Accumulation .........................page 37
Appendix A:
Electrical Requirements .............................................page 38
Appendix B:
Wiring Diagrams
BRD_1G ............................................................page 40
BRD_2G ............................................................page 41
BRD_111 & BRD_111F ...............................................page 42
BRD_155............................................................page 43
BRD_211 & BRD_211F ...............................................page 44
BRD_255............................................................page 45
Appendix C:
Typical Pit Dimensions & Clearance ..................................page 46
Appendix D:
Limited Warranty....................................................page 47
Customer Record
Spa Information.....................................................page 48
Equipment Pack Information ........................................page 48
Electrical Information (see manufacturing label) ......................page 48
Warranty Registration
Dealer Information ..................................................page 49
Customer Information...............................................page 49

Residential Spa
pg. 6 File: RES_Hottub_manual_021116
Introduction
Introduction
Congratulations on your purchase of a Bradford Spa®. Each stainless steel spa that is designed,
manufactured and sold by Bradford Products, LLC is designed to provide a lifetime of enjoyment
and relaxation.
Only quality products and materials are used in the manufacture of Bradford Spas®. Each spa is
constructed using a combination of modern technology and old-world craftsmanship to give
unparalleled service and beauty. The bright, easily cleaned stainless steel surface looks and feels like
no other spa surface, giving a modern and attractive appearance to your home.
About This Document
This Installation Manual will guide you through the process of installing your spa. Before setting up
or operating your spa or related equipment, you should read and understand all instructions. If you
have any questions, please contact Bradford Products, your local dealer, or contractor.
For information on operating or maintaining your new spa, please see the Operations and
Maintenance Manuals provided.
For your own safety, and to avoid the invalidation of your warranty, all text marked with the following
symbols should be read carefully.
Table 1 : Safety Symbols
Symbol Description
Directions must be followed to avoid serious bodily injury or death
Directions must be followed to avoid bodily injury
Directions must be followed to avoid damage to your equipment

Residential Spa
pg. 7
File: RES_Hottub_manual_021116
Introduction
Hot Tub Overview
Bradford’s engineered stainless steel spas come in various shapes and sizes to suit your exact needs.
Your spa will be delivered wrapped in plastic with all plumbing connections clearly labeled for easy
connection to the equipment pack.
The following table provides an overview of the various types of hot tubs and their specications.
NOTE: Weights are based on Standard Tile package, full tile will weigh more.
Table 2 : Hot Tubs Types and Specications.
Spa Name Occupants Jets Water Capacity
(Gallons)
Empty Weight
(lbs)
Full Weight
(lbs)
Hanover 68/16 380 520 3665
Wilmington 75” 4-5 8293 400 2850
Wilmington 87” 6-8 8/16 425 500 4040
Hatteras 4-6 8/16 323 400 3090
Hampton 88/16 445 594 4297
Carolina 4-6 8/16 324 435 3149
Newport 4-6 8/16 312 435 3049
Topsail 4-6 8/16 375 610 3750
Equipment Pack Overview
The equipment pack included with your Bradford Hot tub contains the pump(s), heater, lter, ioniza-
tion system, and electronics/control module for the spa. The equipment pack will be delivered on a
skid with all of the components pre-mounted and wired. The plumbing connections and stub outs
will be clearly labeled. The equipment pack does not require any special weather protection.
If equipment pack is “Frame Mounted” all equipment will be located under the step section of our
standard hot tubs and will have a skim lter.
NOTE: The components found on the equipment pack may vary depending on your conguration.
Equipment Pack Electrical Information:
• M3 240 volt Outdoor Equipment system
• UL listed for 5.5 kW electric heater, 11 kW electric heater & Natural Gas/Propane
remote heaters.

Residential Spa
pg. 8 File: RES_Hottub_manual_021116
Introduction
Figure 1 : Remote Equipment Pack with labeled components
1. Filter Pump
2. Jet Pump
3. Electronics / Control Module
4. Heater
5. Copper Silver Ionizer
6. Cartridge Filter
7. Light Cord
8. Bonding Wire
9. Freeze Sensor
10. Temperature Sensor
11. Current Collector
12. Air Relief Valve
13. Pressure Gauge
14. Topside Control Panel
64” Clearance
Required For Filter
Cartridge Removal
Image for illustration only - Images & Components subject to change or slight variation without notice

Residential Spa
pg. 9
File: RES_Hottub_manual_021116
Figure 2 : Frame Mounted Equipment pack with labeled components
Introduction
1. Filter Pump 5. Cooper Silver Ionizer 9. S/S Skim Filter
2. Jet Pump 6. Current Collector 10. Bonding Wire
3. Electronics / Control Module 7. Light & Cord
4. Heater 8. Temperature Well
Image for illustration only - Images & Components subject to change or slight variation without notice

Residential Spa
pg. 10 File: RES_Hottub_manual_021116
Introduction
The following table lists the components on a standard equipment pack.
Table 3 : Components of the Equipment Pack, Sub Assembly ( Remote Skid Pack )
Component Description
Filter Pump Standard for all equipment packs, this pump can support up to eight
hydrotherapy jets. Pentair Whispero High Performance pump:
WFDS-8 208/230 volt 2 hp two-speed motor. For more information, see the
manufacturer’s manual included with your spa.
Jet Pump Included only in two-pump spa congurations that support up to 16
hydrotherapy jets. Pentair Whispero High Performance pump:
WFE-8 208/230 volt 2 hp one-speed motor. For more information, see the
manufacturer’s manual included with your spa.
Electronics
/ Control Module
Distributes power from the residence to the other components on the
equipment pack.
Heater Heats the water that is pumped into the spa. This heater is electric by default.
An optional natural gas/propane heater or a heat exchanger is available upon
request.
• Electric – Coates 5.5 kW or 11 kW heater
• Natural Gas/Propane – Lochinvar 150,000/400,000 Btu, sized according to
the spa size and climate. For more information, see the manufacturer’s manual
included with your spa.
Copper Silver
Ionizer
Water purication system that sterilizes the water as it goes through the
plumbing. For more information, see the manufacturer’s manual included with
your spa.
Cartridge Filter Removes foreign particles from the water. Pentair Clean & Clear #160316 – 100
sq. ft. cartridge style lter ( Requires 62” of vertical clearance for removal of cartridge )
Light Cord Provides power for the low-voltage underwater light.
This 50’ cord is connected to the light tting in the spa upon installation.
Bonding Wire INSTALLED BY LICENSED ELECTRICIAN Provides a safe electrical ground for the
spa. The Bonding Wire must be connected to the spa bonding bar on the M3
control panel and the building load center (see electrical schematic).
Freeze Sensor Detects freezing conditions and activates the pumps and heaters automati-
cally. Includes a 25’ cord. On a single pump (eight jet) system, place the freeze
sensor after the heater at the point that is most susceptible to freezing condi-
tions. On a two pump (16 jet) system, place the freeze sensor on the return line
of the jet pump at the point most susceptible to freezing.
Gas Heating Appliances must follow the appliance manufacturers instructions
for placement and protection against freezing if the potential exists.
Temperature
Sensor
Continually monitors your water temperature and controls the heater to
maintain your selected water temperature setting.
This 50’ cord is connected to spa upon installation.

Residential Spa
pg. 11
File: RES_Hottub_manual_021116
Introduction
The following table lists the components on a frame-mount equipment pack.
Table 4 : Components of the Equipment Pack, Sub Assembly ( Frame Mounted )
Component Description
Filter Pump Waterway Executive 48
#3420820 - 1A, 2hp two-speed motor
230 Volt single phase
Jet Pump Included only in two-pump spa congurations that support up to 16
hydrotherapy jets. Waterway Executive 48, #3410830 - 1A, 2hp One-speed
motor 230 Volt single phase. For more information, see the manufacturer’s
manual included with your spa.
Custom Stainless
Steel Skim Filter
Consumerables:
20 sq.ft. (2x) Waterway 10 sq.ft. cartridge skim lter - # PW 1110
100 sq.ft. (2x) Waterway 50 sq.ft. cartridge skim lter - # 510-9100 (upon request)
Electronics
/ Control Module
Distributes power from the residence to the other components on the
equipment pack.
Heater Heats the water that is pumped into the spa.
• Electric – Coates 5.5 kW or 11 kW (Heater Upgrade)
For more information, see the manufacturer’s manual included with your spa.
Copper Silver
Ionizer
These items same as standard equipment pack, though located and mounted
directly onto the spa frame and assembly
Cartridge Filter
Light Cord
Bonding Cord
Freeze Sensor
Temperature
Sensor
See Appendix A for the electrical requirements for each equipment pack conguration.

Residential Spa
pg. 12 File: RES_Hottub_manual_021116
Preparing to Install Your Spa
Preparing to Install Your Spa
CAUTION:
Read all instructions before beginning the installation. Failure to follow these instructions
could cause serious body and/or property damage.
Most standard residential spas can be installed in one to two days.
NOTE:
You will need to hire a licensed electrical contractor to wire the spa equipment pack to your
household electrical panel.
Unpacking Your Spa
When you rst receive your spa and equipment pack, unpack it and look it over for any damage that
might have occurred during shipping. An empty spa can weigh hundreds of pounds, so you will need
several people to help move it. When you move the spa, you should hold it by the stainless steel
support frame. Heavy work gloves will help prevent cuts and scrapes form exposed metal surfaces.
WARNING:
Do not try to carry the spa by holding the attached plumbing pipes.
Doing so could break the pipes and void your warranty.
Table 3 : parts List
Component Description
Spa Cover Insulated to prevent heat loss from the water surface.
Spa Care Package Provides tools for general maintenance and cleaning, including:
• Underwater light lens removal tool
• Brominating oater
• Spa vacuum
• Stainless Steel Wire brush
• Scrub sponge
Taylor K-2005
(high range)
water chemistry
test kit
Includes nine tests for thorough testing: total chlorine, free chlorine, bromine,
pH, acid demand, base demand, total alkalinity, calcium hardness, and cyanu-
ric acid. Includes a testing and treatment guide.
Naturally Free
Metal & Scale
Control
Sequestering agent to remove metals from the water
Residential Spa
pg. 13
File: RES_Hottub_manual_021116
Preparing to Install Your Spa
Tools and Suppliers List
The following list describes the tools you will need to perform a basic installation:
• Schedule 40 PVC cement
• Schedule 40 PVC primer
• Hacksaw or pipe cutter
• 6’ level
• Tape measure
• Torpedo level
• Philips head screwdriver
• Wire sh tape
• Pry bar
In addition, you will need the following supplies to properly install your spa:
• 36 grit sandpaper
• 2”diameter non-metallic conduit
• 2” & 2.5” diameter PVC pipes (Schedule 40) pressure rated for plumbing
• 2” & 2.5” 45˚or 90˚ couplings (Schedule 40) pressure rated for plumbing
• 2”non-metallic electrical sweeps for conduit run
If the concrete pad is not level, you will also need to shim (or level) the spa using stainless steel
washers. To properly shim the spa, the washers must be placed beneath all areas that are
o the ground.
Preparing the Installation Site
Before you install your Bradford Spa, rst decide what type of installation you will use. Because of the
stainless steel support frame, you can install the spa in a variety of ways without backlling around
the spa.
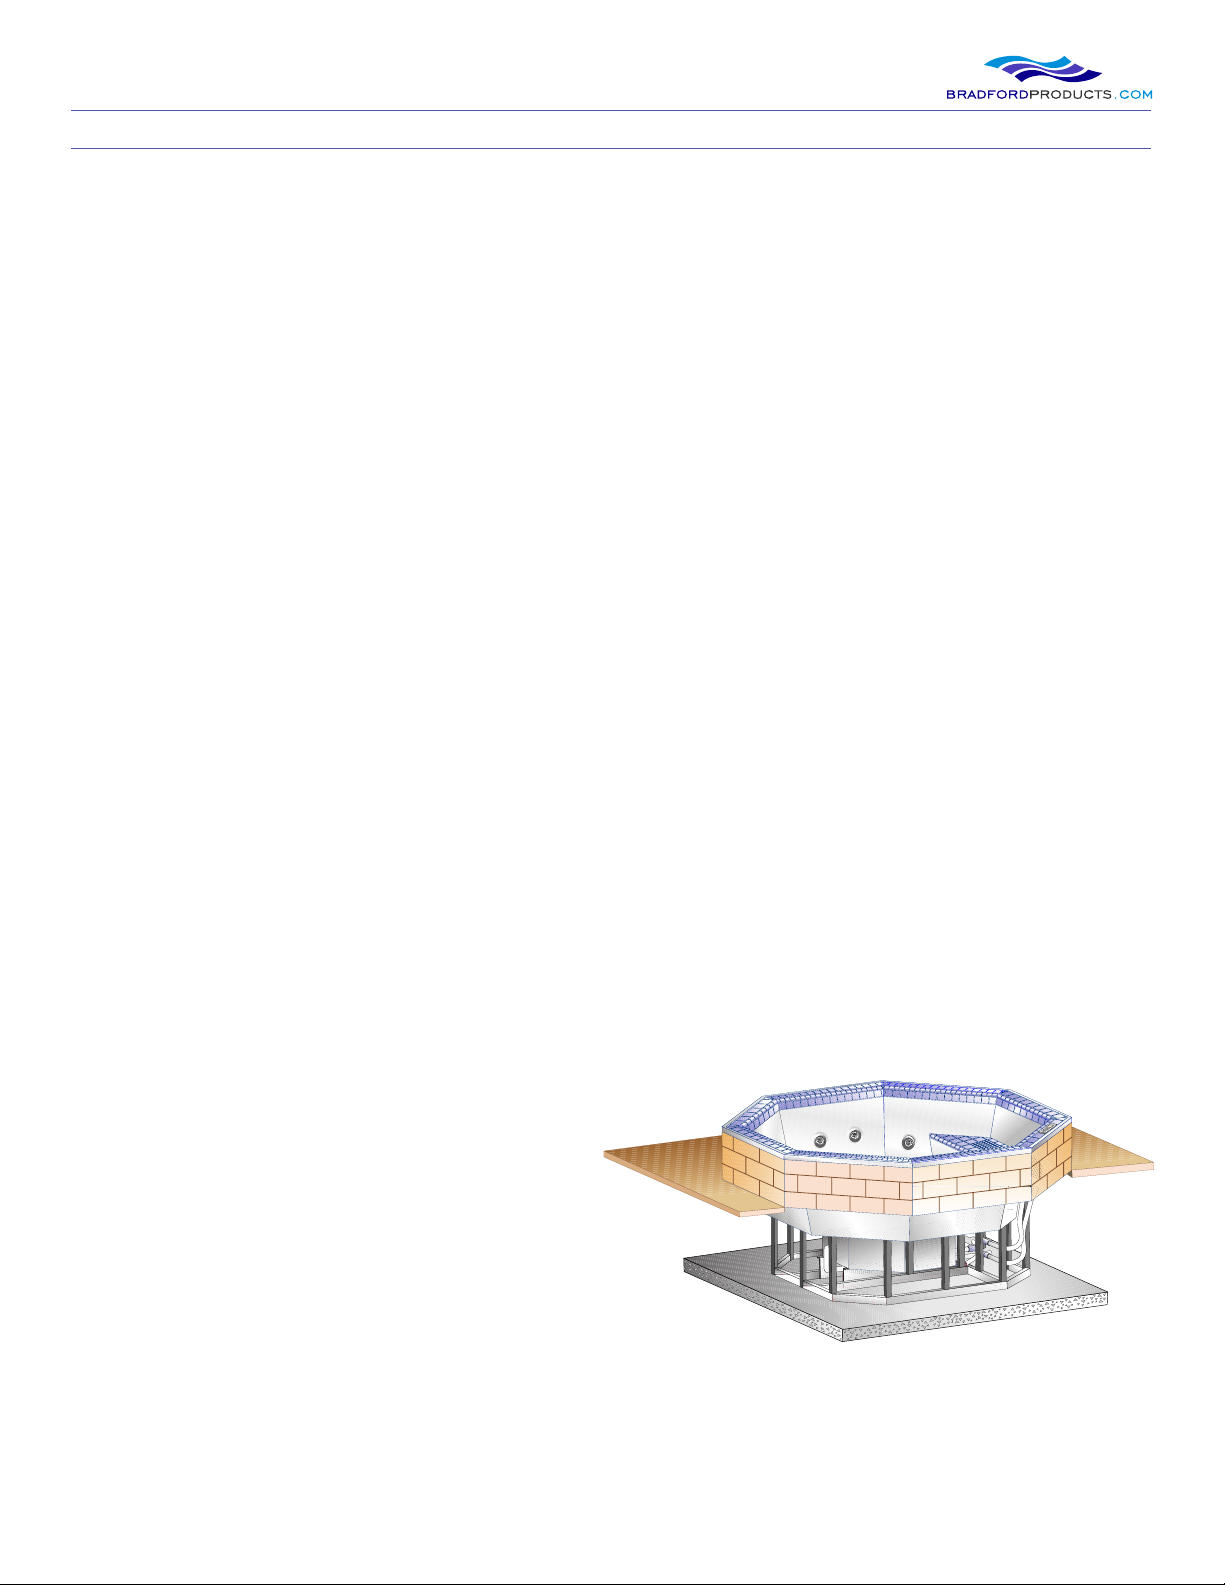
About Installation Types
There are three suggested installation
types: On Grade Mount, Recessed
Mount, or Flush Mount.
Recessed Mount: Use a Recessed
mount when you are planning to
install the spa partially recessed
beneath the ground or a deck. You will
need to partially dig a pit if the spa is
going in the ground.
This is ideal when the spa will be
placed on an elevated deck, however you will need to build a skirt around the side of the spa.
Recessed Mount Installation (Above) - Make sure to leave access for any Frame Mounted equipment
Residential Spa
pg. 14 File: RES_Hottub_manual_021116
Preparing to Install Your Spa
Flush Mount:
Use a Flush mount when you are planning to install the spa completely recessed into the ground or
deck. Bradford Spas have been engineered to allow for permanent in-ground installation. You will
need to dig a vault (pit) large enough to hold the entire spa.
Flush Mount Installation Type (below)
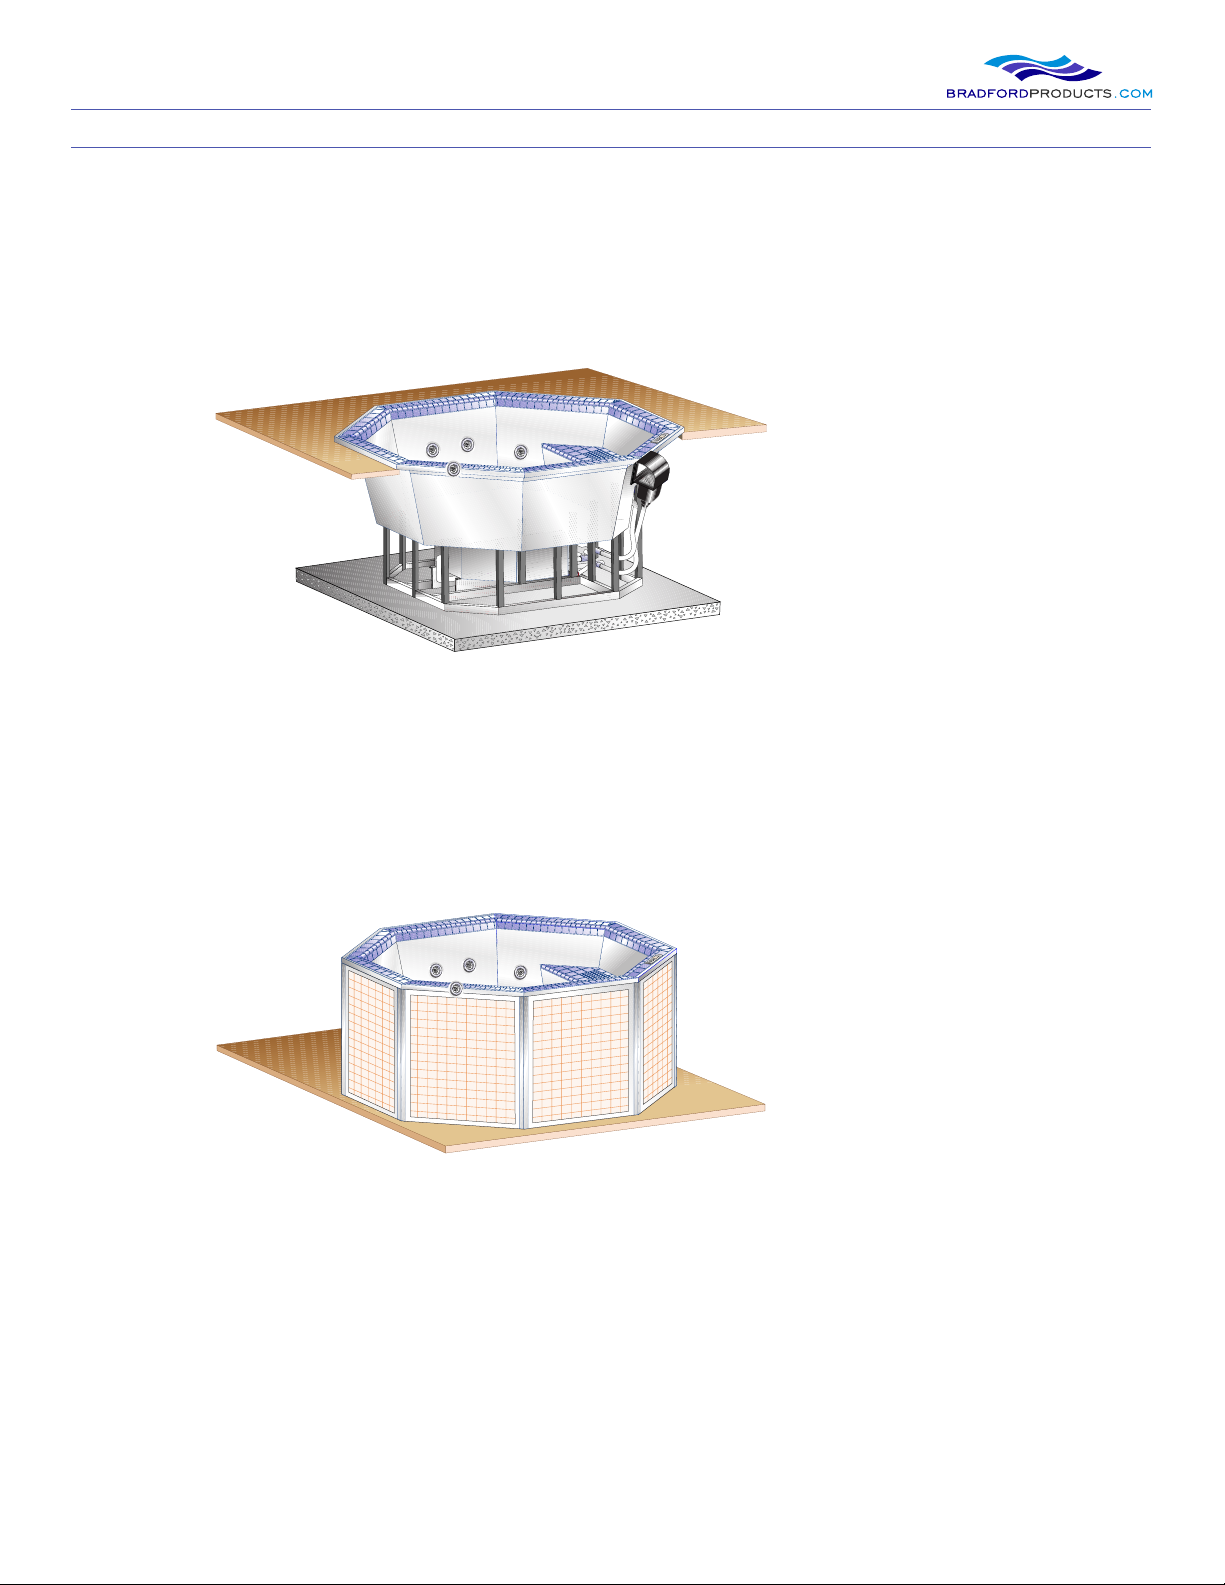
On Grade Mount:
Use an On-Grade mount when you are planning to install the spa on ground level. This installation
will require you to build a set of stairs on the side of the spa for ease of entry and exit and skirting
around the side of the spa.
On Grade Mount Installation Type (below)
Frame Mounted Equipment:
Please provide adequate access panels & hatch locations to reach any Frame Mounted equipment
that may reside below the nished spa installation or ground surface. (see page 15)

Residential Spa
pg. 15
File: RES_Hottub_manual_021116
Preparing to Install Your Spa
Selecting a Good Installation Site
You will need to place the Equipment Pack within the range of the equipment pack wires that run to
the hot tub – approximately 40 feet or less.
For optimal performance, the equipment pack should be located below the water line of the spa.
Preparing for a Recessed or Flush Mount
If you are installing your spa using a recessed or ush mount, you will need to do the following steps:
1. Dig vault
2. Prepare access area
3. Install drain
4. Pour concrete slab
5. Construct retaining wall (Pit Wall)
Figure 3 shows the vault, access area, retaining wall, drain, and concrete slab.
Figure 3 : Recessed or Flush Mount Installation
Frame Mounted Equipment:
Consideration should be given for future access and periodic maintenance to the frame mounted
equipment when choosing a Recessed or Flush Mount style of installation. As the equipment is
mounted on the frame towards the left and right of the entry stairs, providing an open area in this
general vicinity extending approximately half-way down each side of the spa will be benecial to
access the equipment.
NOTE: 18” Clearance Inside Vault
Access inside the vault and around the exterior of the spa shell and plumbing should be considered.
Bradford suggests 18” perimeter clearance around the spa. Ultimately the on-site conditions and
homeowners choice of installation will dictate the allotted clearance around the spa shell.
(see Appendix C for more information)
18”
Clearance

Residential Spa
pg. 16 File: RES_Hottub_manual_021116
Preparing to Install Your Spa
The following sections describe recommended practices for preparing for a recessed
or ush mount installation.
1. Preparing the Vault
When preparing to dig the vault, there are a couple considerations:
Depth: If you are installing the spa using a ush mount, you will need to dig a vault the depth of
the entire spa plus the concrete pad. The concrete pad should be at least 4 inches thick. If you are
installing the spa using a recessed mount, you only need a vault that is the depth of the portion that
will be underground.
Width: You will need to construct a cinder block retaining wall around the edges of the vault, so be
sure to leave enough room around the edges to still install the spa. Cinder blocks are approximately 8
inches thick, so you will need to add 16 inches to the length and width of the vault.
The following table gives the dimensions for each spa type.
Table 4: Spa Vault Dimensions (with calculations for concrete pad if using a 8”cinder Block Wall)
Spa Spa Length (Vault Length) Spa Width (Vault Width)
Hanover 87” (125”) 87” (125”)
Wilmington 87” (125”) 87” (125”)
Hatteras 83” (121”) 83” (121”)
Hampton 87” (125”) 99” (153”)
Carolina 80” (118”) 80” (118”)
Newport 80” (118”) 80” (118”)
Topsail 84” (122”) 84” (122”)
2. Creating Access Area
Before installing your spa, you need to make sure that you can easily access the temperature sensor,
underwater light, plumbing connections, and conduit wires for easy maintenance or repair. Ideally,
the access area should allow you to access the area beneath the spa stairs. See gure 3.
3. Constructing the Retaining Wall (Pit Wall)
Construct a retaining wall (pit wall) around the sides of the vault. This will prevent soil from lling the
vault and make it easier to perform maintenance and repair on your spa. We suggest using concrete
reinforced blocks (cinder block) for constructing the wall. This will add durability and strength.
See gure 3.

Residential Spa
pg. 17
File: RES_Hottub_manual_021116
Preparing to Install Your Spa
4. Installing the Drain
Install a drain on the oor of the pit. This drain will allow any water that collects in the spa pit to
quickly drain away. Elevate the drain slightly to keep it from being covered by the concrete pad.
NOTE: Your contractor will be able to recommend types of drains. Bradford Products does not supply
drains or instructions on installing drains.
5. Pouring the Concrete Pad
Once you have installed the drain:
1. Pour a 4-inch-thick concrete pad that extends all the way to the retaining wall.
NOTE: Do not cover the drain with concrete. Water should be able to ow freely out of the
vault at all times.
2. Level the concrete pad to be within 1/8 inch of level. See gure 3.
3. Wait for the concrete to dry (cure) completely before installing the spa.
CAUTION: Do not use sectional patio pavers or gravel instead of a solid concrete pad. Your spa should
sit on a level surface at all times, and both of these base types may shift over time.
WARNING: Do not put foam insulation or any other type of insulation between the concrete pad and
spa. Doing so will prevent to spa from being level and could cause damage to your spa.
Now you are ready to dig the conduit/plumbing trench and place the equipment pack.
Preparing for an On Grade Mount
If you are installing your spa using an on grade mount, you will need to make sure that your
installation area can support the weight of the spa. See (page 7) for details on the full weight of
the spa. Check with your local building ocials, engineer, or architect for proper foundation and
conformance to any codes.
If you are installing the spa on a wood deck or patio, make sure there are no uneven spots or gaps
that could create an uneven surface for the spa. The surface should be within 1/8 inch of level.
Preparing for an Indoor Installation
The following are special considerations for installing your spa indoors:
• Ventilation – Consult with your contractor to make sure you have a sucient ventilation
system in your spa room, since steam and moisture can cause damage to the interior
of your home.

Residential Spa
pg. 18 File: RES_Hottub_manual_021116
Preparing to Install Your Spa
Preparing for an Indoor Installation (cont.)
• Drainage – When people enter and exit a spa, water inevitably will end up on the oor.
Make sure you have sucient oor drains to keep water from accumulating and causing
moisture problems.
• Ease of installation – Make sure the spa will t though any doors. If your residence is a new
construction, this may not be an issue.
• Weight – Make sure your foundation and any load-bearing oors can support the weight of a
fully-loaded spa. See (page 7) for details on the full weight of the spa.
• Electrical Requirements – There may be additional National Electrical Code and/or local codes
that apply to outlets, fans, and lights located near the spa. Check with a licensed electrician for
more information.
Placing the Equipment Pack
1. Select an installation site for the equipment pack. It must be located within approximately 40
feet of the spa since the wires on the equipment pack wires are approximately 50 feet long
and site location should take into account any elevation changes and obstacles and corners.
NOTE: If you need to place the equipment pack farther away from the spa, you will need a
custom-made equipment pack. Let Bradford Products personnel know in advance to prevent
delay to your project.
2. Construct a base for the equipment pack using either crushed gravel or concrete.
3. For optimal performance, place the equipment pack so it is below the water line of the spa.
See (gure 4) for illustration.
Figure 4 : Equipment Pack placement
Digging a Trench for Plumbing
WARNING: Have your utility company locate and mark any underground pipes or wires before you
begin digging your trench. Failure to do so could cause injury or property damage.
Water Line
Residential Spa
pg. 19
File: RES_Hottub_manual_021116
If you are planning to bury the plumbing pipes and conduit for your spa, dig the trench deep enough
to make sure the pipes are beneath the frost line (the depth at which the moisture in the earth
freezes and thaws). This frost line can vary, depending on the area you live in. This is more important
if you live in a colder climate.
This trench must be wide enough to hold all plumbing pipes and the electrical conduit. You can
insulate the pipes with foam insulation if you desire.
NOTE: Do not backll the trench until after the spa has been water tested and inspected.
Installing the Conduit
Lay a 2-inch diameter PVC conduit from the equipment pack to the spa. This conduit must be
waterproof to keep moisture away from the electrical wires.
NOTE: Use PVC sweeps for bends in the conduit instead of 90-degree elbow. Elbow can make it
dicult to pull the wires though the conduit.
Installing Your Spa
Once you have nished preparing the site, it is time to install your spa. This will include making all
connections between the spa, equipment pack, and residence.
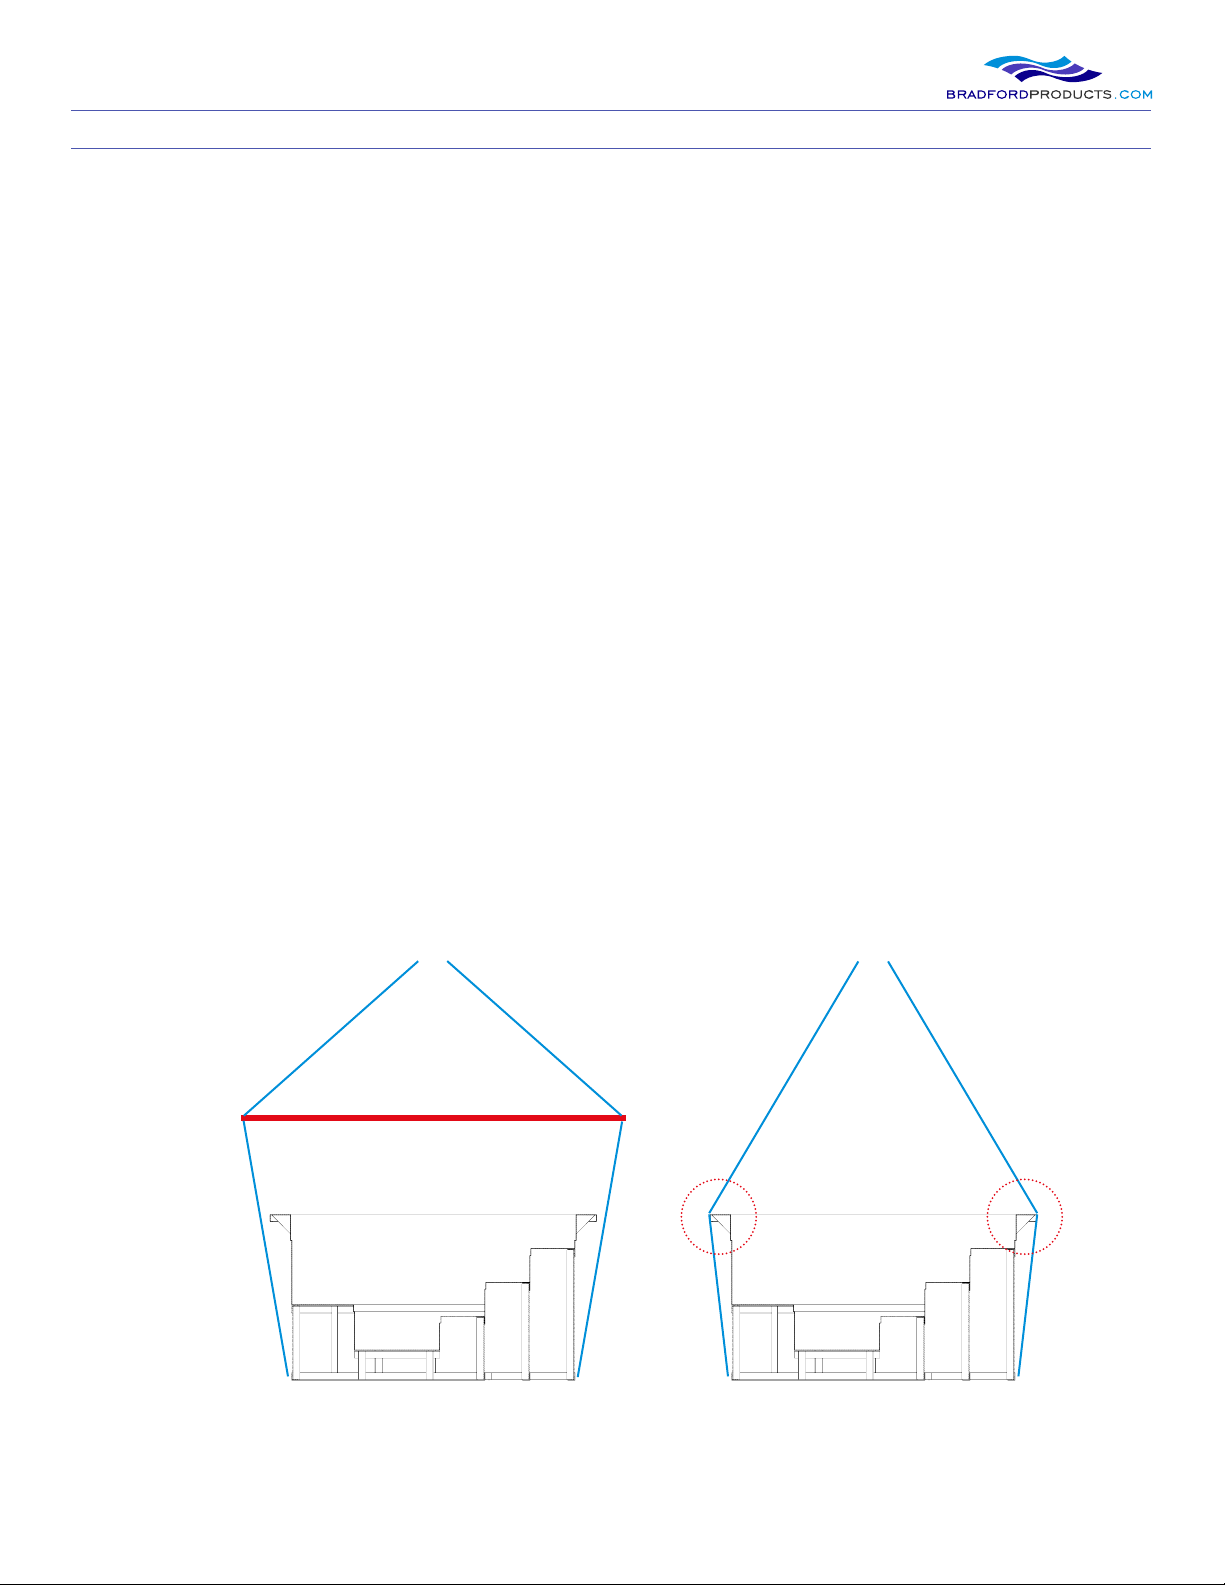
1. Using a crane or boom truck, insert the spa into the vault. The use of spreader bars is advised
to protect the spa top lip and edge. Your crane operator should be able to provide these.
Figure 5 : Lifting the Spa With A Spreader Bar
Preparing to Install Your Spa
Spreader Bar Without Spreader Bar
Damage to the spa top
lip is very possible
Residential Spa
pg. 20 File: RES_Hottub_manual_021116
Installing Your Spa
Installing the Spa (cont.)
2. Check around the steel frame at the bottom of the spa. Each leg of the stainless steel frame
must contact the ground directly.
3. If the concrete pad is not level, use a pry bar to lift the spa frame and insert stainless steel
shims to make the spa level.
Remote Equipment Only - Making Spa, Equipment Pack, and Power Source Connections
Make all connections between the spa and equipment pack before connecting the equipment
pack to the main power source. You will need to make the following connections:
1. Connect water temperature sensor
2. Install freeze sensor
3. Connect the equipment pack to power source
4. Make plumbing connections and ll with water
5. Connect bonding, light, and spa-side control wires
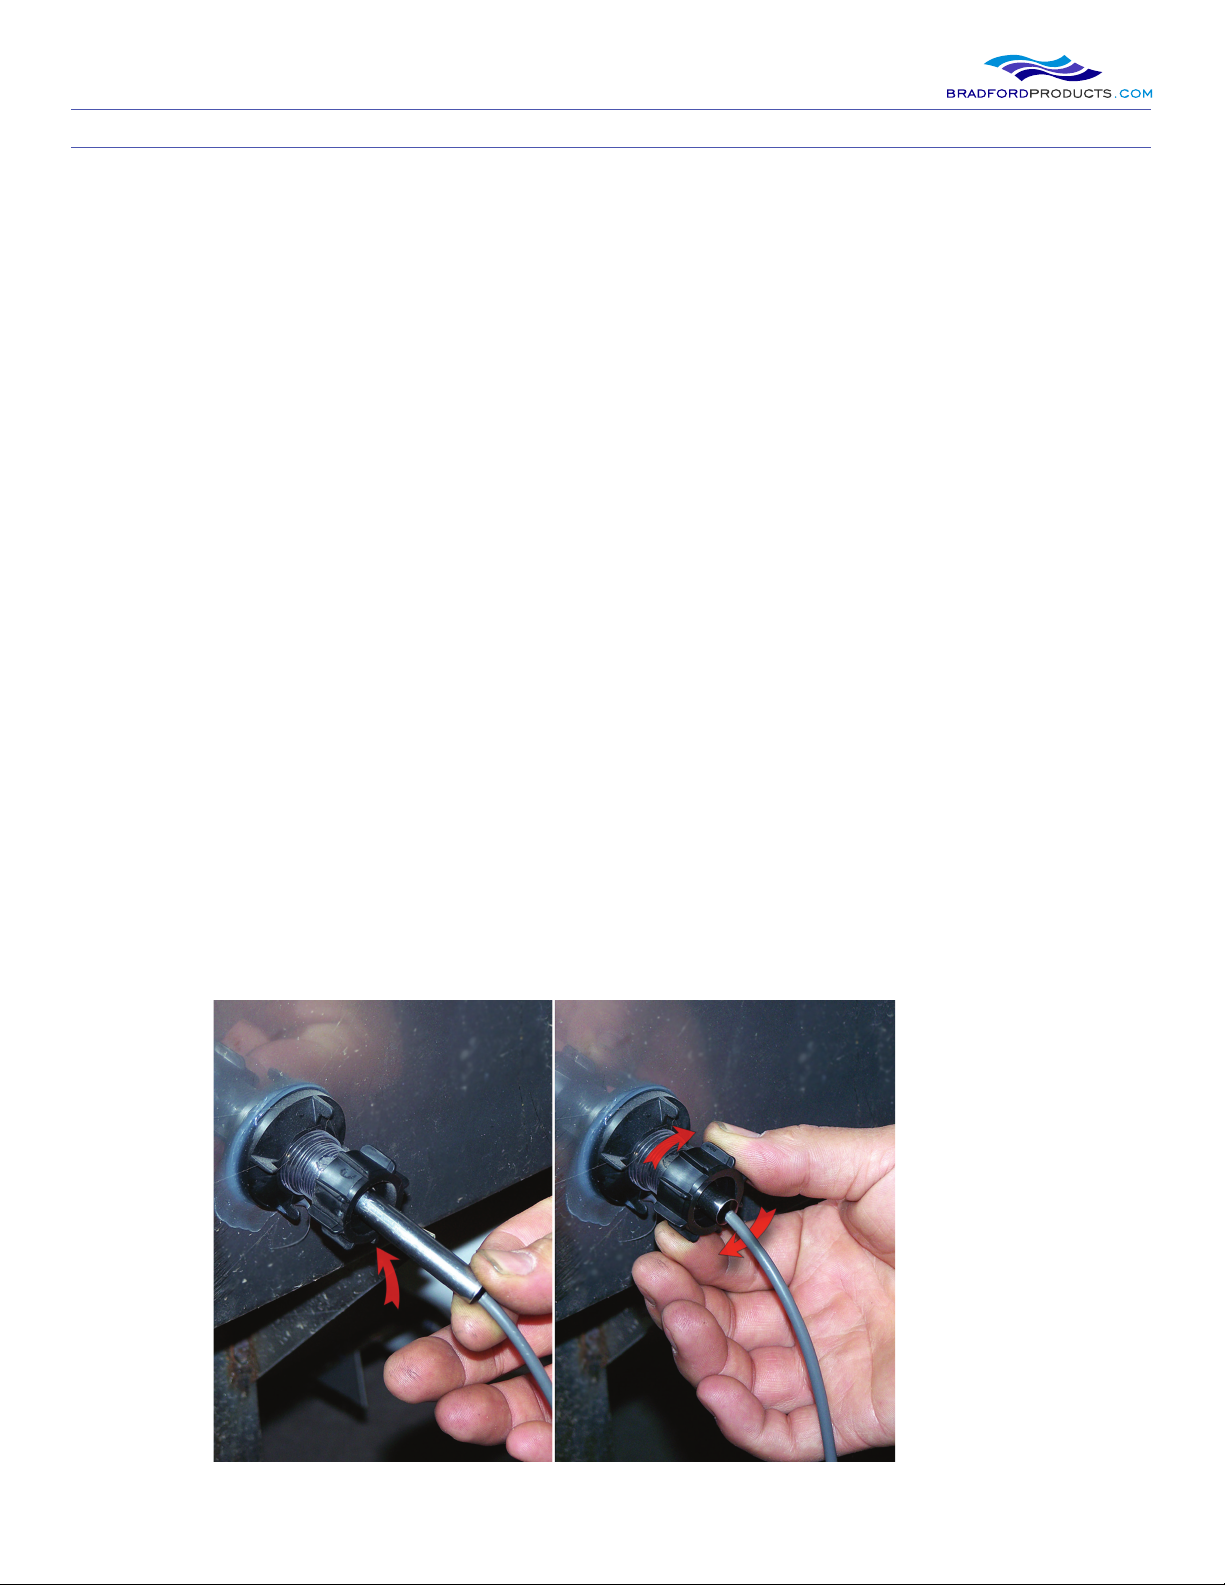
Remote Equipment Only - Connecting Water Temperature Sensor
CAUTION: Always route sensor wires away from high-voltage lines.
To connect the water temperature sensor:
1. Locate the labeled wire on the equipment pack.
2. Pull the water temperature sensor wire from the equipment pack to the spa through
the conduit using a sh tape.
3. Connect the wire to the water temperature sensor on the spa. See (gure 6).
Figure 6 : Water Temperature Sensor wire
Table of contents
Popular Hot Tub manuals by other brands


Maestro
Maestro PEDICURE SPA owner's manual

Aquatic
Aquatic SYMPHONY 17 AISl7242SY Specification sheet

CalderaSpas
CalderaSpas paradise series Pre-delivery instructions

Coleman
Coleman SaluSpa 90363 owner's manual

Jacuzzi
Jacuzzi Gallery R235-LH pump Specification sheet

Watkins
Watkins HOT SPOT RE owner's manual


