Brand Developers Limited Taste the Difference Air Roaster Pro AF510T User manual

Air Roaster PRO
INSTRUCTION MANUAL
Model No:AF510T
BDV2

2
LIMITED REPLACEMENT WARRANTY STATEMENT
ONE (1) YEAR
If your product becomes defective due to faulty material or workmanship within a period of 1
year from the date of purchase, we warrant to do the following:
• For New Zealand Consumers: We will replace the product with a new product, free of
charge, or repair the product at our cost, at our discretion.
• For Australian Consumers: Our goods come with guarantees that cannot be excluded
under the Australian Consumer Law. You are entitled to a replacement or refund for
a major failure and for compensation for any other reasonably foreseeable loss or
damage.You are also entitled to have the goods repaired or replaced if the goods fail to
be of acceptable quality and the failure does not amount to a major failure.
Your warranty is subject to the following conditions:
• DO NOT operate the appliance with a damaged plug or cord, or if the unit has
been dropped, damaged or dropped in water. To avoid the risk of electric shock, do
not disassemble or attempt to repair the appliance on your own. If the supply cord is
damaged, it must be replaced by a qualified electrician in order to avoid a hazard.
Incorrect re-assembly or repair can cause a risk of electric shock or injury to persons
when the appliance is used.
• The item has not been misused, abused, neglected, altered, modified or repaired by
anyone.
• The item has been subjected to fair wear and tear
• The item has not been used for trade, professional or hire purposes.
• The item has not sustained damage through foreign objects, substances or accident.
Your warranty does not cover;
• Components that are subject to natural wear and tear caused by normal use in
accordance with operating instructions.
• Unauthorised/improper maintenance/handling or overload is excluded from this
warranty.
• For guarantee claims, you will need to submit a proof of purchase in the form of a valid
receipt that displays date and place of purchase.
This warranty does not replace but is in addition to your statutory rights.
This warranty does not apply to accessories supplied with the item.
This warranty applies only to the original purchaser and may not be transferred.
Replacement items will be covered by the limited warranty for the balance of the warranty
period from the date of the original purchase.
Please note:
Only the defective product or parts returned to place of purchase will be replaced under
this warranty.
Brand Developers Limited
Unit H, 686 Rosebank Road,
Avondale 1026,Auckland, New Zealand
PO Box 33604,Takapuna,Auckland 0740
FAX: +64 9 306 8203
NZ Customer Care:
Email: customerservice@tvshop.co.nz
Phone: 0800 002 999
Brand Developers Aust Pty Ltd
Unit 3, 2 Roussos Place,
Truganina,VIC 3029, AUSTRALIA
FAX: +61 3 9681 7825
AUST Customer Care:
Email: customerservice@tvshop.com.au
Ph: 1800 890 840
Australia Contact New Zealand Contact

3
IMPORTANT SAFEGUARDS TIPS
Danger
• Do not put the power cord, plug or housing into water or under the tap during cleaning to
avoid damage or personal harm.
• Prevent any liquid entering the appliance to prevent from electric shock or short-circuit.
• Do not cover the air vents of the appliance while it is operating.
• Some parts of the appliance have high temperature during operation, e.g. mesh basket,
wire rack, drip tray, etc.Please use the tongs and take care not to touch any hotitems with
bare hands.
Warning
• Make sure that your output voltage corresponds the voltage stated on the rating label of
the appliance.
• Before using please check the power cord of appliance and the accessories do not use
them with any damage.
• Children should be supervised to ensure that they do not play with the appliance and
please keep the appliance away from children.
• Do not let cord hang over the sharp edge of counter.
• Do not plug in the appliance or operate the control panel with wet hands.
• Do not place or use the appliance on or near combustible materials, such as tablecloth,
curtain or wallpaper, to avoid something burning.
• External power cord connection is not allowed.
• During operation, the appliance’s inner chamber is in high temperature. Please do not put
any plastic dishes, plastic bowls or preservative film into it.
• The appliance should be placed on a horizontal and stable surface when using. Do not
place on plastic, board or any other hot-short, easy-wear surface.
• Do not place the appliance against wall or other appliances, remain around 10cm space
from them.
• Do not place anything on the top of appliance.
• Do not use the appliance beyond the specification of this manual.
• Do not use this product in the unattended situation.
• During the appliance work, hot steam will exhaust through the hind side air outlet. Keep
your hands and face at a safe distance from the steam and the air outlet hole.Also be
careful of hot steam and air when you remove the basket, drip tray, wire rack from the
appliance.
• After finishingcooking and when you take the accessories out, the heated accessories are
with very high temperature, do not touch them.
• If the preset time is too long, the food will be burnt and smoky and when the smoke
release from air outlet, plug off immediately, clean the food and oil on the mesh basket,
wire rack and drip tray,etc.
• After using the appliance, please press the power button, then pull the plug from the
socket, avoid to pull the power cord strongly and directly.

4
BEFORE USE
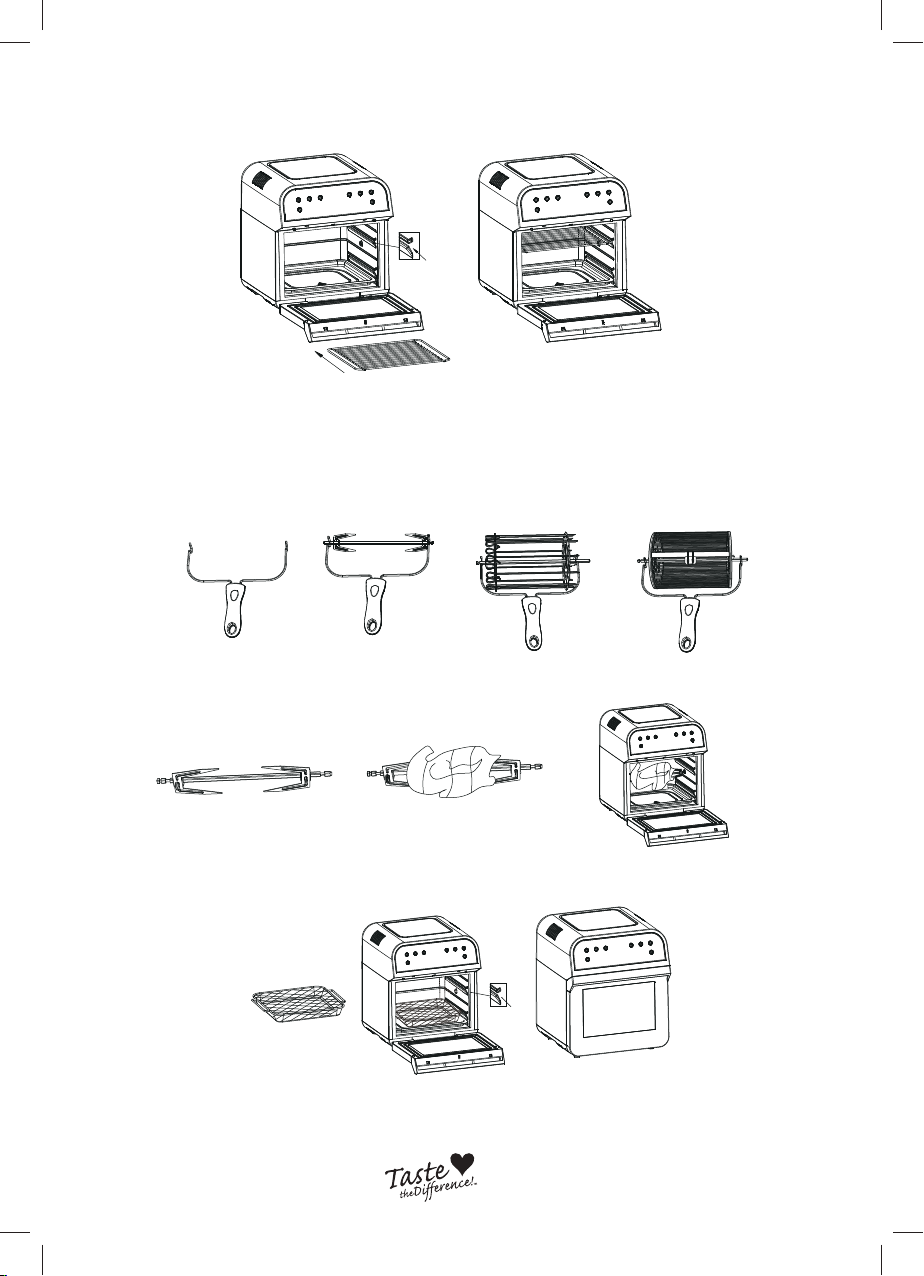
PRODUCT STRUCTURE DIAGRAM
BEFORE FIRST USE:
1 Top cover 8 Cage tong
2 Control panel 9 Rotisserie fork
3 Upper cover 10 Wire rack
4 Housing 11 Mesh basket
5 Power cord 12 Drip tray
6 Inner chamber 13 Rolling cage
7 Door 14 Skewer rack
1. Remove all packaging materials, stickers and labels.
2. Clean the basket and all other accessories with hot water, dishwashing liquid, and a
nonabrasive sponge.
3. Wipe the inside and outside of the appliance with a cloth.

5
INTELLIGENT CONTROL PANEL
Product usage instructions
1. Place the appliance on a stable horizontal and
level surface. Leave at least 10cm free space on
the back and sides and ensure the unit is sufficient
distance away from curtains, wall coverings and
other combustible materials.
2.After opening the front door, the Tray should be pushed into the unit for collecting oil and food
drips.Ensure the tray is placed on the guide rail that is built on both sides of inner wall of the unit.
As shown in the figures below:
6
NOTE:
Ensure to use GLOVES to take out the Wire Rack or Tray after finishing cooking as these will be
hot.
3. Using the Wire Rack.
Insert the Wire Rack on the guide rail also.As shown in the figures below:
4. Cage tong
Use the cage tong to take the rotisserie fork, skewer fork, rolling cage into the inner chamber or
out of inner chamber.
5. Rotisserie fork
Insert the chicken into the rotisserie fork and put it into the inner chamber. As below picture:
6. Mesh basket
Put the food into the mesh basket, put it into the inner chamber, close the door. As below picture:

7
NOTE:
* Always place the Drip Tray on the lowest level so all drips from food cooking are caught.
* Do not let food exceed the MAX position. If the food will expand after/during cooking then take this
into account before cooking starts.
7. Rolling cage
Put the spindle into the rolling cage, open the mouth and put the food into it. Close the opening and
the put the rolling cage into the inner chamber, then close the front door. As below picture (1)-(5)
(1) (2)
(3) (4)
(5)
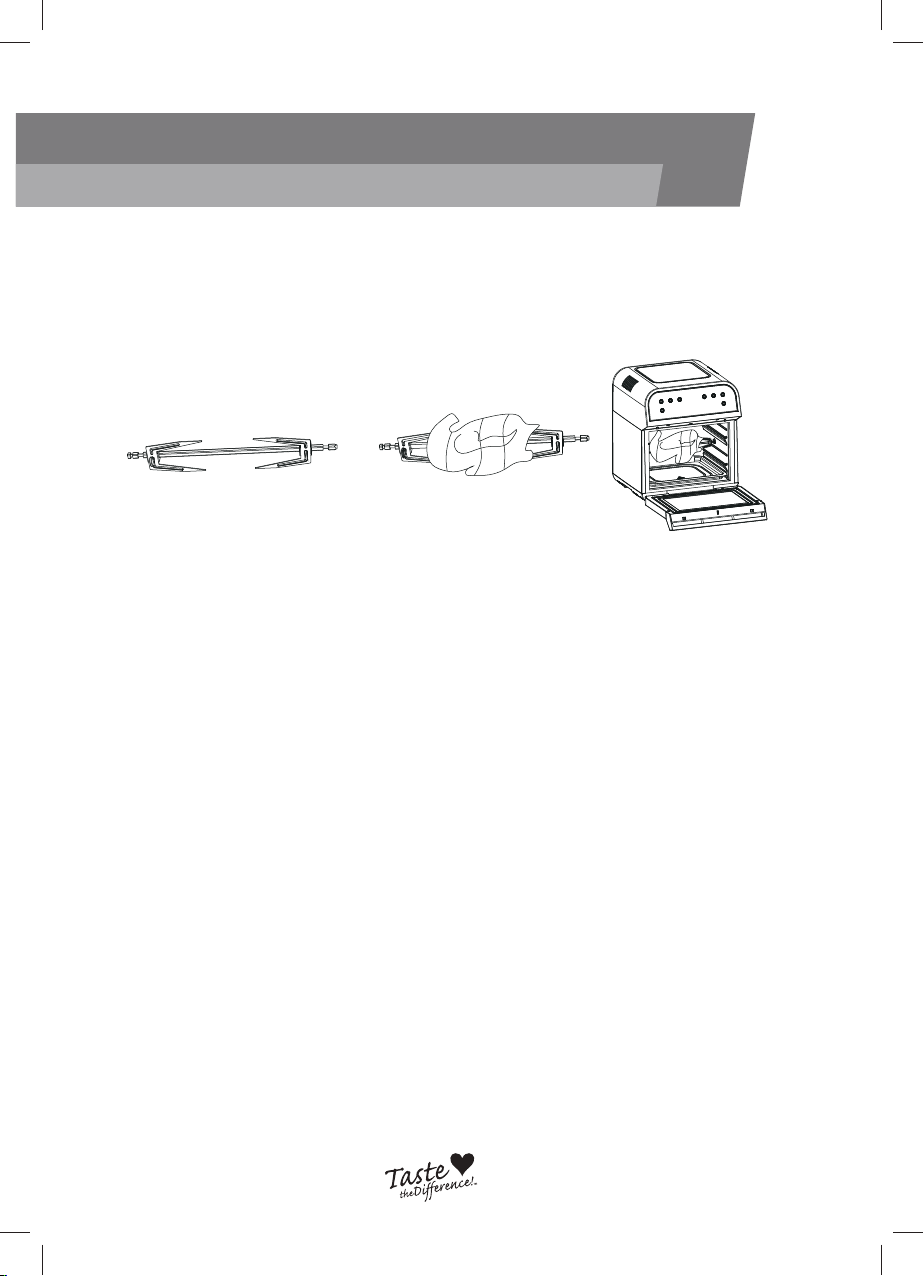
8. Skewer rack
Assemble the centre spindle on the 2 end pieces of the skewer rack. Thread your food onto each
skewer then place these onto the racks, ensuring each end is secure. Place the whole rack into the
inner chamber then close the front door. As below pictures illustrate.
* There is a safety switch as shown in the picture on the right.
If the front door is not shut properly then the unit will not
operate and will sound an alarm reminder when the Start/
Stop button is pressed.

8
Product operating instructions
1. When the power is turned on, the buzzer rings, and the digital screen flashes with all the
indicator lights, then it shows the black screen.
2. Press “ON/OFF”, the indicator light and digital screen light up, then the appliance goes
into standby mode.
3. In standby mode, all keys are locked except the “ON / OFF”“Menu” and “Preset” keys.
4. The unit will shut down automatically after 60 seconds of inactivity in standby mode .
5. Press the “Menu” key to enter the function selection mode, select the desired function,
press the“ON/OFF” key and the unit will start cooking.
Note - the unit will only start if the door is closed.
Menu function selection
1. Use these preset functions to meet your different cooking needs.
2. Press the “Menu” key to cycle through the functions which light up the relevant function on
the control panel, then press the “ON/OFF” key to start cooking.
3. Cooking temperature and time for each function is provided for reference You can also
change the cooking time and temperature manually as desired.
FOOD TEMP (c) TIME
Fries 220° 25 mins
Frozen Food 80° 10 mins
Wings 200° 15 mins
Dehydrate 70° 8 hour
Steak 180° 12 mins
Chips 220° 20 mins
Fish 180° 15 mins
Vegetables 180° 12 mins
Popcorn 220° 10 mins Need to preheat for
2 minutes
Chicken 220° 30 mins
Cake 180° 30 mins
Skewer 200° 15 mins
Pizza 180° 15 mins
Keep Warm 80° 30 mins
Toast 200° 4 mins
Cookie 180° 12 mins
USING THE APPLIANCE

9
Note: Generally the larger the serving of food, the longer the cooking time required.
Setting of cooking time and temperature
1. After pressing “Menu”, if you need to reset cooking temperature and time, press “Temp/
Time” to change cooking time and cooking temperature.
2. When you adjust the cooking temperature, the TEMP icon flashes, then press “+”“-” to
increase or decrease the cooking temperature. Each press will change 10°C.You can hold
down the key and the temperature changes rapidly at 10°C.Temperature adjustable
range is 50-220°C. (Dehydrate function temperature can be adjusted from 50-70°C).
3. When you adjust the cooking time, the TIME icon flashes, press “+”“-” to set your desired
cooking time. Each press will change 1min. If held down, then it will change with every
10mins.The cooking time range is 1--60mins. (Dehydrate function is 8 hours)
Preset function
Press “PRESET” and the screen will show the preset time to 1 hour. You can change the preset
cooking time by “+” and “-”, each press will change by 1min. If held down, then it will change by
10mins.The preset time range is 1 minute - 9 hours 59 minutes.
Note: this function needs the user to press the selection menu first,then press“PRESET”to operate.
If you want to change cooking time and temperature, press “MENU” again and reset the data.
Press “ON/OFF” to confirm the preset function and start countdown.
Pause function
During cooking process, the appliance will stop automatically once you open the door. In this
situation, only “ON/OFF” and “ROTISSERIE” can be used, other key buttons will be locked. When
you close the door, the appliance will continue the previous cooking work.
Note:
When using the Pause function and opening the door when the unit is on, the appliance will
automatically turn off and the display screen will be blank if you don’t close the door within 10
minutes. Opening the door will not recommence the cook and you will need to start your cook
again.
Tips:
During cooking, turn the food regularly to cook the food more evenly.
Note:
During cooking the mesh basket, drip tray and other accessories are very hot and can not be
touched directly by hand.
USING THE APPLIANCE
10
Rotisserie Function
T
indicator light “ROTISSERIE” in the control panel will be on and rotisserie function will begin.
Press “ROTISSERIE”again to cancel this function.
2. Use the rotisserie forks as shown below:
his function helps food cook more evenly. When you press “ROTISSERIE”, the related
Note:
The total weight of chicken should not exceed 1.2kg. If using a chicken or roast meat larger
than 1.2kg it is recommended to use the Fryer Basket, as it is possible the chicken or meat will
be too large and not rotate properly.
To keep your chicken or meat compact and secure it is recommended to truss with cooking
twine.
Cooking Finish
1. When the unit is finished a beep sound is made and the element stops.The fan will
continue operating for 1 minute until the internal temperature drops.
2. Open the front door, then remove the accessories from the inner chamber using the Cage
Tong or gloves and put it in a safe flat place.
Note: When removing the accessories from the appliance, do not touch the accessories with
bare hands.
Tip: If the food does not look fully cooked,put the accessories with the food back again into the
inner chamber and cook a few more minutes at a time until done.
3. After cooking , press the power button to turn off the power supply and pull the power
cord off the wall.
USING THE APPLIANCE

11
Cleaning and maintenance
• Clean the mesh basket, wire rack, tray etc with water or washing-up liquid after using.
• Wipe the appliance with soft moist cloth. No washing-up liquid is required.
• Don’t immerse the power cord, plug or the appliance body in water or other liquid, it
may result in damage, fire, electric shock or injury to persons.
• After drying, assemble all parts and then place them in a dry, clean, non corrosive
environment.

Brand Developers Limited
Unit H, 686 Rosebank Road,
Avondale 1026,Auckland, New Zealand
NZ Customer Care:
Email: customerservice@tvshop.co.nz
Brand Developers Aust Pty Ltd
Unit 3, 2 Roussos Place,
Truganina,VIC 3029, AUSTRALIA
AUST Customer Care:
Email: customerservice@tvshop.com.au
Table of contents
Popular Fryer manuals by other brands

T-Fal
T-Fal Deep Fryer Instructions for use

ULTRAFRYER
ULTRAFRYER F-E21-14 Operation instructions

Rommelsbacher
Rommelsbacher FRP 2135/E instruction manual

Emeril Lagasse
Emeril Lagasse FRENCH DOOR AIRFRYER 360 quick start guide

PowerXL
PowerXL Air Fryer Pro quick start guide

GILES
GILES GGF Series Operation & service manual


Hyundai
Hyundai DF 402 instruction manual

Outdoor Gourmet
Outdoor Gourmet TF2129502-OG Assembly instructions & user manual

Sharp
Sharp AF-GD82A user manual

Frymaster
Frymaster MPH14 Series Service manual

Simple Living Products
Simple Living Products SLP-SM-SB1 owner's manual

Gourmia
Gourmia GTF7530 user manual