Simple Living Products SLP-SM-SB1 User manual

www.simplelivingproducts.com Customer Care: Sales@simpleliving.com
Simple Living Products Air Fryer Product Guide
2
www.simplelivingproducts.com
Need to Contact Us?
Product Registration
To obtain your warranty, you MUST register your purchase within 14 days from the date of purchase.
Simply visit our website to complete product registration today www.simplelivingproducts.com. Follow
these steps to register your purchase today:
•Go to our website www.simplelivingproducts.com
•Select Product Registration
•Enter your contact details including Order ID
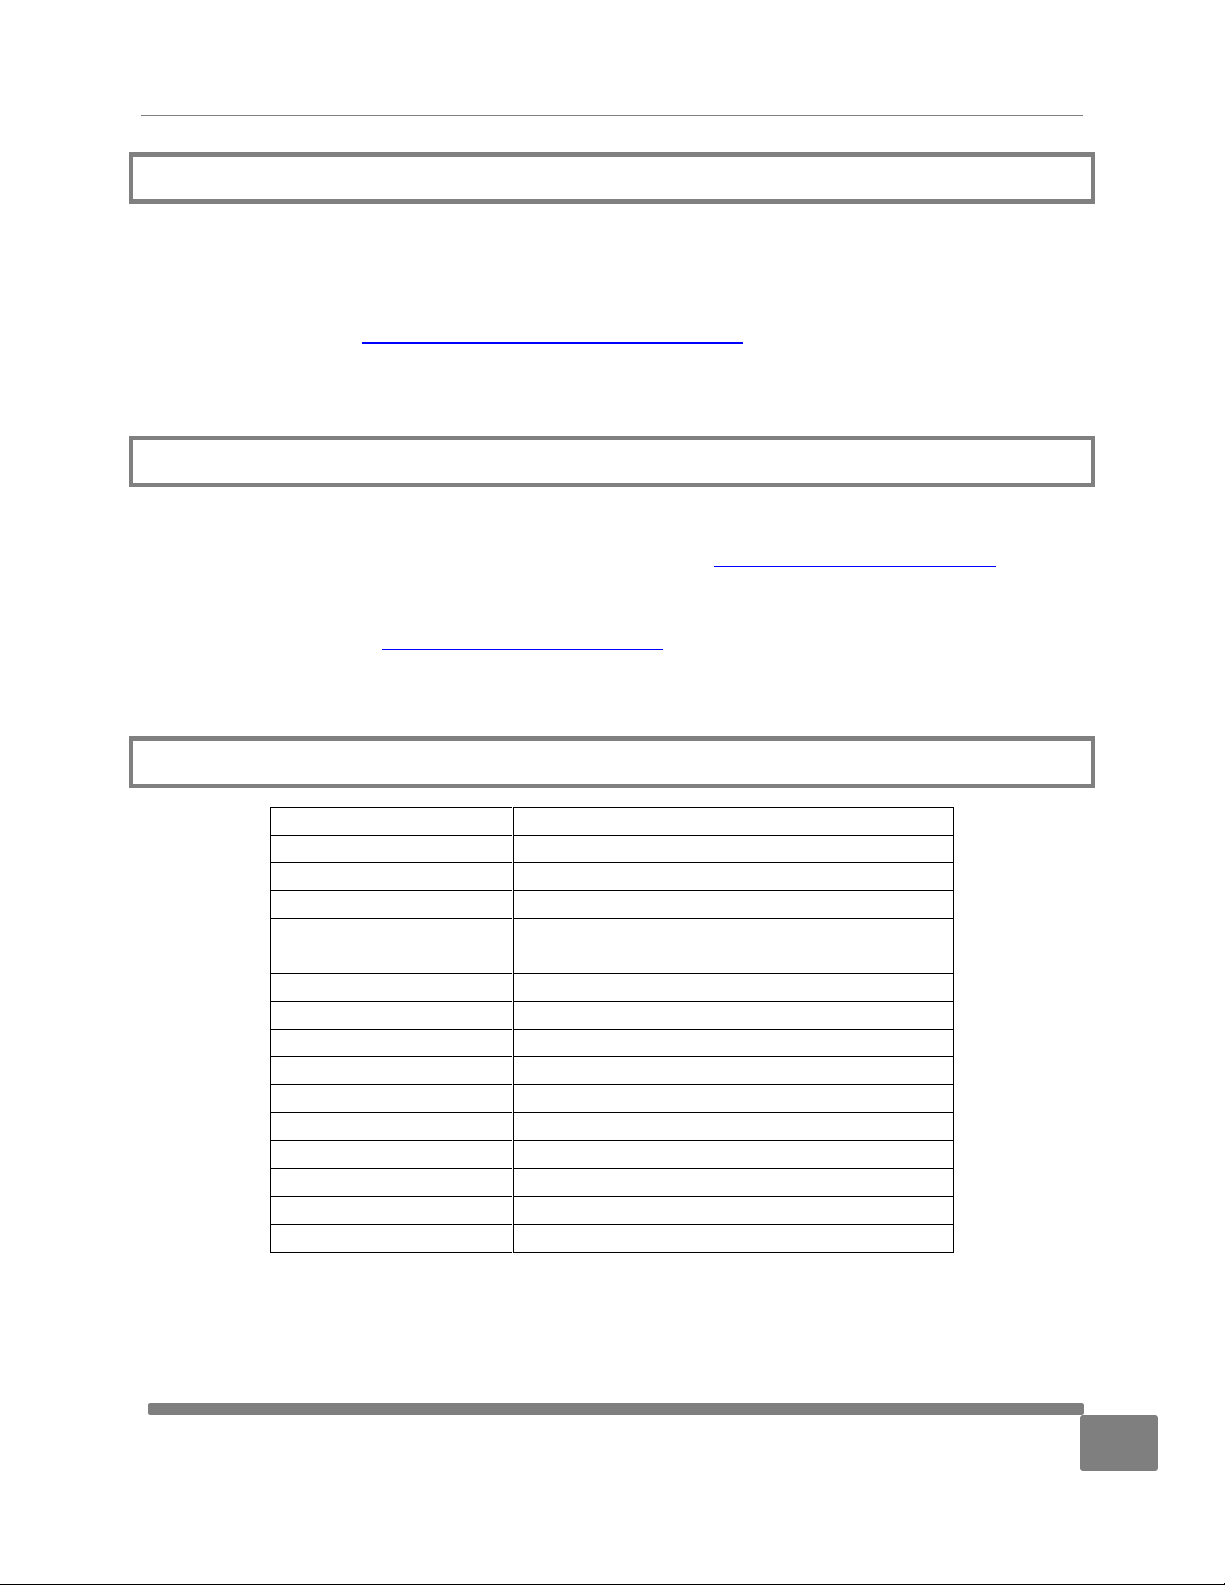
Product Specifications
Website:
www.simplelivingproducts.com
Email:
sales@simplelivingproducts.com
Contact Number:
Facebook:
844-799-7995
www.facebook.com/simplelivingproducts/
Instagram:
https://instagram.com/simplelivingproducts/
Model:
SLP-SM-SB1
Capacity:
1.3L - 1.6L
Temperature Control:
Boiling point 96°C-100°C / 204°F-212°F
Automatic Shutoff:
Yes
Overfill & Overspill
Sensor:
Yes
Timer Length:
30 Minutes
Countdown Timer:
Yes
Audible Notification:
Yes
Non-Stick Jug:
Yes
Non-Slip Feet:
Yes
Dishwasher Safe Parts:
No
Power Specifications:
120V~60HZ
Rated Power:
180W
Plug Type:
3 Pin
Warranty:
1 Year –See Page 10

Simple Living Products Air Fryer Product Guide
3
www.simplelivingproducts.com
Important Safe Guards
To ensure safety, before using your Soup Maker please read this manual carefully.
Incorrect operation can result in serious damage, personal injury or property damage to
others.
Basic safety precautions should always be followed. Do not use the appliance if there is any damage to
the plug, main cord, or other parts of the product. Do not use an unauthorized person to replace or fix
this Soup Maker. Immediately contact the manufacturer.
This appliance is only intended for indoor household use. Do not use it outdoors. If this appliance is used
improperly or for professional or semiprofessional purposes or if it is not used according to the
instructions in this user manual, the warranty automatically becomes invalid and Simple Living Products
refuses any liability for any damages caused.
Important Safety Instructions
•A short power supply cord is provided to reduce the risk of becoming entangled in or tripping
over a long cord. An extension cord / power should not be used with this appliance.
•The appliance complies with all standards regarding electromagnetic fields (EMF). If handled
properly and according to the instructions in this user manual, the appliance is safe to use based
on scientific evidence available today.
•Check if the voltage indicated on this appliance fits the local main voltage.
•Plug the appliance into a standard electrical outlet. Do not plug it into an unearthed socket.
•Do not connect the appliance to an external timer switch.
•Keep the mains cord away from hot surfaces.
•Do not let the mains cord hang over the edge of the table or worktop on which the appliance is
placed.
•Place the appliance on a flat & stable surface, with enough space around it.
•Do not place the appliance on a NON-heat resistant surface.
•Do not place the appliance on or near combustible materials.
•Do not place the appliance on surfaces that may be affected by heat.
•Do not let children operate this appliance.
•Do not submerge this appliance in water or any other liquid substances.
•Before you switch on the appliance, remove any objects on top of it and any flammable objects
close to it.
•Do not pull out the plug with wet hands, this can cause an electric shock.
•Do not touch the inside of the appliance while it is plugged in.
•Do not let this appliance operate unattended.
•Do not move or shake this appliance during operation.
•Always switch off and unplug the appliance after each use and while not in use.
•Let the appliance cool down completely before cleaning and storing away.

Simple Living Products Air Fryer Product Guide
4
www.simplelivingproducts.com
Preparing for First Time Use
•Remove all packaging materials on, around or inside your appliance, including stickers, labels,
and plastics etc.
•Clean the inside of the jug using hot water and mild soap. Dry thoroughly.
Soup Maker Structure Diagram
1. Lid
2. Control Panel
3. Jug
4. Power Socket
5. Overfill Detector
6. Mixing Blades
7. Smooth Soup
8. Chunky Soup
9. Juice
10. Blend
11. ON/Off
12. Mode
13. LED Screen

Simple Living Products Air Fryer Product Guide
5
www.simplelivingproducts.com
Recommendations When Using Your Soup Maker
•Do not use the appliance for anything other than its intended purpose.
•Do not operate the appliance if it has been dropped or damaged in any way.
•Do not run the appliance when the jug is empty.
•Do not use the appliance without the lid being securely clipped in place.
•The metal jug becomes hot during use. Do not touch it during cooking or cooling down. Wait until it
has totally cold down. Always use the handle provided.
•Beware of the steam that may be produced when the lid is removed.
•Do not use the soup maker to blend very hard or large food, you could damage the blades.
•Do not use the appliance if the rotating blades are damaged.
•Do not allow water to get on the electric connections, if the connections get wet, unplug from the
socket immediately and dry thoroughly before use.
•Always make sure there is enough ventilation around the appliance when it is in use.
•The blades are very sharp. Do not touch the blades when the appliance is plugged in.
•The metal jug becomes hot whilst in use. Do not touch it as to prevent any burning injury.
•The heating element surface is subject to residual heat after use.
•For your safety, do not use any accessories that were not provided with the soup maker.
•Ensure that the appliance is switched off before unplugging it or lifting the lid.
•Always disconnect the appliance before adding food and liquids.
•The soup maker is not suitable for use with packet, carton, canned or other prepared soups and must
not be used to reheat any previously prepared soups. This soup maker is for the creation of fresh
soups to be served upon completion of the preprogrammed cycles.
•Do not connect your soup maker to the main supply until you have added your chosen ingredients.
•Cut up food to 2cm squares before putting into the soup maker.
•We also recommend that you do a ratio of 2 parts food to 3 parts of water. This will help the soup
maker mix and stir everything easier and will retain the life of your machine. Therefore, 640ml of food
maximum is recommended per mixing session.
•Always make sure that the total volume of ingredients (food + liquid) is at least 1.3L (Min Level) but
no more than 1.6L (Max Level). The soup maker will not work if those levels are not observed. If you
exceed the maximum level, remove some vegetables or liquid. If you are below the minimum level,
add some vegetablesor liquid. If you do not proceed this way, the appliance will make a “beep” sound,
indicating that MIN and MAX levels have not been observed.
•The chunky Setting only cooks the ingredients, it will not chop them. If after cooking, the soup is a
little chunky for your taste, you can use the Blend Setting to help break down some of the chunks.
Getting to Know Your Soup Maker
1. This appliance has 2 main functions:
•Heating
•Blending
2. This appliance has 4 different modes
Smooth, Chunky, Juice & Blend

Simple Living Products Air Fryer Product Guide
6
www.simplelivingproducts.com
•Smooth
•30 Minutes
•Blends
The smooth soup program is perfect for delicious soup recipes requiring a
smooth consistency. This program ensures the ingredients are blended to the
right consistency, and gently cooked at the right temperature. This program
lasts for 30 minutes, before the soup is ready to serve. You can also use the
smooth function to make hot soymilk.
•Chunky
•28 Minutes
•Does Not Blend
The chunky soup program is perfect for rustic soup recipes requiring a
chunkier consistency. This program ensures the ingredients are heated for
longer to ensure the chunky ingredients are fully cooked. This program lasts
for 28 minutes, before the soup is ready to serve. For chunky soup there is no
blending process, just heating. It is therefore recommended that you cut any
vegetables into small dice sized pieces.
•Juice
•2 Minutes
•Does Not Get Hot
The juice program is ideal for making smoothies or milkshakes from fresh
ingredients. This program lasts for 2 minutes before your drink is ready to
serve. The juice setting does not heat the ingredients, so it’s perfect for ice
cold drinks.
Note: Do not place ice cubes in the Soup &Smoothie Maker.
•Blend / Self Clean
•Must Press for Continuous Operation
•Does Not Get Hot
The blend program allows you to further blend the soup to your desired
consistency, if required. This function works without additional heating of the
soup. To use this function after cooking, you will need to unplug your Soup
Maker before re-plugging into the mains. This resets the Soup Maker,
allowing you to select the Blend Setting with the Mode Button. When
highlighted, press and hold the mode button to blend the contents of the jug.
Warning:
•This function is not suitable for raw meat.
•Do not blend dry ingredients, you must add some liquid before you blend the ingredients.
•Do not use the blending mode for more than 20 seconds without letting the appliance
cool down sufficiently afterwards.
Simple Living Products Air Fryer Product Guide
7
www.simplelivingproducts.com
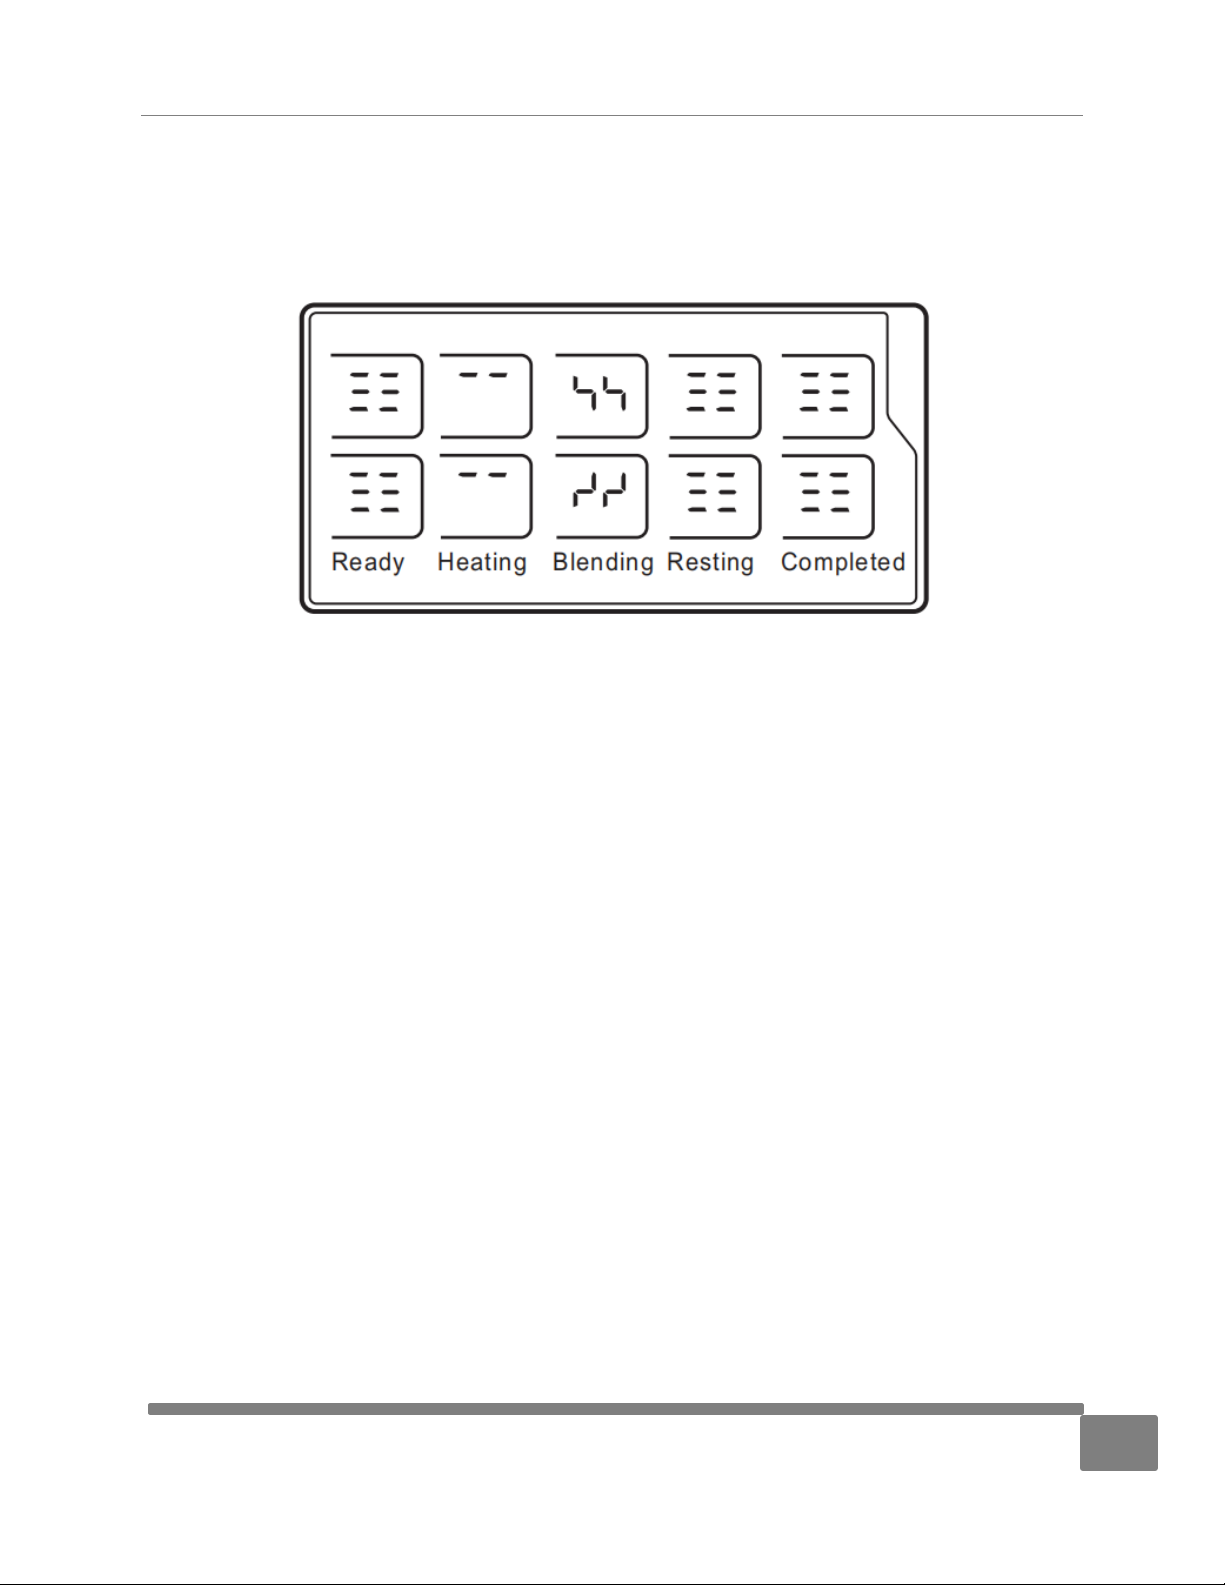
3. LED Screen
This Soup Maker utilizes 3 different processes to create fresh soups and drinks; heating, resting
and blending. Each of these processes are highlighted during the process with a small animation
on the LED Screen.
•Ready
When the Soup Maker is first switched on, the Soup Maker will display this setting.
•Heating
The heating animation will appear in motion when the Soup Maker is heating the contents of
the Jug.
•Blending
The blending animation will be displayed when the Mixing Blade is in use. When switching from
heating to blending the Soup Maker will make a single audible beep.
•Resting
During this part of the process the Soup Maker will occasionally “rest”at which point no
animation will be shown. This is normal.
•Completed
Once the process is completed, the Soup Maker will beep, and the screen will display the
“completed”iron.
Simple Living Products Air Fryer Product Guide
8
www.simplelivingproducts.com
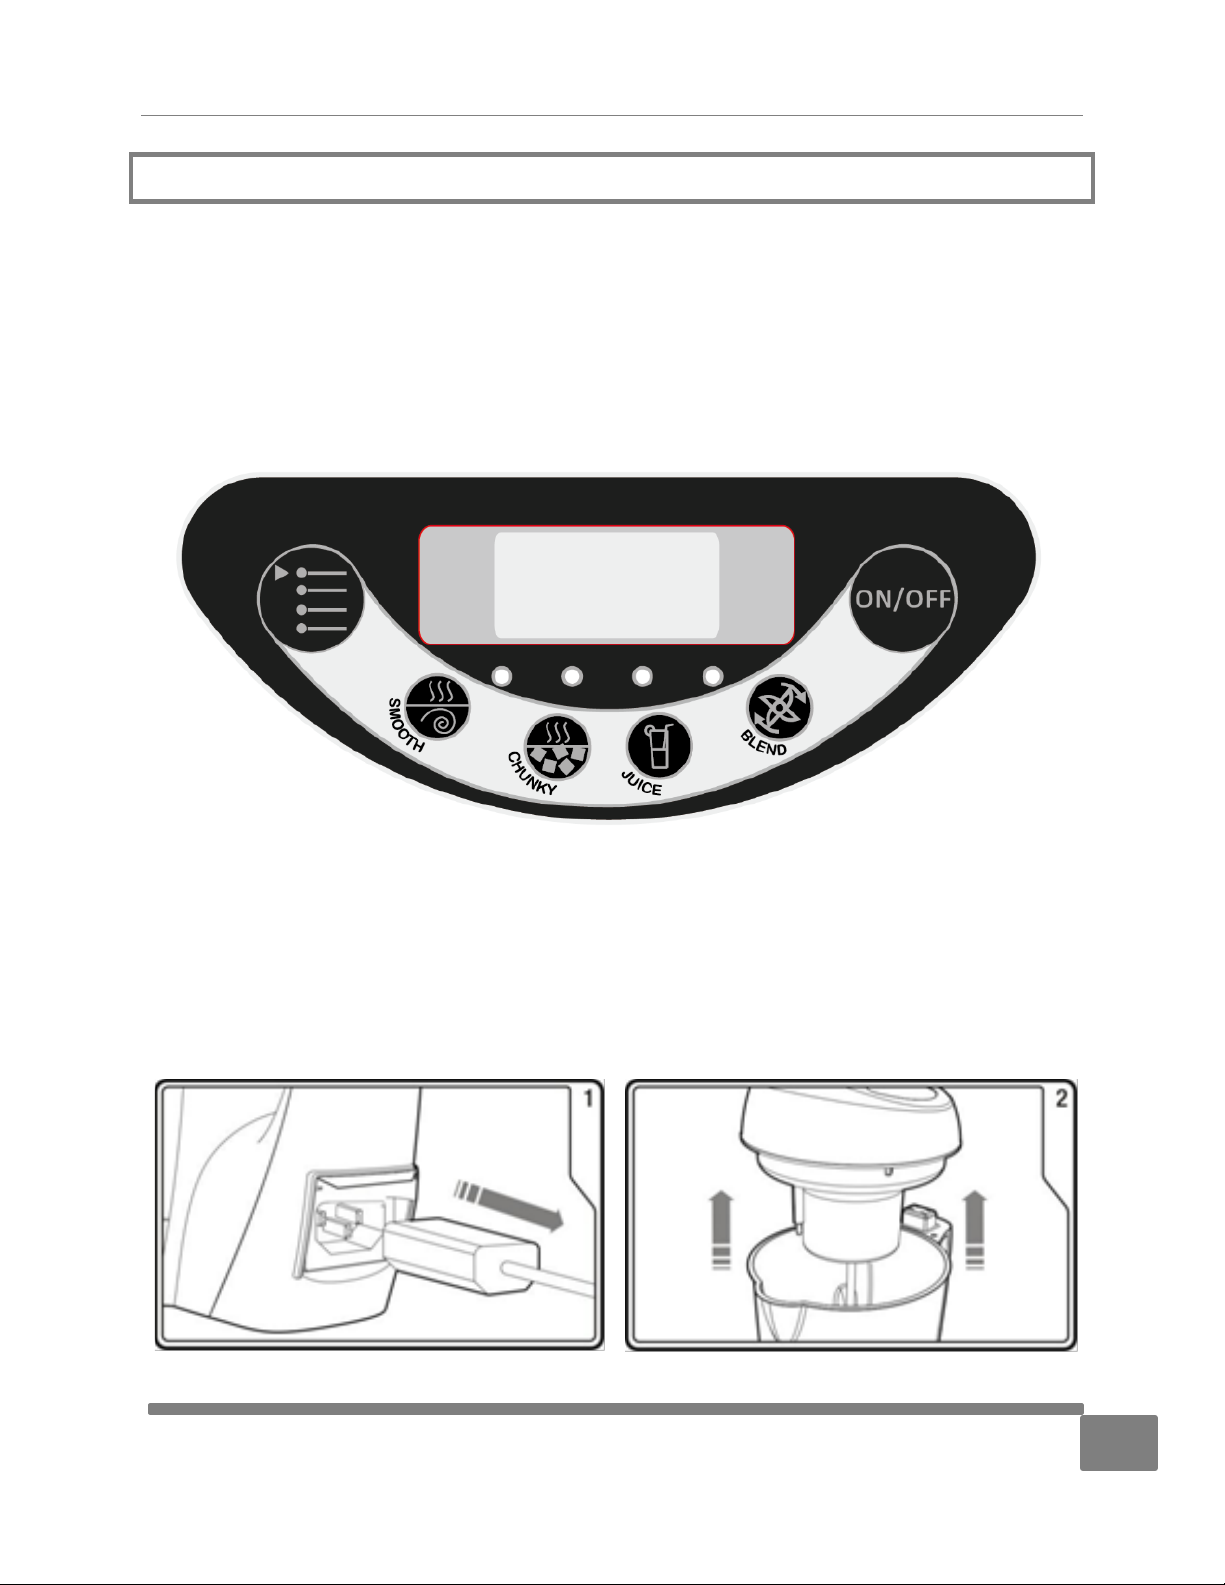
Operating Your Soup Maker
1. Plug in the appliance, the icons will flash in sequence.
2. Select the MODE button to select the desired program; Smooth, Chunky, Juice or Blend. Each
option will illuminate as you browse through them using the mode button.
3. Select the ON/OFF button to start the soup maker. The soup maker will start immediately. Note
that the ON/OFF button is used for function confirmation.
4. When finished the soup maker will beep for 60 seconds and all six icons will flash. After 60
seconds the soup maker will automatically turn off.
How to Use Your Soup Maker

Simple Living Products Air Fryer Product Guide
9
www.simplelivingproducts.com
Ensure the soup maker is unplugged from the
mains.
Remove the lid to be careful not to touch the
blade.
Place the ingredients into the jug.
Add the liquid last, filling up to between max
and min lines marked on the jug.
Place the lid back onto the jug ensuring it is
securely in place.
Plug into the mains. The icons will flash in
sequence.
Press the mode button to select the desired
program. The icon will illuminate.
Press the ON/OFF button. When finished the
soup maker will beep for 60 seconds and all the
icons will flash. Unplug the soup maker, remove
the lid and serve the soup

Simple Living Products Air Fryer Product Guide
10
www.simplelivingproducts.com
Cleaning & Storage
•Do not leave the appliance unattended whilst connected to the main power supply.
•Ensure that the appliance is switched off before unplugging it or lifting the lid.
•Always unplug the appliance if it is left unattended and before assembling, disassembling, or cleaning.
•Do not immerse the appliance and its cable in water or any other liquid.
•The power cord connector must be removed before the appliance is cleaned
•The coupler and appliance inlet must be dried before the appliance is used again.
•Be careful if hot liquid is poured into the appliance as it can be quickly ejected out of the appliance
due to sudden steaming.
•Do not submerge this appliance in water or any other liquid substances.
•Do not clean the soup maker in a dishwasher.
•Clean the surface of the soup maker (jug) and lid (motor unit) with a soft, damp cloth.
•To clean the inside of the jug and inside of the lid, rinse in clean water to remove any
remaining soup. Wipe away any remaining food with a soft cloth and a mild detergent before rinsing
again.
•The blades under the lid are not removable and are very sharp; extreme caution should be taken
when cleaning the inside of the lid.
•After each use, clean the overfill sensor under warm tap water.
•Use the Blend/Self Clean MODE to aid the removal of stubborn stains. Simply assemble the soup
maker as previously described and add 1.3L of warm water with a small amount of mild detergent. Fit
the lid and choose the Blend/Self Clean MODE. Do not use the Blend/Self Clean MODE for more than
20 seconds at a time.
•Make sure to dry the appliance thoroughly before storing away the soup maker.
Environmental Concerns
This marking indicates that this Soup Maker should not be disposed with other household
wastes. To prevent possible harm to the environment or human health from uncontrolled
waste disposal, we kindly ask that you drop it off at an official collection point for recycling.
Frequently Asked Questions
Does the heating function work when I remove the lid?
No. Removing the lid cuts the power to the unit for maximum safety. The heating function only activates
when you have placed on the lid and selected a program.
Can I remove the lid mid-cycle?
Yes, but the power will be immediately cut to the blending blade for your safety. Power will also be cut
to the control panel, so you will need to start the program again from the beginning, after replacing the
lid.
Simple Living Products Air Fryer Product Guide
11
www.simplelivingproducts.com
Can I use uncooked meat in soup recipes made in my Soup Maker?
You should cook meat separately before transferring into your Soup.
Can I change the times on the smooth and chunky soup settings?
No. The times for these settings are preset.
What if my Soup Maker stops working?
Your Soup Maker is fitted with a safety thermostat, which cuts the power and stops the product from
working to prevent overheating if it is used continuously on 3 or more cycles. If this happens, allow the
Soup Maker to cool for 30 minutes and you can continue making your soup. Additionally, If the blend
function is used continuously for more than 20 seconds a safety cut out will cut the power to prevent
overheating. When this happens wait for 10 seconds before reusing the blend function.
Can I make cold soups like Gazpacho in my Soup Maker?
Yes, but you will first need to cook the soup using either the chunky or smooth soup setting. Then simply
allow to cool or refrigerate before enjoying.
What if food burns on the base of my Soup Maker?
Due to the starch and sugars present in some foods, a slight burning may occur if they are placed in
direct contact with the inside base of the jug. To prevent this, add half a cup of water or stock to the
Soup Maker before placing in any solid ingredients. Then top up with the remaining liquid specified in
your recipe.
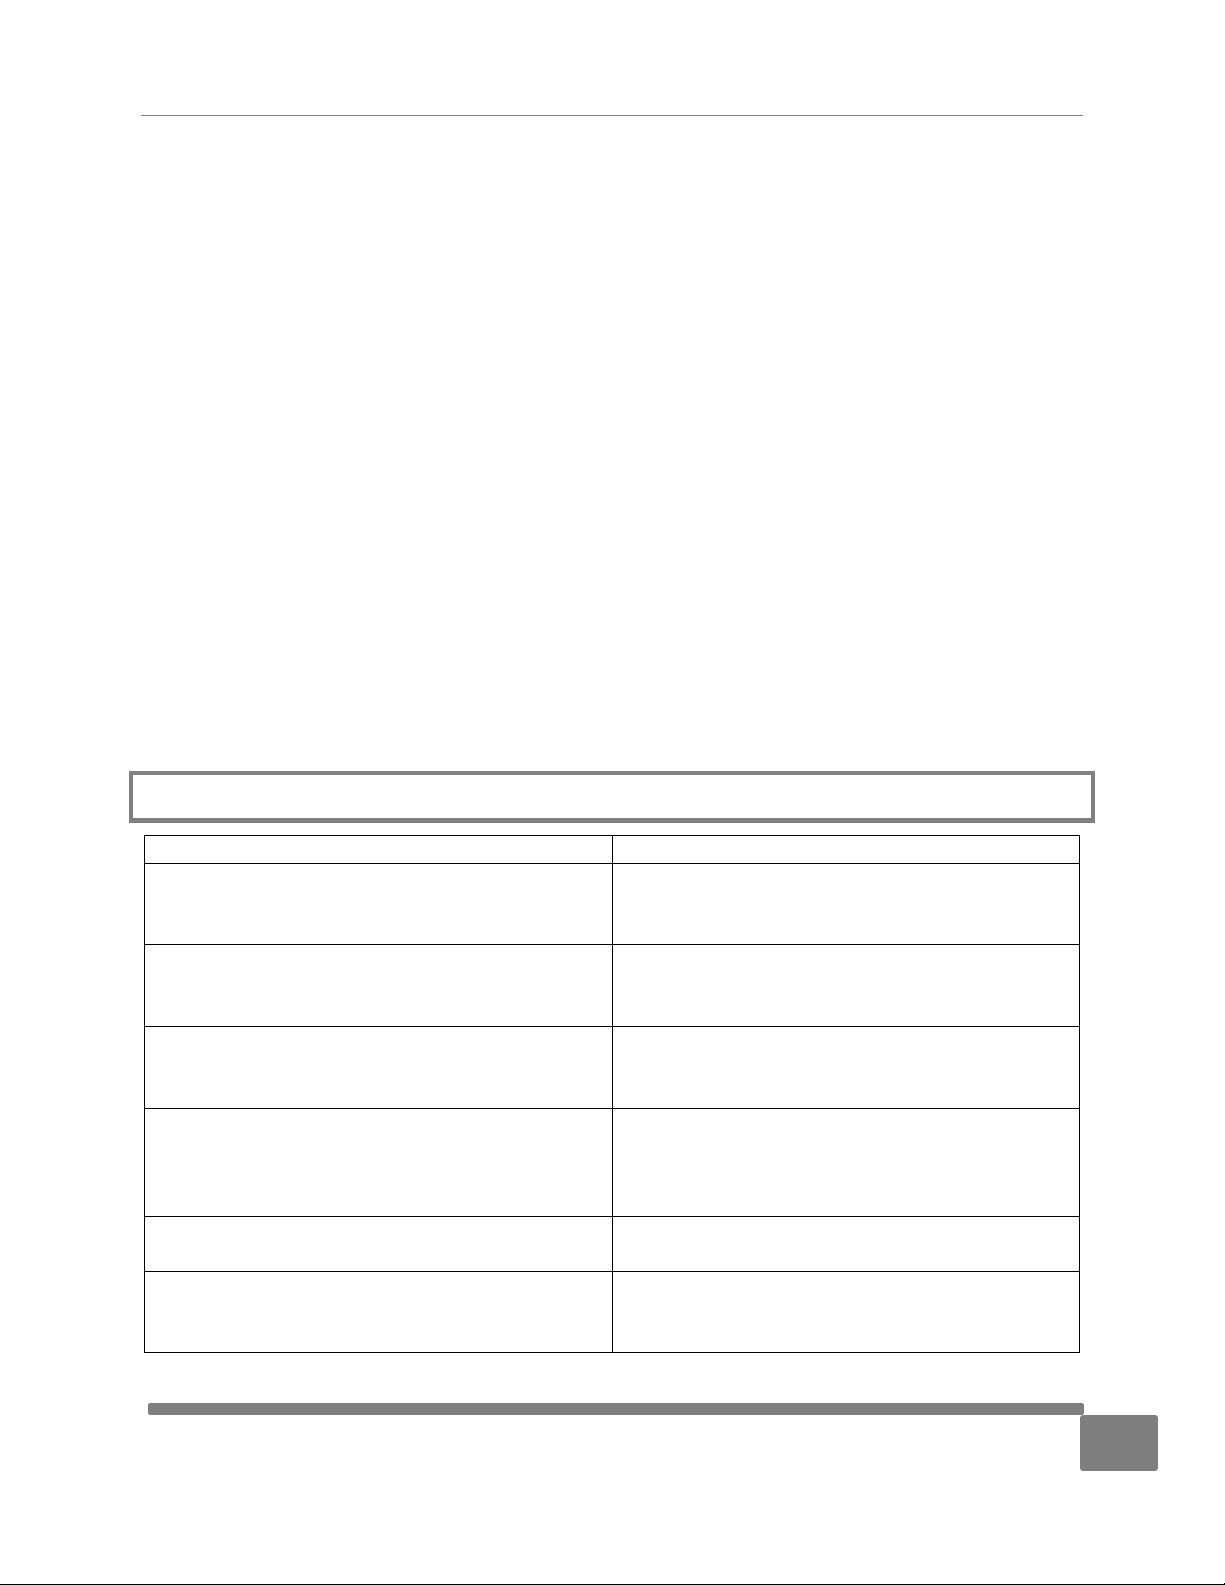
Troubleshooting
Problem
Solution
The soup maker is not working and is beeping.
The liquid level is too high.
Check and clean the overfill sensor. Take off
some food / liquid and put the lid back on.
The soup maker has stopped working mid
program.
The lid is loose.
The liquid level is too high, or the soup maker is
overfilled.
Ingredient pieces are still too large after the
Smooth Soup program has ended.
Pieces may have been too big initially. Add some
water and select the “Manual blending function”
after the initial cooking program has finished.
The ingredients are hard after the cooking cycle
has ended.
Chop the ingredients into small pieces before
adding to the soup maker.
The wrong soup cycle has been used for the
volume added.
The unit is not switching on or an audible sound
is heard.
Check and clean the overfill sensor
The unit is showing an E1 error.
The min and max ingredient requirements have
not been followed. Remove or add some liquids /
Ingredients.
Simple Living Products Air Fryer Product Guide
12
www.simplelivingproducts.com
Simple Living Products Warranty
A limited manufacturer’s warranty covers this appliance. For one year from the original date of
purchase, the manufacturer will repair or replace any parts of this appliance that prove to be defective
in materials and workmanship, provided the appliance has been used under normal operating
conditions as intended by the manufacturer. Proof of purchase must be demonstrated prior to any
replacements or repairs being conducted. To easily obtain your warranty please email us at
sales@simplelivingproducts.com.
Warranty Terms
During the first year, any electrical components of this appliance found to be defective due to materials
or workmanship will be repaired or replaced, at the manufacturer’s discretion.
Exclusions
The warranty will NOT apply if damage is caused by any of the following:
•Power failure.
•Improper power supply such as low voltage, defective household wiring, or inadequate fuses.
•Accident, alteration, misuse, or abuse of the appliance such as using non-approved accessories,
inadequate air circulation in the room or abnormal operating conditions (extreme
temperatures).
•Use in commercial or industrial applications.
•Fire, water damage, theft, war, riot, hostility, or acts of God such as hurricanes, floods, etc.
•Use of force or damage caused by external influences.
•Partially or completely dismantled appliances.
•Cosmetic Damages –Cracks etc.
•If unauthorized personnel have conducted work on the appliance.
•If the appliance is used in a country outside the USA or Canada.
Obtaining service
Please provide proof of purchase and date of purchase. Once confirmed that your appliance is eligible
for warranty service, a Simple Living Products representative will advise you on the next steps.
The purchaser will be responsible for any removal or transportation costs associated with the warranty
repair. Replacement parts and/or units will be new, re-manufactured, or refurbished and is subject to
the manufacturer’s discretion.
For technical support and warranty service, please email sales@simplelivingproducts.com
Simple Living Products Air Fryer Product Guide
13
www.simplelivingproducts.com
Share Your Thoughts

Simple Living Products Air Fryer Product Guide
14
www.simplelivingproducts.com
Other manuals for SLP-SM-SB1
1
Table of contents
Other Simple Living Products Fryer manuals


Popular Fryer manuals by other brands

Frigidaire
Frigidaire EAF200-WHITE instruction manual

Chefman
Chefman TurboFry RJ38-WD-8T user guide

Smeg
Smeg SFR30 Instructions and suggestions for use, installation and maintenance

NuWave
NuWave NuWave Brio 37001 120V Owner's manual & complete recipe book

INNOTECK
INNOTECK Kitchen Pro DS-5015 instruction manual

Philips
Philips HD9720 user manual


