Brandless PRO BLENDER 57001 User manual

PRO BLENDER
✓ 2 Horse Power Motor
✓ 64 OZ BPA-Free Tritan Carafe
✓ Variable Speeds
✓ 6 Stainless Steel Blades
✓ Brandless™
TM

To avoid the risk of serious injury when using your
blender, safety precautions must be followed.
READ ALL INSTRUCTIONS, WARNINGS,
AND SAFEGUARDS BEFORE OPERATING.
Retain these instructions for your reference.

1
INSTRUCTION MANUAL
IMPORTANT SAFEGUARDS
When using this electrical appliance, please follow these basic safety
precautions:
1. Read all instructions.
2. Before using, check that the voltage power corresponds to the
one shown on the appliance nameplate.
3. Do not let cord hang over edge of table or counter.
4. Do not place on or near a hot gas or electric burner, or in a
heated oven.
5. Do not operate any appliance with a damaged cord or plug or after
the appliance malfunctions or has been damaged in any manner.
6. To avoid hazard, do not use if supply cord is damaged.
7. Avoid contact with moving parts.
8. Do not leave foreign objects, such as spoons, forks, knives, or the
measuring cup, in the carafe as they will damage the blades and
other components when starting the machine and may cause injury.
9. Blades are sharp; handle carefully.
10. The use of attachments, including canning jars, not recommended
or sold by the manufacturer may cause fire, electric shock, or injury.
11. The carafe should not be more than 2/3 full when the tamper is
left in while blending. Do not exceed 30 seconds of continuous
blending with the tamper in place.
12. When making nut butters or oil-based foods, do not process for
more than one minute after the mixture starts circulating.
Over-processing can cause dangerous overheating.
13. When blending hot liquids or ingredients, use caution: spray or
escaping steam may cause scalding and burns. Do not fill container
to maximum capacity. Always begin processing on the lowest
speed setting. Keep hands and other exposed skin away from the
lid opening to prevent possible burns.

2
14. When blending hot liquids, remove center piece of two-piece
cover.
15. Turn the power switch and speed dial to “OFF” and unplug the
blender when it is not in use, before putting on or taking off parts,
and before cleaning.
16. Never leave the appliance unattended while it is running.
17. To protect against risk of electrical shock, do not put motor unit
or power cord in or near water or other liquid.
18. Keep hands and utensils, other than the tamper provided, out of
carafe while blending to reduce the risk of severe injury to persons
or damage to the blender. The cover must remain in place when
using the tamper through the cover opening. A scraper may be
used, but must be used only when the blender is not running.
19. If scraping is necessary, turn the power OFF and unplug from the
electrical outlet. Use a silicone spatula only.
20. Always operate blender with lid securely in place.
21. Never put non-food items into the carafe to blend.
22. Do not open the lid before the blades stop running completely to
avoid hazard.
23. Do not put hands or other objects into carafe while operating.
24. This appliance is not intended for use by children or any person
with reduced physical, sensory, or mental capabilities, or lack of
experience and knowledge, unless they are closely supervised and
instructed concerning use of the appliance by a person responsible
for their safety. Close supervision is necessary when any appliance
is used by or near children. Children should be supervised to ensure
that they do not play with the appliance.
25. Do not use outdoors.
26. Save these instructions.
27. Do not fill the carafe above the marked maximum fill line (or rated
capacity) to avoid risk of injury due to damage to the cover or
carafe.
28. Do not let cord contact hot surface, including the stove.

3
SAVE THESE INSTRUCTIONS
NON-COMMERCIAL HOUSEHOLD USE ONLY
NOTES ON THE PLUG CORD
This appliance has a polarized plug to reduce the risk of electric shock.
This plug is intended to fit into a polarized outlet only one way. If the
plug does not fit fully into the outlet, reverse the plug. If it still does not
fit, contact a qualified electrician. Do not attempt to modify the plug
in any way.

4
KNOW YOUR BLENDER
Function switch: With “Soup” and “Pulse” for selection.
Speed dial: Turn the dial to choose manual speed settings from “Low”
to “High.” Once you select a speed, the blender will run until you turn it
to “OFF.”
ON
OFF
SOUP
PULSE
OFF
MED
HI
5
TAMPER
The tamper allows you to accelerate the process of very thick and/or
frozen mixtures that cannot be processed in a regular blender. If food is
not circulating, the machine may be overloaded or may have a trapped
air bubble. Using the tamper helps to maintain circulation by preventing
air pockets from forming. First, turn off the appliance, and then remove
the measuring cup. Next, through the hole in the lid, insert the tamper.
Then turn the appliance back on. Use tamper to press ingredients into
the blades as you make ice creams, nut butters, etc.
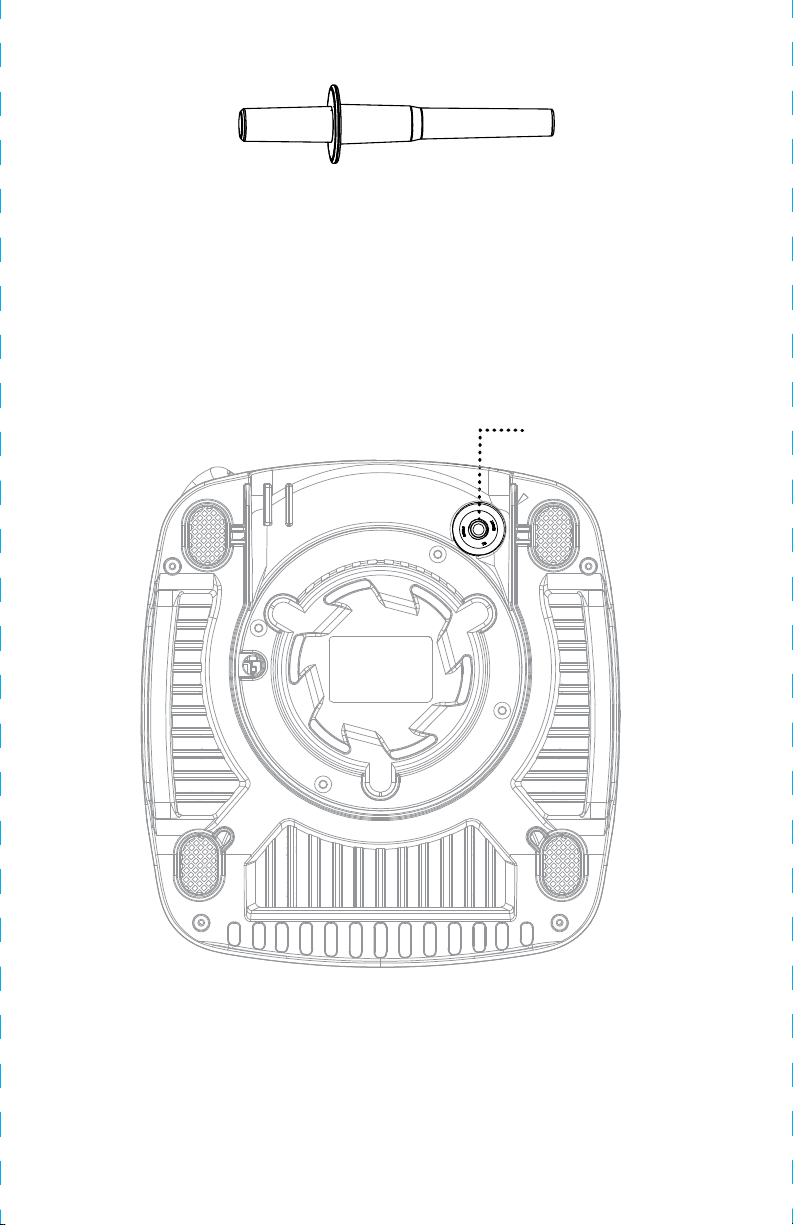
Resettable fuse button: Incorporated to protect the motor from over-
heating. If the motor shuts off while in use: turn the power switch to
“OFF” and the speed dial to “OFF” and unplug from the wall outlet.
Remove the carafe from the motor unit and free the blades of any
obstructions. Wait 30–45 minutes for the unit to cool down. Press
external resettable fuse button on the bottom of the motor unit.
Press To Reset

6
NOTE:
a. “Function switch” and “Speed dial” will not operate simultaneously.
Only one works at a time.
b. The carafe should not be more than 2/3 full when the tamper is
used during blending.
c. Do not use tamper for more than 30 consecutive seconds (to
avoid stressing the motor).
d. You may need to move the tamper not only up and down, but
also side to side.
FOR THE INITIAL USE
1. Unpack the appliance and place all parts on a flat surface.
2. Immerse the carafe, carafe lid, measuring cup, and tamper in warm
soapy water and rinse and dry them. Never immerse motor unit in
water for cleaning to prevent the risk of electric shock.
CAUTION: The blades are very sharp. Please handle carefully.
3. For attaching carafe, first place the carafe lid and measuring cup
into the carafe, ensuring they are placed tightly and properly. Next,
place the carafe onto the carafe support pad and fix it tightly onto
the motor unit. The blender is now ready for use.
NOTE:
a. Before assembling the carafe, be sure the power cord is unplugged
from the power outlet: the power switch should be at “OFF” position
and the speed dial should be at “OFF” position.
b. The appliance will not work if the carafe is not properly
assembled onto the motor unit.
c. Make sure all the parts are assembled properly.

7
OPERATION
BLEND
1. Place the appliance on a flat surface. Make sure it is unplugged.
2. Prepare fruits, vegetables, and other foods by cutting them into
cubes about 1-inch square. Remove the measuring cup and carafe
lid, then put the cubed foods into the carafe. Add purified water to
facilitate the smooth running of the appliance; the recommended
ratio of food to water is 2:3. The amount of mixture should not
exceed the max level as indicated on the carafe. Place carafe lid
and place measuring cup well in position.
3. Connect the appliance with power source, and then push the power
switch to “ON” position.
4. Turn the speed dial to the “HI” speed setting to blend food items.
5. After blending for about 30 seconds, turn the speed dial to “OFF”
position.
6. You may add more ingredients into the carafe after initial blending.
First, turn off the appliance, and then remove the measuring cup and
add the ingredients into the carafe through the center opening of
carafe. Next, replace the measuring cup in position. Finally, turn on
the appliance again.
NOTE:
a. During operation, if the mixture is too thick to be blended,
operate by referring to the description of “Tamper” mentioned
previously.
b. Do not remove the carafe from the motor unit during working
process. If it is necessary to remove the carafe, first turn off the
appliance.
c. The maximum operation time per use should not exceed 3
minutes, and a minimum of 20 minutes rest-time must be
maintained between two consecutive cycles. The appliance
must rest for at least 30 minutes every 10 cycles.

8
7. When finished, move the carafe out of the carafe support pad,
and then carefully take down the measuring cup and carafe lid.
Pour and serve.
CAUTION: The power switch should be at “OFF” position and the
speed dial should be at “OFF” position. The power cord must be
unplugged before removing the carafe.
CRUSHED ICE
1. Place the appliance on a flat surface. Make sure it is unplugged.
2. Prepare ice cubes of approximately 1-inch each. Remove the
measuring cup and carafe lid, then put the ice cubes into the carafe.
Add purified water to facilitate the smooth running of the appliance;
the recommended ratio of ice to water is about 2:3. The amount
of mixture should not exceed the maximum level as indicated on the
carafe. Place carafe lid and measuring cup well in position.
3. Connect the appliance with power source, and push the power
switch to “ON.”
4. Turn the speed dial to the “HI” speed setting or push the function
switch to “Pulse” setting.
5. After crushing ice for 3 minutes, turn the speed dial to “OFF”
position.
6. You may add more ingredients into the carafe after initial blending.
First, turn off the appliance, then remove the measuring cup, and
add the ingredients into the carafe through the center opening of
carafe. Next, replace the measuring cup in position. Finally, turn on
the appliance again.

9
NOTE:
a. During operation, if the mixture is too thick to be crushed, operate
by referring to the description of “Tamper” mentioned previously.
b. Do not remove the carafe from the motor unit while operating.
If it is necessary to remove the carafe, first turn off the appliance.
c. The maximum operation time per use should not exceed 3 minutes,
and a minimum of 20 minutes rest-time must be maintained between
two consecutive cycles. The appliance must rest for at least
30 minutes every 10 cycles.
7. When finished, move the carafe out of the carafe support pad,
and then carefully take down the measuring cup and carafe lid.
Pour and serve.
CAUTION: The power switch should be at “OFF” position and the
speed dial should be at “OFF” position. The power cord must be
unplugged before removing the carafe.
MAKING HOT SOUP
1. Place the appliance on a flat surface. Make sure it is unplugged.
2. Remove the measuring cup and carafe lid, put the ingredients into
the carafe, and fill the carafe with appropriate amount of room
temperature purified water. The amount of mixture should not
exceed 33 fl oz/1000ml. Place the carafe lid and measuring cup well
in position.
3. Connect the appliance with power source, and then push the power
switch to “ON” position.
4. Push the function switch to “Soup” setting.
NOTE:
The machine runs slowly during the first 15 seconds and will
accelerate when detecting food.
5. After blending for about 6 minutes on “Soup” setting, the blender
will automatically shut off.

10
NOTE:
a. During operation, if the soup is too thick to be processed, operate
by referring to the description of “Tamper” mentioned previously.
b. Do not remove the carafe from the motor unit during working
process. If it is necessary to remove the carafe, first turn off
the appliance.
c. The maximum operation time per use should not exceed 6
minutes. A minimum of 30 minutes rest-time must be maintained
between two consecutive cycles.
6. When finished, move the carafe out of the carafe support pad, and
then carefully take down the measuring cup and carafe lid. Pour
and serve.
CAUTION: The power switch should be at “OFF” position and the
speed dial should be at “OFF” position. The power cord must be
unplugged before removing the carafe.

11
CLEANING AND MAINTENANCE
Follow the below steps to clean the blender and the blades.
• After use, reassemble the carafe. Pour in 13-16 FL OZ/400-500mL
of warm water and turn the speed dial to “HI” speed, or push the
function switch to “Pulse” position. Allow it to work for a few
seconds to remove residual food.
• Turn the power switch to “OFF” and the speed dial to “OFF” then
remove the carafe from the motor unit and rinse under running
water.
• Wipe the outer surface of motor unit with a damp cloth.
Do not use abrasive cleansers. Never immerse in water or other
solution for cleaning.
• All parts except the motor unit are dishwasher-safe. You can also
wash the parts, except the motor unit, in warm, soapy water.
• Dry all parts and then reassemble. Store appliance with carafe lid
left open to allow air to circulate and dry completely.
• If you encounter problems during use, never disassemble the motor
unit by yourself; no user-serviceable parts are contained inside.
WARNING:
a. The blades are very sharp. Handle carefully when cleaning.
b. Do not use abrasive cleaners.
c. Never immerse the motor unit in water for cleaning.

12
RECIPES
✓ Tomato Soup
✓ Hummus
✓ Green Smoothie
✓ Berry Smoothie
✓ Almond Butter
✓ Margarita
TM

13
RECIPES
Tomato Soup
Makes approximately 5 cups
Ingredients
2 Cups vegetable broth
1 Can whole peeled tomatoes (14.5oz)
2 Roma tomatoes
1 Large carrot, halved
1 Large garlic clove, peeled
1 Tsp salt
1/4 Tsp ground black pepper
1 Tbsp packed fresh basil leaves
1/4 Cup chickpeas (optional, to thicken soup)
Instructions
Place all ingredients except chickpeas in the order listed in the blender.
Secure lid.
Blend on soup setting until it shuts off on its own after 6 minutes.
Add chickpeas and blend until smooth (about 45 seconds).
Caution: soup will be hot.

14
RECIPES
Hummus
Makes approximately 3 - 1/2 cups
Ingredients
2 Cans chickpeas, plus 1/2 cup liquid reserved from 1 can
1/4 Cup tahini
1/4 Cup lemon juice
1 Large garlic clove, peeled
2 Tbsp olive oil
1 Tsp ground cumin
1/4 - 1/2 Tsp salt, to taste
Instructions
Combine all ingredients except salt in blender in the order listed.
Secure lid and tamper.
Start blender on low and gradually increase speed to high.
At the same time, use tamper through the hole in the lid to push
ingredients toward blades.
Blend 1 minute or until desired consistency is reached.
Season with salt to taste.

15
RECIPES
Green Smoothie
Makes approximately 4 cups
Ingredients
1/2 Cup water
1 Cup green grapes
1 Orange, peeled, halved
1/2 Pear, seeded
1 Banana, peeled
1 Cup packed kale
2 Cups ice cubes
1 Tsp matcha powder (optional)
2 Tsp moringa powder (optional)
Instructions
Place all ingredients in blender in the order listed.
Secure lid and tamper.
Start blender on low and gradually increase speed to high.
At the same time, use tamper through the hole in the lid to press
ingredients toward blades.
Blend until desired consistency is reached.

16
RECIPES
Berry Smoothie
Makes approximately 3 cups
Ingredients
1/2 Cup water
1/2 Cup vanilla yogurt
1/2 Cup red grapes
1 - 1/2 Cup mixed frozen berries (strawberries, blueberries, raspberries)
1 Serving plant-based protein powder (optional)
Instructions
Place all ingredients into blender in the order listed.
Secure lid and tamper.
Start blender on low and gradually increase speed to high.
At the same time, use tamper through the hole in the lid
to press ingredients toward blades.
Blend for 1 minute or until desired consistency is reached.

17
RECIPES
Almond Butter
Makes approximately 1 - 3/4 cup
Ingredients
4 Cups roasted & salted almonds*
1/4 Cup coconut oil, melted
*Also works well with roasted & salted cashews
Instructions
Combine ingredients in blender in the order listed.
Secure lid and tamper.
Turn machine to low speed, very slowly increase speed to high.
At the same time, use tamper through the hole in the lid to press
ingredients toward blades.
Continue to use the tamper until the nut butter flows freely through
the machine.
Turn off machine once desired consistency is reached.

18
RECIPES
Margarita
Makes approximately 2 servings
Ingredients
1/2 Cup tequila
1/2 Cup freshly squeezed lime juice
1/4 Cup triple sec
1 Tbsp agave syrup (or other sweetener)
3 Cups ice
Instructions
Place all ingredients into blender in the order listed.
Secure lid.
Turn machine on low and gradually increase to high.
Blend until desired consistency is reached.
Serve immediately.
To make a non-alcoholic version, substitute the tequila and triple sec
for lime-flavored carbonated water or lemon-lime soda.
Table of contents


