Brandt DFH15624X User manual


To review the section on troubleshooting Tips
will help you to solve some common problems
by yourself .
Dear Custo mer,
P leas e ca refu lly r ead this manual b efor e us ing t he
d ishw ash er, it will hel p yo u us e an d m aint ain t he
d ishw ash er pr ope rly.
Pass it on to a ny s ubsequent ow ner of th e ap pliance.
This manual contains sections on safety Inst ruct ions,
Operating Instructions, Installation Instructions and
Troubleshooti ng Tips, etc.
Keep this ma nual for futu re reference.
If you can not solve the problem s by yourself ,
please ask for the help of professional technicians.
The man ufacturer, following a policy of constant
dev elopment and updating of the product, may
make modifi catio ns w itho ut giving prior notice .
If lost or out-of-date, you can receive a new user
manual from the manufacturer or responsible
vendor.
1) S afety In stru ctions........ ............ ............ .....1-4
2) Q uic k user g uide........... ...............................5
3) O per atin g In stru ctio ns.. ...... ...... ...... ...... ...... .6
4) P rior to f irst time use..... ..... ....... ...... .. ......... ..7
5) Preparing and lo ading dishe s.......... ...........12
6) S tart ing a wa shi ng p rogr am....... ...... ...... ....1 4
7) M ain tena nce and cle aning......... ............ .....16
8) Insta llati on I nstr ucti on.. ...... ...... ...... .. .........1 8
9) Troubles hoo ting Tip s.................................21
Loa ding the baskets accor ding to En50242
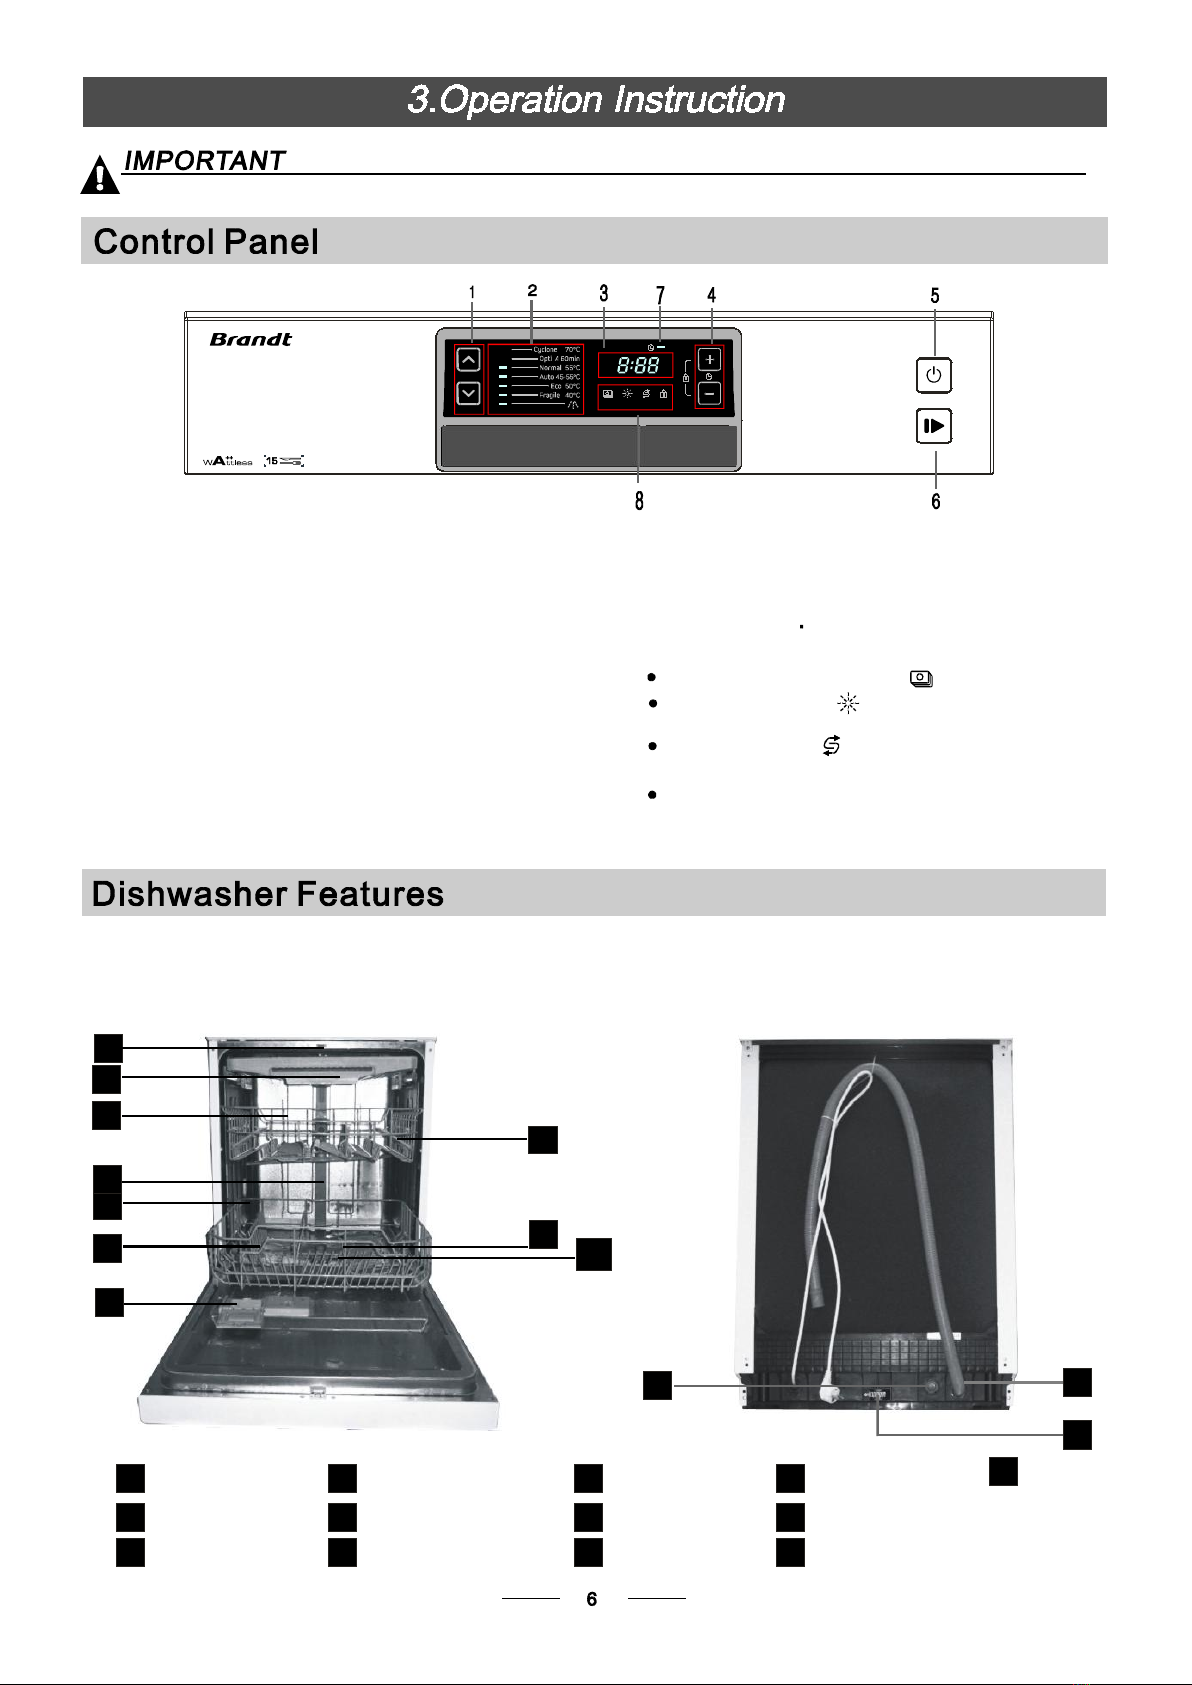
Con trol Pan el... ...... ...... ...... ...... ...... ...... ...... ...... .6
Dishwasher Fea ture s.... ...... ...... ...... ..... ............ ..6
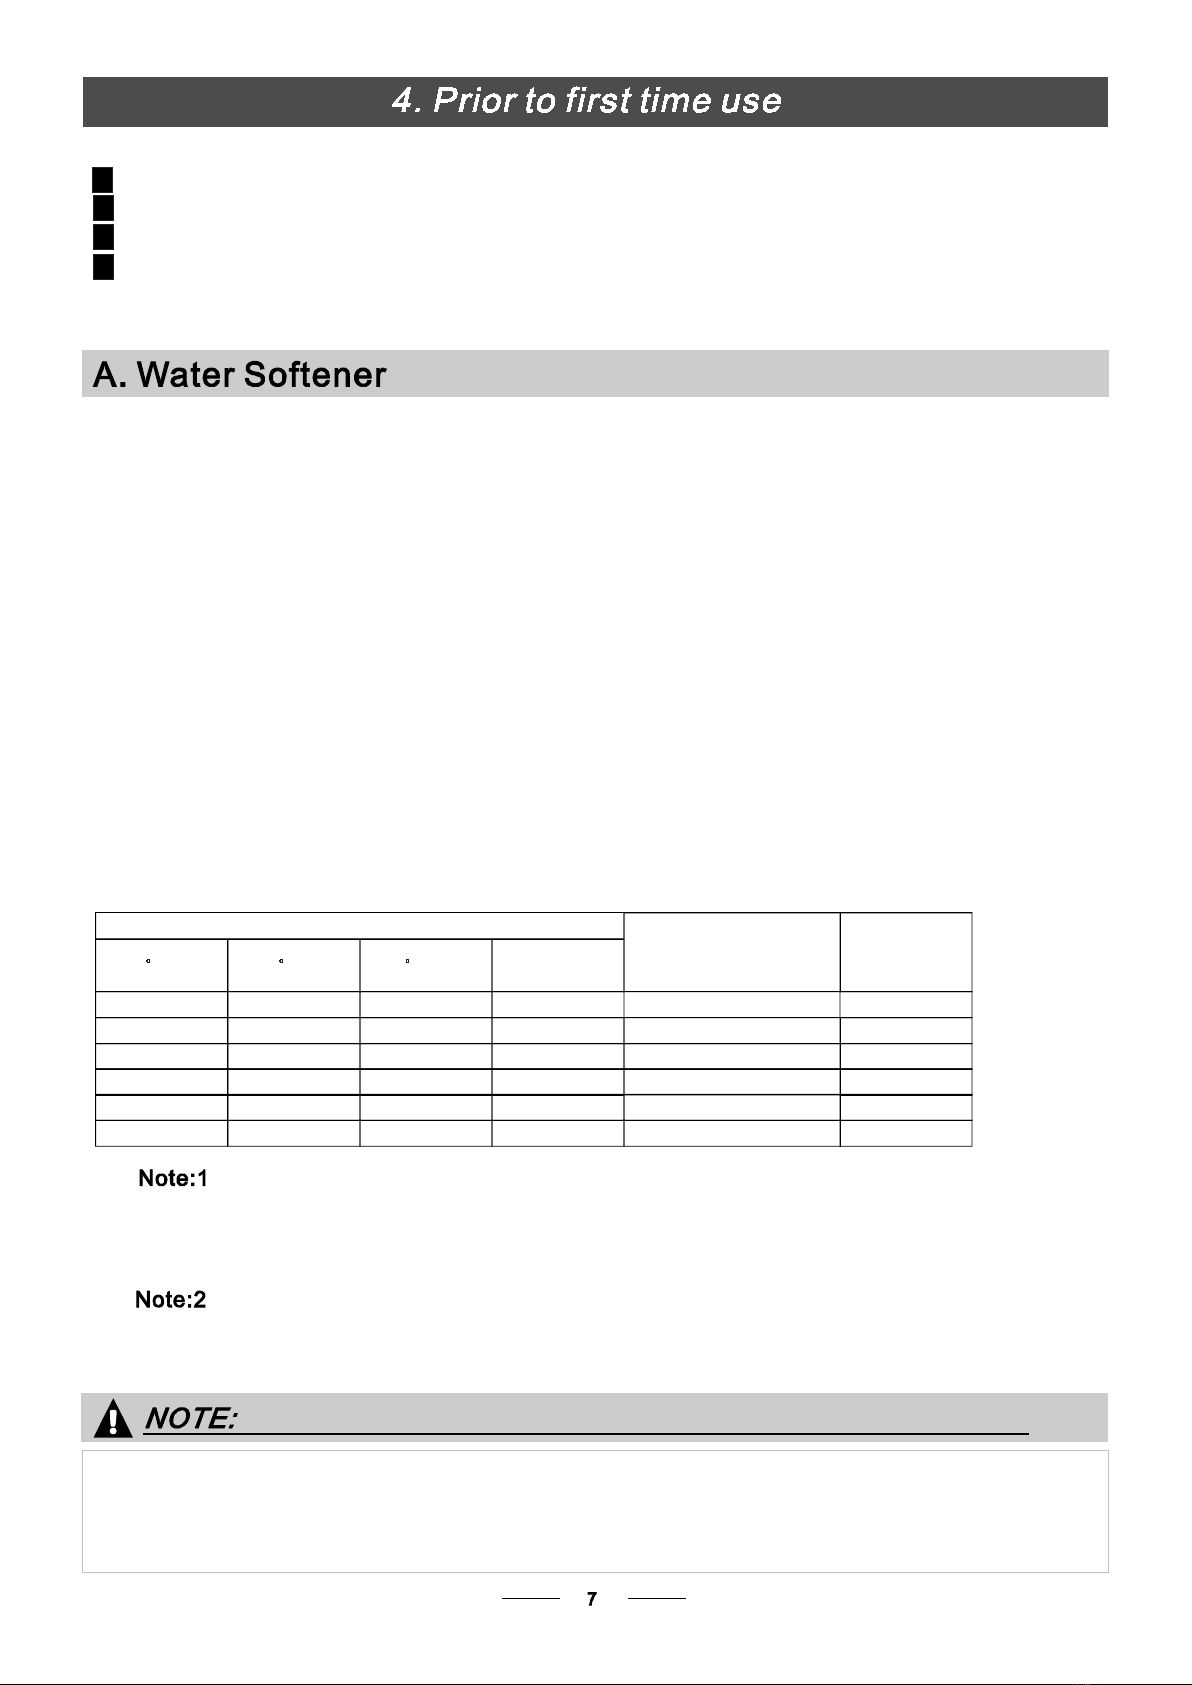
A.Water Sof tene r.... ....... ...... ...... ...... ...... ..... ... ....7
B.Loading the Salt into the Soften er........ ............ 8
C.F illing the Rinse Aid Dispe nser........................ 8
D.F unction of Detergent............................... ......9
Rec ommendations for lo ading and unload ing
the dish was her. ...... ...... ...... ...... ...... ............ .....12
Standard loadin g pa ttern..................................13
Was h Cycle Tab le............................................1 4
Turning on t he A ppli ance..... ...... ...... ...... ...... .....1 4
Cha nging th e Program mid-cycle............ ..........1 5
At t he e nd o f the Wa sh C ycle...... ...... ...... ...... .....1 5
Filte r System.... ...... ...... ...... ...... ...... ...... ...... .....1 6
Car ing for th e Dishw asher............................ .....17
Pos ition ing the Appliance.................................18
Abo ut P ower Connection........... .......................18
Water connection.............................................19
Start of dish was her............. ............ .................20
Bef ore calling for se rvice........... ............ ...........21
Error codes ...... ............ ............ ......................2 2
Tec hnic al in formation.......................................23

1
This appliance is intended to be used in household
and similar applications such as:
-staff kitchen areas in shops, offices and other
working environments;
-farm houses;
-by clients in hotels, motels and other residential type
environments;
-bed and breakfast type environments.
This appliance can be used by children aged from 8
years and above and persons with reduced physical,
sensory or mental capabilities or lack of experience
and knowledge if they have been given supervision
or instruction concerning use of the appliance in a
safe way and understand the hazards involved.
Children shall not play with the appliance. Cleaning
and user maintenance shall not be done by children
without supervision.(For EN60335-1)
Packaging material could be dangerous for children!
This appliance is for indoor household use only.
To protect against the risk of electrical shock,
do not immerse the unit, cord or plug in water or
other liquid.
Please unplug before cleaning and performing
maintenance on the appliance.
Use a soft cloth moistened with mild soap, and then
use a dry cloth to wipe it again.
When using your dishwasher,
follow the precautions listed below:

2
This appliance must be earthed. In the event of a
malfunction or breakdown, earthing will reduce the
risk of an electric shock by providing a path of least
resistance of electric current. This appliance is
equipped with an earthing conductor plug.
The plug must be plugged into an appropriate outlet
that is installed and earthed in accordance with all
local codes and ordinances.
Improper connection of the equipment-earthing
conductor can result in the risk of an electric shock.
Check with a qualified electrician or service
representative if you are in doubt whether the
appliance is properly grounded.
Do not modify the plug provided with the appliance;
If it does not fit the outlet.
Have a proper outlet installed by a qualified electrician.
Do not abuse, sit on, or stand on the door or dish
rack of the dishwasher.
Do not operate your dishwasher unless all enclosure
panels are properly in place.
Open the door very carefully if the dishwasher is
operating, there is a risk of water squirting out.
Do not place any heavy objects on or stand on the door
when it is open. The appliance could tip forward.
When loading items to be washed:
1) Locate sharp items so that they are not likely to
damage the door seal;

3
2) Warning: Knives and other utensils with sharp points
must be loaded in the basket with their points
down or placed in a horizontal position.
Check that the detergent powder is empty after
completion of the wash cycle.
Do not wash plastic items unless they are marked
dishwasher safe or the equivalent.
For check the
manufacturer's recommendations.
Use only detergent and rinse agents recommended for
use in an automatic dishwasher.
The door should not be left open, since this could increase
the risk of tripping.
If the supply cord is damaged, it must be replaced by the
manufacturer or its service agent or a similarly qualified
person in order to avoid a hazard.
During installation, the power supply must not be
excessively or dangerously bent or flattened.
Do not tamper with controls.
The maximum number of place settings to be washed
is 15.
The maximum permissible inlet water pressure is 1MPa.
The minimum permissible inlet water pressure is 0.04MPa.
“ ”
facing
unmarked plastic items not so marked,
Never use soap, laundry detergent, or hand washing
detergent in your dishwasher.
The appliance needs to be connected to the main water
valve using new hose sets. Old sets should not be reused.

4
This appliance's packaging materials are recyclable.
Dispose of the packaging into a suitable waste
collection container to recycle it.
It is prohibited to dispose of this appliance as
household waste.
Correct Disposal of this product: this symbol on the
product or in its packing indicates that this product
may not be treated as household waste. Instead,
it should be taken to the appropriate waste collection
point for the recycling of electrical and electronic
equipment. By ensuring this product is disposed of
correctly, you will help prevent potential negative
consequences for the environment and human health,
which could otherwise be caused by the inappropriate
waste handling of this product.
For more detailed information about the recycling of
this product, please contact your local council your
household waste disposal service, or the shop where
you purchased the product.
For disposing of package and the appliance please
go to a recycling centre. Therefore cut off the power
supply cable and make the door closing device
unusable.
Cardboard packaging is manufactured from recycled
paper and should be disposed in the waste paper
collection for recycling.
By ensuring this product is disposed of correctly, you
will help prevent potential negative consequences
for the environment and human health, which could
otherwise be caused by inappropriate waste handling
of this product.
For more detailed information about recycling of this
product, please contact your local city office and your
household waste disposal service.
DISPOSAL: Do not dispose this product as unsorted
municipal waste. Collection of such waste separately
for special treatment is necessary.

With each wash cycle.
Compartment
For programmes with pre-wash only.
(Follow the user instructions!)
Electric indicator on control panel (if provided).
Check the rinse aid level
(On models with water softener system only.)
Electric indicator on control panel (if provided).
If there is no salt warning light in the control panel
(for some models), you can estimate when to fill the salt into
the softener by the number of cycles the dishwasher has run.
Check the regeneration
salt level
Load the baskets
Select a programme
Running the dishwasher
Fill the detergent dispenser
To lo ad the baske ts, ref er to t he sec tion en titled Loa ding th e Dish wash er Bas kets .“ ”
Switch on the appliance
For detailed operating method read the co rresponding conte nt on the instruction manual.
Switch off the appliance
Turn off the water tap,
unload the baskets
Warn ing : w ait a f ew mi nutes (about 15 m inute s) befor e unlo ading the di shwa sher to avo id
hand ling the dishes and utensils wh ile the y are s till ho t and more s uscep tible to break .
The dishes will al so dry bette r. First start u nl oad ing th e lowe r bask ed.
Changing the programme
Ad ding fo rgotte n dish es
in t he dis hwash er.
When the working cycle has finished, the buzzer of the
dishwasher will sound 8 times, then stop.
Turn off the appliance using the On/Off Button,to turn off the appliance
If the appliance is switched
off during a wash cycle.
Open th e do o r care fully.
Look out for hot ste am
when openin g the door!
If the appliance is switched off during a wash cycle, when switched
on again, please re-select the washing cycle and operate the dishwasher
according to the original Power-on state ).
1.Press the Start/Pause Button to stop the washing.
2.Open the door a little .
3.After the spray arms stop working, you can open the door
completely.
4.Add forgotten dishes.
5.Close the door
6.Press the Start/Pause Button, the dishwasher will run
after 10 seconds.
Turn on the water tap and press the Start/Pause Button. The machine will start working
after about 10 seconds.
Close the door, press the program button until the selected programme lights up.
( See the section entitled Operation instruction )“ ”
Press the On/Off button to switch on the appliance, Open the door.
1. A running cycle can only be modified if it has been running for a short time. Otherwise the detergent
may have already been released and the water already drained. If this is the case, the detergent
dispenser must be refilled.
2. Press the Start/Pause Button to stop washing , Then press programme button for more than 3 seconds,
the programme will cancel.
3. Press the program button to select a new programme.
4. Press the Start/Pause Button, the dishwasher will run after 10 seconds. .
5

before using it for the first tim e.
To get the best perform ance from your dishwas her, read all operating instructions
11 12
Ba ck View
1
2
3
4
5
7
8
910
Front view
Lower basket
Salt container
Dispenser
Cup shelf
Spray arms
Filter assembly
Inlet pipe conne ctor
Drain pipe
Upper basket
Cutlery rack
Top spray arm
1Inner pipe
5
6
7
8
9
10
12
11
3
2
4
6
13
Adjuster
13
5.On/Off Button: To turn on/off the power supply.
8.Di splay indicator:
2.Progra m indicators
Rinse Aid indicator:
Indicates when the dispenser needs to be refilled.
Add salt indicator:
Indicates when the dispenser needs to be refilled.
All in one function indicator:
1. Program Button :Press the button to select a
wash Program.
6.Star t /Pause button: To start the selected
washing program or pause the washing pro gram
when the machine is w orking.
7.Delay indicator
Child lock indicator
3.Display screen: to show the remaining time
and the s tate(runn ing state, delay time etc )
Press the two butto ns for 3 seconds
simultaneously to select the all in one functio n.
Press them ag ain to cancel.
4.Delay button: Press the boutons to delay de start of
the wash cycle.Press + and - but tons simoultaneously
for 3sec onds to lock the prog ram, press them aga in to
cancel.

The wat er softener must be set manually, using the water hardness dial.
The water softener is designed to remove minerals and salts from the water, which would have
a detrim ental or adverse effect on the operation of the appliance.
The more minerals there are, the harder your water is
The softener sho uld be adjusted according to the hard ness of the water in your area. Your local Water Authority
can advise you on the hardne ss of the water in your area.
Adjusting Salt Consumption
The dishwasher is designed to allow for adjustment in the amount of salt consumed bas ed on the ha rdness of
the water used. This is intended to op timise and customise the level o f salt consumption.
WATER SOFTENER
The hardness of the wa ter varies from place to place. If har d water is used i n the dishwasher, deposits will
form on the dishes and utensils.
The appliance is equipped with a sp ecial softener that uses a salt container specifically designed to eliminate
lime and minera ls from the water.
Contact your local water board for information on the hardness of your water supply.
If your model does not have any water softener, you may skip this section.
Clark: British degree
fH: French degree
DH: German degree
dH=1.25 Clarke=1.78 fH =0.178mmol/l
1
The manufactory setting: H3 (EN 50242)
Before using you r dishwasher for the first time:
A. Set the water softener
B. Add 1.5Kg dishwasher salt and then full fill the salt con tainer with water
C. Fill the rinse aid dispenser
D. Fill in detergent
Please follow the steps below for adjustm ent in salt consumption.
1. Switch on the appliance;
2. Press th e Start/ Pause butto n for more than 5 seconds to start the water
softener s ettin g mode (to be d one within 60 seco nds aft er th e applia nce is s witc hed on;
3. Press th e Start/ Pause butto n to select the proper setti ng dependin g on the hardness
of your local water, the setting s will change in the fol lowing
se quence: H1->H2->H 3-> H4->H 5->H6;
4. To end t he s etti ng mode, ei ther pre ss the On/Off button or wait 5 s eco nds.
dH mmol/l
0~90~5 0~0 .94 0
10-20
6-11
1.0-2.0 9
21-3012-17 2.1-3.0 12
20
fH
0~6
7- 14
15- 21
Clarke
WATER HARDNESS
Selector Position Sal t consum ption
(gram/cycle)
18- 22 31-40 22-28 3.1-4.0
41-6023-34 4.1-6.0 30
60
29- 42
35-55
61-98 43-69 6.1-9 .8
H1-> Soak Light brights
H2->Rapide light brights
H3->Rapide,Soak lights br ight
H4->Eco l ight br ights
H5->Eco,soak lights bright
H6->Eco,rap ide lights bright

1. The salt container must only be refilled when the salt warning light in the control panel comes on.
Depending on how well the salt dissolves, the salt warning light may still be on even though the
salt container is filled.
If there is no salt warning light in the con trol panel (for some Models),you can estim ate when to fill
the salt into the softener by the cycles that the dishwasher has run.
2. I f sal t ha s spilled , run a s oak or q uick program to remove it.
Always use salt intended for dishwasher use.
The salt contain er is located beneath the lower basket and should be filled as explained
in the foll owing:
Warning!
Only use salt specif ically designe d for dishwashers use! Every other type o f
salt not specifically desig ned fo r dishwasher use, e specially table salt, wil l
damage the w ater softener. In case of damages caused by the use of unsuitable
salt the manufact urer does not give any wa rranty nor is liable for any damages caused.
Onl y fill with salt before running a c ycle.
This will prevent any grains of salt or salty water, which may have been spilled,
remaining on the bottom of the machine for any period of time, which may cause
corros ion.
C. Filling the Rinse Aid Dispenser
Rinse Aid Dispenser
Function of Rinse Aid
Rinse aid is automatically added during the last rinse, ensuring thorough rinsing, a s pot and strea k free drying.
Warning!
Only use branded rinse aid for dishwasher. Never fill the rinse aid dis penser with any other substances
(e.g. Di shwasher cleaning agent, liquid deterge nt). Th is would damage the app liance.
with water,It is normal for a small amount of water to
come out of the salt container.
Fi ll t he s al t c on tain er t o i ts maximu m limit
AAfter the low er basket has been removed, unscrew and remove the cap from the salt container.
C
DAfter filling the container , s cr ew back the cap tigh tly.
EThe salt warning ligh t will stop being after th e sa lt container has be en fi ll ed with salt .
FImm ediat ely aft er filling the salt into the salt container, a washing program should be started
program Other wise the filter system, pump or ot her important parts of the machine may be damaged
by salty water. This is out of warranty.
(We su ggest to use a short
).
BPlace the end of the funnel (supplied) into the hole and about 1.5kg of dishwasher salt.
po or in
The rinse aid is released d uring the final ri nse to prevent water from forming droplets on your dishes, which can
leave spots and streaks. It also improves drying by allowing water to roll off the dishes. Your dishwasher is
designed to use li quid rinse aids. The rinse aid dispenser is located on the door nex t to the detergent dispenser.
To fill the dispenser, ope n the cap and pour the rinse aid into the dispenser until the level indicator turns c ompletely
black. The volume of the ri nse aid container is about 110m l.

To open the dispenser, turn the cap to the "open" (left) arrow and l ift it out.
Careful ly pour i n the ri nse-aid i nto it s dispenser, wh ilst avo id in g i t t o overfl ow.
Replace the cap by inserting it aligned with "open " arrow and turning it to the closed (right) arrow.
Adjusting Rinse Aid Dispenser
The rinse aid dispenser ha s six or fou r settings. Always st art with the dispe nser
set on "4". If spot s and poor drying are a problem, increase the amount of rinse
aid dispensed by removing the dispe nser lid and rotating the dial to "5". If the
dishes still are no t drying properly or show spots, adjust the dial to the next
high er lever until your dishes are spot-free. The recommended setting is "4".
(Factory value is "4".)
Increa se the dose if there are drop s of water o r lime spots on the di shes after washing.
Reduce i t if there are sticky whitis h stains on your dishes o r a bluish fil m on glass ware or
knife blad es.
1
2
3
As the rinse aid d iminishes, the size o f the black dot
on the rinse aid level indicator changes, as illustrated below.
Full
3 / 4 full
1 / 2 full
1 / 4 full - Should refill to eliminate spotting
Empty
When to Refill the Rinse Aid Dispenser
Unless the rins e-ai d warning light on th e control panel is on, you ca n always estima te the amount from t he color
of the optical level indi cator "C "located next to the cap. When t he r inse -aid contain er is full , the ind icator
wi ll be fully dark. T he s ize o f the dark dot d ecreases as the rinse-aid diminishes . You should nev er le t
the rinse a id le vel be le ss than 1/4 full.
during the next wash. Don't forget to re place the cap be fore you close the dishwasher door.
Clean up any spilled rinse aid w ith an absorbent cloth to avoid excessive foaming
The chemical ingredients that c ompose the detergent are necessary to remove, crush and dispense all dirt out of
the dishwasher. Most of the commercia l quality detergents are suitable for this purpose.
" "
Proper Use of Detergent
Use only detergent specifically m ade for . Keep your detergent fresh and dry.dishwasher use
Don't put powdered detergent into the dispenser u ntil you are ready to wash dishes.
Warning!

Amount of Detergent to Use
Based on their chem ical com position, deterge nts can be split in two basic types:
Dete rgent tablets of diffe rent brands dissolve at different speeds. For t his reason some
detergent tablets cannot dissolve and develop the ir full cleaning power during short
prog rams. There fore please use long program s wh en u sing detergent t ablets, to
ensure t he complete rem oval of detergent residua ls.
The dispenser must be re filled before the start of each wash cycle following the instructi ons
provided in the wash cycle table . Your dishwa sher uses less de tergent and rinse aid than
Conventiona l dishwa sher. Generally, only one tablespoon of detergent is needed for
a normal wash load. More heavily soiled items need more detergent. Al ways add the
detergent just be fore starting the dishwas her, otherwise it could get damp and w ill not
dissolve properly.
Concentrated Detergent
Detergent Tablets
Detergent Dispenser
co nventional, alkaline detergents with caus tic comp onents
low alkaline co ncentrated detergen ts with natural enzym es
Normally new pulverised detergent is with out phosphate. T hus the water softener fu nction of
phospha te is not given. In this case we recommend to fill salt in the salt con taine r even w hen
the hardness of water is only 6 dH. If detergents w itho ut phosphate are used in the case of hard water
often white spots appear on dishes and glasses. In this case pl ease add more detergent to reach
better result s. Detergents without chlorine do only bleach a little. Stron g and coloured spots will not
be removed completely. In this case please choose a program with a hi gher temperature.
°
Detergents
There are 3 sorts of d etergents
1.With phosphate and with ch lorine
2.With phosphate and without chlorine
3.Withou t phosphate and without chlorine
Always add the detergent just before starting each wash cycle.
Only use branded detergent aid for dishwasher.
If the lid is closed: press release button. The lid will spring open.
De ter ge nt tabl et
De ter ge nt pow der
Push latch to open
Dishwasher detergent is corrosive!
Take care to keep it out of reach of children.

Fill the detergent dispenser with detergen t.
The marking indicates the dosing levels , as
illustrate d on the righ t:
Place the main wa sh cycle deterge nt h ere.
Place the pre- was h cycle d etergen t he re.
Plea se o bserve the manufacturers do sing and storage
Recommendations as stated on the detergent packagi ng.
Close the lid a nd press on i t until it locks int o pl ace.
If the dishes are heavily soiled, place an additiona l
detergent do se in the pre-wash detergent chamber. This detergent will take effe ct during the pre-wash phas e.
A
B
Filling the detergent dispenser
Be aware that depend ing on the soiling of water, setting may be different.
Please observe the manufacturer's rec ommendations on the de tergent packaging.
A B
You information about the a mo unt of detergent for th e si ngle program me on page 14.
will f ind

Cutlery with wooden, horn china or
mother-of-pearl handles
Plastic items that are not heat resistant
Older cutlery with glued parts that are not
temperature resistant
Bonded cutlery ite ms or dishes
Pewter or cooper items
Crystal glass
Steel items subject to rusting
Wooden platters
Items made from synthetic fibres
Some types of glasses can become
dull after a large number of washes
Silver and aluminum parts have a
tendency to discolour during washing
Glazed patterns may fade if machine
washed frequently
Are not suitable Are of limited suitability
Dishes and items of cutlery must not lie inside one another, or cover each other.
The upper basket is designed to ho ld more delicate and lighter dishware such as glasses, coffee
and tea cups
Long bladed knives stored in an upright position are a potential haza rd!
Long and/or sharp items of cutlery such as carving knives must be positioned
horizontally in the upper basket.
Please do not ove rload your dishwasher. This is important for good results and for
reasonab le consumption of energy.
To avoid damage , glasses should not touch one anoth er.
Load large and difficult t o cle an i tems in t he lower basket.
Load hollow items suc h as cups, gl asses, pans etc. With the opening facing downwards so that
water can not collect in the container or a deep base.
Consider buying utensils which are identified as dishwasher-proof.
Use a mild detergent that is described as 'kind to dishes'. If necessary, seek further
information from the detergent manufacturers.
For particular items, select a progr am with
To prevent damage, do not take glass and cutlery out of the dishwasher immediately
after the programme has ended.
the lowes t possible temperatu re.
(For best performance of the dishwasher, follow these loading guidelines.
Features and appearance of baske ts and cutlery baskets may vary from your model.)
Scrape off any larg e amounts o f leftover food. Soften remnants of burnt food in pans.
It is not necessary to rinse the d ishes under running water.
Place objects in the dishwasher in following way:
1.Items such as cups, glasses, pots /pans, etc. are faced downwards.
2.Curved items, or ones with recesses, should be loaded aslant so that water can run off.
3.All utensils are stacked securely and can not tip over.
4.All utensils are placed in the way that the spray arms can rotate freely during washing.
Very small items should not be washed in the dishwasher as they could easily fall out of the basket.
To prevent water dripping from the uppe r basket into the lower basket, we recommend that you
empty the lower basket upper basket.
firs t, fo llow ed b y th e
5. Preparing and Loading Dishes

The upper basket is designed to hold more delicate
and lighter dishware such as glasses, coffee and
tea cups and saucers, as well as plates, small bowls
and shallow pans (as long as they are not too di rty).
Position the dishe s an d co okware so that they w ill
not get moved by the spray of w ate r.
Pots, ser ving bowls, etc, must alw ays be placed top down.
Deep pots should be slan ted to allow water to flow out.
Please be reminded that:
The Botto m Basket features folding spikes so that larger or more pots and pans can be loade d.
Th e he ight of the u ppe r rac k ca n be eas ily a djus ted to
ac commod ate talle r dis hes in e ither the upp er a nd lo wer
rack. To raise the rack to the upper position, lift rack unt il
both sides are at the same heig ht. T he rack will secu re
into pl ace. To lower the rack, pu sh down on the handle
and re leas e.
We suggest that you place large items and the most
difficult to clean items such as
pots, pans, lids, serving dishes and b owls, as shown
in the figure below. It is preferable to place serving
dishes and lids on the sid e of the racks in order to
avoid blocking the rotation of the top spray arm.
The maximum diameter a dvis ed for plates in fr ont of
the detergen t dis penser is of 19 cm, this not to
ham per the open ing of it
into th e lo wer basket:
Cutlery should be pla ced in the cutlery rack separatelyfrom each other in the ap propriate pos itio ns, and do make
sure the utensils do not nest together, this may cause bad p erfo rmance.
For a top quality cleaning, place the silverware in the baske t making sure that:
They do not nest together.
Silverware is placed with the male face up.
Long utensils in the middle.
Do not let any item extend through bottom.
Always load sharp utensils with the sharp
pointing down!
For better stacking of pots and pans, the spikes can be
folded down as sh ow in the picture bel ow.
Fo r be tter stac king of c ups , the she lves can be f olde d
down as sh ow in th e picture below.

*EN 50242 : This programme is the test cycle. The information for comparability test
in accordance with EN 50242, as follows:
Capacity: setti ng
Position Upper ba sket: lowest position
Rinse aid setting: 6
15
Pl:0.49w; Po:0.45 w.
Starting a cycle wash
Means : Rinse -aid dispenser needs to be filled.
( )
Draw out the lowe r and up per basket, load the dishes and push them back.
It is load the lower baske t first, then the up per one (see the section entitled
Loading the Dishwasher ).
Pour in the detergent (see the section entitled Salt, D etergent and Rinse Aid ).
Inse rt the plug into the socket. The power supply is 220-240 VAC /50 HZ, the specification
of th e socket is 10A 250VAC. Make sure that the water supply is turned on to full pressure.
If a program is selected, the response light will . Then press the Start /Pause b utto n
recommended to
turn on and the dishwas her
will start its cycle.
“ ”
“ ”
1
2
3
4
5
Close the door, press the ON/ OFF Button.
Press the program button to select the des ired program .
(or )3in1
5/ 32.5g
Glass
Pre-wash(50 )
Wash (60 )
Rinse
Rinse
Rinse(70 )
Drying
℃
℃
℃
175
1. 6
17.5
Wash(60 )
Rinse (60 )
Drying
Pre-w ash(50 )℃
℃
℃
60 10
1.15
5/32.5g
For heaviest so iled c rocker y,
and normally soiled pots
pans dishes etc with dried
on soiling.
、
、
For lightly soiled loa ds that
do not need excellent drying
effic ien cy.
(or )3in1
5/3 2.5g
Pre-wash( 45 )
Wash (55 )
Rinse
Rinse ( )
Drying
℃
℃
℃65
185
1.3
13.5
For normally soiled loads,
such as , plates ,glasses
and lightly soiled pa ns.
pots
(* EN 5 024 2)
(or )3i n1
5/32.5g
Wash (45 )
Drying
Pre-wash
Rinse(65 )
℃
℃
195
0.93 10
This is st andard progr amme,
it i s s uit able to cl ean no rmall y
s oil ed table war e and i t is t he
most effi ci ent progr amm e in
terms of its combined energy
and water consumption for
that type of tableware.
ECO
For lightly so iled crocker y
and glass.
Rinse
Dr ying
Pr e-wash
wash(40 )
Rinse( )
℃
℃60
130
0.9
13
5/32.5g
Aut o sensing wash, lightly,
normally or hea vil y soile d
crockery, with or with out
dried-on food
P re-w ash
A utowash
Rinse
Rinse
Drying
(45 )
(45-55 )
(65 )
℃
℃
℃
150
0.9~1.3
11-15
(or )3in1(or )3in1
5/27.5g5/32.5g
Au to
One hour
Normal
In tensive
Pre-wash
15 0.02 4
To rinse dishes that you plan
to wash later that day
(or )3in1
(or )3in1
6. Starting a Washing Program
Soak

When the working cycle has finished. Turn off the appliance using the ON/O FF button, shut off the wa ter supply
and open the door of the dishwasher. Wait for a few minutes before unloading the dis hwa sher to avoid handling
the dishes and u tensils w hile they are still hot and more susceptible to break. They will also dry better.
Switching Off the Dishwasher
The program light is on but is not blinking, only in this case has the program ended.
1.Switch off the dishwasher by pressing the ON/OFF button.
2.Turn off the water tap!
Open the door carefully.
Hot dishes are sensitive to minutes before removing from
the appliance.
Open the dishwasher's door, leave it ajar and wait a few minutes before removing the dishes. In this way they
will be cooler and the drying will be improved.
shocks. T he d ishes sh ould c oo l do wn for aroun d 15
Unloading the dishwasher
Empty the lower basket first and then the upper one. This will avoid water dripping from the upper Basket onto
the dishes in the lower one.
It is normal for the dishwasher to be wet inside.
A forgotten dish can be added any time before the detergent cup opens.
Add forgotten dishes.
Close the door
After the spray arms stop working, you can open the door
completely.
2
3
Open the door a little .
14
5Press t he Start/Pau se Butto n. The d ishwasher w ill ru n
after 10 second s.
If you open the door , the machine will pause. The program light will
stop blinking unless you close the door . After you close the door ,the mac hine will keep
on working after 10 seconds.
during a wash cycle
When you press the Start/Pause button to pause during washing, the running indicator will
stop blinking unless you pres s the Start/Pause button to start.
Premise:
A running for a short time. Otherwi se, the
detergent may have already be en released, and the appliance m ay have already dr ained the wash water.
If this is the case, the detergent dispenser must be refil led (see the section entitled " Loading the
Detergent " ).
Press the Start/Pause Button to stop washing , then press progr amme button for more than 3 seconds , the
programme will cancel. Then press the program button to select the desired cycle setting, press the Start/Pause
Button,the dishwasher will run after 10 seconds. (See the section entitled " Starting a wash cycle. . ." ).
running cycle can only be changed if it has only been1
2
It is dangerous to open the door mid-cycle,
as hot steam may scald you.
Changing the Program Mid-Cycle

The filter prevents larger remnants of food or other objects from getting inside th e pum.
The residues may block the filter, in this case they must be removed .
The fi lter system consists of a coarse filter,a flat (Main f ilter)
And a microfilter(Fine filter).
Fo od and soil part icles trap ped in this filter are pulverize d by a
special jet on the l ower spray arm and washed down the drain.
La rger items, such as pieces of bones o r glass, that could block
the drain are tr apped in the coarse filter. To remove the items
caught by the filter, gently sque eze the tap on the top of this
filter and l ift out.
This filter holds soil and food residues in the sump area and prevent s
them f rom bein g redeposited on the dishes duri ng wash cycle.
Main filter
1
Coarse filter
2
Fin e filter
3
2
3
1
Filter assembly
The filter efficiently
For best performance and results, the filter must be cleaned regularly. this reason, it is a goo d idea to
remove the larger food particles trapp ed in the filter after each was h cycle by rinsing the semicircular filte r and
cup under runnin g water. To remove th e filter device, pull the cup handle in the upward direct ion.
removes food particle s from the wash water, allowing it to be rec ycled during the cycl e.
For
The dishwasher must never be used without the filters.
Impro per replacement of the filter may reduce the perform ance level of the appliance
and damage dishes and utensils.
1
2
Step 1 Turn the:filter counterclockwise,
Step 2 lift the filter assy up:
When following this procedure from step1 to step 2, the filter system will be removed;
when following it from Step 2 to Step 1, the filter system will be installed.
7. Maintenance and Cleaning

The control pane l can be clea ned by using a lightly dampened cloth.
After cleaning, m ake sure to dry it thoroug hly.
For the exterior, use a good appliance polish wax.
Never use sharp objects, scouring pads or harsh cleaners on any part of the dishwasher.
Winterizing
1 .Cut off the electrical power to the di shwasher at the supply source.
2. Turn off the water supply and disconnect the water inlet pipe from the water valve.
3. Drain the water from the inlet pipe and water val ve. (Use a pa n to gather the water)
4. Reconnect the water inlet pipe to the water valve.
5. Remov e the filter at the bottom of the tub and use a sponge to soak up water in the s ump.
please take frost protection measures on the dishwasher in winter. Every fter washing cycles,
please operate as follows
time a
:
Cleaning the Filter
Cleaning The Door
To clean the coarse fi lter and the fine filter, use a c leaning b rush. R eassemb le the fi lter p arts (see page 13) and
reinsert them in the dishwa sher, positio ning the m in their seat and pressing downwards.
When cleaning the filters, Otherwise, the filters could be
contorted and the performance of the dishwasher could be decreased.
do not knock them.
To clean the edge around the door, you
To avoid penetration of water into the door lock and electrical components, do not
use a spray cleaner of any kind.
sh ould only use a soft, ward and damp
cloth.
Never use a spray cleaner to clean the door panel as it may damage the door loc k
and electrical components.
Abrasive ag ents or som e paper towels should not be used because of the risk of
scratching or leaving spots on the stainless steel surface.
Cleaning the Spray Arms
If your dishwasher cannot work because of the ice,
please contact professional service persons.
It is necessary to clean the spra y arm s re gularly for hard
water chemicals will clog the sp ray arm jets and bearings.
- A fter each cycle, chec k for any deb ris i n the filter to avo id fu ture blockage.
- By unscrew ing the coar se filter, you can remove the filter system . Remove any foo d remnants and
clean the fi lters under running water.
Remarks:
The entire filter assembly should be cleaned once a week.
To remove th e lower spray arm, pull out the spray arm u pward.
To remove the up per spray arm, hold the nut, rotate the arm
clockwise to r emove it.
Wash the arms in soapy and warm water and use a soft brush to
clean the jets. Replace them after rinsing them thoroughly.

It is recommend that you run a was h cy cle with the
dishwasher empt y and then remove the plug from the
sock et, turn off the wa ter supp ly and leave the door of
the appliance slightly open. This w ill help the door
seals to last longer and prevent odours from forming
withi n the appliance.
If the appliance must be moved, try to keep it in the
vertical position. If absolutely necessary, it can be
positioned on its back.
One of the factors that cau se odours to form in the
dishwasher n the seals.
Periodic cleaning with a damp sponge will prevent this
from occurring.
is remaining food s trapped i
Before cleaning or performing maintenance, always
remove the plug from the socket.
To cle an the exterior a nd rubber parts of the di shwasher,
do not use solvents or abrasive cle aning products.
Only use a clo th w ith warm soapy water.
To remove spots or st ains from the sur face of the
interior, use a cloth da mpened with water an a little
vinegar, o r a cleaning product mad e specifically for
dishw ashers.
Remove the Plug
No Solvents or Abrasive Cleaning
Moving the Appliance
Seals
After every wash, turn off the water supply to the
appliance and leave the door slightly open so that
moisture and odours are not tra pped inside.
After Every Wash
When not in Use for a longTime
Ensure the voltage and frequency of the p ower being correspond s to
those on the rating plate. Only insert the plug into an electrica l socke t which is earthed
prop erly. If the electrical socket to which the a ppliance must be connected is not
appropriate for the plug , replace the socket, rather than using a a daptors or the like as
they could cause ove rheating an d burns.
Plea se look at the rating label to know the rat ing voltage and connect the dishw asher to the app ropriate power supply.
Use the required fuse 10 amp, time delay fuse or circuit breaker recommended and provide separate circuit serving
only this appliance.
Position the appli ance in the desired location. The back should rest against the wall behind it, and the sides,
along the adjacent cabinets or walls. The dishwasher is equippe d with water supply and drain hoses that can
be positioned either to the right or the left s ides to facilitate proper installation.
Once the appl iance is positioned for levelling, the height of the dishwasher
level of the feet. In any case,
the applia nce should not be inclin ed more than 2 .
ma y be altered by adjusting the screw ing
For personal safety:
Do not use an extension cord or an adapter plug
with this appliance.
Do not, under any circumstances, cut or remove
the earthing connection from the power cord.
This manual suits for next models
1
Table of contents
Other Brandt Dishwasher manuals

Brandt
Brandt LVE127J User manual

Brandt
Brandt DVC1434JU User manual

Brandt
Brandt VS1010X User manual

Brandt
Brandt DFS1010W User manual

Brandt
Brandt VH1520J User manual

Brandt
Brandt BKDD435J2 User manual

Brandt
Brandt BDB424DX User manual

Brandt
Brandt DWJ137DS User manual

Brandt
Brandt VI 310 User manual

Brandt
Brandt DWF128DW User manual

Brandt
Brandt VF400JU1 User manual

Brandt
Brandt VH1544J User manual

Brandt
Brandt DFH13524W User manual

Brandt
Brandt DWJ127DS User manual

Brandt
Brandt VH1542X User manual

Brandt
Brandt VH1544X User manual

Brandt
Brandt VF 320 User manual

Brandt
Brandt VH1472X User manual

Brandt
Brandt VH1472J User manual

Brandt
Brandt BDF534DW User manual