Braun Acculan 3Ti Manual

Aesculap Power Systems
Acculan® 3Ti
Instructions for use/Technical description
Acculan® 3Ti Dermatome GA670
Gebrauchsanweisung/Technische Beschreibung
Acculan® 3Ti Dermatom GA670
Mode d’emploi/Description technique
Dermatome Acculan® 3Ti
Instrucciones de manejo/Descripción técnica
Dermátomo Acculan® 3Ti
Istruzioni per l’uso/Descrizione tecnica
Dermatomo Acculan® 3Ti
Instruções de utilização/Descrição técnica
Dermátomo Acculan® 3Ti
Gebruiksaanwijzing/Technische beschrijving
Acculan® 3Ti dermatoom
Brugsanvisning/Teknisk beskrivelse
Acculan® 3Ti-Dermatom
Bruksanvisning/Teknisk beskrivning
Acculan® 3Ti dermatom
Инструкция по примению/Техническое
описание
Дерматом Acculan® 3Ti
Instrukcja u¿ytkowania
Dermatom GA670 Acculan® 3Ti

23
26
25
21
2222
20
24


Aesculap Power Systems
Acculan® 3Ti Dermatome GA670
2
Note
Keep instructions for use in Acculan® 3Ti folder!
Legend
1Dermatome
2Nut
3Sliding surfaces
4Trigger (for controlling the oscillation frequency)
5Safety catch
6Blade cover
7Clamping lever
8Sliding surfaces
9Blade guide peg
10 Pusher dog
11 Flap tabs
12 Flaps
13 Surface
14 Setting lever
15 Lock (of setting lever)
16 Dial wheel
17 Roll pin
18 Flap rod
19 Guide slots
20 Sterile funnel
21 Cover
22 Cover release button
23 Battery
24 Dermatome blade
25 Battery removal device
26 Color code
Symbols on product and packages
Caution: See documentation
supplied with the product
Classification Type BF
Labeling of electric and
electronic devices according to
directive 2002/96/EC (WEEE),
see Disposal
Oscillation frequency control
Keep this product dry!
Service label on battery (base)
Notice indicating the next
scheduled service (date) by an
international B. Braun/
Aesculap agency, see
Technical Service
Direction of rotation to undo
the nut

3
Contents
1. Safe handling and preparation ...........................4
2. Product description ................................................ 4
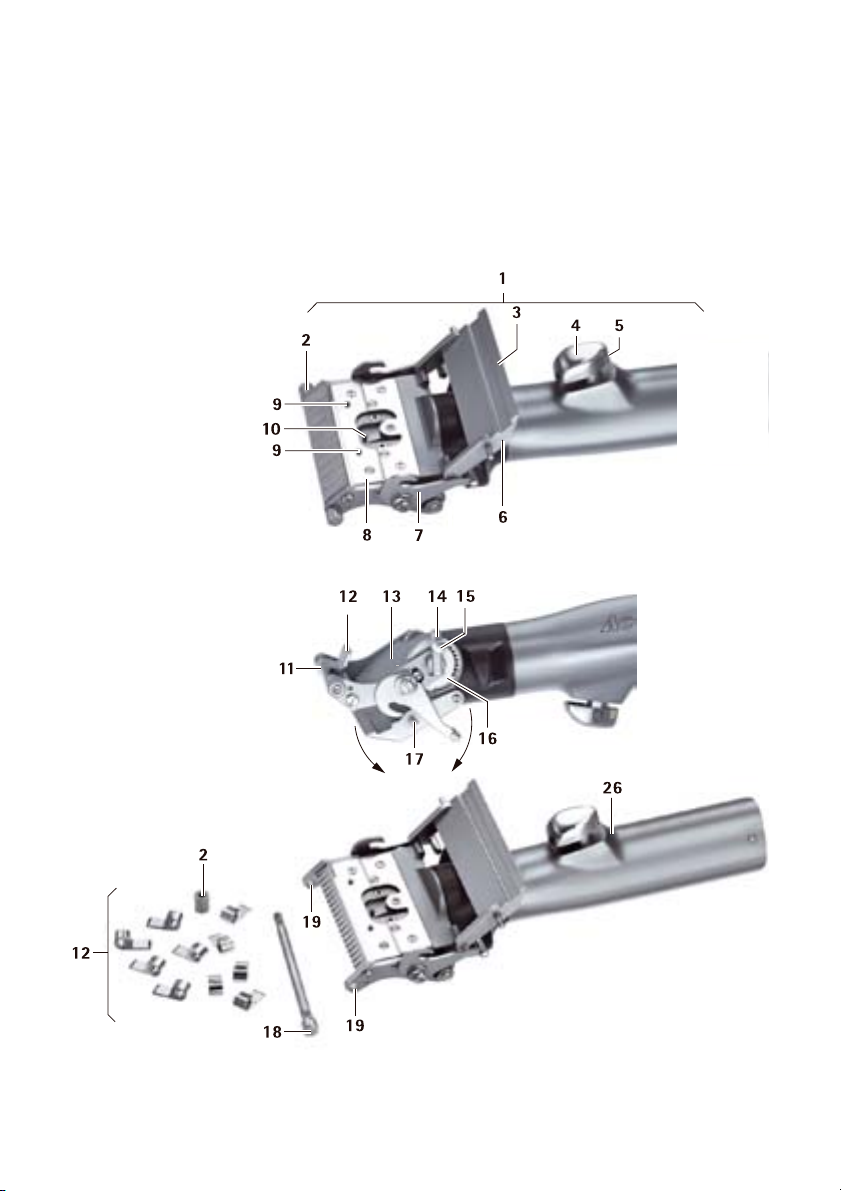
2.1 System components ............................................... 4
2.2 Components necessary for use ........................... 4
2.3 Intended use ............................................................. 5
2.4 Operating principle ................................................. 5
3. Preparation ............................................................... 5
4. Working with the Acculan® 3Ti Dermatome .. 5
4.1 System set-up .......................................................... 5
Installing the flap rod of
the Acculan® 3Ti Dermatome.............................. 5
Dismantling the flap rod of
the Acculan® 3Ti Dermatome.............................. 5
Connecting the accessories.................................. 6
Inserting the dermatome blade........................... 6
Removing the dermatome blade......................... 7
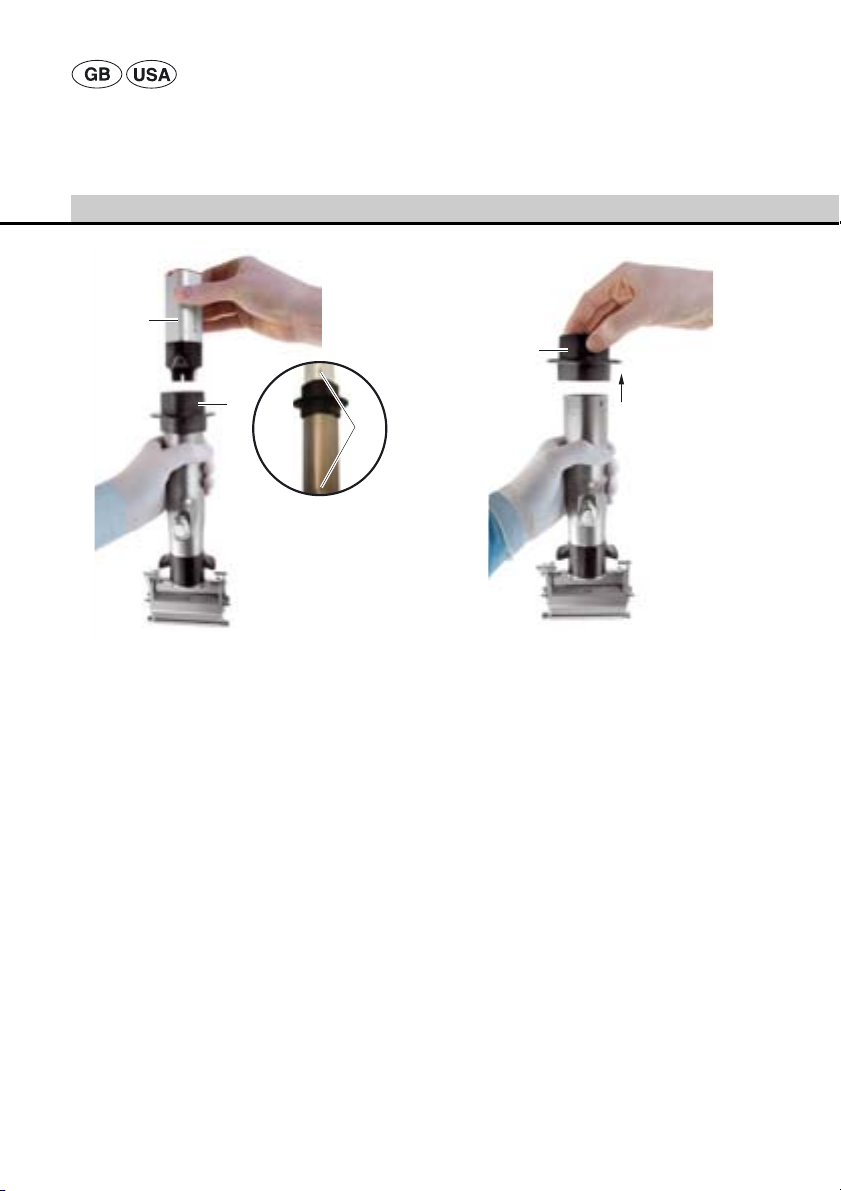
Inserting the battery.............................................. 7
Removing the battery ............................................ 9
Intraoperative battery change........................... 10
Protection against inadvertent activation..... 11
Intraoperative storage......................................... 11
4.2 Function checks .....................................................12
4.3 Safe operation .......................................................12
Adjusting the cutting depth of
the Acculan® 3Ti Dermatome............................ 12
Adjusting the cutting width of
the Acculan® 3Ti Dermatome............................ 12
Operating the Acculan® 3Ti Dermatome........ 13
Taking skin grafts.................................................. 13
5. Validated processing procedure .......................14
5.1 Single-use products .............................................14
5.2 General notes .........................................................14
5.3 Preparations at the place of use ......................15
5.4 Preparation prior to cleaning ............................15
5.5 Cleaning/Disinfecting ..........................................16
5.6 Manual cleaning/disinfecting ...........................17
Manual cleaning and wipe disinfection......... 17
5.7 Mechanical cleaning/disinfecting ....................18
Mechanical alkaline cleaning and
thermal disinfecting............................................. 19
5.8 Inspection, maintenance and checks ..............19
5.9 Packaging ................................................................19
5.10 Sterilization method and parameters .............20
5.11 Sterilization for the US market .........................20
5.12 Storage .....................................................................20
6. Maintenance ..........................................................21
7. Troubleshooting list .............................................22
8. Technical Service ..................................................23
9. Accessories/Spare parts ......................................23
10. Technical specifications ......................................24
10.1 Ambient conditions ..............................................24
11. Disposal ...................................................................25
12. Distributor in the US/Contact in Canada
for product information and complaints .......25
Direction of rotation to
tighten the nut
Service label on Acculan® 3Ti
Dermatome
Notice indicating the next
scheduled service (date) by an
international B. Braun/
Aesculap agency, see
Technical Service

Aesculap Power Systems
Acculan® 3Ti Dermatome GA670
4
1. Safe handling and
preparation
CAUTION
Federal law restricts this device to sale by or on
order of a physician!
¾Prior to use, check for proper condition and func-
tioning of the product.
¾Do not use the product if it is damaged or
defective. Set aside the product if it is damaged.
¾To prevent damage caused by improper setup or
operation, and in order not to compromise
warranty and manufacturer liability:
– Use the product only according to these
instructions for use.
– Observe all safety information and maintenance
advisories.
– Only combine Aesculap products with each other.
– Follow the application advisories acc. to standard,
see “Extracts from relevant standards”.
¾Ensure that the product and its accessories are
operated and used only by persons with the
requisite training, knowledge or experience.
¾Keep the instructions for use accessible for the
user.
¾Always adhere to applicable standards.
¾Follow the instructions for use of the Acculan® 3Ti
Charger, TA022160.
2. Product description
2.1 System components
2.2 Components necessary for use
Designation Art. no.
Acculan® 3Ti Dermatome GA670
Cover GA675
Sterile funnel GA678
Battery GA666
Instructions for use TA013000
Instructions for use
of battery GA666
TA011867
Designation Art. no.
STERILIT® Power Systems drip
lubricator (50 ml)
GA059
Acculan® 3Ti Dermatome GA670
Cover GA675
Sterile funnel GA678
Battery GA666
Charger GA677
Dermatome blade GB228R
STERILIT® Power Systems oil spray
(300 ml)
GB600

5
2.3 Intended use
The Acculan® 3Ti Dermatome is used to produce skin
grafts in dermatologic/traumatologic surgery.
2.4 Operating principle
In the Acculan® 3Ti Dermatome, the rotational speed
of the motor is converted, through reduction gearing
and an eccentric drive unit, directly and with minimum
loss into oscillating movement of the dermatome
blade.
3. Preparation
Non-compliance with these rules will result in
complete exclusion of liability on the part of Aesculap.
¾Prior to use, inspect the Acculan® 3Ti Dermatome
and its accessories for visible damage.
¾Only use Acculan® 3Ti Dermatomes and accessories
that are in perfect condition.
4. Working with the
Acculan® 3Ti Dermatome
4.1 System set-up
Installing the flap rod of the Acculan® 3Ti
Dermatome
¾Attach flaps 12 on flap rod 18 down to the onset
of the rear surface. Observe the symbol on the face
of the thread.
¾Screw the nut 2counterclockwise onto the thread
of flap rod 18 (left-handed thread).
¾Screw the nut 2down to the edge of the visible
surface.
¾Insert and twist flap rod assembly 18 in guide
slots 19 at the lateral surfaces.
¾Push flap rod 18 sideways to the positive stop, so
that the cross pin of flap rod 18 is seated in guide
slot 19.
¾Tighten nut 2by turning it counterclockwise.
Dismantling the flap rod of the Acculan® 3Ti
Dermatome
Fig. 1 Flap rod dismantled
¾Loosen the nut 2by turning it clockwise (left-
handed thread).
¾Screw the nut 2back to the end of the visible
surface.
2 19
19
18
12

Aesculap Power Systems
Acculan® 3Ti Dermatome GA670
6
¾Press on nut 2and push flap rod 18 approx. 4 mm
to one side.
¾Twist flap rod 18 until it can be removed.
¾Remove flap rod 18.
¾Slide off flaps 12 from flap rod 18.
Connecting the accessories
Combinations of accessories that are not mentioned in
the present instructions for use may only be employed
if they are specifically intended for the respective
application, and if they do not compromise the
performance and safety characteristics of the
products.
Also, all equipment connected at the interfaces must
demonstrably meet the respective IEC standards (e.g.
IEC 60950 for data processing equipment, EN 60601
for electromedical devices).
All configurations must meet the system standard
IEC 60601-1-1. The person connecting the units is
responsible for the configuration and must ensure
compliance with system standard IEC 60601-1-1 or
equivalent national standards.
¾Please contact your B. Braun/Aesculap Partner or
Aesculap Technical Service, address see Technical
Service with any inquiries in this respect.
Inserting the dermatome blade
¾Engage safety catch 5.
¾Push both clamping levers 7in the direction of the
arrows.
Blade cover 6is now unlocked.
¾Open blade cover 6in the direction of the arrow.
¾Safely insert dermatome blade 24 in pusher dog 10
and blade guide peg 9, see Fig. 2.
¾Close blade cover 6.
¾Tighten both clamping levers 7so that roll pin 17
engages in the recess of clamping lever 7.
DANGER
Risk of injury due to unapproved
configuration using additional
components!
¾For all components, ensure that
their classification (e.g. Type BF
or Type CF) is the same as that
of the device in the respective
application.
DANGER
Risk of infection and contamination
due to torn or cut surgical gloves!
¾Avoid contact with the cutting
edge when inserting the
dermatome blade.
DANGER
Risk of injury and material damage
due to inadvertent activation of the
dermatome while inserting the
dermatome blade!
¾Prior to inserting the dermatome
blade, engage the safety catch.

7
Removing the dermatome blade
Fig. 2 Safe insertion and removal of the dermatome
blade
¾Release both clamping levers 7.
¾Open blade cover 6.
¾Remove dermatome blade 24 from pusher dog 10
and blade guide peg 9.
Inserting the battery
Fig. 3 Installing the sterile funnel
¾Hold dermatome 1so that the battery
compartment is facing upwards.
¾Install sterile funnel 20, see Fig. 3.
24
9
7
6
CAUTION
Damage to, or destruction of the
batteries due to processing!
¾Do not sterilize batteries.
20
1

Aesculap Power Systems
Acculan® 3Ti Dermatome GA670
8
Fig. 4 Installing the sterile funnel in the battery
compartment
¾Have a helper insert the (unsterile) battery 23
through sterile funnel 20 into the battery
compartment (observe color code 26).
Note
Once the battery is in the battery compartment, a series
of acoustic blips will signal that the dermatome is ready
for operation.
Note
The color code on the floor of the battery compartment
must match the color code at the bottom of the battery.
Fig. 5 Removing the sterile funnel
¾Once the battery has been inserted, have a helper
remove sterile funnel 20 (unsterile), see Fig. 5.
23
20
26
20

9
Fig. 6 Mounting the battery compartment cover
¾Mount cover 21 (sterile) so that it engages at both
cover release buttons 22, see Fig. 6.
Note
Sterility of the unit is ensured only if cover is mounted
correctly.
Removing the battery
Fig. 7 Tapping the dermatome
21
22
CAUTION
Damage to the dermatome and/or
battery caused by knocking the unit
against hard objects!
¾Only tap the dermatome against
the palm of the hand.
¾To remove the battery, only ever
knock the motor unit against
the palm of the hand.

Aesculap Power Systems
Acculan® 3Ti Dermatome GA670
10
Fig. 8 Removing the battery
Note
The battery must be removed after the surgical
operation and prior to processing.
Note
Battery removal device can be used to facilitate the
removal of the battery, see Fig. 9!
¾Hold dermatome 1with the battery compartment
facing upward.
¾Simultaneously press both cover release buttons 22
at cover 21 and remove cover 21.
¾With one hand, completely envelope the battery
compartment at its lower end, see Fig. 7.
¾Tap battery 23 against the palm of the other hand
and remove the battery from the battery
compartment, see Fig. 8.
Intraoperative battery change
Note
The function checks must be carried out prior to each
surgical application of the unit and after each
intraoperative battery change!
Battery removal device is used for intraoperative
battery changes ensuring that sterile conditions are
safely maintained.
Fig. 9 Using the battery removal device
¾Hold dermatome 1with the battery compartment
facing upward and remove cover 21.
¾Mount sterile battery removal device 25, see Fig. 9.
25
1

11
¾Slightly shake dermatome 1with battery removal
device 25 mounted and the battery compartment
facing downward.
Battery 23 smoothly slips into battery removal
device 25.
¾Hand battery removal device 25 containing the
discharged battery 23 to an unsterile helper.
¾Insert charged battery 23, see Inserting the
battery.
Protection against inadvertent activation
Fig. 10 Engaging the safety catch
To prevent inadvertent activation of dermatome 1
while replacing the dermatome blade, trigger 4must
be locked.
¾To lock trigger 4: Move safety catch 5to its OFF
position, see Fig. 10.
Trigger 4is locked. Dermatome 1cannot be activated.
¾To unlock trigger 4: Move safety catch 5to its ON
position, see Fig. 10.
Trigger 4is unlocked. Dermatome 1can be
activated.
Intraoperative storage
Fig. 11 Storing the dermatome ready for operation in
its Eccos® holder
Note
Eccos® holder can be used for intraoperative storage of
the dermatome. The dermatome cannot be processed in
this position. For the correct processing position, see
Mechanical cleaning/disinfecting!
¾Engage safety catch 5against inadvertent
activation, see Protection against inadvertent
activation.
¾Fold back the clamp of the Eccos® holder.
¾Place dermatome 1in the Eccos® holder.
4
5
1

Aesculap Power Systems
Acculan® 3Ti Dermatome GA670
12
4.2 Function checks
Note
The function checks must be carried out prior to each
surgical application of the unit and after each
intraoperative battery change!
¾Follow the advisories/procedure for inspection,
maintenance and checks, see Inspection,
maintenance and checks.
¾Ensure that a dermatome blade is correctly seated
in the dermatome.
¾Ensure that there is a battery in the battery
compartment.
¾Check that the roll pin is securely seated.
¾Check that the dermatome blade is securely seated.
¾Briefly activate the dermatome at maximum
oscillation frequency.
4.3 Safe operation
Adjusting the cutting depth of the Acculan®
3Ti Dermatome
Note
The skin condition (e.g. due to age) of the patient must
be considered when adjusting the cutting depth (graft
thickness)!
¾Set the cutting depth at setting lever 14.
Lock 15 of setting lever 14 prevents inadvertent
changes of the cutting depth setting.
¾Read the cutting depth (graft thickness) on dial
wheel 16 (1/10 mm gradation).
¾Follow the troubleshooting advisories/procedure,
see Troubleshooting list.
Adjusting the cutting width of the Acculan®
3Ti Dermatome
Note
The width of the skin graft will be approx. 2 mm less
than the cutting width set by the flaps.
WARNING
Risk of injury caused by inadvertent
activation of the motor!
¾Secure dermatomes that are not
actually used against
inadvertent activation.
WARNING
Risk of injury and/or malfunction!
¾Always carry out a function
check before using the product.
WARNING
Risk of injury/cuts by the
dermatome blade if the flaps are
opened incorrectly!
¾Always use the flap tabs for
lifting the flaps.

13
Fig. 12 Safely lifting the flaps
¾Set the required cutting width by opening the
appropriate number of flaps 12.
¾Safely lift flaps 12 by pressing flap tabs 11.
¾Completely open flaps 12 until they engage in their
end positions (flap width = 8 mm).
Operating the Acculan® 3Ti Dermatome
Note
The low howling noise heard during startup of the
Acculan® 3Ti Dermatome is normal for this product!
¾Press trigger 4.
The dermatome runs at the continuously controlled
oscillation frequency.
Taking skin grafts
Before using the Acculan® 3Ti Dermatome for the first
time, the user should carry out some test cuts on a
specimen to make themselves familiar with the
operation of the device.
¾Stretch flabby skin.
¾With the sliding surface in level contact with the
skin, push forward dermatome 1in a smooth
movement, applying gentle pressure. Be careful not
to cant dermatome 1.
¾For very thin grafts, use a forceps, from time to
time, to lay up the resected portion of the graft on
surface 13.
¾Switch off the motor and extract the fresh graft
from the dermatome.
- or -
¾Lower the handle and cut off the skin graft with
dermatome 1.
12
11

Aesculap Power Systems
Acculan® 3Ti Dermatome GA670
14
5. Validated processing
procedure
Note
Adhere to national statutory regulations, international
standards and guidelines, and local, clinical hygiene
instructions for sterile processing.
Note
For patients with Creutzfeldt-Jakob disease (CJD),
suspected CJD or possible variants of CJD, observe the
relevant national regulations concerning the
reprocessing of the products.
Note
Mechanical processing should be preferred over
manual cleaning, as mechanical processing produces
better and more reliable cleaning results.
Note
Up-to-date information on processing can be found on
the Aesculap Extranet at www.aesculap-extra.net
Note
Successful processing of this medical product can only
be ensured if processing is performed through a
validated processing procedure. The user/processor is
responsible for the validation.
Due to process tolerances, the manufacturer’s
specifications can only serve as an approximate guide
for assessing the processing procedures applied by the
individual operator/processors.
5.1 Single-use products
5.2 General notes
Encrusted or fixated residues from surgery can make
the cleaning process more difficult or ineffective, and
can cause corrosion of stainless steels. To avoid this,
the time interval between application and processing
should not exceed 6 h, and neither fixating pre-
cleaning temperatures >45 °C nor any fixating
disinfecting agents (active ingredient: aldehyde,
alcohol) be used.
Excessive doses of neutralizers or basic detergents can
cause chemical degradation and/or fading and
obliteration of laser inscriptions on stainless steel
surfaces, regarding visual reading and machine-
readability of the inscriptions.
WARNING
Risk to patients due to damaged,
broken or contaminated products!
These products are intended for
single use only!
¾Do not reprocess the product.
Designation Art. no.
Dermatome blade GB228R

15
Residues containing chlorine or chlorides e.g. in
surgical residues, medicines, saline solutions and in the
service water used for cleaning, disinfection and
sterilization will cause corrosion damage (pitting,
stress corrosion) and result in the destruction of
stainless steel products. To remove such residues, the
products must be rinsed sufficiently with fully
desalinated water and dried thoroughly.
Only process chemicals that have been tested and
approved (e.g. VAH/DGHM or FDA approval or CE mark)
and which are compatible with the product’s materials
according to the chemical manufacturers’
recommendations may be used for processing the
product. All process parameters specified by the
chemical’s manufacturer, such as temperatures,
concentrations and exposure times, must be strictly
observed. Failure to do so can result in the following
problems:
• optical changes to the material, e.g. fading or
discoloration of titanium or aluminum. For
aluminum, pH >8 in the application/process can
already cause visible surface changes.
• material damage such as corrosion, cracks,
fracturing, premature aging or swelling.
¾Do not use process chemicals that cause stress
cracking or brittleness of plastic materials.
¾Further detailed advice on hygienically safe and
material-/value-preserving reprocessing can be
found at www.a-k-i.org, Publications Red Brochure
– Proper maintenance of instruments.
5.3 Preparations at the place of use
¾Remove all batteries from the Acculan® 3Ti
Dermatome, see Removing the battery.
¾Open the clamping levers and remove the
dermatome blade.
¾Disassemble the product immediately after use, as
described in the respective instructions for use.
¾Remove visible surgical residues as completely as
possible, using a lint-free wet wipe.
¾Dismantle the flap rod of the dermatome, see
Dismantling the flap rod of the Acculan® 3Ti
Dermatome.
5.4 Preparation prior to cleaning
¾Have the product dry in a disposal container and
ready for immediate cleaning and disinfecting
within 30 min after use.

Aesculap Power Systems
Acculan® 3Ti Dermatome GA670
16
5.5 Cleaning/Disinfecting
¾Do not clean the motors/handpieces in an
ultrasound bath and do not immerse them in any
fluid.
Let any fluid that penetrates into the product drain
out immediately to avoid the risk of corrosion/
malfunctioning of the product.
CAUTION
Damage to the product due to
inappropriate cleaning/disinfecting
agents and/or excessive
temperatures!
¾Use cleaning and disinfecting
agents according to the
manufacturer’s instructions. The
cleaning and disinfecting agents
must
- be approved for plastics and
high-grade steel,
- not attack softeners (e.g.
silicone).
¾Observe specifications regarding
concentration, temperature and
exposure time.
¾Do not exceed the maximum
allowable cleaning temperature
of 55 °C.

17
5.6 Manual cleaning/disinfecting
Manual cleaning and wipe disinfection
D–W: Drinking water
FD–W: Fully desalinated water (demineralized)
RT: Room Temperature
Stage I
¾Clean the product under running tap water, using
a suitable cleaning brush if necessary, until all
visible residues have been removed from the
surfaces.
¾Mobilize non-rigid components, such as set screws,
links, etc. during cleaning.
¾Make certain the product is positioned in such a
way that water will not enter the product e.g.
through coupling interfaces. (Immediately remove
any fluid that entered inadvertently.)
¾Do not use metal cleaning brushes or other
abrasives that would damage the product surfaces
and could cause corrosion.
Stage II
¾Dry the product with lint-free tissue or medical-
quality filtered compressed air.
Stage III
¾Wipe all surfaces of the product with a single-use
disinfecting wipe.
Stage IV
¾After the specified exposure time (of at least
1 minute), rinse the disinfected surfaces under
running FD water.
¾Hold the product in such a way that water cannot
enter it e.g. through couplings or adapters.
¾Allow water to drip off for a sufficient length of
time.
Stage V
¾Dry the product with lint-free tissue or medical-
quality filtered compressed air.
Stage Step T
[°C/°F]
t
[min]
Conc.
[%]
Water
quality
Chemical
ICleaning RT
(cold)
--D–W-
II Drying RT - - - -
III Wipe disinfection -≥1 - - Meliseptol HBV wipes
50 % Propan-1-ol
IV Final rinse RT
(cold)
0.5 - FD–W -
VDrying RT - - - -

Aesculap Power Systems
Acculan® 3Ti Dermatome GA670
18
5.7 Mechanical cleaning/disinfecting
Note
Categorically, the disinfector must be of tested and
approved effectiveness (e.g. DGHM or FDA approval or
CE mark according to DIN EN ISO 15883).
Note
For thermal disinfection, always use fully desalinated
(demineralized) water. Ensure that Ao is >3 000 for the
process.
Note
The disinfector used for processing must be serviced
and checked at regular intervals.
Fig. 13 Tray with product in Eccos® holder
¾Dismantle the flap rod, see Dismantling the flap rod
of the Acculan® 3Ti Dermatome.
¾Store flaps and nut separately.
¾Ensure that the blade cover is kept open through
the entire processing procedure.
¾Use Eccos® tray GB256R fitted with Acculan® 3Ti
holders, or mount appropriate holders (e.g. Eccos®
holder GB498R) in a suitable tray (instructions for
use TA009721 for Aesculap Eccos® storage
system).
¾Insert the product in its proper position, with the
trigger pointing upwards, in Eccos® holder
GB498R.
Place the battery compartment over the clamp and
swivel the device into the Eccos® holder so that the
trigger points upward, see Fig. 13.
Other manuals for Acculan 3Ti
4
Table of contents
Languages: