Braun Aesculap S4 User manual

Aesculap®
Aesculap Spine
Instructions for use
Screwdriver S4®
Gebrauchsanweisung
Schraubendreher S4®
Mode d'emploi
Tournevis S4®
Instrucciones de manejo
Destornillador S4®
Istruzioni per l'uso
Cacciavite S4®
Instruções de utilização
Chave de parafusos S4®
Gebruiksaanwijzing
Schroevendraaier S4®
Bruksanvisning
Skruvmejsel S4®
Инструкция по применению
Отвертка S4®
Návod k použití
Šroubovák S4®
Instrukcja użytkowania
Śrubokręt S4®
Návod na používanie
Skrutkovač S4®
Kullanım Kılavuzu
Tornavida S4®

2
Aesculap®
Screwdriver S4®
Aesculap®
Screwdriver S4®
Legend
ABase unit
BScrewdriver
CScrew sleeve
DRotating tube
Symbols on product and packages
Applicable to
►For article-specific instructions for use and infor-
mation on material compatibility, see also
Aesculap Extranet at www.aesculap-extra.net
Intended use
Screwdriver S4is used to screw S4polyaxial screws into
bone.
Safe handling and preparation
CAUTION
Federal law restricts this device to sale by, or on
oder of by a physician!
►Ensure that the product and its accessories are
operated and used only by persons with the requi-
site training, knowledge, or experience.
►Read, follow, and keep the instructions for use.
►Use the product only in accordance with its
intended use, see Intended use.
►Remove the transport packaging and clean the new
product, either manually or mechanically, prior to
its initial sterilization.
►Store any new or unused products in a dry, clean,
and safe place.
►Prior to each use, inspect the product for loose,
bent, broken, cracked, worn, or fractured compo-
nents.
►Do not use the product if it is damaged or defec-
tive. Set aside the product if it is damaged.
►Replace any damaged components immediately
with original spare parts.
Caution, general warning symbol
Caution, see documentation sup-
plied with the product
WARNING
Risk of injury caused by incor-
rect operation of the product!
►Attend appropriate prod-
uct training before using
the product.
►For information about
product training, please
contact your national
B. Braun/Aesculap agency.

3
Safe operation
►Push ratchet handle 1onto the screwdriver until it
engages, see Fig. 1.
Fig. 1
►Screw an S4screw onto thread 2up to stop 3, see
Fig. 2. Turn rotating sleeve 4clockwise at the same
time.
Fig. 2
The screwdriver is now ready for use.
Disassembling
►Pull rotating tube Dout of rotating sleeve 4, in the
direction of the arrow, see Fig. 3.
►Open bayonet lock 5.
Fig. 3
►Extract screw sleeve Cfrom rotating sleeve 4, see
Fig. 4.
Fig. 4
►Pull screwdriver Band coupling 6out of base
unit A, see Fig. 5.
Fig. 5
WARNING
Risk of injury and/or malfunc-
tion!
►Always carry out a func-
tion check prior to using
the product.
1
„click“
2
34
D
„click“
5
4
C
6
B

4
Aesculap®
Screwdriver S4®
Assembling
►Insert screwdriver Band coupling 6into base
unit A, in the direction of the arrow, see Fig. 6.
Fig. 6
►Push screw sleeve Conto screwdriver B, in the
direction of the arrow, see Fig. 7.
►Engage bayonet lock 5.
Fig. 7
►Push rotating tube Donto base unit Ain the direc-
tion of the arrow, until it engages, see Fig. 8.
Fig. 8
Validated reprocessing procedure
General safety instructions
Note
Adhere to national statutory regulations, national and
international standards and directives, and local, clini-
cal hygiene instructions for sterile processing.
Note
For patients with Creutzfeldt-Jakob disease (CJD), sus-
pected CJD or possible variants of CJD, observe the rel-
evant national regulations concerning the reprocessing
of products.
Note
Mechanical reprocessing should be favored over man-
ual cleaning as it gives better and more reliable results.
Note
Successful processing of this medical device can only
be ensured if the processing method is first validated.
The operator/sterile processing technician is responsi-
ble for this.
The recommended chemistry was used for validation.
Note
If there is no final sterilization, then a virucidal disin-
fectant must be used.
Note
For the latest information on reprocessing and material
compatibility see also the Aesculap extranet at
www.aesculap-extra.net
The validated steam sterilization procedure was carried
out in the Aesculap sterile container system.
6
B
C
B
5
5
D A
„click“

5
General information
Dried or affixed surgical residues can make cleaning
more difficult or ineffective and lead to corrosion.
Therefore the time interval between application and
processing should not exceed 6 h; also, neither fixating
pre-cleaning temperatures >45 °C nor fixating disin-
fecting agents (active ingredient: aldehydes/alcohols)
should be used.
Excessive measures of neutralizing agents or basic
cleaners may result in a chemical attack and/or to fad-
ing and the laser marking becoming unreadable visu-
ally or by machine for stainless steel.
Residues containing chlorine or chlorides e.g. in surgi-
cal residues, medicines, saline solutions and in the ser-
vice water used for cleaning, disinfection and steriliza-
tion will cause corrosion damage (pitting, stress
corrosion) and result in the destruction of stainless
steel products. These must be removed by rinsing thor-
oughly with demineralized water and then drying.
Additional drying, if necessary.
Only process chemicals that have been tested and
approved (e.g. VAH or FDA approval or CE mark) and
which are compatible with the product’s materials
according to the chemical manufacturers’ recommen-
dations may be used for processing the product. All the
chemical manufacturer's application specifications
must be strictly observed. Failure to do so can result in
the following problems:
■Optical changes of materials, e.g. fading or discol-
oration of titanium or aluminum. For aluminum,
the application/process solution only needs to be
of pH >8 to cause visible surface changes.
■Material damage such as corrosion, cracks, fractur-
ing, premature aging or swelling.
►Do not use metal cleaning brushes or other abra-
sives that would damage the product surfaces and
could cause corrosion.
►Further detailed advice on hygienically safe and
material-/value-preserving reprocessing can be
found at www.a-k-i.org, link to Publications, Red
Brochure – Proper maintenance of instruments.
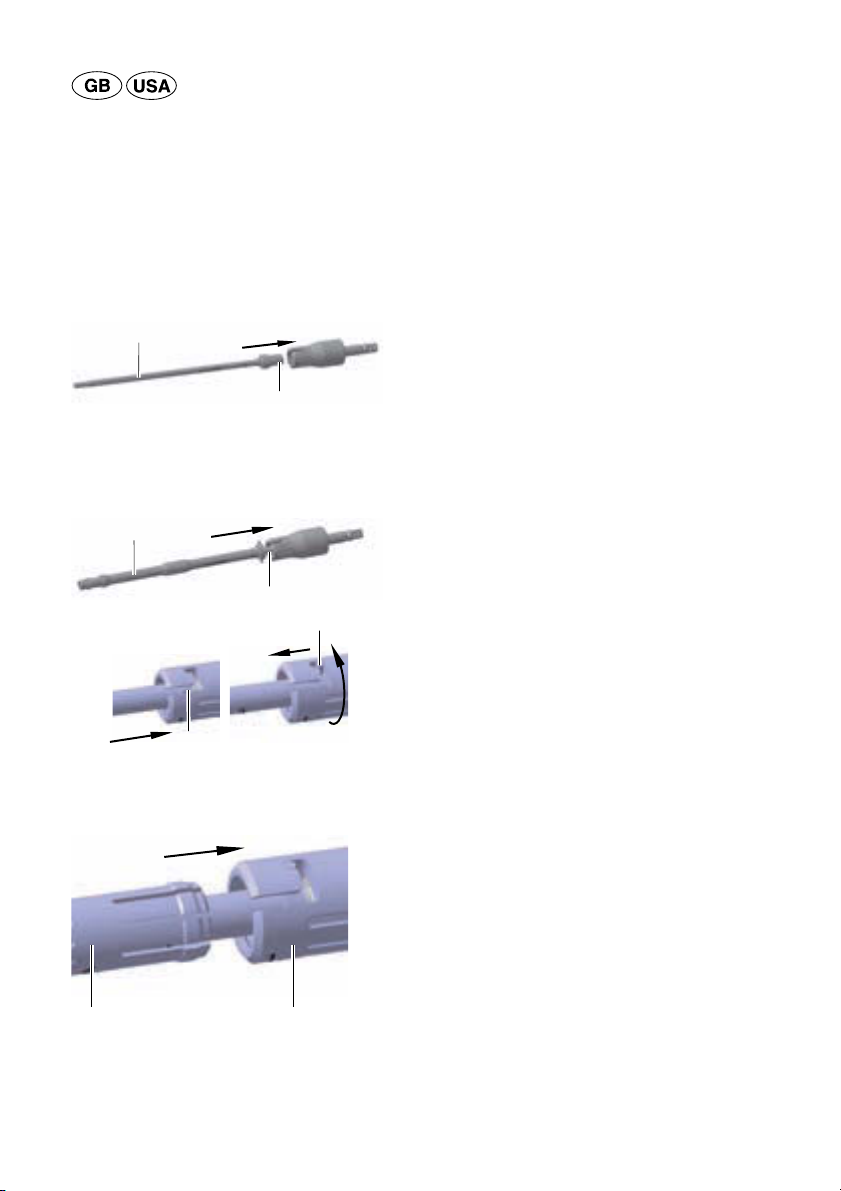
Disassembling the product before carry-
ing out the reprocessing procedure
►Disassemble the product immediately after use, as
described in the respective instructions for use.
Preparations at the place of use
►If applicable, rinse non-visible surfaces preferably
with deionized water, with a disposable syringe for
example.
►Remove any visible surgical residues to the extent
possible with a damp, lint-free cloth.
►Transport the dry product in a sealed waste con-
tainer for cleaning and disinfection within 6 hours.
Preparation before cleaning
►Dismantle the product prior to cleaning, see Disas-
sembling.
Cleaning/disinfection
Product-specific safety notes on the repro-
cessing procedure
CAUTION
Damage to the product due to
inappropriate cleaning/disin-
fecting agents and/or exces-
sive temperatures!
►Use cleaning and disinfect-
ing agents approved for,
e.g., aluminum, plastics
and high-grade steel,
according to the manufac-
turer’s instructions.
►Observe specifications
regarding concentration,
temperature and exposure
time.

6
Aesculap®
Screwdriver S4®
Validated cleaning and disinfection procedure
Validated procedure Specific requirements Reference
Manual cleaning with
immersion disinfection
■Cleaning brush: 50 mm/
∅: 10 mm, e.g., TA no. 007747
■20 ml disposable syringe
■Dryingphase: Use a lint-freecloth
or medical compressed air
Chapter Manual cleaning/disinfection and
sub-chapter:
■Chapter Manual cleaning with immer-
sion disinfection
Manual pre-cleaning
with brush and subse-
quent mechanical alka-
line cleaning and ther-
mal disinfection
■Cleaning brush: 50 mm/
∅: 10 mm, e.g., TA no. 007747
■20 ml disposable syringe
■Place the instrument in a tray
that is suitable for cleaning
(avoiding rinsing blind spots).
■Keep working ends open for
cleaning.
■Place instruments in the tray with
their hinges open.
Chapter Mechanical cleaning/disinfection
with manual pre-cleaning and sub-chap-
ter:
■Chapter Manual pre-cleaning with a
brush
■Chapter Mechanical alkaline cleaning
and thermal disinfecting

7
Manual cleaning/disinfection
►Prior to manual disinfecting, allow water to drip off
for a sufficient length of time to prevent dilution of
the disinfecting solution.
►After manual cleaning/disinfection, check visible
surfaces visually for residues.
►Repeat the cleaning /disinfection process if neces-
sary.
Manual cleaning with immersion disinfection
D–W: Drinking water
FD–W: Fully desalinated water (demineralized, low microbiological contamination: drinking water
quality at least)
RT: Room temperature
*Recommended: BBraun Stabimed
►Note the information on appropriate cleaning
brushes and disposable syringes, see Validated
cleaning and disinfection procedure.
Phase Step T
[°C/°F]
t
[min]
Conc.
[%]
Water
quality
Chemical
I Disinfecting
cleaning
RT (cold) >15 2 D–W Aldehyde-free, phenol-free,
and QUAT-free concentrate,
pH ~ 9*
II Intermediate rinse RT (cold) 1 - D–W -
III Disinfection RT (cold) 15 2 D–W Aldehyde-free, phenol-free,
and QUAT-free concentrate,
pH ~ 9*
IV Final rinse RT (cold) 1 - FD-W -
VDrying RT - - - -

8
Aesculap®
Screwdriver S4®
Phase I
►Fully immerse the product in the cleaning/disinfec-
tant for at least 15 min. Ensure that all accessible
surfaces are moistened.
►Clean the product with a suitable cleaning brush in
the solution until all discernible residues have been
removed from the surface.
►If applicable, brush through non-visible surfaces
with an appropriate cleaning brush for at least
1min.
►Mobilize non-rigid components, such as set screws,
links, etc. during cleaning.
►Thoroughly rinse through these components with
the cleaning disinfectant solution (at least five
times), using a disposable syringe.
Phase II
►Rinse/flush the product thoroughly (all accessible
surfaces) under running water.
►Mobilize non-rigid components, such as set screws,
joints, etc. during rinsing.
►Drain any remaining water fully.
Phase III
►Fully immerse the product in the disinfectant solu-
tion.
►Mobilize non-rigid components, such as set screws,
joints, etc. during rinsing.
►Rinse lumens at least 5 times at the beginning of
the exposure time using an appropriate disposable
syringe. Ensure that all accessible surfaces are
moistened.
Phase IV
►Rinse/flush the product thoroughly (all accessible
surfaces).
►Mobilize non-rigid components, such as set screws,
joints, etc. during final rinse.
►Rinse lumens with an appropriate disposable
syringe at least five times.
►Drain any remaining water fully.
Phase V
►Dry the product in the drying phase with suitable
equipment (e.g. cloth, compressed air), see Vali-
dated cleaning and disinfection procedure.

9
Mechanical cleaning/disinfection with manual pre-cleaning
Note
The cleaning and disinfection device must be of tested
and approved effectiveness (e.g. FDA approval or CE
mark according to DIN EN ISO 15883).
Note
The cleaning and disinfection device used for process-
ing must be serviced and checked at regular intervals.
Manual pre-cleaning with a brush
D–W: Drinking water
RT: Room temperature
*Recommended: BBraun Stabimed
►Note the information on appropriate cleaning
brushes and disposable syringes, see Validated
cleaning and disinfection procedure.
Phase I
►Fully immerse the product in the cleaning/disinfec-
tant for at least 15 min. Ensure that all accessible
surfaces are moistened.
►Clean the product with a suitable cleaning brush in
the solution until all discernible residues have been
removed from the surface.
►If applicable, brush through non-visible surfaces
with an appropriate cleaning brush for at least
1min.
►Mobilize non-rigid components, such as set screws,
links, etc. during cleaning.
►Thoroughly rinse through these components with
the cleaning disinfectant solution (at least five
times), using a disposable syringe.
Phase II
►Rinse/flush the product thoroughly (all accessible
surfaces) under running water.
►Mobilize non-rigid components, such as set screws,
joints, etc. during rinsing.
Phase Step T
[°C/°F]
t
[min]
Conc.
[%]
Water
quality
Chemical
I Disinfec-
tant
cleaning
RT (cold) >15 2 D–W Aldehyde-free, phenol-free, and
QUAT-free concentrate, pH ~ 9*
II Rinsing RT (cold) 1 - D–W -

10
Aesculap®
Screwdriver S4®
Mechanical alkaline cleaning and thermal disinfecting
Machine type: single-chamber cleaning/disinfection device without ultrasound
D–W: Drinking water
FD–W: Fully desalinated water (demineralized, low microbiological contamination: drinking water
quality at least)
*Recommended: BBraun Helimatic Cleaner alkaline
►Check visible surfaces for residues after mechani-
cal cleaning/disinfecting.
Phase Step T
[°C/°F]
t
[min]
Water
quality
Chemical
I Prerinse <25/77 3 D–W -
II Cleaning 55/131 10 FD-W ■Concentrate, alkaline:
–pH=13
– <5 % anionic surfactant
■0.5 % working solution
– pH = 11*
III Intermediate rinse >10/50 1 FD-W -
IV Thermal disinfect-
ing
90/194 5 FD-W -
VDrying - - - According to the program for cleaning
and disinfection device

11
Inspection, maintenance and checks
►Allow the product to cool down to room tempera-
ture.
►After each complete cleaning, disinfecting and dry-
ing cycle, check that the instrument is dry, clean,
operational, and free of damage (e.g. broken insu-
lation or corroded, loose, bent, broken, cracked,
worn, or fractured components).
►Dry the product if it is wet or damp.
►Repeat cleaning and disinfection of products that
still show impurities or contamination.
►Check that the product functions correctly.
►Immediately put aside damaged or inoperative
products and send them to Aesculap Technical Ser-
vice, see Technical Service.
►Assemble dismountable products, see Assembling.
►Check for compatibility with associated products.
Packaging
►Place the product in its holder or on a suitable tray.
Ensure that all cutting edges are protected.
►Pack trays appropriately for the intended steriliza-
tion process (e.g. in sterile Aesculap containers).
►Ensure that the packaging provides sufficient pro-
tection against recontamination of the product
during storage.
Steam sterilization
Note
The product may only be sterilized when dismantled.
►Check to ensure that the sterilizing agent will come
into contact with all external and internal surfaces
(e.g. by opening any valves and faucets).
►Validated sterilization process
– Disassemble the instrument
– Steam sterilization through fractionated vac-
uum process
– Steam sterilizer according to DIN EN 285 and
validated according to DIN EN ISO 17665
– Sterilization using fractionated vacuum pro-
cess at 134 °C/holding time 5 min
►When sterilizing several instruments at the same
time in a steam sterilizer, ensure that the maxi-
mum load capacity of the steam sterilizer specified
by the manufacturer is not exceeded.

12
Aesculap®
Screwdriver S4®
Sterilization for the US market
■Aesculap advises against sterilizing the device by
flash sterilization or chemical sterilization.
■Sterilization may be accomplished by a standard
prevacuum cycle in a steam autoclave.
To achieve a sterility assurance level of 10-6, Aesculap
recommends the following parameters:
*Aesculap has validated the above sterilization cycle
and has the data on file. The validation was accom-
plished in an Aesculap sterile container cleared by FDA
for the sterilization and storage of these products.
Other sterilization cycles may also be suitable, how-
ever individuals or hospitals not using the recom-
mended method are advised to validate any alternative
method using appropriate laboratory techniques. Use
an FDA cleared accessory to maintain sterility after
processing, such as a wrap, pouch, etc.
WARNING for the US market
If this device is/was used in a patient with, or sus-
pected of having Creutzfeldt-Jakob Disease (CJD),
the device cannot be reused and must be destroyed
due to the inability to reprocess or sterilize to elim-
inate the risk of crosscontamination.
Storage
►Store sterile products in germ-proof packaging,
protected from dust, in a dry, dark, temperature-
controlled area.
Technical Service
►For service and repairs, please contact your
national B. Braun/Aesculap agency.
Modifications carried out on medical technical equip-
ment may result in loss of guarantee/warranty rights
and forfeiture of applicable licenses.
Service addresses
Aesculap Technischer Service
Am Aesculap-Platz
78532 Tuttlingen / Germany
Phone: +49 (7461) 95-1602
Fax: +49 (7461) 16-5621
E-Mail: [email protected]
Aesculap Orga Tray/Sterile container (perforated
bottom)
Minimum cycle parameters*
Steriliza-
tion method
Temp. Time Minimum
drying
time
Prevacuum 270 °F/
275 °F
4 min 20 min
WARNING
Risk of injury and/or malfunc-
tion!
►Do not modify the product.

13
Or in the US:
Aesculap Implant Systems LLC
Attn. Aesculap Technical Services
615 Lambert Pointe Drive
Hazelwood
MO, 63042
Aesculap Repair Hotline
Phone: +1 (800) 214-3392
Fax: +1 (314) 895-4420
Other service addresses can be obtained from the
address indicated above.
Disposal
►Adhere to national regulations when disposing of
or recycling the product, its components and its
packaging!
Distributor in the US/Contact in
Canada for product information
and complaints
Aesculap Implant Systems LLC
3773 Corporate Parkway
Center Valley, PA, 18034,
USA

14
Aesculap®
Schraubendreher S4®
Aesculap®
Schraubendreher S4®
Legende
AGrundkörper
BSchraubendreher
CSchraubhülse
DDrehrohr
Symbole an Produkt und
Verpackung
Geltungsbereich
►Für artikelspezifische Gebrauchsanweisungen und
Informationen zur Materialverträglichkeit siehe
auch Aesculap Extranet unter
www.aesculap-extra.net
Verwendungszweck
Der Schraubendreher S4wird zum Eindrehen der
S4-Polyaxialschraube in den Knochen verwendet.
Sichere Handhabung und Bereit-
stellung
►Produkt und Zubehör nur von Personen betreiben
und anwenden lassen, die die erforderliche Ausbil-
dung, Kenntnis oder Erfahrung haben.
►Gebrauchsanweisung lesen, einhalten und aufbe-
wahren.
►Produkt nur bestimmungsgemäß verwenden, siehe
Verwendungszweck.
►Fabrikneues Produkt nach Entfernung der Trans-
portverpackung und vor der ersten Sterilisation rei-
nigen (manuell oder maschinell).
►Fabrikneues oder unbenutztes Produkt an einem
trockenen, sauberen und geschützten Platz aufbe-
wahren.
►Produkt vor jeder Verwendung visuell prüfen auf:
lose, verbogene, zerbrochene, rissige, abgenutzte
und abgebrochene Teile.
►Kein beschädigtes oder defektes Produkt verwen-
den. Beschädigtes Produkt sofort aussortieren.
►Beschädigte Einzelteile sofort durch Originaler-
satzteile ersetzen.
Achtung, allgemeines Warnzei-
chen
Achtung, Begleitdokumente
beachten
WARNUNG
Verletzungsgefahr durch Fehl-
bedienung des Produkts!
►Vor der Verwendung des
Produkts an der Produkt-
Schulung teilnehmen.
►Wenden Sie sich an die
nationale B. Braun/
Aesculap-Vertretung, um
Informationen bezüglich
der Schulung zu erhalten.

15
Bedienung
►Ratschengriff 1bis zum Einrasten auf den Schrau-
bendreher aufschieben, siehe Abb. 1.
Abb. 1
►S4-Schraube bis zum Anschlag 3auf das
Gewinde 2drehen, siehe Abb. 2. Dabei Drehhülse 4
in Uhrzeigersinn drehen.
Abb. 2
Der Schraubendreher kann jetzt eingesetzt werden.
Demontage
►Drehrohr Daus Drehhülse 4in Pfeilrichtung her-
ausziehen, siehe Abb. 3.
►Bajonettverschluss 5öffnen.
Abb. 3
►Schraubhülse Caus Drehhülse 4herausziehen,
siehe Abb. 4.
Abb. 4
►Schraubendreher Bmit Kupplung 6aus
Grundkörper Aabziehen, siehe Abb. 5.
Abb. 5
WARNUNG
Verletzungsgefahr und/oder
Fehlfunktion!
►Vor jedem Gebrauch Funk-
tionsprüfung durchführen.
1
„click“
2
34
D
„click“
5
4
C
6
B

16
Aesculap®
Schraubendreher S4®
Montage
►Schraubendreher Bmit Kupplung 6in Pfeilrich-
tung in Grundkörper Aeinstecken, siehe Abb. 6.
Abb. 6
►Schraubhülse Cauf Schraubendreher Bin Pfeil-
richtung aufschieben, siehe Abb. 7.
►Bajonettverschluss 5einrasten.
Abb. 7
►Drehrohr Dbis zum Einrasten auf Grundkörper Ain
Pfeilrichtung aufschieben, siehe Abb. 8.
Abb. 8
Validiertes Aufbereitungsverfah-
ren
Allgemeine Sicherheitshinweise
Hinweis
Nationale gesetzliche Vorschriften, nationale und
internationale Normen und Richtlinien und die eigenen
Hygienevorschriften zur Aufbereitung einhalten.
Hinweis
Bei Patienten mit Creutzfeldt-Jakob-Krankheit (CJK),
CJK-Verdacht oder möglichen Varianten bezüglich der
Aufbereitung der Produkte die jeweils gültigen natio-
nalen Verordnungen einhalten.
Hinweis
Die maschinelle Aufbereitung ist aufgrund eines besse-
ren und sichereren Reinigungsergebnisses gegenüber
der manuellen Reinigung vorzuziehen.
Hinweis
Es ist zu beachten, dass die erfolgreiche Aufbereitung
dieses Medizinprodukts nur nach vorheriger Validie-
rung des Aufbereitungsprozesses sichergestellt werden
kann. Die Verantwortung hierfür trägt der Betreiber/
Aufbereiter.
Zur Validierung wurde die empfohlene Chemie verwen-
det.
Hinweis
Wenn keine abschließende Sterilisation erfolgt, muss
ein viruzides Desinfektionsmittel verwendet werden.
Hinweis
Aktuelle Informationen zur Aufbereitung und zur
Materialverträglichkeit siehe auch Aesculap Extranet
unter www.aesculap-extra.net
Das validierte Dampfsterilisationsverfahren wurde im
Aesculap-Sterilcontainer-System durchgeführt.
6
B
C
B
5
5
D A
„click“

17
Allgemeine Hinweise
Angetrocknete bzw. fixierte OP-Rückstände können
die Reinigung erschweren bzw. unwirksam machen
und zu Korrosion führen. Demzufolge sollte ein Zeit-
raum zwischen Anwendung und Aufbereitung von 6 h
nicht überschritten, sollten keine fixierenden Vorreini-
gungstemperaturen >45 °C angewendet und keine
fixierenden Desinfektionsmittel (Wirkstoffbasis: Alde-
hyd, Alkohol) verwendet werden.
Überdosierte Neutralisationsmittel oder Grundreiniger
können zu einem chemischen Angriff und/oder zur
Verblassung und visuellen oder maschinellen Unles-
barkeit der Laserbeschriftung bei nicht rostendem
Stahl führen.
Bei nicht rostendem Stahl führen Chlor- bzw. chlorid-
haltige Rückstände (z. B. OP-Rückstände, Arzneimittel,
Kochsalzlösungen, im Wasser zur Reinigung, Desinfek-
tion und Sterilisation) zu Korrosionsschäden (Lochkor-
rosion, Spannungskorrosion) und somit zur Zerstörung
der Produkte. Zur Entfernung muss eine ausreichende
Spülung mit vollentsalztem Wasser mit anschließender
Trocknung erfolgen.
Nachtrocknen, wenn erforderlich.
Es dürfen nur Prozess-Chemikalien eingesetzt werden,
die geprüft und freigegeben sind (z. B. VAH- oder FDA-
Zulassung bzw. CE-Kennzeichnung) und vom Chemi-
kalienhersteller hinsichtlich Materialverträglichkeit
empfohlen wurden. Sämtliche Anwendungsvorgaben
des Chemikalienherstellers sind strikt einzuhalten. Im
anderen Fall kann dies zu nachfolgenden Problemen
führen:
■Optische Materialveränderungen wie z. B. Verblas-
sen oder Farbveränderungen bei Titan oder Alumi-
nium. Bei Aluminium können sichtbare Oberflä-
chenveränderungen bereits bei einem pH-Wert von
>8 in der Anwendungs-/Gebrauchslösung auftre-
ten.
■Materialschäden, wie z. B. Korrosion, Risse, Brüche,
vorzeitige Alterung oder Quellung.
►Zur Reinigung keine Metallbürsten oder keine
anderen die Oberfläche verletzenden Scheuermit-
tel verwenden, da sonst Korrosionsgefahr besteht.
►Weitere detaillierte Hinweise zu einer hygienisch
sicheren und materialschonenden/werterhalten-
den Wiederaufbereitung, siehe www.a-k-i.org
Rubrik Veröffentlichungen Rote Broschüre – Inst-
rumentenaufbereitung richtig gemacht.
Demontage vor der Durchführung des
Aufbereitungsverfahrens
►Produkt unmittelbar nach dem Gebrauch nach
Anleitung demontieren.
Vorbereitung am Gebrauchsort
►Wenn zutreffend, nicht einsehbare Oberflächen
vorzugsweise mit VE-Wasser, z. B. mit Einmal-
spritze, spülen.
►Sichtbare OP-Rückstände möglichst vollständig
mit einem feuchten, flusenfreien Tuch entfernen.
►Produkt trocken in geschlossenem Entsorgungs-
container binnen 6 h zur Reinigung und Desinfek-
tion transportieren.
Vorbereitung vor der Reinigung
►Produkt vor der Reinigung zerlegen, siehe Demon-
tage.

18
Aesculap®
Schraubendreher S4®
Reinigung/Desinfektion
Produktspezifische Sicherheitshinweise zum
Aufbereitungsverfahren
VORSICHT
Schäden am Produkt durch
ungeeignete Reinigungs-/Des-
infektionsmittel und/oder zu
hohe Temperaturen!
►Reinigungs- und Desinfek-
tionsmittel nach Anwei-
sungen des Herstellers ver-
wenden, die z. B. für
Aluminium, Kunststoffe,
Edelstahl zugelassen sind.
►Angaben zu Konzentration,
Temperatur und Einwirk-
zeit beachten.

19
Validiertes Reinigungs- und Desinfektionsverfahren
Validiertes Verfahren Besonderheiten Referenz
Manuelle Reinigung mit
Tauchdesinfektion
■Reinigungsbürste: 50 mm/
∅: 10 mm, z. B. TA-Nr. 007747
■Einmalspritze 20 ml
■Trocknungsphase: Flusenfreies
Tuch oder medizinische Druckluft
verwenden
Kapitel Manuelle Reinigung/Desinfektion
und Unterkapitel:
■Kapitel Manuelle Reinigung mit Tauch-
desinfektion
Manuelle Vorreinigung
mit Bürste und anschlie-
ßender maschineller
alkalischer Reinigung
und thermischer Desin-
fektion
■Reinigungsbürste: 50 mm/
∅: 10 mm, z. B. TA-Nr. 007747
■Einmalspritze 20 ml
■Produkt auf reinigungsgerechten
Siebkorb legen (Spülschatten ver-
meiden).
■Arbeitsenden zur Reinigung
geöffnet halten.
■Produkt mit geöffnetem Gelenk
auf dem Siebkorb lagern.
Kapitel Maschinelle Reinigung/Desinfek-
tion mit manueller Vorreinigung und
Unterkapitel:
■Kapitel Manuelle Vorreinigung mit
Bürste
■Kapitel Maschinelle alkalische Reini-
gung und thermische Desinfektion

20
Aesculap®
Schraubendreher S4®
Manuelle Reinigung/Desinfektion
►Vor der manuellen Desinfektion das Spülwasser
ausreichend vom Produkt abtropfen lassen, um
eine Verdünnung der Desinfektionsmittellösung zu
verhindern.
►Nach der manuellen Reinigung/Desinfektion ein-
sehbare Oberflächen visuell auf Rückstände prüfen.
►Falls nötig, den Reinigungs-/Desinfektionsprozess
wiederholen.
Manuelle Reinigung mit Tauchdesinfektion
T–W: Trinkwasser
VE–W: Vollentsalztes Wasser (demineralisiert, mikrobiologisch mindestens Trinkwasserqualität)
RT: Raumtemperatur
*Empfohlen: BBraun Stabimed
►Informationen zu geeigneten Reinigungsbürsten
und Einmalspritzen beachten, siehe Validiertes Rei-
nigungs- und Desinfektionsverfahren.
Phase Schritt T
[°C/°F]
t
[min]
Konz.
[%]
Wasser-
Qualität
Chemie
I Desinfizierende
Reinigung
RT (kalt) >15 2 T–W Konzentrat aldehyd-, phenol-
und QAV-frei, pH ~ 9*
II Zwischenspülung RT (kalt) 1 - T–W -
III Desinfektion RT (kalt) 15 2 T–W Konzentrat aldehyd-, phenol-
und QAV-frei, pH ~ 9*
IV Schlussspülung RT (kalt) 1 - VE–W -
V Trocknung RT - - - -
Other manuals for Aesculap S4
4
Table of contents
Languages:
Popular Power Screwdriver manuals by other brands

AEG
AEG BSS18SBL2 Original instructions

Power Craft
Power Craft ECD 16 operating instructions

Heinner
Heinner VSA001 instructions

Graphite
Graphite 58G000 Translation of the original instructions

WETRA-XT
WETRA-XT Asist AE2S03DN-50 Instructions for use

Parkside
Parkside 102653 translation of original operation manual