Bravo CX-7000 User manual
Model name:
Model
Content of Electronic Manual
Before Use ...................................... Precautions, disclaimer, etc.
Operating the Printer...................... Procedures for printing cards
Replacement ...........Procedures for replacing consumable items
Maintenance................................................Cleaning procedures
Troubleshooting................... Actions to take when troubles occur
Setup................................... Installation, connection, setting, etc.
o
0
0
0
0
0
0
CD-ROM Content
Electronic Manual
Printer Driver
Status Monitor
Software Development Technical Information
o
•
•
•
•
Card Printer
Instruction Manual
LST1002-001B
Accessories
CD-ROM ................................................................................1
Instruction Manual..................................................................1
READ ME FIRST :LST1004...................................................1
Power Cord (2 m).... ...............................................................1
Cleaning Card ........................................................................1
Card Stacker ..........................................................................1
USB 2.0 Cable (2 m) ..............................................................1
Gloves ....................................................................................1
Tweezers ................................................................................1
o
0
0
0
0
0
0
0
0
0
Products Sold Separately
To purchase these items, consult our authorized dealers.
Use the retransfer film or ink ribbon within half a year after purchase.
Ink Ribbon(YMCK)1000 frames/roll, Model: CY-340-100E
Ink Ribbon (YMCKK) 750 frames/roll, Model: CY-35K-75E
Ink Ribbon (YMCKU) 750 frames/roll, Model: CY-35U-75E
Retransfer Film 1000 frames/roll, Model: CY-3RA-100
Cleaning Kit, Model: CX210-CKIT1
Magnetic Head Cleaning Card (5 Pcs),
Cotton Swab (5 Large and 5 Small), Cleaning Wipes (1 Box)
Cleaning Card, Model: CX210-CC1
10 Pcs/Set
o
•
•
•
•
•
•
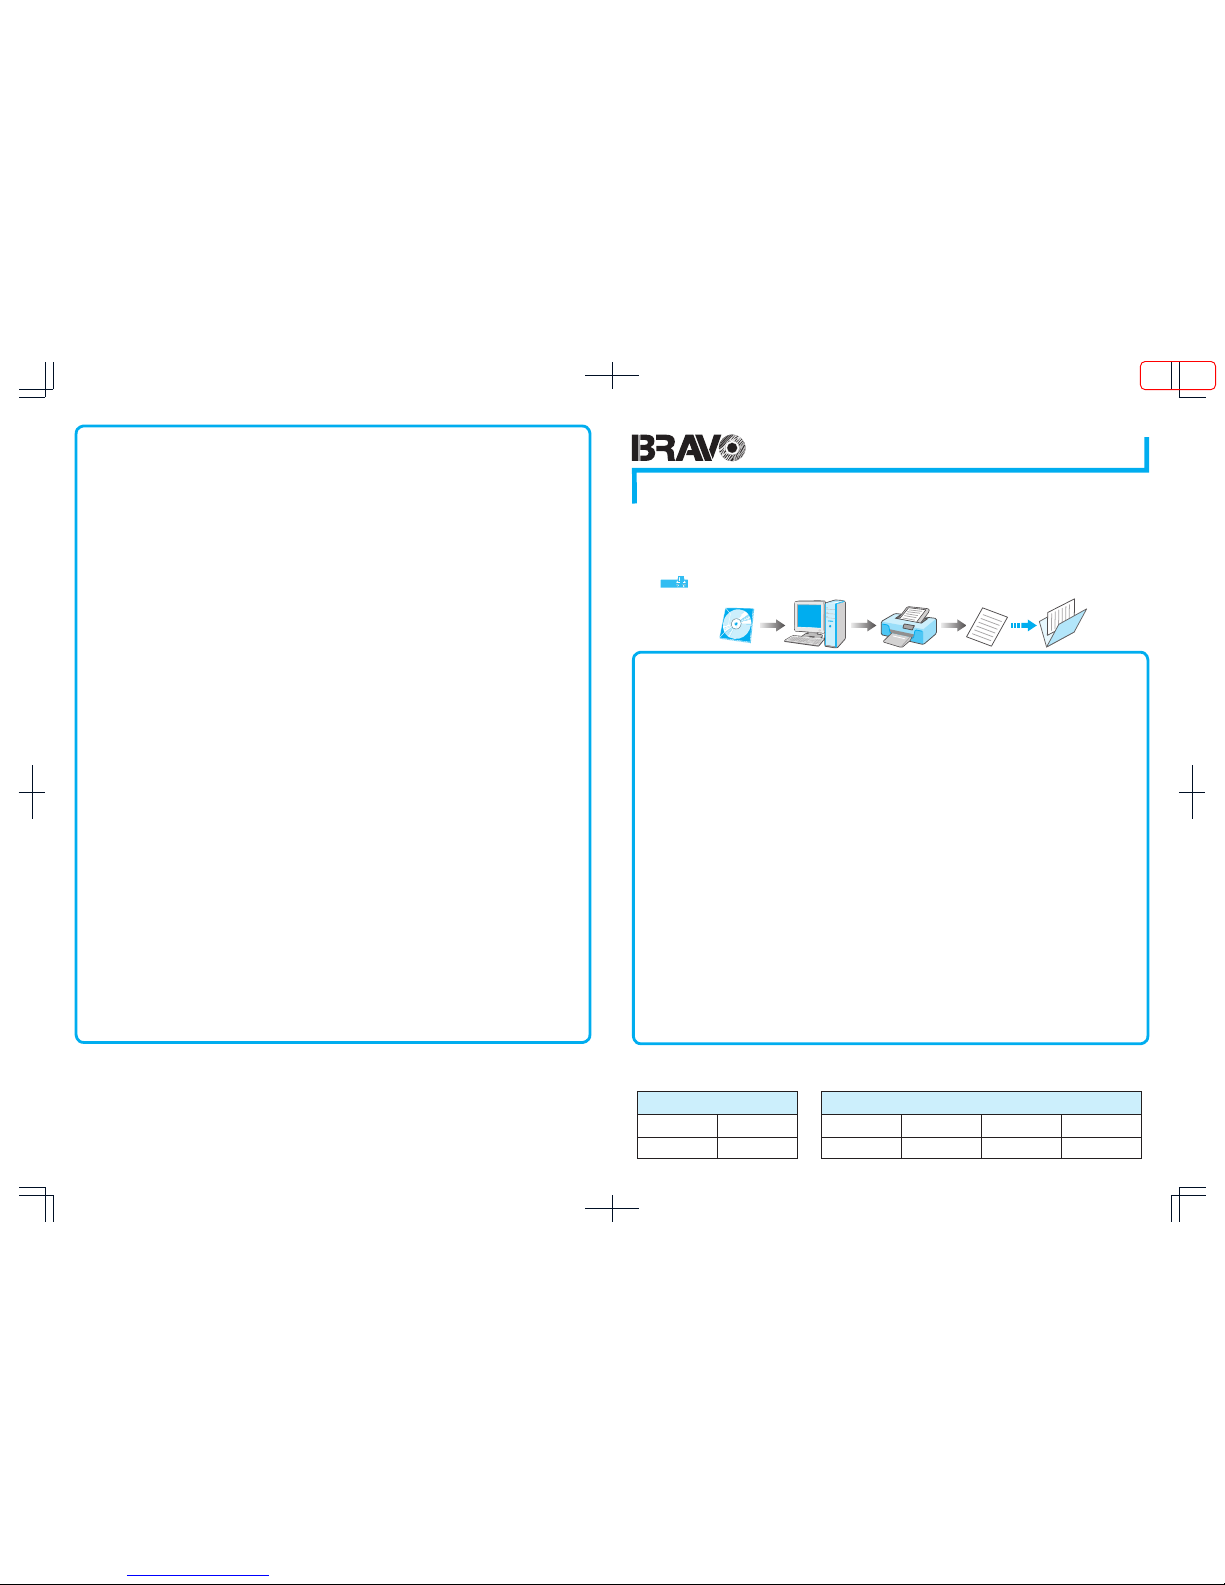
Thank you for purchasing this product.
Please read through the “Electronic Manual” in the CD-ROM carefully in advance to ensure proper use of this product.
Also, to make sure that the product is used safely, please read through the “Safety Precautions” in the “READ ME FIRST”
booklet. Please store the manuals properly after reading so that they can be referred to whenever necessary.
Place this “Instruction Manual” near the printer and use it as and when needed.
Click Print in the “Electronic Manual” of the CD-ROM to print out the necessary PDF files.
Store the printed PDF files between the pages of this “Instruction Manual”.
Specifications
Operating environment conditions ....Temperature: 15°C to 30°C
(When peel-off ink, UV ink is used: 17 °C to 28 °C)
Humidity: 35 % to 70 % No condensation
(When peel-off ink, UV ink is used: 35 % to 60 % )
Storage environment conditions
<Printer unit>
Temperature : -15 °C to 55 °C
Humidity : 20 % to 80 %
<Printing media (retransfer film or ink ribbon) / card>
Temperature : 5 °C to 25 °C
Humidity : 40 % to 60 %
Power supply..................................
AC 100 V - 120 V, 50 Hz/60 Hz
AC 220 V - 240 V, 50 Hz/60 Hz
Power consumption ........................................................... 310 W
(maximum power when all options are installed)
Current consumption...................................3.5 A (100 V system)
1.6 A (200 V system)
Mass.................................................................... approx. 13.5 kg
(single-sided printer, including bend remedy unit)
Dimensions ............... 343 mm x 335 mm x 322 mm (W x H x D)
o
0
0
0
0
0
0
0
* The specifications and appearance of this product may be modified
for improvement without prior notice.
CX-7000
Function Option
Single-sided
Printing
Double-sided
Printing Bend Remedy unit Magnetic Encoder Contact IC
Encoder
Non-contact IC
Encoder
Function & Option Checklist
Use the checklist below to identify the functions and options of the printer in use. Tick accordingly.
o
LST1002-001B
© 2014 JVC KENWOOD Corporation
Emphor Fzco
P.O.Box: 61232
Jebel Ali Free Zone, Dubai, UAE.
Tel : +971 4 8830233
Fax: +971 4 8830133
MEMO
ISSUED
2014/11/26
J-TECS infomation _PLEMIA_ Count:- Checked:00000 Date:20141126 Approved:00000 Date:20141126

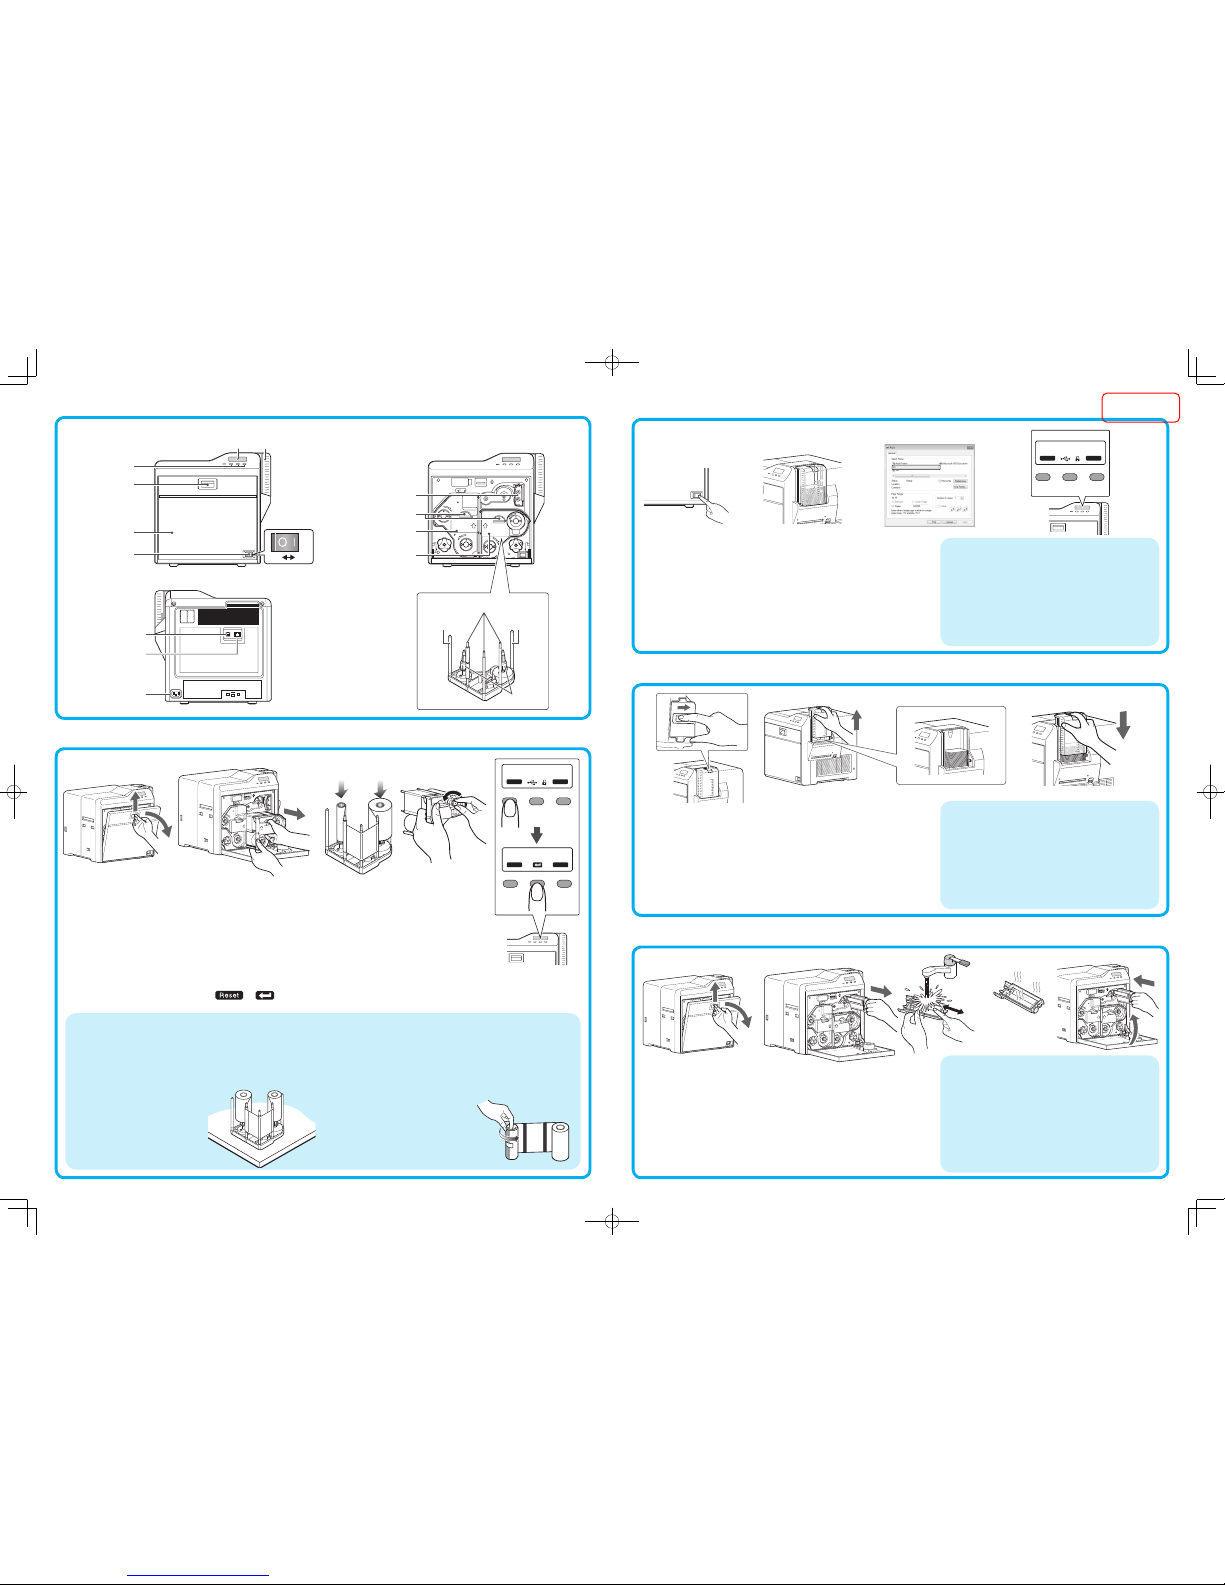
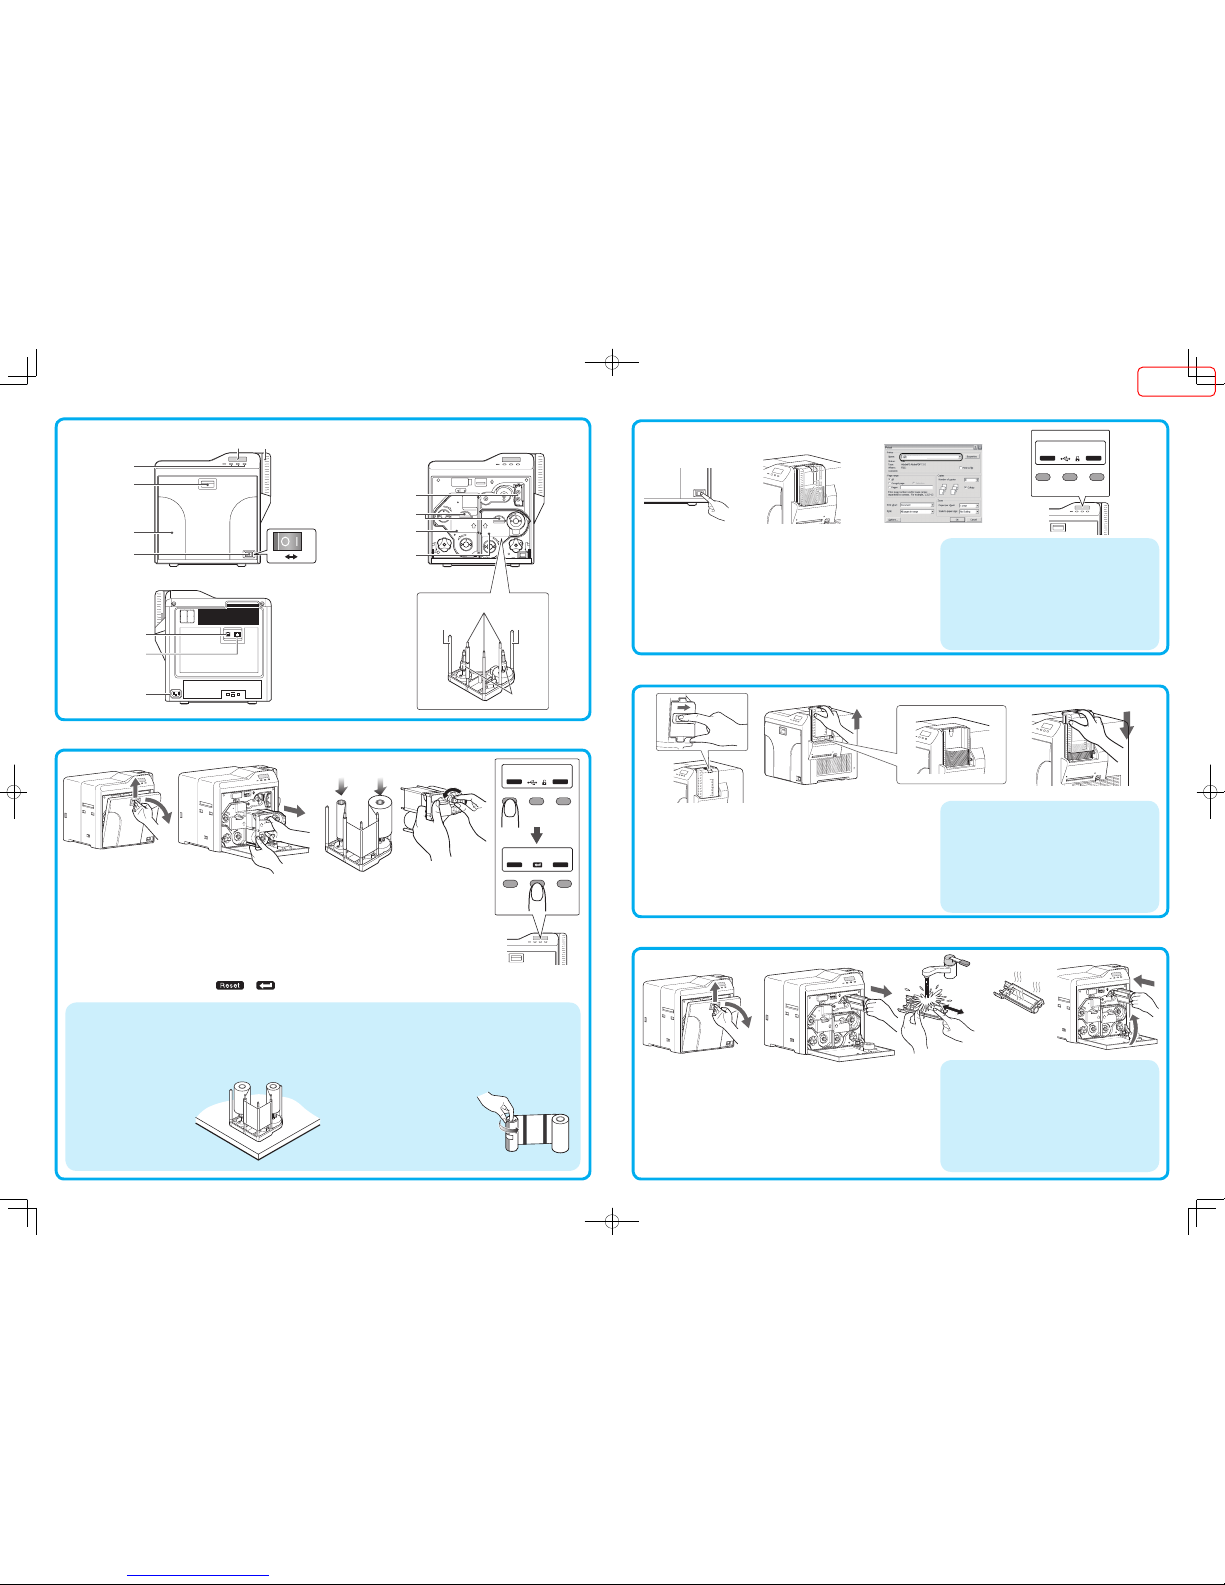
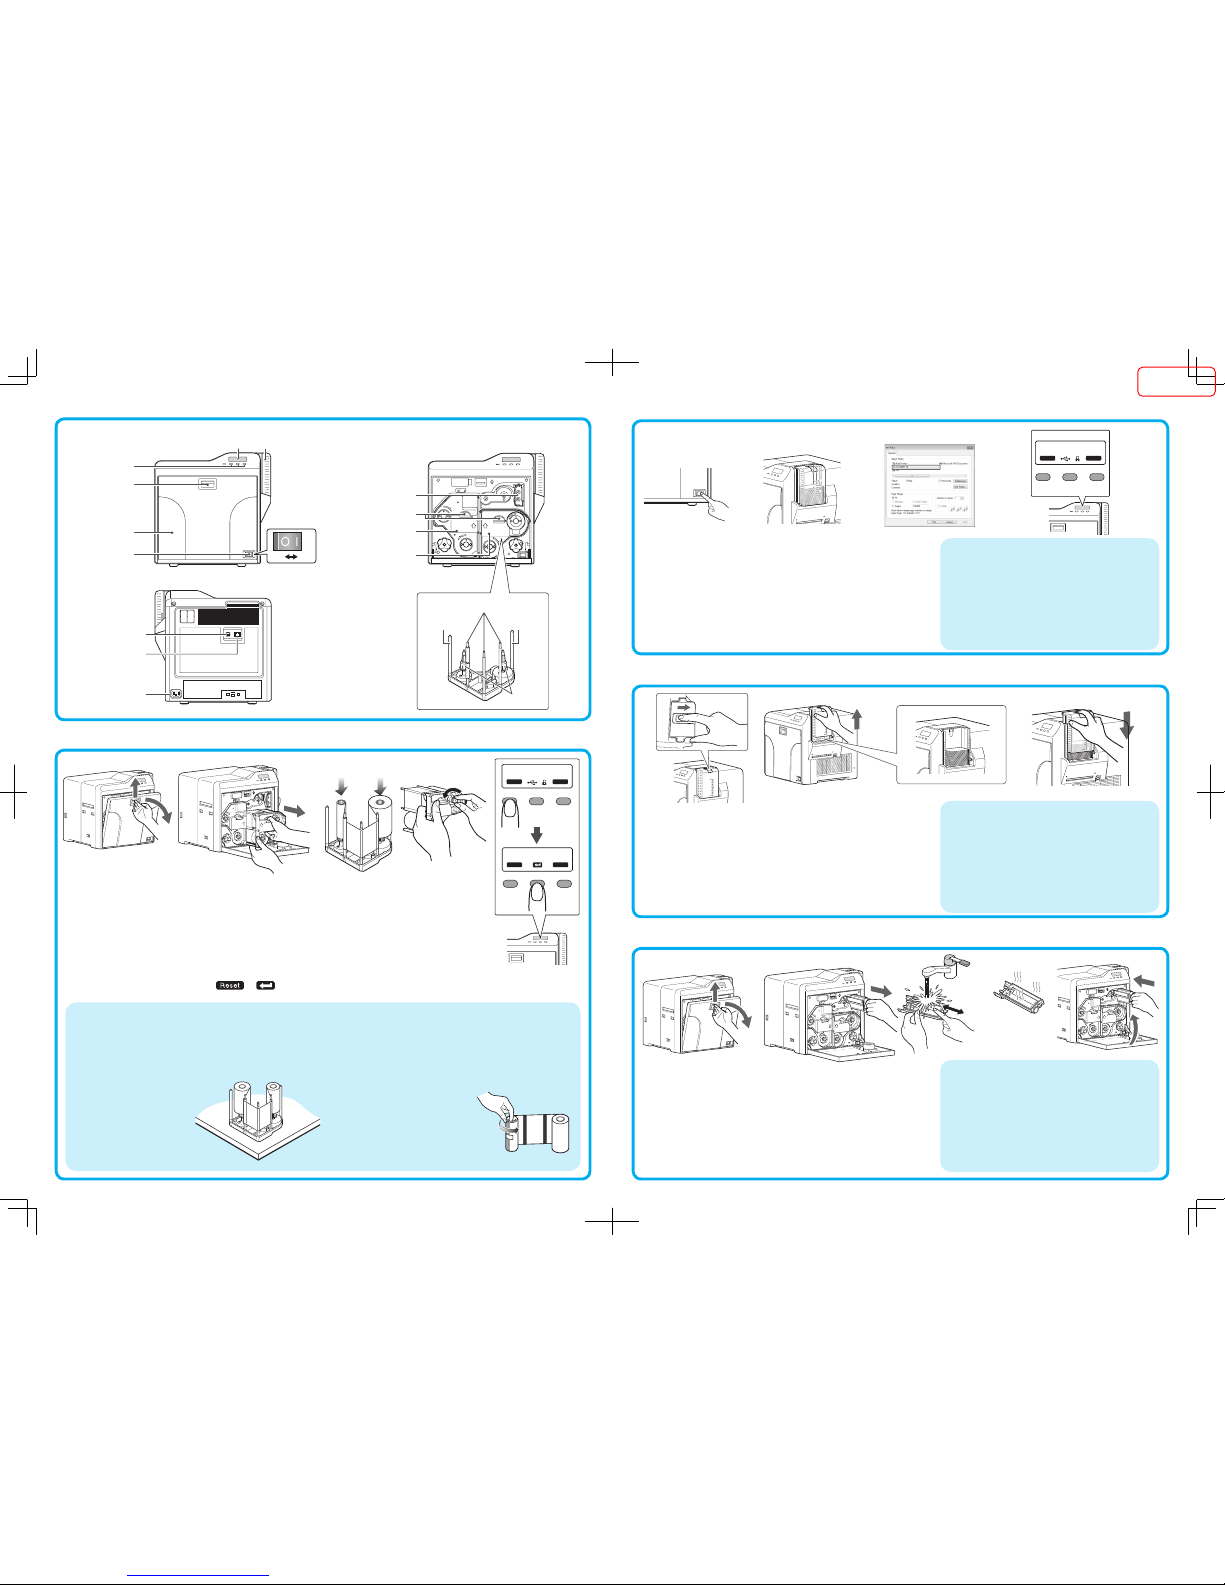
Name of Parts
Replenishing Cards
Set the card hopper knob to [OPEN]
Lift to remove the card hopper cover
Align the orientation of the cards, and set them in the printer
Install the card hopper cover, and set the card hopper knob to [LOCK]
1.
2.
3.
4.
Replacing the Retransfer Film/Ink Ribbon
Open the printer door
Press and hold down the cassette button, and pull out the cassette (left: retransfer film cassette/
right: ink ribbon cassette) to remove the retransfer film/ink ribbon
Install a new retransfer film/ink ribbon
Install while referring to the indication on the label of the cassette.
With the retransfer/inked surface facing outward, unwind the retransfer film/ink ribbon along the three shafts,
and insert it firmly into the bobbin holders.
Remove any slack in the retransfer film/ink ribbon, and insert the cassette along the guide rail until a
“click” sound is heard
Close the printer door, and press to reset the printer
1.
2.
3.
•
•
4.
5.
Maintenance of Cleaning Roller
Open the printer door
Remove the cleaning unit
Wash the cleaning roller with water
Wash the roller with water, and remove any dirt from the surface of the cleaning
roller with your finger.
Allow the cleaning roller to air dry
Set the cleaning unit, and close the printer door
1.
2.
3.
•
4.
5.
Turn on the power
Check to ensure that cards are inserted into the card hopper
Open the application’s print settings screen, and select this printer in
[Name]
After ensuring that a [Ready] message appears on the LCD panel of
the printer, start printing
1.
2.
3.
4.
CX-7000 U1
100
100
50
50
1
100
50
1
Ready
To t a l ***
Reset Menu
Printing a Card
The cassette is heavy when the retransfer film/ink ribbon is loaded.To
prevent the cassette from dropping during handling, make sure to hold it
with both hands.
Do not touch the retransfer/inked face (the side that faces outward when
installed) with your hand. Touching it may cause printing errors. Put on the
supplied gloves when handling the retransfer film/ink ribbon.
Do not perform any work on the printer
door. Do not place heavy objects or apply
load on the printer.
When installing a new film, make sure that
at least three black lines are wound onto
the take-up side.
•
•
•
•
[Front] [When printer door is open]
Precautions
If the security lock is on, deactivate it. After work is complete, activate
the security lock again.
Do not touch the printing surface of the card. Touching it may cause
printing errors. Put on the supplied gloves when handling the cards.
To prevent card jams from occurring, limit the number of cards stored
in the card hopper at any time to about 100 pieces regardless of the
card thickness.
When using new cards, set them after making sure that they are not
adhered to each other due to static.
Align the cards before setting them in the printer. Otherwise, the card
hopper cover may not close properly, and this may damage the printer.
•
•
•
•
•
Precautions
If the security lock is on, deactivate it. After work is complete, activate the
security lock again.
When installing a used ink ribbon, align the yellow side of the unused ribbon
with the arrow indicated on the label of the cassette.
When installing a used retransfer film, align the unused side of the film with
the arrow indicated on the label of the
cassette.
Stand the cassette on a flat surface as
illustrated in the diagram.
•
•
•
•
Precautions
If the security lock is on, deactivate it. After work is complete,
activate the security lock again.
Start work after ensuring that the power has been turned off.
If the printer is used every day, make sure to clean the cleaning
roller daily at the end of the operation.
After washing, allow the cleaning roller to dry completely before
installing it to the printer.
Do not wash the cleaning roller with anything other than water (e.g.,
alcohol).
Replace the cleaning unit with a new one after using it for about one year.
For details on its replacement, please consult our authorized dealers.
•
•
•
•
•
•
[Cassette]
Precautions
If you see an [Initializing..] or [Preheating..] message on the LCD
panel of the printer, this means the printer is not ready yet. Print-
ing cannot be performed until a [Ready] massage appears.
Printing the card on the side with the magnetic stripe may cause
printing errors or damage to the card’s functions. If you want to
do so, please consult our authorized dealers in advance.
For printing using application software prepared by the user, refer
to the instruction manual of the corresponding application.
•
•
•
[Rear]
4321
Exit Next
>
Initialize OK?
Door Open
To t a l D1
Reset Menu
***
5
Operation buttons
Sliding knob
Card hopper
Printer door
Power switch
AC inlet
Retransfer film cassette
Ink ribbon cassette
USB cable
connection terminal
LAN cable
connection terminal
Cleaning unit
Shafts
Bobbin
holders
Operation panel
12 3 4
Cassette buttons
Guide
shaft
Guide
shaft
54321
1
100
50
1
100
50
1
342
100
50
1
100
100
50
50
1
1
100
50
1
Off On
ISSUED
2014/11/26
Model name:
Model
Content of Electronic Manual
Before Use ...................................... Precautions, disclaimer, etc.
Operating the Printer..................... Procedures for printing cards
Replacement .......... Procedures for replacing consumable items
Maintenance............................................... Cleaning procedures
Troubleshooting ................... Actions to take when troubles occur
Setup................................... Installation, connection, setting, etc.
o
0
0
0
0
0
0
CD-ROM Content
Electronic Manual
Printer Driver
Status Monitor
Software Development Technical Information
o
•
•
•
•
Card Printer
Instruction Manual
LST1597-001A
Accessories
CD-ROM ................................................................................1
Instruction Manual..................................................................1
READ ME FIRST :LST1004...................................................1
Power Cord (2 m) ...................................................................1
Cleaning Card ........................................................................1
Card Stacker ..........................................................................1
USB 2.0 Cable (2 m) ..............................................................1
Gloves ....................................................................................1
Tweezers ................................................................................1
o
0
0
0
0
0
0
0
0
0
Products Sold Separately
To purchase these items, consult our authorized dealers.
Use the retransfer film or ink ribbon within half a year after purchase.
Ink Ribbon (YMCK) 1000 frames/roll, Model: CY-340-100E
Ink Ribbon (YMCKK) 750 frames/roll, Model: CY-35K-75E
Ink Ribbon (YMCKP) 750 frames/roll, Model: CY-35P-75E
Ink Ribbon (YMCKU) 750 frames/roll, Model: CY-35U-75E
Retransfer Film 1000 frames/roll, Model: CY-3RA-100
Cleaning Kit, Model: CX210-CKIT1
Magnetic Head Cleaning Card (5 Pcs),
Cotton Swab (5 Large and 5 Small), Cleaning Wipes (1 Box)
Cleaning Card, Model: CX210-CC1
10 Pcs/Set
o
•
•
•
•
•
•
•
Thank you for purchasing this product.
Please read through the “Electronic Manual” in the CD-ROM carefully in advance to ensure proper use of this product.
Also, to make sure that the product is used safely, please read through the “Safety Precautions” in the “READ ME FIRST”
booklet. Please store the manuals properly after reading so that they can be referred to whenever necessary.
Place this “Instruction Manual” near the printer and use it as and when needed.
Specifications
Operating environment conditions
Temperature: 15 °C to 30 °C
(When peel-off ink, UV ink is used: 17 °C to 28 °C)
Humidity: 35 % to 70 % No condensation
(When peel-off ink, UV ink is used: 35 % to 60 %)
Storage environment conditions
<Printer unit>
Temperature : -15 °C to 55 °C
Humidity : 20 % to 80 %
<Printing media (retransfer film or ink ribbon) / card>
Temperature : 5 °C to 25 °C
Humidity : 40 % to 60 %
Power supply.................................
AC 100 V - 120 V, 50 Hz/60 Hz
AC 220 V - 240 V, 50 Hz/60 Hz
Power consumption ........................................................... 310 W
(maximum power when all options are installed)
Current consumption.................................. 3.5 A (100 V system)
1.6 A (200 V system)
Mass.................................................................... approx. 13.5 kg
(double-sided printer, excluding optional built-in items)
Dimensions ............... 343 mm x 335 mm x 322 mm (W x H x D)
o
0
0
0
0
0
0
0
* The specifications and appearance of this product may be modified
for improvement without prior notice.
CX-7600
Option
Bend Remedy unit Magnetic Encoder Contact IC Encoder Non-contact IC Encoder
Option Checklist
Use the checklist below to identify the options of the printer in use. Tick accordingly.
o
LST1597-001A
© 2015 JVC KENWOOD Corporation
Emphor Fzco
P.O.Box: 61232
Jebel Ali Free Zone, Dubai, UAE.
Tel : +971 4 8830233
Fax: +971 4 8830133
MEMO
ISSUED
2015/08/06
J-TECS infomation _PLEMIA_ Count:- Checked:00000 Date:20150806 Approved:00000 Date:20150806
Name of Parts
Replenishing Cards
Set the card hopper knob to [OPEN]
Lift to remove the card hopper cover
Align the orientation of the cards, and set them in the printer
Install the card hopper cover, and set the card hopper knob to [LOCK]
1.
2.
3.
4.
Replacing the Retransfer Film/Ink Ribbon
Open the printer door
Press and hold down the cassette button, and pull out the cassette (left: retransfer film cassette/
right: ink ribbon cassette) to remove the retransfer film/ink ribbon
Install a new retransfer film/ink ribbon
Install while referring to the indication on the label of the cassette.
With the retransfer/inked surface facing outward, unwind the retransfer film/ink ribbon along the three shafts,
and insert it firmly into the bobbin holders.
Remove any slack in the retransfer film/ink ribbon, and insert the cassette along the guide rail until a
“click” sound is heard
Close the printer door, and press to reset the printer
1.
2.
3.
•
•
4.
5.
Maintenance of Cleaning Roller
Open the printer door
Remove the cleaning unit
Wash the cleaning roller with water
Wash the roller with water, and remove any dirt from the surface of the cleaning
roller with your finger.
Allow the cleaning roller to air dry
Set the cleaning unit, and close the printer door
1.
2.
3.
•
4.
5.
Turn on the power
Check to ensure that cards are inserted into the card hopper
Open the software’s print settings screen, and select this printer in
[Name]
After ensuring that a [Ready] message appears on the LCD panel of
the printer, start printing
1.
2.
3.
4.
CX-7600 U1
100
50
1
100
50
1
Ready
Total ***
Reset Menu
Printing a Card
The cassette is heavy when the retransfer film/ink ribbon is loaded.To
prevent the cassette from dropping during handling, make sure to hold it
with both hands.
Do not touch the retransfer/inked face (the side that faces outward when
installed) with your hand. Touching it may cause printing errors. Put on the
supplied gloves when handling the retransfer film/ink ribbon.
Do not perform any work on the printer
door. Do not place heavy objects or apply
load on the printer.
When installing a new film, make sure that
at least three black lines are wound onto
the take-up side.
•
•
•
•
[Front] [When printer door is open]
Precautions
If the security lock is on, deactivate it. After work is complete, activate
the security lock again.
Do not touch the printing surface of the card. Touching it may cause
printing errors. Put on the supplied gloves when handling the cards.
To prevent card jams from occurring, limit the number of cards stored
in the card hopper at any time to about 100 pieces regardless of the
card thickness.
When using new cards, set them after making sure that they are not
adhered to each other due to static.
Align the cards before setting them in the printer. Otherwise, the card
hopper cover may not close properly, and this may damage the printer.
•
•
•
•
•
Precautions
If the security lock is on, deactivate it. After work is complete, activate the
security lock again.
When installing a used ink ribbon, align the yellow side of the unused ribbon
with the arrow indicated on the label of the cassette.
When installing a used retransfer film, align the unused side of the film with
the arrow indicated on the label of the
cassette.
Stand the cassette on a flat surface as
illustrated in the diagram.
•
•
•
•
Precautions
If the security lock is on, deactivate it. After work is complete,
activate the security lock again.
Start work after ensuring that the power has been turned off.
If the printer is used every day, make sure to clean the cleaning
roller daily at the end of the operation.
After washing, allow the cleaning roller to dry completely before
installing it to the printer.
Do not wash the cleaning roller with anything other than water (e.g.,
alcohol).
Replace the cleaning unit with a new one after using it for about one year.
For details on its replacement, please consult our authorized dealers.
•
•
•
•
•
•
[Cassette]
Precautions
If you see an [Initializing..] or [Preheating..] message on the LCD
panel of the printer, this means the printer is not ready yet. Print-
ing cannot be performed until a [Ready] massage appears.
Printing the card on the side with the magnetic stripe may cause
printing errors or damage to the card’s functions. If you want to
do so, please consult our authorized dealers in advance.
For printing using application software prepared by the user, refer
to the instruction manual of the corresponding software.
•
•
•
[Rear]
4321
Ex i t N ex t
>
Initialize OK?
Door Open
Total D 1
Reset Menu
***
5
Operation buttons
Sliding knob
Card hopper
Printer door
Power switch
AC inlet
Retransfer film cassette
Ink ribbon cassette
USB cable
connection terminal
LAN cable
connection terminal
Cleaning unit
Shafts
Bobbin
holders
Operation panel
1 2 3 4
Cassette buttons
Guide
shaft
Guide
shaft
54321
1
100
50
1
100
50
1
3 42
100
50
1
100
50
1
100
50
1
Off On
ISSUED
2015/08/06
Model
Specifications
Operating environment conditions ....Temperature: 15°C to 30°C
(When peel-off ink, UV ink is used: 17 °C to 28 °C)
Humidity: 35 % to 70 % No condensation
(When peel-off ink, UV ink is used: 35 % to 60 % )
Storage environment conditions
<Printer unit>
Temperature : -15 °C to 55 °C
Humidity : 20 % to 80 %
<Printing media (retransfer film or ink ribbon) / card>
Temperature : 5 °C to 25 °C
Humidity : 40 % to 60 %
Power supply..................................
AC 100 V - 120 V, 50 Hz/60 Hz
AC 220 V - 240 V, 50 Hz/60 Hz
Power consumption ........................................................... 310 W
(maximum power when all options are installed)
Current consumption...................................3.5 A (100 V system)
1.6 A (200 V system)
Mass.................................................................... approx. 13.5 kg
(single-sided printer, including bend remedy unit)
Dimensions ............... 343 mm x 335 mm x 322 mm (W x H x D)
o
0
0
0
0
0
0
0
* The specifications and appearance of this product may be modified
for improvement without prior notice.
CD-ROM Content
Electronic Manual
Printer Driver
Status Monitor
Software Development Technical Information
o
•
•
•
•
Card Printer Instruction Manual
LST0993-001F
Products Sold Separately
To purchase these items, consult our authorized dealers.
Use the retransfer film or ink ribbon within one year after purchase.
YMCK (1000 frames/roll) Set, Model: CY-P340A-DN
YMCKP (750 frames/roll) Set, Model: CY-P35PA-DN
Ink Ribbon (YMCKK) 750 frames/roll, Model: CY-35K-75D
Ink Ribbon (YMCKU) 750 frames/roll, Model: CY-35U-75D
Retransfer Film 1000 frames/roll, Model: CY-3RA-100
Cleaning Kit, Model: CX210-CKIT1
Magnetic Head Cleaning Card (5 Pcs),
Cotton Swab (5 Large and 5 Small),
Cleaning Wipes (1 Box)
Cleaning Card, Model: CX210-CC1
10 Pcs/Set
o
•
•
•
•
•
•
•
CX-D80
LST0993-001F
Dai Nippon Printing Co., Ltd.
Content of Electronic Manual
Before Use ...................................... Precautions, disclaimer, etc.
Operating the Printer......................Procedures for printing cards
Replacement ........... Procedures for replacing consumable items
Maintenance................................................Cleaning procedures
Troubleshooting ................... Actions to take when troubles occur
Setup................................... Installation, connection, setting, etc.
o
0
0
0
0
0
0
Accessories
CD-ROM ................................................................................1
Instruction Manual..................................................................1
READ ME FIRST :LST1004...................................................1
Power Cord (2 m) ...................................................................2
Cleaning Card ........................................................................1
Card Stacker ..........................................................................1
USB 2.0 Cable (2 m) ..............................................................1
Gloves ....................................................................................1
Tweezers ................................................................................1
o
0
0
0
0
0
0
0
0
0
Thank you for purchasing this product.
Please read through the “Electronic Manual” in the CD-ROM carefully in advance to ensure proper use of this product.
Also, to make sure that the product is used safely, please read through the “Safety Precautions” in the “READ ME FIRST”
booklet. Please store the manuals properly after reading so that they can be referred to whenever necessary.
Place this “Instruction Manual” near the printer and use it as and when needed.
Click
Print
in the “Electronic Manual” of the CD-ROM to print out the necessary PDF files.
Store the printed PDF files between the pages of this “Instruction Manual”.
MEMO
ISSUED
2014/12/24
J-TECS infomation _PLEMIA_ Count:- Checked:00000 Date:20141224 Approved:00000 Date:20141224
CX-D80
100
50
1
100
50
1
Ready
Total ***
Reset Menu
Open the printer door
Press and hold down the cassette button, and pull out the cassette (left: retransfer film cassette/
right: ink ribbon cassette) to remove the retransfer film/ink ribbon
Install a new retransfer film/ink ribbon
Install while referring to the indication on the label of the cassette.
With the retransfer/inked surface facing outward, unwind the retransfer film /ink ribbon along the three shafts,
and insert it firmly into the bobbin holders.
Remove any slack in the retransfer film/ink ribbon, and insert the cassette along the guide rail until a
“click” sound is heard
Close the printer door, and press to reset the printer
1.
2.
3.
•
•
4.
5.
Set the card hopper knob to [OPEN]
Lift to remove the card hopper cover
Align the orientation of the cards, and set them in the printer
Install the card hopper cover, and set the card hopper knob to [LOCK]
1.
2.
3.
4.
Open the printer door
Remove the cleaning unit
Wash the cleaning roller with water
Wash the roller with water, and remove any dirt from the surface of the cleaning
roller with your finger.
Allow the cleaning roller to air dry
Set the cleaning unit, and close the printer door
1.
2.
3.
•
4.
5.
Turn on the power
Check to ensure that cards are inserted into the card hopper
Open the application’s print settings screen, and select this printer in
[Name]
After ensuring that a [Ready] message appears on the LCD panel of
the printer, start printing
1.
2.
3.
4.
Precautions
If the security lock is on, deactivate it. After work is complete, activate
the security lock again.
Do not touch the printing surface of the card. Touching it may cause
printing errors. Put on the supplied gloves when handling the cards.
To prevent card jams from occurring, limit the number of cards stored
in the card hopper at any time to about 100 pieces regardless of the
card thickness.
When using new cards, set them after making sure that they are not
adhered to each other due to static.
Align the cards before setting them in the printer. Otherwise, the card
hopper cover may not close properly, and this may damage the printer.
•
•
•
•
•
Precautions
If the security lock is on, deactivate it. After work is complete,
activate the security lock again.
Start work after ensuring that the power has been turned off.
If the printer is used every day, make sure to clean the cleaning
roller daily at the end of the operation.
After washing, allow the cleaning roller to dry completely before
installing it to the printer.
Do not wash the cleaning roller with anything other than water (e.g.,
alcohol).
Replace the cleaning unit with a new one after using it for about one year.
For details on its replacement, please consult our authorized dealers.
•
•
•
•
•
•
Precautions
If you see an [Initializing..] or [Preheating..] message on the
LCD panel of the printer, this means the printer is not ready yet.
Printing cannot be performed until a [Ready] massage appears.
Printing the card on the side with the magnetic stripe may cause
printing errors or damage to the card’s functions. If you want to
do so, please consult our authorized dealers in advance.
For printing using application software prepared by the user, refer
to the instruction manual of the corresponding application.
•
•
•
[Front] [When printer door is open]
[Cassette][Rear]
Operation buttons
Sliding knob
Card hopper
Printer door
Power switch
AC inlet
Retransfer film cassette
Ink ribbon cassette
USB cable
connection terminal
LAN cable
connection terminal
Cleaning unit
Operation panel
Cassette buttons
Replenishing Cards
Maintenance of Cleaning Roller
Printing a Card
Name of Parts
Replacing the Retransfer Film/Ink Ribbon
The cassette is heavy when the retransfer film/ink ribbon is loaded.To
prevent the cassette from dropping during handling, make sure to hold it
with both hands.
Do not touch the retransfer/inked face (the side that faces outward when
installed) with your hand. Touching it may cause printing errors. Put on the
supplied gloves when handling the retransfer film/ink ribbon.
Do not perform any work on the printer
door. Do not place heavy objects or apply
load on the printer.
When installing a new film, make sure
that at least three black lines are wound
onto the take-up side.
•
•
•
•
Precautions
If the security lock is on, deactivate it. After work is complete, activate the
security lock again.
When installing a used ink ribbon, align the yellow side of the unused ribbon
with the arrow indicated on the label of the cassette.
When installing a used retransfer film, align the unused side of the film with
the arrow indicated on the label of the
cassette.
Stand the cassette on a flat surface
as illustrated in the diagram.
•
•
•
•
Shafts
Bobbin
holders
Guide
shaft
Guide
shaft
Off On
4321
Ex i t N ex t
>
Initialize OK?
Door Open
Total D 1
Reset Menu
***
5
1 2 3 4
54321
1
100
50
1
100
50
1
3 42
100
50
1
100
50
1
100
50
1
ISSUED
2014/12/24

Model
Specifications
Operating environment conditions ....Temperature: 15°C to 30°C
(When peel-off ink, UV ink is used: 17 °C to 28 °C)
Humidity: 35 % to 70 % No condensation
(When peel-off ink, UV ink is used: 35 % to 60 % )
Storage environment conditions
<Printer unit>
Temperature : -15 °C to 55 °C
Humidity : 20 % to 80 %
<Printing media (retransfer film or ink ribbon) / card>
Temperature : 5 °C to 25 °C
Humidity : 40 % to 60 %
Power supply..................................
AC 100 V - 120 V, 50 Hz/60 Hz
AC 220 V - 240 V, 50 Hz/60 Hz
Power consumption ........................................................... 310 W
(maximum power when all options are installed)
Current consumption...................................3.5 A (100 V system)
1.6 A (200 V system)
Mass.................................................................... approx. 13.5 kg
(double-sided printer, excluding optional built-in items)
Dimensions ............... 343 mm x 335 mm x 322 mm (W x H x D)
o
0
0
0
0
0
0
0
* The specifications and appearance of this product may be modified
for improvement without prior notice.
CD-ROM Content
Electronic Manual
Printer Driver
Status Monitor
Software Development Technical Information
o
•
•
•
•
Card Printer Instruction Manual
LST1594-001A
Products Sold Separately
To purchase these items, consult our authorized dealers.
Use the retransfer film or ink ribbon within one year after purchase.
YMCK (1000 frames/roll) Set, Model: CY-P340A-DN
YMCKP (750 frames/roll) Set, Model: CY-P35PA-DN
Ink Ribbon (YMCKK) 750 frames/roll, Model: CY-35K-75D
Ink Ribbon (YMCKU) 750 frames/roll, Model: CY-35U-75D
Retransfer Film 1000 frames/roll, Model: CY-3RA-100
Cleaning Kit, Model: CX210-CKIT1
Magnetic Head Cleaning Card (5 Pcs),
Cotton Swab (5 Large and 5 Small),
Cleaning Wipes (1 Box)
Cleaning Card, Model: CX210-CC1
10 Pcs/Set
o
•
•
•
•
•
•
•
CX-D80H
LST1594-001A
Dai Nippon Printing Co., Ltd.
Content of Electronic Manual
Before Use ...................................... Precautions, disclaimer, etc.
Operating the Printer......................Procedures for printing cards
Replacement ........... Procedures for replacing consumable items
Maintenance................................................Cleaning procedures
Troubleshooting ................... Actions to take when troubles occur
Setup................................... Installation, connection, setting, etc.
o
0
0
0
0
0
0
Accessories
CD-ROM ................................................................................1
Instruction Manual..................................................................1
READ ME FIRST :LST1004...................................................1
Power Cord (2 m) ...................................................................2
Cleaning Card ........................................................................1
Card Stacker ..........................................................................1
USB 2.0 Cable (2 m) ..............................................................1
Gloves ....................................................................................1
Tweezers ................................................................................1
o
0
0
0
0
0
0
0
0
0
Thank you for purchasing this product.
Please read through the “Electronic Manual” in the CD-ROM carefully in advance to ensure proper use of this product.
Also, to make sure that the product is used safely, please read through the “Safety Precautions” in the “READ ME FIRST”
booklet. Please store the manuals properly after reading so that they can be referred to whenever necessary.
Place this “Instruction Manual” near the printer and use it as and when needed.
MEMO
ISSUED
2014/11/17
J-TECS infomation _PLEMIA_ Count:- Checked:00000 Date:20141117 Approved:00000 Date:20141117
100
50
1
100
50
1
Ready
Total ***
Reset Menu
Open the printer door
Press and hold down the cassette button, and pull out the cassette (left: retransfer film cassette/
right: ink ribbon cassette) to remove the retransfer film/ink ribbon
Install a new retransfer film/ink ribbon
Install while referring to the indication on the label of the cassette.
With the retransfer/inked surface facing outward, unwind the retransfer film /ink ribbon along the three shafts,
and insert it firmly into the bobbin holders.
Remove any slack in the retransfer film/ink ribbon, and insert the cassette along the guide rail until a
“click” sound is heard
Close the printer door, and press to reset the printer
1.
2.
3.
•
•
4.
5.
Set the card hopper knob to [OPEN]
Lift to remove the card hopper cover
Align the orientation of the cards, and set them in the printer
Install the card hopper cover, and set the card hopper knob to [LOCK]
1.
2.
3.
4.
Open the printer door
Remove the cleaning unit
Wash the cleaning roller with water
Wash the roller with water, and remove any dirt from the surface of the cleaning
roller with your finger.
Allow the cleaning roller to air dry
Set the cleaning unit, and close the printer door
1.
2.
3.
•
4.
5.
Turn on the power
Check to ensure that cards are inserted into the card hopper
Open the application’s print settings screen, and select this printer in
[Name]
After ensuring that a [Ready] message appears on the LCD panel of
the printer, start printing
1.
2.
3.
4.
Precautions
If the security lock is on, deactivate it. After work is complete, activate
the security lock again.
Do not touch the printing surface of the card. Touching it may cause
printing errors. Put on the supplied gloves when handling the cards.
To prevent card jams from occurring, limit the number of cards stored
in the card hopper at any time to about 100 pieces regardless of the
card thickness.
When using new cards, set them after making sure that they are not
adhered to each other due to static.
Align the cards before setting them in the printer. Otherwise, the card
hopper cover may not close properly, and this may damage the printer.
•
•
•
•
•
Precautions
If the security lock is on, deactivate it. After work is complete,
activate the security lock again.
Start work after ensuring that the power has been turned off.
If the printer is used every day, make sure to clean the cleaning
roller daily at the end of the operation.
After washing, allow the cleaning roller to dry completely before
installing it to the printer.
Do not wash the cleaning roller with anything other than water (e.g.,
alcohol).
Replace the cleaning unit with a new one after using it for about one year.
For details on its replacement, please consult our authorized dealers.
•
•
•
•
•
•
Precautions
If you see an [Initializing..] or [Preheating..] message on the
LCD panel of the printer, this means the printer is not ready yet.
Printing cannot be performed until a [Ready] massage appears.
Printing the card on the side with the magnetic stripe may cause
printing errors or damage to the card’s functions. If you want to
do so, please consult our authorized dealers in advance.
For printing using application software prepared by the user, refer
to the instruction manual of the corresponding application.
•
•
•
[Front] [When printer door is open]
[Cassette][Rear]
Operation buttons
Sliding knob
Card hopper
Printer door
Power switch
AC inlet
Retransfer film cassette
Ink ribbon cassette
USB cable
connection terminal
LAN cable
connection terminal
Cleaning unit
Operation panel
Cassette buttons
Replenishing Cards
Maintenance of Cleaning Roller
Printing a Card
Name of Parts
Replacing the Retransfer Film/Ink Ribbon
The cassette is heavy when the retransfer film/ink ribbon is loaded.To
prevent the cassette from dropping during handling, make sure to hold it
with both hands.
Do not touch the retransfer/inked face (the side that faces outward when
installed) with your hand. Touching it may cause printing errors. Put on the
supplied gloves when handling the retransfer film/ink ribbon.
Do not perform any work on the printer
door. Do not place heavy objects or apply
load on the printer.
When installing a new film, make sure
that at least three black lines are wound
onto the take-up side.
•
•
•
•
Precautions
If the security lock is on, deactivate it. After work is complete, activate the
security lock again.
When installing a used ink ribbon, align the yellow side of the unused ribbon
with the arrow indicated on the label of the cassette.
When installing a used retransfer film, align the unused side of the film with
the arrow indicated on the label of the
cassette.
Stand the cassette on a flat surface
as illustrated in the diagram.
•
•
•
•
Shafts
Bobbin
holders
Guide
shaft
Guide
shaft
Off On
4321
Ex i t N ex t
>
Initialize OK?
Door Open
Total D 1
Reset Menu
***
5
1 2 3 4
54321
1
100
50
1
100
50
1
3 42
100
50
1
100
50
1
100
50
1
ISSUED
2014/11/17
Table of contents


