Bravox BVX-D930 User manual


2
ENGLISH
Operating Instructions ............................................................................................................................................... pg 3 ~ 40
PORTUGUÊS
Manual de Instruções.............................................................................................................................................. pg 41 ~ 80
ESPAÑOL
Manual de Instrucciones .........................................................................................................................................pg 81 ~119

3
CONTENTS
CONTENTS .............................................................................................................................................................................. 3
ACCESSORIES ........................................................................................................................................................................ 4
PRECAUTION .......................................................................................................................................................................... 5
INSTALLATION (installation/removal)....................................................................................................................................... 7
ATTACHING & REMOVING THE FRONT PANEL ................................................................................................................... 8
FRONT PANEL ......................................................................................................................................................................... 9
BASIC OPERATION ................................................................................................................................................................. 10
REMOTE CONTROL ................................................................................................................................................................ 13
RADIO OPERATION ................................................................................................................................................................. 17
DVD/VCD/CD/MP3/MP4/XVID OPERATION ........................................................................................................................... 20
SYSTEM SETUP ...................................................................................................................................................................... 30
ELECTRICAL CONNECTION................................................................................................................................................... 36
TECHNICAL SPECIFICATIONS ............................................................................................................................................... 37
TROUBLESHOOTING .............................................................................................................................................................. 39

4
ACCESSORIES
Mounting Bracket X1 Removable Trim Ring X1 Small metal strip X1 Washer X1 Nut X1
Rubber X1 Remote Control X1 Release key X2 Protective case X1 AV in Cable X1
ISO Wire connector X1 Removable control panel X1 User manual X1 USB cable X1

5
PRECAUTION
This unit is designed and manufactured with the user’s safety in mind, however any improper use or operation may result in certain
dangers. It is therefore highly recommended to read this manual thoroughly and adhere to the following precautions.
SAFETY PRECAUTIONS
• To prevent an electrical shock, do not open the housing of the unit. In any case of malfunctioning, only have the unit serviced by
an approved and qualified service centre.
• Do not expose to any water or to a very humid environment. Do not operate the unit when your hands are wet as this may cause
a short circuit.
• For safe driving, keep the volume low in order to concentrate on traffic conditions.
• Do not clean the unit with alcohol, only clean with a soft dry cloth.
• If the unit has been kept at a high temperature or in a high humidity environment, cool down the car interior before turning on the
unit.
• Do not use the unit for a long time without running the vehicle engine, it may drain the battery and the engine s vehicle may not
be able to start.
• Before final installation in the dashboard opening, connect the wiring and make sure the unit is working properly.
• Only use parts provided with the unit to ensure proper installation.
• Do not route wiring in places that the heat may melt the wiring insulation.
• When replacing the fuse, ensure that the new fuse has the capacity recommended by the manufacturer.

6
PRECAUTION
OPERATION PRECAUTIONS
• Do not operate the player with scratched, bent or broken discs. When a disc is not loaded properly, do not force it into the disc
loader.
• Never insert any other objects into the disc loader like a coin or pin, etc as this may cause damage or a short circuit.
• Do not use different disc formats other than 8 cm or 12cm round discs.
• Please dispose of used batteries according to the regulations in your country.
• If the unit is disconnected to the battery, it will lose memorized data.
• If the source disc has poor sound quality due to scratches, dirt or a bad recording, the playback sound quality may be poor.
Remote control:
• Do not let the remote control fall onto the floor, where it may become jammed under the brake or accelerator pedals.
• Do not short-circuit, disassemble or heat the battery.
• Do not dispose of the battery in a fire.
• Dispose of used batteries properly.

7
INSTALLATION (installation/removal)
Note:
Unit should be installed horizontally at an angle of less than 30°
DIN FRONT-MOUNT (A)
Installation of the unit
1. Metal Sleeve
Install the metal sleeve in the dashboard.
For optimal performance of the CD player, the metal sleeve should be positioned horizontally
(between 10° and 30°). Fix metal sleeve into place by pressing the metal tags outwards
using screwdriver.
2. Front Mounting
Slide the radio into the metal sleeve until the springs at either side of the radio snap into the
openings of the sleeve.

8
3. Removing Radio
Insert the levers supplied with the unit into the grooves at both sides of the unit until they lock. Pull the levers toward you makes it
possible to remove the unit from the dashboard.
JIN REAR-MOUNT (B) (Option)
Installation using the screw holes on the sides of the unit.
Remove the outer rim around the front panel and the side springs. Select a position
where the screw holes of the mounting bracket and the screw holes of the radio
become aligned and tighten the screws at 2 places on each side.
ATTACHING & REMOVING THE FRONT PANEL
Removing the Front Panel
• Press the RELEASE button to open the front panel.
• Push the front panel to right and pull the left side of the front panel away from
the unit, as shown in the figure below.
(It is highly recommended to keep the front panel in the protective case provided)
Attaching the Front Panel
• First Insert the right side of the front panel as shown in the figure below and
gently push the left side of the front panel onto the unit until you hear a click
sound, which confirms that the front panel is firmly attached.

9
FRONT PANEL

10
BASIC OPERATION
1. PWR/BACK
Press the button to turn on the unit, press and hold the button for 1 second to turn off the unit. In menu mode, when you want to
return to the previous menu, you can press the button.
2. MODE
Press this button to select one of the following sources: RADIO/DVD/USB/SD/AV.
3. BAND
Press this button to select the band in the following sequence: FM1/FM2/FM3/AM1/AM2.
4. AMS
Hold down the AMS button for a few moments to automatically store stations with a good reception. Press this button briefly to scan
through the preset stations.
5. VOL/MENU
Adjust the volume by turning the knob clockwise or counterclockwise. Press this button briefly to display the menu. You can choose
one of the following sub-menus: AUDIO/PICTURE/SETUP. Press the cursor to select a sub-menu and then press it to access the
selected sub-menu. Rotate the button to adjust to the desired setting. When you want to return to the previous menu, you can
press the PWR/BACK button.
In the AUDIO sub-menu, you can adjust the following options: VOLUME/BASS/TREBLE/BALANCE FADER/EQ (equalizer) /LOUD
(loudness) /SUB.W. (sub woofer).
In the PICTURE sub-menu, you can adjust the status for one of the following options by rotating the VOL button: BRIGHTNESS/
CONTRAST/COLOR/TINT/DISP.M 16:9/DEFAULT.
In the SETUP sub-menu, you can adjust the following options: SYSTEM and CLOCK.
• In the SYSTEM sub-menu, you can select TIME to switch the time display on or off and TIME.M to select a 24-hour or 12-hour
display.
• The CLOCK sub-menu allows you to set the hours and minutes.
You can select DEFAULT to restore the default settings.
6. TA
In radio mode, press briefly to turn the TA function on/off. Hold down the button to select STEREO or MONO mode.

11
BASIC OPERATION
7. PTY
In radio mode, press the button to turn the PTY function on/off. Hold down this button to select “LOC” - local stations or long
distance stations.
8. ME/
In Radio mode, press the button briefly to select a preset station number that you would like to store. Hold down the button to save
the station under the selected number. In play mode, press this button to pause or resume playback.
9. IR window
To receive the infrared signal from the remote control.
10.RPT/SET
Press the SET button to select a stored station in radio mode. In playback mode, press the RPT button repeatedly to select a
repeat playback mode.
11. AF
In radio mode, press the button to turn the AF function on/off. Hold down the button to turn the REG (regional) function on/off.
12.AV IN
Connect the AV cable (not supplied) to your external AV device, then press the MODE button to switch to AV mode.
Note:
If there is no external video input, the TFT displays “AV NO VIDEO”.
13. TFT display
14.
In radio mode, press one of these buttons to seek a station automatically. Hold down one of the buttons to switch to manual tuning.
In DVD/USB/CARD mode press these buttons to select the previous or next file. Hold down the button for 2 seconds to fast forward
or fast backward.
15.[ ] RELEASE
Press this button to open the front panel.

12
BASIC OPERATION
16. USB port
17. SD Slot
Note:
Once the SD card could not eject after pressing, just take it out manually.
18. DISC Loading Slot
19.
Press the button to eject a disc when it is loaded into the unit.
20.RESET
Press the button to reset the unit using a sharp object such as a pencil to reset the unit.
13
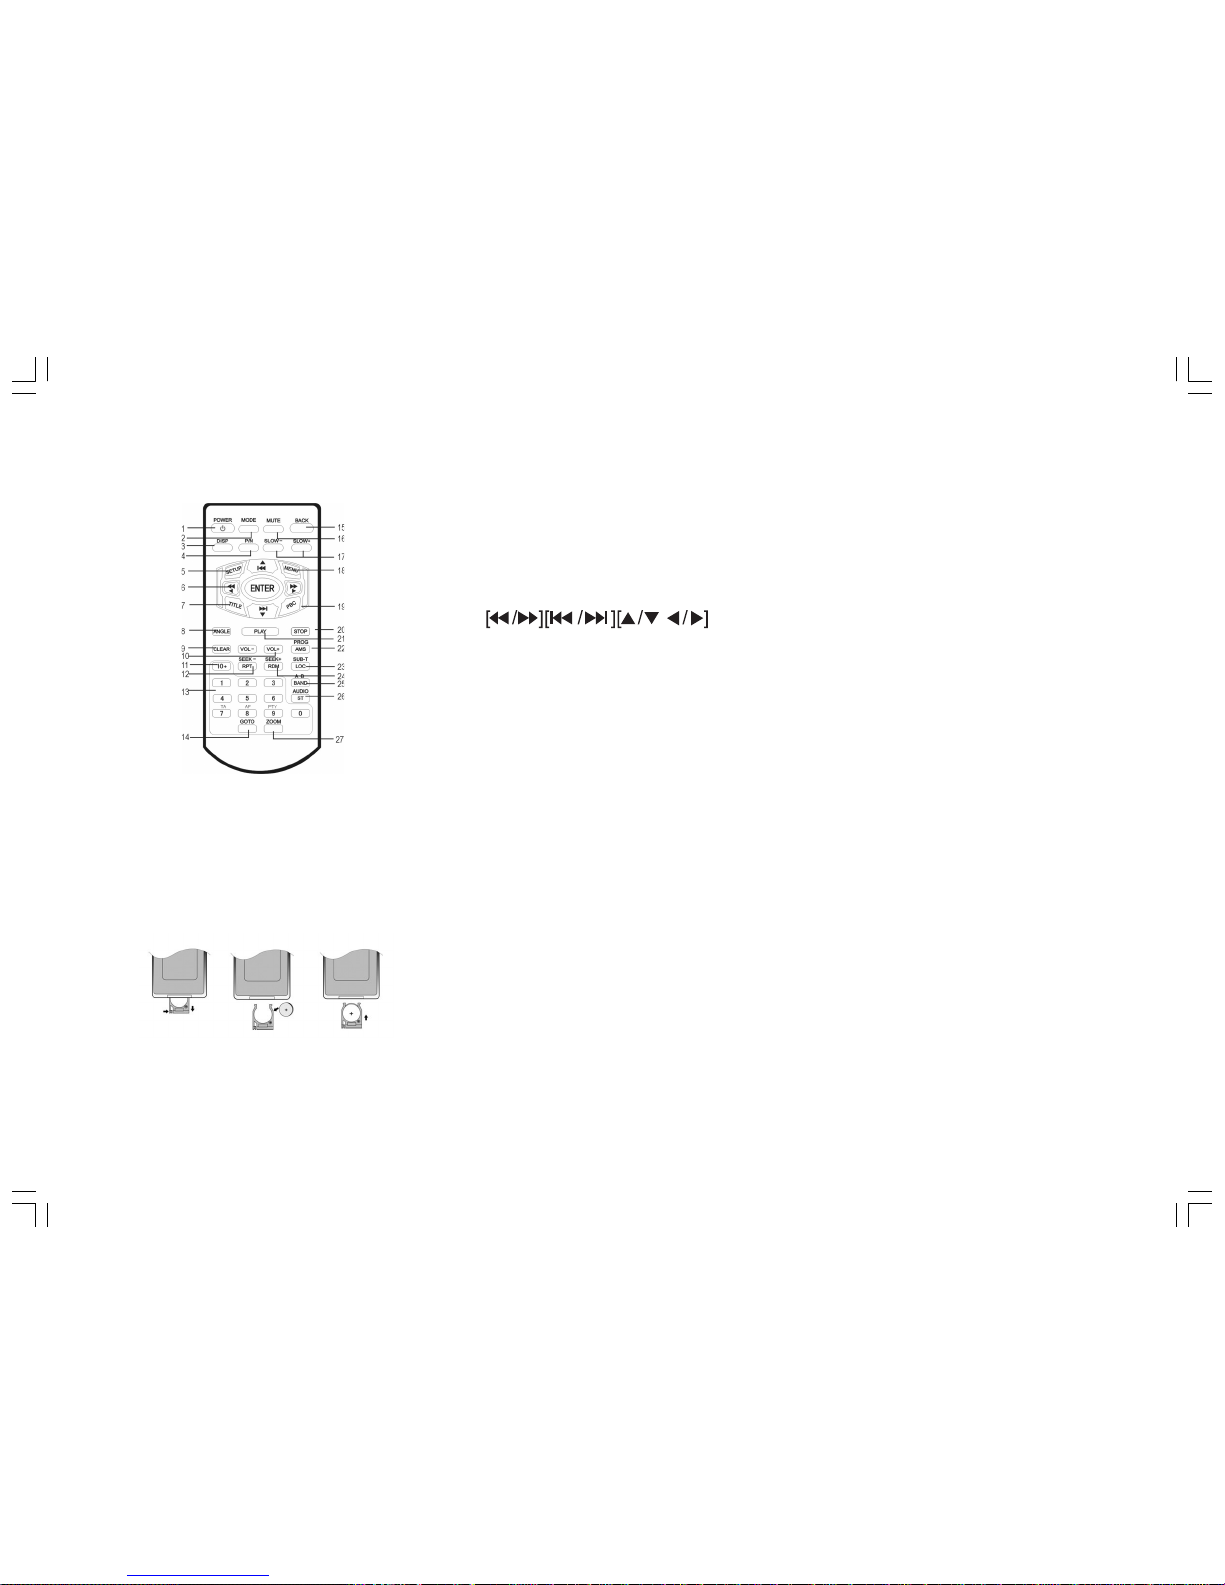
REMOTE CONTROL
Installing the battery
Slide the tray out on the back of the remote
control and insert the battery with polarity
(+) on top as shown.
1. POWER
2. MODE
3. DISP
4. P/N (PAL/NTSC)
5. SETUP
6. /ENTER
7. TITLE
8. ANGLE
9. CLEAR
10. VOL-/VOL+
11. 10+ BUTTONS
12. RPT/SEEK
13. (0-9) NUMBER BUTTON
14. GOTO
15. BACK
16. MUTE
17. SLOW-/SLOW+
18. MENU
19. PBC
20. STOP
21. PLAY
22. AMS/PROG
23. LOC/SUB-T(local stations/subtitles)
24. RDM/SEEK+
25. BAND/A-B (band/repeat A-B)
26. ST/AUDIO (stereo/audio language)
27. ZOOM
Use and care of the remote control
Point the remote control to the IR window on the front panel for operation.
Notes:
Using the battery incorrectly can cause malfunctions. Take note of the following
points for the remote control:
• Keep the battery out of the reach of children. Should the battery be swallowed,
immediately consult a doctor.
• Use one CR2025 (3V) Lithium battery.
• Remove the battery if the remote control is not to be used for a month or longer.

14
REMOTE CONTROL
1. POWER
Press to turn on or off the unit.
2. MODE
Press this button to select one of the following modes: RADIO, DVD, USB, SD or AV.
3. DISP
In DVD mode, press the DISP button to display the following information: Title Elapsed, Title Remain, Chapter Elapsed, Chapter
Remain; Display Off.
In VCD/CD mode, Single Elapsed, Single Remain, Total Elapsed, Total Remain, Display Off.
In MP3/WMA mode and when the car is parked, hold down the DISP button on the remote control to display the file list or single file
information on the unit display.
Note:
This function does not work when the car is driven that only the single file information can be displayed.
4. P/N (PAL/NTSC)
In DVD and VCD mode, press to select the PAL, MULTI or NTSC system.
5. SETUP
In DVD playback mode, press to display system SETUP menu, you can adjust the settings to your preference.
6. ENTER
[fast backward/fast forward][previous track/next track][up/down/left/right] and then press ENTER to access the selected item or
confirm the selection in the system setting menu.
7. TITLE
In DVD playback mode, press the button to display the title menu.
8. ANGLE
Press to change the camera angle in DVD mode (Available only when it was shot at different camera angles).
9. CLEAR
Press to clear an entry.
10.VOL-/VOL+
Press to adjust the volume.

15
REMOTE CONTROL
11. 10+
Press to select a track or chapter, press it repeatedly to input 1_, 2_, 3_...for double digits
12.RPT/SEEK-
In DVD/USB/CARD mode, press to RPT repeatedly to select repeat playback mode. In radio mode, press to scan stations downwards.
13. (0-9) NUMBER BUTTON
Press to select track chapter or preset stations. In radio mode, press the button (7) TA/(8) AF/(9) PTY to select TA/AF/PTY
functions.
In DVD/VCD mode, long press the button (0) A-B will repeat playback of a specific section.
14.GOTO
In DVD mode, press GOTO button and the UP/DOWN cursors to display the following options: TITLE, TRACK, AUDIO, SUBTITLE,
ANGLE, TT TIME, CH TIME, REPEAT, TIME DISP. Then press the ENTER button to set the item.
In VCD mode, press GOTO button and cursor UP/DOWN to select TRACK, DISC, TIME, TRACK TIME, REPEAT, TIME DISP.
In VCD mode, press GOTO button to then use the UP/DOWN cursors to display the following options: DISC TIME, TRACK TIME,
TRACK.
In CD mode, press GOTO button to display the following options: DISC TIME, TRACK TIME, TRACK.
In MP3/MP4 mode, press GOTO button to select “SELECT:_ _ _” or “GOTO _:_ _:_ _”. Then press the 0-9 number buttons to select
the track or time for playback.
Note:
GOTO function may not work for some discs such as MP3 discs, which have different burning conditions.
15.BACK
Press to return to the previous menu in the menu mode.
16.MUTE
Press to shut off the sound output. Press it again to resume previous sound level.
17.SLOW-/SLOW+
Press to playback slow motion forward or backward.

16
REMOTE CONTROL
18.MENU
Press to display the menu. This menu contains the following options: AUDIO/PICTURE/SETUP.
In DVD mode, hold down this button to display the ROOT MENU.
19.PBC
For VCD, press this button to turn on PBC ON. The disc menu (if available) will display and then use the NUMBER button (0-9) to
select the options in the menu.
20.STOP
Press to stop the playback.
21.PLAY
Press to start playback or resume playback.
22.AMS/PROG
In radio mode, press briefly to scan through preset stations. Press for longer to automatically store stations. In DVDVCD/CD mode,
press this button to set program playback.
23.LOC/SUB-T (local stations/subtitles)
In FM radio mode, press to receive the local stations only and “LOC” is displayed on the screen. Press it again to turn off this
function.
In DVD playback mode, press this button to change the subtitle language.
24.RDM/SEEK+
In DVD/VCD/CD mode, press this button to play the tracks/chapters in random order. In radio mode, press this button to search
forwards for stations.
25. BAND/A-B (band/repeat A-B)
In radio mode, press the button to select bands. In DVD mode, press this button to repeat a specific section on a disc.
26.ST/AUDIO (stereo/audio language)
In FM radio mode, press to select stereo or mono reception. In DVD mode, press this button to select the audio language.
In VCD mode, press to select one of the following audio outputs: MONO LEFT, MONO RIGHT, MIX MONO or STEREO.
27.ZOOM
Press to enlarge or reduce the picture size.

17
RADIO OPERATION
Listening to the radio
1. Press the [MODE] button to select the radio mode.
2. Press the [BAND] button repeatedly to select the radio band in the following sequence:
3. Press the [ ] buttons on the unit to tune in a station automatically.
Tuning
There are 3 types of tuning mode available, seek tuning, manual tuning and preset tuning.
Seek tuning
1. Press the [BAND] button to select the desired band.
2. Press the [ ] buttons on the unit to tune in a station automatically.
Manual tuning
1. Press the [BAND] button to select the desired band.
2. Press the [ ] button on the unit for a few moments to switch to manual tuning and “MANUAL” will be displayed on the screen.
Press [ ] to increase the frequency. When it is not pressed for few seconds, “MANUAL” will disappear and the manual tuning
function is cancelled.
Press the [ ] button to reduce the frequency.

18
RADIO OPERATION
Preset tuning - Recalling a preset station
A total of 30 preset stations on the (FM-18, AM-12) band are available in the unit’s memory. Press [ ] or [ ] on the remote control to
recall a preset station.
Auto store
Auto store is a function for storing up to 6 stations. If 6 stations with good reception cannot be received, the previous stored stations (if
they exist) remain as they are.
1. Press the [BAND] button to select the desired band (FM1-FM2-FM3-AM1-AM2).
2. Hold down the [AMS] button for 2 seconds or longer. The stations with good reception are stored automatically.
Manual store
In radio mode, press the SEEK-/SEEK+ button on the remote control to scan stations. When your desired stations are searched, long
press the digit [1-6] to store.
RDS (RADIO DATA SYSTEM) OPERATION
The RDS data are the PI, PS, TP, PTY, TA and AF DATA.
PI: Program identification Code for identifying program.
PS: Program Service Name Broadcast station name data expressed in alphanumerically character.
TP: Traffic Program identification data for traffic information broadcasting.
PTY: See “Using PTY to select Program” on the next page.
TA (Traffic Announcement): function enabling the broadcast of traffic information.
AF (Alternative Frequencies): function enabling automatic search for the best alternative frequency available.

19
RADIO OPERATION
Setting AF MODE
• Press AF button briefly to switch on/off AF mode. “AF” is displayed when AF function is on.
• With AF function on, it automatically searches for the best alternative frequency available for the current station.
•ALERT will be displayed when an emergency broadcasting is received; meanwhile sound output level will be adjusted to the
preset output level automatically when the volume control is set at minimum.
• It is possible to programme the car radio so that it exits disc/USB/card mode or the current radio station when traffic information
is broadcast. Press the TA button briefly to switch TA mode on or off.
When TA mode is switched on, the unit automatically broadcasts the traffic information available. To interrupt the broadcast of
traffic information without switching off the TA function, briefly press the TA button. The unit will then return to the previous mode.
Using PTY to Select a Program
The PTY function allows you to search for stations with a particular program type. You can select the type by pressing the [ ]
buttons on the main unit or pressing and on the remote control. Refer to the type for your selection as listed in table below:
When PTY is selected, the radio starts to search corresponding PTY information, and stops if the corresponding PTY information is
found.
If corresponding PTY information is not found, normal radio reception is resumed.
NEWS COUNTRY REL_MUSIC
INFORM OLDIES REL_TALK
SPORTS SOFT PERSNLTY
TALK NOSTALGA PUBLIC
ROCK (classic rock) JAZZ COLLEGE
CLK_ROCK CLASSICL WEATHER
ADLT_HIT R_&B_ TEST
SOFT_RCK SOFT_R&B ALERT
TOP_40 LANGUAGE

20
DVD/VCD/CD/MP3/MP4/XVID OPERATION
MP3
1. Playing a disc, an SD/MMC card or a USB device containing MP3 files
Connect a USB device using the supplied USB cable or press the [ ]button to open the front panel, insert a disc into the disc slot
or an SD/MMC card into the card slot. The unit will automatically switch on when a disc, card or USB device is inserted. Press
MODE button to select the source: DISC/USB/SD.
If a media containing MP3&WMA files is inserted, the playback will start automatically, even if the media contains JPEG files.
• In order to display the full content of the media, you have to hold DISP button for a few seconds. Then you can select the file you
want and you have to press PLAY button to play it or display it.
• Due to security reason, this function is available only if the car is parked (brown parking brake wire connected to parking brake
switch).
During MP3 playback, if it has folders, press the STOP button, then press the [ ] buttons to select the required folder.
Then confirm using the ENTER button. Then select the next track desired using the buttons. Press PLAY button to start playback.
2. Quick track selection
When playing MP3 files, press the or button on the remote control to go to the next or previous track.
3. Repeat playing
When playing MP3 files, press the RPT button repeatedly on the remote control to select repeat mode: SINGLE, REPEAT ONE,
REPEAT ALL. While in SINGLE mode, the unit will stop after the single track is played. While in REPEAT ONE mode, the unit will
play one track repeatedly. While in REPEAT ALL mode, it will play all tracks repeatedly.
Note:
• The RPT button on the main unit performs the same function.
4. Selecting an MP3 track (or file) using the number buttons
Press the number buttons to select a track, then press the ENTER button to confirm.
Note:
• This function can only be operated using the remote control.
• If you make a mistake, press CLEAR button to clear.
Table of contents
Languages:


