bredent HELBO TheraLite User manual
PHOTODYNAMIC THERAPY
HELBO®
User Manual
HELBO®TheraLite Laser
and additional accessories for the antimicrobial Photodynamic therapy
Version 14 06/2017
bredent medical GmbH &Co. KG |Weissenhorner Str. 2 |89250 Senden |Germany |T: (+49) 0 73 09 / 8 72-4 41 |F: (+49) 0 73 09 / 8 72-4 44 |www.bredent-medical.com |@: [email protected]
S I N C E 1 9 7 4

PHOTODYNAMIC THERAPY
HELBO®User Manual for HELBO® TheraLite Laser
2
Table of contens
1. ANTIMICROBIAL PHOTODYNAMIC THERAPY (aPDT) 3
1.1. INTRODUCTION 3
1.2. COMPONENTS (AN OVERVIEW) 4
1.3. CLINICAL PROCEDURE (IN RED) 5
1.3.1. Periodontology 6
1.3.2. Endodontics 7
1.4. THE PHOTOBIOLOGICAL EFFECT 8
2. THE HELBO® THERALITE LASER: 9
2.1. PRODUCT DESCRIPTION AND PURPOSE 9
2.2. CONTROL ELEMENTS 10
2.3. APPLICATION 10
2.3.1. Contraindications / Side effects 11 11
2.4. HELBO® FIBRE OPTICS 12
2.4.1. HELBO® 3D Pocket Probe 13
2.4.2. HELBO® 2D Spot Probe 14
2.4.3. HELBO® 3D Endo Probe 15
2.5. START-UP 16
2.5.1. Batteries 16
2.5.2. Operating states / displays 17
2.5.3. Main switch 18
2.5.4. Button 18
2.6. MAINTENANCE / SERVICE 19
2.7. CLEANING 19
2.8. POWER SUPPLY 20
2.8.1. Changing the batteries 20
2.8.2. Battery storage 21
2.9. SAFETY INSTRUCTIONS / WARNING NOTICES 22
2.10. EMC (ELECTROMAGNETIC COMPATIBILITY) 24
2.11. TECHNICAL SAFETY CHECK in accordance with EN 62353 28
2.12. TECHNICAL DATA 29
2.13. CE MARKING 30
2.14. DISPOSAL 31
2.15. TROUBLESHOOTING 31
2.16. LASER EMERGENCY STOP 33
2.17. Warning signs / Information signs / General signs 34
2.18. GENERAL INFORMATION ABOUT LASER SAFETY 35
2.19. GUARANTEE 36

PHOTODYNAMIC THERAPY
HELBO®User Manual for HELBO® TheraLite Laser
3
Version 14 06/2017
1. ANTIMICROBIAL PHOTODYNAMIC THERAPY (aPDT)
1.1. INTRODUCTION
Antimicrobial photodynamic therapy represents a method of treating superficial bacterial infections locally.
This therapy involves applying a dye (phenothiazine chloride) to the infected area after having mechanically
cleaned it. After an exposure time of at least 60 seconds, excess dye is rinsed away. This is followed by exposure
of the dyed, infected tissue to the HELBO® TheraLite Laser. The fibre optic used depends on the area being treated.
The HELBO® 2D Spot Probe is used on larger areas, and includes a spacer to ensure that the power density necessary
for therapeutic purposes is maintained. It radiates divergent beams of light outwards and forwards.
The HELBO® 3D Pocket Probe is used to treat infected pockets, and the HELBO® 3D Endo Probe is designed for
use on infected root canals.
Staining the pathogenic bacteria with the dye and then exposing them to the laser results in targeted transfer
of the light energy to the ambient oxygen, converting it quantum-energetically into short-lived, antimicrobially
active singlet oxygen (= type II photodynamic reaction). The singlet oxygen’s oxidative effect breaks down both
the bacteria and the surrounding biofilm matrix, which explains the source of aPDT’s targeted decontamination
effect on localised, superficial infections. As such, using the HELBO® aPDT to remove pathogens alleviates the
body’s inflammatory reaction.
The 660-nm laser light also has a photobiological effect on the healthy cells of the tissue being treated, further
amplifying the therapy’s ability to reduce inflammation and promote wound healing.
For this reason, the HELBO® TheraLite Laser is also suitable for use in low-level laser therapy (LLLT), i.e., for use
without dye in order to promote wound healing. Known effects of 660-nm LLLT on tissue include pain relief;
promotion of epithelialisation, collagen synthesis and blood vessel formation; oedema reduction; bruise healing;
and scar tissue conversion.

PHOTODYNAMIC THERAPY
HELBO®User Manual for HELBO® TheraLite Laser
4
1.2. COMPONENTS (an overview)
HELBO® TheraLite Laser
• Diode laser with integrated power control and innovative fibre optics
• Exceptional light power allows short treatment times; mains-power independent for greater mobility (battery
mode)
• Small, light and ergonomically perfect for fatigue-free operation
HELBO® 3D Pocket Probe: for infected pockets
• Three-dimensional, uniform, lateral exposure
• Angled for optimum access to all areas, including distal areas
• Sterile disposable product to prevent spread of bacteria
• Power density > 60mW/cm2
HELBO® 3D Endo Probe: for infected root canals
• Three-dimensional, uniform, lateral exposure
• Increased apical radiation
• More flexible fibre optic for effective use in root canals
• Greater probe rigidity
• Sterile disposable product to prevent spread of bacteria
• Power density > 55mW/cm2
HELBO® 2D Spot Probe: for infected surfaces
• Concentrated two-dimensional exposure
• Spacer and active field marker ensures optimum power density
• Sterile disposable product to prevent spread of bacteria
• Power density > 100mW/cm2
HELBO® Endo Seal
• Light-curing one-component lacquer for dentine sealing
HELBO® T-Controller: (T = Time &Therapy Control)
• Aesthetic
• Functional
• Simple control of
relevant performance parameters for
assured therapy success
• Optimum time &therapy control
HELBO® CHARGER SET
• Microcontroller-controlled charging function
• Automatic refreshing program to care for your battery
• High-end NiMH batteries with 800 mAh typical

PHOTODYNAMIC THERAPY
HELBO®User Manual for HELBO® TheraLite Laser
5
Version 14 06/2017
1.3. CLINICAL PROCEDURE (in red)
Control of relevant process parameters with the HELBO® T-Controller
Brief instructions Activity
(at device)
Display Acoustic
signal
Therapy stage Next stage
Initial situation:
Rinse mouth 2x
None None None Rinse patient’s mouth twice for
approx. 20 sec. with sufficient
water / remove saliva and blood
from the areas to be treated
Switch main switch to „on“
Main switch in “on“
position
Switch main
switch to „on“
Tooth fields 1-8 flash (red) None Select corresponding tooth field
according to the number of teeth
to be treated
Press corresponding tooth
field according to the num-
ber of teeth to be treated
Pressing the correct
tooth field, application
of phenothiazine
chloride dye
Press corre-
sponding tooth
field according
to the number
of teeth to be
treated
Tooth fields according to the
number of teeth to be treated
are permanently lit
None Dye application and distribution
(if necessary) using the air
blower on the multi-functional
syringe to ensure thin, uniform
coverage of the entire surface
Monitoring dye exposure
time by pressing the Go/
Break key
Pressing the Go/Break
key. Phenothiazine
chloride dye exposure
time: 60 -180 sec.
Press Go/Break
button
Tooth fields according to the
number of teeth to be treated
are permanently lit / “photosen-
sitizer” display (blue) is perma-
nently lit for 60 sec. and flashes
slowly for another 120 sec.
Beep Dye exposure (60-180 sec.) Rinsing using the multi-
functional syringe and
suctioning off excess dye
Rinsing and suction of
excess phenothiazine
chloride dye
None “Photosensitizer” display (blue)
flashes rapidly
None Rinsing using the multi-function-
al syringe (including in the
pocket!) and suctioning off
excess dye
Press Go/Break button once
more; exposure of first tooth
with the HELBO® TheraLite
Laser for 60 sec.
Press Go/Break button
once more, exposure
with HELBO® TheraLite
Laser: 60 sec. per tooth/
per cm2
Press Go/Break
button
Tooth field “1” flashes, tooth
fields of the teeth not yet treat-
ed are permanently lit, 60 sec.
display indicates exposure time
in 10 sec. intervals
Beep Exposure of first tooth with
the HELBO® TheraLite Laser for
60 sec.
Exposure of the remaining
teeth with the HELBO®
TheraLite Laser for 60 sec.
each
Exposure of the remain-
ing teeth: 60 sec. per
tooth/per cm2
None Tooth field “2” (3-8) flashes,
tooth fields still requiring treat-
ment are permanently lit, 60
sec. display indicates exposure
time in 10 sec. intervals, tooth
fields of teeth already treated
are not lit
Beep
(every
10 sec.
after each
additional
tooth)
Exposure of the remaining teeth
with the HELBO® TheraLite Laser
for 60 sec. per tooth
End of therapy after last
sound is heard (all tooth
fields 1-8 flash)
Conclusion of therapy:
Rinse
Turn off device
by pressing
„on/off“ button
None None Thoroughly rinse patient’s mouth None
Other func-
tions:
Press Go/Break
button during
treatment
Tooth fields still to be treated
are permanently lit / 60 sec.
display flashes
None
Press RESET
button during
treatment
Starting point: All tooth fields
flash
„Check Bat-
tery“ warning
light
Lights up early when battery
power is low => change battery
None

PHOTODYNAMIC THERAPY
HELBO®User Manual for HELBO® TheraLite Laser
6
1Perform professional dental cleaning.
Important: Removing concrement from the tooth/root surface ensures better
access to the biofilm.
The aPDT procedure is performed immediately or no more than 1-2 days
after cleaning (aPDT is recommended on the following day in particular
if there is excessive bleeding after cleaning).
1.3.1. Periodontology
2Apply phenothiazine chloride dye starting at the fundus of the pocket
Important: Any pockets of air down inside the dental pocket will prevent the
phenothiazine chloride dye from reaching all the bacteria.
3Leave the phenothiazine chloride dye on for at least one minute -- three minutes
when treating pockets > 6 mm or persistent, refractory infections.
Important: Only bacteria stained blue will be killed.
4Rinse pocket thoroughly with H2O– remove excess dye, including at the bottom
of the pocket (use suitable rinsing device).
Important: Apply a very thin layer of phenothiazine chloride dye so that not too
much light will be absorbed and the laser light has its full desired
effect.
5Circular exposure for approx. 1 minute (in 6 areas) per tooth/cm².
Important: Only sufficiently exposed bacteria are killed.
Ensure proper condition of optics and preferably recharge
batteries daily.

PHOTODYNAMIC THERAPY
HELBO®User Manual for HELBO® TheraLite Laser
7
Version 14 06/2017
1Prepare the tooth in the conventional manner forendodontic purposes.
Important: Dental dam recommended; preparation to ISO 45 is best (manually or
by machine), rinse afterwards (H2O), then dry with paper tips, which are
then left in place in the canals.
1.3.2. Endodontics
2Apply HELBO® Endo Seal all over the crown area and allow light-curing to take place.
Important: Diffusing dye can cause permanent discolouration, so protecting this
area is essential.
3Remove paper tips and apply phenothiazine chloride dye, working from apical
to coronal.
Important: This prevents air pockets so that the phenothiazine chloride dye
reaches all bacteria; when treating small areas (< ISO45), use a suitable
instrument (e.g., Lentulo) to transfer the dye apically.
4Leave the phenothiazine chloride dye for at least one minute.
Important: Only bacteria stained blue will be killed.
5Remove any excess phenothiazine chloride dye -- preferably by rinsing with
H2O and drying thoroughly using paper points.
Important: Excess dye will absorb light energy and may prevent correct light
application; root canals must be completely dry.
6Expose for 1 minute per canal: Strive for contact exposure – as close as possible to
the stained bacteria, including in an apical direction.
Important: Only adequately exposed bacteria are killed.
Ensure proper condition of optics and preferably recharge
batteries daily.
7Seal canals and mechanically remove (finisher!) any dye residue in the crown area.
Important: Thanks to significant reduction in the number of bacteria, definitive
obturation can be performed immediately.

PHOTODYNAMIC THERAPY
HELBO®User Manual for HELBO® TheraLite Laser
8
1.4. THE PHOTOBIOLOGICAL EFFECT
What is achieved by the photobiological effect?
• Inflammation is suppressed
• Wounds heal faster
• Pain is reduced
How does the photobiological effect work?
• The mitochondria in the cells are stimulated, the inhibiting influences on the metabolism and the energy
supply are reduced.
Why does the photobiological effect work?
• The radiation with blue to red laser light (wavelength 380 nm to 700 nm) stimulates the synthesis from ADP
to ATP through oxidative phosphorylation.
The so-called low-level laser therapy (and thus the photobiological effect) is a regulation therapy. It increases the
circulation where required by the respective indication and conversely inhibits it for those indications where it is not
required. The same regulatory behaviour is effected by the laser treatment in the case of the immune reaction too.

PHOTODYNAMIC THERAPY
HELBO®User Manual for HELBO® TheraLite Laser
9
Version 14 06/2017
2. The HELBO® TheraLite Laser
2.1. PRODUCT DESCRIPTION AND PURPOSE
The HELBO® TheraLite Laser is an
• active,
• electrical,
• therapeutic
• hand-held
medical device intended for temporary use.
The HELBO® TheraLite Laser is designed for exposing tissue surfaces to laser light with a wavelength of 660 nm
at a fixed area dose. The laser light is not transferred to the desired point via the laser device itself -- this happens
only in combination with the fibre optics intended for this purpose (HELBO® 3D Pocket Probe, HELBO® 2D Spot Probe
and HELBO® 3D Endo Probe).
The HELBO® TheraLite Laser is a battery-powered, hand-held, mobile Class 2M laser device. The front part of
the HELBO® TheraLite Laser has a fibre optic connector. Three different coloured LEDs near the button indicate
the device’s operational status. The laser is equipped with a number of safety features, including a time delay, a
main switch, reverse polarity protection for batteries in the contact cap, a battery warning function, and a laser
beam locking apparatus.
The HELBO® TheraLite Laser emits the monochromatic, coherent light in the red spectral range necessary for
antimicrobial photodynamic therapy (aPDT) and low-energy laser therapy (LLLT). It is not possible to use the
HELBO® TheraLite Laser without fibre optics, as the device will not emit light without them. The fibre optics have
a maximum power of 40 mW and emit light in the visible range at wavelengths of 660 to 667 nm

PHOTODYNAMIC THERAPY
HELBO®User Manual for HELBO® TheraLite Laser
10
2.2. CONTROL ELEMENTS
2.3. APPLICATION
The HELBO® TheraLite Laser has been specially developed and manufactured for use in context of antimicrobial
photodynamic therapy and low-level laser therapy.
It may only be used in combination with the HELBO® fibre optics specially designed for it. These light guides are
used for different purposes and each have specific indications.
The treating physician or dentist is solely responsible for selecting patients to receive this treatment.
Potential dental indications include:
• Periodontal disease
• Peri-implantitis
• Endodontitis
• Alveolar disinfection
• Bone necrosis
• Disorders of the skin or mucous membranes
• Tooth decay
Combination display:
• Laser ready –
• Emissions –
• Battery warning indicator
The following are located on the rear side:
• Laser warning label
• Indication of the laser class
• Serial number and technical data
• CE mark
• Manufacturer’s label
Start button
Luer connection for HELBO® fibre optics
Main switch

PHOTODYNAMIC THERAPY
HELBO®User Manual for HELBO® TheraLite Laser
11
Version 14 06/2017
2.3.1. Contraindications / Side effects
Contraindications for use include:
• Treatment of tumours
• Treatment of auto-immune diseases
• Treatment of the eye
• Application of high doses of laser light to the thyroid
• Use during pregnancy:
No study results are currently available regarding use of the device on pregnant women.
As such, use of the HELBO® TheraLite Laser during pregnancy is not recommended at this time.
• Allergies:
No allergies to the dye are currently known.
Avoid injuries when screwing on the needle, and when using the blunt needle to apply the dye. Patients
occasionally report a mild burning sensation in the infected areas after they have been stained with the
dye and then exposed to the HELBO® TheraLite Laser. This abates when laser exposure stops.
• Use of the dye can result in temporary blue discolouration of the soft tissue and the teeth / dental prosthesis.
Avoid applying the dye directly to fillings and crowns if at all possible, or protect them by inserting a dental
dam or coating them with petroleum jelly prior to application. If dye is applied directly to fillings or crowns,
rinse it away using a great deal of water. Discolouration of surrounding tissue should disappear within a few
hours.
A clinical assessment of the HELBO® TheraLite Laser and its accessories (literature review for study analysis
purposes, risk management analysis, and market observations following product release) revealed no relevant
adverse effects or safety problems.
The intended users of this medical device are:
• Dentists
• Dental assistants
• Prophylaxis assistants
Specifics regarding intended users:
• Dental training, at least to the level of dental prophylaxis assistants
• Training in the fundamentals of laser safety
• Professional training (through the manufacturer) on correct device usage
• Fundamental understanding of hygiene
• Capable of perceiving/distinguishing colours
• Knowledge of the language in which device labels and accompanying documents (e.g.,: user manual)
are written.
• Good physical health to enable the user to handle the laser safely (the user must be capable of pointing
the device at the affected area without significant trembling)
This medical device must only be used by healthcare professionals who have received training on its
intended use.
!
PHOTODYNAMIC THERAPY
HELBO®User Manual for HELBO® TheraLite Laser
12
2.4. HELBO® FIBRE OPTICS
The HELBO® 3D Pocket Probe, HELBO® 2D Spot Probe and HELBO® 3D Endo Probeare used in combination with
the HELBO® TheraLite Laser for two- or three-dimensional exposure of infected tissue surfaces stained with
(phenothiazine chloride), in context of lethal antimicrobial photodynamic therapy.
The HELBO® 3D Pocket Probe, HELBO® 3D Endo Probe and HELBO® 2D Spot Probe are all shipped in sterile packaging
as sterile, ready-to-use products.
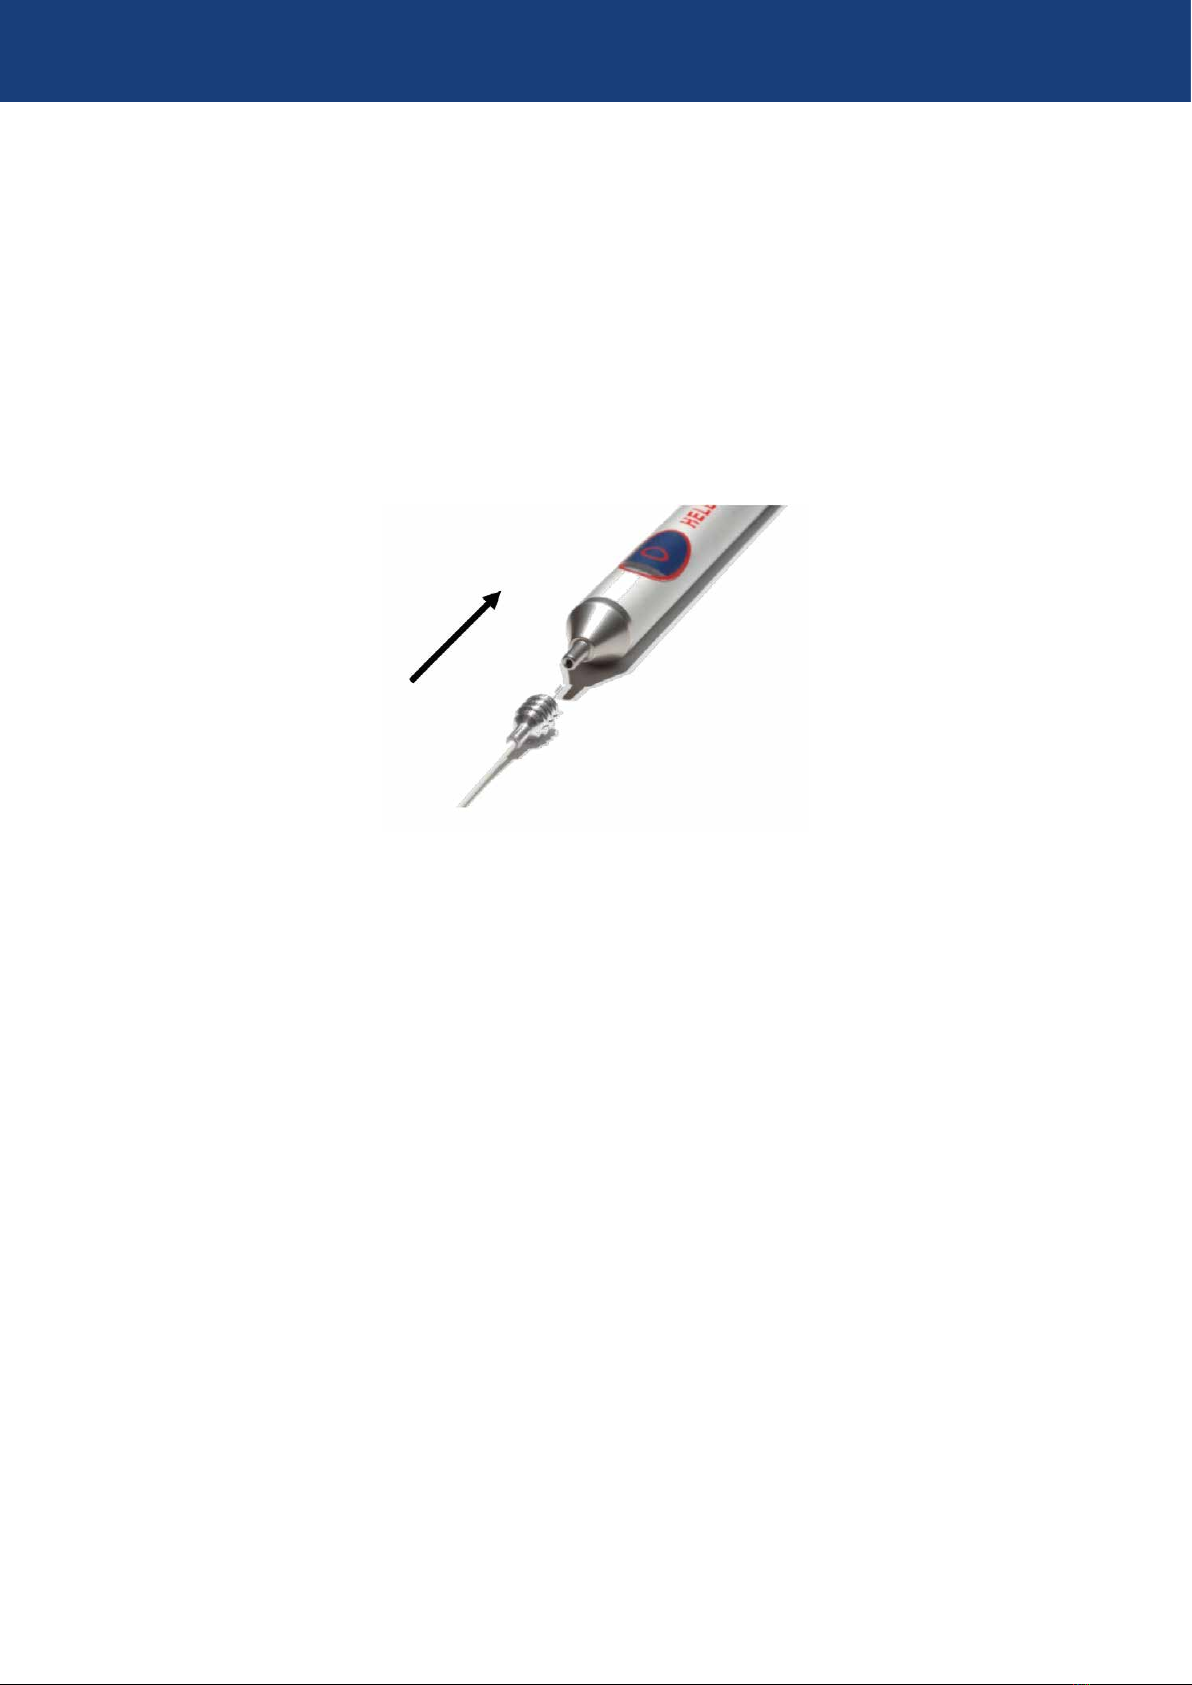
Remove them from the packaging under sterile conditions. To do this, grasp the silver coupling between thumb
and index finger, and then insert it into the output end of the HELBO® TheraLite Lasers. Make sure the plug is
completely over the conical connection on the laser, and insert it all the way to the stop. You will feel a slight
amount of resistance when plugging the fibre optic in at the correct position
Please see the appropriate product package insert for further important notes.
PHOTODYNAMIC THERAPY
HELBO®User Manual for HELBO® TheraLite Laser
13
Version 14 06/2017
2.4.1. HELBO® 3D Pocket Probe
Sterile optical fibres for three-dimensional exposure of infected tissue surfaces during antimicrobial Photodynamic
therapy, five units per pack.
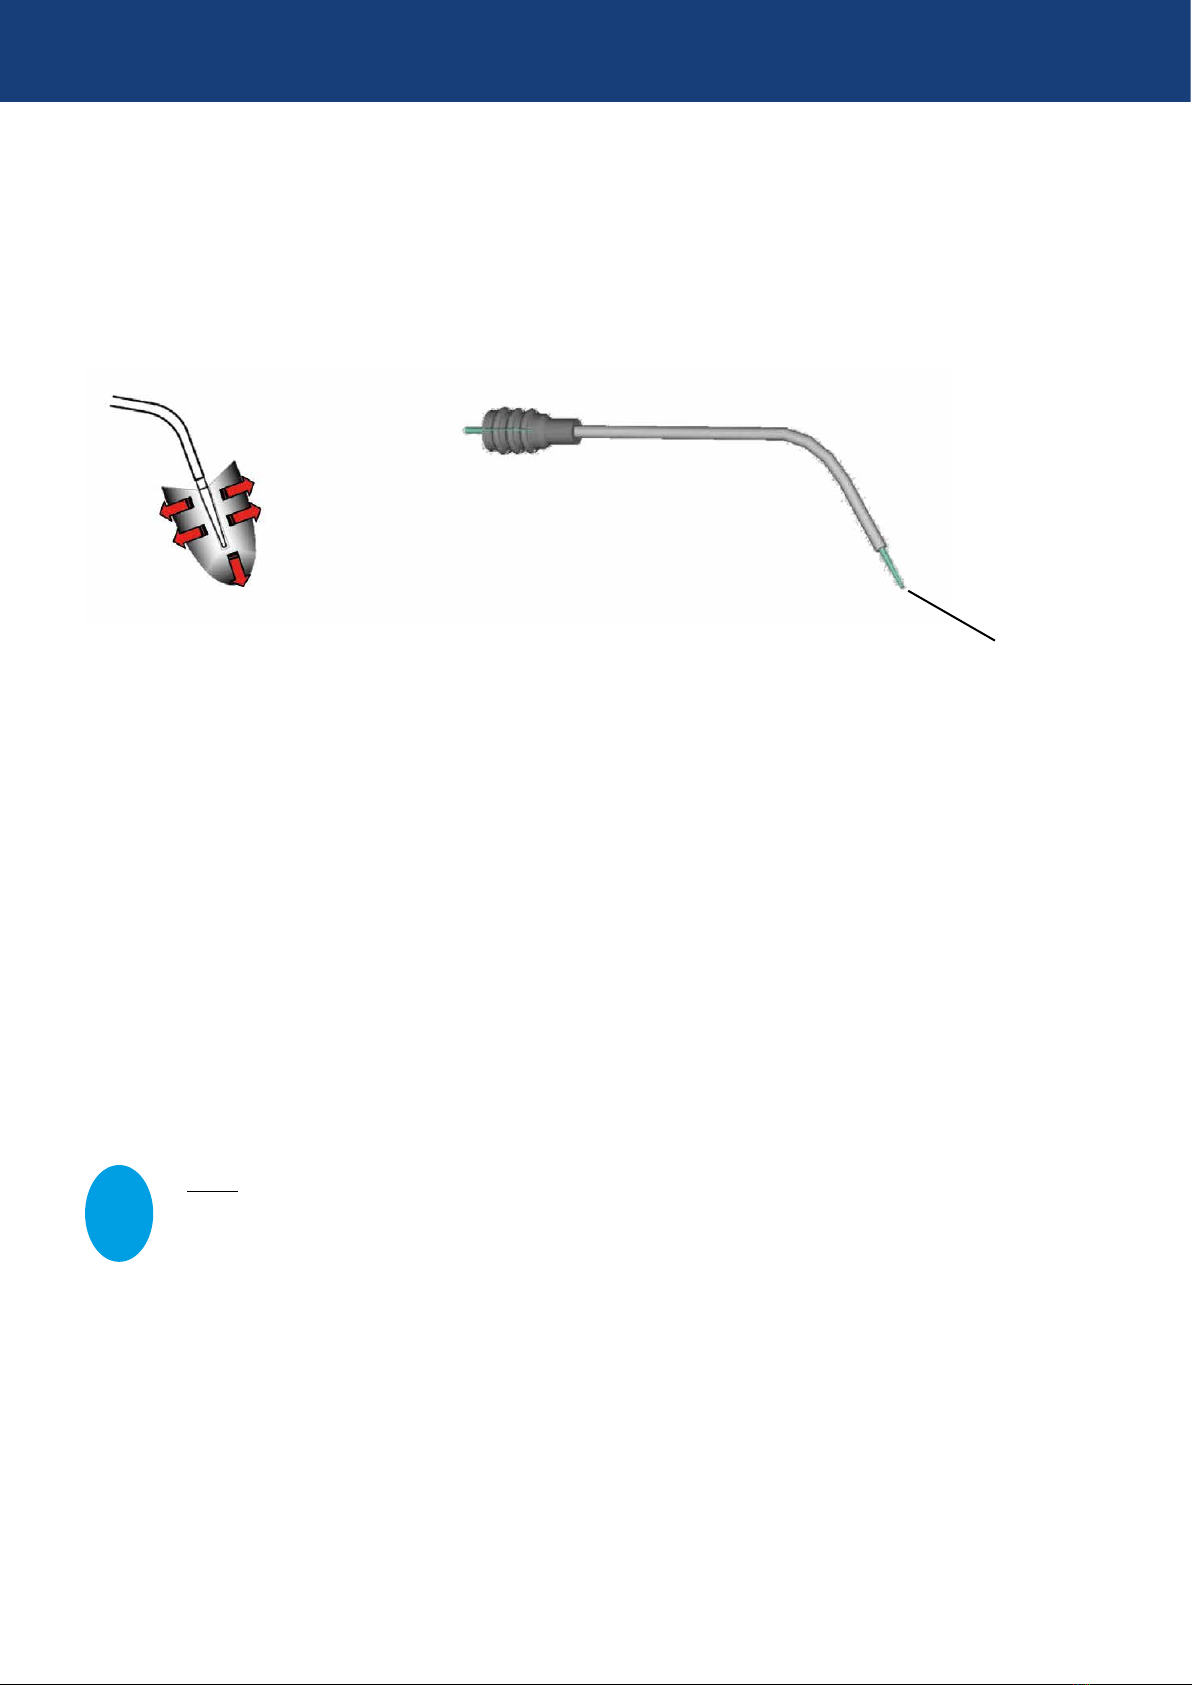
The front conical area of the optical fibre is ground as a microlens to facilitate even light distribution both vertically
and horizontally.
The HELBO® 3D Pocket Probe is particularly suitable for the following indications:
• Periodontal pocket
• Peri-implantitis
• Alveolar osteitis
When using the laser, bring the HELBO® 3D Pocket Probe in contact with infected tissue regions as much as possible.
Make sure any pockets or recessed areas within the tissue receive full exposure. When treating areas with
complex morphology, guide the HELBO® 3D Pocket Probe as far down into the recesses and pockets as possible.
Exposure time should be at least 60 sec. per cm2or per tooth.
The average power density for the HELBO® 3D Pocket Probe is at least 60 mW/cm² at the surface.
NOTE: The HELBO® 3D Pocket Probe is a sterile medical product intended for one-time use. Do not
re-sterilise it. If the packaging is damaged, dispose of the product.
Fig.1:
Radial and axial exposure of the area
using the HELBO® 3D Pocket Probe
Fig.2:
HELBO® 3D Pocket Probe
3D CAD drawing
Laser output end
!
PHOTODYNAMIC THERAPY
HELBO®User Manual for HELBO® TheraLite Laser
14
2.4.2. HELBO® 2D Spot Probe
Sterile optical fibres for two-dimensional exposure of infected tissue surfaces during antimicrobial Photodynamic
therapy, five units per pack.
The HELBO® 2D Spot Probe is identical in construction to the HELBO® 3D Pocket Probe, but is surface-ground at the
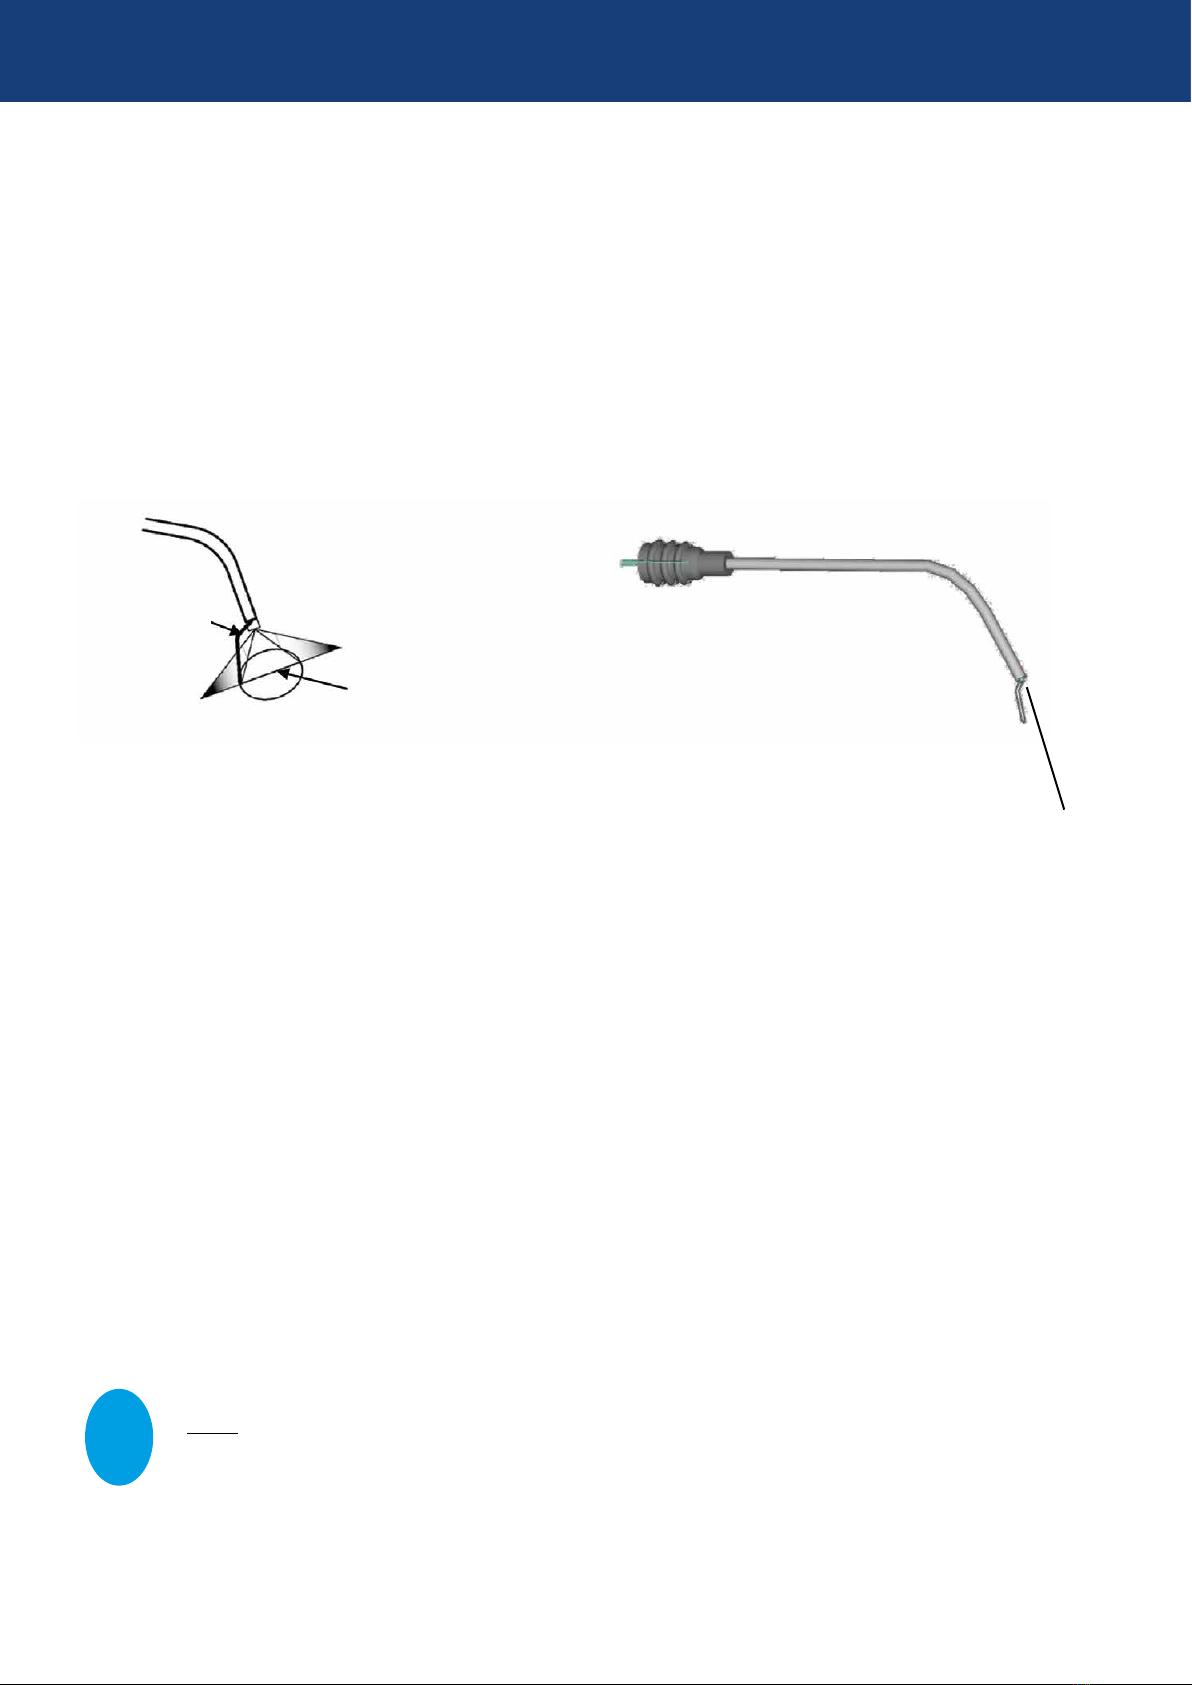
end and emits light forwards (see Fig. 3 and 4), rather than having a conically ground peak. The additional spacing
piece facilitates optimum spacing and thus the correct power density for treatment. It also indicates the clinically
effective area for contact with the surface to be treated. The point at which the spacing piece touches the surface
marks the limit of the clinically effective area, within which a sufficient power density for treatment is guaranteed
during exposure, and also serves as orientation for overlapping exposure.
The HELBO® 2D Spot Probe is particularly suitable for the following indications:
• Periodontal infections treated by open curettage
• Root tip resections
• Open membranes during implantological treatment
• Herpes labialis
• Aphthae
Draw the HELBO® 2D Spot Probe across the tissue surface such that the spacer remains in contact with the
surface, thus ensuring that the laser remains at the same distance and thus provides uniform light power. Make
sure that all infected tissue regions are exposed for at least 60sec. per cm2within the marked area.
The average power density for the HELBO® 2D Spot Probe is at least 100 mW/cm² within the clinically effective area.
NOTE: The HELBO® 2D Spot Probe is a sterile medical product intended for one-time use. Do not
re-sterilise it. If the packaging is damaged, dispose of the product.
Fig.3:
Light beam of axial exposure of area using
HELBO® 2D Spot Probe
Fig.4:
HELBO® 2D Spot Probe
3D CAD drawing
Spacing piece
Clinically effective
area
Laser output end
!

PHOTODYNAMIC THERAPY
HELBO®User Manual for HELBO® TheraLite Laser
15
Version 14 06/2017
2.4.3. HELBO® 3D Endo Probe
Sterile optical fibres for three-dimensional exposure of infected tissue surfaces during antimicrobial Photodynamic
therapy, five units per pack.
The HELBO® 3D Endo Probe looks almost identical to the HELBO® 3D Pocket Probe. But the HELBO® 3D Endo Probe is
completely different as regards its functionality..
The HELBO® 3D Endo Probe has a protective metallic tube, which makes it robust enough for use in root canals. The
long thin optical fibre has been developed for use in root canals based on a preparation size of ideally ISO 45.
The front cylindrical area of the HELBO® 3D Endo Probe is ground by means of a special process. This favours even
light distribution across the entire lateral radiation area of 12 mm.
The HELBO® 3D Endo Probe emits radiation with increased power in a forwards direction to ensure the apex is ade-
quately irradiated.
The HELBO® 3D Endo Probe is particularly suitable for the following indications:
• Root disinfection as part of antimicrobial Photodynamic therapy
When using the HELBO® 3D Endo Probe, bring it as close as possible to the dye-stained bacteria, including apically.
Make sure the root canal receives full exposure.
Exposure time should be at least 60 sec. per root canal.
The average power density for the HELBO® 3D Endo Probe is at least 55 mW/cm² at the surface.
NOTE: The HELBO® 3D Endo Probe is a sterile medical product intended for one-time use. Do not re-ster-
ilise it. If the packaging is damaged, dispose of the product.
Fig.5:
Radial and axial exposure of area using
HELBO® 3D Endo Probe
Fig.6:
HELBO® 3D Endo Probe
3D CAD drawing
Laser output end
!

PHOTODYNAMIC THERAPY
HELBO®User Manual for HELBO® TheraLite Laser
16
2.5. START-UP
IMPORTANT: OPERATION BY AUTHORISED PERSONS ONLY!
The laser device should only be operated by personnel who have received sufficient training and information on the
exact processes for antimicrobial Photodynamic therapy and the handling of all necessary components (please see
also the notes in the instruction manual, package insert, etc.).
Start-up should only be performed under the environmental conditions described in Section 2.12.
This should prevent any improper use of the accessories and processes required for antimicrobial Photodynamic
therapy.
Brief overview of steps in the commissioning process:
1. Insert batteries
2. Check operational status / display
3. Turn main switch on
4. Press button
5. Start laser therapy
2.5.1. Batteries
The charged batteries are inserted into the HELBO®
TheraLite Laser with the positive terminal facing towards the
main switch.
The main switch is attached to the last battery. Press the main
switch gently against the top battery and screw clockwise up
to the stop position.
Turn the rear part of the main switch clockwise until it notice-
ably engages.
Release the rear part of the main switch when it has been
turned as far as the stop position. The combination display will
now light up green – the laser is ready for use.
!

PHOTODYNAMIC THERAPY
HELBO®User Manual for HELBO® TheraLite Laser
17
Version 14 06/2017
2.5.2. Operating states / displays
STANDBY
The batteries are inserted into the HELBO® TheraLite Laser.
The main switch is in the OFF position.
This is the “Standby” state.
LASER READY
NOTE: When the batteries have been inserted and the main switch is set to ON, the laser device
is ready to emit laser radiation.
Before switching on the main switch of the HELBO® TheraLite Laser. read the relevant notice label on the case.
If the HELBO® TheraLite Laser is in Standby mode and the main switch is set to ON, the combination indicator
will light up green. This is called “laser ready” status.
For safety reasons, the start button remains locked for at least 2 seconds after the main switch has been turned to the
ON position. During this time, pressing the button will not activate the laser beam.
COMBINATION DISPLAY
The combination display is located in front of the start button and can have the following states:
GREEN The combination display lights up green as soon as the batteries have been correctly inserted
and the main switch has been properly installed and turned to the ON position.
RED The combination indicator lights up red to indicate that the device requires charging.
This means that the device’s laser power is no longer sufficient for antimicrobial photodynamic
therapy - replace the batteries immediately!
ORANGE As soon as the start button has been pressed and the 2-second locking phase (as described
above) is over, the green display will go out. The combination display, which now lights up
orange, indicates that a laser beam is being emitted. If the start button is pressed again, the
orange light will go out and the laser emission will stop.
The device will not emit a laser beam unless an applicator is fitted.
A combination of orange and green is not permissible (see troubleshooting).
The indicator may also light up red-green or red-yellow. For more information, please see Chapter 2.8.1, Battery
Replacement.
!

PHOTODYNAMIC THERAPY
HELBO®User Manual for HELBO® TheraLite Laser
18
2.5.3. Main switch
The main switch should be turned to the OFF position when the HELBO® TheraLite Laser is not in use. The main switch
prevents the batteries from discharging when not in use. Removing the main switch, or turning it to the OFF position,
will disconnect the HELBO® TheraLite Laser from the power supply.
The asymmetrical shape of the main switch prevents the HELBO® TheraLite Laser from rolling.
OFF position ON position
2.5.4. Button
To start the laser beam, press the marked area (red inner circle) of the HELBO® TheraLite Laser with your finger. The
HELBO® TheraLite Laser will continue to emit a laser beam until the button is pressed for a second time.
For safety reasons, the button will remain locked for about two seconds after the main switch
has been turned to ON.
Within this time, pressing the button will not trigger laser emission!
• Pressing the start button will activate the HELBO® TheraLite Laser.
• When the desired exposure time has elapsed, press the start button again to turn off the
HELBO® TheraLite Laser.
After treatment, turn the main switch to the OFF position and place the HELBO® TheraLite Laserback into its
case or into the HELBO®T-Controller. Please recharge flat batteries immediately.
18
Version 11 09/2016
TASTER
Zur Auslösung der Laserstrahlung müssen Sie die makierte Stelle (roter Kreisring) des HELBO®TheraLite
Lasers mit Ihrem Finger betätigen. Der HELBO®TheraLite Laser emittiert solange Laserstrahlung, bis Sie
den Taster ein zweites Mal betätigen.
Der Schalter bleibt noch ungefähr 2 Sekunden nach dem Aufsetzen des Hauptschalters gesperrt;
Innerhalb dieser Zeit bewirkt ein Drücken des Tasters keine Auslösung der Laserstrahlung.
•Durch Betätigen des Einschalt -Tasters wird der HELBO®TheraLite Laser aktiviert.
•Wenn die gewünschte Belichtungszeit verstrichen ist, betätigen Sie den Einschalt –Taster erneut, um
den HELBO®TheraLite Laser wieder abzuschalten.
•Nach der Behandlung den Hauptschalter auf AUS Position drehen und den HELBO®TheraLite Laser in
das Etui bzw. den HELBO®T-Controller legen!
•Leere Akkumulatoren sofort laden –Ladebedarf wird durch eine rote LED-Anzeige in der
Kombinationsanzeige angezeigt.
•Die Inbetriebnahme des HELBO®TheraLite Lasers darf nur durch entsprechend geschultes und
qualifiziertes Personal erfolgen.

PHOTODYNAMIC THERAPY
HELBO®User Manual for HELBO® TheraLite Laser
19
Version 14 06/2017
2.6. MAINTENANCE / SERVICE
On site
Maintenance is limited to changing the batteries and cleaning the device if needed.
Annual
Laser devices must be inspected annually for safety-related defects. Arrange for re-calibration and safety checks as
needed. For more detailed information, see Point 2.11. Safety check.
The annual service should be carried out by the manufacturer.
This will ensure that all relevant functions and parameters are inspected. This also applies to functions that do not
need to be tested in accordance with standards but that influence the behaviour and lifespan of the device. Any elimi-
nation of defects/repairs and calibrations can then be carried out directly afterwards.
If you have any questions, please contact the manufacturer:
bredent medical GmbH &Co. KG, Weissenhorner Str. 2, 89250 Senden, Germany
Telefon: +49 (0) 73 09 / 872 - 6 00, Telefax: +49 (0) 73 09 / 872 - 6 35
2.7. CLEANING
IMPORTANT: Never autoclave the HELBO® TheraLite Laser or immerse it in liquid.
Clean the HELBO® TheraLite Laser using only a pH-neutral disinfectant liquid. Moisten a soft cloth lightly with
the liquid and use it to remove any external contamination from the laser.
For hygienic reasons, it is advisable to clean the laser device after each treatment.
Please ensure at all times that no dirt or liquid gets into the opening of the HELBO® TheraLite Laser.
If dirt gets into the opening, please contact Customer Service at bredent medical GmbH &Co. KG. Never try to re-
move dirt from the opening yourself, as this could damage the HELBO® TheraLite Laser.
Notes for your safety:
Damage caused by misuse of the device must be repaired immediately, otherwise the operational safety
of the HELBO® TheraLite Laser can no longer be guaranteed by the manufacturer. This also applies to all
other malfunctions.
Damage caused by misuse is excluded from the guarantee.
Please always contact the manufacturer regarding repairs in order to ensure that they are carried out properly.
18
Version 11 09/2016
TASTER
Zur Auslösung der Laserstrahlung müssen Sie die makierte Stelle (roter Kreisring) des HELBO®TheraLite
Lasers mit Ihrem Finger betätigen. Der HELBO®TheraLite Laser emittiert solange Laserstrahlung, bis Sie
den Taster ein zweites Mal betätigen.
Der Schalter bleibt noch ungefähr 2 Sekunden nach dem Aufsetzen des Hauptschalters gesperrt;
Innerhalb dieser Zeit bewirkt ein Drücken des Tasters keine Auslösung der Laserstrahlung.
•Durch Betätigen des Einschalt -Tasters wird der HELBO®TheraLite Laser aktiviert.
•Wenn die gewünschte Belichtungszeit verstrichen ist, betätigen Sie den Einschalt –Taster erneut, um
den HELBO®TheraLite Laser wieder abzuschalten.
•Nach der Behandlung den Hauptschalter auf AUS Position drehen und den HELBO®TheraLite Laser in
das Etui bzw. den HELBO®T-Controller legen!
•Leere Akkumulatoren sofort laden –Ladebedarf wird durch eine rote LED-Anzeige in der
Kombinationsanzeige angezeigt.
•Die Inbetriebnahme des HELBO®TheraLite Lasers darf nur durch entsprechend geschultes und
qualifiziertes Personal erfolgen.
!
!

PHOTODYNAMIC THERAPY
HELBO®User Manual for HELBO® TheraLite Laser
20
2.8. POWER SUPPLY
The HELBO® TheraLite Laser operates only on rechargeable battery power!
The power is supplied by 2 rechargeable batteries, each with an individual voltage of 1.2 volts.
With fully charged batteries from the IPC charger set, the period of operation is approx. 120 minutes (continuous op-
eration). An even longer period of operation may be achieved during short-term operation, depending on the on-time/
pause time and the battery condition.
Please note that the manufacturer can only guarantee the faultless function of the HELBO® TheraLite Laser if the
correct batteries are used. In terms of their technical configuration, batteries may have completely different discharge
patterns, despite having similar performance data! There may also be differences in the construction of the electrical
contact surfaces that could hinder proper contact. This could lead to undesired interruptions in the power supply!
The following batteries have been checked for suitability and approved:
• Panasonic eneloop 750mAH 1.2-volt NiMH batteries, size AAA R03
(with new, freshly-charged batteries, approx. 120 min in continuous operation)
The following chargers have been inspected for charging the aforementioned batteries:
• Voltcraft IPC
• Sanyo NC-MQR06W
• Panasonic BQ-CC16
• Panasonic BQ-CC55(E)
2.8.1. Changing the batteries
You can tell when the batteries are empty and need recharging from one of the following signs:
• The combination display lights up red as well as orange while the laser is active.
• The combination lights up red as well as green immediately after inserting the batteries.
• The deep red laser beam emitted from the applicator loses intensity and becomes noticeably lighter (and the
red light shows in the combination display).
If the combination display lights up red immediately after it is switched on, the batteries have already
discharged to such an extent that successful therapy can no longer be guaranteed.
The batteries must immediately be exchanged for new ones.
If the combination display lights up during treatment, you can carry treatment on for another 1–2
minutes. After that, it is imperative that you change the batteries in order not to compromise the
success of the therapy.
Note: Please note that charged batteries lose capacity over time. Fully charged batteries will only have 1/3 of their
original capacity after 14 days.
Table of contents
Popular Measuring Instrument manuals by other brands

Scheppach
Scheppach GM09 Translation from the original instruction manual

Tektronix
Tektronix TriMode P7500 Series manual

Dwyer Instruments
Dwyer Instruments DDM-01 Installation and operating instructions

NF
NF FRA5087 instruction manual

Leica
Leica Builder T user manual

KIM ELECTRIC
KIM ELECTRIC KMB000 Series installation manual

BERTHOLD TECHNOLOGIES
BERTHOLD TECHNOLOGIES Uni-Probe LB 490 user manual

MKS
MKS 903 Series instruction manual

ARJAY ENGINEERING
ARJAY ENGINEERING HYDROSENSE 4410-OCM user manual

Flow vision
Flow vision FC50-dbEX Instructions for installation

Schaller
Schaller humimeter FS2 operating manual

SPL-Laboratory
SPL-Laboratory Next-LCD 2015 user manual


