Brentwood HOME Base II User manual

BRENTWOOD Base II
OWNER’S MANUAL
Installation & Operation
Serial No.


Safety & Warranty Warnings 1
Parts List 4
Electronics Quick Reference Guide 5
Installaon Guide 7
Remote Control Instrucons 9
Seng Programmable Posions and Pairing Remote 11
Seng Preset posions 13
Emergency Baery Backup 14
Synchronizing Two Bases 16
To Operate The Beds Separately Again 18
Bluetooth Intrucons 19
Troubleshoong 21
CONTENTS

Safety & Warranty Warnings
A: READ THE FOLLOWING INFORMATION CAREFULLY BEFORE USING THIS PRODUCT
If unable to understand warnings, cauons, and/or instrucons, contact the dealer or technical personnel if applicable, before aempng to
use the equipment. Otherwise, injury or damage may result.
SAFETY WARNINGS:
• Do not use bed outdoors.
• Do not use bed near explosives.
• Using bed with oxygen administering equipment other than the
nasal masked type creates a possible fire hazard.
• When using nasal or masked type administering equipment, route and secure oxygen or air tubing properly to ensure that tubing does not
become entangled or damaged during normal operaon of the bed.
• Use cauon when having liquids in or around the bed to ensure no spilling occurs. In case of spillage, stand in a dry,clean area of the floor
and unplug the bed immediately. Clean up spill and allow the area around bed to dry thoroughly before using the electric controls again. Do
not eat or drink hot liquids while operang the bed.
• This appliance is not intended for use by persons (including children) with reduced physical, sensory or mental capabilies, or lack of
experience and knowledge, unless they have been given supervision or instrucons concerning use of the appliance by a person
responsible for their safety.
• Do not allow children or individuals with disabilies to operate the bed without adult supervision.
• Do not allow any person or pet under the bed at any me.
• During bed operaon, make sure body is posioned within the confines of the bed. Do not place extremies over the sides of the bed
when operang bed funcons.
-1-

WARRANTY WARNING!
Do not open or tamper with control box, motors, or remote (with the excepon of baery compartments). The warranty will be void if the
internal workings of these components are tampered with.
Product Rang:
The motors are not designed to operate connuously for more than [2] minutes in an [18] minute me period or approximately 10% duty
cycle. Aempng to circumvent or exceed this rang will shorten the life expectancy of the foundaon and may void the warranty. Operang
Informaon:
• Aer power foundaon assembly is completed, operate remote control to ensure proper funcons.
• Keep moving parts free of obstrucon during bed operaon (including sheets, clothing, tubing, wiring, and products using electric power
cords).
• Distribute body weight evenly over bed surface. Do not place enre weight on head or foot secons of the bed, during reposioning and
entering or exing bed.
Hospital Use Disclaimer:
This power foundaon is designed for residenal use only. It is not approved for hospital use and does not comply with hospital standards.
Weight Limits:
This product is not rated to support weights in excess of 850 pounds inclusive of the maress and bedding. The bed will structurally support
this weight, provided it is evenly distributed across the foundaon. The power foundaon is not designed to support or li this amount in
the head or foot secons alone. Exceeding this weight restricon could damage the bed and/or cause injury and will void the warranty.
-2-

RADIO FREQUENCY:2.4 GHz
FCC COMPLIANCE:
This device complies with Part 15 of the FCC Rules. Operaon is subject to the following two condions: (1) This device may not cause
harmful interference, and (2) this device must accept any interference received, including interference that may cause undesired operaon.
To comply with the FCC RF exposure requirements, no change to the antenna or the device is permied. Any change to the antenna or the
device could result in the device exceeding the RF exposure requirement and void user’s right to operate the device.
-3-

-4-
All electronics and components that need to be installed are located in boxes under the foundaon or
aached to the frame. Before discarding the packing materials, ensure that all the parts are accounted for.
Parts List
Power Cord (1)
AAA Baeries (3)
A
Adjustable Legs (6)
B
Power Supply (1)
C
D
Remote Control (1)
E
Retainer Bar (2)
Aached to the frame
F
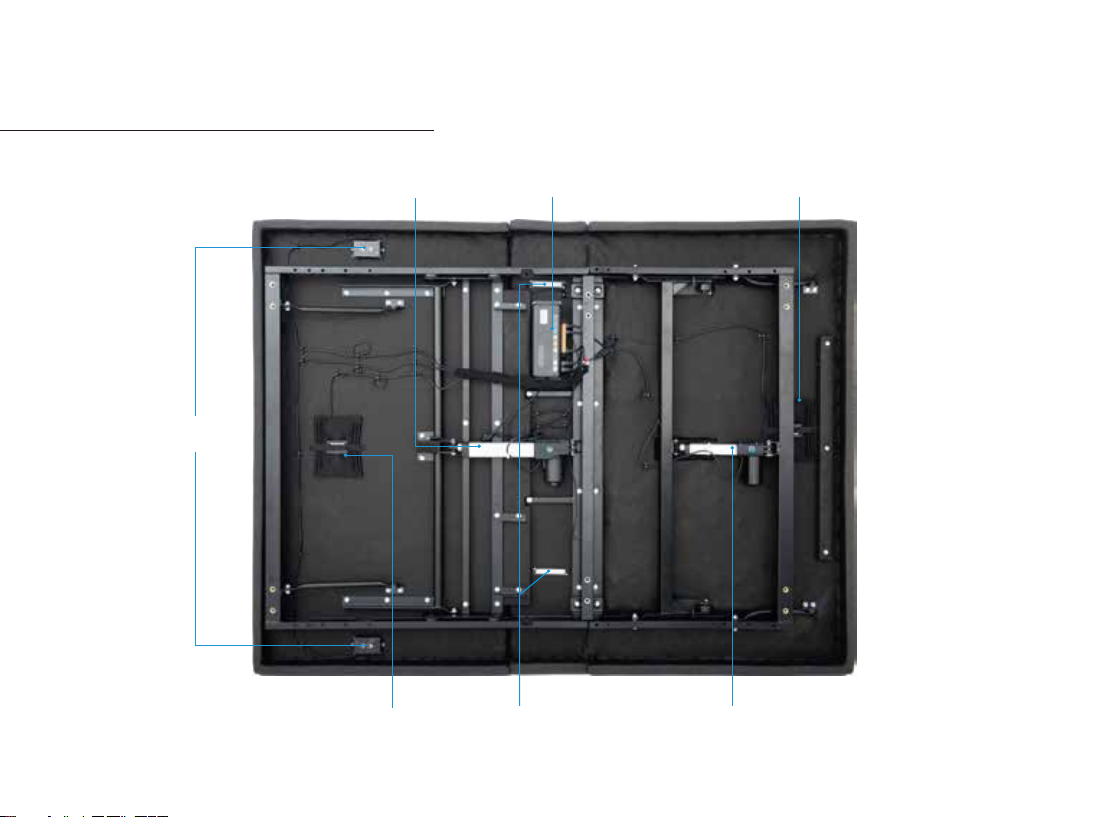
Electronics Quick Reference Guide
-5-
USB Ports
Foot MotorHead Massage Motor
Head Motor Control Box Foot Massage Motor
LED Light

-6-
Remote
r
Control Box
Power Cord
Power Supply Pairing Buon
LED Light
Head Massage Motor Foot Massage Motor
Foot Motor
Head Motor
USB Ports
Note: For safety reasons, lifting of the adjustable bed frame must be performed by two (2) people; and the
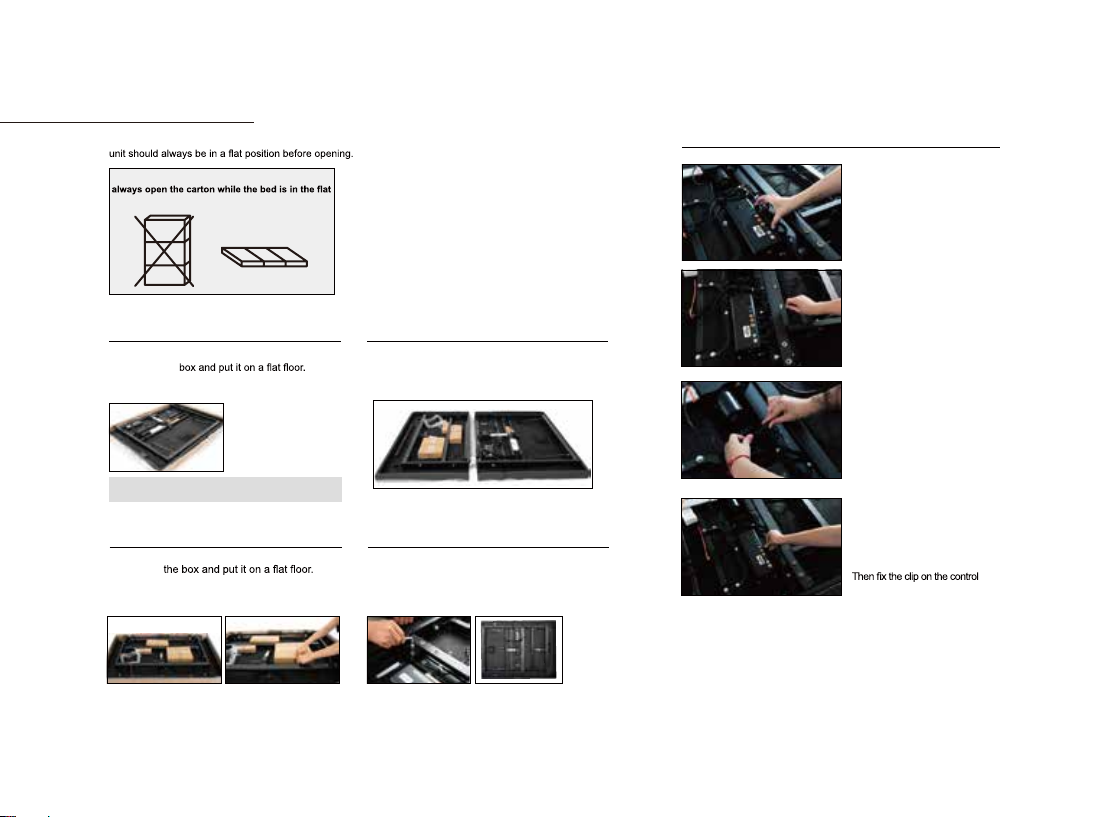
STEP 1
STEP 2
Open the box labeled “Head Base”. Take the Head
Base out of the
Cut the ribbon securing the remote and set the remote
aside for now.
Note: do not pull the ribbon from the base as the upholstery will be
damaged.
Open the box labeled “Foot Base”, and take the Foot
Base out of
Cut the ribbon secturing two accessory boxes and
one retainer bar, dispose of properly. Set them aside
for now.
STEP 3
NOTE: To avoid damage to the foundation,
position.
Take the clip out from the control
box which is used to lock the plugs.
STEP 4
STEP 5
You also need to plug the
massage cable into the Y
cablelabeled Foot Massage.
Plug the Foot motor cable into the
control box plug labeled Foot Motor
picture.
box to lock all the plugs.
Installation Guide
Put the Head base in front of the Foot base with two
people, make sure the sides of the Foot base and the
Head base are lined up straight with each other.
-7-
Connect the two bases by connecting bar,which is in
the accessory box. Half of the bar had been fixed with
the foot base. Screw the other half by using 13mm
wrench and 2 bolts (included). See the pictures as
below.
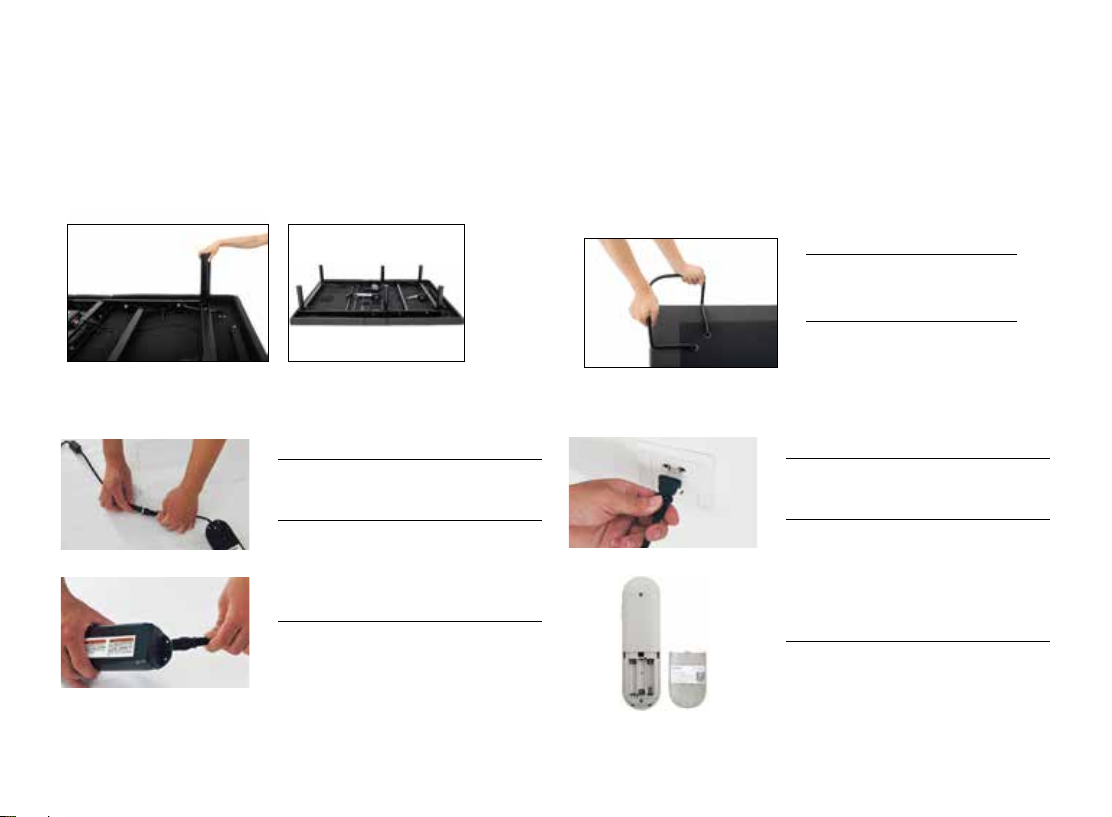
Attaching the bed legs
Remove the six (6) bed legs from the accessory box. Hand tighten the legs by threading them clockwise
into the pre-threaded holes on the bed frame.
Installing the retainer bar
STEP 1
Turn the bed frame over carefully, top side up.
STEP 2
Insert the ends of the retainer bar into the quick
connect brackets located at the foot of the bed.
Setting up the electronics
STEP 1
STEP 2
Take out the power supply and the power cord from
the accessory box.
Connect the power cord from the control box to the
power supply.
STEP 3
Connect the power cord that was packaged with the
power supply to the power supply.
STEP 4
STEP 5
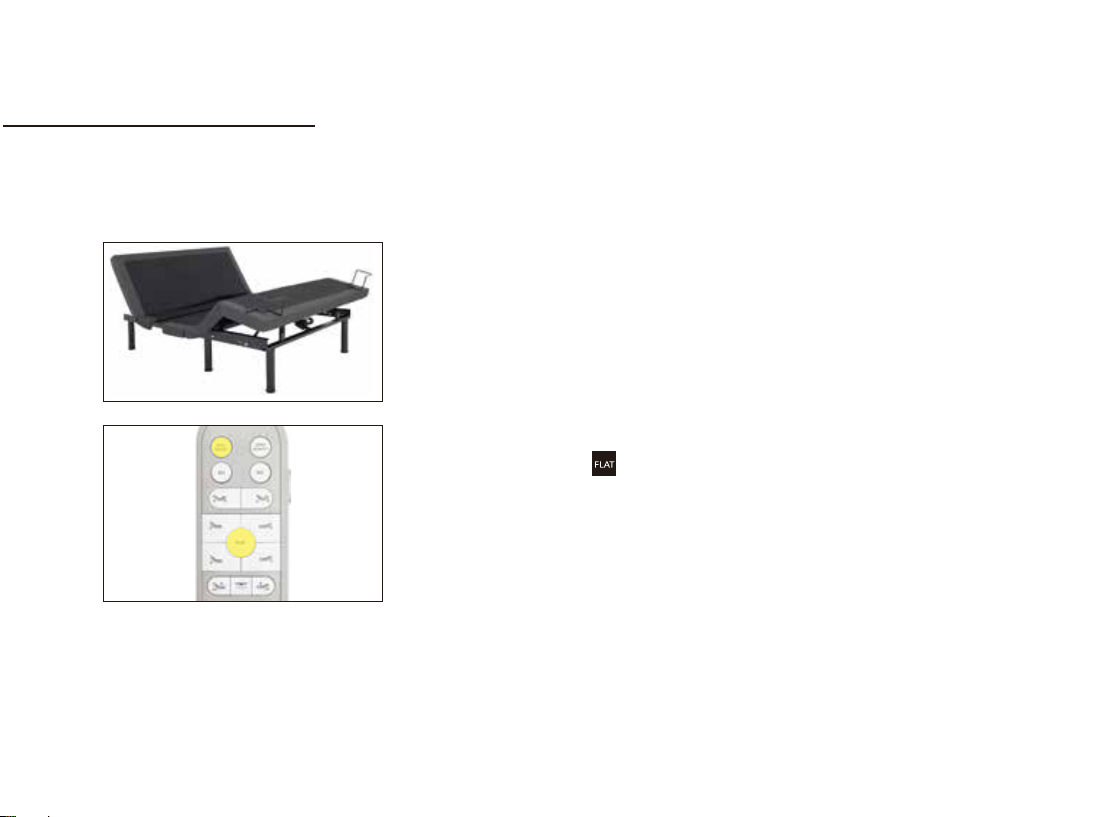
Plug the power cord into a working electrical outlet.
Install the two (2) AAA batteries into the remote
control.
STEP 6
Confirm the remote control works by pressing the lift
buttons. Installation for single or independent operation
of the bed frame is now complete.
-8-
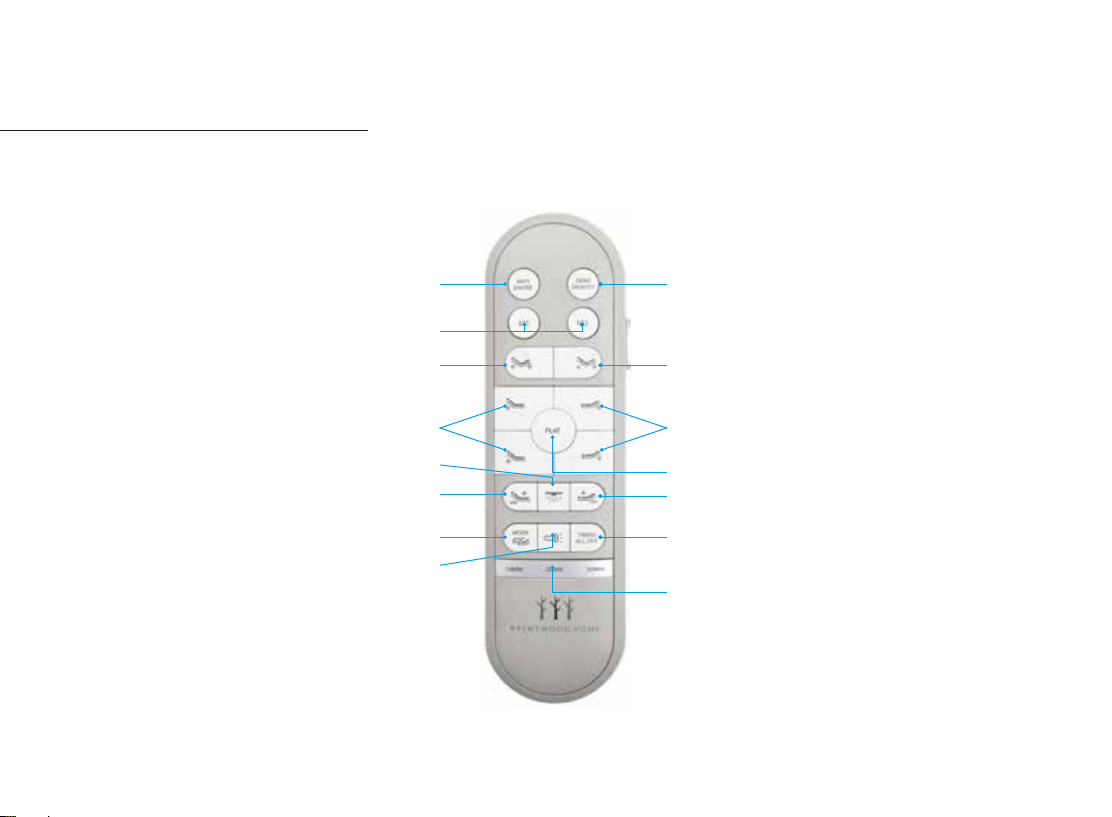
Remote Control Instructions
-9-
Memory Posions
Lis and Lowers Head Lis and Lowers Foot
An Snore Preset Posion
Flat Buon
Foot Massage on (3 intensies)
Massage Modes Select (3 modes)
Under Bed LED ON/OFF
Flash Light ON/OFF
10,20,30 Minute Massage
Timer Light
Head Massage On (3 intensies)
Head and Foot Massage
Timer/Stop Buon
Lis Head & Foot Lowers Head & Foot
Zero-G Preset Posion
-10-
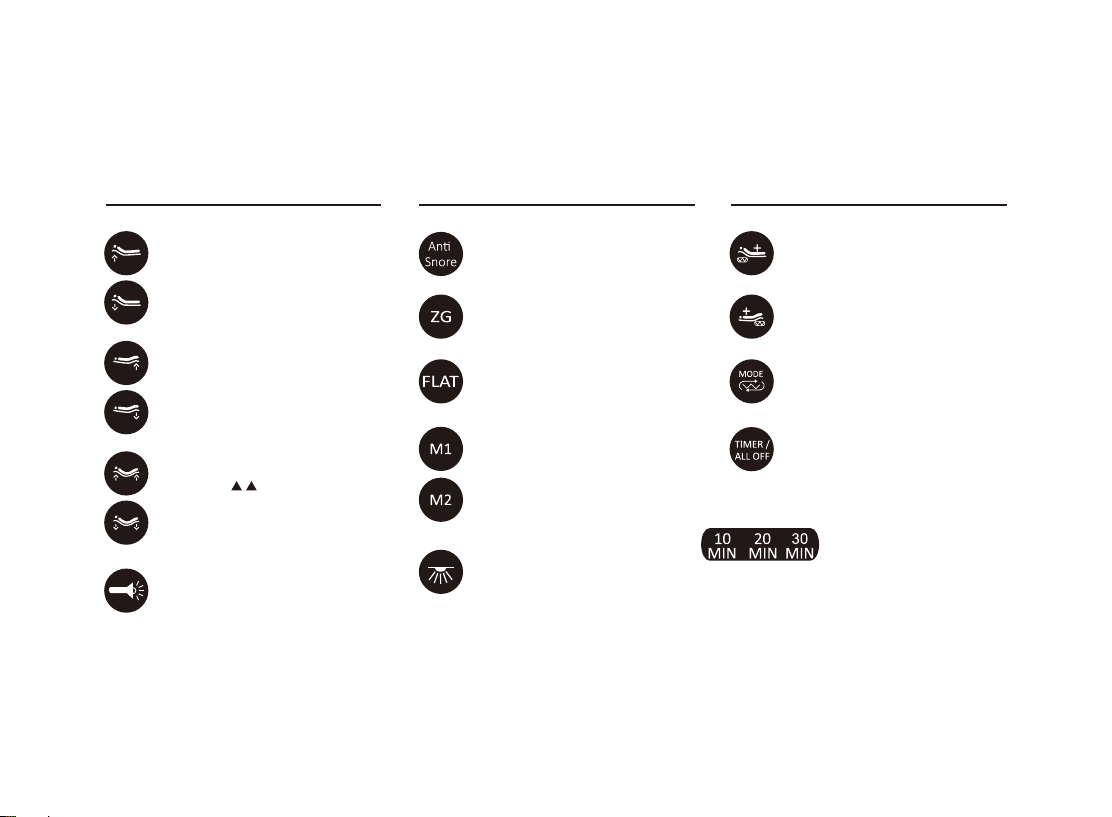
ONE TOUCH BUTTONS MASSAGE FEATURE
The double arrows li and
lower the head & foot secon of
the base.
Press and hold the buon, flash
light will be on.
ADJUST
Lis and Lowers Foot
Under Bed LED ON/OFF
Lis and Lowers Head
An Snore Preset Posion
Memory Posions
Flat Buon
Zero-G Preset Posion
Massage Modes Select (3 modes)
Head Massage On (3 intensies)
Foot Massage on (3 intensies)
The buon will select a 10, 20 or
30 minute seng. Pressing a
fourth me will turn off massage.
The light on the top of the
remote indicates a 10,20 or
30(backlit of 10&20 MIN on)
minute mer seng.

-11-
STEP 3
Setting Programmable Positions and Pairing Remote
SETTING PROGRAMMABLE POSITIONS
To adjust the saved posion, repeat steps 1 and 2 and the new posion will be saved.
STEP 1
Adjust the head and foot to your desired posion.
The adjustable base has a programmable feature that allows you to save custom posions.
Please read all the instrucons below before seng your custom presets on the remote.
STEP 2
Press and hold the flat buon first, then press and
hold memory buon for 5 seconds unl you hear 2
beeps sound.

-12-
PAIRING REMOTE
STEP 1
Make sure the baeries work fine. Replace them when needed.
STEP 2
Plug the power cord to the power source.
The original remote that comes in the box is already paired to the base. No further acon is required.
In the event that the remote is not paired with the base, follow the steps below.
STEP 3
Press and hold head li and foot li simultaneously, then press and hold the buon on the cord of control
box for 3 seconds unl your hear 2 beeps sound, the remote is then paired.
Pairing Buon
-13-
STEP 3
Setting Preset positions
SETTING PRESET POSITIONS
To adjust the saved posion, repeat steps 1 and 2 and the new posion will be saved.
STEP 4
If you want to restore to factory sengs, unplug the power supply for 5 seconds, then plug back in. The base will restore to factory
sengs.
STEP 1
Adjust the head and foot to your desired posion.
STEP 2
Press and hold the flat buon first, then press and
hold An Snore buon for 5 seconds unl you hear 2
beeps sound.
The adjustable base has a programmable feature that allows you to modify preset posions.
Please read all the instrucons below before seng your preset posions on the remote.

-14-
Emergency Battery Backup
Overview
Important: The backup baery is only to be used in case of a power outage. Baeries are not to be used for normal operaon of the base. The
backup baery will not support repeated movement for an extended period of me.
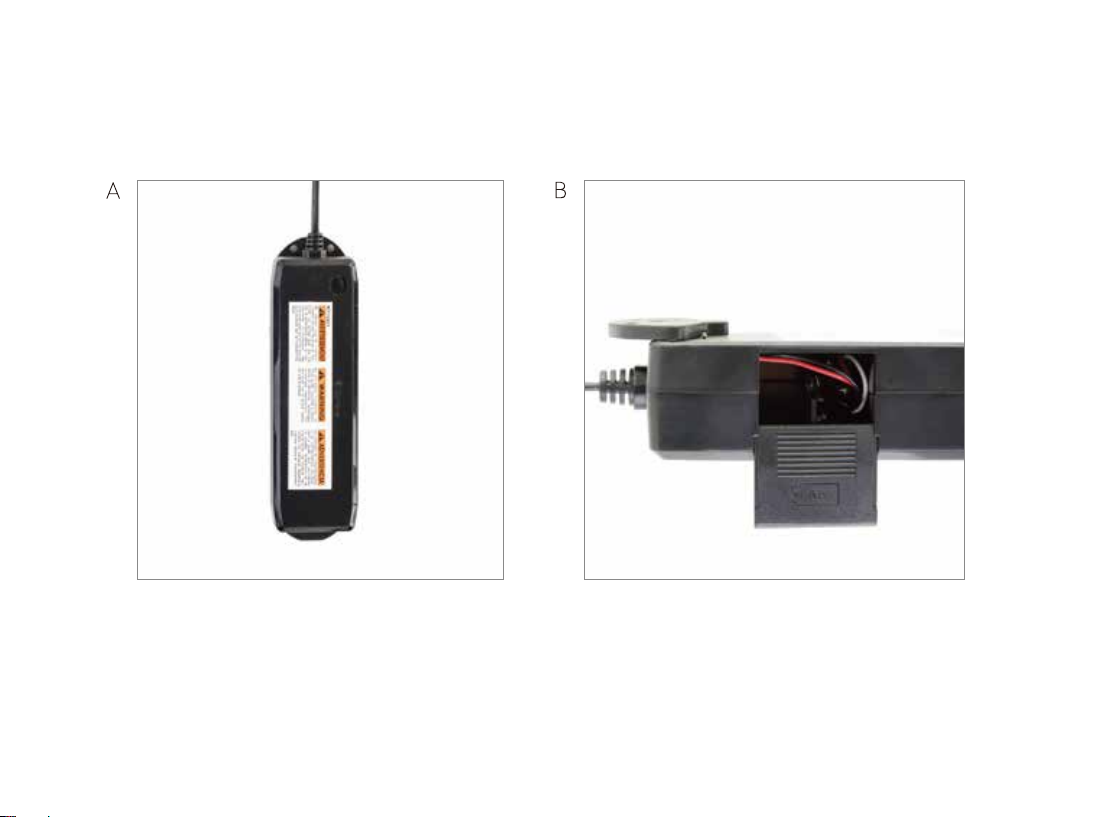
Backup Baery Use:
Use two 9V baeries only (not included). If a power outage occurs, install the 9V baeries into the power supply to allow temporary power
to the base (see image A).
Installing Baeries:
Unplug the power cord from the outlet and remove the cover from the compartment on the underside of the power supply (see image B).
Place two 9V baeries inside, close the cover and plug the power cord back into the wall outlet. The backup baery will not support
repeated movement for extended periods of me. Aer power is restored, unplug power cord, remove the baeries, then plug the power
cord back into the wall for normal use.
-15-
-16-
Remote A Remote B
Base B
Base A
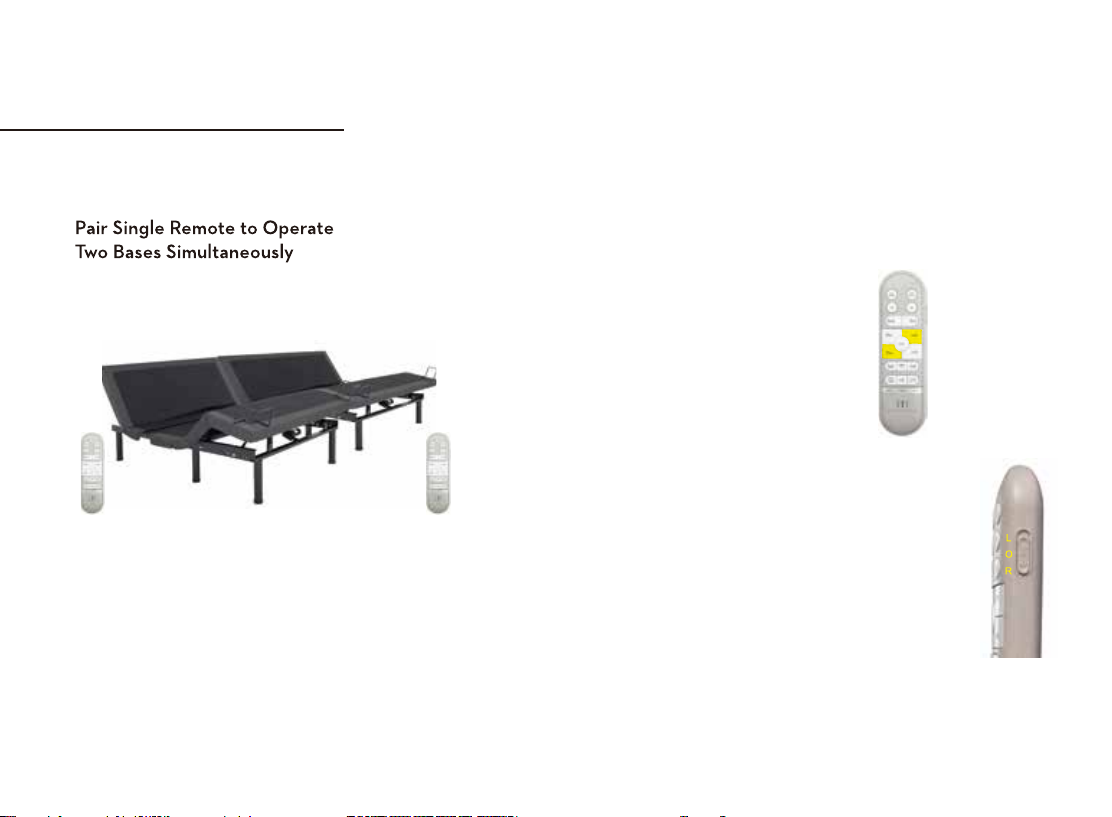
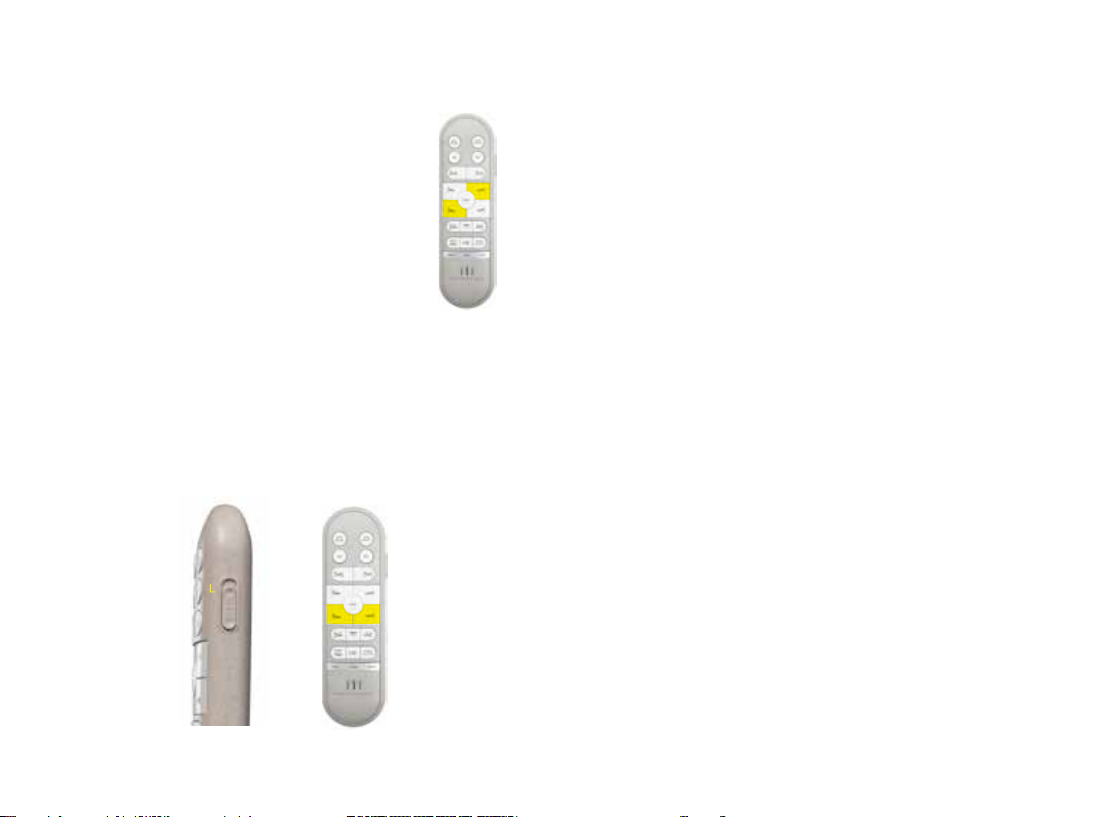
Synchronizing Two Bases
(for Twin XL and Split sizes only)
Step 1:
Ensure both bases (A and B) are plugged into a power source.
Step 2:
1. Make sure Remote A was already paired to Base A and Remote B
was paired to Base B. If not, please pair them by following the
pairing remote instrucons on page 12.
2. On Remote A, press and hold Head Down and
Foot Up at the same me, within 5 seconds, the
Remote A backlit LEDs will blink.
(Named Crossover)
3. Slide the side buon to "L" posion, then you can use Remote
A to control Base A only.
4. If you slide the side buon to "O" posion, then you can also
use Remote A to control Base A only.
5. Slide the side buon to " R" posion, then pair the Remote A
to Base B, you can use Remote A to control Base B only.
If you want to use Remote A to control two bases simultaeously,
slide the side buon to "O" posion.
Please note: If you want to control the bases through sliding the
side buon, only one remote can work. Another remote will not
be workable.
So now you can not use Remote B to control Base B, you need to
re-pair Remote B to Base B. Then if you want to use Remote B to
control two bases, only follow the above steps 2-5 on Remote B.
-17-
On Remote A, slide the side buon to "L" posion.
On Remote B, Press and Hold Head Down & Foot Down at the
same me, within 5 seconds, the flashlight on Remote B will be
on. Meanwhile press and hold Head Up & Foot Up on Remote
A, then the flashlight on Remote B will blink. Now Remote B has
learned Remote A successfully. Both remotes can control both
bases simultaneously now.
For example:
1. If you want to use Remote A to control two bases, slide the
side buon to "O" posion on Remote A.
2. If you want to use Remote A to control Base A only, slide the
side buon to "L" posion on Remote A.
3. If you want to use Remote A to control Base B only, slide the
side buon to " R" posion on Remote A.
The same steps for Remote B, if you want to use Remote B.
Two remotes control two bases simultaneously.
On Remote B, press and hold Head Down and Foot
Up at the same me, within 5 seconds, the Remote
B backlit LEDs will blink. (Named Crossover)
Remote A Remote B
Table of contents
Other Brentwood Indoor Furnishing manuals

Popular Indoor Furnishing manuals by other brands

Regency
Regency LWMS3015 Assembly instructions

Furniture of America
Furniture of America CM7751C Assembly instructions

Safavieh Furniture
Safavieh Furniture Estella CNS5731 manual

PLACES OF STYLE
PLACES OF STYLE Ovalfuss Assembly instruction

Trasman
Trasman 1138 Bo1 Assembly manual

Costway
Costway JV10856 manual


