Breville AirActive 3D Connect User manual

Instruction Book - Suits all LFA208 Models
the AirActive 3D™Connect
LFA208_ANZ_IB_A20_FA.indd 1 28/5/20 5:29 pm

2
BREVILLE
RECOMMENDS
SAFETY FIRST
At Breville we are very safety
conscious. We design and
manufacture consumer
products with the safety of you,
our valued customer, foremost
in mind. In addition, we ask
that you exercise a degree
of care and adhere to the
following precautions.
IMPORTANT
SAFEGUARDS
READ ALL INSTRUCTIONS
BEFORE USE AND SAVE
FOR FUTURE REFERENCE
• Carefully read all instructions
before operating the air
circulator for the first time and
save for future reference.
• Remove and safely discard
any packaging material and
promotional labels before
using the air circulator for the
first time.
• To eliminate a choking hazard
for young children, remove and
safely discard the protective
cover fitted to the power plug
of this air circulator.
• When unpacking the air
circulator, check to see you
have received all the items
listed in the parts list, before
discarding the packaging.
• Do not place the air circulator
near the edge of a bench or
table during operation. Ensure
that the surface is level, stable,
clean and free of water and
other substances.
• Always ensure the air circulator
is properly assembled before
use. Follow the instructions
provided in this book.
• This air circulator is intended
for household use only
and not for commercial or
industrial use.
• Disconnect the power plug
before dismantling, assembling
or before cleaning and when
the air circulator is not in use.
2 Breville Recommends Safety First
6 Components
7 Control Panel
8 Features
9 Operation
10 Functions
13 Wi-Fi Connectivity
14 Care, Cleaning & Storage
Contents
LFA208_ANZ_IB_A20_FA.indd 2 28/5/20 5:29 pm

3
• Avoid touching moving parts
of the air circulator.
• Never insert fingers, pencils or
any other objects through the
guards whenever the power
plug is connected, in particular
while the air circulator is
switched on.
• The air circulator must not
be used if the guards are not
fastened correctly, according
to instructions provided in
this book.
• Do not operate in the presence
of explosives and/or flammable
fumes or liquids.
• Do not unplug the air circulator
by pulling on the cord.
• Never carry the air circulator by
the cord or yank to disconnect
from an outlet; instead, grasp
the plug and pull to disconnect.
Do not pull the cord around
sharp edges or corners.
• Allow the air circulator fan
blade to stop completely,
always switch off at the power
outlet, and then unplug from
the outlet:
−Before attempting to move
the air circulator
−Before cleaning and
maintenance unless
otherwise specified in
this booklet
−Immediately after use.
• To prevent damage to the
air circulator do not use
alkaline cleaning agents when
cleaning, use a soft cloth and
mild detergent.
• Do not place anything, on
top of the air circulator when
assembled, when in use and
when stored.
• Store the unit out of reach
of children.
• Keep the air circulator
clean. Follow the cleaning
instructions provided in
this book.
LFA208_ANZ_IB_A20_FA.indd 3 28/5/20 5:29 pm
4
IMPORTANT
SAFEGUARDS
FOR ALL
ELECTRICAL
APPLIANCES
• Fully unwind the power cord
before use.
• Connect only to a 230V or
240V power outlet.
• The appliance must be used on
a properly grounded outlet. If
it is not sure, please consult a
qualified electrician.
• Do not, under any
circumstances, modify the
power plug or use a power
plug adapter.
• Do not place this appliance on
or near a heat source, such as
hot plate, oven or heaters.
• Position the appliance at a
minimum distance of 20cm
away from walls, curtains and
other heat or steam sensitive
materials and provide adequate
space above and on all sides for
air circulation.
• Do not let the power cord hang
over the edge of a bench or
table, touch hot surfaces or
become knotted.
• This appliance is for household
use only. Do not use this
appliance for anything other
than its intended use. Do not
use in moving vehicles or
boats. Do not use outdoors.
Misuse may cause injury.
• The appliance is not
intended for use by persons
(including children) with
reduced physical, sensory
or mental capabilities, or
lack of experience and
knowledge, unless they have
been given supervision or
instruction concerning use
of the appliance by a person
responsible for their safety.
• Children should be supervised
to ensure that they do not play
with the appliance.
• Always turn the appliance to
the OFF position, switch off at
the power outlet and unplug
at the power outlet when the
appliance is not in use.
• Before cleaning, always turn the
appliance to the OFF position,
switch off at the power outlet,
unplug at the power outlet
and remove the power cord, if
detachable, from the appliance
and allow all parts to cool.
LFA208_ANZ_IB_A20_FA.indd 4 28/5/20 5:29 pm

5
• To protect against electric
shock, do not immerse the
power cord, power plug or
appliance in water or any other
liquid or allow moisture to
come in contact with the part,
unless it is recommended in
the cleaning instructions.
• Any maintenance other than
cleaning should be performed
at an authorised Breville
Service Centre.
• It is recommended to regularly
inspect the appliance. To
avoid a hazard, do not use the
appliance if power cord, power
plug or appliance becomes
damaged in any way. Return
the entire appliance to the
nearest authorized Breville
service centre for examination
and / or repair.
FOR HOUSEHOLD USE ONLY
SAVE THESE INSTRUCTIONS
• The installation of a residual
current device (safety switch)
is recommended to provide
additional safety protection
when using electrical
appliances. It is advisable
that a safety switch with a
rated residual operating
current not exceeding 30mA
be installed in the electrical
circuit supplying the appliance.
See a qualified electrician for
professional advice.
• During electrical storms,
the appliance should be
disconnected from the power
source at the wall socket to
prevent any electrical surges
that may arise during the storm
and which may inadvertently
cause damage to the appliance
and its electronic componentry.
LFA208_ANZ_IB_A20_FA.indd 5 28/5/20 5:29 pm
6
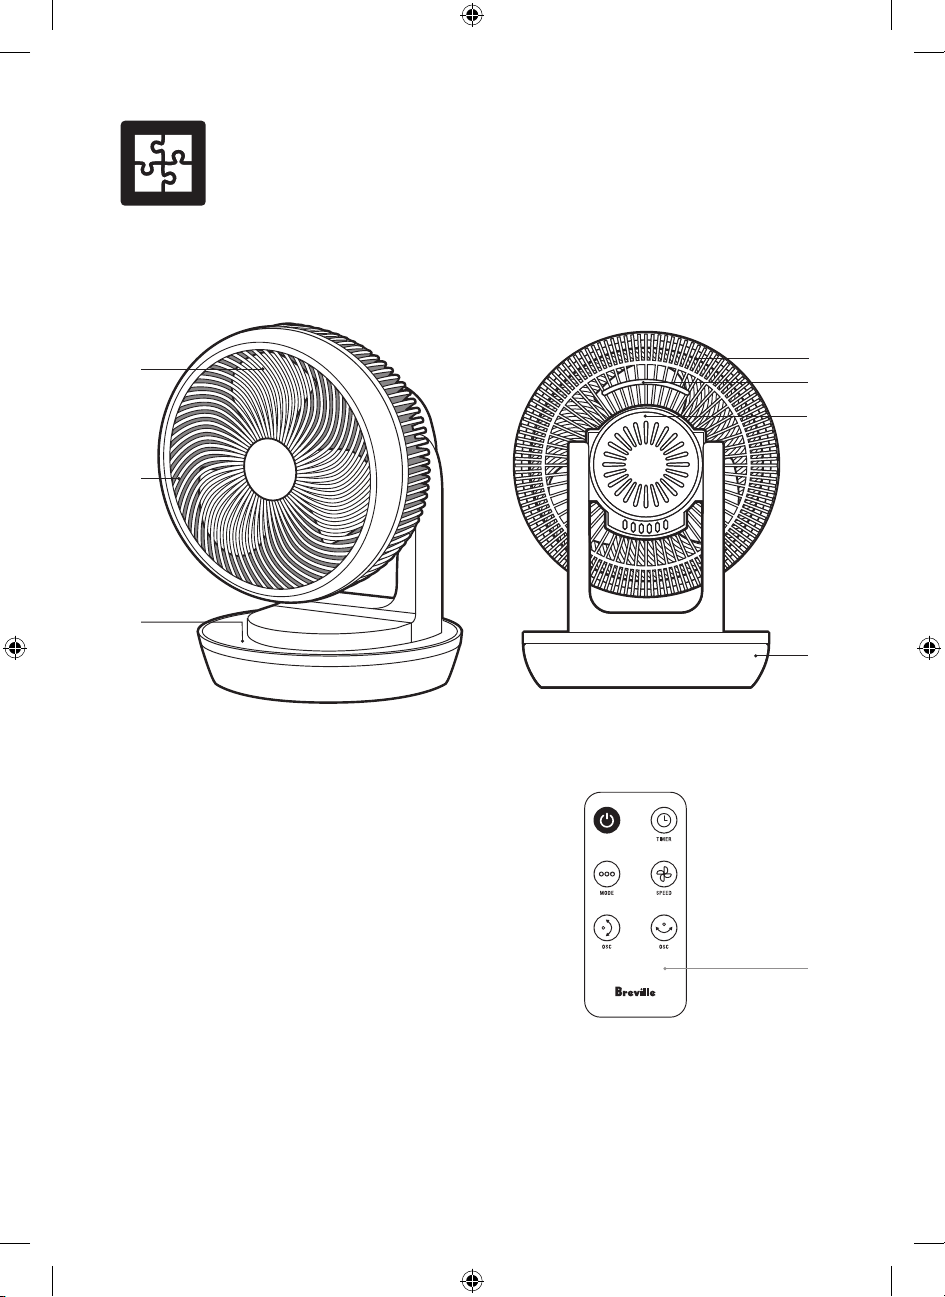
A. Fan blades
B. Front grille
C. Control panel with LED display
D. Rear grille
E. Carry handle
F. Circulator motor head
G. Base
H. Remote control
NOT PICTURED
Power cord
Components
FRONT VIEW REAR VIEW
A
C
B
D
G
H
E
F
LFA208_ANZ_IB_A20_FA.indd 6 28/5/20 5:29 pm

7
A. VERTICAL OSCILLATION
B. MODE
C. POWER ON/OFF
D. HORIZONTAL OSCILLATION
E. TIMER / WI-FI
F. FAN SPEED
G. LED DISPLAY
OSC
MODE
OSC
SPEED
TIMER
Control Panel
C
B
A
E
F
G
D
LFA208_ANZ_IB_A20_FA.indd 7 28/5/20 5:29 pm
8
FFeatures
WHAT IS AN AIR CIRCULATOR?
Traditional fans will move air that is directly
in contact with them, pulling air from behind
to the front, with the benefit of cooling being
felt only when directly facing you. Usually,
traditional fans are only used during the
warmer months.
Air circulators on the other hand, work to keep
all air in a room in motion, moving around
constantly and creating an air circulation
pattern that will make the whole room
more comfortable.
By using a 3D air circulation, your Breville air
circulator ensures constant movement of the
air in the room, reducing cold and warm spots
that are found in many rooms.
By circulating both stale indoor air and fresh
outdoor air (from open windows), Breville air
circulators also work on improving ventilation.
The Breville air circulator is perfect to use all
year round, as it regulates temperature, clears
stuffy air, and creates a safe environment for
the whole family.
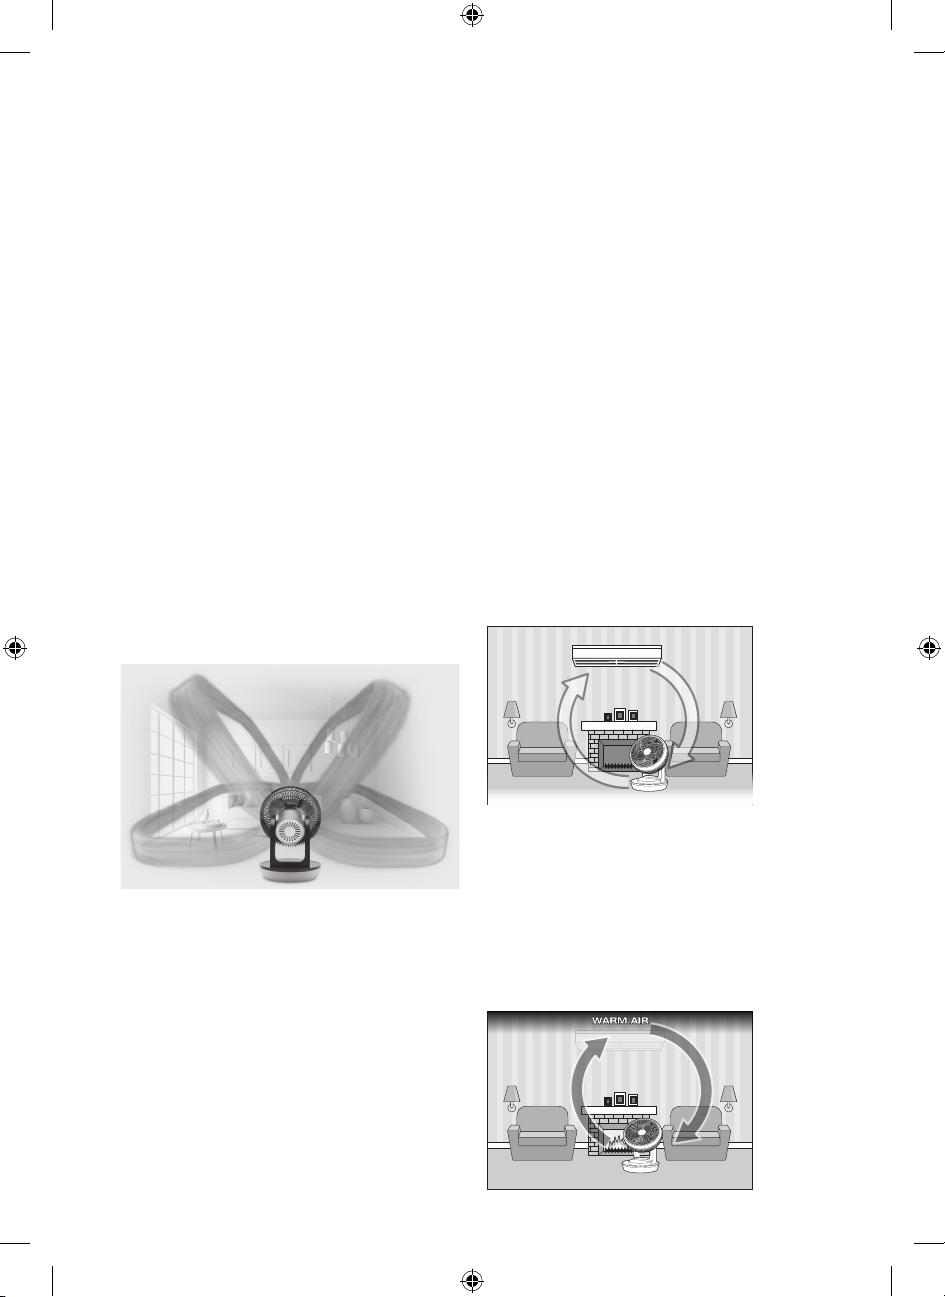
WHERE TO POSITION YOUR
AIR CIRCULATOR?
WARMER MONTHS:
Cool air tends to sink to the floor. During
warm weather, point the air circulator
facing towards a wall on high speed. angled
halfway between the ceiling and floor. The
circulator will efficiently cool the room down
by forcing the cool air to move, creating air
circulation patterns.
When using an air conditioner, point the air
circulator from the back of the room towards
the bottom of the air conditioner at a 30° angle
to intensify the cool air and distribute the
cool air faster and more efficiently around the
room. Use the horizontal oscillation for even
better distribution.
COLD AIR
COOLER MONTHS:
Warm air naturally rises towards the ceiling.
When using a heater, the warm air produced
will move up. Point the air circulator up at a 90°
angle. By pointing the air circulator upwards,
the hot air will circulate with the cooler air near
the floor, resulting in better distribution of
room temperature.
LFA208_ANZ_IB_A20_FA.indd 8 28/5/20 5:29 pm
9
oOperation
BEFORE FIRST USE
Before using your Breville air circulator for the
first time, remove all packaging material and
promotional labels.
OPERATING YOUR BREVILLE
AIR CIRCULATOR
1. Place the air circulator on a flat surface. Use
the Where to Position Your Air Circulator
section in this booklet for positioning
depending on requirements.
2. Insert the power plug into a 230V or 240V
power outlet and switch the outlet on. The
LED display will illuminate to display the
current room temperature. The air circulator
is now on standby mode.
3. Touch the button to turn the air
circulator on. The air circulator will
automatically start on NORMAL mode
at fan speed 1.
nNOTE:
To return to standby mode at any time during
operation, touch the button.
wCAUTION:
Never insert fingers, pencils or any other
objects through the guards whenever the
power plug is connected, in particular while the
air circulator is switched on.
nNOTE:
The air circulator is fitted with a power saving
feature. The LED display will dim after 15
seconds if any of the operating buttons on the
control panel are not touched. The lights will
illuminate brighter once any of the operating
buttons on the control panel are touched.
nNOTE:
To avoid infrared interference that may trigger
the operation of the air circulator, ensure the
air circulator is positioned away from other
infrared remote-controlled appliances.
ROOM AMBIENT TEMPERATURE
Your Breville Air Circulator is fitted with a
temperature sensor that detects the room
temperature and reports it through the LED
display. The figure displayed is only an
indication of the room temperature and will
vary depending on the location of the air
circulator in the room.
The LED display screen will cycle to show the
ambient temperature and the setting under
any selected mode.
LFA208_ANZ_IB_A20_FA.indd 9 28/5/20 5:29 pm
10
oFunctions
MODE
This Breville AirActive 3D™ Connect air
circulator has 3 modes: NORMAL, NATURAL
and SMART ECO. The air circulator will start
automatically on NORMAL mode on speed 1
once it is switched on.
To choose between these modes: touch the
button until the light illuminates next to the
selected mode; NATURAL or SMART ECO.
NORMAL MODE
NORMAL mode has 3 fan speed settings;
setting 1 for low speed, setting 2 for medium
speed and setting 3 for high speed. To choose
a circulator speed setting, touch the button
until the desired speed flashes on the LED
display and the speed will adjust automatically.
NORMAL mode is the default mode settings
for this air circulator. In NORMAL mode, none
of the lights next to NATURAL or SMART
ECO illuminate on the control panel.
NATURAL MODE
Continuous air flow can create a chilling
effect on the skin and a discomfort when
exposed for too long. NATURAL mode
generates a gentle breeze to maintain body
temperature, by simulating wind blowing
rhythm, automatically alternating wind speeds
according to pre-programed cycles. NATURAL
mode has 3 variations.
When the air circulator is on, to activate
NATURAL mode, touch the button until
the light illuminates next to the NATURAL
mode on the control panel and the default
NATURAL cycle program 1 (n1) displays on
the LED display. The fan speed will operate
automatically according to the natural cycle 1
(n1) program.
To select NATURAL cycle program 2 (n2) and
NATURAL cycle program 3 (n3), touch the
button once or twice and ‘n2’ and ‘n3’ will
display respectively.
To stop NATURAL mode and return to
NORMAL mode, touch the button until
no lights illuminate next to NATURAL and
SMART ECO buttons on the control panel.
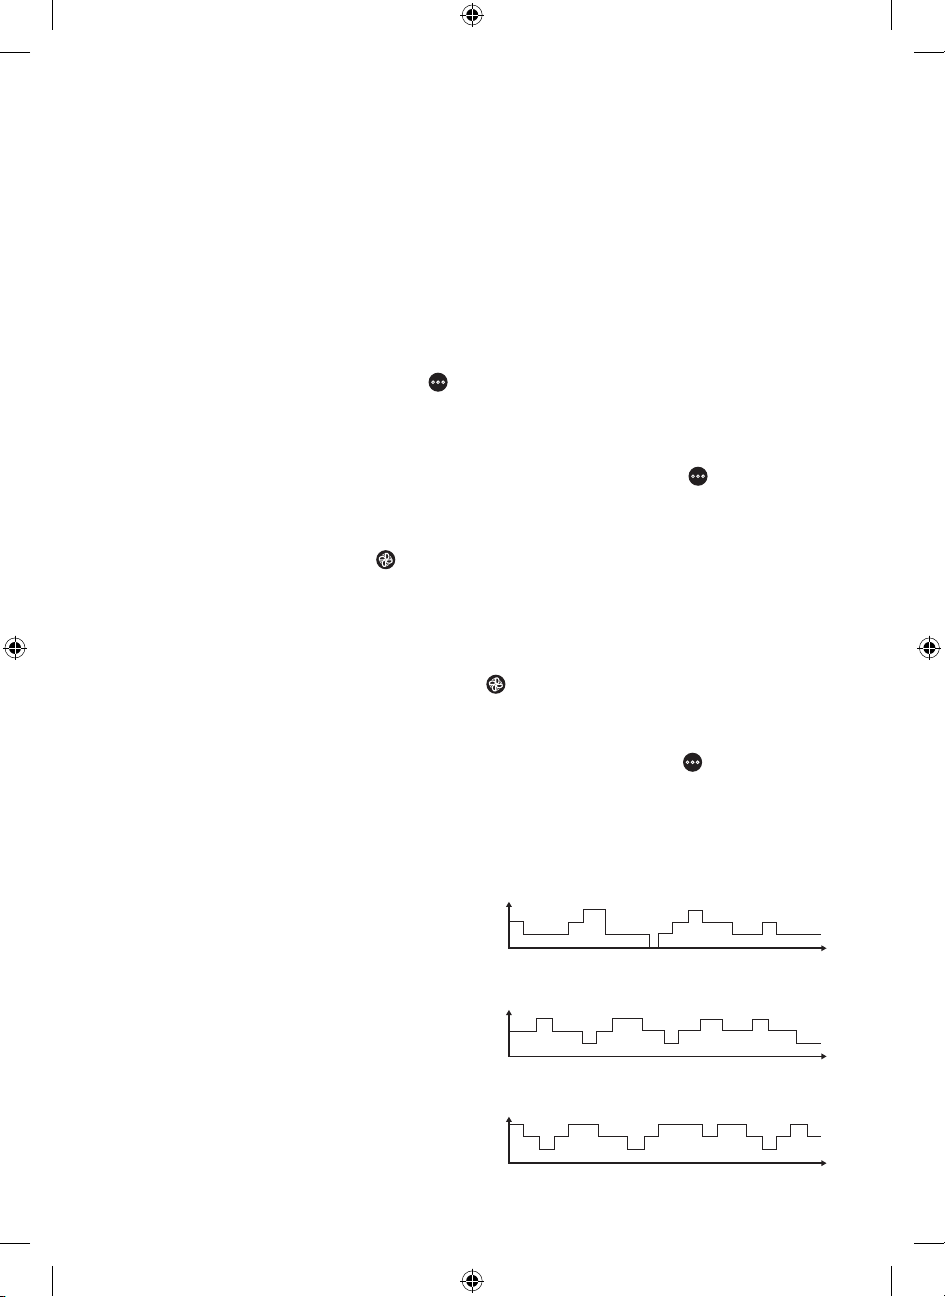
Diagram showing NATURAL cycle programs:
Program 1 (n1)
2
3
1
OFF
Program 2 (n2)
OFF
2
3
1
Program 3 (n3)
1=LOWSPEED, 2 = MEDIUM SPEED,3=HIGHSPEED
OFF
2
3
1
LFA208_ANZ_IB_A20_FA.indd 10 28/5/20 5:29 pm

11
SMART ECO MODE
SMART ECO mode will automatically adjust
the fan speed depending on the ambient
temperature. This program delivers the optimal
cycle to save energy and operate quietly and
efficiently, when possible. SMART ECO mode
is ideal to use during sleep or to be left on for a
long period of time.
When the air circulator is on, to activate SMART
ECO mode, touch the button until the light
illuminates next to the SMART ECO mode
on the control panel. The air circulator will
automatically adjust the fan speed based on the
following programmed rules.
Ambient T (°C) Air circulator speed
< 26 Speed 1
26 – 28 Cycle between speed 1
and speed 2. Operation for
7.5 secs on each speed.
29 – 34 Cycle between speed 2
and speed 3. Operation for
7.5 secs on each speed.
> 35 Speed 3
nNOTE:
Fan speed in this mode cannot be
manually adjusted.
To stop SMART ECO mode and return to
NORMAL mode, touch the button until
no lights illuminate next to NATURAL and
SMART ECO modes.
AUTO-OFF TIMER
This Breville air circulator comes with an 8-hour
auto-off timer that can be set in 1 hour intervals
and switches fan to standby mode after the set
number of hours has elapsed. The AUTO-OFF
TIMER can be set on any MODE.
To set the timer, touch the button repeatedly
until the desired number of hours is displayed
on the LED display and a green light illuminates
above the TIMER button on the control panel.
The auto-off timer will start on the selected
mode, and the mode will stop automatically
once the auto-off timer has expired.
The LED display will display the set circulator
mode setting once the auto-off timer begins. To
check the pre-set time left on the LED display,
touch the button once.
To cancel the auto-off time anytime once set,
touch the button until ‘0H’ is displayed on
the LED display screen and the green light
above the TIMER button no longer illuminate
within a few seconds.
nNOTE:
• To run the air circulator continuously, do not
set the timer or set the timer to ‘0H’.
• All modes can be adjusted at any time after
the timer is set.
• The air circulator will stop and switch to
standby mode once the set time has elapsed.
OSCILLATION AND 3D AIR
CIRCULATION
The Breville air circulator can oscillate
automatically left and right and up and down.
The oscillations can be set on any MODE.
To activate the left and right oscillation, touch
the button once. The air circulator will move
left and right continuously.
To activate the up and down oscillation, touch
the button once. The air circulator will start
to move up and down continuously.
To achieve 3D air circulation, activate both
horizontal and vertical oscillations. This will set
a unique air circulation pattern.
To set the orientation of your air circulator,
touch the respective oscillation button
again. The air oscillator will stay at your
preferred position.
When the air circulator is turned off,
the oscillation will return to its initial
position automatically.
LFA208_ANZ_IB_A20_FA.indd 11 28/5/20 5:29 pm

12
REMOTE CONTROL
The Breville air circulator comes with a remote
control. This remote control features the same
buttons as the control panel (except the Wi-Fi
function) on the air circulator and can be used
the same way.
To avoid misplacing the remote control,
place the remote control on the right side
of the air circulator frame with the remote
control symbol.
The remote control includes 1 x CR2032 3V
Lithium battery. This Lithium battery is
protected by an isolating slip. Before first
using the remote control, remove the battery
isolating slip by pulling the slip outwards away
from the remote control.
To check and/or to replace the battery, open
up the battery compartment at the back of the
remote by forming a good grip of the remote,
pushing the small arched groove to the right
and simultaneously pushing out the battery
compartment cover by pushing the rectangular
groove outwards (Fig 1a). Insert the battery
paying attention to the polarity (+ and -).
Fig 1a
Reinsert the battery compartment into the
remote control ensuring that the + symbol
is facing upwards when inserted (Fig 1b).
Make sure the battery compartment is
correctly secured.
Fig 1b
nNOTE:
To use the remote control, it must be pointed at
the control panel and must be used within five
meters of the air circulator.
wWARNING
KEEP BATTERIES OUT OF REACH OF
CHILDREN
Swallowing may lead to serious injury in as
little as 2 hours or death, due to chemical burns
and potential perforation of the oesophagus.
If you suspect your child has swallowed or
inserted a button battery immediately call the
24-hour Poisons Information Centre on 13 11
26 for fast, expert advice. Examine devices
and make sure the battery compartment is
correctly secured, e.g. that the screw or other
mechanical fastener is tightened. Do not use if
compartment is not secure.
Dispose of used button batteries immediately
and safely. Flat batteries can still be dangerous.
Tell others about the risk associated with
button batteries and how to keep their
children safe.
LFA208_ANZ_IB_A20_FA.indd 12 28/5/20 5:29 pm
13
Wi-Fi
Connectivity
SET UP YOUR AIR CIRCULATOR
1. Ensure the mobile device is connected to
a home Wi-Fi network.
2. To set up the air circulator, turn the air
circulator on at the power outlet. The air
circulator must be on standby mode. Touch
and hold the button for 5 seconds, until
the symbol light is flashing rapidly. The
air circulator is now ready to connect.
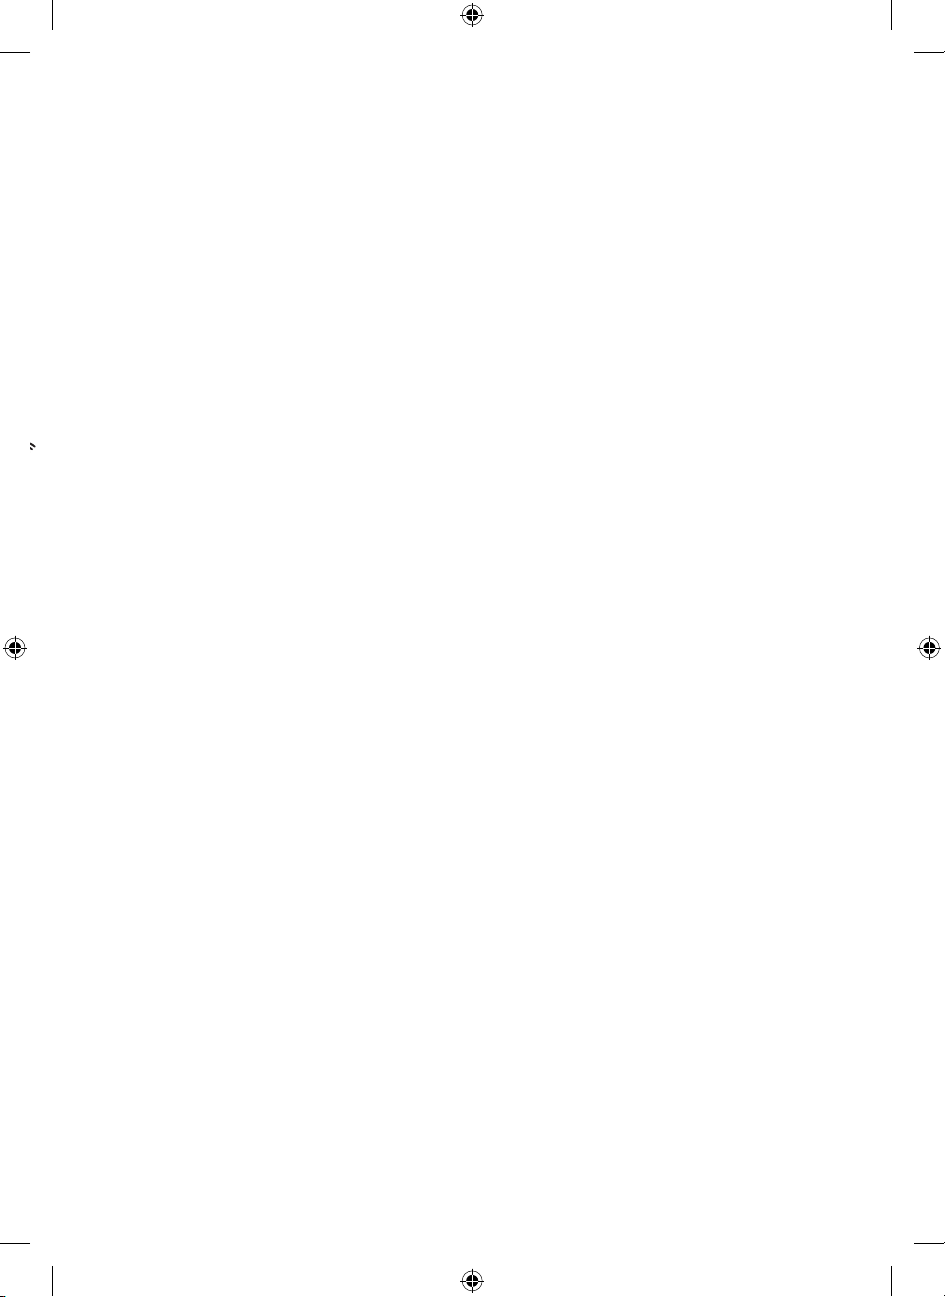
3. Log into your Breville Home Connect™ app
account and stay on the “Home” page. To
add the air circulator to the list, touch ‘Add
Device’ or the symbol found in the top
right-hand corner of the screen. Follow the
prompts in the app.
4. If the connection is successful, the air
circulator will appear in the main page of
the app and the symbol light on the air
circulator will illuminate.
The Breville AirActive 3D™ Connect air
circulator can offer remote operation by using
a home Wi-Fi connection and the Breville
Home Connect™ app downloaded to a
compatible mobile phone.
To go straight to the appropriate app store,
Scan the QR code below.
For instructions on how to use the app,
scan the QR code below, refer to the Quick
Start Guide that can be found in the box or
go to: tinyurl.com/HomeConnectQuickStart
nNOTE:
The Breville Home Connect™ app is
compatible with mobile phones running
Android® 5.0 or later and iOS devices
9.0 or later.
LFA208_ANZ_IB_A20_FA.indd 13 28/5/20 5:29 pm
14
C
Care, Cleaning
& Storage
CARE AND CLEANING
Always switch the Breville air circulator off.
Switch off at the power outlet and unplug from
the power outlet prior to cleaning the base,
grilles and fan blades.
To clean the outside of the air circulator, wipe
the exterior with a soft, damp cloth. Never use
an abrasive cleaner.
To clean the fan blades and remove dust that
may have accumulated, use a soft, damp cloth
or a vacuum cleaner with the brush attachment.
STORAGE
When not in use, store the air circulator in
a cool, clean and dry location.
LFA208_ANZ_IB_A20_FA.indd 14 28/5/20 5:29 pm
15
Note
LFA208_ANZ_IB_A20_FA.indd 15 28/5/20 5:29 pm

Australian Customers
Phone: 1300 139 798
Web: www.breville.com
New Zealand Customers
Phone: 0800 273 845
Web: www.breville.com
Breville Customer Service Centre
Breville, the Breville logo, AirActive 3D and Breville Home Connect are trademarks of Breville Pty. Ltd.
Android is a trademark of Google LLC. All other brands may be trademarks of their respective owners.
Breville’s products are distributed in New Zealand under license. A.B.N. 98 000 092 928.
Due to continued product improvement, the products illustrated/photographed in this booklet
may vary slightly from the actual product.
LFA208 ANZ – A20
LFA208_ANZ_IB_A20_FA.indd 16 28/5/20 5:29 pm
This manual suits for next models
1
Table of contents
Other Breville Fan manuals


