Brew-Boss Fill-Boss User manual


Fill-Boss® Operation Manual V3.00
1 - Fill-Boss® Overview
Fill-Boss® is an automated counter-pressure bottle and growler filler that makes bottling
non-carbonated and carbonated beverages very easy. Counter pressure filling of bottles minimizes
foaming during bottling, allowing beverages to be carbonated before bottling. This eliminates the
yucky dead yeast sediment that collects at the bottom of the bottle from carbonating in the bottle with
sugar or DME. Beverages can be consumed immediately after bottling as well. The Version 3
Fill-Boss® unit is a major upgrade from the previous versions of the product. The V3 model now
includes an LCD display as well as a rotary switch that allows better prompting and user configuration
using a menu based system. The new V3 also adds an automated bottle detection system that
automatically starts filling the bottle when it detects that a bottle has been inserted.
Warning: it is the responsibility of the customer to assure that the pressure used
when filling with the Fill-Boss® is within the capacity of the vessel/bottle being
filled. For example, never use more than 15psi when filling glass growlers. Please
consult the manufacture of your beverage vessel/bottle for maximum recommended
pressures before attempting to fill with the Fill-Boss® .
The Fill-Boss® works by compressing the contents of the bottle to the same pressure as the beverage is
inside the keg or brite tank. The fill process is as follows:
1. User installs a bottle (Bottles should be chilled as much as possible to minimize foaming during
filling).
2. User presses the button.
3. Fill-Boss® opens a CO2 valve and purges the bottle of air and replaces it with CO2 via the tube
that extends to the bottom of the bottle. CO2 is heavier than air so a short shot of CO2 will
force air out of the bottle leaving the bottom of the bottle filled with CO2.
4. Fill-Boss® then pressurizes the bottle to the same pressure as the keg.
5. The beverage valve is then opened but the beverage will not flow as the pressure in both the keg
and bottle are the same.
6. Fill-Boss® then momentarily opens the bleed valve, which slowly allows the CO2 gas in the
bottle to escape. As gas escapes, the beverage is allowed to flow into the bottle.
7. Fill-Boss® is equipped with an innovative level sensor. When the beverage reaches this sensor,
the flow of the beverage is automatically stopped.
8. User removes the bottle.
The Fill-Boss® is capable of filling many types of bottles and containers including beer bottles (12 oz
and 22 oz bombers, wine bottles, growlers, pop top bottles, etc. It handles bottles from 8 to 14 inches
tall and up to 5 inches in diameter. The standard unit is equipped with a custom food grade silicone
rubber conical fill head seal to provide a leak-proof seal to the bottle. If the standard fill head seal does
not match your bottle type, you can simply purchase a standard drilled stopper to match your container.
The fill head is designed to accept any standard stopper.
Page 2
Fill-Boss® Operation Manual V3.00
Brew-Boss offers an optional inline filter kit for the beverage line of the Fill-Boss®. If you are filling
homebrewed, nano, or craft beer or other beverages with yeast sediment, fruit sediment, or other trub
potentially in your filling vessel, we highly recommend using a filter like we supply. The valves on the
filler have small orifices that can be easily plugged by sediments.
Cleaning the filler immediately after a fill session is the most important thing we can stress. Most
issues we’ve been contacted about relate to the user not properly cleaning the Fill-Boss® immediately
after a fill session. Leaving sticky beverages sit inside the machine for extended periods of time can
cause the valves to stick shut or flow to be reduced. Very hot tap water is all that is needed for an
effective cleaning. Use the clean function as described in this manual after every fill session.
2 - Fill-Boss® Operational Modes
The Fill-Boss® has three (3) FILL MODES. Manual, Automatic, and Trained/Timed and also
included a special auto bottle detection system that starts filling automatically after a bottle is inserted.
Manual Fill Mode is the simplest of all the modes and requires that the user press the button to start
and stop filling. When this mode is active, a “M” will be displayed in the lower right corner of the
LCD display as shown here.
Automatic Fill Mode (default) incorporates a fill detection sensor that detects the overflow from the
bottle when filling and automatically stops the fill when overflow is detected. When this mode is
active, an “A” will be displayed in the lower right corner of the LCD display as shown here.
In this mode, pressing the button during filling will stop filling immediately to override the automatic
sensor. Please note that this mode may not work properly with some beverages and requires that the
proper pressure be used for your beverage to minimize foaming in the bottle. If this mode is not
working reliably, switch to manual or trained/timed mode.
Timed/Trained Fill Mode requires that the user train the filler when filling the first bottle and the time
to fill is stored by the controller. Subsequent bottles are filled for that same time. For most beverages,
Page 3

Fill-Boss® Operation Manual V3.00
this is the most consistent mode. When this mode is active, a “T” will be displayed in the lower right
corner of the LCD display as shown here.
The fill time is based on the time you specify when filling the first bottle. This fill time is remembered
until the Fill-Boss® is powered down or reset using the LCD menu. To use this mode, press the button
to start filling. During filling, the filler will beep regularly indicating that the filler is timing the fill and
the display a prompt indicating it is the first fill and to press STOP when full as shown here.
When the bottle fills to the desired level, simply press the button again. The time will be stored from
the time the fill was started until the time it was stopped and subsequent fills will fill for the exact same
amount of time. Fills should be fairly consistent using this mode provided the pressure in the system
stays the same throughout the bottling session.
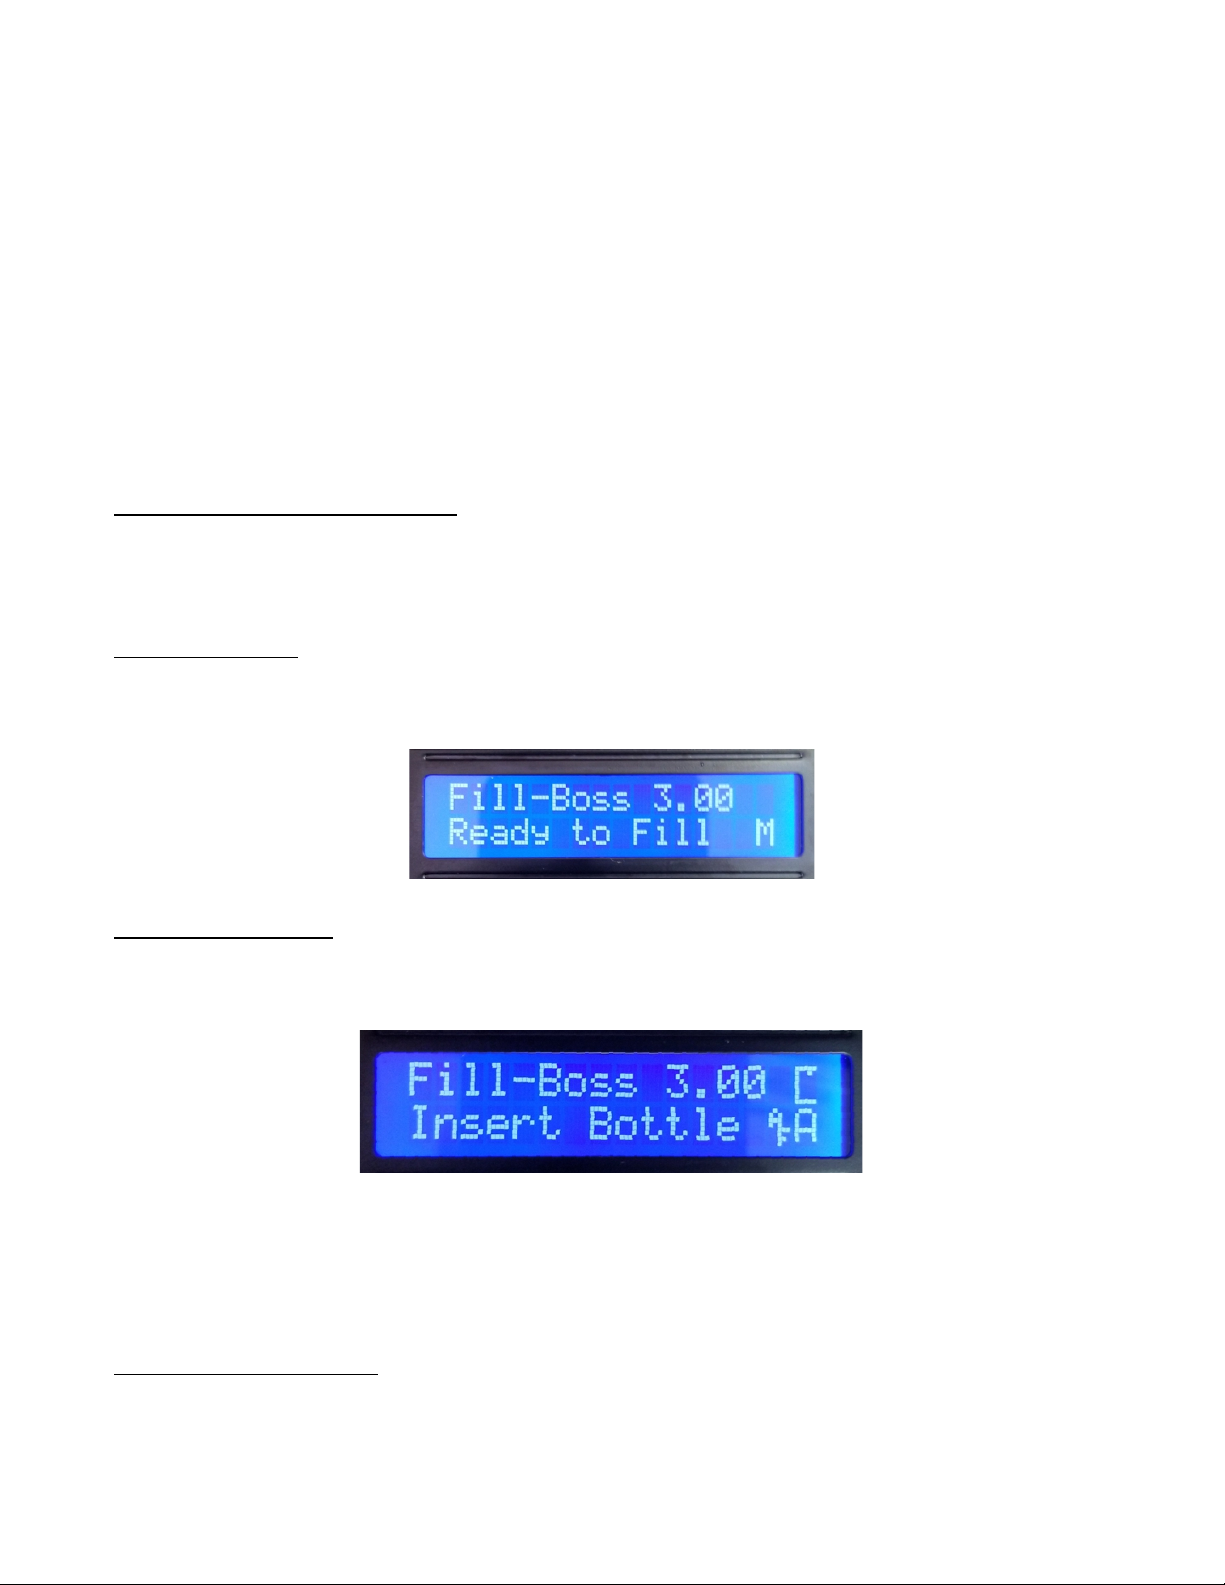
Auto Bottle Detect Mode
The Fill-Boss® also includes a unique feature that greatly increases the productivity of the filler. This
mode incorporates a sensor that detects when a bottle is inserted and automatically starts filling without
the need for the user to press the button on the filler. This mode is identified by a small offset AF
symbol in the lower right corner of the LCD as shown here next to the “A” indicating Auto Fill Detect
Mode:
To enable this mode, simply rotate the switch when the filler is not actually filling. The LCD display
will toggle to show the AF symbol as well as the symbol shown in the upper right corner of the LCD.
The symbol shown here represents the filler believes there is no bottle inserted. Think of it as a side
view of the filler with no bottle in it.
Page 4
Fill-Boss® Operation Manual V3.00
When the filler thinks there is no bottle inserted, it will display “Insert Bottle” as shown on the image
above. Once you insert a bottle, the filler will delay for the amount of time you have set your “Auto
Start Time” parameter to (see menu parameters discussed later in this document). After that delay,
filling will commence automatically without requiring the user to press the button. The display will
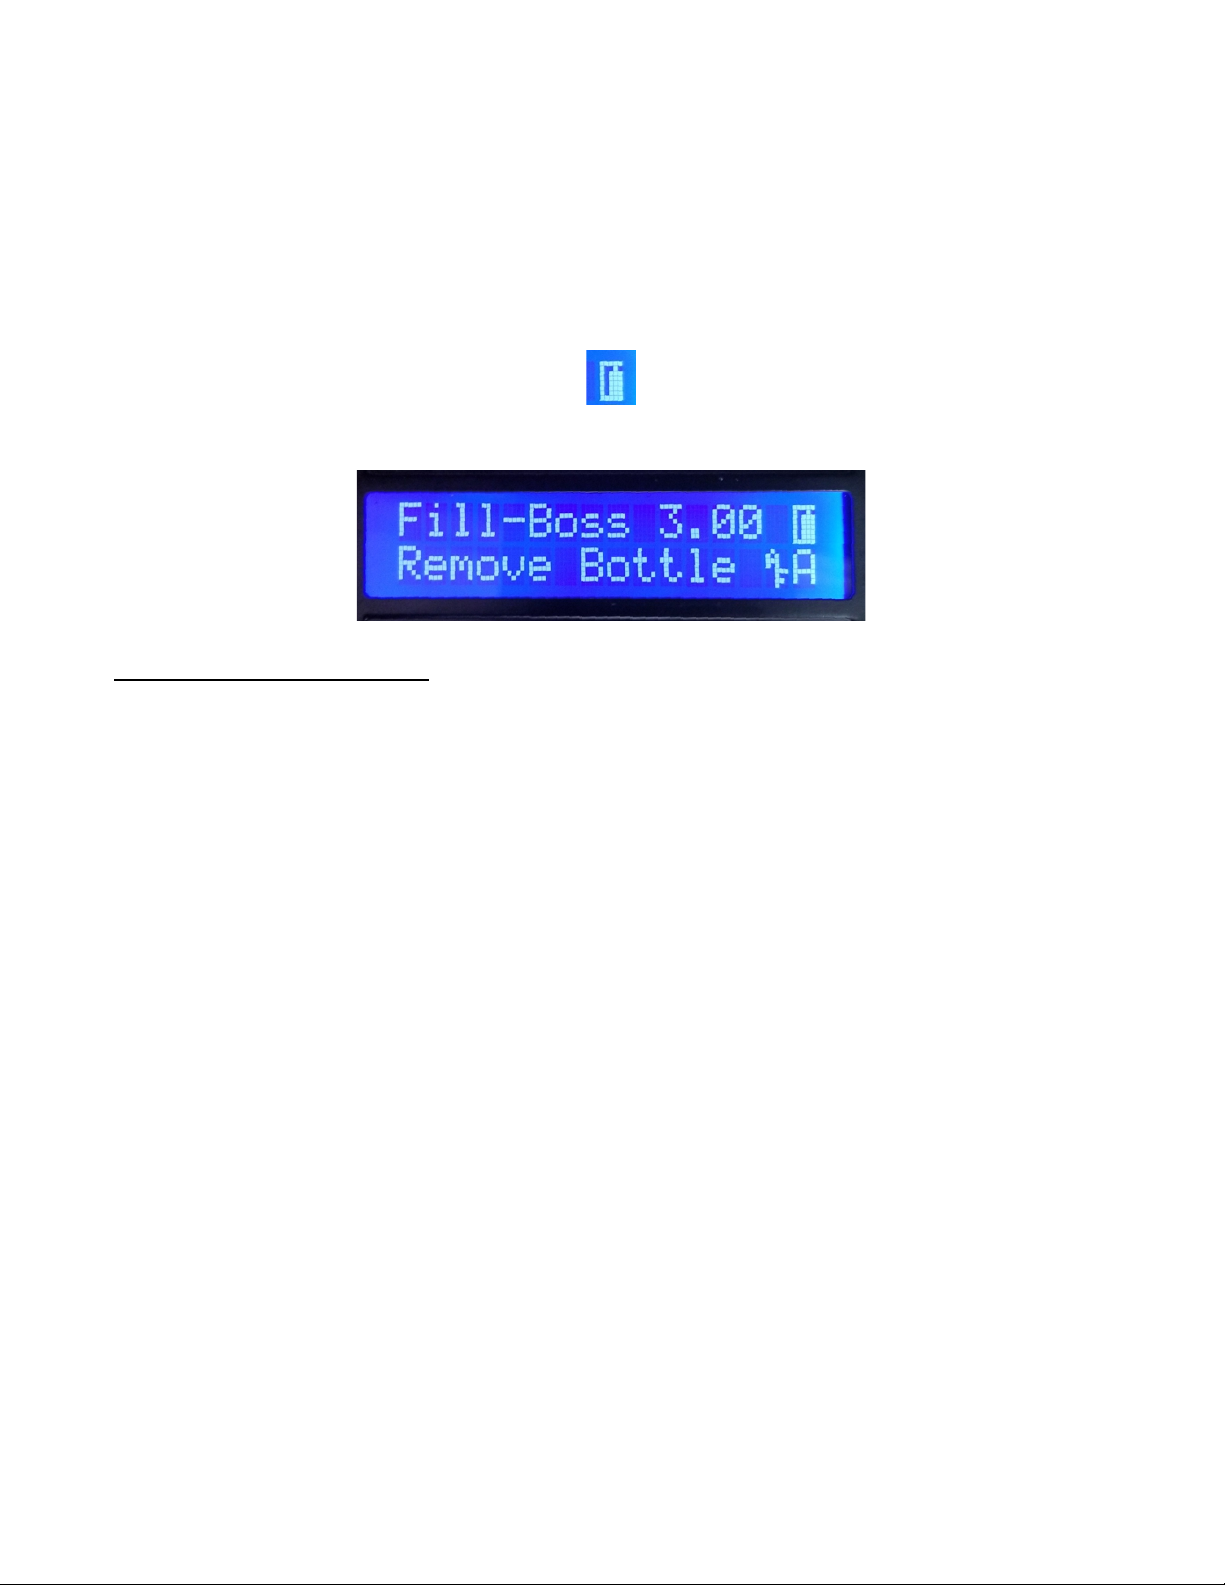
change to show that a bottle has been inserted with the following icon. Again, picture the filler from
the side with a bottle now inserted.
After filling completes, the LCD will display “Remove Bottle” as shown here.
Filling Sequence of Operations
The Fill-Boss® fills bottles using a counter pressure methodology where the bottle is first purged of air
with the gas being used for carbonation, then compressed to the same pressure as the beverage in the
beverage container/keg. By slowly releasing the pressure in the bottle, beverage is allowed to enter the
bottle to replace the gas that is slowly allowed to bleed out. This methodology greatly reduces foaming
during filling and by incorporating a “cap on foam” environment, greatly reduces the possibility that
oxygen remains in the bottle after filling.
The basic sequence of operations for the Fill-Boss® is as follows:
- Bottle is purged of air for Purge Time (Gas Valve Open - Bleed/Overflow Valve Open)
- Bottle is compressed for Compress Time to Equalize pressure of keg and bottle (Gas Valve
Open - Bleed/Overflow Valve Closed)
- Bottle is filled by opening Bleed/Overflow valve intermittently with the liquid valve open based
on Fill Speed setting
- Once bottle full (either auto sensed, timed, or manually), all valves close.
- If EOF Line Purge parameter set greater than zero, the Bleed/Overflow valve and gas valves are
opened for EOF Line Purge time to clear the fill tube that extends to the bottom of the bottle.
- The filler then waits for EOF Bleed-Off Delay time for bubbles in liquid to settle to top of the
bottle.
- The Bleed/Overflow valve is then opened for Bleed-Off Time to release the desired amount of
pressure from the bottle. The goal here is to release enough pressure so when physically
removing the bottle that the contents do not expand so quickly that the entire bottle foams over.
The goal is to have the beverage slowly foam over when removed so that the cap on foam
methodology is incorporated.
- The filler beeps and notifies the user that the bottle is ready for removal.
Page 5

Fill-Boss® Operation Manual V3.00
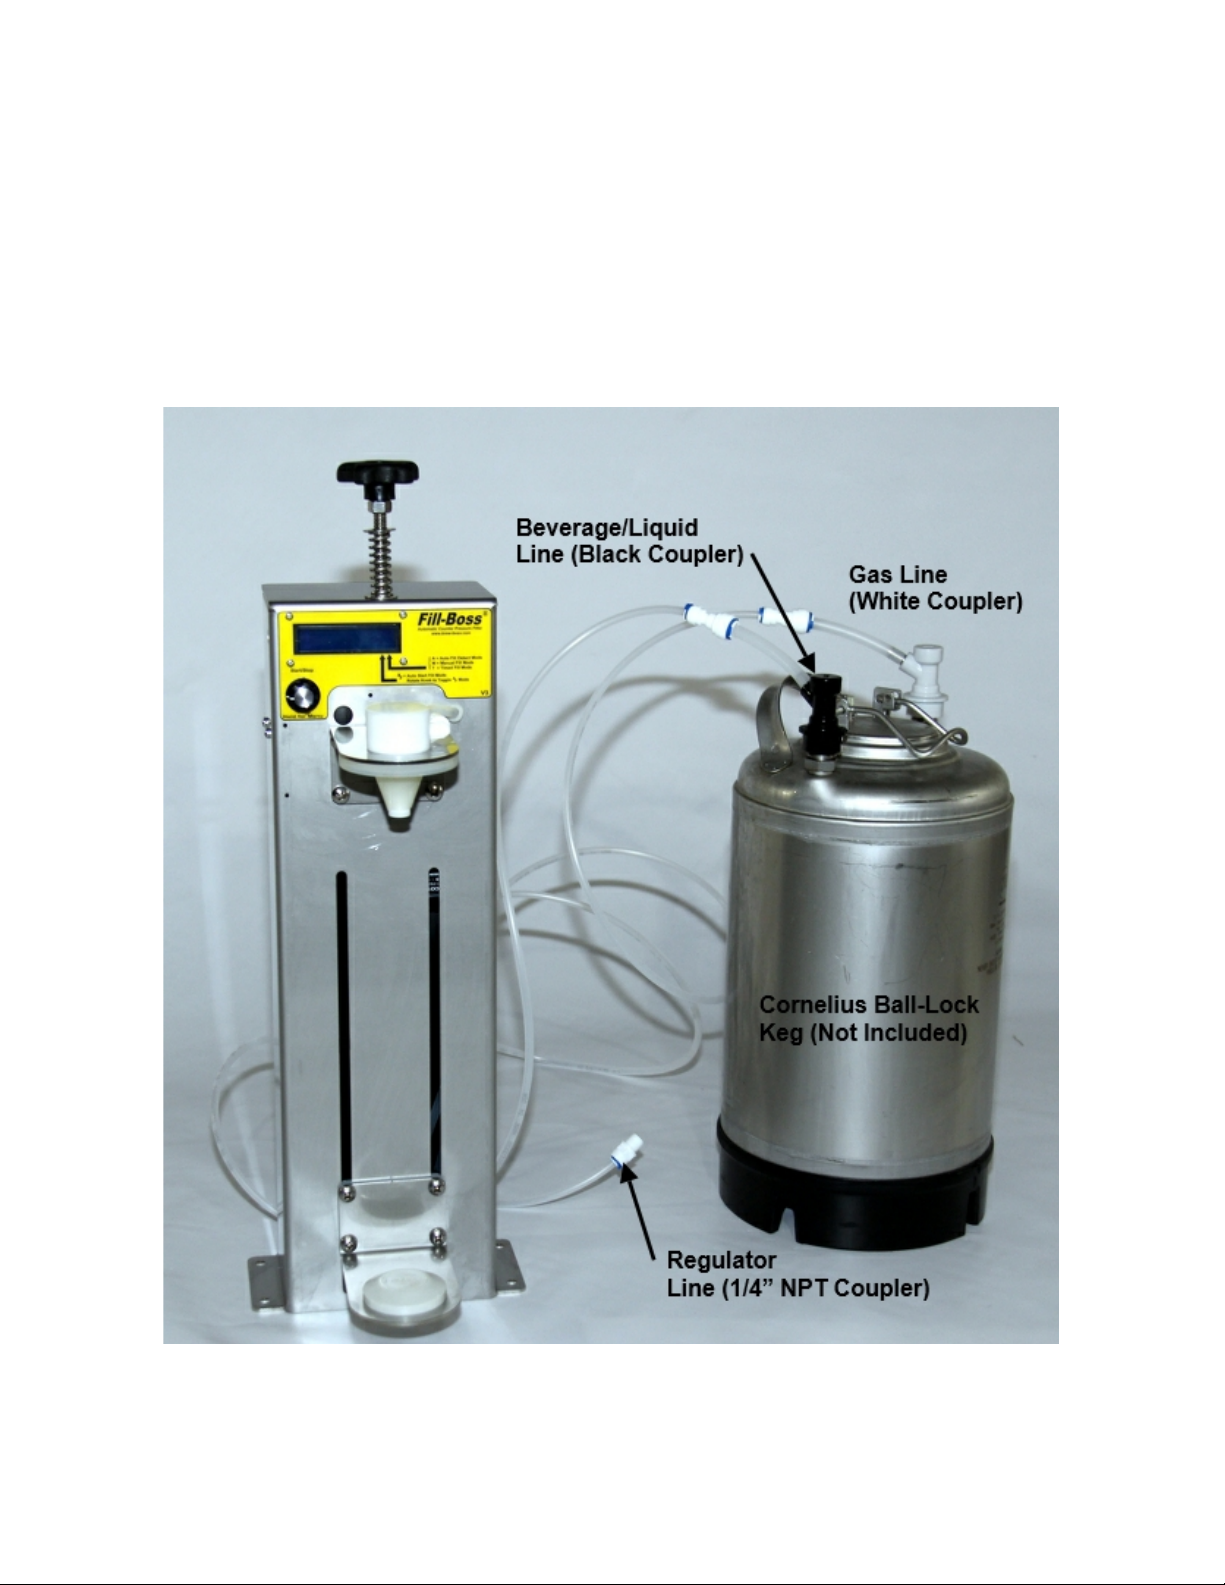
3 - Fill-Boss® Components
Page 6
Fill-Boss® Operation Manual V3.00
The Fill-Boss® is designed to use ball lock type connectors for connection to your beverage container
(Cornelius kegs, Sanke kegs, or brite tanks). We have standardized on these connections because they
can be easily and quickly connected and disconnected and have built in valves to eliminate the need for
valves. Adapters for nearly every type of keg or brite tank are readily available. We offer the
Fill-Boss® with multiple connection options to facilitate most beverage containers.
Fill-Boss® Gas and Fluid Components (Recommended Sanitizing and Cleaning Setup)
Page 7

Fill-Boss® Operation Manual V3.00
4 - Fill-Boss® Setup
The Fill-Boss® is very simple to set up. The unit is supplied with the proper components that allow it
to be connected to a Cornelius ball-lock type keg and a gas regulator you supply.
Find a location where you can mount the Fill-Boss® device that will allow access to the back of the
unit as well as the front. There should also be 120 Volt AC power available within a few feet of the
unit.
Mount the Filler
Bolt or screw the Fill-Boss® device to a work surface. Four 1/4” diameter mounting holes at the base
of the unit are provided for this purpose. Do not consider using the Fill-Boss® without securely
mounting it. It is designed to be used bolted down, not free standing. Severe bodily injury could result
from using the filler free-standing.
Power the Filler
Next, connect power to the Fill-Boss® by plugging the DC plug into the power supply port on the
upper left of the Fill-Boss® as shown in the picture. Plug the DC power adapter supplied (12VDC 2
AMP) into 120 volt supply. At this point, the Fill-Boss® will start up. A self diagnostics test in run to
validate that the auto fill sensor is available and then the
Ready to Fill” prompt will display. The main LCD display will always display your current firmeware
version (e.g 3.XX).
Connect CO2 Gas Line to Regulator
Next, connect the CO2 input tube to your CO2 regulator. A ¼ inch NPT quick connect is provided as
this is the most common port size on beverage regulators. If yours is a different size, you can procure
your own quick connect adapter to fit your regulator. It is important to note that the gas supply
pressure must be the same source for both the beverage container and the Fill-Boss®. Nearly every
customer that has reported that the unit does not properly fill (too much foaming) has not followed this
rule. The Fill-Boss® unit and the beverage tank/keg must use the same gas pressure source!
This manual is written assuming you will be using the ball lock connectors on a Cornelius style keg. If
you are connected to a brite tank or Sanke style keg, adjust the instructions below based on your
attachment style. The white ball lock connector is for the “CO2 In” port on a Cornelius keg and the
Black is for the “Beverage Out” port. Locate a Cornelius keg so that the hoses coming from the
Fill-Boss® reach the keg and regulator easily. If you will not be using the white ball lock connector,
you can remove the T fitting and connect the gas line to your gas source directly.
If you are not using Cornelius style kegs, obtain appropriate adapters to adapt the gas and beverage
lines to your setup before continuing, although we recommend you retain the Cornelius ball lock
connectors and procure a small Cornelius keg that you dedicate for sanitizing the filler before filling
and cleaning the filler after filling.
Page 8

Fill-Boss® Operation Manual V3.00
Route Overflow Tube
We have supplied about 6 feet of spare ¼” tubing for use as an overflow tube and a fill tube. Please cut
the tubing as required for overflow. We recommend no longer than 3 feet of tubing be connected to the
overflow valve. Route the overflow/bleed tube that exits the back of the filler to a container to capture
the overflow from the filler. We recommend using a glass growler for this purpose as the foam that
ends up in the growler after filling can be consumed! Alternatively, route the overflow tube directly
into a drain. Never operate the Fill-Boss® without the bleed tube routed to a collection container.
Adjust Filler to Bottle
Adjust the support platform on the Fill-Boss® to fit your bottle or container. To accomplish this, lower
the platform using the adjustment knob on top of the unit to give clearance for the bottle. Center the
bottom of the bottle on the support puck and tighten the top adjustment knob until the spring is
compressed as much as possible that still allows you to remove the bottle by pressing down on the
knob.
Spring Shown Compressed
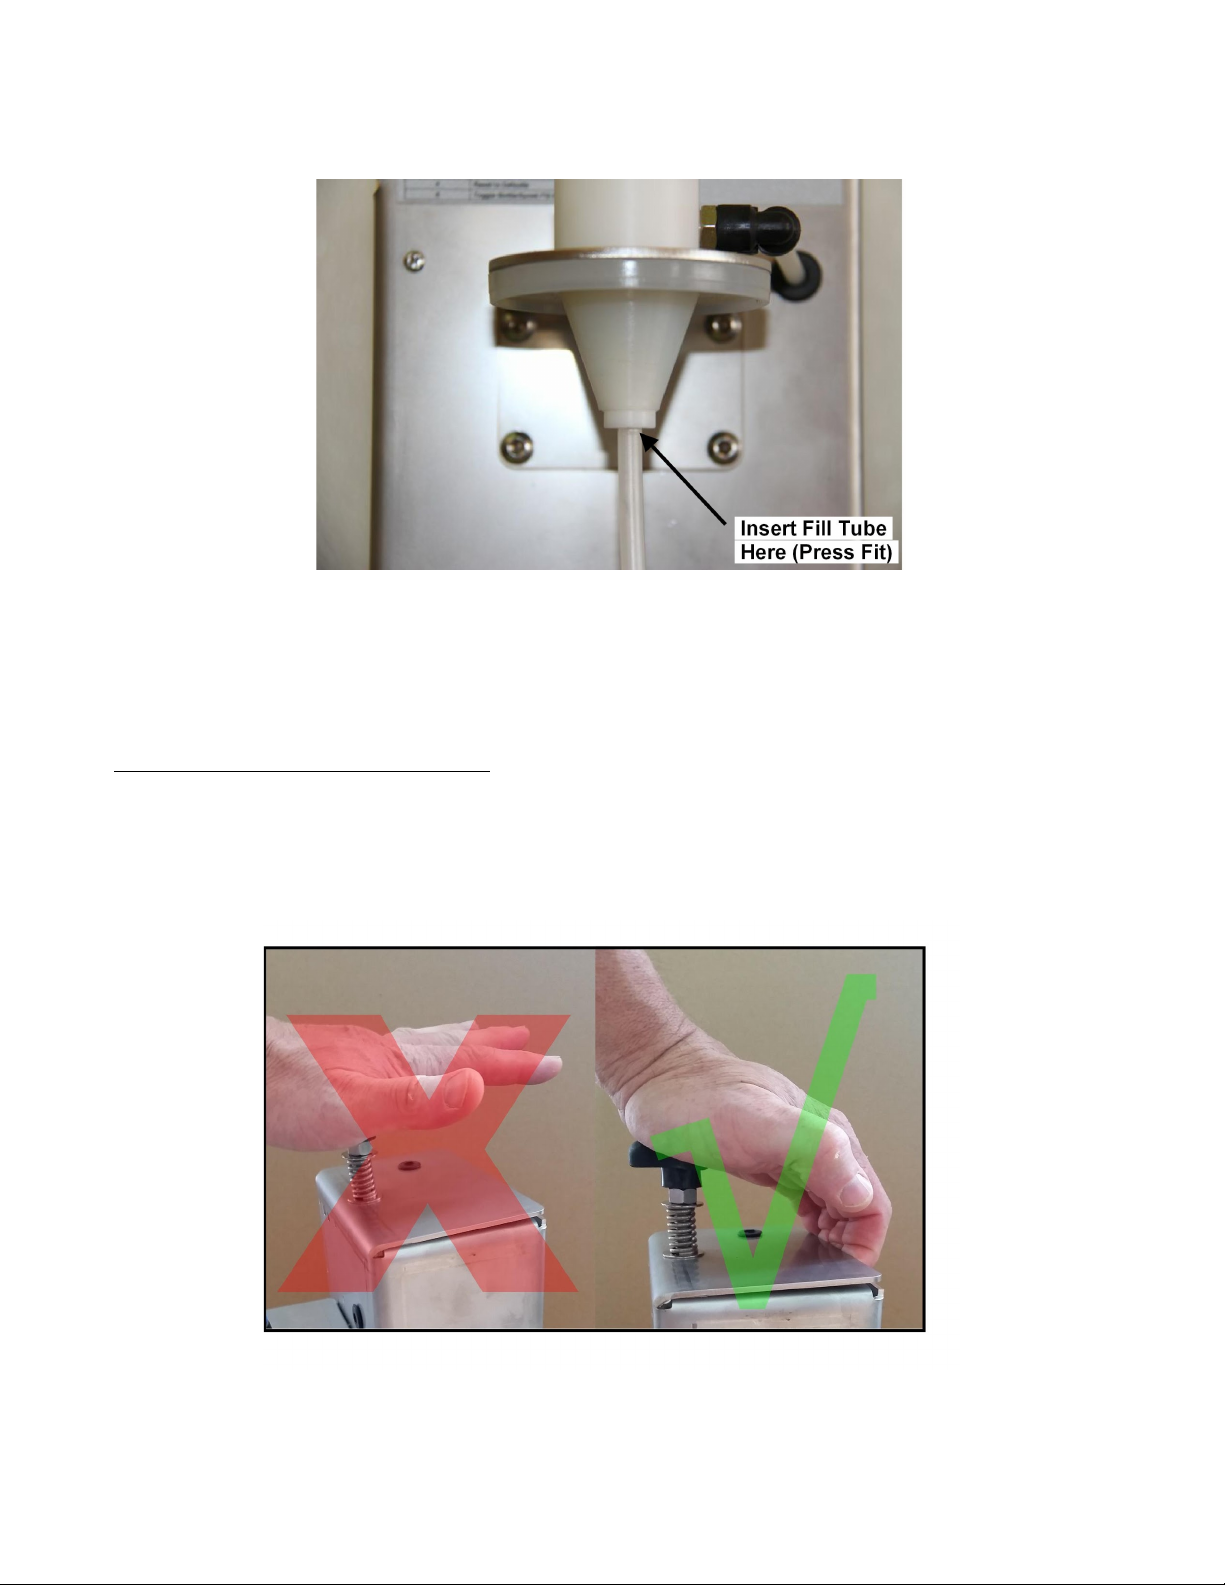
Install Fill Tube to Fill Head
The filler utilizes a fill tube that fills beverage to fill from the bottom up, to minimizing foaming. The
Fill-Boss® is supplied with approximately 6 feet of tubing that you must cut to the proper length for
your bottle (allow enough for the overflow tubing as well). Remove the bottle from the filler and insert
the tubing into the fill head as shown here. Push the tubing into the hole on the bottom of the fill head
as far as it will go. This is a press fit so make certain the tubing is securely inserted.
Page 9
Fill-Boss® Operation Manual V3.00
Now, locate the point were the tubing touches the locating puck on the adjustable platform. Cut the
tube off at a 45 degree angle at the bottom of the fill tube. The goal is to cut it to a length so that the
tube just touches the bottom of the bottle/container being filled. Retain the various lengths you cut as
well as any left over tubing for future use on other size bottles.
Install Bottle with Fill Tube Installed
The Fill-Boss® is designed to use the spring to offset the pressure in the bottle. For this reason, the
spring is fairly strong. Do not try and push down on the adjustment knob, as it can take a considerable
amount of force to do so. Instead, grab the filler by the top/back edge as shown and simply press down
on the adjustment knob with the heel of your hand. This makes it much easier to install and release
bottles.
To install a bottle, feed the end of the fill tube into the opening of the bottle as shown here.
Page 10

Fill-Boss® Operation Manual V3.00
Next, gude the bottle up to the fill head and position the bottle so the opening of the bottle engages the
conical bottle seal. Now compress the spring to lower the platform as shown above and center the
bottom of the bottle on the locating puck on the platform. Release the compression knob and the bottle
is in position for filling as shown here.
.
Page 11

Fill-Boss® Operation Manual V3.00
5 - Fill-Boss® Testing
It is best to test your Fill-Boss® with water first to make certain everything is operational before filling
actual beverages. Add a few gallons of water to your keg and connect the white and black ball lock
connectors to the keg to the In and Out ports respectively. Again, the white ball lock is for the
CO2/Gas “IN”and the Black is for the beverage “OUT”.
Next, pressurize the system. To do this, turn the pressure adjustment valve or knob on your regulator
all the way counterclockwise to “zero” pressure. Open the valve on your CO2 tank. The pressure on
the output gauge of your regulator should indicate “0”.
Turn the pressure adjustment knob on the regulator slowly clockwise until the pressure gauge reads
about 15-18 psi (this is the optimum fill pressure but you can play with it to optimize for your
beverage). Never exceed 15 psi for glass growlers!
Listen for any leaks in the CO2 lines to the keg and Fill-Boss® filler. You should hear CO2 filling the
keg, but should not hear any leaking from the quick connects on the CO2 lines. Fix any leaks before
proceeding.
Make certain that the unit is powered up and that the unit is in Auto Fill Mode (default). Setting fill
modes and other parameters is discussed later in this document,.
Press the push-button to start filling. You should hear gas escape from the purge valve for about 2
seconds, then hear the bottle being pressurized. The LCD will indicate purging and compression states.
If you have any gas leaks around the mouth of the bottle by the bottle seal, make certain the bottle is
centered and you have the spring tension set properly. You may need to tighten (clockwise) the
adjustment knob to increase the pressure on the bottle. The proper compression of the bottle is the
minimum required to be leak free.
After compression stage is complete, the filling begins as the liquid flow valve opens. During this
time, the LCD will indicate that it is filling. If you want to stop/interrupt filling, simply press the
button again.
You should see water flowing into the bottle at this point and hear the purge/bleed valve cycling at
regular intervals. This is the valve opening momentarily to let pressure out of the bottle which then
allows more liquid in to replace it.
When the water reaches the fill sensor, the flow of liquid will be stopped, the beeper will beep, and the
LCD will display “Fill Complete”, indicating that the bottle is full.
Press down on the adjustment knob at the top of the Fill-Boss® to remove the compression on the
bottle and remove the bottle by rotating the bottle out from the bottom of the bottle and slide the fill
tube out of the bottle. If all worked well, you are ready to go!
Page 12
Fill-Boss® Operation Manual V3.00
6 - Fill-Boss® Menu Functions
The Fill-Boss® includes a very user friendly LCD based menu system for setting operating parameters
and setting fill modes that were described above. There are many functions included in the firmware of
the Fill-Boss® unit, accessible via the rotary push-button and indicated by the LCD.
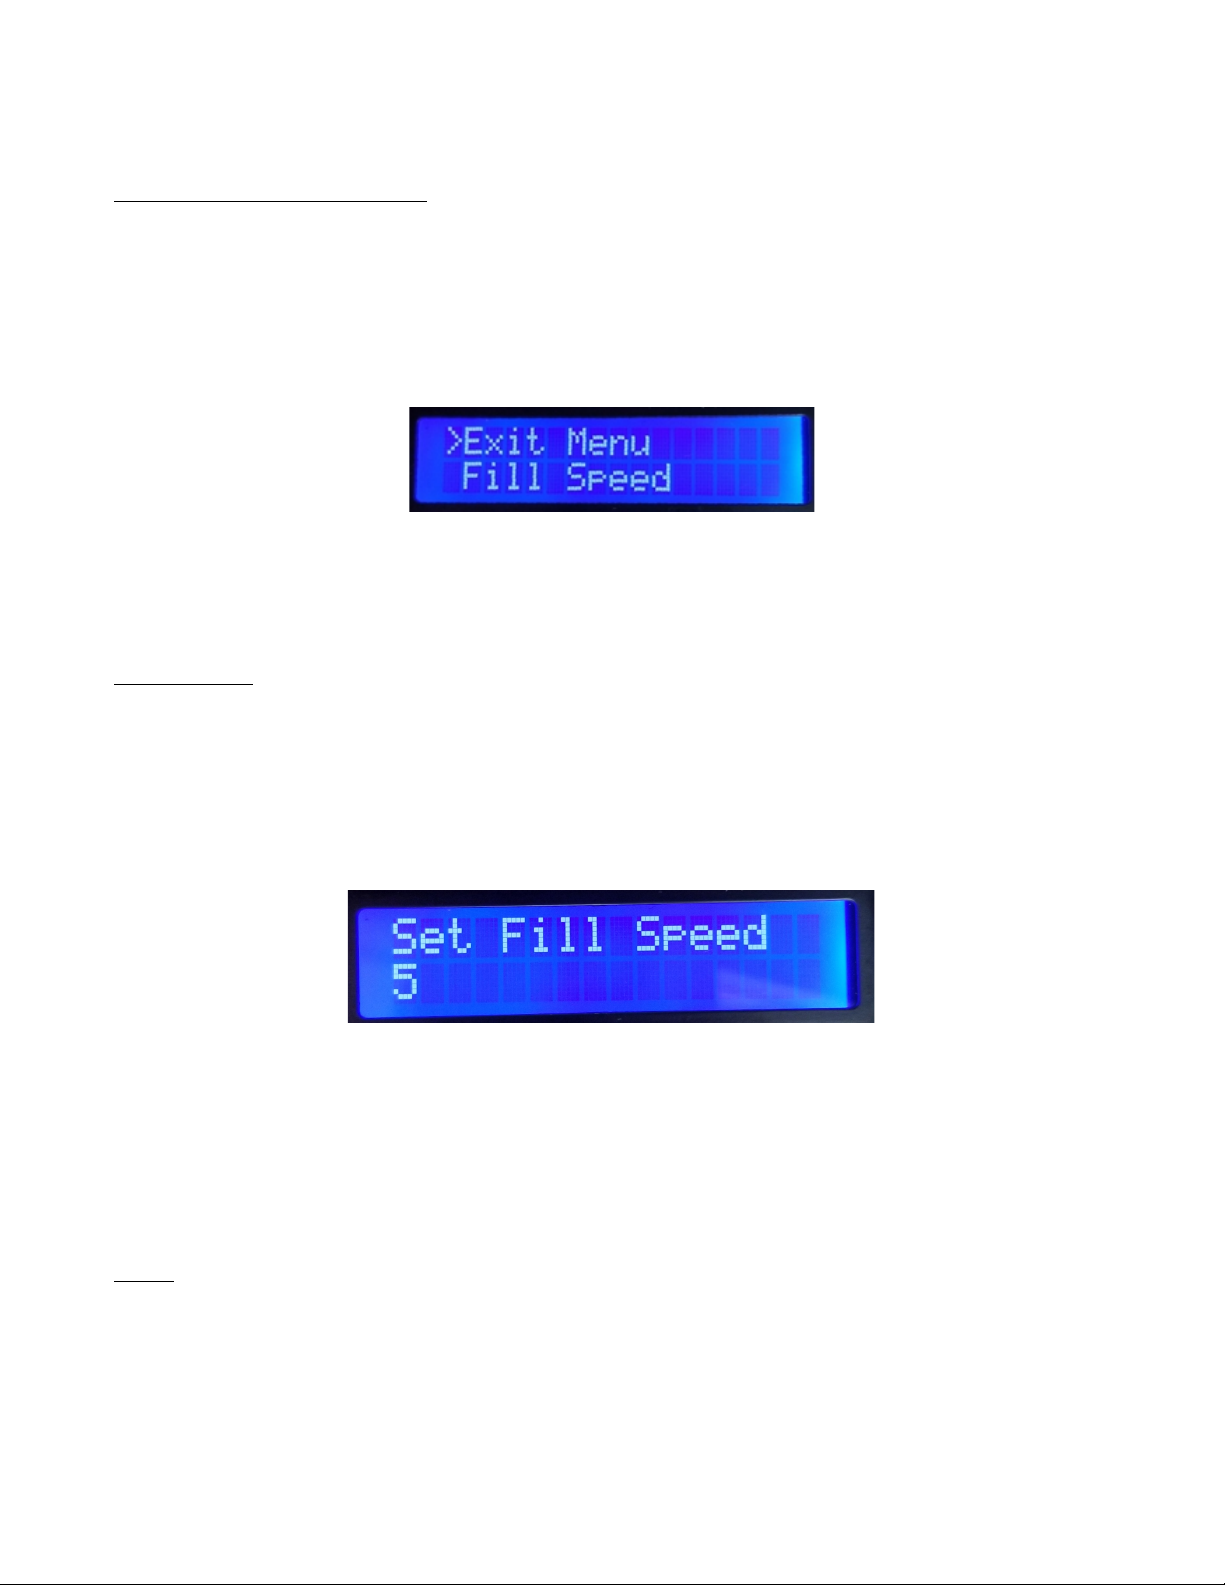
To access the menu functions on the Fill-Boss® , simply depress and hold the button down until the
menu is displayed (approx 3 seconds). You will see the display change and it will look like the
following image.
The “>” character to the left of the menu item indicates the function that will be executed when the
button is depressed. In this case, depressing the button will exit the menu and return the unit to filling
mode. Rotating the knob clockwise will advance down the menu tree and counterclockwise will move
up the menu tree. All menu functions and parameters are described below.
Set Fill Speed
The Fill-Boss® filler has 10 fill speeds ranging from 1 to MAX (10). Fill speed is controlled by the
rate at which the filler opens the bleed valve to release pressure from the bottle. As pressure is released
from the bottle, liquid enters the bottle to replace the missing gas. The faster this occurs, the faster the
fill occurs. You need to set the fill speed to the fastest speed that still prevents excessive foaming
inside the bottle. To set the fill speed, depress the button when the > symbol is positioned to the left of
the Fill Speed menu prompt, The display will change to display the current fill speed as shown here.
Simply rotate the switch to set the desired fill speed 1-MAX and depress the button again to set the
speed. This speed will be retained permanently (even when powered off) until you change it again ore
restore defaults. After setting the new fill speed, the system will exit the menu mode automatically and
return to fill mode. Please note that MAX speed does not use counter pressure filling and simply opens
the bleed valve wide open allowing full beverage flow. Use this setting for filling non carbonated
beverages or beverages that don’t foam.
Clean
The Fill-Boss® filler firmware has a special fill mode that makes cleaning the filler very simple.
After your filling session is completed (or before filling to sanitize), it is important to clean the
Fill-Boss® . As mentioned earlier, it is a good idea to procure a small Cornelius keg to utilize for
sanitizing and cleaning functions.
Page 13
Fill-Boss® Operation Manual V3.00
1. Clean your keg or use a spare empty one.
2. Add about 1/4 gallon very hot tap water to the keg.
3. Connect the keg to the Fill-Boss® .
4. Connect the gas supply to the Fill-Boss®. Please note that you may want to obtain another
regulator and use compressed air for cleaning to save on the expense of CO2.
5. Use a spare bottle and fill it three times with the filler, emptying the bottle each time and
re-using it.
6. Re-install the empty bottle.
7. Empty the overflow container.
8. Start the “Clean Function” by selecting the “Clean” menu option.
9. The filler will automatically fill and empty the bottle multiple times using the hot water in your
keg.
10. Remove the bottle and empty it.
11. Restart the Clean Function and process as above until the keg is empty. Make certain to empty
the catch overflow container as necessary. It is important to perform this function until the keg
is empty to assure you have purged all lines with gas so that no water remains in the system
after cleaning.
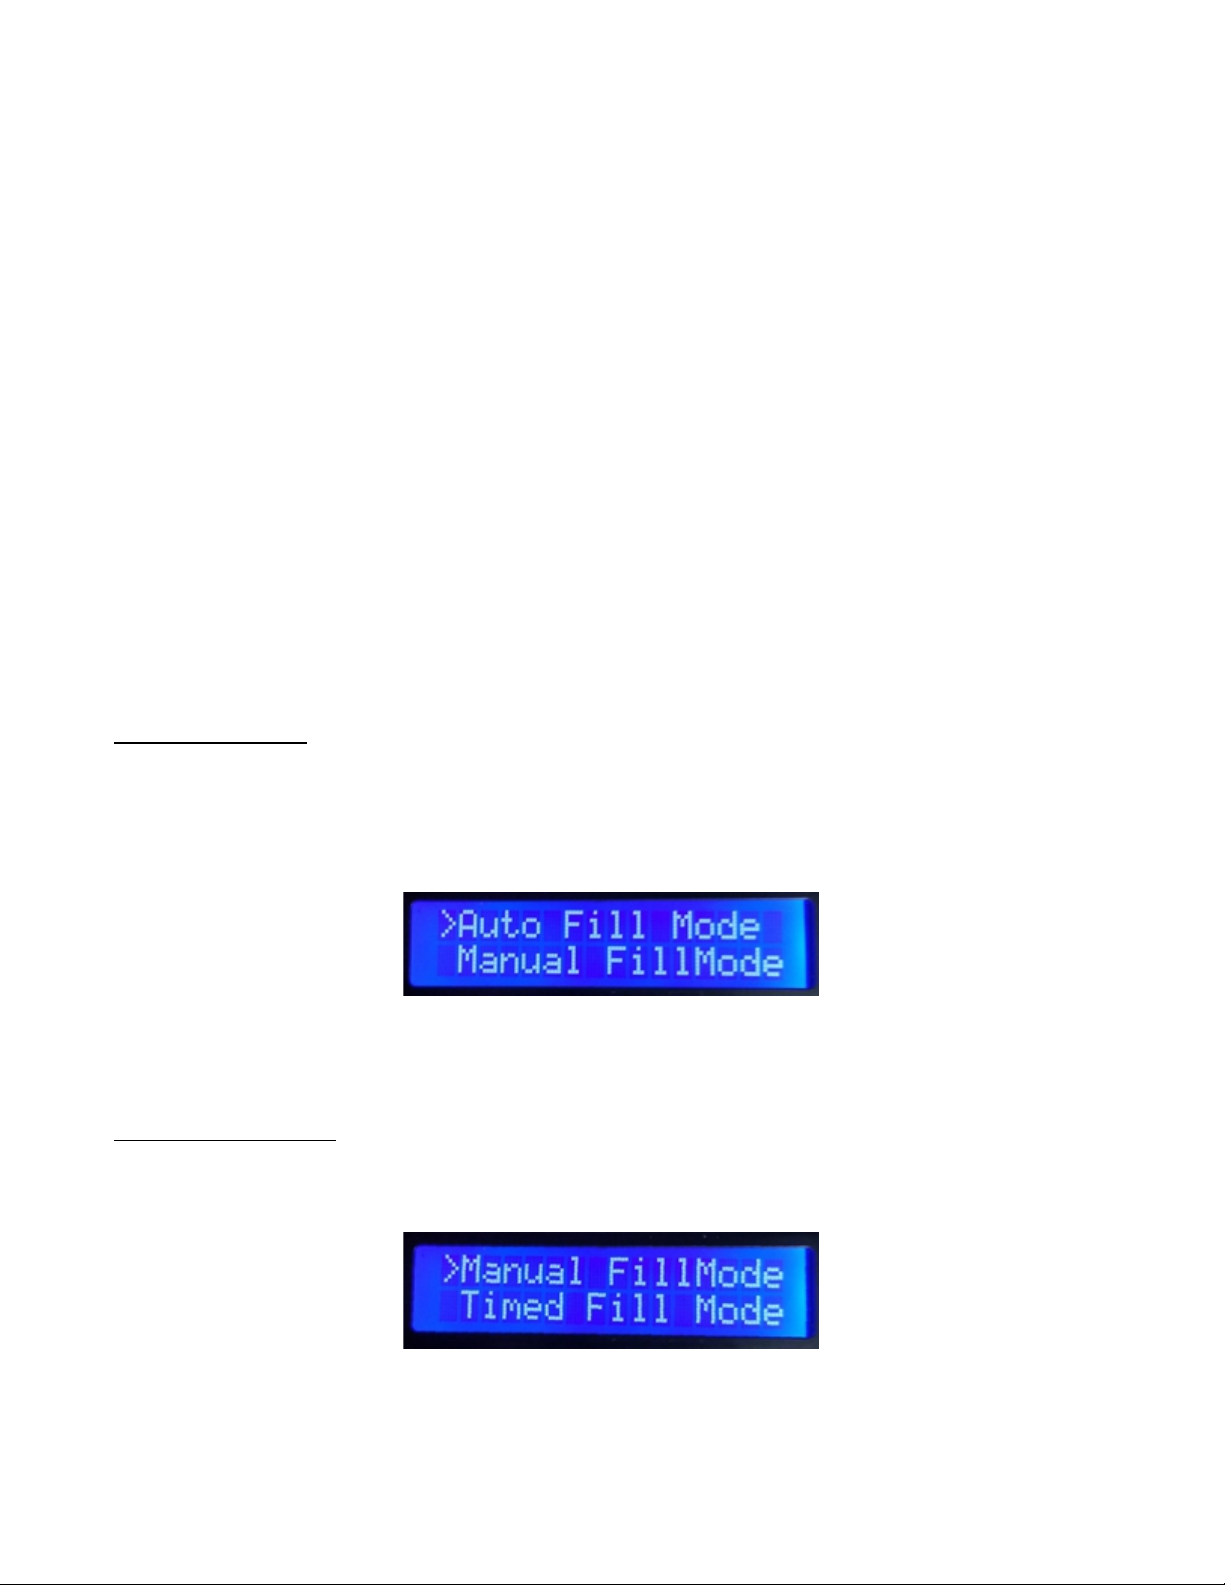
Set Auto Fill Mode
Auto Fill Mode utilizes the fill sensor integrated into the overflow line on the filler. This sensor
determines when gas in the overflow line is replaced by foam or liquid that has reached the top of the
bottle. If you want o use this fill mode, simply enter the menu function and rotate the knob until the
following is displayed.
Depress the button and the filler will be set to Auto Fill Mode and the filler will exit the menu and
return to filling mode.
Set Manual Fill Mode
Manual Fill Mode requires that the user determine when to stop filling If you want o use this fill mode,
simply enter the menu function and rotate the knob until the following is displayed.
Depress the button and the filler will be set to Manual Fill Mode and the filler will exit the menu and
return to filling mode.
Page 14

Fill-Boss® Operation Manual V3.00
Set Timed/Trained Fill Mode
Timed/trained Fill Mode requires that the user determine when to stop filling for the 1st bottle being
filled. If you want o use this fill mode, simply enter the menu function and rotate the knob until the
following is displayed.
Depress the button and the filler will be set to Timed Fill Mode and the filler will exit the menu and
return to filling mode. Please note that after the 1st bottle is trained, the time required to fill the first
bottle will be retained only for the current fill session and will be reset when the Rest Defaults is
selected from the menu or the unit is powered down.
Set Auto Start Time
Auto Start Time is a parameter that the filler uses to create a delay before filling is started after a bottle
is inserted and Auto Bottle Detect mode is active. Once a bottle is inserted, the filler will wait this
amount of time before actually starting to fill. This gives the user the opportunity to abort the fill
quickly should the user have inserted the bottle incorrectly or for any other reason. We recommend this
be set to at least 1 second. To set the auto start time parameter, simply select the menu item and set the
desired time using the rotary switch and then depress the button to store the parameter permanently.
Toggle Beeper
The Fill-Boss® filler has an audible beeper that allows the unit to signal the operator when filling is
complete or their attention is required. If you do not want the beeper to operate, simply select this
menu option and the beeper will be toggled (if it was on, it will be set to off and if it was off it will be
set to on.)
Reset Defaults
The Fill-Boss® filler is shipped with some operational defaults. If you want to restore all settings to
defaults, simply select this menu option in the menu. Defaults are:
Fill Speed = 5
Auto Fill Mode
Auto Start Time = 2 Seconds
Beeper Enabled
Purge Time = 3 Seconds
Compress Time = 2 Seconds
EOF Line Purge = 0 ms
Bleed Off Delay = 1 Second
EOF Bleed Off Time = 0.5 Seconds
FD Offset = 20
Page 15

Fill-Boss® Operation Manual V3.00
Purge Time
Purge time is the amount of time that gas is allowed to flow into the bottle at the beginning of the fill.
The purpose of this step is to force the air out of the bottle and replace it with CO2 or other gas. Since
CO2 is heavier than air and the gas is introduced through the fill tube to the bottom of the bottle, the air
is pushed out of the bottle through the overflow port on the fill head. The default purge time is 3
seconds. This time is optimized for a 12 ounce bottle and should be increased for larger volume
bottles. To set the purge time, simply select it from the menu and set the value in seconds to the desired
purge time. This value is stored permanently and will be retained even when powered off.
Compress Time
Compress time is the amount of time that gas is allowed to flow into the bottle after the purge valve is
closed after purge. This time must be adequate to allow the bottle to get pressurized to the same
pressure as the keg/beverage supply tank. The default compress time is 2 seconds. This time is
optimized for a 12 ounce bottle and should be increased for larger volume bottles. To set the purge
time, simply select it from the menu and set the value in seconds to the desired compress time. This
value is stored permanently and will be retained even when powered off.
EOF Line Purge
EOF Line Purge is short for “End Of Fill Line Purge”. This parameter sets the amount of time that the
filler opens the gas valve at the end of the fill to purge the fill tube that extends to the bottom of the
bottle prior to the bleed off delay described below. Some users like to clear the fill tube of beverage
after the fill is complete so the next bottle does not start out by forcing the leftover beverage in the fill
tube into the bottle during the purge step. With some beverages, the left over beverage that is purged
from the fill tube can create foam that stays in the bottle, affecting fill detect. The default value for this
parameter is 0ms (milliseconds), which basically disables this feature. If you want to purge the fill
tube, select a value from 50 to 100 ms. This value is stored permanently and will be retained even
when powered off.
Bleed-Off Delay
Bleed-Off Delay is a parameter that sets the amount of time that the filler waits after fill is detected
before releasing the pressure in the bottle. This gives the beverage time to settle out by letting bubbles
from the bottom float to the top. This delay minimizes the amount of foam that gets created when
pressure is abruptly released from the bottle in the bleed off step. The goal here is to release enough
pressure so when physically removing the bottle that the contents do not expand so quickly that the
entire bottle foams over. The goal is to have the beverage slowly foam over when removed so that the
cap on foam methodology is incorporated.
EOF Bleed Off Time
The EOF Bleed Off Time parameter sets the amount of time that the Bleed/Overflow valve is opened
after the bottle is filled to release some of the pressure in the bottle. Again, the goal here is to release
enough pressure so when physically removing the bottle that the contents do not expand so quickly that
the entire bottle foams over. The goal is to have the beverage slowly foam over when removed so that
the cap on foam methodology is incorporated. Set this parameter according to your beverage so that a
Page 16

Fill-Boss® Operation Manual V3.00
enough pressure remains in the bottle to create a cap on foam situation.
FD Offset
The FD Offset Parameter is an internal parameter that the filler uses to determine the difference
between gas in the overflow tube and foam or liquid. If the auto fill sensor is not detecting your
beverage, lower this value. If the sensor is over sensitive and is repeatedly sensing fill too early, try
increasing this number. You can use the Show SensorData menu option to help you determine the
proper offset by comparing the value you observe a few seconds after the start of a fill vs the value you
see when you see visible evidence of foam or beverage in the overflow tube. Please note that some
“sticky” (sugary or malty) beverages create too much surface adhesion inside the overflow tube and
simply may not be able to be automatically sensed by the auto fill detection sensor. If that becomes the
case, try the timed or manual modes instead.
Show SensorData
The Show SensorData menu option allows you to see the raw data being reported by the auto fill
sensor. When you select this mode, the display will change to the image shown below. Use this to help
you determine the optimum FD Offset as described above. Please note that you should only enable this
function in Manual Fill Mode and you will not be able to see true sensor readings if the Auto Fill Mode
is enabled. CURR is the current value that the sensor is reporting and the TH is the currently set
threshold or FD Offset as described above. Make note of the CURR value when the overflow tube is
purged and contains only gas, as observed a few seconds after filling is started. Then, when the bottle
fills, make note of the CURR value with foam or liquid in the overflow tube. The FD Offset must be a
number less than the difference between the two values noted above.
To exit this mode, turn the power to the filler off and back on to restart the controller.
Test Valves
The three menu functions “Test Liq Valve”, “Test Purge Valve”, and “Test Gas Valve” are diagnostic
features used to test the valves should you suspect a valve failure. Make certain when using these
menu options that you are prepared for gas and or liquid to be dispensed. Each one of these will open
and close the valve for a short pulse.
Page 17

Fill-Boss® Operation Manual V3.00
7 - Fill-Boss® Operation and Functions
Before a fill session, it is advisable to sanitize the Fill-Boss® . The best method to sanitize the
Fill-Boss® is to add about ¼ gallon of brewery sanitizer (Star San or equiv.) to an empty keg and
install the keg to the Fill-Boss® . Fill 2-3 bottles to properly sanitize the tubing and valves until the keg
empties to assure that you purge all the sanitizer from the filler with gas. Make certain to wash your
hands in sanitizer as well. We recommend a spray bottle with sanitizer be kept near the filler during
operation in the event you touch the fill tube, stopper, etc.
After sanitation, connect the beverage keg or brite tank. We now need to prime the system to validate
beverage flow as well as flush the remaining sanitizer out of the filler. Hold a collection cup so that it
will catch liquid from the fill tube. Press the button to start filling. You will hear gas (CO2) coming
from the fill tube for several seconds followed by liquid flowing from it. Once you get actual beverage
flowing into the collection cup, press the button again to stop the filler. Discard the beverage in the
collection cup as it is contaminated with sanitizer.
Fill Bottle
Operation of the Fill-Boss® is exactly as explained above in Fill-Boss® Testing, just use your favorite
beverage instead of water! Bottles should be sanitized and also must be chilled as much as possible
(40F minimum) to minimize foaming during filling. CO2 gets expelled from liquid suspension when
warmed. Warm bottles will warm the beverage, causing CO2 to be released from the beverage inside
the bottle, causing foaming inside the bottle while filing. After installing a bottle, simply depress the
rotary button to start filling or use the auto bottle detect mode (described earlier) to start filling
automatically. Fill speed can be set in the menu any time the unit is not filling or it can be changed
during a fill (Auto Fill Detect and Manual Modes Only, Not in TIMED MODE) by simply rotating the
rotary switch during the fill. Clockwise increases the fill speed and Counter clockwise decreases the
fill speed. Always fill at the fastest speed you can that minimizes foaming appropriately to get the
proper fill without excessive loss of foam/beverage.
Clean Filler
Immediately after your fill session, clean the filler using the clean function described in detail earlier
with hot tap water only. If you wish to clean with a brewery line cleaner, make certain to finish
cleaning with plain hot water to flush any cleaners out of the lines and valves.
Page 18

Fill-Boss® Operation Manual V3.00
Troubleshooting/Minimizing Foaming
If you have filling issues, please use the Reset Defaults menu function to reset the unit to defaults and
cycle the power on the unit before contacting support. Since every beverage is different, it is important
to try varying fill speeds and pressures to get a proper fill. With a little experimenting, most every
beverage can be filled successfully. In general, the higher the carbonation level of the beverage the
higher the pressure you will need to fill at. If you are getting too much foaming, first try lowering the
fill speed. Alternatively, try raising the pressure. Increasing pressure will increase fill speed as well
but will create a larger pressure release burst (spray) when you remove a bottle, so the goal is to fill at
the lowest pressure you can. Experiment until you get the correct balance of fill speed and pressure. If
you are getting sprayed when removing the bottle, try letting the bottle rest a while before removing it.
We cannot stress enough the need to chill your bottles before filling them! The colder the bottle the
better. We typically fill a sink with water, add Star San at proper dilution for the volume of water and
ice, and then add several pounds of ice to chill the water. We then submerse bottles in the ice water to
sanitize and chill them.
We also recommend the FastWasher device. This simply sets in a sink or cooler filled with an ice water
bath, as described above, and allows you to chill and sanitize 24 bottles at a time. Here is a link to that
product or scan the QR Code.
http://www.fastbrewing.com/fastwasher
For support, contact [email protected]
Page 19

Fill-Boss® Operation Manual V3.00
Page 20


