BRIA YM-8368 User manual
CD/Cassette Boombox
YM-8368
User Manual

Warnings and Precautions
CAUTION:TO PREVENT ELECTRIC SHOCK, ENSURE
TO INSERT 2 PIN PLUG CORRECTLY INTO THE
MATCHING SOCKET OR ADAPTOR.
To reduce the risk of electric shock, do not remove cover(or back).
There are no user-serviceable parts inside. Please refer any
servicing to qualified service personnel.
Do not mix old and new batteries.
DO not mix alkaline, standard(carbon-zinc),or rechargeable (ni-cad,ni-mh,etc) batteries.
NOTE: This equipment has been tested and found to comply with the limits for a class B digital
device, pursuant to part 15 of the FCC Rules.
These limits are designed to provide reasonable protection against harmful interference in a
residential installation. This equipment generates ,uses ,and can radio frequency energy and,
if not installed and used in accordance with the instructions, may cause harmful interference
to radio communications. However, there is no guarantee that interference will not occur in a
particular installation. If this equipment does cause harmful interference to radio or
television reception, which can be determined by turning the turning the equipment off and
on, the user is encouraged to try to correct the interference by one or more of the following
measures:
•Re-position or relocate the receiving antenna.
•Increase the separation between the equipment and receiver.
•Connect the equipment into an outlet on a circuit different form that to which the receiver
is connected.
•Consult the dealer or an experienced radio/TV technician for help.
-1-
WARNING: Changes or modifications to this unit not approved by the party responsible for
compliance could void the user’s authority to operatic the equipment.
WARNING: To prevent fire or shock hazards, do not expose this unit to rain or moisture.
This product utilizes a Class
1 laser to read Compact
Discs. This laser Compact
Disc Player is equipped
with safety switches to
avoid exposure when the
CD door is opened and the
CD player’s lid is damaged.
Invisible laser radiation is
present when the CD
player is open and the
system’s interlock has
failed or has been
damaged. It is very
important that you avoid
direct exposure to the laser
beam at all times. Please
do not attempt to damage
or bypass the safety
switches.
CAUTION: Danger of explosion if battery is incorrectly replaced. Replace only with the
same or equivalent type.
This symbol, located on the
back orbottom of the unit,
is intended to alertthe user to
the presence of
importantoperating and
maintenance
(servicing)instructions in the
literature
Accompanying the appliance.
This symbol ,located on the
back or bottom of the unit,
is intended to
alertthe user
to the presence of uninsulated
“dangerousvoltage“within the
Product’s enclosure that may
constitutea risk of electric
shock to persons.
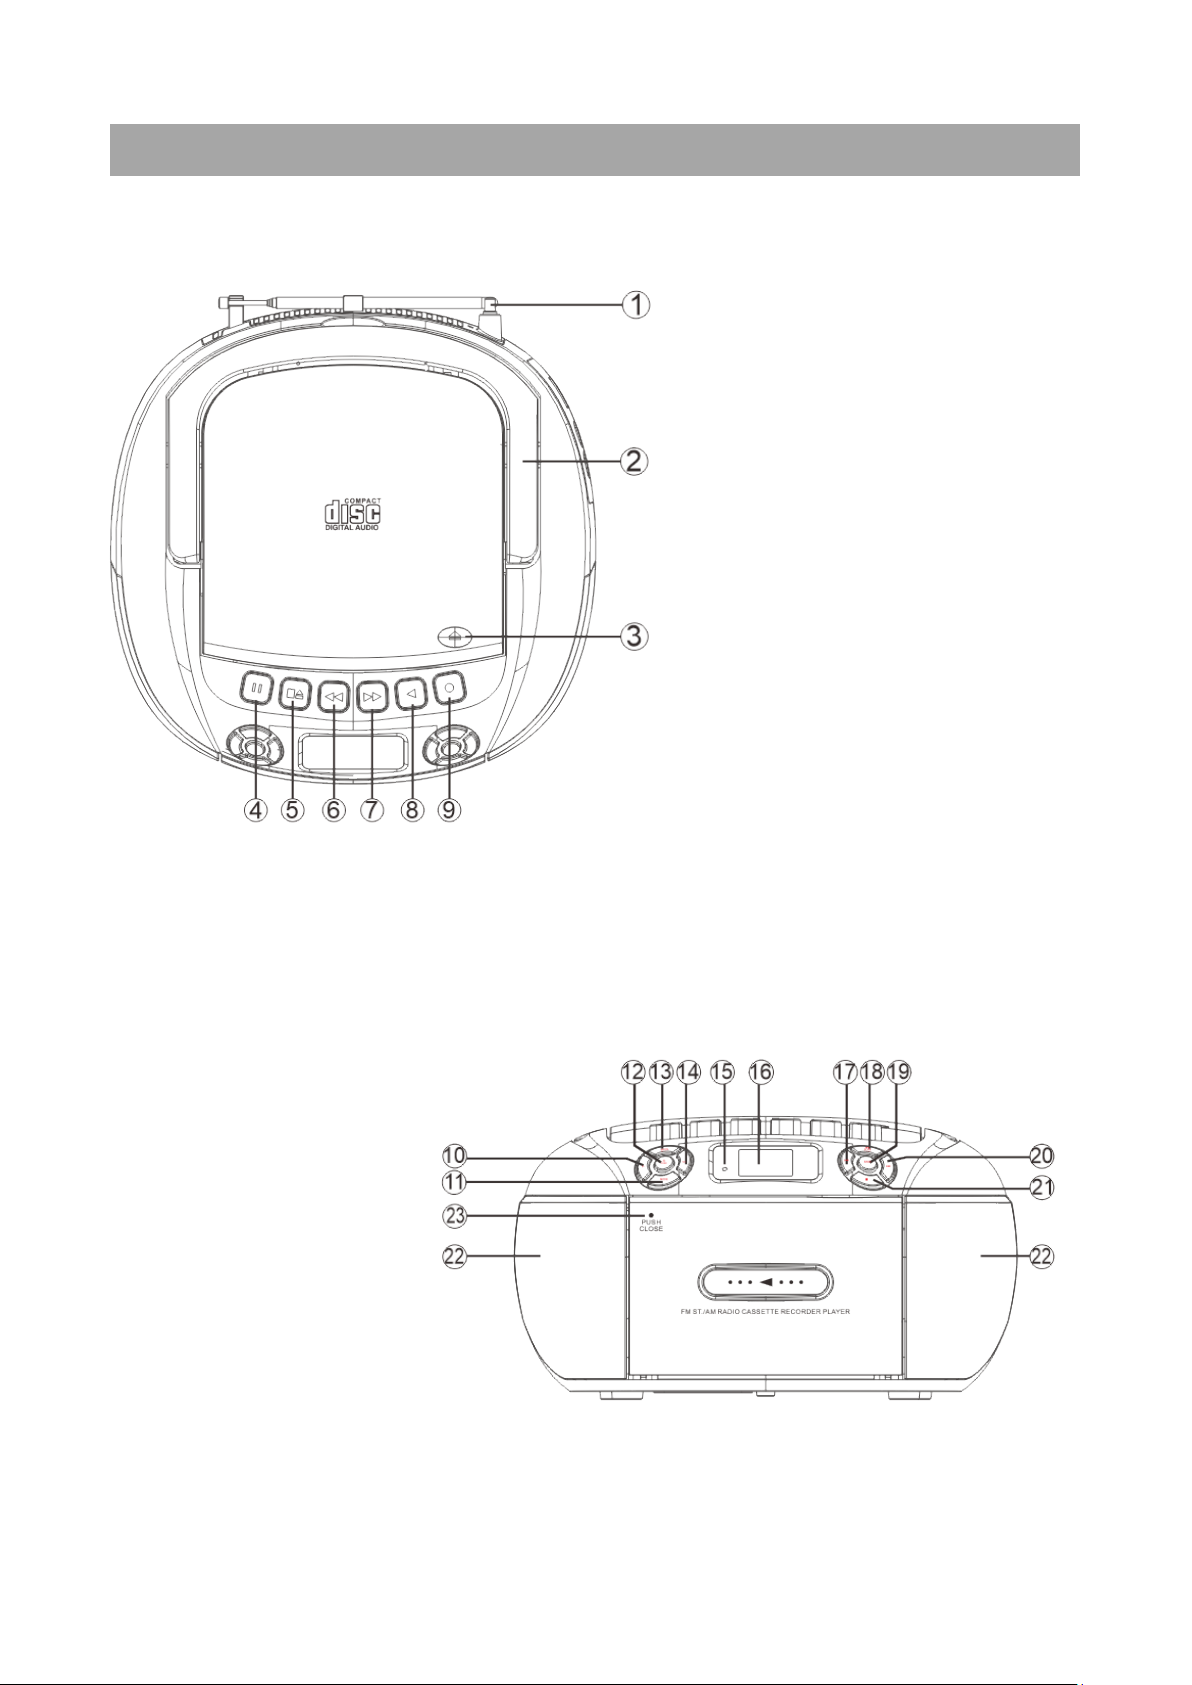
Location Of The Controls
1. FM antenna
2. Handle
3.CD door open/close
4. Cassette stop buttons
5. Cassette stop/EJECT
6. Cassette previous button
7.Cassette forward button
8. Cassette play button
9. Cassette recording button
10. Volume –
11. Playing mode
12. Power ON/OFF/TAEP/RADIO
Function switch button
13. Program
14. Volume +
15. Power indicator
16. LCD display
17. CD rewind
18. Play/pause
19. BAND/FM/AM
frequency switch
20. CD Forward
21. CD Pause
22. Left /right speaker
23. Cassette door open /close
-2-
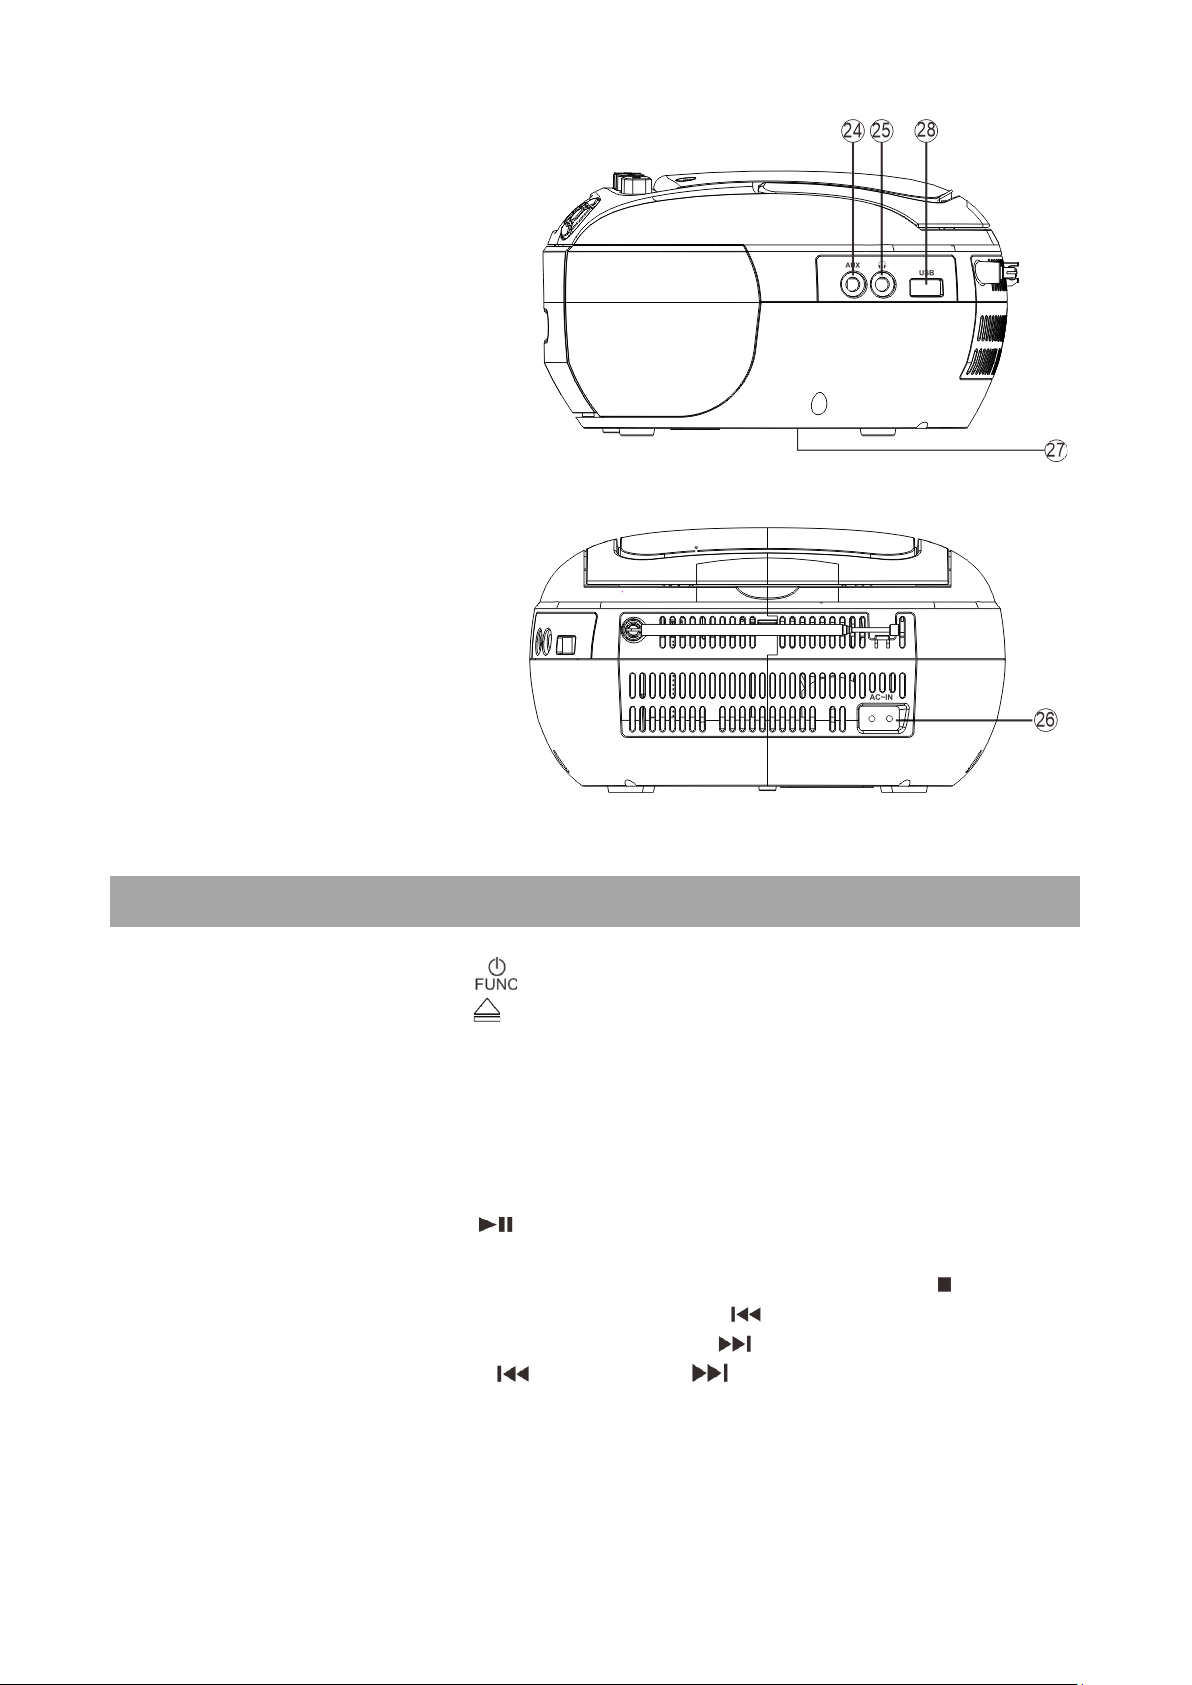
24. AUX jack
25. Earphone jack
26. AC socket
27. Battery door
28. USB port
CD Operation
1.Move the function switch ( ) to CD/MP3 position.
2. Press CD door/off button ( ), open the CD door, insert the disc (label side
up) and close the door.
Several seconds after closing the door, it will automatically play the first
song. The LCD display will show “CD”, “MP3” according to the inserted type
of CD.
3. To adjust Volume button (V-) or (V+) to be your desired level and enjoy the
music.
4. Press the CD play/pause ( ) to stop or pause playback, press again to
resume playback.
5. If you want to stop the playback, just press the CD stop button ( ).
6. During playback, to press the previous button ( ), you can return to
previous songs; And by press forward button () it will move to next songs;
long press previous button ( ) or forward ( ) it will fast
forward/backward.
7. CD Playing mode
A. During CD playing mode, press (MODE) button, it will repeat the current
song, the LCD will show “REPEAT” as in Figure 1.
-3-

B. Press the button a second time, it will repeat the whole disc, the LCD
will show “REPEAT” as in figure 2.
C. when you press the button for the third time, the player will randomly
playback, the LCD will show “RAN” as in figure 4.
D. when you press the button for the fourth time, the player will turn back to
normal playback.
When play the CD -R/CD/RW; MP3
A. During CD playing mode, press (MODE) button, it will repeat the current
song, the LCD will show “REPEAT” as in Figure 1.
B. Pressing the button, a second time, it will repeat the whole disc, the LCD
will show “REPEAT” as in figure 2.
C. Pressing the button for the third time, it will repeat the folder, the LCD will
show “REPEAT FOLDER” as figure 3.
D. when you press the button for the fourth time, the player will turn back to
normal playback.
8. Programming function
1. You can program a desired sequence of your favorite music in stop mode.
2. Pressing the (PROG)button on the unit, the LCD will show “PROG RAM
P01” (see figure 5).
3. You can use the PREVIOUS ( ) or NEXT ( ) button to scroll through
the songs of the CD/MP3.
4. Select the song number of your choice and then press (PROG) again.
5. If you want to program another song then just repeat the above step. (you
can program up to 30 songs from CD or 99songs from MP3).
6.if you are finished with programming, press CD pause button ( ) to star
playing the programmed sequence. The program playback will be
displayed on the LCD as shown figure6.
Radio Operation
1.Set the function button ( ) to radio mode, and press (Band) button to
switch FM or AM as desired.
-4-
2. The LCD will be shown FM or AM with playing stations code.
3. Automatic search; Long press CD play/pause button ( ) to start scan and
save the program, it could save up to P01-P20 programs. press button
(PROG) to find already stored program and press ( ) or ( ) to play the
stored program as desired.
4. Manual search: Long press ( ) or ( ) to select the program as desired,
and it will auto stop by last program.
5. Manual stored station: long pressing (PROG) to save the playing station
and press ( ) or ( ) to choose the station you want to save. And press
(PROG) to back to normal.
6. In radio mode, to clear the stored station, need press and hold the (MODE)
and ( )buttons at the same times, machine restore to the factory settings,
the screen displays "rSt", and Machine will shut down automatically.
7. Pressing volume +(V+) or volume-(V-) to adjust suitable volume.
8. For AM reception, it is recommended to rotate the set for best reception, for
FM reception, extend the antenna fully and rotate to find best possible
reception.
Cassette Operation
A. Playing
1. Pressing function button to TAPE mode;
2. Pressing cassette STOP/EJECT( ) button to open the cassette door and
insert a tape push cassette door to close it. Pressing cassette
play( )button and you can adjust volume +/-(V-)(V+) to obtain the desired
sound level.
3. Pressing cassette pause ( ) button to pause the playback, press it again to
resume the playback.
4. Pressing the cassette fast forward or cassette rewind button( )or( ) to
rapidly advance or rewind the tape.
5. Pressing cassette STOP/EJECT ( )to stop the operation.
6. The music will be stopped by tape is fully finished; if you want to stop the
music during play, you may just refer to stop 5.
B. Recorder
1. Pressing a pre-recorded cassette tape with exposed tape facing upwards,
to press the function button ( )to CD/AM or FM position.
2. If choose CD recording; to put the CD in right way in device and it will play
in few seconds later.
3. If choose radio recording; to put function button( ) to radio position, find
the right station to press cassette play( ) and cassette recording( ),you
can enjoy the music during recording.
-5-
USB Operation
1. Press function button to USB mode, and put USB dock to USB port.
2. Several second after USB dock is inserted, it will automatically play the first
song, the playing time and program will be shown alternately.
3. Press pause button ( ) to pause the music, and playing time will be flash
on the display, press Pause ( ) again to continue playing
4. Press stop button ( ) to stop playing, and total programs will be shown on
display.
5. press the previous button ( ), you can return to previous songs; And by
press forward button ( ) it will move to next songs;
6. Long press previous button ( ) or forward ( ) it will fast
forward/backward the music.
Bluetooth
1.Press the ON/OFF/FUNC( ) key to switch to the Bluetooth mode. When
"bt" flashing, it is waiting for connection. Search for the pairing name:
"BRIA" PB277" to connect;
2. When the pairing successfully, you can hear a "beep" sound, and the
character "bt" light on
3. This time you can select and play the music you want with your device.
4. Press the PLAY/PAUSE/SCAN( ) button to start playing or Pause playing
music
5. Press the button for previous music;
6. Press the button for next music;
7. When switch back to Bluetooth mode from other mode or standby, the unit
will automatically connect back the last connection.
8. Press and hold the PLAY/PAUSE/SCAN( ) button for 2 seconds, the
currently connected Bluetooth device will be disconnected, and the unit is
waiting for connection. At this time, other Bluetooth devices can search for
the device name and connect;
9. While waiting for connection or Bluetooth paused playback, if there is no
device connection or operation within 10 minutes, it will automatically turn
off.
-6-

Specifications
Power AC: ~110V/60Hz 10W
DC: 9V(UM-2*6pcs)
Output power: RMS 1.2 W x2
CD playback frequency: 31.5Hz-16kHz±3dB
CD signal/noise ratio: ≥40dB
CD sampling frequency: 44.1kHz
Frequency range: FM: 87.5-108MHz
AM: 520-1710kHz
Speaker impedance: 8Ω+8Ω
Dimensions: 214.5(L)*215.5(W)*121.5(H)mm
Weight: about1.44kg
The device is not suitable for professional use. In case of professional use, all
warranty obligations of the manufacture will be voided.
Power Supply
1.Battery application:
Push the battery door downward according to the direction show in the
battery door of the product body and open the battery door, insert 6pcs
(Size C) and cover properly the battery door.
2. AC power operation
Insert one end of the AC power cord to the input jack of AC power another
end is plugged into the 110V.
After the player is connected to the (26) power, the unit will be turn on via
Function Switch and indicator will be light on at this time.
Stereo Phone Jack
For private listening, insert a 3.5mm headphone into the phone jack - the
speaker output will be cut off automatically.
Sound Input Operation
The player can play the audio of various sound sources, such as smartphone,
MP3 player etc. Move the function switch ( ) to AUX mode, insert the 3.5mm
jack of the sound source into the AUX (24) input. The unit will automatically
switch to AUX mode and “AU” will be shown on the LCD display.
-7-

Troubleshooting Guide
FCC Statement
Changes ormodifications not expressly approved by the party responsible for
compliance could void the user's authority tooperate the equipment.
This equipment hasbeen tested and found to comply with the limits for a
Class B digital device, pursuant to Part 15 of the FCC Rules. These limits are
designed toprovide reasonable protection against harmful interference in a
residential installation. This equipment generates uses andcan radiate radio
frequency energy and, ifnotinstalled and used inaccordance with the
instructions, may cause harmful interference to radio communications.
However,there isnoguarantee that interference will not occur ina particular
installation. Ifthis equipment does cause harmful interference to radio or
television reception, which can be determined byturning the equipment off
and on, the user isencouraged to try tocorrect the interference byone or
more of the following measures:
-- Reorient or relocate the receiving antenna.
-- Increase the separation between the equipment and receiver.
-- Connect the equipment into an outlet on a circuit different from that to
which the receiver is connected.
-- Consult the dealer oran experienced radio/TV technician for help
This device complies with part 15ofthe FCC rules. Operation issubject to
the following two conditions (1)this device may not cause harmful
interference, and (2) this device must accept anyinterference received,
including interference that may cause undesired operation.
This equipment complies with FCC radiation exposure limits set forth for an
uncontrolled environment. This equipment should be installed and operated
with minimum distance 20cm between the radiator & your body
-8-
Symptom
Possible cause
Solution
No working
-Power cable not in AC
jack correctly
-Put the AC power cable in
correctly way
CD player will
not play
-CD is not loaded properly
-Load CD with label side up
-CD may not be
compatible with the player
-Use better quality blank media
and re-test
-CD door is not put in right
way
-Check the CD door is fully
closed in right way
No sound
from device
-Operate the wrong way
-Check this manual on each
step for it
-Volume at minimum
-Increase volume
Intermittent
sound from
CD player
-Dirty or defective disc or
lens
-Clean or replace the defective
disc or use a clean lens
-Player is subject to
excessive shock or vibration
-Relocate the player away from
shock or vibration.

SAFETY INSTRUCTIONS
READ INSTRUCTIONS: Read all safety and operating instructions prior to
use.
RETAIN INSTRUCTIONS: The safety and operating instructions should be
saved for future reference.
FOLLOW INSTRUCTIONS: All operating and safety instructions should be
followed.
CLEANING: Unplug this product from the wall outlet before cleaning. Do not
use liquid or aerosol cleaners. Use a dry cloth to clean.
WATER AND MOISTURE: To avoid electrocution risk, do not use this product
near water.
STABILITY: Do not place this product on an unstable cart, stand, bracket or
table. The product may fall, causing serious injury to a child or adult, and /or
may damage product.
VENTILATION : Slots and openings in the cabinet are provided for ventilation
and to ensure reliable operation of the product and to avoid overheating. Do
not block vents.
POWER SOURCES: This product should be operated only using the type of
power source indicated on the marking label. If you are not sure of the voltage
of your power supply, consult your power company or product dealer. For
products intended to operate using battery power, check the operating
instructions.
GROUNDING OR POLARIZATION: If this product is equipped with a
polarized alternating-current line plug ( a plug having one blade that is wider
than the other), the plug will only fit into the power outlet one way. This is a
safety feature. If you are unable to fully insert the plug into the power outlet, try
reversing the plug. If this product is equipped with a three wire grounding-type
plug (a plug with a third ( grounding pin ), this plug will only fit into a
grounding-type outlet. If you are unable to insert the plug, contact your
electrician to replace the obsolete outlet. Do not defeat the safety purpose of
the polarized plug.
POWER CORD PROTECTION: Power supply cords should be routed so that
they are not likely to be walked on, tripped over, or pinched by items placed on
or against them, and playing particular attention to the points where the cord
meets the wall plug and where the cord leaves the product.
-9-

OVERLAD PROTECTION: This product is equipped with an overload
protection. This is a safety feature. If replacement of plug is necessary, be
sure that the service technician has used a replacement plug specified by the
manufacturer.
ADDED POWER PROTECTION: For added protection during a lighting storm
or when product is left unused and unattended for some time, be sure to
unplug product from wall outlet.
PRODUCT SERVICE: Do not attempt to service this product yourself, as
opening or removing covers may expose you to dangerous voltage or other
hazards. Refer all service to a qualified technician.
LIMITED WARRANTY
Bria provides a limited warranty of 60 Days for all of its products. Bria
Warrants this product to the original purchaser ONLY, to be free from defects
in materials and workmanship originating from the manufacturer. Bria agrees,
at its discretion during the warranty period, to repair or replace the product if it
is determined to be defective at “no charge”. This warranty does not cover
cosmetic damage, antennas, AC cords, damage due to power surges,
connection to improper voltage supplies, damage caused by leaking batteries,
misuse, mishandling, improper application, acts of GOD, or attempted repair
by an unauthorized service agent.
Products are sold for personal, non-commercial use only. Product is not
warranted for commercial or rental use.
In order to have your merchandise repaired or replaced under warranty. You
must contact Bria’s customer service department at number or email address
below within the warranty period. The customer service department will
provide you with an RMA number (return authorization code) and the street
address for product service / returns.
With the product, you must include the followings:
1 . Proof of purchase, which must have a purchase date which falls within the
warranty period specified in the product manual.
2. All of the accessories that came in the package, as well as the main unit.
3. A detailed description of the problem you are having with the product.
4. All returns must have an RMA Number (an RMA number can be obtained
by contacting customer service)
-10-

The product must be sent in the original packaging, or a reasonable substitute,
to prevent damage. You must include your full name, shipping address, and
telephone number for order reference. No return will ship back to a PO Box.
REPAIR OR REPLACEMENT AS PROVIDED UNDER THIS WARRANTY IS
THE EXCLUSIVE REMEDY OF THE CONSUMER. BRIA SHALL NOT BE
LIABLE FOR INCIDENTAL OR CONSEQUENTIAL DAMAGES FOR BREACH
OF ANY EXPRESS OR IMPLIED WARRANTY OF THIS PRODUCT .
The warranty period of a repaired or replaced unit will be the balance of the
original purchase date.
BRIA CUSTOMER SERVICE
16730 Schoenborn Street Suite B
North Hills Ca 91343
bria.customer.services@gmail.com
-11-
Table of contents


