Brice EFM200A Service manual

It is strictly forbidden to reproduce this instruction manual or any part thereof.
AUTOMATIC MODULAR
ICE-CUBE MAKER WITH VERTICAL
EVAPORATOR SYSTEM
CLEANING AND SANITIZING MANUAL
FOR AUTHORIZED MAINTENANCE PERSONNEL ONLY
24
7
48
re
v. 04

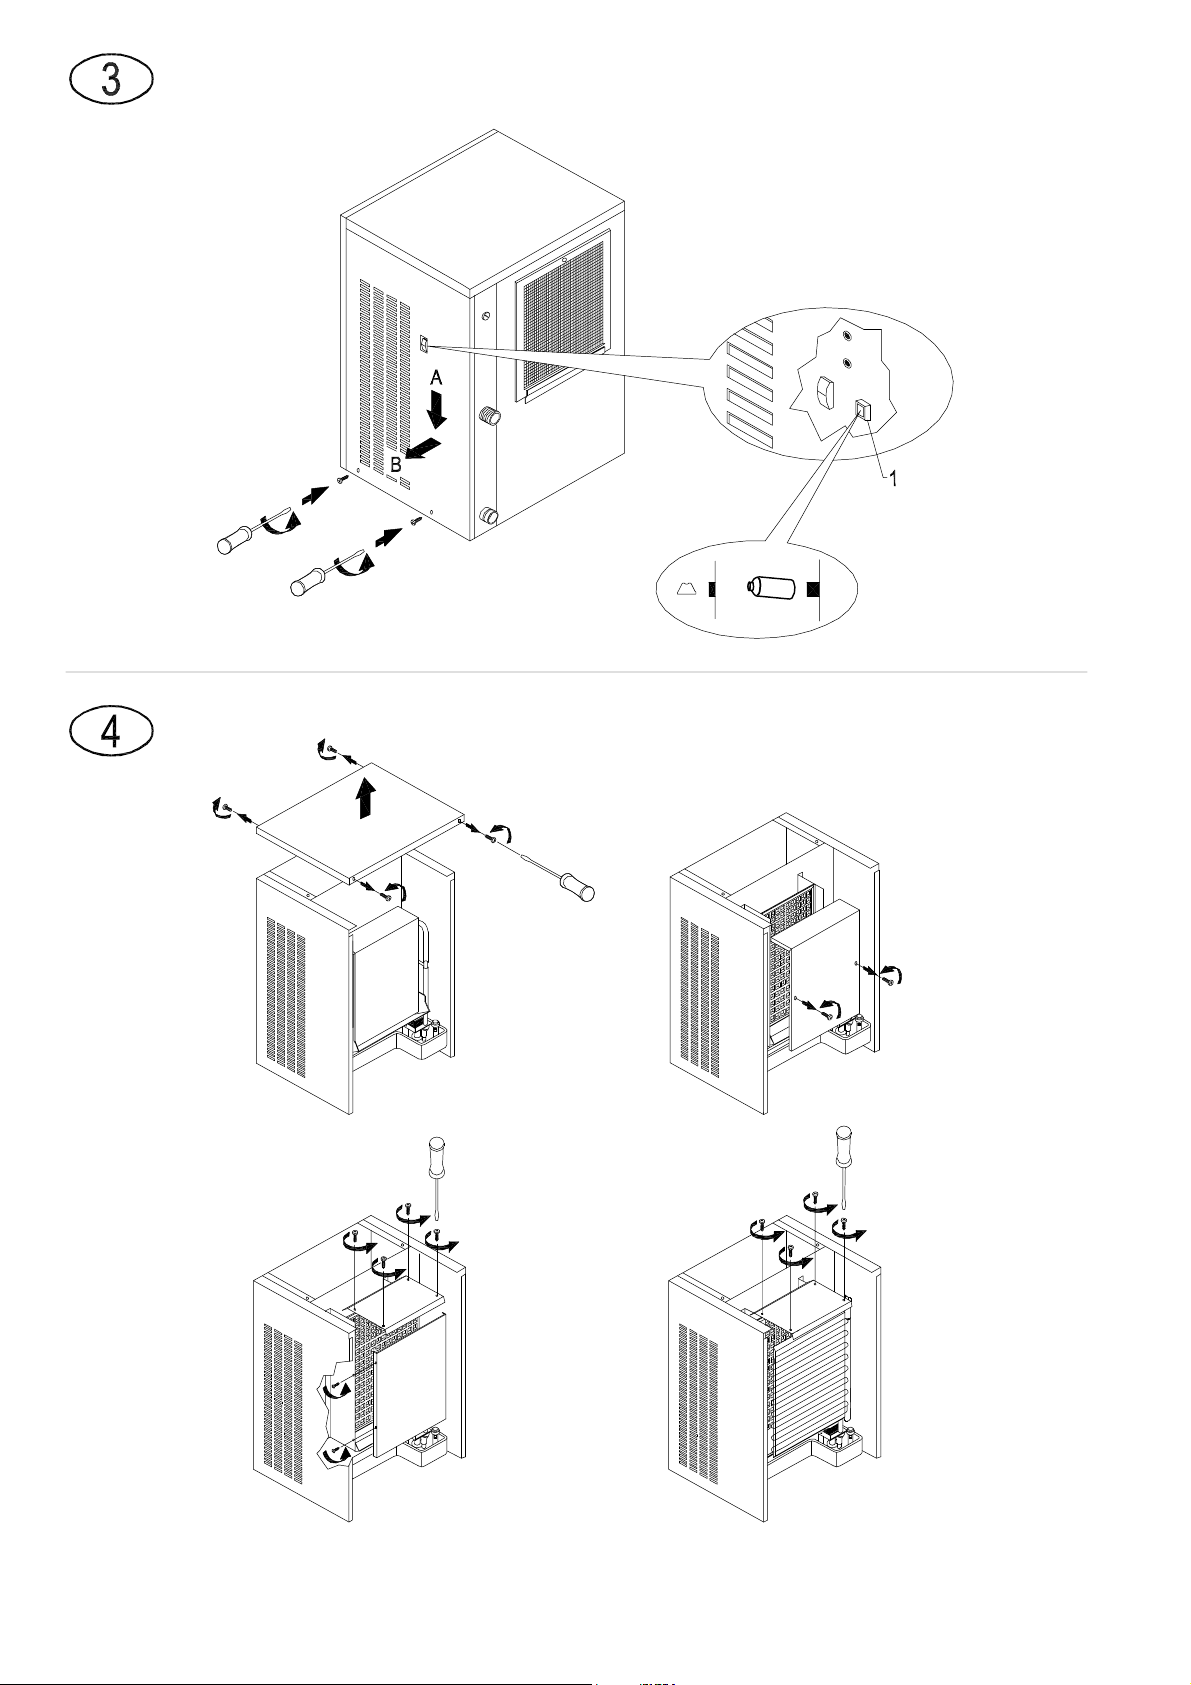


TABLE OF CONTENTS
1 RECOMMENDATIONS
2 CLEANING
3 SANITIZING
4 NOTE FOR MODEL WITH DAILY PRODUCTION OF 750 kg
The figures in this manual are of a general nature. Some details may therefore differ,
depending on the specific model.
The Manufacturer declines all liability for any inaccuracies in this cleaning and sanitizing
manual due to printing or transcription errors. The Manufacturer also reserves the right to
make any modifications to the products that may be necessary or useful, also in the interest
of the user, without impairing the products’ essential features of functionality and safety.

1 RECOMMENDATIONS
This cleaning and sanitizing manual forms an integral part of the automatic modular ice-cube
maker with vertical evaporator system (also more simply called “appliance” in the text) and must
be kept for possible future consultation
In the event of the appliance being sold or transferred to another person, this manual must be
handed over to the new user, in order to enable him to become familiar with the operation of the
equipment and the corresponding advice and recommendations
This cleaning and sanitizing manual does not replace the instruction book supplied with the ice
maker, which should be referred to for all subjects not covered by this manual; in particular,
please refer to the instruction book for the start-up procedure, connection of the appliance to the
electricity mains and water supply, and cleaning of components not expressly mentioned in the
cleaning and sanitizing manual
The frequency of cleaning and sanitizing operations can vary, depending on:
• temperature and environmental conditions
• temperature and quality of water (hardness, presence of grit, etc )
• quantity of ice produced, or time of use of ice-cube maker
• periods of non-use of ice-cube maker
TO ENSURE CORRECT CLEANING AND SANITIZING OF THE ICE-CUBE MAKER, PERFORM
THE OPERATIONS DESCRIBED IN THIS MANUAL AT LEAST ONCE A MONTH
‼
IMPORTANT
• the operations described in this manual must only be performed by skilled, authorized personnel
• the appliance must be installed in a hygienically clean location; avoid premises such as cellars
and storerooms, because poor hygiene promotes the formation and proliferation of bacteria in
the ice-cube maker
• a cleaning and sanitizing kit specifically designed for this appliance is available from your dealer
• do not use corrosive substances to remove limestone from the appliance, because this will
invalidate the guarantee, and may cause serious damage to the materials and components of
the appliance
• gloves suitable to protect against cuts must be worn when performing all operations involving
handling of sheet metal parts in particular
• gloves suitable to protect the skin against the substances used must be worn when performing
all cleaning and sanitizing operations
• wear suitable goggles during cleaning and sanitizing operations to protect the eyes against
splashes of the substances used
• take care not to spill water or solutions on the wiring or the power cable
2 CLEANING
1 wait for ice cubes to drop, switch off appliance with luminous switch, disconnect from mains
power supply, and remove front panel by loosening fixing screws (Fig 1)
2 remove overflow pipe (Fig 2) to drain water in basin
3 reposition overflow pipe and fill basin with a 25% solution of water and white vinegar Refer to
the table for the amount of solution required, depending on daily output (Fig 2)
4 reposition front panel
5 remove right-hand side panel by removing lower screws and extracting it from its seating (Fig 3)
6 press washing pushbutton (1 in Fig 3) and reposition right-hand side panel
7 connect appliance to mains power supply and switch on with luminous switch
8 operate appliance for at least 20 minutes
9 switch off appliance and disconnect from mains power supply
10 remove front panel (Fig 1), top and evaporator cover panel (Fig 4)
11 clean both sides of evaporator with water and vinegar solution, using a stiff brush and a brush
with soft bristles (Fig 5)

12 pour plenty of cold water onto the evaporator and direct the sediment removed into the basin
beneath with the aid of the brush
During cleaning of the evaporator, take care:
• not to bend coils
• not to detach the water supply pipes
• not to remove the evaporator thermostat
13 remove (Fig 6) and clean with ordinary washing-up liquid:
• overflow pipe (Fig 2)
• ice-cube chute (2)
• sprayer bank (3), taking care to remove side caps (4)
• sprayer bank feed pipes (5)
14 clean with the same washing-up liquid, removing any sediment with a non-abrasive sponge:
• evaporator cover panel
• basin
• tilting panel (7 in Fig 6)
15 rinse and refit (Fig 6):
• sprayer bank feed pipes (5)
• sprayer bank (3), after repositioning side caps (4)
• overflow pipe (Fig 2)
• ice-cube chute (2)
• evaporator cover panel (Fig 4)
16 prepare to perform the sanitizing operations described in the next chapter
3 SANITIZING
Use a 200 mg/l solution of sodium hypochlorite and water (or a solution of ½ ounce of normal
bleach to 1 gallon of water), or one of the solutions commonly used to disinfect babies' feeding
bottles; in this case, check that the sanitizing product is:
• authorized by your country's Ministry of Health
• suitable for use with food-making machinery
• not harmful to the materials and components of this appliance
For the directions for use and concentrations, please refer to those shown on the packaging and
recommended by the manufacturer We recommend using the solution at the temperature of 25°C
1 fill basin with sanitizing solution Refer to the table for the amount of solution required,
depending on daily output (Fig 2)
2 reposition front panel
‼
Before connecting the appliance to the mains power supply, ensure that all cables and
electrical wiring are perfectly dry.
3 connect appliance to mains power supply and switch on with luminous switch
4 operate appliance for at least 20 minutes
5 switch off appliance and disconnect from mains power supply
6 remove front panel (Fig 1), top, and evaporator cover panel (Fig 4)
7 remove (Fig 6) and immerse in sanitizing solution for 30 minutes:
• overflow pipe (Fig 2)
• ice-cube chute (2)
• sprayer bank (3) and side caps (4), after removing them from the bank
• sprayer bank feed pipes (5)
• evaporator cover panel (Fig 4)
8 pour sanitizing solution onto both sides of the evaporator (Fig 5) and tilting panel (7 in Fig 6)
and distribute with a stiff brush and a brush with soft bristles
9 thoroughly rinse evaporator, tilting panel and inner basin by pouring plenty of cold water over
them

10 thoroughly rinse ice-cube chute, evaporator cover panel, sprayer bank and the corresponding
side caps, overflow pipe and sprayer bank feed pipes under running water
11 refit parts previously removed
12 reposition front panel of appliance and secure with screws
13 reposition top and secure with screws
14 remove right-hand side panel by removing lower screws and extracting it from its seating (Fig 3)
15 press washing pushbutton (1 in Fig 3) and refit right-hand side panel by tightening fixing
screws
The ice-cube maker can now be reactivated as specified in the instruction book
‼
IMPORTANT All the ice produced during the first five cycles after cleaning and
sanitizing operations must be discarded.
When the appliance is cleaned and sanitized, its bin must also be cleaned and sanitized.
THE FOLLOWING ADDITIONAL OPERATIONS ARE REQUIRED FOR SOME PARTICULAR
MODELS:
4 MODEL WITH DAILY PRODUCTION OF 750 kg
To access the washing pushbutton (1), remove the front right-hand panel located above the
condenser (Fig 7)
To access the evaporators, remove the front left-hand and rear left-hand panels by unscrewing
the fixing screws and lifting them to release them; then remove the left-hand part of the top by
lifting it from the framework of the appliance (Fig 8)
Repeat the operations described in chapters 2 and 3 on the front and rear evaporators
At the end of the cleaning and sanitizing operations on the appliance, reposition the panels
previously removed, and tighten the fixing screws
This manual suits for next models
1
Popular Ice Maker manuals by other brands


Ice-O-Matic
Ice-O-Matic ICE2106 Series Specification sheet

Hoshizaki
Hoshizaki KM-1601SAH instruction manual

AGA marvel
AGA marvel MA15CRC Installation, operation and maintenance instructions

Hoshizaki
Hoshizaki AM-50BAE parts list

Cornelius
Cornelius ED150 "K" Style Lid Kit installation instructions

Frigidaire
Frigidaire FXIC151-SS use & care