BRIFIELD BR1 User manual

BRIFIELD®
BR1 BODY CAMERA
USER MANUAL
Customer Service Email
info@brifield.co.uk

CONTENTS
Page 1: BR1 Diagram
Page 2/ 3/ 4: BR1 Diagram
explanation.
Page 5: Screen functions / Menu
functions
Page 6/ 7/ 8/ 9: Menu functions
Page 9/ 10 / 11 /12:Important
information
Page 12:Product box contents /
Customer service

1

2
BR1 DIAGRAM EXPLANATION
1. Lens: Capture Video and images. The lens is
also what triggers the motion detection.
2. Sensor: Detects low and high light levels, this is
what triggers the automatic IR night vision.
3. Infrared night vision lights: Gives a white
vision that helps in very low light areas, or
nighttime.
4. White LED light: Helps in low light areas.
5. Left button: A. In idle mode, press to access the
playback mode. B. When recording a video, hold
this button to zoom the picture out. C. In playback
mode, press to rewind the video. D. In menu mode,
press to scroll up.
6. Middle button: A. In menu mode, press to select.
B. In playback mode, press to pause/resume video
or audio playback.
7. Right button: A. In idle mode, press to enter
menu mode. B. In menu mode, press to scroll down.
C. In playback mode, press to fast forward the

3
video. D. In playback mode, hold to zoom in the
image.
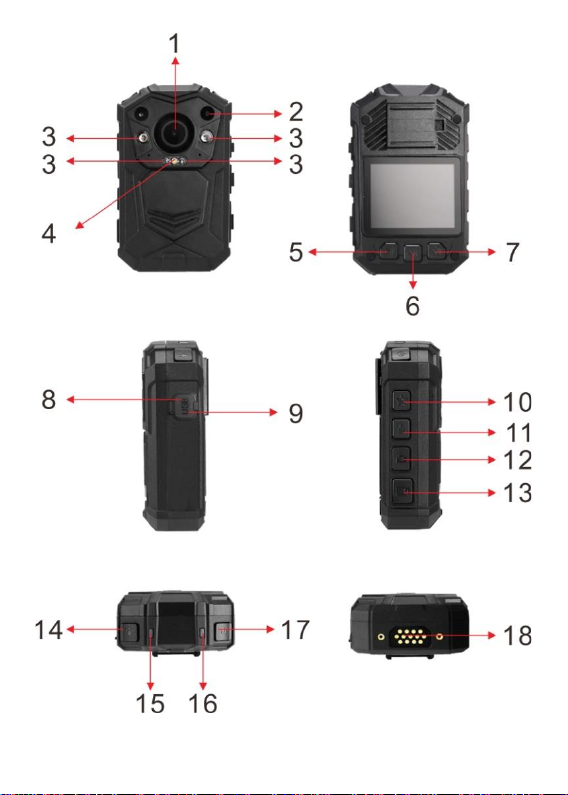
8. USB port: Connect the BR1 USB cable to your
computer, from there you can transfer your
recorded video and audio files, and pictures to the
computer.
9. Reset button: Used to reset the device.
10. Important file button: When recording a video
or an audio recording, press this button once. This
will then add a STAR icon on the video or audio file
in playback mode. This will also add a S letter at the
end of the file name on your computer. This helps
to easily identify the more important video and
audio files.
11. Audio record button: A. In idle mode, press to
start an audio recording. B. When recording a video,
press to mute/unmute the microphone. C. In idle
mode, hold for 2 seconds to switch between 720p
and 1080p video resolutions.
12. Picture button: A. In idle mode, press to take a
picture. B. In idle mode, hold for 2 seconds to turn
on flashing white LED light. C. While recording a
video, press to take a picture.

4
13. Video record button: A. In idle mode, press
once to start a video recording. B. When the device
is switched off, hold for 3 seconds to power on the
device, and start a video recording immediately.
14. IR Light / White LED light button: A. In both
idle mode and while video recording, press to turn
on/off the IR night vision lights. B. In both idle mode
and while recording a video, hold for 2 seconds to
turn on/off the white LED light.
15. Left LED light: A. Flat GREEN when idle. B.
Flashing RED when recording a video. C.
Temporary flat RED when a picture is taken in idle
mode. D. Flashing AMBER light when recording an
audio recording. E. Flat RED when pre-record is
turned on.
16. Right LED light: A. Flat RED when charging. B.
Flat GREEN when fully charged.
17. Power button: A. Hold for 3 seconds to switch
the device on/off. B. In the menu, press to exit the
menu. C. Press to turn the LCD screen on/off.
18. Dock charging: Used to charge the BR1 body
camera via the dock charging unit.

5
SCREEN FUNCTIONS
MENU FUNCTIONS
Use left button number 5 to go up. Right button
number 7 to go down. Middle button number 6 to
select. Button number 17 to go back, also known as
the top right power button.
Video Resolutions - Change the video resolutions.
Picture Megapixel - Change the Megapixel of the
camera.

6
Burst: for example, if you select 5 bursts, then
when you take a picture, 5 pictures will be taken
one after the other.
Self-timer: This gives you a countdown, when the
countdown reaches 0 then a picture will be taken.
Quality: The quality of the video recordings.
Pre-record: This feature will pre-record a short clip
before you press the record button, it will then
integrate itself into the main recording. The pre-
record clip length with each resolution - 1440p = 22
Seconds. 1296p = 30 Seconds. 1080p = 30
Seconds. 720p = 30 Seconds. 480p = 30 Seconds.
Post record: The amount of time the device waits
until it stops the video recording.
Auto record: When activated, it will automatically
start a video recording when the device is turned
on.
Loop recording: When the memory card becomes
full, the loop feature will automatically override the
earliest recording then continue to record over the
following recorded videos.
Split time: This is how long you want the video
clips to be.

7
Slide show: This allows a slideshow within the
internal picture playback mode. Changes picture
every 5 seconds.
Infrared: Manual Mode lets you turn the IR on and
off yourself manually, and auto mode activates the
IR automatically when the view in front of the lens is
dark and deactivates when the view is light.
Motion Detection: Turn on/off. You will know the
motion detection is activated because there will
now be a face icon on the LCD screen. Once the
motion detection is turned on from within the menu,
press the record button. Now any motion in front of
the lens will trigger the device to start a video
recording. The device will continue to record, but
when there is no longer any motion in front of the
lens, there is a 10 second countdown. After the 10
seconds, the video will stop recording.
Record warning: When turned on, the device says
‘’Recording start’’ and ‘’Recording stop’’. When
deactivated, no sound will happen.
Global positioning: Turn the GPS on/off.
Time zone: Select your time zone.

8
Language: Select your language.
Screen saver: The amount of time the screen will
stay on until the LCD screen turns off.
LCD Brightness: Option of Low/Medium/High.
Auto Power off: The amount of time the device will
remain idle before powering off.
LED light: Option to turn the 2 LED lights
permanently off.
White LED: Turn off the white LED light.
Key tone: Turn the key tone on/off.
Volume: Change the volume of camera speaker.
This affects the loudness of video playback, audio
playback, the key tone, record warning, and any
other sounds played by camera. This doesn't affect
the volume of the recorded video or audio files
themselves.
Coding Format: Select whether you would like to
use H.264 or H.265 coding.
Time and date: Adjust the time and date.

9
ID Setting: Change the user ID. Use the left and
right keys to change the letter or number and use
the middle key to select and move onto the next
character.
Password: Turn the password on/off.
Change password: Use the left and right buttons
to change character and use the middle button to
select and move onto the next character.
Default setting: This will reset the internal settings
back to the default settings.
Version of the device: The version of the current
device.

10
IMPORTANT INFORMATION
Memory Card (MAC users only): The only way to
completely delete your recorded files and free up
your memory from your BR1 body camera, is to
empty your trash bin on your MAC. If you do not do
this, then eventually the memory card will become
full, and when it’s full you won’t be able to record
any new footage.
The clips and attachment studs rotate 360
degrees: The crocodile clip, epaulette clip, chest
harness and shoulder harness attachment studs,
and the KlickFast stud ALL turn 360 degrees. Slot
the stud or clip into the back of the BR3 then turn
the clip or stud to a vertical position. Or you can slot
the clips and studs into the back of the body
camera, then attach the body camera to the chest
or shoulder harness or KlickFast dock, then turn the
body camera itself vertically.
How to unlock the KlickFast stud from the dock:
To make it easier, firstly remove the BR1 body
camera from the stud piece, then turn the stud
piece itself 180 degrees (Upside down) then pull
the piece out. Please do not be afraid to use some

11
force while turning the stud piece; the stud piece is
a sturdy attachment.
Transfer files to PC: Plug the USB lead into the
computer. Enter the password. Find the drive file on
the computer. Once you are in the file, click into the
DCIM file. From there you can access all the
recorded files. Drag the files from the DCIM files to
your computer.
Change password: Access the change password
within the menu, enter your old password (Left key
to go up, and right key to go down, middle key to
select and move on to the next one. The default
password is 000000) Now enter the new password.
Then enter your new password again to confirm it.
Change user ID: Select ID setting from the menu.
Use left key to go up, use right key to go down, use
middle key to select and move on to the next
character.
Reset device: To reset the device, use a small
needle to jab the reset button. The reset button is
located next to the USB port.
Playback recorded files on the device: Press the
left button, button 5. Then enter your password.
Press the left button to go left, right button to go
right, middle button to select. Press the star button,
button 10 to change between file types.

12
Computer playback app: There are many different
video playback apps online. You will need to
download one to playback the video and audio files
from this device. Or your computer might already
have one pre-installed.
Delete files: You can only delete the recorded files
from a computer. This is to stop people from getting
rid of the evidence straight from the device itself. To
delete the files from your computer, right click, then
delete them.
H.264 and H.265 video coding: H.265 coding
uses far less memory and has better video
compression than H.264. But it uses slightly more
battery power than H.264. If you want more
information on H.265 there are many articles online,
alternatively email us at [email protected].uk
GPS: To activate the GPS, turn it on from within the
menu. You can only connect to the GPS outside,
not inside. Once the GPS is turned on, and your
stood outside, it will take a couple minutes to
connect. Once the GPS has connected, the
coordinates will be live, then you can start
recording your video. The coordinates will then
screen stamp on that video.

13
128GB Memory card: There is a 128GB memory
card built into this device, you cannot remove this
card. Please be aware that the internal settings do
take up some memory space, so if you see that the
memory card is not quite 128GB then do not worry,
this is normal.
Product warranty: We offer a 12-month warranty
on the Brifield BR1 body camera. This warranty
covers faults that was caused by the manufacturer.
If the fault was caused by the buyer, then the
warranty will be void.
BR1 USB Lead: Please only use the USB lead
provided in the product box. Using other USB leads
might cause damage to the BR1 body camera.
IP65 Water rating: Please note that the BR1 body
camera is not fully waterproof. Do not submerge it
into water. IP65 is the rating of the BR1 body
camera, this is resistant to weather and dust. Rain
will not damage the BR1.

14
PRODUCT BOX CONTENTS
1 X BR1 BODY CAMERA
1 X USER MANUAL
1 X USB LEAD
1 X UK 3 PIN PLUG
1 X EPAULETTE CLIP
1 X CROCODILE CLIP
1 X CHARGING DOCK
1 X CHEST HARNESS
1 X SHOULDER HARNESS
1 X KLICKFAST STUD
1 X KLICKFAST DOCK
CUSTOMER SERVICE
If you have any questions at all then please feel
free to email us.
We guarantee a reply to your email within 12 hours.
We will do our absolute best to help you with all
your questions and any technical problems.
Email address: info@brifield.co.uk

BRIFIELD®
BR1 BODY CAMERA
USER MANUAL
Customer Service Email
info@brifield.co.uk
Table of contents
Popular Accessories manuals by other brands

Xiaomi
Xiaomi Aqara quick start guide

Dometic
Dometic TRIM LINE 9472 010 Series installation instructions

Somogyi
Somogyi home CO 05 LCD instruction manual

Honeywell
Honeywell C7600A Product data

American DJ
American DJ EURO FOG JUICE Material safety data sheet

Chase Research
Chase Research CC4 Operating instruction