brigele DR 2100 User manual

Dashboard camera
DR 2100
User Manual
Before installing and operating this device, please carefully
read through this entire User Manual.
Please retain this User Manual for future reference.
f you ever pass this device to someone, please also give this
User Manual along with the device.
For more information, please visit http://www.brigele.com/support/

2
Read th s rst
This device is intended to be installed in a vehicle. Always obey all federal, state
and local traffic laws and regulations. t is driver’s responsibility to know all
applicable laws.
Driver should only operate the device’s controls or adjust its position when the
vehicle is stationary. While the vehicle is moving, only vehicle passengers may
operate the device, provided they do not obscure driver’s view of the road and
they do not interfere with the driver’s access to vehicle controls.
Carefully select a safe location to install the device and its cables, so it does not
obscure driver’s view of the road, prevent or limit operation of vehicle controls.
Take a note that although Brigele did its best to provide you with reliable mount,
the device may detach during driving because of vibrations and temperature
changes. This is normal for suction cup and adhesive tape mounts, and is not a
defect. When mounting the device, make sure it won’t damage the vehicle or
injure vehicle occupants due to falling off. You assume responsibility for damages
to the vehicle and its occupants resulting from the device falling off.
f you are unsure about safe location for the device or its cables, consult with your
mechanic or vehicle dealer.
WAR I G:
Never place the device, the cables or mounts in the area of airbag deployment.
Specically, if the vehicle is equipped with side curtain airbags, never place the
cable under A-pillar headliner on the side facing the door. Deploying airbag
may force the device to detach with a great speed, possibly causing severe
injures to vehicle occupants.
SIDE
CURTAIN
AIRBAG
BANG!
SIDE
CURTAIN
AIRBAG
SIDE
CURTAIN
AIRBAG
WRONG!

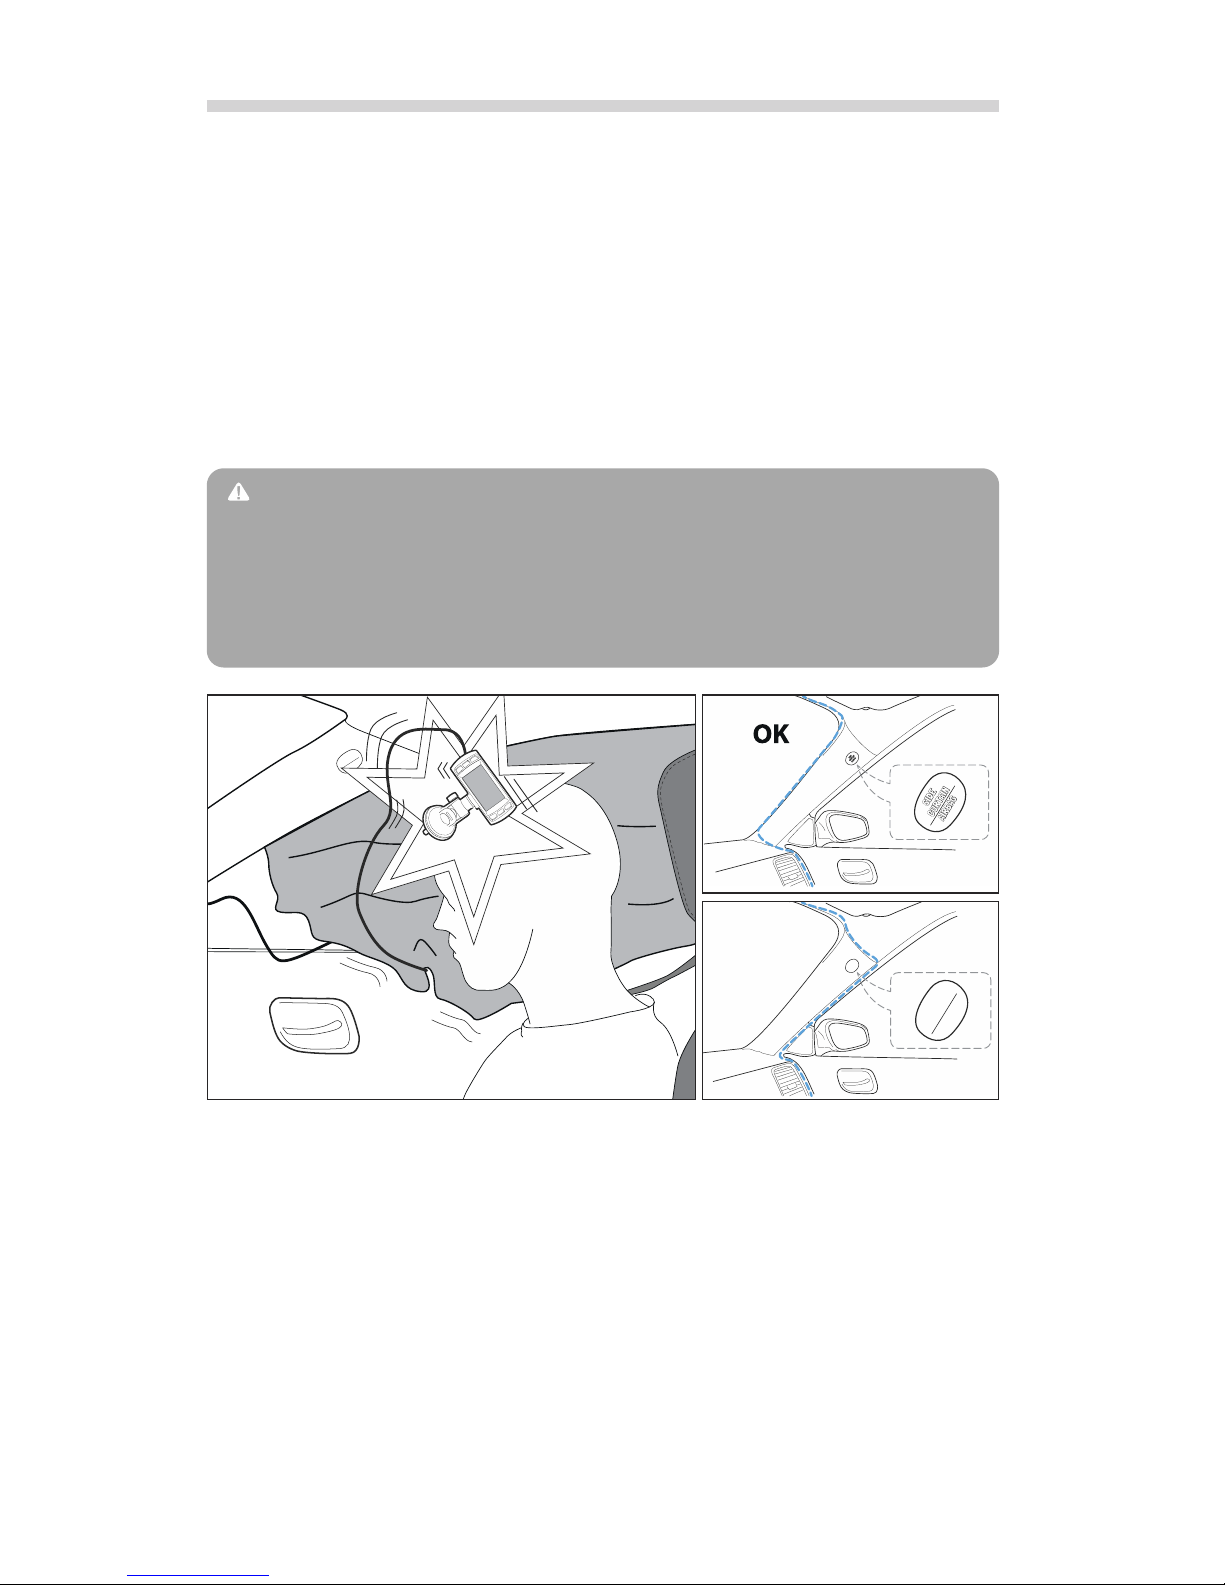
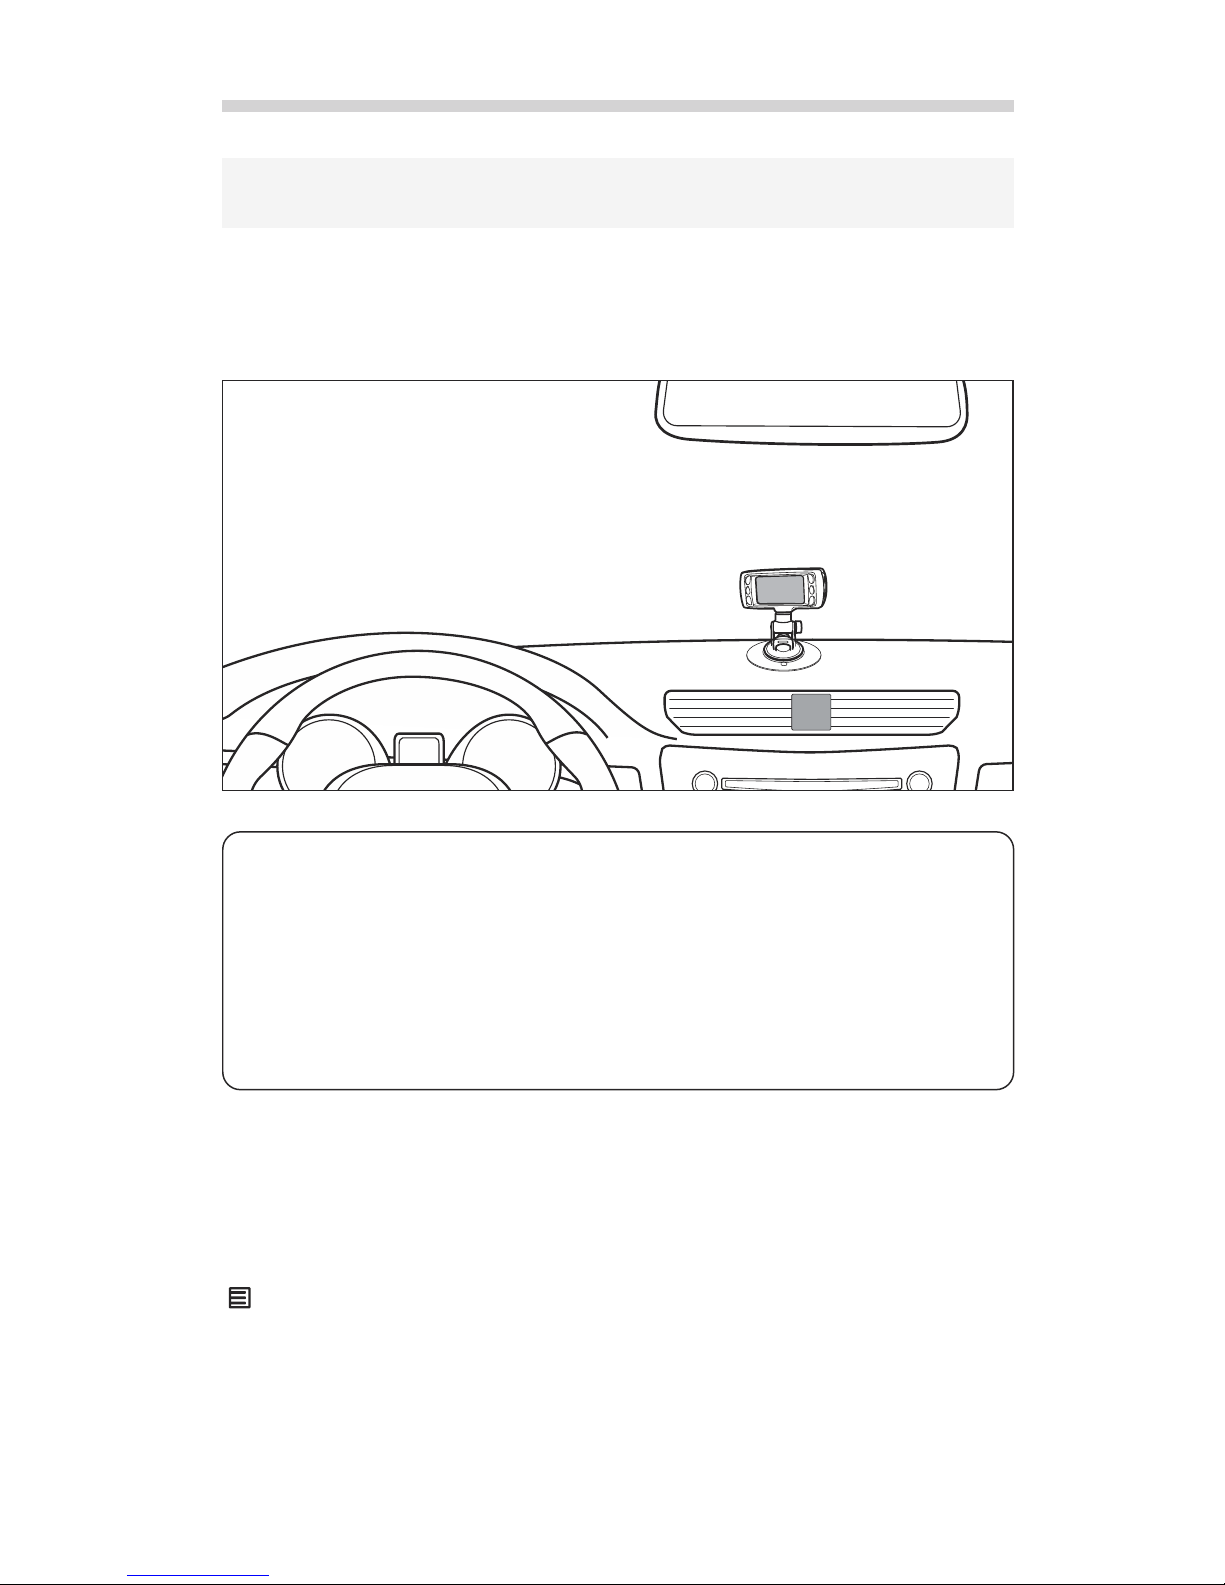
n some states there may be regulations on where (and
whether) you can affix objects to the windshield.
Also some states may limit use of in-vehicle video event
recorders. For example, your dashboard camera may
record only 30 seconds before and after the “triggering
event”: a crash, sudden acceleration, and so on – unless
it is used for “monitoring driver’s performance”.
Make sure to check your local laws before installing the
device. For more information please refer to http://www.brigele.com/state-laws/
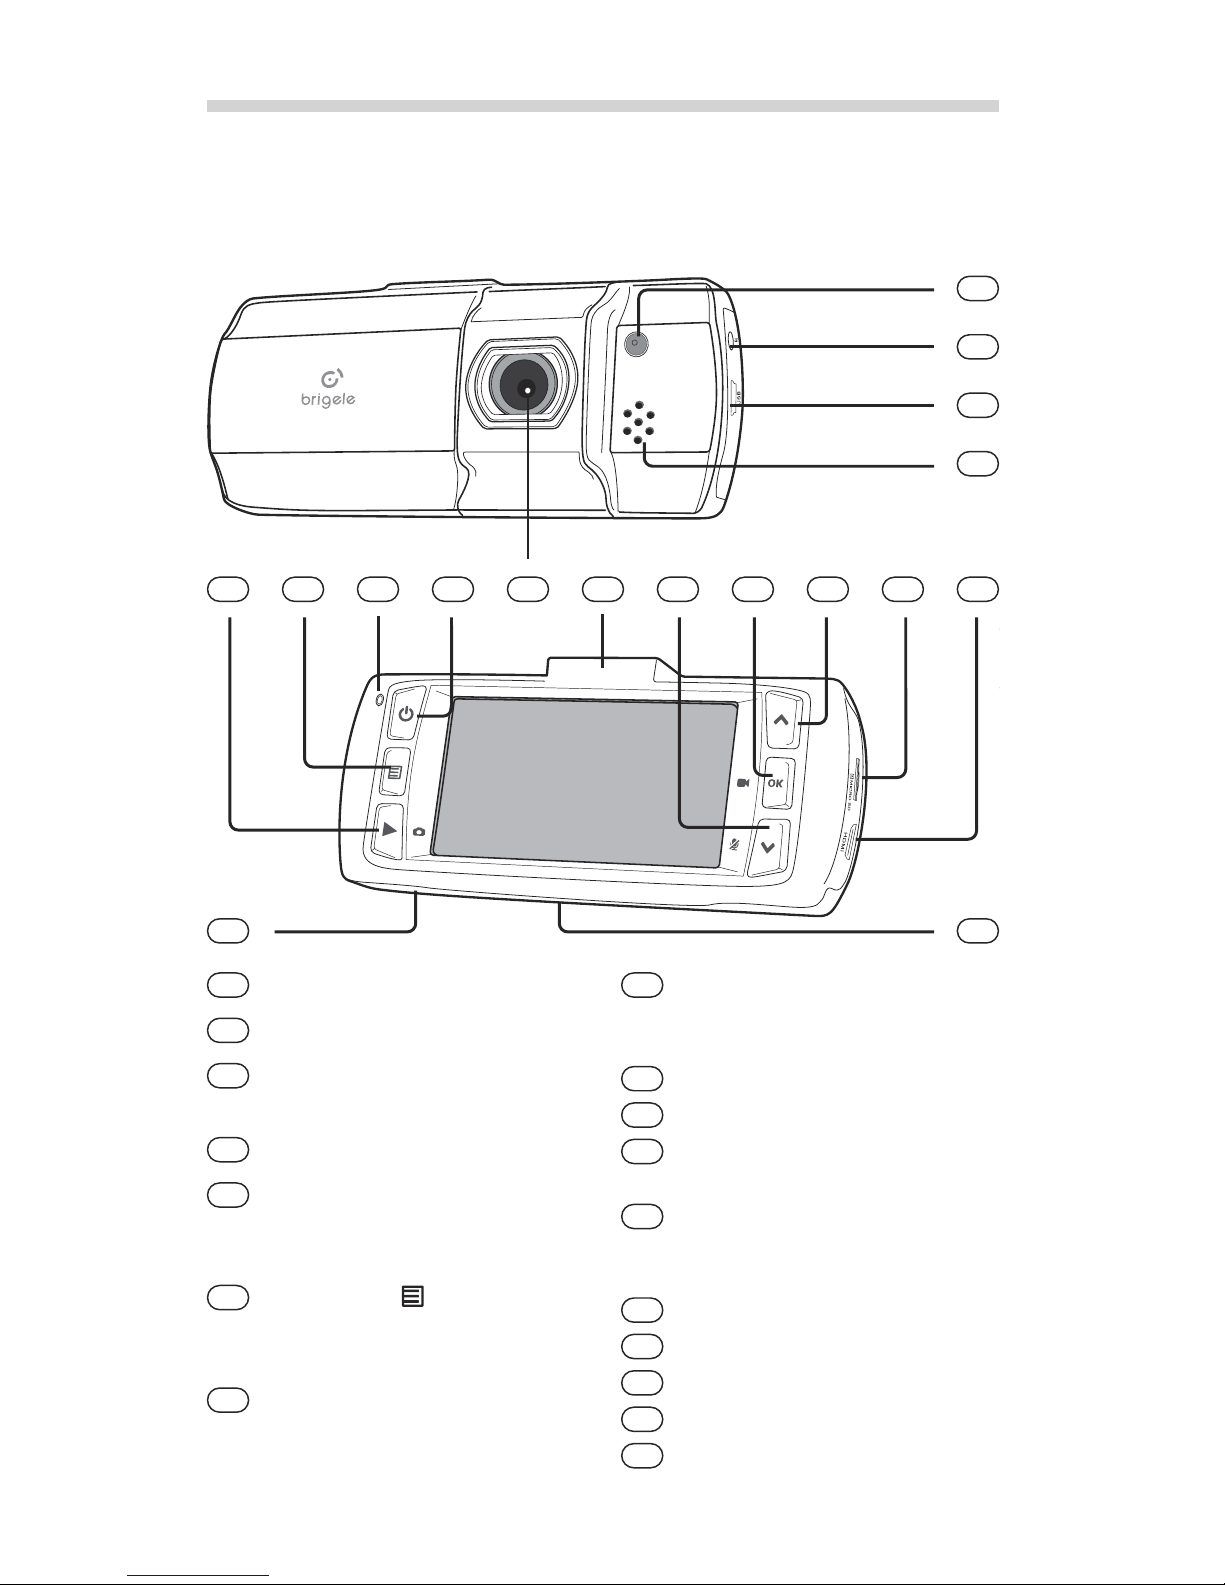
Remember not to abuse the privacy of others. We recommend that you will warn
your passengers that their conversations may be recorded by your dashboard
camera. We also recommend placing warning sticker that comes with your device
at conspicuous place inside your vehicle.
Please take note that California law requires these stickers to be present in the car.
L m ted warranty
Brigele warrants this product to be free from defects in materials and
workmanship within one year after purchase from retail or online store.
Should this product fail within warranty period, Brigele or its agents, at their
option, will replace or repair it, or refund the amount paid for the product, less
reasonable allowance for its usage, upon its return.
This warranty does not cover any defects resulting from unauthorized repairs or
modications, use of faulty, non-compliant or not approved by Brigele accessories,
including but not limited to car chargers and memory cards, or any other than
intended use.
To make a claim under this warranty, contact the place of original purchase.
This warranty gives you specic legal rights, and you may also have other rights
that vary from state to state.
TO THE EXTENT ALLOWED BY LOCAL LAW, EXCEPT FOR THE OBL GAT ONS
SPEC F CALLY SET FORTH N TH S WARRANTY STATEMENT, N NO EVENT SHALL
BR GELE AND TS VENDORS BE L ABLE FOR ANY ND RECT, SPEC AL, NC DENTAL
OR CONSEQUENT AL DAMAGES ( NCLUD NG LOSS OF PROF TS) WHETHER BASED
ON CONTRACT, TORT, OR ANY OTHER LEGAL THEORY AND RRESPECT VE OF
WHETHER BR GELE OR THE VENDOR HAS ADVANCE NOT CE OF THE POSS B L TY
OF SUCH DAMAGES.
3

Introduct on
Congratulations on your purchase of dashboard camera. This is modern, reliable
and simple device and we do hope it will accompany many of your journeys to
come.
Dashboard camera, or, simply, a dash cam, records video and audio of your driving.
t will provide indubitable account of what really happened should you need to
prove your point – whatever the situation may be. t could be a crash, or you
contesting the wrongfully issued ticket, or a case of insurance scam. t can even
help if your car has been vandalized or hit-and-ran1. Some models can even record
your speed and GPS location. No matter what, you will always have an eyewitness
standing by your side – because dash cam video can even be accepted as
evidence in court.
But the dash cam can be used not only as protection device. t can give you much
fun by capturing scenic views, driving through memorable places or simply
catching a rare or stunning event, such as a deer crossing in front. You can save
such videos in your archive, show them to your friends and family or share on
Facebook or YouTube.
Just make sure you have your device mounted, a memory card installed, and
power attached – and let your journey begin!
1Parking monitoring mode is available not on all Brigele dash cams.
4

What s n the box
Your dashboard camera comes with complete set of accessories to get you started
1) Dashboard camera DR 2100
2) Suction cup mount with rotating shaft
3) Power adapter with extra USB port, 11½ ft. power cable
For use with cigarette lighter / car accessory power port. Works on vehicles with
both 12V and 24V electrical systems.
4) 16 GB Micro SD card with SD adapter and plastic travel case
5) Cable clip with adhesive base (6 pieces)
Use these clips to route the power cable.
6) This User Manual
7) 3 ft. data cord (USB A to USB mini B)
For connecting your dash cam to computer
8) Warning stickers
California law requires a notice that passenger conversation may be recorded.
Use these stickers inside your car if you drive it in the State of California.
9) Dashboard mounting plate with adhesive base
For mounting your dash cam off windshield, e.g. on dashboard.
5
x6
1) 2) 3)
4) 5) 6)
7) 8) 9)

Gett ng to know your camera
Take a look at the controls on your dashboard camera.
6
13121097 865
16
11 15
17
14
1
2
3
4
Ambient light sensor
AV out port
USB port
Used for both power and data.
Speaker
Mode button []
Switches between Video recording,
Photo and Playback modes.
Menu button [ ]
Brings up settings menu for current
mode.
Status indicator
Red - connected to power, blinking -
recording.
Power button []
Press to toggle display on and off,
press and hold to switch on or off.
Lens
Suction cup mount point
Down [] / Mute [] button
Press to mute or unmute the mic.
OK [OK] / Rec [] button
Press to start or stop recording
manually.
Up button []
MicroSD card slot
HDMI out port
Microphone
Reset button
1
2
3
4
5
6
7
8
9
10
11
12
13
14
15
16
17

7
Here are the control icons on the display.
+
-
1
5
4
2
6 7 8 109 11 12
3
Mode icon
Displays []when in Video mode (not recording), [] is ashing when
recording video. Displays [] in Photo mode.
Current resolution (Video mode)
Current position in the segment (when recording video)
Segment length
Number on the icon displays the length of the video segment in minutus. When
recording continuous video, this icon is absent.
WDR mode
WDR (Wide Dynamic Range) is the mode when the camera automatically
enhances too bright and too dark areas by adjusting exposition.
Shock sensor sensitivity
con is absent when shock sensor is off, and number of parentheses shows the
sensor sensitivity (the more parentheses, the higher the sensitivity).
Exposure compensation
Memory card
Displays when memory card is installed and can be read.
Current date
Current time
Microphone status (crossed out when mic is muted: [])
Battery status
1
3
4
5
2
6
7
8
9
10
11
12

Qu ck start and nstallat on
8
1. Select a spot to place your dash cam
We suggest placing the camera on the windshield directly behind rearview mirror.
This is where it is least noticeable from the outside of the vehicle and where it
does not obscure view of the road.
Also check that there is nothing blocking the view in front of the lens, such as rain
sensor, windshield visor strip and so on.
OTE:
n some states there may be regulations regarding
placing objects on the windshield. Make sure to check
your state and local laws before installing the camera.
For more information please refer to
http://www.brigele.com/state-laws/
WAR I G:
Never place the camera in the airbag deployment area. Deploying airbag
may throw off the camera into vehicle occupants, causing severe injuries.
f you’re in doubt, call your vehicle dealer or your mechanic.

f your state’s law prohibits installing a dash cam on the windshield, you can always
install it on the dashboard.
Affix dashboard mounting plate on the dashboard, and then attach suction cup
mount to the plate.
Rotat ng v deo and d splay symbols
When your dash cam is placed upside-down, the video it records is also being
recorded upside-down.
To x it, enable video rotation option. Go to General settings in the menu (press
[ ] twice), and then scroll to “ mage rotation” and select “ON” (use []or []to
scroll, [OK] to select).
When image rotation option is enabled (set to “ON”), then recorded video is turned
by 180º. Also, symbols on the display turned over.
9
1A. Mount ng your dash cam off w ndsh eld
OTE:
Place your dash cam at the centermost position on the dashboard, and as high
as possible.
Do not place your dashcam on movable parts, such as lids. These parts may
tremble when car is in motion, causing the video to blur.
NEVER PLACE YOUR DASH CAM N THE A RBAG DEPLOYMENT AREAS OR ON
PANELS MARKED W TH “SRS A RBAG” LABEL.

Use some cloth or tissue and, if needed, a soft
detergent such as soapy water to clean the
windshield where you are going to attach the
camera. This step is important and should
not be skipped: the inside surface of
windshield always has a thin layer of dirt and
grease, which prevents rm grip.
Make sure you are inserting the card correctly. f
the card swings sideways, turn it over. Never
force the card in – you can damage both the
device and the card.
Connect suction cup mount to your dash
cam, and then attach it to windshield.
10
OTE:
This dash cam supports Micro SDHC memory cards with capacity up to 32GB.
t does not work with cards over 32GB (Micro SDXC).
2. Clean the spot to attach the camera
3. Insert memory card
4. Attach the camera to w ndsh eld
1

11
Plug the power cord into USB port on the camera. nsert power adapter into cig-
arette lighter socket.
You can route the power cord around windshield as shown below:
2 3
5. Connect the power

Do not forget to set correct date and time on the camera. t is important for
credibility of your video recordings.
1. f camera is recording, press [] button to stop recording. You can see red
dot blinking in the top left corner when camera is recording.
2. Press [ ] button twice to enter settings menu.
2. n the Settings menu, scroll down to Date and Time, and then press OK.
3. Adjust date and time as needed. Use [] and [] buttons to change
values, [OK] button to proceed. Press [ ] button to exit when nished.
Now you are all set. Enjoy your dashboard cam
12
6. Check date and t me sett ng
WAR I G:
Never place the device, the cables or mounts in the area of airbag deployment.
Specically, if the vehicle is equipped with side curtain airbags, never place the
cable under A-pillar headliner on the side facing the door. Deploying airbag
may force the device to detach with a great speed, possibly causing severe
injures to vehicle occupants.
SIDE
CURTAIN
AIRBAG
BANG!
SIDE
CURTAIN
AIRBAG
SIDE
CURTAIN
AIRBAG
WRONG!
+
-

Bas c operat ons
The dashboard camera turns on and starts recording as soon as engine starts.
After the engine stops, the camera stops recording and shuts down, immediately
or after a delay (congurable in settings).
To turn camera on or off, press and hold [] button for at
least 2 seconds.
Once turned on, your dashboard camera starts recording immediately. When it is
recording, indicator light blinks red and there is a ashing red dot on the display.
To stop or start recording, press [] button.
13
Turn ng your dash cam on and off
Start ng and stopp ng record ng
OTE:
Pull out the power adapter from cigarette lighter socket if you plan to
leave your vehicle for more than several days. Power adapter has electronic
components that consume some electricity – barely noticeable, but enough to
drain the battery, especially if the battery is not new.
+
-

f you don’t want the sound to be recorded, you can mute the microphone. When
the camera is recording, press the [] button. When the microphone is off, the
microphone icon on the display is crossed out.
To turn the microphone back on, press the [] button again.
Your dashboard camera has 3 modes of operation: video recorder, photo camera
and playback. t always starts in video recorder mode. To switch between modes,
press [] button.
Your dashboard camera is also a photo camera. This is useful if you need to take
pictures and you don’t have a camera with you. Dashboard camera has small
internal battery so it can work some time outside your car without being
connected to the power.
First, press [/] button once to enter photo camera mode. Aim the camera and
press [OK] button to take p icture. The picture will be saved on memory card.
To protect the video segment from deletion or from being overwritten by newer
segments (see “Loop recording” at Page 18 for more details), video segment can
be protected, or locked.
14
Mut ng the m crophone
Operat on modes
Photo camera mode
Protect v deo segement
OTE:
Once you turned off the microphone, it does not
turn back on automatically. So if the microphone is
off, next time you turn on the camera, it will stay
turned off. Press [] again to turn it back on.
OTE:
f you switch the mode when the camera is recording, it will stop recording. To
continue recording, you will need to start recording manually.

When your camera is recording video, press [] button to protect current
segment. Press [] button again to unprotect it.
To view recorded videos and photos, press [] button twice. You will see the
recordings as tiles. Each tile is a video segment or photo.
Video segments are marked with [] icon. Protected video segments are marked
with [] icon. Photos do not have any icons.
To browse the recordings, use [] and [] buttons. To view photo or video
segment, press [OK] button.
To start playing video segment, press [OK] button. To stop, press [OK] button
again. You can fast forward or rewind video segment, use [] and [] buttons.
When viewing photo or video segment, press [ ] button to delete, protect or
unprotect it.
To setup your dashboard camera, press [ ] button. f the camera is recording, rst
stop the recording by pressing [] button.
There are two settings pages: settings for current mode of operation (video
15
V ew ng record ngs
Sett ng up your camera
WAR I G:
Formatting memory card will erase everything on it, including protected
segments. f you want to clear the memory card but wish to keep protected
segments, use “Delete all” option when viewing video segment (see below).

recording or photo camera), and global settings. Global settings are available in
both modes.To switch between settings pages, press [ ] button. To highlight a
setting, use [] and [] buttons, and then press [OK] to select.
Change values with [] and [] buttons, and then press [OK] button to conrm
a setting. To go back to menu without saving a setting, press [ ] button.
For detailed description of available settings, please refer to Settings reference
section.
You can connect your dashboard camera to Windows, Mac or Linux computer. Use
data cable that comes with your camera.
Once connected, your dashboard camera will appear in your computer as mass
storage device, like ordinary USB ash drive.
16
Connect ng to computer

To connect your dashboard camera to TV, use analog AV cable or mini-HDM cable
(both not included with your camera). Once connected, the screen of dashboard
camera will be mirrored on your TV.
17
Connect ng to TV

Advanced sett ngs
This section describes advanced features of your dashboard camera. Normally,
you may want to keep factory default settings and to skip this section. However,
if you prefer to have complete control or to make ne-tuning, this section is for
you.
Your dashboard camera can record video in a loop. This means that once the
memory card runs out of free space, newer recordings start replacing oldest ones
in a loop. This feature can be set up in video settings, by setting up segment
length. Video recording can be split into segments, the continuous fragments of
video.
You can adjust segment length or to disable loop recording by turning off video
segmentation: select OFF in “Segment length” menu. By default, the segment
length is 3 minutes, loop recording is on.
Mode of operation: Video recording
Setting: Segment length
To conserve free space on memory card, your dashboard camera can record video
only when it sees a motion in front. This can be particularly useful if you frequently
use your dashboard camera when a vehicle is stationary.
By default, motion detection is off.
Mode of operation: Video recording
Setting: Motion detection
Your dashboard camera can detect impacts and rapid acceleration or braking with
built-in shock sensor. When shock sensor detects an impact or unusual
acceleration, it can protect current segment, if a camera is recording. f camera is
not recording, it will start the recording immediately.
By default, shock sensor’s sensitivity is set Medium.
Mode of operation: Video recording
Setting: Shock sensor
18
Mot on detect on
Loop record ng
Shock sensor

Your dashboard camera can imprint current time and date, and license plate
number as a watermark on the video. t may be useful to have additional account
on when exactly the incident took place, and on which vehicle the camera was
installed.
By default, date and time is being stamped on the video. To turn it off, go to Date
stamp menu in General settings.
To enter the license plate number, go to general setup and select “License plate
number”. Use [] and [] buttons to select characters, [OK] to move to the next
character. Underscore mark ( _ ) denotes space.
To clear license plate number, replace all characters with underscore marks.
Mode of operation: General settings
Setting: Date stamp, License plate number
n some cases, traffic lights and other illuminated constructions may icker. This
is because they actually icker with the frequency of alternating current in the
power grid. This icker is invisible to human eye, but can be captured by video
camera.
There is a setting to compensate this, Frequency, in the global settings of your
dashboard camera. By default it is set to 60Hz, exactly the frequency in power grid
in the United States.
Normally you don’t need to change it. But if you travel abroad where the
alternating current’s frequency is different (e.g. in Europe it is 50Hz), you will need
to adjust this setting to avoid ickering.
Mode of operation: General settings
Setting: Frequency
When you mount the camera on the dashboard, and not on the windshield, your
dashboard camera will be placed upside-down. To compensate, you can rotate
the video by 180 degrees. Go to General settings / mage rotation and select “ON”.
This also rotates on-screen information and icons.
Mode of operation: General settings
Setting: Rotation
19
Impr nt ng date, t me and l cense plate on the v deo
Remove cker at traffic l ghts
Image rotat on

Sett ngs reference
This section describes all settings and menus.
20
Resolution Video resolution. Unless you need to
save space on your memory card, the
best option is Full HD.
1080p Full HD
(default)
720p 1280x720
WVGA 848x480
VGA 640x480
Segment
length
Length of video segments. When set to
OFF, turns off Loop recording.
OFF
1 minute
3 minutes (default)
5 minutes
WDR Wide dynamic range – a technology to
enhance the picture in bright and dark
areas.
ON (default)
OFF
Motion
detection
f ON, the camera records only when it
detects a movement. Useful to conserve
space on memory card.
ON
OFF (default)
Power off
delay
A delay between the engine is stopped
and the camera shutdown. When OFF,
camera shuts down right after the
engine is stopped.
OFF
10 seconds (default)
20 seconds
30 seconds
Power on
delay
A delay between the engine is started
and the camera starts recording. When
OFF, camera starts recording
immediately after engine is started.
OFF (default)
10 seconds
20 seconds
30 seconds
Record
audio
Whether the microphone is on or off.
Same as [] button.
ON (default)
OFF
Date stamp Whether to imprint current time and
date on the video.
ON (default)
OFF
Shock
sensor
Sensitivity of shock sensor. f OFF, never
attempts to automatically protect video
segments or start emergency recording.
OFF
Low
Medium (default)
High
V deo record ng mode
Table of contents
Other brigele Dashcam manuals