Briteq LDP-COBWASH 150TC User manual


ENGLISH OPERATION MANUAL
BRITEQ®1/64 LDP-COBWASH 60TC + 150TC
OPERATION MANUAL
Thank you for buying this Briteq®product. To take full advantage of all possibilities and for your own safety,
please read these operating instructions very carefully before you start using this unit.
FEATURES
This unit is radio-interference suppressed. This product meets the requirements of the current European and
national guidelines. Conformity has been established and the relevant statements and documents have been
deposited by the manufacturer.
Powerful indoor / outdoor IP65 LED projector equipped with an RGB COB led:
LDP-COBWASH 60TC: small enclosure, equipped with a 60W COB led for smaller applications.
LDP-COBWASH 150TC: bigger enclosure, equipped with a 150W COB led for larger applications.
Thanks to the very wide beam angle, this projector is the perfect solution for “close range" applications like
wall washing but also great on concert stages, in theaters, discotheques, exhibition booths, …
Thanks to the RGB point source you obtain perfect color mixing without any color shadows, even at very
close range
Excellent built-in programs for wonderful, ever changing, light shows.
Excellent RGB color mixing and dimming down to 0%
Completely silent operation, thanks to natural convection cooling system.
Backlit alphanumeric LCD-display and waterproof touch keys to select different options of the setup menu.
Works in standalone, master/slave or can be selected by DMX: fading colors, static colors / chases
Both models can be used as master/slave in one DMX-line.
Full DMX control with different channel modes: 3ch, 4ch and 6ch.
Can be used with LEDCON-02 Mk2 easy controller!
IR-remote controller included: no difficult controllers needed!
Selectable lamp behavior: halogen lamp (slow) or led (fast)
Four dimmer curves: linear, square, inverse square, S-curve
In case of DMX failure you can choose between blackout and freeze mode.
Lock function to avoid unwanted altering of the settings.
Special waterproof power in/outputs: easy daisy chaining of several units.
Special waterproof DMX in/outputs with adapter cables to XLR for maximum compatibility
High efficiency and low power consumption:
LDP-COBWASH 60TC: only 68W max at full power (white color).
LDP-COBWASH 150TC: only 195W max at full power (white color)..
Strong multifunctional bracket, designed for both fixed floor and truss mounting.
Barn doors:
LDP-COBWASH 60TC: Optionally available
LDP-COBWASH 150TC: Included and already installed
BEFORE USE
Before you start using this unit, please check if there’s no transportation damage. Should there be any, do
not use the device and consult your dealer first.
Important: This device left our factory in perfect condition and well packaged. It is absolutely necessary
for the user to strictly follow the safety instructions and warnings in this user manual. Any damage caused
by mishandling is not subject to warranty. The dealer will not accept responsibility for any resulting defects
or problems caused by disregarding this user manual.
Keep this booklet in a safe place for future consultation. If you sell the fixture, be sure to add this user
manual.

ENGLISH OPERATION MANUAL
BRITEQ®2/64 LDP-COBWASH 60TC + 150TC
Check the contents:
Check that the packing contains the following items:
Operating instructions
LDP-COBWASH 60TC or LDP-COBWASH 150TC
Power conversion cable (IP-cabling to schuko, L=1,8m)
DMX input conversion cable (IP-cabling to XLR-male)
DMX output conversion cable (IP-cabling to XLR-female)
SAFETY INSTRUCTIONS:
To protect the environment, please try to recycle the packing material as much as possible.
To avoid condensation to be formed inside, allow the unit to adapt to the surrounding temperatures when
bringing it into a warm room after transport. Condense sometimes prevents the unit from working at full
performance or may even cause damages.
Don’t place metal objects or spill liquid inside the unit. Electric shock or malfunction may result. If a foreign
object enters the unit, immediately disconnect the mains power.
Locate the fixture in a well ventilated spot, away from any flammable materials and/or liquids. The fixture
must be fixed at least 50cm from surrounding walls.
Don’t cover any ventilation openings as this may result in overheating.
Prevent use in dusty environments and clean the unit regularly.
Keep the unit away from children.
Inexperienced persons should not operate this device.
Maximum safe ambient temperature is 40°C. Don’t use this unit at higher ambient temperatures.
Make sure the area below the installation place is free from unwanted persons during rigging, de-rigging
and servicing.
Allow the device about 10 minutes to cool down before to start servicing.
Always unplug the unit when it is not used for a longer time or before to start servicing.
The electrical installation should be carried out by qualified personal only, according to the regulations for
electrical and mechanical safety in your country.
Check that the available voltage is not higher than the one stated on the unit.
The power cord should always be in perfect condition. Switch the unit immediately off when the power cord
is squashed or damaged. It must be replaced by the manufacturer, its service agent or similarly qualified
persons in order to avoid a hazard.
Never let the power-cord come into contact with other cables!
This fixture must be earthed in order to comply with safety regulations.
Don’t connect the unit to any dimmer pack.
Always use an appropriate and certified safety cable when installing the unit.
In order to prevent electric shock, do not open the cover. There are no user serviceable parts inside.
Never repair a fuse or bypass the fuse holder. Always replace a damaged fuse with a fuse of the same
type and electrical specifications!
CAUTION: To reduce the risk of electric shock, do not remove
the top cover. No user-serviceable parts inside. Refer servicing
to qualified service personnel only.
The lightning flash with arrowhead symbol within the equilateral triangle is intended to alert the
use or the presence of un-insulated “dangerous voltage” within the product’s enclosure that may
be of sufficient magnitude to constitute a risk of electric shock.
The exclamation point within the equilateral triangle is intended to alert the user to the presence
of important operation and maintenance (servicing) instructions in the literature accompanying
this appliance.
This symbol means: indoor use only
This symbol means: Read instructions
This symbol determines: the minimum distance from lighted objects. The minimum distance
between light-output and the illuminated surface must be more than 1 meters
The device is not suitable for direct mounting on normally flammable surfaces. (suitable only for
mounting on non-combustible surfaces)
CAUTION: Do not stare at operating lamp.
May be harmful to the eyes.

ENGLISH OPERATION MANUAL
BRITEQ®3/64 LDP-COBWASH 60TC + 150TC
In the event of serious operating problems, stop using the fixture and contact your dealer immediately.
The housing and the lenses must be replaced if they are visibly damaged.
Please use the original packing when the device is to be transported.
Due to safety reasons it is prohibited to make unauthorized modifications to the unit.
Important: Never look directly into the light source! Don’t use the effect in the presence of persons suffering
from epilepsy.
DESCRIPTION:
PROJECTOR
Descriptions are made for the LDP-COBWASH60TC. All points are identical for the LDP-COBWASH150TC,
except where indicated.
1. POWER INPUT: mains input cable using a special 4pin IP-rated connector. Connect it to the mains
output cable of the previous projector in the line or use the supplied conversion cable to connect the
projector directly to a wall outlet socket.
2. DMX INPUT: DMX input cable using a special 3pin IP-rated connector. Connect it to the DMX output
cable of the previous LDP-projector in the line or use the supplied conversion cable to connect the unit to
a standard XLR-output of a projector or DMX controller.
3. POWER OUTPUT: mains output cable using a special 4pin IP-rated connector. Connect it to the power
input cable of the next projector in the line. Maximum power for the power line: 10A(2300W)
4. DMX OUTPUT: DMX output cable using a special 3pin IP-rated connector. Connect it to the DMX input
cable of the next LDP-projector in the line or use the supplied conversion cable to connect the unit to a
standard XLR-input of a DMX-projector.
5. DISPLAY & BUTTONS: Backlit alphanumeric LCD-display and waterproof touch keys to select different
options of the setup menu:
MENU-button: used to browse the different menu options or to exit a menu option.
DOWN-button: used to go to the next menu option or to decrease a parameter value.
UP-button: used to go to the previous menu option or to increase a parameter value.
ENTER-button: used to select a menu option or confirm a setting.
6. HANGING BRACKETS: with knobs or Allen bolts on both sides to fasten the unit. The projector should
be fixed to a flat wall, on the ground or on the ceiling using at least two adapted screws.
7. SAFETY HOLE: used to attach a safety cable when the unit is rigged, see paragraph “overhead rigging”.
8. BARN DOOR fixing holes: used to fix the optional BARN DOOR.
LDP-COBWASH 150TC: not applicable, barn doors already installed.
9. IR-RECEIVER: receives the commands from the included IR-remote. (remote functions: see further)
10. COB led: special high power led chip, avoid looking directly in the light from a close distance.
11. TEMPERED GLASS: makes the enclosure waterproof. Replace the glass immediately if it’s scratched or
broken.

ENGLISH OPERATION MANUAL
BRITEQ®4/64 LDP-COBWASH 60TC + 150TC
IR-REMOTE
Note: Make sure that the IR-remote option in the setup menu is switched ON before you start using the
remote control.
1. BLACKOUT-button: used to switch the output ON/OFF
2. COLOR-button: used to select one of the pre-programmed static colors of the projector. First press the
COLOR-button, followed by one of the 10 number buttons to select the desired color.
3. COLOR (NUMBER) buttons: each buttons represents a color.
1-button: warm white
2-button: cold white
3-button: red
4-button: orange
5-button: yellow
6-button: green
7-button: cyan
8-button: blue
9-button: purple
0-button: custom color (previously saved in memory)
4. PROG-button: used to select one of the effect programs.
With each press you go to the next effect:
Press 1x: Color change 7colors selected
Press 2x: Color change 3colors selected
Press 3x: Color fade effect selected
5. STROB-button:used to switch the strobe function
ON/OFF. First press the STROB-button, followed by the
±buttons (7) to adjust the strobe speed.
Remark: works on the effect programs.
6. SPEED-button: used to adjust the speed of the effect programs. First press the SPEED-button, followed
by the ±buttons (7) to adjust the program speed.
7. ±-Buttons: used to increase / decrease the value of the selected function.
8. CUSTOM COLOR ADJUST-buttons: press one of these buttons to select the static custom color and
adjust one of its color components:
Press the R-button: followed by the ±buttons (7) to adjust the red component in the custom color.
Press the G-button: followed by the ±buttons (7) to adjust the green component in the custom color.
Press the B-button: followed by the ±buttons (7) to adjust the blue component in the custom color.
9. DIM-button: followed by the ±buttons (7) to adjust the GENERAL DIMMER.
10. F2-button: used to switch the projector to DMX-mode and set the DMX-address remotely. Below an
example is shown to set DMX-address “437”
Press the S-button: output turns red.
Press 1st number button (3): in this case button “4” , the output turns green.
Press 2nd number button (3): in this case button “3” , the output turns blue.
Press 3rd number button (3): in this case button “7” , the output flashes 2 times to indicate that the
new DMX-address is accepted
11. SOUND-button: used to start the sound activated programs
12. F1-button: not used for this projector
13. Battery compartment: receives a CR2025 3V-battery (supplied).
OVERHEAD RIGGING
Important: The installation must be carried out by qualified service personal only. Improper
installation can result in serious injuries and/or damage to property. Overhead rigging requires
extensive experience! Working load limits should be respected, certified installation materials
should be used, the installed device should be inspected regularly for safety.
Make sure the area below the installation place is free from unwanted persons during rigging, de-rigging
and servicing.
Locate the fixture in a well ventilated spot, far away from any flammable materials and/or liquids. The
fixture must be fixed at least 50cm from surrounding walls.
The device should be installed out of reach of people and outside areas where persons may walk by or be
seated.

ENGLISH OPERATION MANUAL
BRITEQ®5/64 LDP-COBWASH 60TC + 150TC
Before rigging make sure that the installation area can hold a minimum point load of 10times the device’s
weight.
Always use a certified safety cable that can hold 12times the weight of the device
when installing the unit. This secondary safety attachment should be installed in a way
that no part of the installation can drop more than 20cm if the main attachment fails.
The device should be well fixed; a free-swinging mounting is dangerous and may not
be considered!
Don’t cover any ventilation openings as this may result in overheating.
The operator has to make sure that the safety-relating and machine-technical
installations are approved by an expert before using them for the first time. The installations should be
inspected every year by a skilled person to be sure that safety is still optimal.
ELECTRICAL INSTALLATION + ADDRESSING
Important: The electrical installation should be carried out by qualified personal only,
according to the regulations for electrical and mechanical safety in your country.
Master / Slave mode:
Connect the projectors together as shown on the drawing. Please refer to the paragraph “SETUP MENU” to
setup the master. You can also switch the IR-remote on the master to ON and use the included IR-remote.
All slaves must be set to SLAVE-mode. You can put as many slaves as you like on condition that the overall
power consumption on the power line stays under 10A (2300W).
IMPORTANT: make sure that no DMX-controller is connected, this will result in unexpected behavior!
Electrical installation for two or more units in DMX-mode:
The DMX-protocol is a widely used high speed signal to control intelligent light equipment. You need to
“daisy chain” your DMX controller and all the connected units.
Use the supplied DMX input conversion
cable (IP-cabling to XLR-male) to connect
the first unit in the line to the controller.
Pin layout XLR-3pin: Pin1 = GND ~ Pin2
= Negative signal (-) ~ Pin3 = Positive signal (+)
To prevent strange behavior of the light effects, due to interferences, you must use a
90Ω to 120Ω terminator at the end of the chain. Never use Y-splitter cables, this
simply won’t work!
If the projector is followed by units that have a regular DMX-input with XLR-3pin,
please use the supplied DMX output
conversion cable (IP-cabling to XLR-
female) to make the connection.
Make sure that all units are connected to
the mains.
Each unit in the chain needs to have its proper starting address so it knows which commands from the
controller it has to decode. In the next section you will learn how to set the DMX addresses.

ENGLISH OPERATION MANUAL
BRITEQ®6/64 LDP-COBWASH 60TC + 150TC
HOW TO SETUP:
For both models all points are identical, except for the display messages: displays are shown on the left side.
To select any of the functions, press the MODE button until the required function is shown on the display
or use the DOWN and UP buttons to browse the menu.
Select the function with the ENTER button.
Use DOWN and UP buttons to change the values.
Once the required value is selected, press the ENTER button to confirm.

ENGLISH OPERATION MANUAL
BRITEQ®7/64 LDP-COBWASH 60TC + 150TC
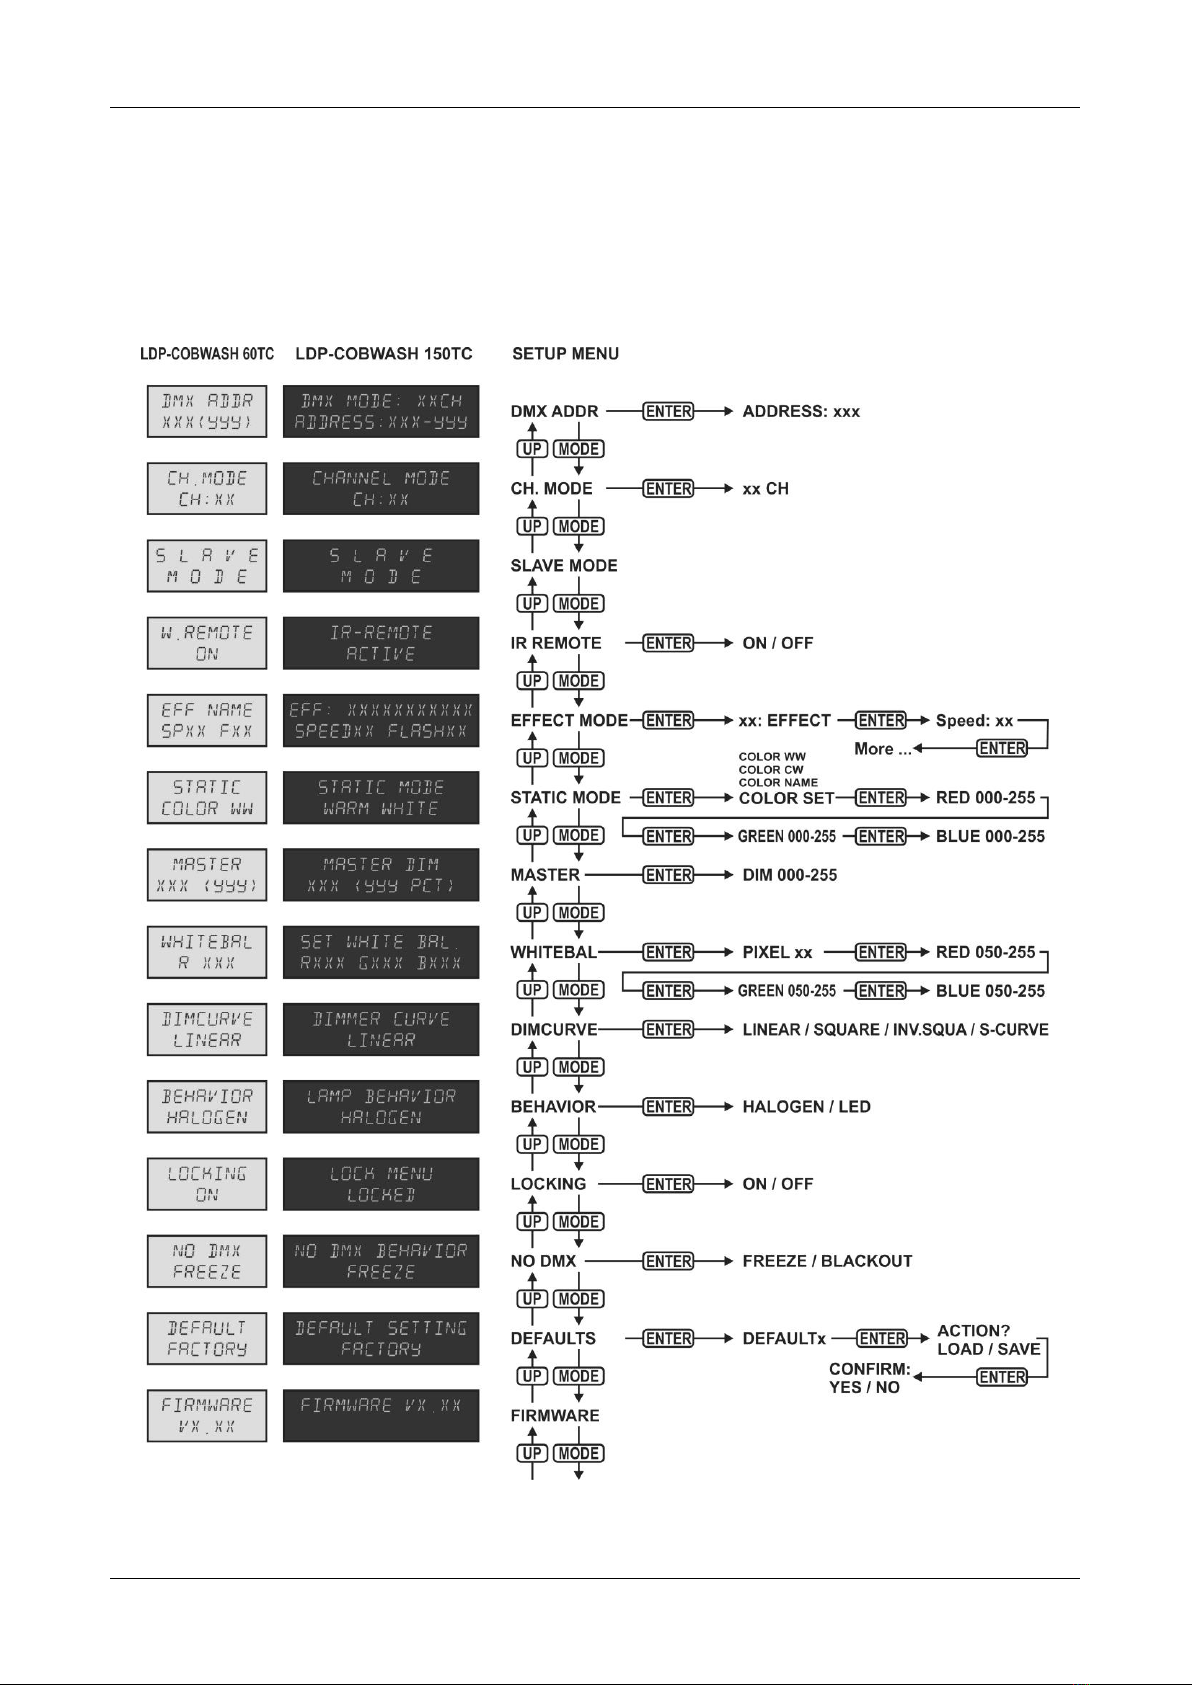
DMX ADDR
Used to set the desired DMX-address.
Press the MODE button until the desired function is showing on the display.
Press the ENTER button: the values can be changed
Use DOWN and UP buttons to select the desired DMX512 address. The last occupied DMX-address is
also shown: makes it easier to set the address of the next unit in the chain.
Once the correct address shows on the display, press the ENTER button to save it.
Note: on RDM-compatible controllers this option can also be remotely set.
CH. MODE
Used to set the desired channel mode.
Press the MODE button until the desired function is showing on the display.
Press the ENTER button: the values can be changed
Use DOWN and UP buttons to select the desired mode:
CH:03 R, G & B can be set separately, no master dimmer.
CH:04 R, G & B can be set separately, with combined strobe + master dimmer on CH4.
CH:04+ R, G & B can be set separately, with master dimmer on CH4. (no strobe)
CH:06 R, G & B can be set separately, with separate master dim, strobe and color fade channels.
Once the correct option shows on the display, press the ENTER button to save it.
Remark: on RDM-compatible controllers this option can also be remotely set.
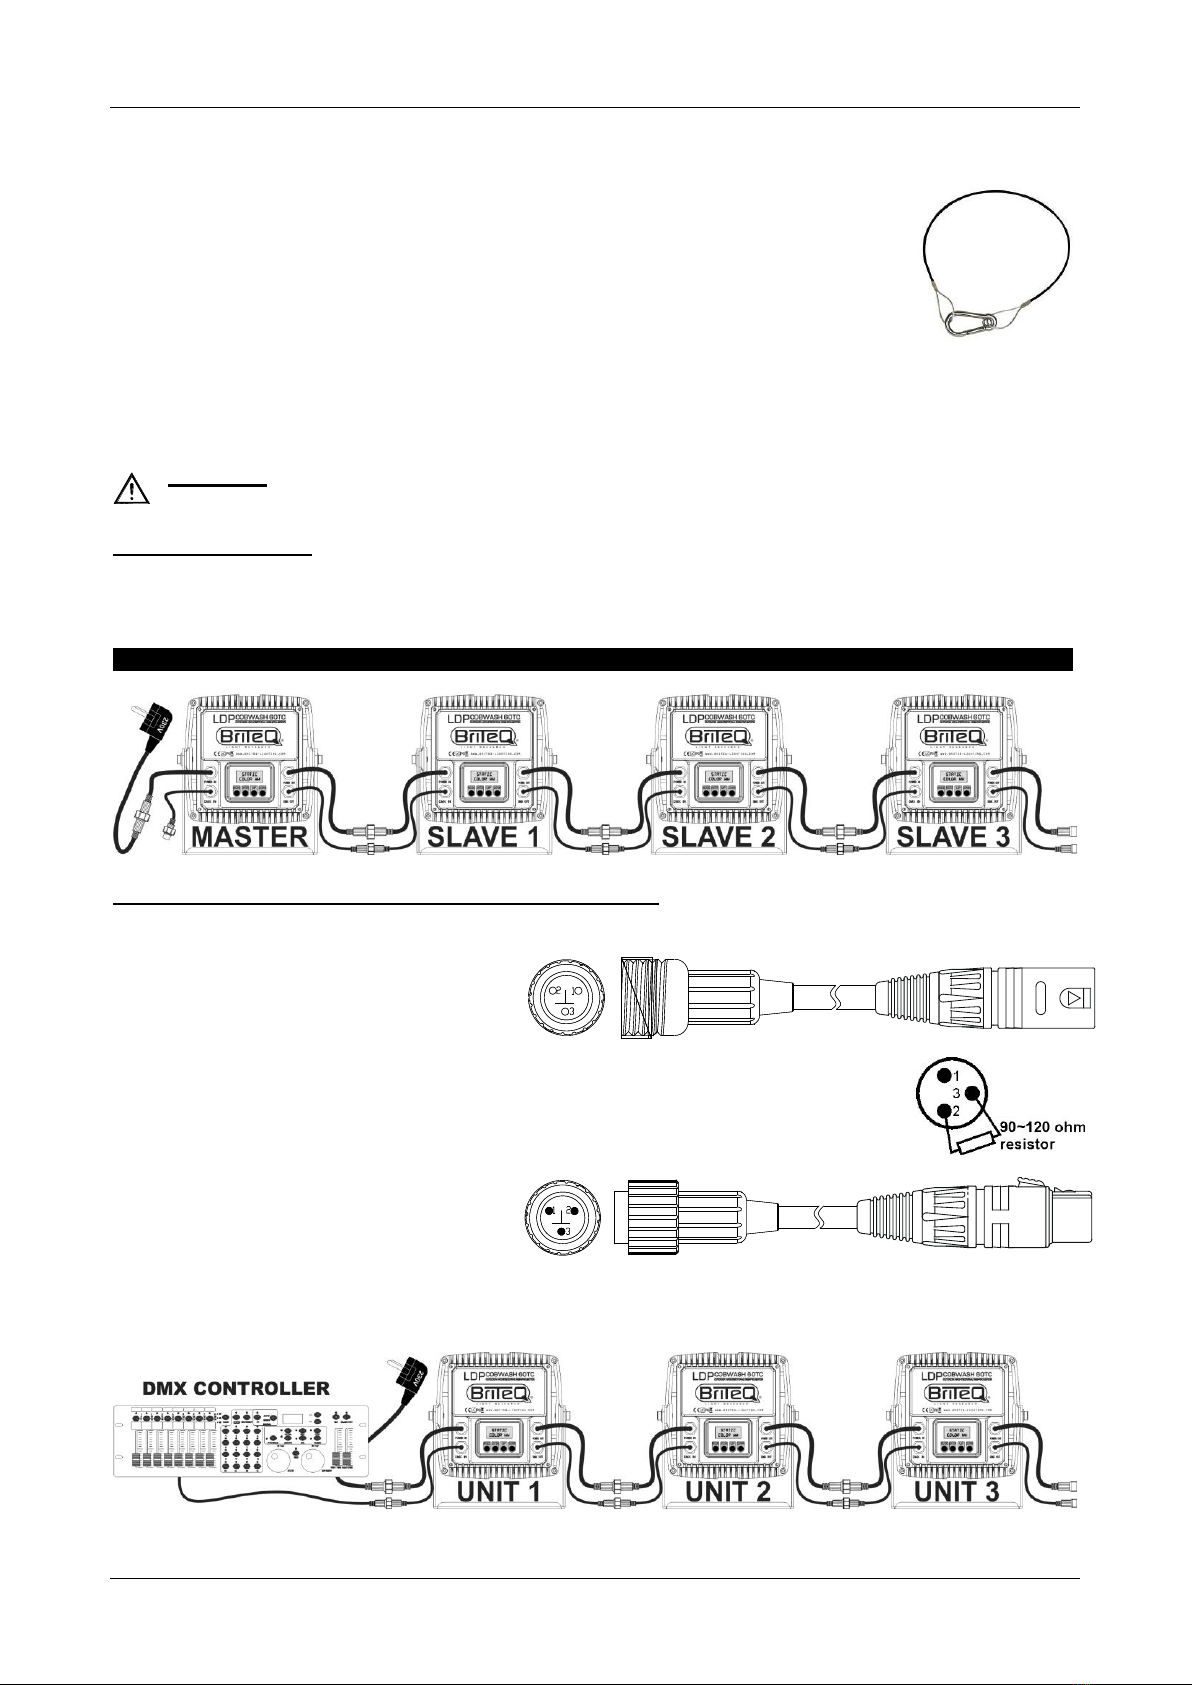
SLAVE MODE
Used to set the projector as slave in a master/slave setup.
Press the MODE button until SLAVE MODE is showing on the display.
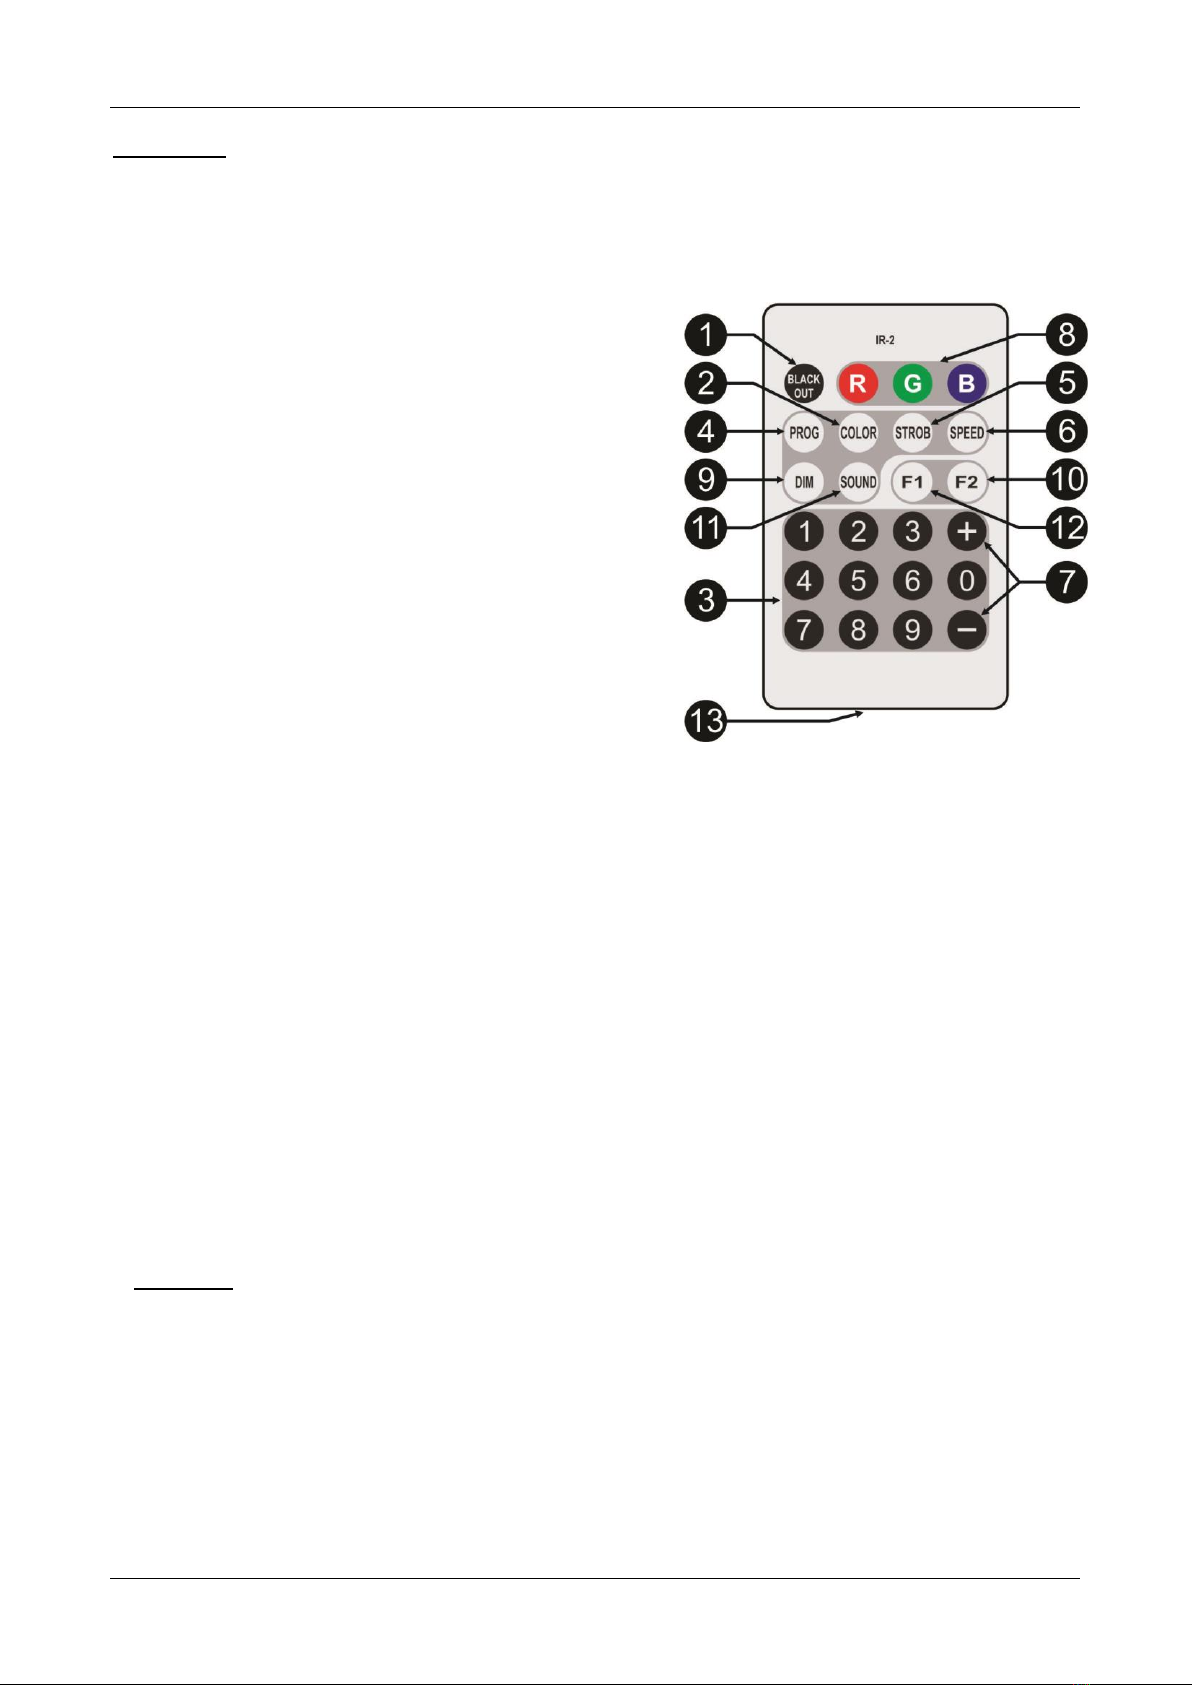
IR-REMOTE
Used to set the wireless remote function on/off.
Press the MODE button until the desired function is showing on the display.
Press the ENTER button: the values can be changed
Use DOWN and UP buttons to select the desired mode:
OFF The unit does not accept commands from the supplied remote controller.
ON The unit can be controlled by the supplied remote controller.
Once the correct option shows on the display, press the ENTER button to save it.
EFFECT MODE
Used to set the desired effect mode while used as master.
Press the MODE button until the desired function is showing on the display.
Press the ENTER button: the values can be changed
Use DOWN and UP buttons to selected the desired mode:
COL.CH7 (COLOR CHANGE 7) 7 colors change automatically without fading.
COL.CH3 (COLOR CHANGE 3) red, green and blue change automatically without fading.
COL.FADE (COLOR FADE) colors change with a nice fading effect.
Once the correct option shows on the display, press the ENTER button to save it.
Use DOWN and UP buttons to select the desired playback speed from 01 (very slow) to 99 (fast).
Once the correct value shows on the display, press the ENTER button to save it.
Use DOWN and UP buttons to select the desired strobe speed from 00 (NO strobe) to 99 (fast).
Once the correct value shows on the display, press the ENTER button to save it.
STATIC COLOR MODE
Used to set the desired fixed color while used as master: 9 preset colors + 1 custom color.
Press the MODE button until the desired function is showing on the display.
Press the ENTER button: the values can be changed
Use DOWN and UP buttons to selected the desired color:
COLOR WW warm white 3200K
COLOR CW warm white 5600K
RED
ORANGE
YELLOW

ENGLISH OPERATION MANUAL
BRITEQ®8/64 LDP-COBWASH 60TC + 150TC
GREEN
CYAN
BLUE
PURPLE
COLOR SET this is a color that can be set by the user. Follow these steps:
Press the ENTER button: the display shows the value (000-255) for RED. (change with ± buttons)
Press the ENTER button: the display shows the value (000-255) for GREEN. (change with ± buttons)
Press the ENTER button: the display shows the value (000-255) for BLUE. (change with ± buttons)
Repeat these steps until you have the desired values. The settings will be automatically saved.
MASTER DIM
Used to set the master dimmer while used as master.
Press the MODE button until the desired function is showing on the display.
Press the ENTER button: the values can be changed
Use DOWN and UP buttons to select the desired level for the master dimmer. (please note that the last
selected static color will be used to set the value)
Once you have the desired level, press the ENTER button to save it.
Note: the setting of this option has NO effect while the projector is used as SLAVE or in DMX-mode.
WHITE BALANCE
Used to set the white balance or to perfectly match the colors of several projectors.
Press the MODE button until the desired function is showing on the display.
Press the ENTER button: the display shows the value (050-255) for RED. (change with ± buttons)
Press the ENTER button: the display shows the value (050-255) for GREEN. (change with ± buttons)
Press the ENTER button: the display shows the value (050-255) for BLUE. (change with ± buttons)
Repeat these steps until you have the desired values. The settings will be automatically saved.
Note: the setting of this option affects all color settings, static colors and DMX-controlled colors.
DIMMER CURVE
Used to set the dimmer curve of the master dimmer.
Press the MODE button until the desired function is showing on the display.
Press the ENTER button: the values can be changed
Use DOWN and UP buttons to selected the desired curve:
Once you have the desired curve, press the ENTER button to save it.
LAMP BEHAVIOR
Used to select the reaction time of the projector.
Press the MODE button until the desired function is showing on the display.
Press the ENTER button: the values can be changed
Use DOWN and UP buttons to select the desired mode:
LED The projector follows the instructions instantly, no delay.
HALOGEN The projector imitates the behavior of a halogen lamp (slower reaction time).
Once the correct option shows on the display, press the ENTER button to save it.
LOCKING MODE
Used to lock the setup menu against unwanted altering of the settings.
Press the MODE button until the desired function is showing on the display.
Press the ENTER button: the values can be changed
Use DOWN and UP buttons to select the desired mode:
OFF The setup menu can be used at any time.
ON After a short time the setup menu locks automatically, the display shows “ LOCKED ***** ”.
Unlock the display by pressing the buttons in this order: UP, DOWN, UP, DOWN, ENTER.

ENGLISH OPERATION MANUAL
BRITEQ®9/64 LDP-COBWASH 60TC + 150TC
Once the correct option shows on the display, press the ENTER button to save it.
NO DMX BEHAVIOR
Used to set how the projector reacts when the DMX-signal suddenly disappears.
Press the MODE button until the desired function is showing on the display.
Press the ENTER button: the values can be changed
Use DOWN and UP buttons to select the desired mode:
BLACKOUT output turns black while no DMX is detected.
FREEZE: output based on the last valid DMX-signal is kept on the projector.
Once the correct option shows on the display, press the ENTER button to save it.
Note: as soon as the input detects a DMX-signal, blackout or freeze mode will be cancelled.
DEFAULT SETTINGS
This is your emergency exit if you really messed up the settings: just return to factory settings.
Also 2 user settings can be saved/loaded.
Press the MODE button until the desired function is showing on the display.
Press the ENTER button: the values can be changed
Use DOWN and UP buttons to selected the desired settings:
FACTORY
USER1
USER2
Press the ENTER button:
FACTORY was selected: the display shows “LOAD”
Press the ENTER button: the display shows “CONFIRM?”
Use DOWN and UP buttons to select YES / NO
Press the ENTER button to confirm.
USER1 / USER2 was selected: the display shows “ACTION?”
Use DOWN and UP buttons to select LOAD / SAVE
Press the ENTER button to confirm: the display shows “CONFIRM?”
Use DOWN and UP buttons to select YES / NO
Press the ENTER button to confirm.
SAVE was selected: the current settings of the setup menu are saved to memory.
LOAD was selected: the previously saved settings are loaded.
FIRMWARE VERSION
Used to show the current version of the firmware.
Press the MODE button until the FIRMWARE is showing on the display.
The firmware of this unit can be upgraded using a special upgrade tool with Windows®software. (separately
available from Briteq).
Each time the projector is switched on, the display shows “UPDATE Wait ….”: while this message shows on
the display you can start the update using our special upgrade tool. More information about this can be found
in the user manual of the upgrade tool and / or our website: www.briteq-lighting.com

ENGLISH OPERATION MANUAL
BRITEQ®10/64 LDP-COBWASH 60TC + 150TC
RDM FUNCTIONS / REMOTE SETUP
RDM means “Remote Device Management”. This projector works with a brief set of RDM-functions which
means that it can setup a bi-directional communication with an RDM-compatible DMX-controller. Some of
these functions are briefly explained below, others will be added in the future.
The DMX-controller sends out a “discovery command”, all RDM devices respond and send their unique
device ID.
The DMX-controller asks each RDM device for some basic data so it knows which devices are connected.
The projector will respond:
Device name: the actual name of the unit
Manufacturer: Briteq®
Category: LED Dimmer
Firmware: x.x.x.x (firmware version of the projector)
DMX address: xxx (current DMX start address of the projector)
DMX footprint: xx (number of DMX-channels used by the projector)
Personality: xx (current personality [or DMX-working mode] used by the projectors)
The DMX-controller can send certain commands to each RDM device which allow remote setup of the
units. Thanks to this the projectors can be setup remotely.
The following functions can be managed remotely:
No more need to take a ladder and set all units one by one!
DMX START ADDRESS: The start address can be set remotely from 001 to xxx.
PERSONALITY: The DMX working mode (DMX-chart) can be set remotely.
These 2 functions make it possible to prepare a complete DMX-patch of all projectors on the DMX-
controller and send these data to all projectors at once. More functions will be added later.
OPERATING INSTRUCTIONS
Note: when the projector is switched on the display shows “UPDATE WAIT …” This message informs you
that IF you want to upgrade the firmware, you should do it while this message is shown on the display. For
normal use you can ignore this message completely.
A. Standalone 1unit:
Just connect the projector to the mains.
Select menu option “MASTER” to set the desired light output.
Refer to chapter HOW TO SETUP to learn how to set the other menu options.
B. Two or more units in master/slave setup:
Connect the units together. Refer to the chapter “electrical installation” to learn how to do this.
Select menu option “MASTER” to set the desired light output on the master (the first projector in the
DMX chain)
Set all the other projectors in SLAVE mode
The projectors will now follow the settings of the master projector so they all work synchronously.
C. Controlled by universal DMX-controller:
Connect all units together. Refer to the chapter “Electrical installation for two or more units in DMX-
mode” to learn how to do this (don’t forget to address all units properly!)
Connect all units to the mains and turn on the DMX controller.
Since each unit has its own DMX-address, you can control them individually. Remember that each unit
can use a different number DMX-channels, depending on the DMX-mode you have selected in the
menu. See the different DMX charts below:
3 channel DMX-Mode: RGB
Channel:
Value:
Function:
Remarks
1
000-255
Red (0-100%)
2
000-255
Green (0-100%)
3
000-255
Blue (0-100%)

ENGLISH OPERATION MANUAL
BRITEQ®11/64 LDP-COBWASH 60TC + 150TC
4 channel DMX-Mode: RGB + MASTER DIM / STROBE
Note: This mode can be used with LEDCON-02 Mk2
Channel:
Value:
Function:
Remarks
1
000-255
Red (0-100%)
2
000-255
Green (0-100%)
3
000-255
Blue (0-100%)
4
000-200
Master dimmer
000=0% ~ 200=100% (full open)
201-247
Strobe
Increasing speed: 201=slow ~ 247=fast
248-255
Master dimmer @ 100%
Master dimmer is full open
4+ channel DMX-Mode: RGB + MASTER DIM (NO STROBE)
Channel:
Value:
Function:
Remarks
1
000-255
Red (0-100%)
2
000-255
Green (0-100%)
3
000-255
Blue (0-100%)
4
000-255
Master dimmer
000=0% ~ 255=100% (full open)
6 channel DMX-Mode: all pixels working together in RGB + MASTER DIM + STROBE
Channel:
Value:
Function:
Remarks
1
000-255
Master dimmer (0-100%)
2
000-007
No strobe (open)
008-255
Strobe
Increasing speed: 008=slow ~ 255=fast
3
000-007
No function
Channels 4+5+6 are active
008-255
Color fade effect
Increasing speed: 008= very slow ~ 255=fast
4
000-255
Red (0-100%)
Not used while CH3 = 008 ~ 255
5
000-255
Green (0-100%)
Not used while CH3 = 008 ~ 255
6
000-255
Blue (0-100%)
Not used while CH3 = 008 ~ 255
MAINTENANCE
Make sure the area below the installation place is free from unwanted persons during servicing.
Switch off the unit, unplug the mains cable and wait until the unit has been cooled down.
During inspection the following points should be checked:
All screws used for installing the device and any of its parts should be tightly fastened and may not be
corroded.
Housings, fixations and installations spots (ceiling, truss, suspensions) should be totally free from any
deformation.
When an optical lens is visibly damaged due to cracks or deep scratches, it must be replaced.
The mains cables must be in impeccable condition and should be replaced immediately when even a
small problem is detected.
In order to protect the device from overheat the cooling fans (if any) and ventilation openings should be
cleaned monthly.
The cleaning of internal and external optical lenses and/or mirrors must be carried out periodically to
optimize light output. Cleaning frequency depends on the environment in which the fixture operates: damp,
smoky or particularly dirty surroundings can cause greater accumulation of dirt on the unit’s optics.
Clean with a soft cloth using normal glass cleaning products.
Always dry the parts carefully.
Attention: We strongly recommend internal cleaning to be carried out by qualified technician!

ENGLISH OPERATION MANUAL
BRITEQ®12/64 LDP-COBWASH 60TC + 150TC
SPECIFICATIONS
MODEL
LDP-POWERWASH 60TC
LDP-POWERWASH 150TC
Power supply
AC 100-250V, 50/60Hz
Power consumption (RGB = max)
66Watt max (white 100%)
170Watt max (white 100%)
Power in/out linking capacity
10A max (2300Watt)
16A max (3600Watt)
Fuse
no user replaceable fuse
DMX connections
Waterproof 3pin cable
Conversion cables to 3pin XLR
male / female included
Waterproof 3pin cable
Conversion cables to 3pin XLR
male / female included
DMX channel modes
3 / 4 / 4+ / 6
3 / 4 / 4+ / 6
Lamp type
60W RGB COB led
150W RGB COB led
Beam angle:
120°
60°
Enclosure temperature (Ta: 40°C)
Surface: 75°C max.
Surface: 75°C max.
Dimensions HxWxD (mm)
223x202x122 (see drawing)
326x344x220 (see drawing)
Weight (kg)
3,8
9,5
Battery for the IR-remote
3V Lithium, model: CR2025
LDP-POWERWASH 60TC
LDP-POWERWASH 150TC
The information might be modified without prior notice
You can download the latest version of this user manual on our website: www.briteq-lighting.com

FRANÇAIS
GUIDE D'UTILISATION
BRITEQ®13/64 LDP-COBWASH 60TC + 150TC
GUIDE D'UTILISATION
Nous vous remercions d'avoir acheté ce produit Briteq®. Pour tirer pleinement profit de toutes les possibilités
du produit et pour votre propre sécurité, lisez ces instructions très attentivement avant d'utiliser cet appareil.
CARACTÉRISTIQUES
Cet appareil ne produit pas d'interférences radio. Ce produit répond aux exigences des directives
européennes et nationales actuelles. La conformité a été établie et les déclarations et documents
correspondants ont été déposés par le fabricant.
Puissant projecteur LED intérieur/extérieur IP65 muni d'une diode lumineuse COB RVB :
LDP-COBWASH 60TC : boîtier réduit, muni d'une diode lumineuse COB 60 W pour les applications
peu étendues.
LDP-COBWASH 150TC : boîtier plus grand, muni d'une diode lumineuse COB 150 W pour les
applications plus étendues.
Grâce au très large angle du faisceau, ce projecteur constitue une solution parfaite pour des applications
« à courte distance » telles que lèche-mur, mais également peut être bien adapté à des scènes de concert,
théâtres, discothèques, stands d'exposition etc.
Grâce aux sources ponctuelles RVB, vous obtiendrez un mélange de couleur parfait sans altération, même
à courte distance
Excellents programmes intégrés offrant de fabuleux jeux de lumière en perpétuels changements.
Excellent mélange de couleurs RVB et gradation à 0%.
Fonctionnement complètement silencieux, grâce au système de refroidissement par convection naturelle.
Afficheur à cristaux liquides alphanumérique rétroéclairé et touches tactiles étanches pour sélectionner les
différentes options dans le menu de configuration.
Fonctionnement en mode autonome, maître/esclave ou commandé par DMX : Dégradé de couleurs,
couleurs fixes/entrelacements
Les deux modèles sont utilisables en maître/esclave dans une chaîne DMX.
Contrôle DMX complet avec différents modes de canaux : 3 canaux, 4 canaux et 6 canaux.
Utilisable avec le contrôleur simple LEDCON-02 Mk2 !
Télécommande infrarouge incluse : aucun contrôleur complexe nécessaire !
Comportement des lampes au choix : lampe halogène (lente) ou LED (rapide)
Quatre courbes de variation de l'intensité : linéaire, carré, carré inversé, courbe en S
En cas d'échec DMX, le mode « tout éteint » ou « maintien » resteront disponibles.
Fonction de verrouillage afin d'empêcher les modifications indésirables de la configuration.
Entrées/sorties étanches spéciales : pour simplifier la mise en cascade de plusieurs unités.
Entrées/sorties étanches spéciales avec câbles adaptateur vers connecteur XLR pour plus de compatibilité
Haute efficacité et faible consommation d'énergie :
LDP-COBWASH 60TC : uniquement 68 W max à pleine puissance (couleur blanche).
LDP-COBWASH 150TC : uniquement 195 W max à pleine puissance (couleur blanche).
Support multifonction résistant, conçu pour les installations au sol et un montage en treillis.
Coupe-flux :
LDP-COBWASH 60TC : Disponible en option
LDP-COBWASH 150TC : Inclus et préinstallé
AVANT UTILISATION
Avant d'utiliser cet appareil, vérifiez s'il n'a pas été endommagé durant le transport. En cas de dommages,
n'utilisez pas l'appareil et consultez immédiatement votre revendeur.
Important : Cet appareil est expédié de notre usine en parfait état et bien emballé. Il est absolument
nécessaire que l'utilisateur suive strictement les instructions et les avertissements de sécurité se trouvant
dans ce manuel. Tout dommage dû à une mauvaise manipulation n'est pas garanti. Le revendeur
n'accepte aucune responsabilité pour tous les défauts et problèmes dus au non-respect de ce manuel.
Conservez ce manuel dans un endroit sûr pour toute consultation future. Si vous vendez l'appareil,
assurez-vous de joindre ce manuel.

FRANÇAIS
GUIDE D'UTILISATION
BRITEQ®14/64 LDP-COBWASH 60TC + 150TC
Vérifiez le contenu :
Vérifiez que le carton contient les éléments suivants :
Instructions d'utilisation
LDP-COBWASH 60TC ou LDP-COBWASH 150TC
Câble adaptateur d'alimentation (câble IP vers schuko, L=1,8 m)
Câble adaptateur d'entrée DMX (câble IP vers XLR mâle)
Câble adaptateur de sortie DMX (câble IP vers XLR femelle)
INSTRUCTIONS DE SÉCURITÉ :
Pour protéger l'environnement, essayez de recycler autant que possible les matériaux d'emballage.
Pour éviter une formation de condensation interne, laissez l'appareil s'adapter à la température ambiante
quand vous le mettez dans une pièce chaude après le transport. La condensation empêche parfois
l'appareil de fonctionner à plein rendement ou peut même causer des dommages.
Ne placez pas d'objets métalliques et ne renversez pas de liquides à l'intérieur de l'appareil. Un choc
électrique ou un dysfonctionnement peut en résulter. Si un corps étranger pénètre dans l'appareil,
débranchez immédiatement le cordon d'alimentation de la prise secteur.
Placez l'appareil dans un endroit bien aéré, loin de tout matériau et/ou liquide inflammable. L'appareil doit
être fixé à au moins 50 cm des murs environnants.
Ne couvrez pas les ouvertures de ventilation, cela pourrait entraîner une surchauffe.
Évitez une utilisation dans des environnements poussiéreux et nettoyez l'appareil régulièrement.
Gardez l'appareil loin de la portée des enfants.
Les personnes inexpérimentées ne doivent pas utiliser cet appareil.
La température ambiante de fonctionnement maximale est de 40°C. N'utilisez pas cet appareil à des
températures ambiantes plus élevées.
Assurez-vous qu'aucune personne étrangère ne se trouve dans la zone en dessous de l'emplacement
d'installation durant le montage, le démontage et l'entretien.
Laissez environ 10 minutes à l'appareil pour refroidir avant de commencer l'entretien.
Débranchez toujours l'appareil lorsqu'il ne va pas être utilisé pendant une longue période ou avant de
commencer l'entretien.
L'installation électrique doit être effectuée par du personnel qualifié, conformément à la réglementation en
matière de sécurité électrique et mécanique dans votre pays.
Vérifiez que la tension secteur n'est pas supérieure à celle indiquée sur l'appareil.
Le cordon d'alimentation doit toujours être en parfait état. Éteignez immédiatement l'appareil dès que le
cordon d'alimentation est écrasé ou endommagé. Il doit être remplacé par le fabricant, son agent de
service ou une personne de même qualification afin d'éviter tout danger.
Ne laissez jamais le cordon d'alimentation entrer en contact avec d'autres câbles !
Ce luminaire doit être mis à la terre pour être conforme à la réglementation en matière de sécurité.
Ne connectez pas l'appareil à un variateur de lumière.
ATTENTION : Pour réduire le risque de choc électrique, ne
retirez pas le panneau supérieur. L'appareil ne contient aucun
composant réparable par l'utilisateur. Confiez toute réparation à
un personnel qualifié uniquement.
Le symbole de l'éclair à l'intérieur d'un triangle équilatéral est destiné à alerter l'utilisateur de la
présence de « tensions dangereuses » non isolées à l'intérieur de l'appareil, d'une magnitude
pouvant constituer un risque d'électrocution.
Le symbole du point d'exclamation dans un triangle équilatéral sert à avertir l'utilisateur que
d'importants conseils d'utilisation et de maintenance sont fournis dans la documentation
accompagnant l'appareil.
Ce symbole signifie : pour usage intérieur uniquement
Ce symbole signifie : Lisez les instructions
Ce symbole définit : la distance minimale requise avec les objets éclairés. La distance minimale
entre la sortie de lumière et la surface éclairée doit être supérieure à un 1 mètre
Cet appareil n'est pas adapté pour un montage direct sur des surfaces normalement
inflammables. (ne convient que pour le montage sur surfaces non combustibles)
ATTENTION : Ne fixez pas votre regard sur une lampe allumée.
Peut être nocif pour les yeux.

FRANÇAIS
GUIDE D'UTILISATION
BRITEQ®15/64 LDP-COBWASH 60TC + 150TC
Utilisez toujours un câble de sécurité approprié et certifié lors de l'installation de l'appareil.
Afin d'éviter un choc électrique, n'ouvrez aucun panneau. L'appareil ne contient aucun composant
réparable par l'utilisateur.
Ne réparez jamais un fusible et ne court-circuitez jamais le porte-fusible. Remplacez toujours un fusible
endommagé par un fusible du même type ayant les mêmes spécifications électriques !
En cas de sérieux problèmes de fonctionnement, cessez d'utiliser l'appareil et contactez immédiatement
votre revendeur.
Le boîtier et l'objectif doivent être remplacés s'ils sont visiblement endommagés.
Utilisez l'emballage d'origine pour transporter l'appareil.
Pour des raisons de sécurité, il est interdit d'apporter des modifications non autorisées à l'appareil.
Important : Ne regardez jamais directement la source de lumière ! N'utilisez pas le jeu de lumière en
présence de personnes souffrant d'épilepsie.
DESCRIPTION :
PROJECTEUR
La description concerne le modèle LDP-COBWASH60TC. Toutes ces informations sont valables aussi pour
le modèle LDP-COBWASH150TC, sauf indication contraire.
1. ENTRÉE D'ALIMENTATION : câble d'entrée d'alimentation muni d'un connecteur à 4 broches d'indice
de protection spécial. Connectez ce câble au câble de sortie d'alimentation secteur du projecteur
précédent dans la chaîne ou utilisez le câble adaptateur fourni pour connecter directement le projecteur
à une prise électrique murale.
2. ENTRÉE DMX : Câble d'entrée DMX muni d'un connecteur à 3 broches d'indice de protection spécial.
Connectez ce câble au câble de sortie DMX du projecteur précédent dans la chaîne ou utilisez le câble
adaptateur fourni pour connecter directement l'unité à une sortie XLR standard d'un projecteur ou d'un
contrôleur DMX.
3. SORTIE D'ALIMENTATION : câble de sortie d'alimentation muni d'un connecteur à 4 broches d'indice
de protection spécial. Connectez ce câble au câble d'entrée d'alimentation du projecteur suivant dans la
chaîne. Puissance maximale de la ligne d'alimentation : 10 A (2300 W)
4. SORTIE DMX : Câble de sortie DMX muni d'un connecteur à 3 broches d'indice de protection spécial.
Connectez ce câble au câble de sortie DMX du projecteur suivant dans la chaîne ou utilisez le câble
adaptateur fourni pour connecter directement l'unité à une entrée XLR standard d'un projecteur DMX.
5. AFFICHEUR ET TOUCHES : Afficheur à cristaux liquides alphanumérique rétroéclairé et touches
tactiles étanches pour sélectionner les différentes options dans le menu de configuration :
Touche « MENU » : pour parcourir les différentes options de menu ou pour quitter une option de
menu.
Touche « DOWN » : pour passer à l'option de menu suivante ou pour diminuer la valeur d'un
paramètre.
Touche « UP » : pour passer à l'option de menu précédente ou pour augmenter la valeur d'un
paramètre.
Touche « ENTER » : pour sélectionner une option de menu ou valider un réglage.

FRANÇAIS
GUIDE D'UTILISATION
BRITEQ®16/64 LDP-COBWASH 60TC + 150TC
6. SUPPORTS DE SUSPENSION : avec verrous ou écrous hexagonaux sur les deux côtés pour fixer
l'unité. Le projecteur doit être fixé sur une paroi plane, au sol ou au plafond à l'aide d'au moins deux vis
adaptées.
7. ORIFICE DE SÉCURITÉ :utilisé pour attacher un câble de sécurité au cours du levage de l'appareil,
reportez-vous au paragraphe « Montage au plafond ».
8. Trous de fixation du COUPE-FLUX : utilisés pour fixer le COUPE-FLUX facultatif.
LDP-COBWASH 150TC : non prévus, coupe-flux préinstallés.
9. RÉCEPTEUR IR : reçoit les commandes de la télécommande IR. (fonctions à distance : voir plus loin
dans le document)
10. Diode lumineuse COB : puce LED spéciale de puissance élevée, évitez de regarder directement la
source de lumière à une courte distance.
11. VERRE TREMPÉ : rend le boîtier étanche. Remplacez immédiatement le verre s'il est fissuré ou brisé.
TÉLÉCOMMANDE IR :
Remarque : Vérifiez que la télécommande IR est activée dans le menu de configuration des options avant
de l’utiliser.
1. Touche [BLACKOUT] : permet d’allumer/éteindre l’unité
2. Touche [COLOR] : pour sélectionner l’une des couleurs fixes préprogrammées du projecteur. Appuyez
d’abord sur la touche [COLOR] suivie de l’une des 10 touches numériques pour sélectionner la couleur
souhaitée.
3. Touches de COULEUR (NUMÉROTÉES) : chaque touche représente une couleur.
Touche 1 : Blanc chaud
Touche 2 : blanc froid
Touche 3 : rouge
Touche 4 : orange
Touche 5 : jaune
Touche 6 : vert
Touche 7 : cyan
Touche 8 : bleu
Touche 9 : violet
Touche 0 : couleur personnalisée (mémorisée
précédemment)
4. Touche [PROG] : pour sélectionner un des programmes
d’effet. À chaque pression, vous passez à l’effet suivant :
1 pression : Variation de couleur sur 7 couleurs
choisies
2 pressions : Variation de couleur sur 3 couleurs
choisies
3 pressions : Effet de dégradé de couleur choisi
5. Touche [STROB] : pour activer ou désactiver la fonction
stroboscopique. Appuyez d’abord sur la touche [STROB] suivie des touches « ± » (7) pour régler la
vitesse de l’effet stroboscopique.
Remarque : agit sur les programmes d’effet.
6. Touche [SPEED] : pour régler la vitesse des programmes d’effet. Appuyez d’abord sur la touche
[SPEED] suivie des touches « ± » (7) pour régler la vitesse du programme.
7. Touches « ± » : pour augmenter/diminuer la valeur de la fonction choisie.
8. Touches de RÉGLAGE DE LA COULEUR PERSONNALISÉE : appuyez sur l’une de ces touches pour
sélectionner la couleur personnalisée fixe et régler l’une de ces composantes :
Appuyez sur la touche « R » : suivie des touches « ± » (7) pour régler la composante rouge de la
couleur personnalisée.
Appuyez sur la touche « G » : suivie des touches « ± » (7) pour régler la composante verte de la
couleur personnalisée.
Appuyez sur la touche « B » : suivie des touches « ± » (7) pour régler la composante bleue de la
couleur personnalisée.
9. Touche [DIM] : suivie des touches « ± » (7) pour régler le GRADATEUR PRINCIPAL.
10. Touche [F2] : pour commuter le projecteur en mode DMX et régler l'adresse DMX à distance. L'exemple
ci-dessous illustre le réglage de l'adresse DMX « 437 »
Appuyez sur la touche « S » : la sortie de lumière devient rouge.
Appuyez sur la touche du 1er numéro (3) : dans notre cas, la touche « 4 », la sortie de lumière
devient verte.

FRANÇAIS
GUIDE D'UTILISATION
BRITEQ®17/64 LDP-COBWASH 60TC + 150TC
Appuyez sur la touche du 2ème numéro (3) : dans notre cas, la touche « 3 », la sortie de lumière
devient bleue.
Appuyez sur la touche du 3ème numéro (3) : dans notre cas la touche “7”, la sortie clignote 2 fois
pour indiquer que la nouvelle adresse DMX a été acceptée.
11. Touche [SOUND] : pour lancer les programmes à commande sonore
12. Touche F1 : non utilisée pour ce projecteur
13. Compartiment de la pile : accueille une pile CR2025 de 3 V (fournie).
MONTAGE AU PLAFOND
Important : L'installation ne doit être effectuée que par un personnel qualifié. Une mauvaise
installation peut entraîner des blessures et/ou dommages graves. Un montage au plafond exige
une grande expérience ! Les limites de charge de fonctionnement doivent être respectées, des
matériels d'installation certifiés doivent être utilisés, l'appareil installé doit être inspecté
régulièrement pour vérifier les conditions de sécurité.
Assurez-vous qu'aucune personne étrangère ne se trouve dans la zone en dessous de l'emplacement
d'installation durant le montage, le démontage et l'entretien.
Fixez l'appareil dans un endroit bien aéré, loin de tout matériau et/ou liquide inflammable. L'appareil doit
être fixé à au moins 50 cm des murs environnants.
L'appareil doit être installé hors de portée des personnes, loin des passages et des endroits où des
personnes peuvent aller et venir, ou s'asseoir.
Avant de lever l'appareil, assurez-vous que le point de suspension peut supporter une charge d'au moins
10 fois le poids de l'appareil.
Lors de l'installation de l'appareil, utilisez toujours un câble de sécurité certifié qui peut
supporter 12 fois le poids de l'appareil. Ce support de suspension de sécurité
secondaire doit être installé de manière à ce qu'aucune partie de l'installation ne
puisse tomber de plus de 20 cm si le support principal lâche.
L'appareil doit être bien fixé, un montage balançant est dangereux et ne doit pas être
envisagé !
Ne couvrez pas les ouvertures de ventilation, cela pourrait entraîner une surchauffe.
L'opérateur doit s'assurer que la sécurité relative à l'installation et les conditions techniques sont
approuvées par un expert avant d'utiliser l'appareil pour la première fois. Les installations doivent être
inspectées chaque année par une personne qualifiée pour être sûr que la sécurité est toujours optimale.

FRANÇAIS
GUIDE D'UTILISATION
BRITEQ®18/64 LDP-COBWASH 60TC + 150TC
INSTALLATION ÉLECTRIQUE + ADRESSAGE
Important : L'installation électrique doit être effectuée par du personnel qualifié, conformément
à la réglementation en matière de sécurité électrique et mécanique dans votre pays.
Mode Maître/Esclave :
Connectez ensemble les projecteurs comme indiqué sur le schéma. Veuillez consulter le paragraphe
« MENU DE CONFIGURATION » pour configurer l'unité maître. Vous pouvez également activer la
télécommande IR sur l'unité maître et utiliser la télécommande IR incluse. Tous les unités esclave doivent
être réglées en mode ESCLAVE. Le nombre d'unité esclave est limité uniquement par la consommation
électrique totale de la chaîne qui est fixée à 10 A (2300 W).
IMPORTANT : vérifiez qu'aucun contrôleur DMX ne soit connecté, il en résulterait un comportement
imprévisible !
Installation électrique de deux ou plusieurs unités en mode DMX :
Le protocole DMX est largement utilisé pour contrôler des équipements lumineux multifonctions au moyen
d'un signal à haute vitesse. Vous devez « mettre en cascade » votre contrôleur DMX et toutes les unités
connectées.
Utilisez le câble adaptateur d'entrée DMX
(câble IP vers XLR mâle) fourni pour
connecter la première unité de la chaîne
au contrôleur.
Disposition du connecteur XLR à 3 broches : Broche 1 = terre ~ Broche 2 = signal négatif (-) ~ Broche 3 =
signal positif (+)
Pour éviter un comportement anormal des effets de lumière, à cause des
interférences, vous devez utiliser un terminateur de 90 à 120 Ωà la fin de la chaîne.
N'utilisez jamais de séparateurs de câbles en Y, cela ne fonctionne pas !
Si le projecteur est relié à des unités munies d'une entrée DMX normale avec un
connecteur XLR à 3 broches, veuillez
utiliser le câble adaptateur de sortie DMX
(câble IP vers XLR femelle) pour réaliser
la connexion.
Assurez-vous que toutes les unités sont branchées au secteur.
Chaque unité dans la chaîne doit avoir sa propre adresse de début afin qu'elle sache quelles sont les
commandes du contrôleur à décoder. Dans la section suivante, vous allez apprendre comment définir les
adresses DMX.
This manual suits for next models
1
Table of contents
Languages:
Popular Outdoor Light manuals by other brands

Philips
Philips AmazonLED2 BBC201 Mounting instructions

Würth
Würth WLH 1 Premium Translation of the original operating instructions

physa
physa MF-22 user manual

LIGMAN
LIGMAN LIGHT LINEAR PT-X 15 installation manual

Satco
Satco Nuvo 65-890 Installation and safety instructions

Telefunken
Telefunken MAL 31200xTF Mounting instructions