Broilermaster H3X-2 User manual

Page 1
PREMIUM GRILLS
GAS-FIRED
MODELS MODELS
H4X-2
H4XN-2
H4PK-2 Series
P4X-2
P4XF-2
P4XN-2
P4XFN-2
MODELS
R3-1 R3N-1
R3B-1 R3BN-1
MODELS MODELS
H3X-2 H3PK1N-3 P3X-2 P3XN-2
H3XN-2 H3PK2N-2 P3SX-2 P3SXN-2
H3PK1-3 H3PK3N-2 P3XF-2 P3XFN-2

B102163-0-1113Page 2
IMPORTANT
This manual should be read thoroughly by the person installing the grill and all persons
who will use and maintain the grill. The installer should be sure the manual is left in the
possession of the user. The user should retain this manual for future reference when us-
ing or cleaning the grill and to properly identify any repair parts that may be required.
WARNING
Reference this manual for proper installation and maintenance instructions. Improper
installation, adjustment, alteration, service or maintenance can cause personal injury or
property damage. For assistance or additional information consult a qualied installer,
service agency or the gas supplier.
DANGER: FOR YOUR SAFETY
IF YOU SMELL GAS:
1. Shut off gas to the appliance.
2. Extinguish any open ame.
3. Open the grill lid.
4. If odor continues, keep away from the appliance and imme-
diately call your gas supplier or your re department.
WARNING: FOR YOUR SAFETY
1. Do not store or use gasoline or other ammable vapors or liquids in the vicinity of
this or any other appliance.
2. An LP cylinder not connected for use shall not be stored in the vicinity of this or any
other appliance.
CAUTION:
Parts may have sharp edges. Wear leather work gloves and handle parts carefully dur-
ing the unpacking, assembly and installation.
WARNING
Broilmaster® Gas Grills must ONLY use propane cylinders equipped with an Overll
Protection Device (OPD). Use only a reputable propane dealer when exchanging or
lling cylinders. An overlled or improperly lled propane cylinder can be dangerous.

B102163-0-1113 Page 3
Congratulations!
Welcome to the beauty, durability, and prestige of a Premium Gas Grill
by Broilmaster®. With award-winning excellence built into every feature
and durability that surpasses other Premium gas grills, Broilmaster has
manufactured the ultimate gas grill for discriminating outdoor chefs for
over 30 years.
At Broilmaster, we continually strive to enhance the performance and
quality of our products for your grilling enjoyment. Every effort will be
made to ensure that Broilmaster continues to be your choice as the
Premium grill of the future.
Whether you are at the lake or in the privacy of your own backyard, the
Broilmaster®Premium Gas Grill performs far beyond the ordinary and is
designed to provide your family with years of outdoor cooking pleasure.
Thank You!
Broilmaster®is a registered trademark of
Empire Comfort Systems, Inc.
918 Freeburg Ave.
Belleville, Illinois 62220
Telephone 800-851-3153

B102163-0-1113Page 4
MASTER PARTS DISTRIBUTOR LIST .........................................................................................5
HOW TO ORDER REPAIR PARTS................................................................................................5
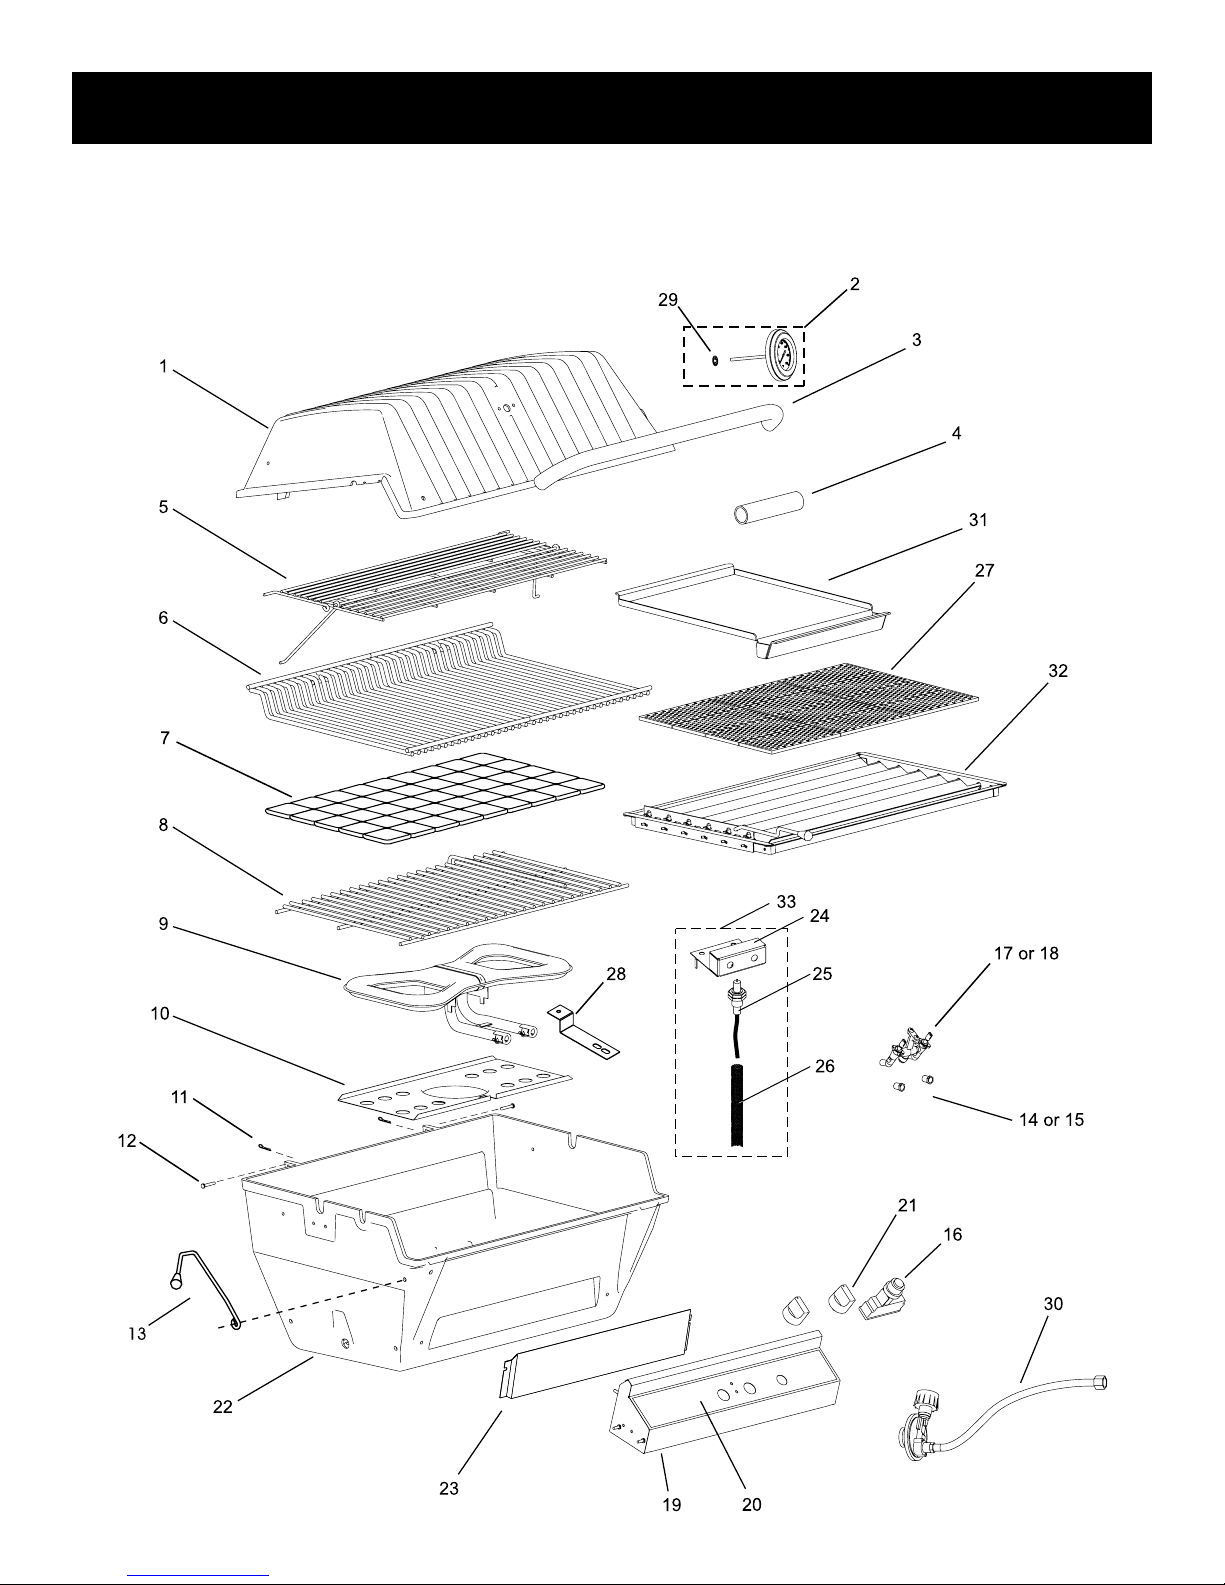
P3X SERIES PARTS DIAGRAM ...................................................................................................6
P3X SERIES PARTS LIST............................................................................................................. 7
P4X SERIES PARTS DIAGRAM ...................................................................................................8
P4X SERIES PARTS LIST............................................................................................................. 9
H3X SERIES PARTS DIAGRAM ................................................................................................. 10
H3X SERIES PARTS LIST........................................................................................................... 11
H4X SERIES PARTS DIAGRAM ................................................................................................. 12
H4X SERIES PARTS LIST........................................................................................................... 13
R3 SERIES PARTS DIAGRAM.................................................................................................... 14
R3 SERIES PARTS LIST .............................................................................................................15
GRILL ASSEMBLY ......................................................................................................................16
WARRANTY TERMS ..............................................................................................................16-17
PROPANE GAS GRILLS ........................................................................................................18-20
NATURAL GAS GRILLS ............................................................................................................. 21
OWNER’S MANUAL FOR P AND H SERIES GRILLS ..........................................................22-32
HARDWARE PACK - H3, H4.................................................................................................... 23
HARDWARE PACK - P3, P4 ....................................................................................................24
GRILL ASSEMBLY ..............................................................................................................25-29
OPERATION - PROPANE & NATURAL GAS GRILLS............................................................. 30
OPERATION............................................................................................................................. 30
MAINTENANCE .......................................................................................................................31
TROUBLESHOOTING .............................................................................................................32
OWNER’S MANUAL FOR R SERIES GRILLS ......................................................................33-47
HARDWARE PACK .................................................................................................................. 34
SAFETY PRECAUTIONS......................................................................................................... 35
GRILL ASSEMBLY ..............................................................................................................36-39
GAS CONVERSION TO NATURAL GAS................................................................................. 40
INFRARED COOKING .............................................................................................................41
INFRARED COOKING SAMPLE TIMES..................................................................................42
OPERATION - PROPANE & NATURAL GAS GRILLS........................................................43-44
BLUE FLAME BURNER MAINTENANCE................................................................................ 45
INFRARED BURNER MAINTENANCE.................................................................................... 46
TROUBLESHOOTING .............................................................................................................47
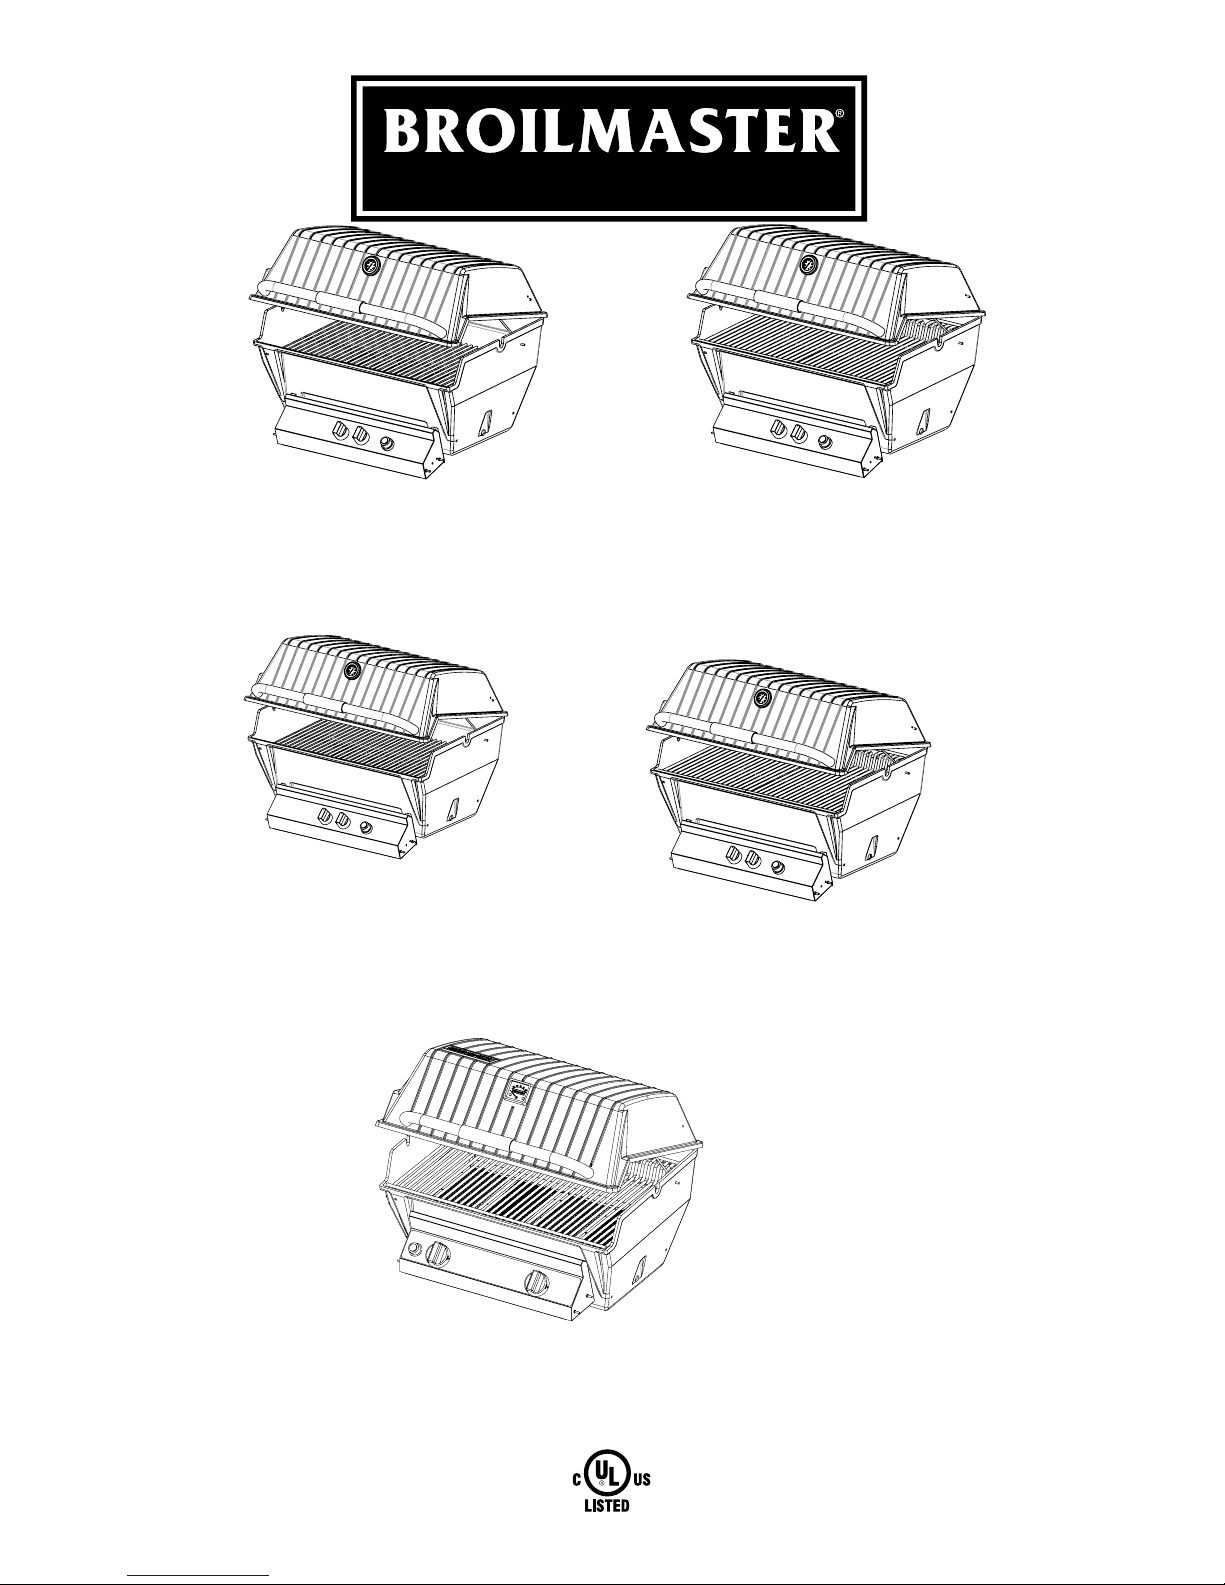
Congratulations!
You have chosen the nest grill for your outdoor cooking pleasure. Please take time to read this entire
manual before assembling your Premium Broilmaster® gas grill.
TABLE OF CONTENTS

B102163-0-1113 Page 5
To Order Parts Under Warranty, please contact your local Empire dealer. See the dealer locator at www.empirecomfort.com.
To provide warranty service, your dealer will need your name and address, purchase date and serial number, (located on
control panel heat shield) and the nature of the problem with the unit.
To Order Parts After the Warranty Period, please contact your dealer or one of the Master Parts Distributors listed below.
This list changes from time to time. For the current list, please click on the Master Parts button at www.empirecomfort.com.
Please note: Master Parts Distributors are independent businesses that stock the most commonly ordered Original Equip-
ment repair parts for Heaters, Grills, and Fireplaces manufactured by Empire Comfort Systems Inc.
MASTER PARTS DISTRIBUTOR LIST
Parts Not Under Warranty
Parts can be ordered through your Service Person, Dealer, or a Master Parts Distributor. See this page for the Master Parts Distribu-
tors list. For best results, the service person or dealer should order parts through the distributor. Parts can be shipped directly to the
service person/dealer.
Warranty Parts
Warranty parts will need a proof of purchase and can be ordered by your Service Person or Dealer. Proof of purchase is required for
warranty parts.
All parts listed in the Parts List have a Part Number. When ordering parts, rst obtain the Model Number and Serial Number from the
name plate on your equipment. Then determine the Part Number (not the Index Number) and the Description of each part from the fol-
lowing illustration and part list. Be sure to give all this information . . .
Appliance Model Number Part Description
Appliance Serial Number Part Number
Type of Gas (Propane or Natural)
Do not order bolts, screws, washers or nuts. They are standard hardware items and can be purchased at any local hardware store.
Shipments contingent upon strikes, res and all causes beyond our control.
HOW TO ORDER REPAIR PARTS
Dey Distributing
1401 Willow Lake Boulevard
Vadnais Heights, MN 55101
Phone: 651-490-9191
Toll Free: 800-397-1339
Website: www.deydistributing.com
Parts: Heater, Hearth and Grills
Victor Division of F. W. Webb Company
200 Locust Street
Hartford, CT 06114
Phone: 860-722-2433
Toll Free: 800-243-9360
Fax: 860-293-0479
Toll Free Fax: 800-274-2004
Websites: www.fwwebb.com & www.victormfg.com
Parts: Heater, Hearth and Grills
East Coast Energy Products
10 East Route 36
West Long Branch, NJ 07764
Phone: 732-870-8809
Toll Free: 800-755-8809
Fax: 732-870-8811
Website: www.eastcoastenergy.com
Parts: Heater, Hearth and Grills
Able Distributors
2501 North Central Avenue
Chicago, IL 60639
Phone: 773-889-5555
Toll Free: 800-880-2253
Fax: 773-466-1118
Website: www. abledistributors.com
Parts: Heater

B102163-0-1113Page 6
All repair part orders should be placed through your local Broilmaster® dealer. To locate a dealer in your
area visit www.broilmaster.com. To ensure prompt and accurate service, please provide the following
information when placing a repair part order: Model Number, Serial Number, Part Name, Part Number,
and Quantity of parts needed.
P3X SERIES PARTS DIAGRAM

B102163-0-1113 Page 7
P3X SERIES PARTS LIST
Index
No.
Description Part Number
P3SX P3SXN P3X P3XN P3XF P3XFN
1 Grill Body Top (with heat indicator, hinge) B102042 B102042 B102042 B102042 B102042 B102042
1 Grill Body Top (casting only) B101883 B101883 B101883 B101883 B101883 B101883
2 Heat Indicator (stainless) with push nut DPP119 DPP119 DPP119 DPP119 DPP119 DPP119
3 Lid Handle (stainless) B070486 B070486 B070486 B070486 B070486 B070486
4 Foam Grip B073097 B073097 B073097 B073097 B073097 B073097
5 Retract-A-Rack (stainless) B072695 B072695 B072695 B072695 B072695 B072695
6 Cooking Grid (two piece Stainless Steel DPA111 DPA111 DPA111 DPA111 DPA111 DPA111
7 Briquette Bag N/A N/A DPA34 DPA34 N/A N/A
8 Briquette Rack B101061 B101061 B101061 B101061 B101061 B101061
9Burner Assembly DPP111 DPP111 DPP111 DPP111 DPP111 DPP111
10 Wind Deector B101742 B101742 B101742 B101742 B101742 B101742
11 Bridge Pin B057805 B057805 B057805 B057805 B057805 B057805
12 Hinge Pin B057804 B057804 B057804 B057804 B057804 B057804
13 Lid Stop Kit DPA106 DPA106 DPA106 DPA106 DPA106 DPA106
14 Orice - LPG (#54 drill) P204 P204 P204 P204 P204 P204
15 Orice - NAT (#48 drill) P300 P300 P300 P300 P300 P300
16 Electric Ignitor B072218 B072218 B072218 B072218 B072218 B072218
17* Valve - LPG (without orices) B101420 B101420 B101420 B101420 B101420 B101420
18* Valve - NAT (without orices) B101421 B101421 B101421 B101421 B101421 B101421
19 Shelf Pin B073963 B073963 B073963 B073963 B073963 B073963
20 Control Panel Assembly (with label and shield) B102167 B102167 B102167 B102167 B102167 B102167
20 Control Panel Label (not shown) B101517 B101517 B101517 B101517 B101517 B101517
21 Valve Knob - Black B070084 B070084 B070084 B070084 B070084 B070084
22 Grill Body Bottom (casting only) B101879 B101879 B101879 B101879 B101879 B101879
23 Control Panel Shield B101622 B101622 B101622 B101622 B101622 B101622
24 Electrode Bracket B101834 B101834 B101834 B101834 B101834 B101834
25 Electrode B101666 B101666 B101666 B101666 B101666 B101666
26 Protective Sleeve B102041 B102041 B102041 B102041 B102041 B102041
27 Flare Busters Kit DPA116 DPA116 N/A N/A DPA116 DPA116
28 Burner Bracket DPP118 DPP118 DPP118 DPP118 DPP118 DPP118
29 Push Nut B101665 B101665 B101665 B101665 B101665 B101665
30 Hose & LPS Regulator B069756 N/A B069756 N/A B069756 N/A
31 Griddle, Stainless Steel B101400 B101400 N/A N/A N/A N/A
32 Smoker/Shutter (includes Actuator Arm & Knob DPA100 DPA100 N/A N/A N/A N/A
33 Collector Box Assembly DPP116 DPP116 DPP116 DPP116 DPP116 DPP116
NS Ignitor Ground Wire B072684 B072684 B072684 B072684 B072684 B072684
NS Hardware Package B101973 B101973 B101973 B101973 B101973 B101973
NS Actuator Arm - Smoker/Shutter B100408 B100408 N/A N/A N/A N/A
NS Knob - Smoker/Shutter Knob B100098 B100098 N/A N/A N/A N/A
NS - Not Shown
*Valves are not convertible. To convert the unit to a different gas type, a new valve must be purchased.

B102163-0-1113Page 8
All repair part orders should be placed through your local Broilmaster® dealer. To locate a dealer in your
area visit www.broilmaster.com. To ensure prompt and accurate service, please provide the following
information when placing a repair part order: Model Number, Serial Number, Part Name, Part Number,
and Quantity of parts needed.
P4X SERIES PARTS DIAGRAM
21
16
20
28
23
22
12
11
10
17 or 18
8
9
6
5
1
3
4
14 or 15
7
31
19
27
2
30
29
34 24
25
26

B102163-0-1113 Page 9
P4X SERIES PARTS LIST
Index
No. Description Part Number
P4X P4XN P4XF P4XFN
1 Grill Body Top (with heat indicator, hinge) B102043 B102043 B102043 B102043
1 Grill Body Top (casting only) B076621 B076621 B076621 B076621
2 Heat Indicator (stainless) DPP119 DPP119 DPP119 DPP119
3 Lid Handle (stainless) B070486 B070486 B070486 B070486
4 Foam Grip B073097 B073097 B073097 B073097
5 Warming Rack (stainless) B072696 B072696 B072696 B072696
6 Cooking Grid (two piece Stainless Steel DPA112 DPA112 DPA112 DPA112
7 Briquette Bag DPA34 DPA34 N/A N/A
8 Briquette Rack B067449 B067449 B067449 B067449
9Burner Assembly DPP111 DPP111 DPP111 DPP111
10 Wind Deector B101742 B101742 B101742 B101742
11 Bridge Pin B057805 B057805 B057805 B057805
12 Hinge Pin B057804 B057804 B057804 B057804
13 Lid Stop Kit DPA106 DPA106 DPA106 DPA106
14 Orice - LPG (#55 drill) P182 P182 P182 P182
15 Orice - NAT (#49 drill) P265 P265 P265 P265
16 Electric Ignitor B072218 B072218 B072218 B072218
17* Valve - LPG (without orices) B101420 B101420 B101420 B101420
18* Valve - NAT (without orices) B101421 B101421 B101421 B101421
19 Shelf Pin B073963 B073963 B073963 B073963
20 Control Panel Assembly (w/label and shield) B102168 B102168 B102168 B102168
20 Control Panel Label B101518 B101518 B101518 B101518
21 Valve Knob - Black B070084 B070084 B070084 B070084
22 Grill Body Bottom (casting only) B101443 B101443 B101443 B101443
23 Control Panel Shield B101621 B101621 B101621 B101621
24 Electrode Bracket B101834 B101834 B101834 B101834
25 Electrode B101666 B101666 B101666 B101666
26 Protective Sleeve B102041 B102041 B102041 B102041
27 Flare Busters Kit N/A N/A DPA117 DPA117
28 Burner Bracket DPP118 DPP118 DPP118 DPP118
29 Push Nut B101665 B101665 B101665 B101665
30 Mounting Plate Assembly B101997 N/A B101997 N/A
31 Hose & LPS Regulator B069756 N/A B069756 N/A
34 Collector Box Assembly DPP116 DPP116 DPP116 DPP116
NS Hardware Package - LPG & NAT B101973 B101973 B101973 B101973
NS Ignitor Ground Wire B072684 B072684 B072684 B072684
NS - Not Shown
*Valves are not convertible. To convert the unit to a different gas type, a new valve must be purchased.

B102163-0-1113Page 10
All repair part orders should be placed through your local Broilmaster® dealer. To locate a dealer in your
area visit www.broilmaster.com. To ensure prompt and accurate service, please provide the following
information when placing a repair part order: Model Number, Serial Number, Part Name, Part Number,
and Quantity of parts needed.
H3X SERIES PARTS DIAGRAM
31 24
26
2
27
29
30
25

B102163-0-1113 Page 11
H3X SERIES PARTS LIST
Index No. Part Description Part Number
H3X H3XN
1 Grill Body Top (with heat indicator, hinge, B102042 B102042
1 Grill Body Top (casting only) B100456 B100456
2 Heat Indicator (stainless) DPP119 DPP119
3 Lid Handle (stainless) B070486 B070486
4 Foam Grip B073097 B073097
5 Warming Rack (Chrome) B100594 B100594
6 Cooking Grid (two piece Stainless Steel) B101397 B101397
7 Briquette Bag B058122 B058122
8 Briquette Rack B101061 B101061
9Burner Assembly DPP109 DPP109
10 Wind Deector B063065 B063065
11 Bridge Pin B057805 B057805
12 Hinge Pin B057804 B057804
13** Lid Stop Kit DPA106 DPA106
14 Orice - LPG (#55 drill) P182 P182
15 Orice - NAT (#49 drill) P265 P265
16 Electric Ignitor B072218 B072218
17* Valve - LPG (without orices) B101420 B101420
18* Valve - NAT (without orices) B101421 B101421
19 Shelf Pin B073963 B073963
20 Control Panel Assembly (with label) B101563 B101563
20 Control Panel Label (not shown) B101517 B101517
21 Valve Knob - Black B070084 B070084
22 Grill Body Bottom (casting only) B101879 B101879
23 Control Panel Shield B101622 B101622
24 Electrode Bracket B101834 B101834
25 Electrode B101666 B101666
26 Protective Sleeve B102041 B102041
27 Burner Bracket DPP118 DPP118
28 Hose & LPS Regulator B069756 N/A
29 Push Nut B101665 B101665
30 Mounting Plate Assembly B101997 B101997
31 Collector Box Assembly DPP116 DPP116
NS Hardware Package B101971 B101971
NS Ignitor Ground Wire B072684 B072684
NS - Not Shown
*Valves are not convertible. To convert the unit to a different gas type, a new valve must be purchased.
**Note: H3 Series grills do not come with a Lid Stop Kit. The Lid Stop Kit must be purchased separately.

B102163-0-1113Page 12
H4X SERIES PARTS DIAGRAM
21
16
20
23
22
12
11
10
17 or 18
8
9
6
5
1
3
4
14 or 15
7
31
19
28
2
24
25
27
29 30
26

B102163-0-1113 Page 13
H4X SERIES PARTS LIST
Index No. Description Part Number
H4X H4XN
1 Grill Body Top (with heat indicator, hinge) B102043 B102043
1 Grill Body Top (casting only) B076621 B076621
2 Heat Indicator (stainless) DPP119 DPP119
3 Lid Handle (stainless) B070486 B070486
4 Foam Grip B073097 B073097
5 Warming Rack (stainless) B072696 B072696
6 Cooking Grid DPA114 DPA114
7 Briquette Bag DPA34 DPA34
8 Briquette Rack B067449 B067449
9Burner Assembly DPP115 DPP115
10 Wind Deector B101742 B101742
11 Bridge Pin B057805 B057805
12 Hinge Pin B057804 B057804
13** Lid Stop Kit DPA106 DPA106
14 Orice - LPG (#122 mm) P312 P312
15 Orice - NAT (#50 drill) P245 P245
16 Electric Ignitor B072218 B072218
17* Valve - LPG (without orices) B101420 B101420
18* Valve - NAT (without orices) B101421 B101421
19 Shelf Pin B073963 B073963
20 Control Panel Assembly (w/label and shield) B102168 B102168
20 Control Panel Label B101518 B101518
21 Valve Knob - Black B070084 B070084
22 Grill Body Bottom (casting only) B101443 B101443
23 Control Panel Shield B101621 B101621
24 Collector Box Assembly DPP116 DPP116
25 Electrode Bracket B101834 B101834
26 Electrode B101666 B101666
27 Protective Sleeve B102041 B102041
28 Burner Bracket DPP118 DPP118
29 Push Nut B101665 B101665
30 Mounting Plate Assembly B101997 B101997
31 Hose & LPS Regulator B069756 N/A
NS Hardware Package - LPG & NAT DPP116 DPP116
NS Ignitor Ground Wire B072684 B072684
NS - Not Shown
*Valves are not convertible. To convert the unit to a different gas type, a new valve must be purchased.
**Note: H4 Series grills do not come with a Lid Stop Kit. The Lid Stop Kit must be purchased separately.

B102163-0-1113Page 14
All repair part orders should be placed through your local Broilmaster dealer. To locate a dealer in your
area, visit www.Broilmaster.com. To ensure prompt and accurate service, please provide the following
information when placing a repair part order: Model Number, Serial Number, Part Name, Part Number,
and Quantity of parts needed.
2
1
3
6
4
5
7
8
12
11
10
9
13
14
16
19
20
21
22 18
17
15
23
24
25
26
R3 SERIES PARTS DIAGRAM

B102163-0-1113 Page 15
Index
No. Description
Part Number
R3 R3N R3B R3BN
1 Grill Body Top - Black B100456 B100456 B100456 B100456
2 Heat Indicator (Stainless) B101406 B101406 B101406 B101406
3 Lid Handle (Stainless) B070486 B070486 B070486 B070486
4 Foam Grip B073097 B073097 B073097 B073097
5 Stainless Steel Retract-A-Rack B072695 B072695 B072695 B072695
6 Stainless Steel V-Channel Cooking Grid
(Qty 2 for R3 and R3N)
DPA121 DPA121 DPA121 DPA121
7 Briquet Rack N/A N/A B101369 B101369
8 Burner N/A N/A B101030 B101030
9 Burner Shield N/A N/A B101154 B101154
10 Collector Box Assembly N/A N/A B101212 B101212
11 Ignitor Spacer N/A N/A B101082 B101082
12 Infrared Burner (one required) N/A N/A B102180 B102180
12 Infrared Burner (two required) B102180 B102180 N/A N/A
13 Wind Deector B101045 B101045 B101045 B101045
14 Grill Body Bottom - Black B101881 B101881 B101881 B101881
15 Infrared Ignitor (one Required) N/A N/A B101271 B101271
15 Infrared Ignitor (two Required) B101271 B101271 N/A N/A
16 Control Panel Shield B101046 B101046 B101046 B101046
17 Pin, Shelf B073963 B073963 B073963 B073963
18 Manifold And Valve Assembly (includes orices) B101356 B101316 B101314 B101317
19 Electronic Ignitor B072218 B072218 B072218 B072218
20 Control Panel Assembly (w/label and shield) B102169 B102169 B102169 B102169
21 Control Panel Label B101272 B101272 B101272 B101272
22 Valve Knob R3918 R3918 R3918 R3918
23 Hose And LP Regulator B069756 N/A B069756 N/A
24* Control Housing - Stainless Steel B101121 B101121 B101121 B101121
25** Cover Plate - Black B101596 B101596 B101596 B101596
25a** Cover Plate - Black B101767 B101767 B101767 B101767
25** Cover Plate - Stainless Steel B101597 B101597 B101597 B101597
25b** Cover Plate - Stainless Steel B101768 B101768 B101768 B101768
26 Burner Screen B102182 B102182 B102182 B102182
N/S Char-Master Briquets N/A N/A B101323 B101323
N/S Hardware Pack B101274 B101275 B101309 B101310
N/S Bridge Pin B057805 B057805 B057805 B057805
N/S Hinge Pin B057804 B057804 B057804 B057804
N/S Natural Gas Conversion Kit BCK1004 N/A BCK1004 N/A
N/S Ground Lug (two Required) B069747 B069747 N/A N/A
N/S Ground Wire B072684 B072684 N/A N/A
N/S Hardware Pack, Adjustable Lid Stop B101097 B101097 B101097 B101097
N/S - NOT SHOWN
*Control Housing is used only when installing grill head onto cart. See the instructions that come with the cart for Control Housing
installation instructions.
** Cover Plate is used only when installing grill head onto post. See the instructions that come with the post for Cover Plate installation
instructions.
R3 SERIES PARTS LIST

B102163-0-1113Page 16
Before You Begin
All Broilmaster grills require some assembly and installation. Follow
all instructions unless noted to apply only to other specic models.
If you purchased an accessory with your Broilmaster, follow
the instructions provided with the accessory for assembly and
installation. If an instruction refers to a step that is not required for
your grill model, please continue to the next step.
Compare the parts found in the shipping container to the parts list
provided. If any parts are missing contact your Broilmaster®dealer
before beginning assembly.
CAUTION: FOR YOUR SAFETY
Parts may have sharp edges. Wear leather work gloves and
handle parts carefully during the unpacking, assembly and
installation.
Recommended Tools
These items are recommended for the assembly of your grill:
Do NOT use power tools.
• Phillips screwdriver
• Adjustable wrench set
• Socket set
• Soapy water solution (to test for leaks)
• Liquid soap (for foam grip)
Grill Mountings
Assemble your base option before assembling your Broilmas-
ter®grill head.
Refer to the Broilmaster® Cart, Base, and Post instructions
provided with each accessory for assembly, installation, and
mounting procedures.
GRILL ASSEMBLY
Empire Comfort Systems Inc. warranties this Broilmaster premium gas grill to be free from defects at the time of purchase and for the
periods specied below. Broilmaster Premium Gas Grills must be installed by a qualied technician and must be maintained and oper-
ated safely, in accordance with the instructions in the owner’s manual. This warranty applies to the original purchaser only and is not
transferable. All warranty repairs must be accomplished by a qualied gas appliance technician.
Limited Lifetime Parts Warranty – Against Rust-Through
If the items listed below fail because of defective workmanship or material, Empire will repair or replace at Empire’s option.
• Aluminum Grill Housing (except paint)
• Stainless Steel Cooking Grids and Stainless Steel Griddles
• Select Stainless Steel Components – Cart, Mounting, Bowtie Burner, Side Burner (DPA150, DPA151), Side Burner Housing
(DPA152), and Warming Rack
• Stainless Steel Built-In Components – Built-In Kits for 3-Series Grill Heads, Door Kit, Tilt-Out LP Tank Door, and Vent Register
Kit
Limited Ten-Year Parts Warranty – Against Rust-Through
If the items listed below fail because of defective workmanship or material, Empire will repair or replace at Empire’s option.
• H-Series and R3B Stainless Steel Burners
WARRANTY TERMS

B102163-0-1113 Page 17
WARRANTY TERMS
Limited Five-Year Parts Warranty – Against Rust-Through
If the items listed below fail because of defective workmanship or material, Empire will repair or replace at Empire’s option.
• Infrared Burners on R3 or R3B
• Flare Buster™ Ceramic Flavor Enhancers
• Painted Electro-Galvanized Steel Components
• Stainless Steel Smoker Shutter
Limited Two-Year Parts Warranty – Against Rust-Through
If the items listed below fail because of defective workmanship or material, Empire will repair or replace at Empire’s option.
• Porcelain Coated Steel Briquette Racks
• Chrome-Plated Warming Rack
• Stainless Steel Flavor Screen
• Stainless Steel Heat Shield
Limited One-Year Parts Warranty
If the items listed below fail because of defective workmanship or material, Empire will repair or replace at Empire’s option.
• Valves, knobs, ignitors, labels, hoses, ttings and all other parts and accessories – including those made from stainless steel –
unless specied above
• Paint on Aluminum Grill Head
Duties Of The Owner
The appliance must be installed by a qualied installer and operated in accordance with the instructions furnished with the ap-
pliance.
A bill of sale, cancelled check, or payment record should be kept to verify purchase date and establish warranty period.
Ready access to the appliance for service.
What Is Not Covered
Damages that might result from the use, misuse, or improper installation or storage of this appliance.
Travel, diagnostic costs and freight charges on warranted parts to and from the factory.
Claims that do not involve defective workmanship or materials.
Unauthorized service or parts replacements.
Removal and reinstallation cost.
Inoperable due to improper or lack of maintenance.
The costs of a service call to diagnose a problem and labor for replacement or repairs.
How To Get Service
To make a claim under this warranty, please have your receipt available and contact your installing dealer. Provide the dealer
with the model number, serial number, type of gas, and purchase verication. The installing dealer is responsible for providing service
and will contact the factory to initiate any warranted parts replacements. Empire will make replacement parts available at the factory.
Shipping expenses are not covered.
If, after contacting your Empire dealer, service received has not been satisfactory, contact: Consumer Relations Department,
Empire Comfort Systems Inc., PO Box 529, Belleville, Illinois 62222, or send an e-mail to [email protected] with “Consumer
Relations” in the subject line.
Your Rights Under State Law
This warranty gives your specic legal rights, and you may also have other rights, which vary from state to state.
Broilmaster is a Division of Empire Comfort Systems, Inc.

B102163-0-1113Page 18
Grill Location
When choosing the ideal location for your Broilmaster®Premium
Gas Grill, remember this grill is designed for outdoor use ONLY.
You should never install or operate your grill in any building, garage,
or other enclosed area.
For your safety, this grill should not be installed or operated under
any combustible materials, such as carports, covered porches,
awnings, or overhangs.
Never install or operate your grill in or on any recreational vehicle
or boat.
CAUTION: The installation and operation of this grill at clear-
ances less than specied below may lead to the possibility of
re, property damage, or personal injury.
A minimum clearance of 16 inches is required from the sides of the
grill to any combustible material.
A minimum clearance of 18 inches is required from the back of the
grill to any combustible material.
Some examples of combustible materials are a wall, a fence, patio
furniture, or the wall of your home.
The area surrounding the grill should be clear to ensure proper
ventilation. Do not obstruct the ow of combustion and ventilation
air in any way. The ventilation openings on the propane cylinder
enclosure must also remain free and clear of debris.
Portable grills should be level and positioned away from direct wind
prior to each use.
WARNING: Do not install or operate this grill where gaso-
line or other ammable materials are used or stored. Failure
to comply with this warning could result in explosion or re
causing property damage or personal injury.
Cylinder Requirements
Your Broilmaster®Premium Gas Grill requires a standard twenty
pound propane gas cylinder.
The maximum height allowable for a replacement cylinder is ap-
proximately twelve inches (30.5 centimeters).
The propane gas cylinder used must be:
1. Constructed and marked in accordance with the specications
for LP gas cylinder of the U.S. Department of Transportation
(D.O.T.) or the National Standard of Canada, CAN/CSA-B339,
Cylinders, Spheres, and Tubes for Transportation of Dangerous
Goods; and Commission as applicable.
2. Provided with a listed overlling protection device (OPD).
3. Provided with a listed safety device having direct access with
the vapor space of the cylinder and the cylinder supply system
must be arranged for vapor removal.
4. Provided with a shutoff valve terminating in a valve outlet as
specied in the Standard for Compressed Gas Cylinder Outlet
and Inlet Connections, ANSICGA-V-1.
5. Provided with a plug to effectively seal off the cylinder outlet
when the cylinder is being stored or transported.
6. Provided with a collar to protect the cylinder valve.
Caution: Do not use a propane gas cylinder which has a capac-
ity greater than twenty pounds with this grill and side burner.
PROPANE GAS GRILLS

B102163-0-1113 Page 19
Propane Cylinder Safety
Liquid Propane (LP) gas has a long history of safe use when the
safety precautions provided in this manual are followed.
Failure to follow these safety precautions could result in a
re or explosion causing property damage or personal injury.
Propane gas cylinders should always be handled, stored, and
transported with extreme caution in a secured upright position.
Never attempt to use or repair a propane gas cylinder that has been
damaged. Never attempt to use or repair a cylinder with a faulty or
damaged valve outlet. A cylinder that has been dropped, dented,
or otherwise damaged must be replaced.
A propane gas cylinder should never be transported in the pas-
senger area of a vehicle.
Keep cylinders out of direct sunlight and never apply any other
source of direct heat to them.
When relling your cylinder, always insist on a reputable, qualied
gas dealer. Your propane gas cylinder is lled by weight, and should
never exceed eighty percent (80%) of its weight limit. If the cylin-
der is not completely empty, the gas dealer must make necessary
adjustments to ensure it is not overlled. Never use an overlled
Propane gas cylinder.
Cylinder Storage
Your grill must be stored outdoors in a well ventilated area if the
cylinder is attached to it.
Disconnected cylinders must have a threaded valve plug tightly
installed and must not be stored in any building, garage, or other
enclosed area.
Flammable materials (gasoline, grill covers, etc.) must not be stored
in the cylinder enclosure.
Always store Propane cylinders in a secured upright position, out
of the reach of children.
PROPANE GAS GRILLS
Connection Requirements
Caution: Never use Liquid Propane (LP) gas in a grill designed
for Natural gas, or Natural gas in a grill designed for Liquid
Propane gas. Questions regarding different types of gases
should be directed to your local gas supplier.
Installation must conform to local codes or, in the absence of local
codes, with the National Fuel Gas Code, ANSI Z223.1. In Canada,
installation shall be in accordance with CAN/CGA-B149.2 Propane
Installation Code, or CAN/CGA-B149.1 Natural Gas Installation
Code, and local codes where applicable. Consult your local gas
supplier or propane gas dealer for code regulations and recom-
mended procedures.
Warning: Broilmaster®Premium Gas Grills require Liquid
Propane (LP) cylinders equipped with an Overll Protection
Device (OPD). An overlled or improperly lled Propane cyl-
inder can be dangerous.
Always use the pressure regulator and hose assembly supplied
with your Propane gas grill.
Note: Not all valve and cylinder combinations are compatible.
Check warning tag on valve and cylinder as well as external tting
threads.
All Broilmaster®pressure regulators and hose assemblies require
Propane cylinders with a Type 1 connection device as illustrated.
See Figure 1.
Figure 1

B102163-0-1113Page 20
Pressure Regulator and Hose Assembly
The pressure regulator has an outlet pressure of not more than
eleven inches water column. It must be connected to the Propane
gas cylinder’s female valve outlet before the grill can be operated.
Caution: Operation of a Propane gas grill without the pres-
sure regulator and hose assembly will cause gas leaks which
could lead to re or explosion, resulting in property damage
or personal injury.
The pressure regulator’s tting must remain clean and free of nicks
and scratches. A dirty, nicked or scratched tting can cause a gas
leak, resulting in an explosion or re. Use only genuine Broilmaster®
replacement parts unless otherwise specied by the manufacturer.
PROPANE GAS GRILLS
Connecting to Propane Gas / Cylinder Retention Means
ATTENTION: Propane gas cylinders that are acceptable for
use with this grill must comply with Cylinder Requirements, Page
18, and Connection Requirements, Page 19.
Position the cylinder in the opening in the bottom of the cart and
secure with the cylinder retaining bracket. See Figure 2.
Figure 2
Attach the pressure regulator to the Propane gas cylinder’s valve
using the plastic handwheel. Tighten in a clockwise motion to
achieve a gas tight seal. See Figure 3.
CLOCKWISE
Figure 3
Caution: Do not use a wrench or any other tool to tighten. Use
of a wrench or other tool will damage the plastic handwheel.
To disconnect the Propane gas cylinder, turn OFF the cylinder’s
valve and the grill’s control valve. Remove the regulator by turning
the plastic handwheel counterclockwise.
Caution: Assure hose does not touch the casting or mounting
components.
This manual suits for next models
28
Table of contents
Other Broilermaster Grill manuals