Broilermaster P3X-3 User manual

Page 1
GAS-FIRED
P3X
SERIES
P4X
SERIES
P3X(N)-3, P3SX(N)-3, P3XF(N)-3, P4X(N)-2, P4XF(N)-2
P3X AND P4X GRILL HEAD
PREMIUM GRILLS

B102217-0-0414Page 2
IMPORTANT
This manual should be read thoroughly by the installer and by anyone who will use
or maintain the grill.
Installer - Write the model number, serial number, and date of installation in the manual.
If available, attach a copy of the receipt. Leave this manual with the grill owner.
Grill Owner - Read and retain this manual. It contains instructions on using and main-
taining your grill, plus information on ordering replacements parts. Attach a copy of
your receipt to this manual. Your receipt established the proof of purchase required
for warranty replacement parts.
WARNING
Follow the instruction in this manual for proper installation and maintenance of the
grill. Improper installation, adjustment, alteration, service or maintenance can cause
injury or property damage. For assistance or additional information consult a
qualied installer, service agency or the gas supplier.
DANGER: FOR YOUR SAFETY
IF YOU SMELL GAS:
1. Extinguish any open ame.
2. Shut off gas to the appliance.
3. Open the grill lid.
4. If odor continues, keep away from the appliance call
your gas supplier or your re department.
WARNING: FOR YOUR SAFETY
1. Do not store or use gasoline or other ammable vapors or liquids in the vicinity
of this or any appliance.
2. Only the LP tank connected for use shall be placed in the vicinity of this grill.
CAUTION:
Parts may have sharp edges. Wear leather work gloves and handle parts carefully
during unpacking, assembly and installation.
WARNING
For LP grills, use propane cylinders equipped with an Overll Protection Device (OPD).
An overlled or improperly lled propane cylinder can be dangerous.
IMPORTANT INFORMATION

B102217-0-0414 Page 3
Thank you for purchasing a Premium Gas Grill.
Broilmaster takes pride in its reputation as the The Most Durable Grill Known to Man.
From its thick aluminum casting to its massive cooking grids, your Broilmaster
is built to last. In fact we still make replacement parts for Broilmaster grills built
more than 30 years ago.
Visit www.broilmaster.com and click on the Hall of Fame to see a sampling of
our long-time customers. We hope you enjoy years of great meals prepared on
your Broilmaster. And we hope to add your photo to the Hall of Fame one day.
Thank You!
Broilmaster is a registered trademark of
Empire Comfort Systems, Inc.
918 Freeburg Ave.
Belleville, Illinois 62220
Telephone 800-851-3153

B102217-0-0414Page 4
ASSEMBLY INSTRUCTIONS ........................................................................................................ 5
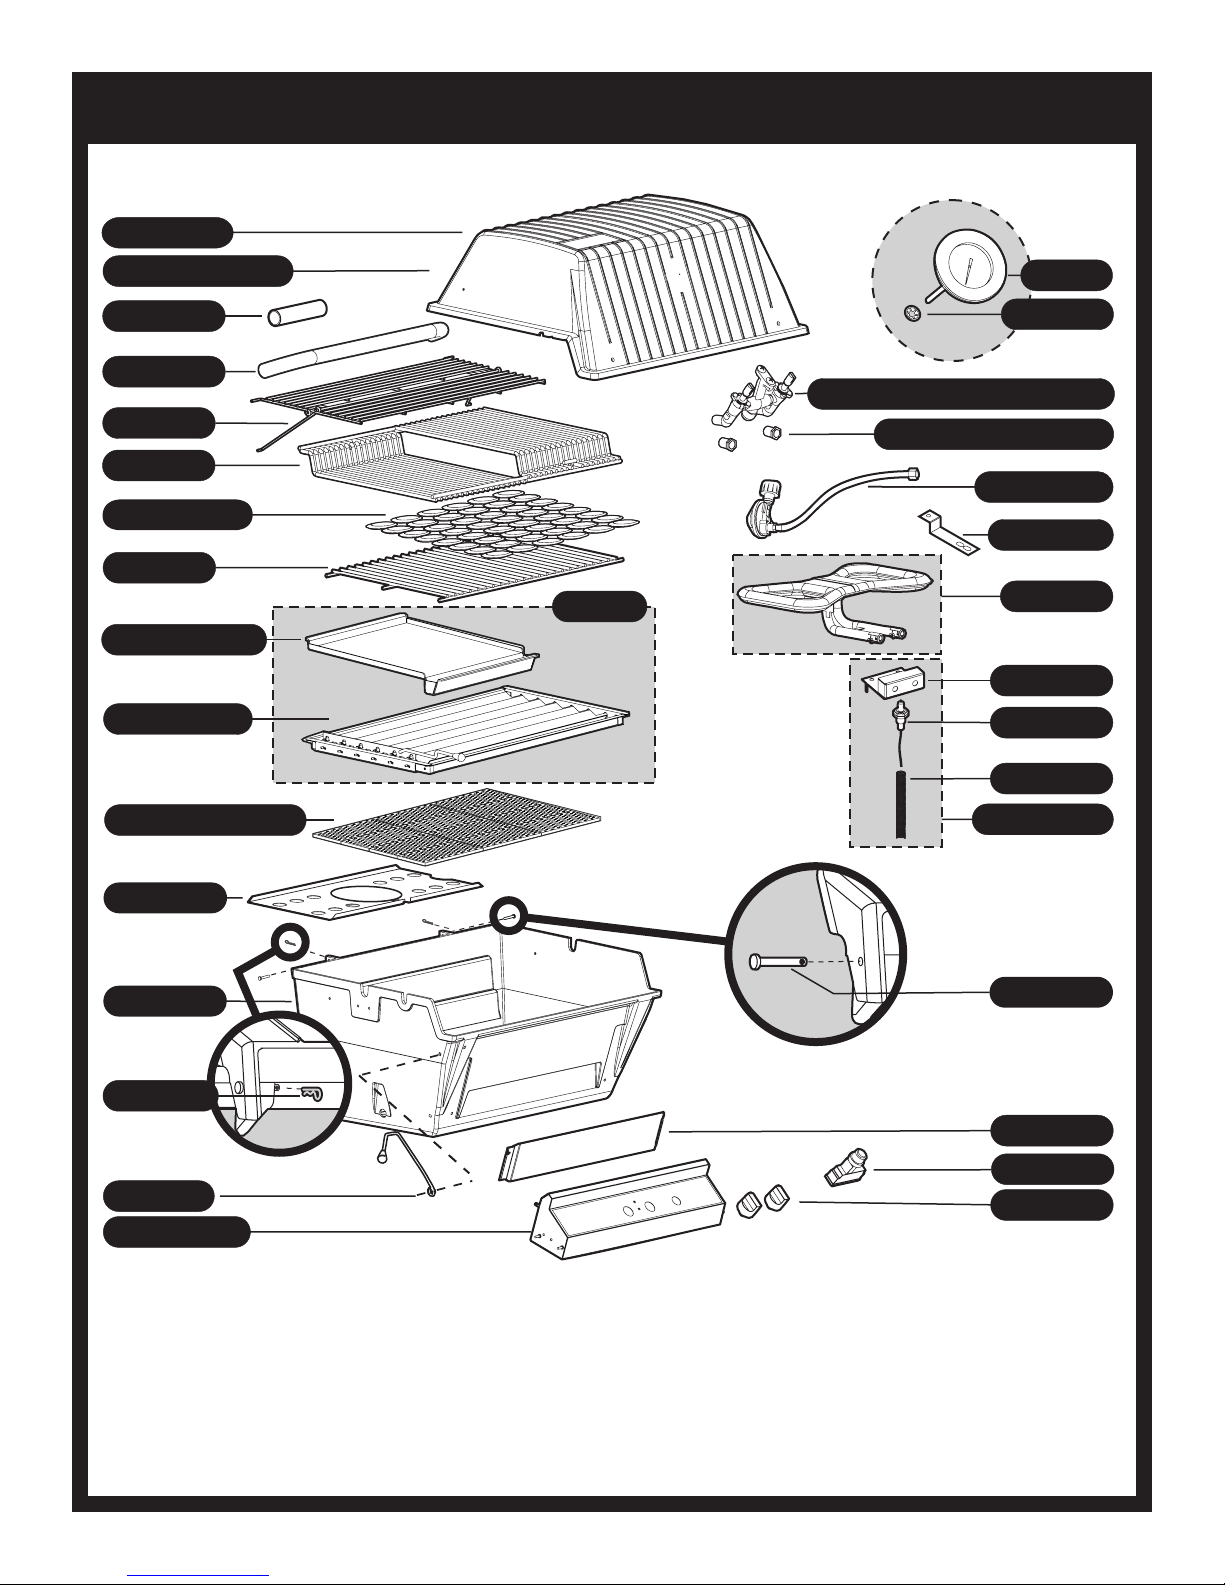
P3X PARTS DIAGRAM..................................................................................................................6
P4X PARTS DIAGRAM..................................................................................................................7
GRILL HEAD HARDWARE PACK ................................................................................................8
UNPACK AND REMOVE LID ........................................................................................................9
INSERT BURNER HOLD-DOWN BOLT......................................................................................10
WIND DEFLECTOR PLACEMENT.............................................................................................. 11
INSERT CONTROL PANEL.........................................................................................................12
ATTACH IGNITER WIRE ............................................................................................................. 13
INSTALL BURNER ASSEMBLY..................................................................................................14
CONNECT IGNITER LEADS.......................................................................................................15
KNOB AND BATTERY PLACEMENT .........................................................................................16
INSTALL LID STOP .....................................................................................................................17
INSTALL HANDLE....................................................................................................................... 18
REINSTALL LID........................................................................................................................... 19
INSTALL RACKS....................................................................................................................20-23
PROPANE GAS GRILLS ........................................................................................................24-27
NATURAL GAS GRILLS ........................................................................................................28-29
COMPLETED ASSEMBLY .......................................................................................................... 30
OWNER’S MANUAL FOR P3X AND P4X GRILLS................................................................31-40
OPERATION - PROPANE AND NATURAL GAS GRILLS...................................................31-32
MAINTENANCE .......................................................................................................................33
TROUBLESHOOTING .............................................................................................................34
IMPORTANT SAFETY INFORMATION...............................................................................35-36
COOKING TIPS........................................................................................................................ 37
WARRANTY TERMS................................................................................................................38
MASTER PARTS DISTRIBUTOR LIST .................................................................................... 39
GRILL MAINTENANCE HISTORY ........................................................................................... 40
Y
ou have chosen the nest grill for your outdoor cooking pleasure.
Please take time to read this entire manual before assembling your Premium Broilmaster
gas grill.
TABLE OF CONTENTS

B102217-0-0414 Page 5
Before You Begin
All Broilmaster grills require some assembly. For the best results, follow the step-by-step instructions.
For natural gas grills and for permanently mounted LP grills, have your gas supplier run service to the desired
location first.
If you purchased an accessory with your Broilmaster, follow the instructions provided. Assemble your base
options before assembling your Broilmaster grill head. Refer to the Broilmaster Cart, Base, and Post
instructions provided with each accessory for assembly, installations, and mounting procedures.
Compare the parts in the box to the parts list provided in this manual. If any are missing, contact your
Broilmaster dealer before beginning assembly.
TOOLS
REQUIRED
3/8”, 7/16” and 3/4”
REQUIRED
3/8” and 7/16”
REQUIRED
3/8” and 7/16”
REQUIRED
3/8” and 7/16”
REQUIRED
CAUTION:
Parts may have sharp edges. For your safety
wear leather work gloves and handle parts
carefully during unpacking and assembly.
ASSEMBLY INSTRUCTIONS

B102217-0-0414Page 6
DPP116 (1)
COLLECTOR BOX ASSEMBLY
B102041 (1)
PROTECTIVESLEEVE
B101666 (1)
ELECTRODE
DPP111 (1)
BURNER ASSEMBLY
B101834 (1)
ELECTRODE BRACKET
B102042 (1)
TOPWITH HEAT INDICATOR, HINGE
B101665 (1)
PUSH NUT
DP119 (1)
HEAT INDICATOR
B073097 (1)
FOAM GRIP
B070486 (1)
LID HANDLE
B101883 (1)
GRILL BODY TOP
B072695(1)
RETRACTING RACK
DPA34 (1)
BRIQUETTE BAG P3X(N) ONLY
DPA111 (1)
COOKING GRID (2) PIECES
B101061 (1)
BRIQUETTE RACK
B069756 (1)
HOSE & LPS REGULATOR
B101420 (1,LP) OR B101421 (1,NAT)
VALVELPG OR NATURAL
P204 (2,LP) P300 (2,NAT)
ORIFICELPG OR NATURAL
B057804 (2)
HINGE PIN
B070084 (2)
VALVE KNOB
B072218 (1)
ELECTRIC IGNITOR
DPA106 (1)
LID STOP KIT
B101622 (1)
CONTROLPANELSHIELD
B101879 (1)
GRILL BODY BOTTOM
B101514 (1)
CONTROLPANELASSEMBLY
B069756 (1)
HOSE & LPS REGULATOR
DPP118 (1)
BURNER BRACKET
DPP7SS (1)
WIND DEFLECTOR
B057805 (2)
COTTER PIN
DPA115 (1)
GRIDDLE (P3SX(N) ONLY)
DPA116 (1)
FLARE BUSTER (P3XF(N) NOT APPLICABLE)
DPA100 (1)
SMOKER/SHUTTER (P3SX(N) ONLY)
P3SX(N)
SERIES ONLY
P3X SERIES PARTS DIAGRAM

B102217-0-0414 Page 7
DPP116 (1)
COLLECTOR BOX ASSEMBLY
B102041 (1)
PROTECTIVESLEEVE
B101666 (1)
ELECTRODE
DPP111 (1)
BURNER ASSEMBLY
B101834 (1)
ELECTRODE BRACKET
B102042 (1)
TOPWITH HEAT INDICATOR, HINGE
B101665 (1)
PUSH NUT
DP119 (1)
HEAT INDICATOR
B073097 (1)
FOAM GRIP
B070486 (1)
LID HANDLE
B101883 (1)
GRILL BODY TOP
B072695(1)
RETRACTING RACK
DPA34 (1)
BRIQUETTE BAG P3X(N) ONLY
DPA111 (1)
COOKING GRID (2) PIECES
B101061 (1)
BRIQUETTE RACK
B069756 (1)
HOSE & LPS REGULATOR
B101420 (1,LP) OR B101421 (1,NAT)
VALVELPG OR NATURAL
P204 (2,LP) P300 (2,NAT)
ORIFICELPG OR NATURAL
B057804 (2)
HINGE PIN
B070084 (2)
VALVE KNOB
B072218 (1)
ELECTRIC IGNITOR
DPA106 (1)
LID STOP KIT
B101622 (1)
CONTROLPANELSHIELD
B101879 (1)
GRILL BODY BOTTOM
B101514 (1)
CONTROLPANELASSEMBLY
B069756 (1)
HOSE & LPS REGULATOR
DPP118 (1)
BURNER BRACKET
DPP7SS (1)
WIND DEFLECTOR
B057805 (2)
COTTER PIN
DPA115 (1)
GRIDDLE (P3SX(N) ONLY)
DPA116 (1)
FLARE BUSTER (P3XF(N) NOT APPLICABLE)
DPA100 (1)
SMOKER/SHUTTER (P3SX(N) ONLY)
P3SX(N)
SERIES ONLY
DPP116 (1)
COLLECTOR BOX ASSEMBLY
B102041 (1)
PROTECTIVESLEEVE
B101666 (1)
ELECTRODE
DPP111 (1)
BURNER ASSEMBLY
B101834 (1)
ELECTRODE BRACKET
B076621 (1)
TOPWITH HEAT INDICATOR, HINGE
B101665 (1)
PUSH NUT
DP119 (1)
HEAT INDICATOR
B073097 (1)
FOAM GRIP
B070486 (1)
LID HANDLE
B102043 (1)
GRILL BODY TOP
B072696(1)
RETRACTING RACK
DPA34 (1)
BRIQUETTE BAG P4X AND P4XN ONLY
DPA112 (1)
COOKING GRID (2) PIECES
B067449 (1)
BRIQUETTE RACK
B069756 (1)
HOSE & LPS REGULATOR
B101420 (1,LP) OR B101421 (1,NAT)
VALVELPG OR NATURAL
P182 (2,LP) P265 (2,NAT)
ORIFICELPG OR NATURAL
B057804 (2)
HINGE PIN
B070084 (2)
VALVE KNOB
B072218 (1)
ELECTRIC IGNITOR
DPA106 (1)
LID STOP KIT
B101621 (1)
CONTROLPANELSHIELD
B101443 (1)
GRILL BODY BOTTOM
B101515 (1)
CONTROLPANELASSEMBLY
B069756 (1)
HOSE & LPS REGULATOR
DPP118 (1)
BURNER BRACKET
DPP7SS (1)
WIND DEFLECTOR
B057805 (2)
COTTER PIN
DPA117 (1)
FLARE BUSTER
P4XF AND P4XFN
SERIES ONLY
P4X SERIES PARTS DIAGRAM

B102217-0-0414Page 8
COTTER PIN
B057805
(1)
FOAM GRIP
B073097
(1)
KNOB
B070084
(2)
KNOB,TAPERED
B100098
(1)
HEX NUT,
SS,1/4-20
B076331
(1)
HEX LOCKNUT,
SS,10-24
R4021
(1)
LID, STOP
B076521
(1)
GROUND
WIRE
B072684
(1)
KEPS NUT,
SS,10-24
B073967
(3)
BATTERY, AA
B076529
(1)
PHILLIPS TRUSS HEAD SCREW,
10-24 X 3/4
B100128
(1)
PHILLIPS PAN HEAD SCREW,
SS,10-24 X 1
B073978
(2)
SPACER
B662325
(1)
FLATWASHER,
1/4 ID X 5/8 OD
B076332
(2)
PHILLIPS PAN HEAD SCREW,
SS,1/4-20 X 1-1/2
B101649
(1)
GRILL HEAD HARDWARE PACK - B102155

B102217-0-0414 Page 9
BROILMASTER
PREMIUM GRILLS
REMOVING LID
To ease assembly, remove Grill Lid
and Warming Rack. Remove Warming
Rack and set aside. Remove the two
Pins and Clips at the rear of the Grill
Lid and set aside. After Pins, Lid and
Warming Rack have been removed,
remove the contents from inside the
Grill.
Prior to assembling Grill Head
assemble Cart or Post mounting first.
Follow Mounting instructions
provided with your Broilmaster Cart or
Post.
UNPACK AND REMOVE LID

B102217-0-0414Page 10
7/16”
After the Securing Bolt has been installed,
proceed and Install Grill Head on a Cart or
Post Mounting. (See Grill Head on a Cart or
Post Mounting Instructions that come with
the mounting option).
INSERT BURNER HOLD-DOWN BOLT
PHILLIPS PAN
HEAD SCREW
SS, 1/4-20 X 1-1/2
B101649 (1)
HEX NUT,
SS, 1/4-20
B076331(1) .

B102217-0-0414 Page 11
Place the Wind Deflector in the bottom
Casting.
The Wind Deflector cannot
be installed until after the bottom
Casting is installed on theCart or Post.
WIND DEFLECTOR PLACEMENT

B102217-0-0414Page 12
CONTROL
PANEL
CONTROL
PANEL
SHIELD
3/8”
If Side Shelf Accessory was purchased
install at this time. Follow Side Shelf
Note: If Side Shelf Accessory was
purchased install at this time.
Follow Side Shelf instructions.
INSERT CONTROL PANEL
KEPS NUT,
SS, 10-24
B073967(2)

B102217-0-0414 Page 13
COLLECTOR BOX
Connect the ground wire to the ground
lug on the Collector Box before
installing the burner into the casting.
ATTACH IGNITER WIRE

B102217-0-0414Page 14
Slide the Venturi on to the Valve
Assembly to the left as shown.
Raise the unsecured end of the Burner
Bracket and slip it over the Phillips
Truss Head Screw. The screw will fit
into the hole on the Burner Bracket.
Insert Cotter Pin.
Note: Ignitor Wires run through center
hole with Venturi.
3
2
4
5
Insert the Burner Assembly into
the Grill bottom with the Venturi
Tubes facing the front of the Grill.
1
INSTALL BURNER ASSEMBLY
COTTER PIN,
B057805(1)

B102217-0-0414 Page 15
IGNITERIGNITER
Route Leads from Burner and Secure to
Ignitor Terminals (polarity is not
important).
CONNECT IGNITER LEADS

B102217-0-0414Page 16
Unscrew the Ignitor Knob from the
Control Panel, and insert AA Battery,
positive side up, and replace Ignitor
Button.
AFTER
KNOB AND BATTERY PLACEMENT

B102217-0-0414 Page 17
KNOB
LID STOP
ROD
Screw the black Knob onto the Lid
Stop. Do not overtighten.
3/8”
INSTALL LID STOP
PHILLIPS TRUSS HEAD SCREW,
SS,10-24 X 3/4
B100128 (1)
HEX LOCK NUT,
SS, 10-24
R4021 (1)
FLAT WASHER
1/4 x 5/8 OD
B076332 (2)
SPACER,
B662325 (1)

B102217-0-0414Page 18
Tip: For ease of installation, lightly
lubricate the inside of the Foam Grip with
Liquid Soap before twisting it on to
Handle.
HANDLE INSTALLATION
PHILLIPS PAN HEAD SCREW,
SS,10-24 X 1
B073978 (2)

B102217-0-0414 Page 19
REINSTALL LID
HINGE PIN,
(FROM PREVIOUS STEPS)
B057804 (1)
COTTER PIN,
(FROM PREVIOUS STEPS)
B057805 (1)

B102217-0-0414Page 20
P4XF(N) MODELS
Position the Flare Busters as shown
P3SXF(N) MODELS
Position the Flare Busters as shown
P3XF(N), P4XF(N) FLARE BUSTERS AND RACKS
This manual suits for next models
11
Table of contents
Other Broilermaster Grill manuals
Popular Grill manuals by other brands

Fiesta
Fiesta EZA30030-B311 Assembly manual

Chef's Grill
Chef's Grill RT2417S-1 manual

Napoleon
Napoleon PRESTIGE II 450 instructions

Brixton
Brixton BQ-6385 instruction manual

Falcon
Falcon G350/10 User, installation and servicing instructions

Louisiana Grills
Louisiana Grills LG Series Assembly and Operation Manual Warranty Card