Broox RB-101 User manual

Solar Animal Repellent
USER MANUAL
RB-101
®

2
Thanks for purchasing this item. Please read and understand
these instructions and keep this manual for future reference.
This item uses solar power to recharge the batteries so it
is always working after the battery recharged. The Passive
Infrared sensor (PIR) detects motion and triggers the ultrasonic
speaker emitting a tone that animals can feel and chase away
these animals.
Please download the catalogue via above QR code

3
Important tips
Here are some general tips to help you to use your repellents for
repelling animals:
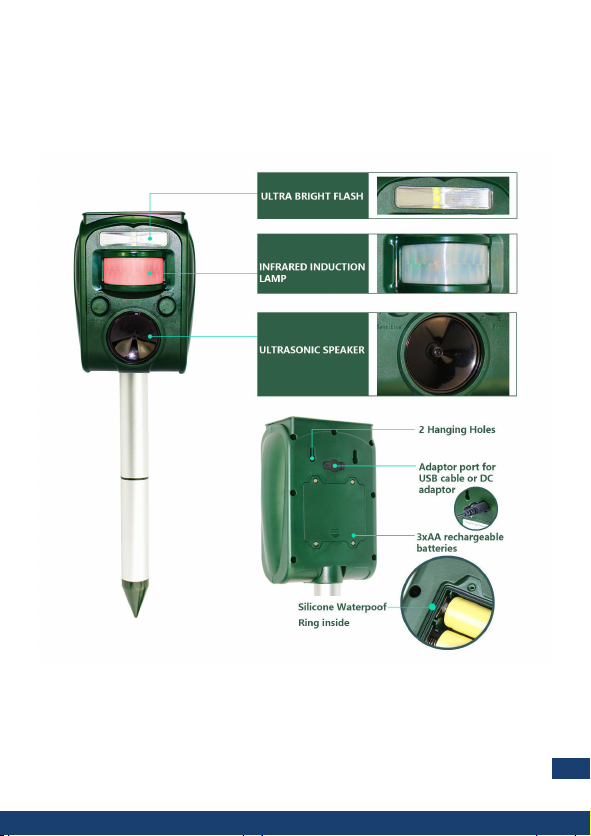
1. Make sure that batteries are working well. It is suggested for
getting the desired result, charge the batteries 3 times for 6
hours to reactive them (since your device hasn’t been working
for more than 2 months). After that you can hear some ultrasonic
sound, alarm sound and see the ashing light with rotating
the frequency knob (the knob on the right site).
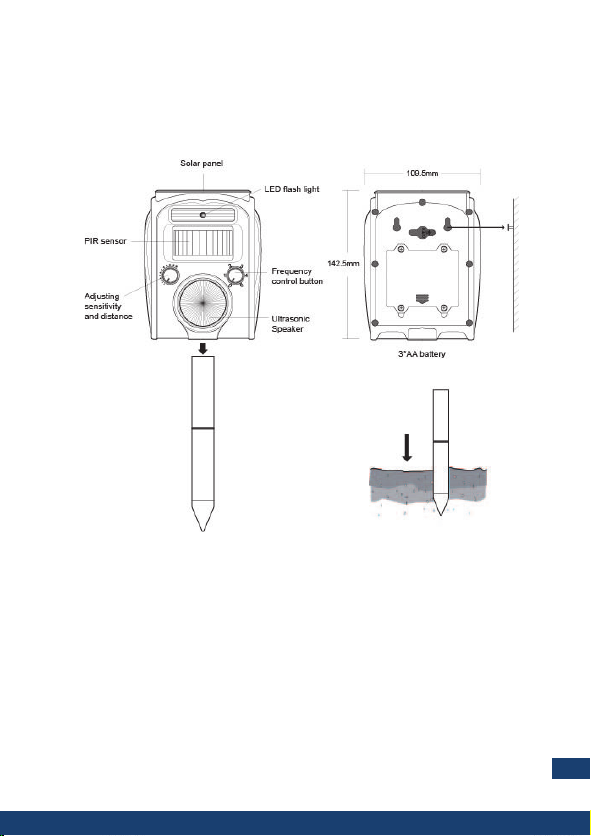
2. Now please nd a proper place to install your devices. Prevent
to install the device in shadow, otherwise the number of times
for charging will increase.
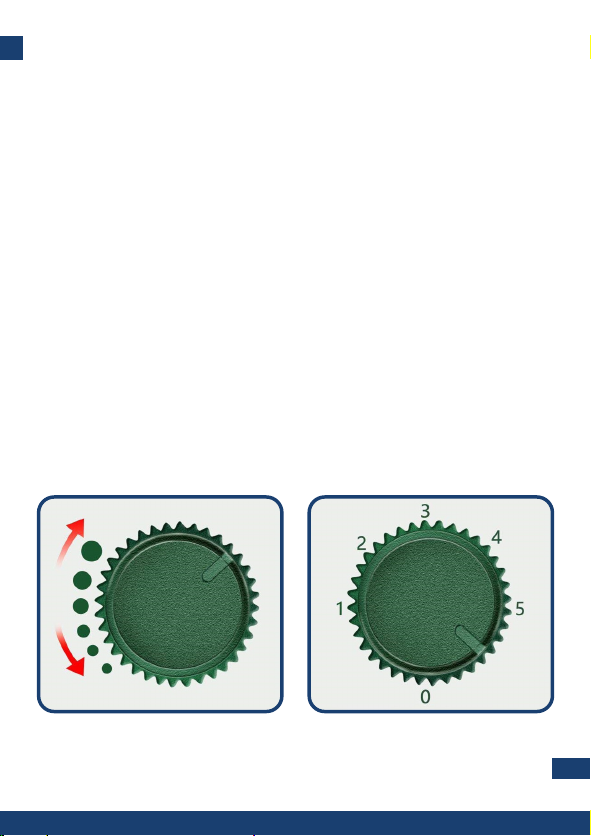
3. Now, you have 3 choices to set up devices for animals. Mode
1, 2, 3, Mode 4, Mode 5.
4. If you prefer having ashing light with ultrasonic sound
simultaneously, please use mode 5.
5. If you prefer having an alarm with ashing light simultaneously
to scare the animals, please use mode 4. If the alarm doesn’t
bother you, usually this is the best choice. We suggest you use
this mode for some days and after that change it to ultrasonic
mode.
6. If you prefer just ultrasonic sound, use mode 1 or 2 or 3. Please
let us know the kind of the animal you want to repel for more
advice.
7. After some time, animals get used to the generated frequency
by the device, so you’d better change the frequency mode or
put it on mode 4 for one day and after that period put it on
its normal mode.
8. Having patience is the key to get the suitable result from these
devices. It usually takes 2-4 weeks to notice the signicant
difference and perfect operation of them.

4
Operation
»A strong ultrasonic wave to frighten animals. The wave is
activated when an animal enters the PIR Sensor range and
then the animals feel uncomfortable and will run away from
the area.
»A strong ashing LED to scare animals. The strong ashing
LED will be activated when an animal enters the area, then
the animal will be scared and ee away.
»In order to have better effect, we add alarm sound to scare
wild animals

5
SET UP
“Sensitivity” Knob (Left knob): You can adjust the item sensitivity
and distance. By turning the knob clockwise, you increase the range
of protection.
“Frequency” Knob (Right knob): This is to control frequency. By
turning the knob clockwise, the frequency will be increased.
“Frequency” Knob positions came as below:
• 0: OFF
• 1: 13.5KHZ-19.5KHZ to repel animals like mice, rats, dogs,
foxes, martens etc.
• 2: 19.5KHZ-24.5KHZ to repel animals like cats, raccoons,
badgers, skunks etc.
• 3: 24.5KHZ-45.5KHZ to repel animals like bats, birds, rodents
etc.
• 4: Alarm and strong red LED ashing lights to scare wild
animals.
• 5: All functions together (mode 1, mode 2 , mode 3) with
strong ashing.
Frequency knobSensitivity Knob

6
Assemble and Installation
1. Remove the battery compartment on the back; Install 3x
AA, 1.2 V rechargeable batteries, and then close the battery
compartment. (battery is included, so this is not needed)
2. Place the unit pointed towards the area that you want to protect
(for example, in the owerbed or against the wall etc.)
3. Remember to choose a place where the solar panel on the
top can get sunshine as long as possible. And avoid to cover
the solar panel.
4. If you mount the unit in the ground, insert the spike into the
ground carefully. Please leave the spike 12cm or more above
the ground. It is suggested that you dig a hole and then insert
the unit to ensure no damage occurs.
5. The item can be inserted in the ground, or mounted against the
wall, or the top part can be placed directly on the at surface.

7
- Assemble and Installation

8
Technical Specication
»Infrared sensor angle: 110 degrees
»Detection range: 8-9 meters depending on animals size (the
bigger size, the larger range)
»Power supply: solar power + 3 X Ni-mH AA rechargeable
batteries, or 9V, 1A adapter. (An USB cable is included for you
to charge)
»When you charge the item with USB cable, red light will be
activated and keep lighting. The light turn to blue as charged
fully.
»When adapter plugged, the item will keep working, but the
PIR sensor will not work. However we suggest do not turn on
the device when it is getting charged.
»If there are a few days as cloudy or rainy, you can charge the
item via the adapter.
»Green LED: indicates the unit is activated

9
- Technical Specication

10
Battery issues
1. If new batteries are in the product, and you do not want to use
the item for a long time (more than 1 month), the batteries power
may be fully released. It is suggested to charge the batteries
3-5 times to activate so they will become normal to use.
2. If the battery which has been used for a very long time, gets
charged full very soon, it means you need to change the
batteries.
3. If the batteries have not been used for a long time, please
replace 3x Ni-Mh or Ni-Cad AA, 1.2 V rechargeable batteries in
the battery compartment. Better quality and bigger capacity
of batteries, lead to a better effect of your device.
4. Please deal with the abandoned batteries to the recycling center
for the used electrical and electronic devices. You can consult
the local government for more information.
Caution
1. It happens that human can hear part of its range. So put the
device as far as possible from human life place. Do not install
the device in a children and baby play ground area.
2. Do not cover up the PIR sensor
3. To clean the device, use damp-soft and mild soap with water.
Do not use harsh chemicals or abrasive cleaning agents that
may damage the device.

11
Raymond Broox Inc.
www.raymondbroox.com
contact@raymondbroox.com

Raymond Broox Inc.
www.raymondbroox.com
contact@raymondbroox.com
CA,USA
Other manuals for RB-101
1
Table of contents