BSC BSJ600LC User manual

Instruction Manual
Roots Vacuum Pump
BSJ600LC
BSJ1200LC

Contents
1. Introduction ..................................................................................................................................1
1.1.Application range and definition.......................................................................................1
1.2. Description........................................................................................................................1
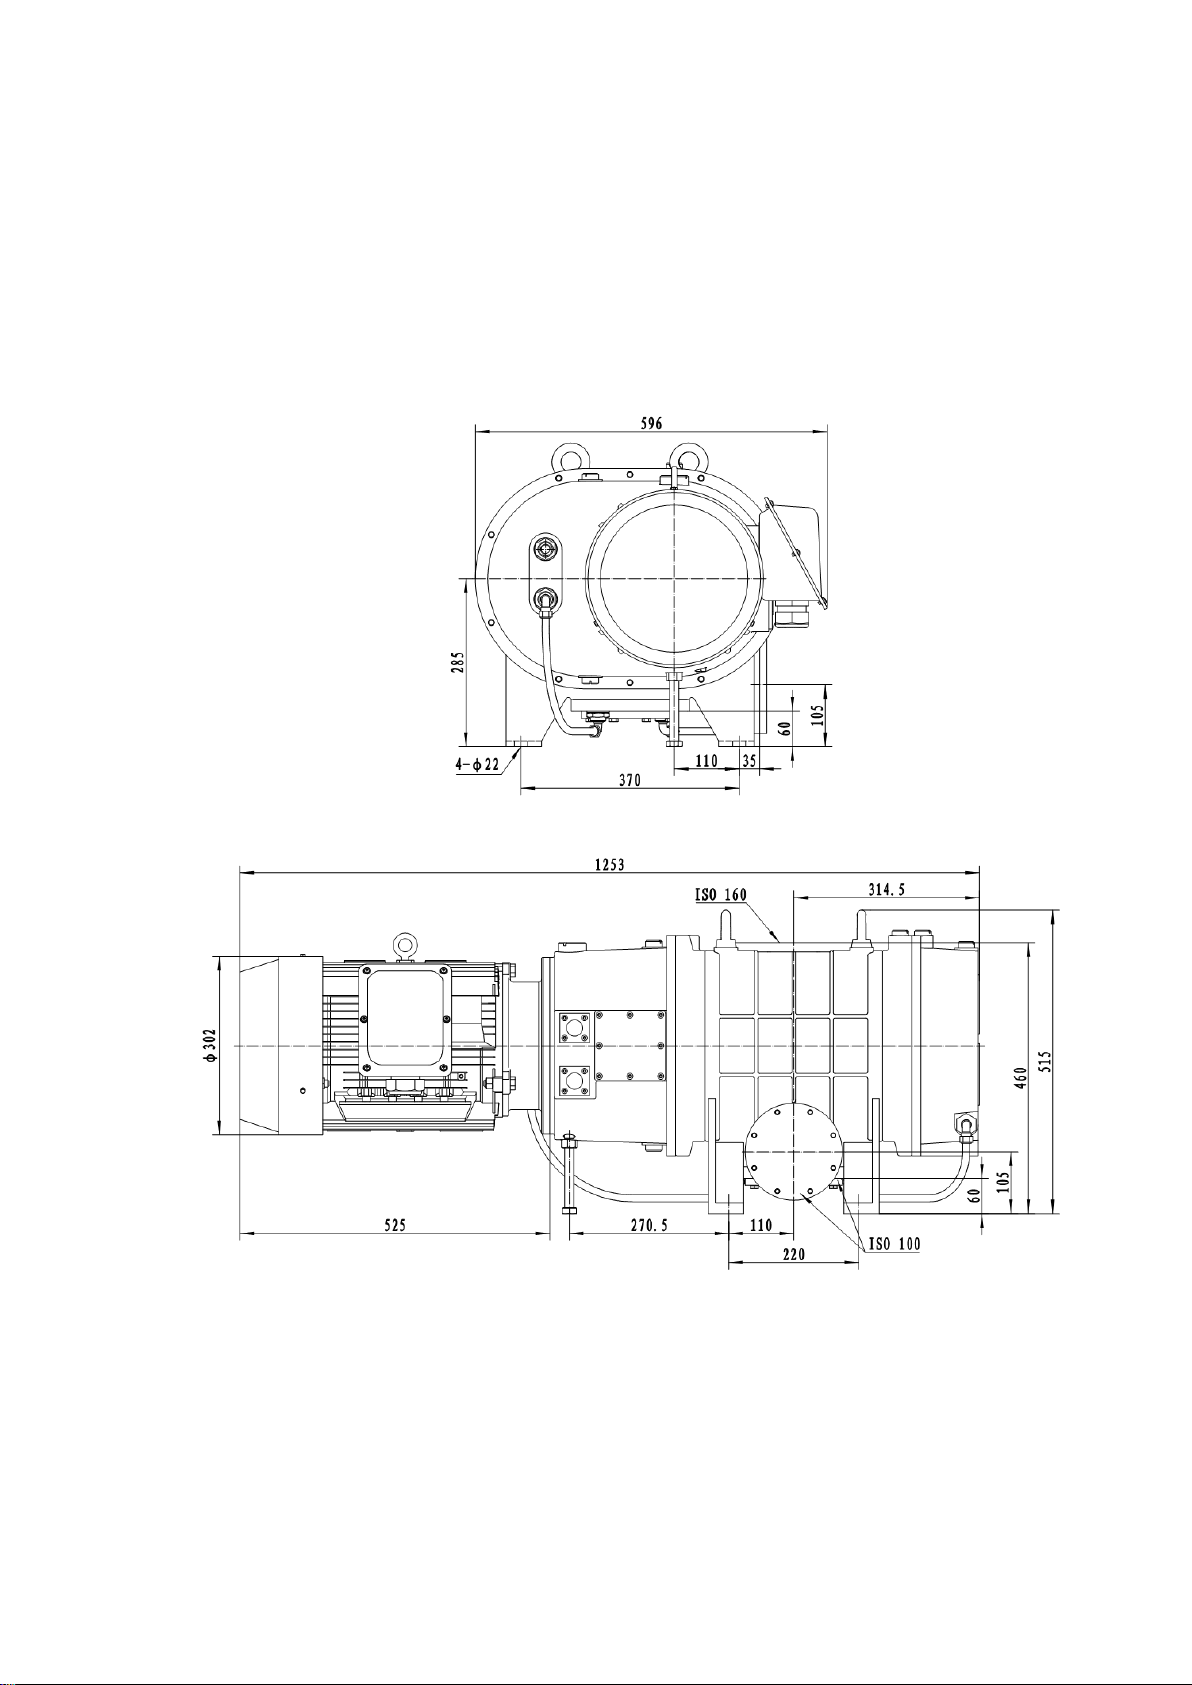
1.2.1. Outline...................................................................................................................1
1.2.2. Structure ...............................................................................................................2
1.2.3. Working Principle ..................................................................................................2
1.2.4. Hydraulic transmission..........................................................................................2
2. Technical Data ...............................................................................................................................2
2.1. Operation and storage......................................................................................................2
2.2. Performance .....................................................................................................................3
2.3. Mechanical data................................................................................................................3
2.4. Electric data ......................................................................................................................4
2.5. Lubrication data ................................................................................................................4
2.6. Cooling water data............................................................................................................4
2.7. Vibration and Noise data ..................................................................................................5
2.8. Connection........................................................................................................................5
3. Installation ....................................................................................................................................5
3.1. Safety ................................................................................................................................5
3.2. System requirement .........................................................................................................6
3.3. Unpacking inspection........................................................................................................7
3.4. Oil filling ............................................................................................................................8
3.4.1. Hydraulic drive ......................................................................................................8
3.4.2. Shaft seal oil reservoir...........................................................................................8
3.4.3. Gear cover.............................................................................................................9
3.5. Electric connection............................................................................................................9
3.5.1. Power supply.........................................................................................................9
3.5.2. Motor connection .................................................................................................9

3.6. Check the direction of rotation of the pump..................................................................10
3.7. Connection of Inlet/Outlet port...................................................................................... 11
4. Operation....................................................................................................................................12
4.1. Operation safety .............................................................................................................12
4.2. Start-up procedures........................................................................................................13
4.2.1. Inspection before start-up ..................................................................................13
4.2.2. Start-up ...............................................................................................................13
4.2.3. Stop .....................................................................................................................13
5. Maintenance ...............................................................................................................................14
5.1. safety information...........................................................................................................14
5.2. Maintenance plan ...........................................................................................................15
5.3. Oil level check .................................................................................................................15
5.4. Check the pump connection ...........................................................................................16
5.5. Oil change .......................................................................................................................17
6. Storage and disposal...................................................................................................................18
6.1. Storage ............................................................................................................................18
6.2. Disposal...........................................................................................................................18
7. Warranty term.............................................................................................................................18
8. Disclaimer ...................................................................................................................................18
9. Trouble check list ........................................................................................................................20

Fig. 1 BSJ600LC Dimension drawing

Fig. 2 BSJ1200LC Dimension drawing

Fig. 3 BSJ600LC and BSJ1200LC pump
1. Oil filler plug (shaft seal oil reservoir)
2. Oil filler plug (hydraulic drive)
3. Inlet port
4. Lifting ring
5. Oil filler plug (gear cover)
6. Oil level sight glass (gear cover)
7. Oil drawing plug (gear cover)
8. Cooling water connection
9. Side outlet port
10. Oil level sight glass (hydraulic drive)
11. Oil level sight glass ( shaft seal oil reservoir)
12. Terminal box

Fig. 4 Shaft seal/ Hydraulic drive oil level sight glass
1. Shaft seal oil reservoir sight glass
2. Shaft seal oil reservoir recommended oil level
3. Shaft seal oil reservoir reflector plate
4. Hydraulic drive sight glass
5. Hydraulic drive recommended oil level
6. Hydraulic drive reflector plate

Fig. 5 Gear cover oil level sight glass
1. Oil level sight glass
2. Oil level Max
3. Oil level Min

1. Introduction
1.1 Application range and definition
This manual contains installation, operation and maintenance instructions for the BAOSI
hydraulic coupling series roots vacuum pump. The user must use the pump as specified in
this manual and must read this manual before installing and operating the pump.
Important safety information is highlighted by WARNING. The use of WARNING is
defined as follows.
WARNING
Warnings are given where failure to observe the instruction could result in
injury or death to people.
The units used throughout this manual comply with SI International Measurement Unit.
1.2 Description
1.2.1 Outline
The pump is compact and has a high pumping speed. The user must use the pump with a
suitable backing pump. The pump can operate continuously at an inlet pressure of up to
1000mbar (causing the pump body temperature to be abnormally high). Using of two or
more pumps in series can get lower system pressures.
The motor side cover and the gear side cover of the pump are connected to the pump outlet
by a pressure equalization passageway to form a part of the vacuum system. The connecting
passageway is provided with felt to remove debris to prevent contamination of the
lubricating oil and bearings.
The BSJ600LC and BSJ1200LC pumps have a cooling pipeline in the pump outlet, to reduce
the temperature of the rotor and exhaust gas.
Normal operation within the parameters specified in this manual, the pump can safely pump
non-combustible gases and vapors.
The inlet flange and outlet flange of the pump are ISO standard flange.
1.2.2 Structure
The pump is a positive displacement roots vacuum pump, and the three-phase motor drives
the pump through a hydraulic drive.

The bearings, gears and seals of the pump are lubricated by the pump oil inside the motor
side cover and gear side cover. A series of oil seals stop the oil from reaching the rotor side
of the pump. Inside of the motor side cover and gear side cover is evacuated. You can check
the oil level by the oil level sight glass mounted on the motor side cover/gear side cover. The
motor side cover/gear side cover is equipped with a refilling screw plug and an oil drain
screw (see Fig.2).
1.2.3 Principle of operation
The motor shaft of the pump drives one of the rotors in the rotor housing through the
hydraulic drive inside the motor side cover. The synchronizing gears drive the second rotor
in the opposite direction inside the rotor housing. A small clearance is maintained between
the rotors and between the rotors and the inner wall of the rotor housing. This clearance
allows the pump to operate at high speed without mechanical wear and without the need for
lubrication inside the swept volume.
1.2.4 Hydraulic drive
The hydraulic drive consists of a fluid coupling which connects the motor shaft to the rotor.
The system configuration ensures that the rotor's rotational speed is reduced, when the gas
load is too high. When the gas load is reduced, the rotors accelerate to full speed. This allows
the pump to operate continuously over the vacuum range without the risk of motor overload
and without the need for bypass valves and associated pipelines.
The fluid coupling is extremely sensitive to the viscosity of the pump oil. The packaged
pump is equipped with special oil for the BAOSI vacuum pump.

2. Technical Data
2.1 Operating and storage conditions
Note: Operating in the temperature range of -10 to 5 °C, we recommend that the pump be
operated continuously in addition to the necessary shutdown maintenance. In addition,
attention should be paid to the requirements for cooling water proposed in Section 2.6.
Due to the flexibility of the hydraulic drive, the range of backing pumps that can be used
with the pump is wide. The environmental conditions for operation and storage are shown in
the table below.
Ambient operating temperature and humidity
Ambient storage temperature and humidity
Altitude
5 to 40℃, below 90%RH
-10 to 50℃, below 90%RH
Below 1000m
Table.1 Operating and storage conditions
2.2 Performance
Rotational speed:
50Hz power supply
60Hz power supply
Maximum outlet pressure
0 to 2950 r/min
0 to 3560 r/min
1000 mbar absolute (1×10⁵Pa)
Pressure differential ( determined by the hydraulic drive):
BSJ600LC
50Hz power supply
60Hz power supply
BSJ1200LC
50Hz power supply
60Hz power supply
0 to 80 mbar (0 to 8×10³Pa)
0 to 67 mbar (0 to 6.7×10³Pa)
0 to 70 mbar (0 to 7×10³Pa)
0 to 50 mbar (0 to 5×10³Pa)
Table.2 Performance
2.3 Mechanical data
Dimensional drawing See Fig.1
Weight BSJ600LC 350 kg
BSJ1200LC 425 kg
Table.3 Mechanical data

2.4 Electrical data
Note: Motor data can be found on the motor rating plate and in the motor terminal box.
Electrical supply
Phases
Voltage tolerance
50Hz
60Hz
Full load rated current
380/400/415V-50Hz, 440/460V-60Hz
3
±10%
-2.5%,+5%
Following
Pump 380V
50Hz
400V
50Hz
415V
50Hz
440V
60Hz
460V
60Hz
BSJ600LC
BSJ1200LC
Rated current/A
Rated power/kW
21.2
11
20.3
11
20
11
18.3
11
17.8
11
Table.4 Electrical data
2.5 Lubrication data
Recommended oil BSO-46
Oil capacity:
Shaft seal oil reservoir
Hydraulic drive
Gear cover
1.5L
7.5L
4L
Table.5 Lubrication data
2.6 Cooling water data
Recommended cooling water flow
(with inlet temperature of 20℃)
BSJ300LC 3L/min
BSJ600LC 6L/min
BSJ1200LC 6L/min
Recommended cooling water supply pressure 2 to 6 bar gauge (2×10⁵to 6×10⁵Pa)
3 to 7 bar absolute (3×10⁵to 7×10⁵Pa)
Permissible temperature range 5 to 35 ℃
Table.6 Cooling water data
2.7 Vibration and Noise data

Vibration level
<
1.8mm/s r.m.s. in the range 10 to1000 Hz
Continuous
A-weighted sound
pressure level measured at 1meter
83 dB(A)
Table.7 Vibration and Noise data
2.8 Connection
Cooling water connection:
Inlet
Outlet
3/8inch
3/8inch
Vacuum connection:
Inlet
Outlet
BSJ600LC
ISO160
ISO100
BSJ1200LC
ISO250
ISO100
Table.8 Connection
3. Installation
3.1 Safety
WARNING
Obey the safety instructions in this s
ection and take note of suitable
precautions. Failure to observe these instructions may result in injury to
people and damage to equipment.
•The pump must be installed by suitably trained and instructed technician.
•Ensure that the installer is familiar with the safety procedures associated with the
product being pumped. Wear protective clothing when in contact with contaminated
parts. Disassemble and contaminated parts in the fume hood.
•Degassing and purging the pumping system before starting installation work.
•Before starting work, check that the required parts are ready and the type is correct.
•Make sure that no debris enters pump when installing.
•Other electrical components in the pumping system should be disconnected from the
power supply to prevent accidental activation.
•Ensure that the cooling air flow through the pump motor cooling fan cannot be
obstructed.
•All pump servicing points and oil level sight glasses should have suitable access.
•Ensure that all electrical cables and cooling water pipelines are in a safe position and the

connection is secure and reliable, without the risk of tripping over others.
•After the installation work is completed, a system leak test is carried out, and it is found
that the leak should be blocked to prevent dangerous substances from leaking out of the
system and air entering the system.
3.2 System requirement
Design the pumping system to consider the following points:
•Suitable backing pumps must be used: see sections 2.1 and 2.2.
•The pump must be mounted on a firm, level surface.
•The vacuum pipeline must be adequately supported to prevent stress passing to the
pipeline joint.
•If necessary, install a hose in the system pipeline to reduce the transmission of vibration
and prevent the joint from being stressed. If a hose connection is used, it must be
ensured that the maximum pressure rating of the hose used is higher than the highest
pressure the system can produce.
•The intake air temperature must be limited to the system temperature class.(if necessary)
•If dangerous substances will be pumped, ensure that the design incorporates all suitable
safety precautions.
•When the pumping system is shutting down, the user must purge with an inert gas to
dilute the dangerous gases to safe concentrations.
•If the pump is installed in a new system, ensure that all preliminary pipelines have been
installed and a suitable base for the pump has been prepared before starting installation.
Check of the following supplies and facilities are available for connection to the pump:
•Power supply.
•Cooling water supply and return.
•Exhaust extraction system.
•Inlet mesh (if necessary).
3.3 Unpack and inspect
WARNING
Use suitable lifting equipment to carry the pump.
Otherwise, it may cause personal injury or Pump damage.
The steps for unpack and inspect are as follows:

1. Put the pallet in a convenient position with a forklift.
2. Remove all packaging materials.
3. Remove the pump from its pallet with suitable lifting equipment.
•Attach the lifting equipment to the lifting bolts of the pump.
•The center of mass of the pump is offset towards the motor. Additional support belt
must be installed on the motor to ensure that the pump is supported during lifting to
prevent it from tilting.
4. Remove all protective covers and inspect the pump.
5. If the pump is damaged, notify the supplier and the carrier in writing within three days,
indicating the part number of the pump and the order number and the supplier invoice
number. In addition, all packaging materials must be kept for inspection. Do not use the
pump if it is damaged.
6. If the pump is not intended to be used immediately, reinstall the protective covers. And
store the pump in the conditions as described in sections 2.1 and 6.1.
3.4 Oil filling
WARNING
Ensure that the oil grade used is correct and the oil levels in the pump are
correct. If the oil is used improperly or the oil level is incorrect, the
performance of the pump will be affected and the pump may be damaged,
which will endanger its structural safety.
3.4.1 Hydraulic drive
We recommend that the oil level on the motor side cover be maintained at the recommended
oil level shown in Figure3. If the oil level above or below the recommended oil level, the
performance of the pump may be affected.
The oil level must not be lower than the bottom of the reflector plate(Figure 3), otherwise the
pump will be damaged. Proceed as follows:
1. Unscrew the oil filler plug (See Fig.2).
2. Filling the pump oil to the recommended oil level is at the top of the motor side cover
reflector plate (See Fig. 3).
Due to the internal structure of the motor side cover, refueling to the top of the reflector
plate, the oil level in the oil level sight glass of the motor side cover will slowly drop.
Observe for a while, when the oil level is no longer falling; continue to refuel to the top
of the reflector plate. Observe for a while, if the oil level is still below the top of the

reflector plate, repeat the above steps until the oil level is at the top of the reflector plate.
4. Reinstall the oil filler plug.
3.4.2 Shaft seal oil reservoir
WARNING
Ensure that the correct vented filler plug is reinstalled in the shaft seal oil
reservoir. If using a non-vented plug, the oil reservoir will be pressurized,
and the oil level sight glass may be broken.
For the oil level of the shaft seal oil reservoir, we recommend the oil level as shown in
Figure 3. As long as the oil level is above the bottom of the reflector plate, the user can
operate the pump. The oil level of the shaft seal must not be lower than the bottom of the
reflector plate. Otherwise, the pump may be damaged.
The steps are as follows:
1. Unscrew the vented oil filler plug (See Fig.2).
2. Filling the pump oil to the recommended oil level is at the top of the shaft seal reflector
plate (See Fig.3).
3. Reinstall the vented oil filler plug.
3.4.3 Gear cover
Use the same oil that was used to fill the motor side cover and shaft seal oil reservoir.
1. Unscrew the oil filler plug (See Fig.2).
2. Filling the pump oil to the recommended oil level is at the middle of the gear cover oil
level (See Fig.3).
3. Reinstall the oil filler plug.
3.5 Electric connection
3.5.1 Power supply
The motor is configured for "high pressure" operation (380 V and above). The motor itself
does not have a protective device. We recommend that you install a protective device
(overload, leakage circuit breaker, etc.).
WARNING
Ensure that the electric installation of the pump conforms with local and
national safety requirements. It must be connected to a suitably fused and
protected electrical supply with a suitable earth point.

3.5.2 Motor connection
Refer to the wiring instructions provided with the pump motor. Configure electrical
connections according to the manufacturer’s instructions.
WARNING
A suitable crimping card must be installed on the power supply cable.
Otherwise, the cable (or cable core) may be disconnected from the pump
and there may a risk of injury or death from electric shock.
WARNING
Ensure that the pump can be isolated and locked out from the power supply.
The motor must be correctly configured and the power connections must be
correct. If not, the motor can be damaged.
WARNING
When the motor is connected to the power supply, the motor power supply
is automatically cut off when the backing pump is stopped. Otherwise, if the
motor continues to run when the backing pump is stopped, the pump will
overheat.
WARNING
Connect the power supply to the motor through a contactor which has a
manual reset control.
It should be connected to the power supply via a contactor with overload protection, or use a
controller with a contactor.
The user must use a contactor with a manual reset control. Otherwise, the pump will
automatically restart after a circuit overload or power supply failure.
Use a suitable multi-wire cable and a suitable cable gland to connect the power supply to the
pump motor.
Connect the motor and power supply as follows:
1. Remove the motor terminal box cover.

2. Check the power supply voltage and frequency. If necessary, configure the motor(the
terminal wires and any links) to operate the motor at the user's power supply voltage.
Refer to the wiring instructions supplied with the pump motor.
3. Connect the cable core to the suitable terminal, according to the wiring diagram inside
the terminal box cover.
4. Tighten the cable gland and install the terminal box cover.
3.6 Check the direction of pump rotation
WARNING
Block the inlet or connect the pump to the vacuum system before checking
the direction of pump rotation. If not, there is a danger of objects being
trapped in the rotating rotors.
The three-phase power supply to the motor has the possibility of connecting the wrong phase.
If the power supply is phased incorrectly, the rotor will reverse or not rotate. Check the
direction of rotation as described below:
1. Check if the pump is connected to the vacuum system or that the inlet is blocked.
2. Connect and switch on the backing pump.
3. The motor fan cover is marked with the correct direction of rotation arrow. Turn on the
pump for two or three seconds, then turn off the pump to see if the motor fan rotates in
the same direction as the label. If the directions are the same, the motor power supply is
wired correctly. If reversed, the motor power supply wiring is wrong. Then turn off the
backing pump and deflate the system, disconnect the pump from the power supply, and
align the wiring pairs of any two phases in the motor terminal box. Repeat steps 2 and 3
above to confirm that the motor is rotating in the correct direction.
3.7 Connect the pump inlet and outlet
WARNING
In the course of commissioning, if particles, debris or loose parts are could
enter the pump, a suitable inlet filter must be installed. The user can remove
the filter before the pump is put into operation.
WARNING
If the user installs an isolation valve between the p
ump and the backing
pump, the valve must be interlocked with the pump so that the pump can be
shut down when the valve is closed.

As required, connect the inlet of the pump to the vacuum system, and the outlet of the pump
to the inlet of the backing pump. The inlet and outlet flanges of the pump are standard ISO
flanges.
All BSJ600LC and BSJ1200LC pumps have two alternative outlet position: on the underside
of the pump and the side of the pump. Users can choose to use it as needed. The pump is
supplied with the side outlet and the bottom outlet is blocked. If the user does not wish to use
the side outlet, remove the blind plate and O-ring from the outlet below the pump and
reinstall the blind plate and O-ring on the side outlet flange.
Pay attention to the following when connecting the pump to the vacuum system.
1. Move the pump to the required position and ensure that it is level and secure.
2. In order to get the best pumping speed, ensure that the pipeline connected to the pump
inlet is as short as possible, and the inner diameter of the pipe is not less than the
diameter of the pump inlet.
3. Pipelines connecting the pump to the vacuum system should be connected by soft pipe
to reduce vibration and stress.
4. In dusty applications, low-impedance inlet filter should be used to minimize abrasion in
the pump.
4. Operation
4.1 Operational safety
WARNING
Ensure that the cooling air flow through the pump and motor is not
restricted. If the air flow is restricted during pump operation, the pump and
motor temperatures will exceed their normal temperature.
Abnormal temperature can reduce pump reliability and
risk of explosion.
During the operation of the pump, it is forbidden to touch the surface
directly by hand to avoid being burnt.
WARNING
Do not operate the pump when the inlet or outlet is in open to atmosphere.
If not, fingers or other parts of the body may get trapped and may be injured
by the rotating pump.
4.2 Start-up procedure
4.2.1 Inspection before start-up

1. Check that the oil level of shaft seal oil reservoir/ motor side cover/ gear side cover.
2. Check that the pump is installed correctly, especially after initial installation and
maintenance.
3. Turn on the cooling water supply and check if the cooling water has sufficient flow at
the correct pressure and check if the water connections leaks.
4.2.2 Start-up
1. Close all valves that are open to atmosphere and ensure that all other openings are
closed.
2. Switch on the baking pump and open the baking valve (if installed).
3. Switch on the pump.
4. Allow the pump to run for about 15 minutes to reach normal operating temperature.
5. Slowly open the pump inlet isolation valve (if installed).
4.2.3 Stop
1. Close the pump inlet isolation valve (if installed).
2. Leave the pump operating for sufficient time to drain the dangerous substances in the
pump.
3. Switch off the pump.
4. Close the backing air pump admittance valve (if installed) and Switch off the backing
pump.
5. Turn off the cooling water supply.
5. Maintenance
5.1 Safety information
WARNING
Obey the safety instructions below and take note of suitable precautions.
Otherwise, it may result in personal injury and equipment damage.
•The pump must be maintained by suitably trained and instructed technicians.
•The pump is not suitable for pumping gases with oxygen content greater than
atmospheric oxygen (oxygen content > 21%) or other strong reactive gases.
•The pump is not suitable for pumping flammable, explosive and toxic gases and
chemicals. When pumping those gases, the pump oil will be contaminated except for the
pump. Therefore, safety precautions should be taken during maintenance.
This manual suits for next models
1
Table of contents
Other BSC Water Pump manuals
Popular Water Pump manuals by other brands

Etatron
Etatron eOne quick start guide

Lincoln industrial
Lincoln industrial A Series Operator's manual

Grundfos
Grundfos UPM3 manual

SFA
SFA SANILife Tray Matic installation instructions

GORMAN-RUPP PUMPS
GORMAN-RUPP PUMPS ULTRA V V3C60SC-B Series Installation, operation, and maintenance manual with parts list

Ryobi
Ryobi P750 Operator's manual