BSi Real Freedom User manual

NORTH AMERICA
Broadcast Sports International,
7455 Race Road
Hanover, MD 21076
United States
Tel: +1-410-564-2600
INTERNATIONAL
Broadcast Sports International,
Axis 3, Rhodes Way
Watford, Hertfordshire WD24 4YW
United Kingdom
Tel: +44 (0)1923 233406
Real Freedom
Fiber Antenna Extender
Product Manual
Revision A

Real Freedom | Fiber Antenna Extender Product Manual 2 of 28
Manual part number: 20006-1-000
Revision A
Copyright © 2021, Broadcast Sports International. All Rights Reserved.
This publication or parts thereof may not be reproduced in any form, by any method, for any purpose.
Company names, logos and product names are registered trademarks or trademarks of their respective
owners. Broadcast Sports International or any of its group companies make no claim to third-party
t to the
Broadcast Sports International General Sales Terms and Conditions.
This manual contains important information regarding the installation and operation of the Real Freedom
Fiber Antenna Extender. For safe and reliable operation, installers must ensure that they are familiar with,
and fully understand, all instructions contained herein. Broadcast Sports International reserves the right to
revise and improve its products as it sees fit. This publication describes the state of this product at the time
of publication and may not always reflect the product in the future.
In this manual, the following symbols call your attention to important information:
CAUTION
Indicates that care is required when proceeding to avoid damage to the system.
IMPORTANT
Indicates important information that you should read before installing, configuring, or using the
system.
NOTE
Used to draw your attention to additional important information.
TIP
Indicates information that may make procedures easier.
WARNING
Indicates a potentially hazardous situation.
Warranty information
All products are warranted to be free from defects in materials or workmanship for a period of 24
months. If
returned within the applicable warranty period, BSI will, at
its sole discretion and at no cost to the customer,
repair or replace the defective product with another unit of the same or equivalent model. This warranty does
not cover failures due to abuse, misuse, accident or unauthorized alterations or repairs.
Contact details and technical support
Real Freedom Team
For product information and help with missing or damaged items.
Email: EngineeringDepartment@BSINTL.COM
Tel: +1-410-564-2642
Telephone Support Line
Product technical support is provided via a
telephone support line. Trained
technicians are available to offer setup and configuration advice and to assist
in troubleshooting technical issues.
Tel: +1-410-564-2642
Return Merchandise
Authorization (RMA)
Procedure
Problems that cannot be resolved on the telephone may require the device to
be returned to BSI for repair. In such cases, the telephone operator will assist
the customer in obtaining an RMA.
Please note that no returns can be accepted without a valid RMA.

Real Freedom | Fiber Antenna Extender Product Manual 3 of 28
Hazard warning labels
The following hazard warning labels are fixed to the Real Freedom Fiber Antenna Extender for your
information and safety.
Base unit
Remote unit
About this manual
This manual contains safety information and information for installing, configuring, and operating a Real
Freedom Fiber Antenna Extender.
It applies to the following products:
•IFB-3211: Real Freedom Fiber Base Unit
•IFR-3211: Real Freedom Fiber Remote Unit

Real Freedom | Fiber Antenna Extender Product Manual 4 of 28
Contents
1 Introduction................................................................................................................................6
Configuration example .................................................................................................................................. 6
2 Installation and configuration...................................................................................................7
Overview........................................................................................................................................................ 7
Preparation.................................................................................................................................................... 7
Environmental requirements..................................................................................................................... 7
Power requirements.................................................................................................................................. 8
Unpack the fiber antenna extender........................................................................................................... 8
Additional items required for installation................................................................................................... 8
Cable requirements................................................................................................................................... 8
Pole mount a fiber base or remote unit......................................................................................................... 8
Precautions............................................................................................................................................... 8
Temporary installation............................................................................................................................... 9
Permanent installation .............................................................................................................................. 9
Installation using ¼-20 UNC mounts ........................................................................................................ 9
Surface mount a fiber base or fiber remote unit............................................................................................ 9
Connections................................................................................................................................................. 10
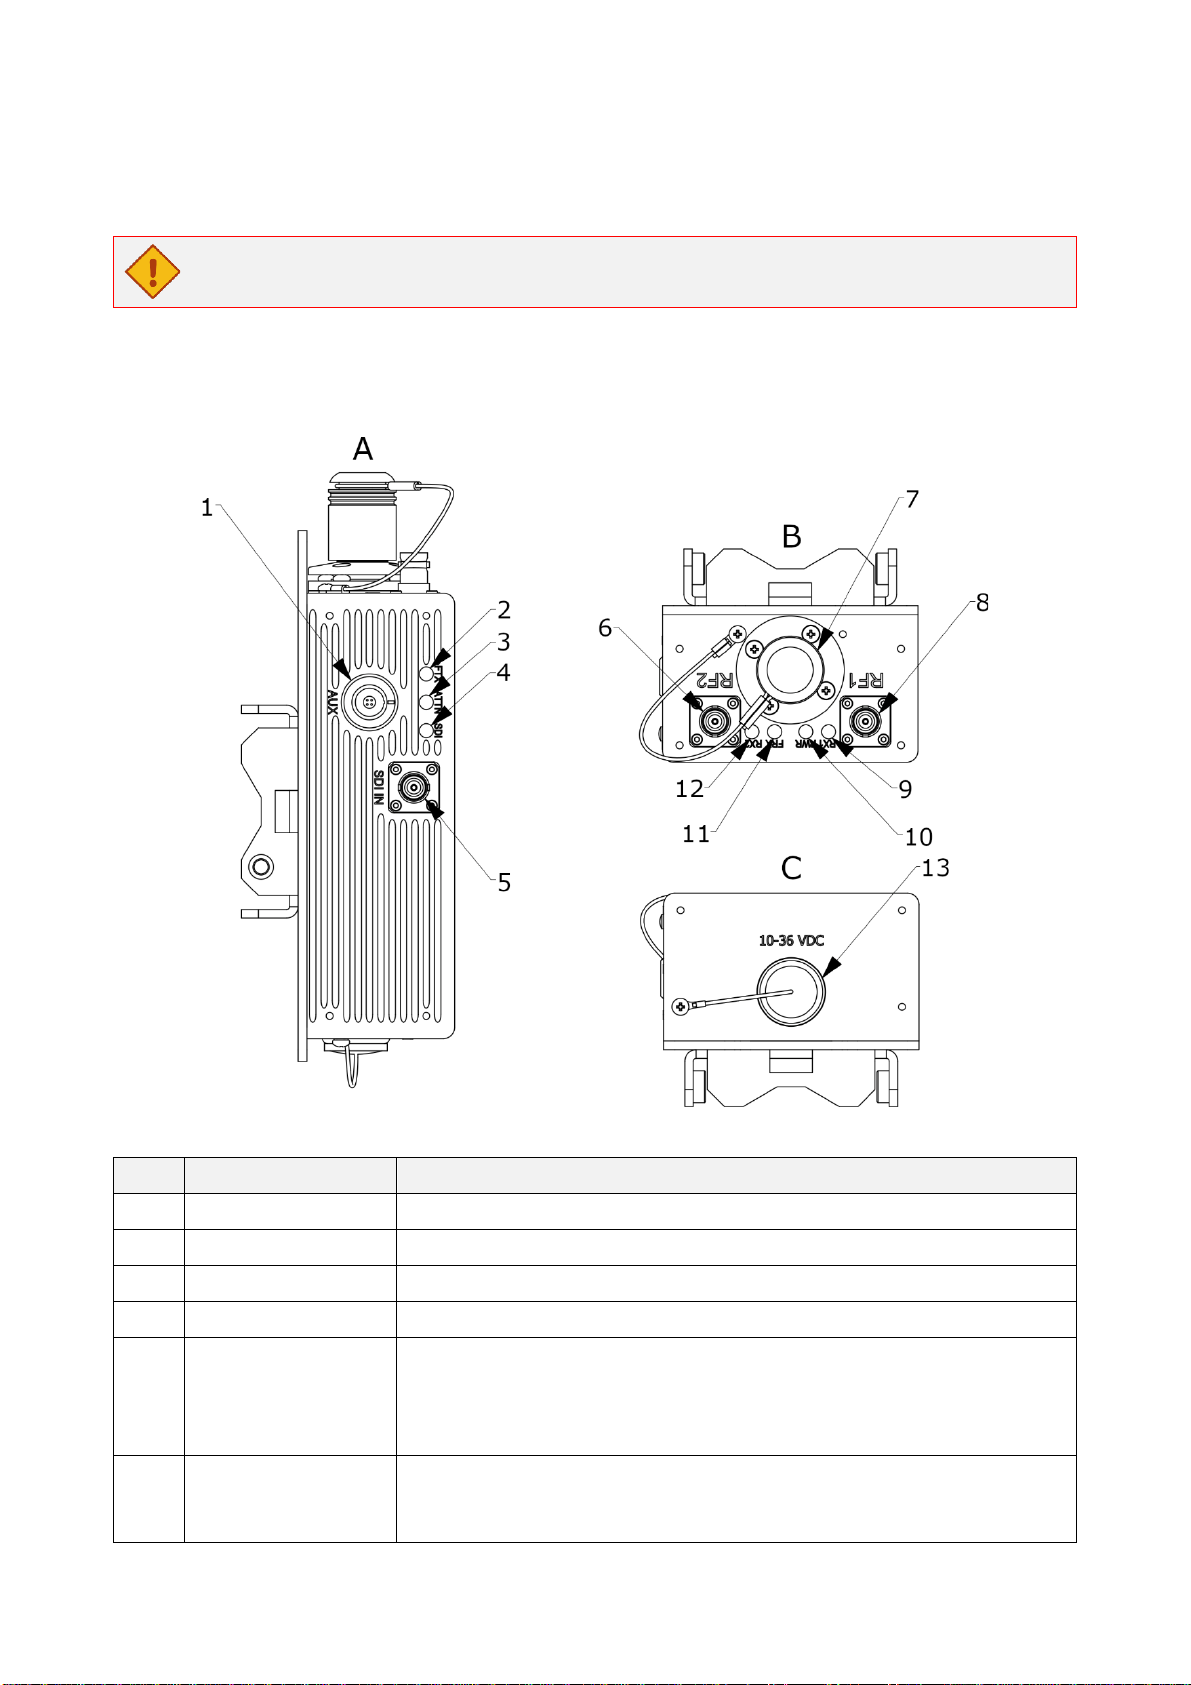
Fiber base unit ........................................................................................................................................ 10
Fiber remote unit..................................................................................................................................... 11
Connect a downconverter to a fiber remote unit..................................................................................... 12
Connect a fiber remote unit to a fiber base unit...................................................................................... 12
Connect a fiber base unit to a receiver................................................................................................... 13
Configure a fiber antenna extender............................................................................................................. 13
3 Operation..................................................................................................................................14
Fiber base unit status LEDs........................................................................................................................ 14
FTX ......................................................................................................................................................... 14
ATTN....................................................................................................................................................... 14
SDI.......................................................................................................................................................... 15
RX1/RX2................................................................................................................................................. 15
PWR........................................................................................................................................................ 15
FRX......................................................................................................................................................... 15
Fiber remote unit status LEDs..................................................................................................................... 16
FRX......................................................................................................................................................... 16
ATTN....................................................................................................................................................... 16
SDI.......................................................................................................................................................... 16

Real Freedom | Fiber Antenna Extender Product Manual 5 of 28
DC1/DC2................................................................................................................................................. 16
PWR........................................................................................................................................................ 17
FTX ......................................................................................................................................................... 17
4 Troubleshooting.......................................................................................................................18
Fiber issues............................................................................................................................................. 18
RF issues................................................................................................................................................ 18
5 Maintenance.............................................................................................................................20
Routine maintenance procedures ............................................................................................................... 20
Performance monitoring.......................................................................................................................... 20
Visual inspection..................................................................................................................................... 20
Cleaning ...................................................................................................................................................... 20
Storage........................................................................................................................................................ 20
A Technical data .........................................................................................................................21
Fiber base unit dimensions ......................................................................................................................... 21
Fiber remote unit dimensions...................................................................................................................... 23
Connector pinout assignments.................................................................................................................... 25
AUX connector........................................................................................................................................ 25
DC power input connector ...................................................................................................................... 25
RF input/output connector....................................................................................................................... 26
SDI input/output connector ..................................................................................................................... 26
B Safety and regulatory compliance .........................................................................................27
Safety notice................................................................................................................................................ 27
Hazard warning labels................................................................................................................................. 27
Electromagnetic compatibility Class A ..................................................................................................... 27
Compliance statement (United States)................................................................................................... 27
Disposal and recycling European Union .................................................................................................. 28

Real Freedom | Fiber Antenna Extender Product Manual 6 of 28
1
Introduction
The Real Freedom Fiber Antenna Extender provides unparalleled flexibility of operation. Multiple RF
cameras incorporating camera control may be deployed from a single remote site utilizing just a single
SMPTE hybrid fiber cable.
The system consists of a fiber base unit (IFB-3211) which integrates with a Real Freedom Receiver for
command and control along with a fiber remote unit (IFR-3211). Both units are fully weatherproof and are
linked together by a single SMPTE hybrid or single mode dual fiber cable.
The Real Freedom Fiber Antenna Extender incorporates an SDI/ASI return video channel from the base unit
to the remote unit and allows you to simultaneously extend camera control and receive antennas by up to
2 km / 1.5 miles with a single hybrid fiber cable. Providing power to remote Real Freedom Downconverters
and Data Transmitters over hybrid fiber cable, the system supports multiple RF cameras with a single
SMPTE cable.
T
Freedom Fiber Antenna Extender within the network, including the status and control of any attached Real
Freedom Data Transmitters and Downconverters. Fiber optic signal levels and real-time health check
reporting are displayed on the receiver, alerting you when RF performance is affected. Up to six Real
Freedom Receivers can be simultaneously supported by a single fiber base unit when utilized with the
optional Real Freedom Active UHF Splitter.
Configuration example
This example shows multiple RF cameras incorporating camera control deployed from a single remote site
utilizing a single SMPTE hybrid fiber cable. Note that the base unit and splitter can be replaced with a rack
mount fiber base unit incorporating the active splitter.
Figure 1: Networked multi camera reception with remote fiber extender and active splitter.

Real Freedom | Fiber Antenna Extender Product Manual 7 of 28
2
Installation and configuration
This chapter contains the installation and configuration instructions for the Real Freedom Fiber Antenna
Extender (fiber base and fiber remote units).
Overview
The main installation and configuration steps for a Real Freedom Fiber Antenna Extender are as follows:
1. Optionally, pole mount the base and remote units.
2. Connect a Real Freedom Downconverter to the remote unit.
To remotely control up to six Real Freedom Camera Back Transmitters and to provide camera control of
most brands of broadcast camera, connect a Real Freedom Data Transmitter to one of the
downconverters.
3. Connect the base unit to the remote unit using a fiber cable.
4. Connect the RF outputs from the base unit to a Real Freedom Receiver either directly or via an active
UHF splitter.
5. From the receiver, monitor fiber optic signal levels, voltages, and currents of connected equipment, which
can help to alert you when RF performance is affected. If RF levels are low, use the receiver to
introduces extra gain into the system.
Preparation
When planning the installation locations for the fiber base and remote units, you should take note of the
following points:
•In general, you should install the base and remote units in areas where they can be accessed easily by
support technicians. This area should also be out of reach or inaccessible to anyone that does not need
to gain access, such as fans at a sporting event or attendees at a conference.
•Install the fiber base unit close to the receiver to minimize the loss of RF signal strength.
•Install the antenna close to the downconverter using the shortest cable length as possible to minimize
cable loss.
•Locate the remote unit as close as possible to the downconverter to minimize RF cable loss.
Environmental requirements
The following table summarizes the environmental requirements for the operation and storage of a Real
Freedom Fiber Antenna Extender.
Table 1: Environmental requirements
Specification
Details
Humidity
95% non-condensing
Operating and storage temperature
14° to 149°F / -10° to +65°C

Real Freedom | Fiber Antenna Extender Product Manual 8 of 28
Power requirements
The following table summarizes the power requirements for a Real Freedom Fiber Antenna Extender.
Table 2: Power requirements
Specification
Details
Power
936 V DC
Consumption
Each fiber unit consumes about 8.5 W. Note this does not include
any peripherals connected to the remote unit such as a
downconverter and data transmitter.
The recommended power supply for a SMPTE fiber base unit is
Mean-Well GST90A24-P1M (24 V 90 W). This provides sufficient
power for a fiber base and fiber remote with two downconverters
and a data transmitter connected.
Note that the remote unit requires a power supply for fiber lengths of greater than two kilometers.
When using SMPTE, the remote unit does not need power unless the fiber length exceeds two kilometers. If
you are using other fiber connectors, for example, ST or LC, then these do not include a means for power
insertion over the fiber and the remote unit must be powered locally.
Unpack the fiber antenna extender
Unpack the Real Freedom Fiber Antenna Extender and refer to the packing list to ensure that all items are
included. Report any missing items immediately to the Real Freedom Team.
Inspect the base and remote units for signs of damage. Report any damage to the Real Freedom Team.
Additional items required for installation
To install the Real Freedom Fiber Antenna Extender, you will require the following additional items:
•936 V DC power supplies with XLR-4 male connector.
•The other components of your Real Freedom installation, which may include one or more receivers,
downconverters, data transmitters, camera back transmitters and cameras, and active UHF splitters.
Cable requirements
To install the Real Freedom Fiber Antenna Extender, you will require the following cables:
•Fiber cable with appropriate connectors.
•Coaxial cables with BNC connectors.
It is recommended that you use good quality cable with the correct impedance: All fiber connections are
75 Ohm.
Pole mount a fiber base or remote unit
The Real Freedom Fiber Base and Fiber Remote units are supplied with a removable mounting bracket
which allows you to mount either unit to a pole for temporary or permanent installation. The mounting bracket
can be secured to vertical or horizontal poles of between 1.44 and 2.68 inch (36.5 to 68 mm) in diameter.
Precautions
You should read these precautions before you pole mount a fiber base unit and/or fiber remote unit.
•Before attaching a fiber base or fiber remote unit to a pole or camera mount, ensure that the pole can
support the weight of the unit (1.8 lb. / 0.82 kg), antenna, attached cables, and any other devices that you
intend to attach to the pole. This is particularly important if you intend to attach the unit to the end of the
pole.

Real Freedom | Fiber Antenna Extender Product Manual 9 of 28
•The fiber base or remote unit must be mounted vertically.
•When attaching the mounting bracket to the fiber base or remote unit, do not overtighten the screws as it
may result in thread damage.
Temporary installation
For temporary installation, use cable ties.
1. If not already attached, attach the mounting bracket to the back of the fiber base or fiber remote unit
using the four screws (M3 x 8) provided.
Do not overtighten the screws as it may result in thread damage.
2. Pass at least two cable ties through the slots in the mounting bracket and around the pole.
3. Close and tighten the cable ties to secure the fiber base or fiber remote unit to the pole.
Permanent installation
For permanent installation, use hose clamps.
1. If not already attached, attach the mounting bracket to the back of the fiber base or fiber remote unit
using the four screws (M3 x 8) provided.
Do not overtighten the screws as it may result in thread damage.
2. Pass the hose clamps through the slots in the mounting bracket and around the pole.
3. Tighten the hose clamps to secure the fiber base or fiber remote unit to the pole.
Installation using ¼-20 UNC mounts
Mount a fiber base or fiber remote unit on a standard Manfrotto lighting stand, camera mount, repro arm,
magic arm, clamp, or Dado kit using a ¼-20 camera mount screw.
NOTE: part number: 195) to
go from the ¼-20 mount to a Manfrotto super clamp (part number: 035C).
1. If not already attached, attach the mounting bracket to the back of the fiber base or fiber remote unit
using the four screws (M3 x 8) provided.
Do not overtighten the screws as it may result in thread damage.
2. Either thread a ¼-20 screw through the screw hole in the mounting bracket into the hole in the mount or
screw the fiber unit onto the mounting screw.
3. Tighten to secure the fiber base or fiber remote unit.
Surface mount a fiber base or fiber remote unit
Depending on the installation type and site, you may wish to mount a fiber base or fiber remote unit onto a
vertical surface, such as a wall.
1. If attached, remove the mounting bracket from the back of the fiber base or fiber remote unit.
The bracket is secured with four screws (M3 x 8).
2.
plugs into the holes, as necessary.
3. Attach the fiber base or fiber remote unit using four screws.
4. Check that the fiber base or fiber remote unit is vertical and tighten the screws.

Real Freedom | Fiber Antenna Extender Product Manual 10 of 28
Connections
Refer to the following drawings which show the locations of the connectors and LEDs on the fiber base and
fiber remote units.
CAUTION: To prevent damage, it is recommended that you only use BSI supplied cables and
accessories with these products.
Fiber base unit
Refer to the following drawing which shows the locations of the connectors on the fiber base unit. Note for
easy identification, the base unit is black to match the receiver.
Figure 2: Fiber base unit connectors and status LEDs. A Side, B Top, C Bottom.
Key
Component
Description
1
AUX
Use for programming and firmware updates.
2
FTX
Indicates the state of the optical transmitter.
3
ATTN
Indicates whether remote attenuation is activated.
4
SDI
Indicates whether a valid SDI input has been detected.
5
SDI IN
SDI/ASI input. Use to connect an SDI or ASI source to the fiber base unit
to send over the fiber link to the fiber remote unit.
Note that this interface does not support 3G-SDI.
Connector: BNC (F)
6
RF2
Use to connect the fiber base unit to a Real Freedom Receiver or Real
Freedom Active UHF Splitter.
Connector: BNC (F)

Real Freedom | Fiber Antenna Extender Product Manual 11 of 28
Key
Component
Description
7
Fiber connector
Use to connect the fiber cable to the base unit. The other end of the fiber
cable connects to the fiber remote unit.
Fiber FC/APC S & D connectors and SMPTE are typically the most
used, but other connector types are available.
8
RF1
Use to connect the fiber base unit to a Real Freedom Receiver or Real
Freedom Active UHF Splitter.
Connector: BNC (F)
9
RX1
Indicates whether the base unit has a comms link with the receiver (RF1).
10
PWR
Indicates whether the base unit is powered and has detected a fiber
remote unit.
11
FRX
Indicates the state of the RF1 and RF2 optical receive levels.
12
RX2
Indicates whether the base unit has a comms link with the receiver (RF2).
13
10-36 VDC
DC input to power the unit.
Connector: XLR-4 (M)
Fiber remote unit
Refer to the following drawing which shows the locations of the connectors on the fiber remote unit. Note for
easy identification, the remote unit is grey to match the downconverter.
Figure 3: Fiber remote unit connectors and status LEDs. A Side, B Top, C Bottom.
Key
Component
Description
1
AUX
Use for programming and firmware updates.
2
FRX
Indicates the status of optical receive level.
3
ATTN
Indicates whether remote attenuation is activated.

Real Freedom | Fiber Antenna Extender Product Manual 12 of 28
Key
Component
Description
4
SDI
Indicates whether a valid SDI signal is being output.
5
SDI OUT
SDI/ASI output. Provides an SDI/ASI output if an SDI/ASI source has
been connected to the fiber base unit.
Note that this interface does not support 3G-SDI.
Connector: BNC (F)
6
RF2
Use to connect a Real Freedom Downconverter to the fiber remote unit.
Connector: BNC (F)
7
Fiber connector
Use to connect the fiber cable to the remote unit. The other end of the
fiber cable connects to the fiber base unit.
Fiber FC/APC S & D connectors and SMPTE are typically the most
used, but other connector types are available.
8
RF1
Use to connect a Real Freedom Downconverter to the fiber remote unit.
Connector: BNC (F)
9
DC1
Indicates whether the downconverter on RF1 has power and a comms link
with the remote unit.
10
PWR
Indicates whether the remote unit has DC power and has detected a fiber
base unit.
11
FTX
Indicates the state of the optical fiber transmitters.
12
DC2
Indicates whether the downconverter on RF2 has power and a comms link
with the remote unit.
13
10-36 VDC
DC input to power the unit.
Note that if you are using SMPTE fiber, then the remote unit does not
require DC power.
Connector: XLR-4 (M)
Connect a downconverter to a fiber remote unit
Connect downconverters to a fiber remote unit using the RF1/RF2 BNC connectors.
NOTE: The connection between the downconverter output and the fiber remote cannot exceed a
reasonable distance without beginning to affect performance. The chosen system configuration
will influence the placement of components and the cable lengths required.
Connect a fiber remote unit to a fiber base unit
Use an appropriate fiber cable to connect the fiber remote unit to the fiber base unit. FC/APC S & D
connectors and hybrid SMPTE are typically the most used connectors, but other connector types are
available.
IMPORTANT: Practice clean fiber handling procedures and clean all fibers prior to connection.
Dirt may be easily transferred from one fiber to another.

Real Freedom | Fiber Antenna Extender Product Manual 13 of 28
Connect a fiber base unit to a receiver
Use coaxial cables to connect the outputs (RF1 and RF2) from the base unit to the BNC connectors on the
back of a Real Freedom Receiver (RF1 and RF2).
The distance between the receiver and base unit should be kept to a minimum to maintain a strong signal.
IMPORTANT: When connecting a fiber base unit to the Real Freedom Receiver, the coaxial
connections must be made to sequential RF input pairs on the receiver (for example, RF1/RF2 or
RF3/RF4 or RF5/RF6 or RF7/RF8) when operated in single (normal) pedestal mode. When
operated in dual pedestal (single stream) mode, the connections from the fiber base to the
receiver must be (RF2/RF4 or RF6/RF8).
When an incorrect connection is made, the Connection Map will not populate correctly
and the RX1 and RX2 blue LEDs on the fiber base unit will flash to indicate that correct
communication has not been established between the fiber base and receiver.
Configure a fiber antenna extender
Once the power is supplied, the Real Freedom Receiver automatically detects the Real Freedom Fiber
Extender (fiber base and remote units) and configures itself appropriately.
NOTE: Refer to the Real Freedom Receiver Product Manual for more information on the fiber
configuration options and how to enable Active Mode (Gain Boost) when RF levels are low.

Real Freedom | Fiber Antenna Extender Product Manual 14 of 28
3
Operation
Once connected to the system and configured, no further changes are required to the Real Freedom Fiber
Antenna Extender during the routine operation of the system.
TIP: Fiber Status page to view fiber optic signal levels, voltages and currents
of connected equipment, and real-time health check information, which can help to alert you
when RF performance is affected. If the fiber levels are low or extremely low, you will see amber
and red signal indicators. This usually indicates that you need to clean the fibers.
Fiber base unit status LEDs
Use the LED indicators on the fiber base to help you to determine whether the unit is operating correctly.
FTX
The FTX LED indicates the state of the optical transmitter.
Table 3: Base unit FTX LED indications
Condition
Description
SOLID AMBER
NORMAL STATE
SDI/ASI fiber Tx ON. The optical transmitter (used to send camera
control and SDI/ASI data over the fiber link) is ON.
FLASHING AMBER
ERROR STATE
SDI/ASI fiber Tx Alarm. Optical transmitter has an alarm.
OFF
ERROR STATE
SDI/ASI fiber Tx OFF. Optical transmitter has been deactivated.
ATTN
The ATTN LED indicates whether remote attenuation is activated.
Table 4: Base unit ATTN LED indications
Condition
Description
SOLID AMBER
Remote attenuation ON (Rx Control).
Attenuation has been activated from the Real Freedom Receiver menu.
FLASHING AMBER
Remote attenuation ON (Manual Control).
Attenuation activated but is not being controlled from the Real Freedom
Receiver menu.
OFF
Remote attenuation OFF.
Attenuation has been deactivated from the Real Freedom Receiver
menu.

Real Freedom | Fiber Antenna Extender Product Manual 15 of 28
SDI
The SDI LED indicates whether a valid SDI input has been detected.
Table 5: Base unit SDI LED indications
Condition
Description
GREEN
Valid SDI/ASI input.
SOLID AMBER
SDI/ASI input ON.
OFF
SDI/ASI power OFF.
RX1/RX2
The RX1/RX2 LEDs indicate whether the base unit has a comms link with the receiver.
Table 6: Base unit RX1 and RX2 LED indications
Condition
Description
BLUE
NORMAL STATE
Receiver comms OK.
SLOW FLASHING BLUE
ERROR STATE
Receiver no comms.
PWR
The PWR LED indicates whether the base unit is powered and has detected a fiber remote unit.
Table 7: Base unit PWR LED indications
Condition
Description
SOLID GREEN
NORMAL STATE
Power OK, remote detected.
SLOW FLASHING GREEN
ERROR STATE
Power OK, remote not detected.
SOLID RED
ERROR STATE
Power alarm, remote detected.
SLOW FLASHING RED
ERROR STATE
Power alarm, remote not detected.
OFF
ERROR STATE
No power.
FRX
The FRX LED indicates the state of the RF1 and RF2 optical receive levels.
Table 8: Base unit FRX LED indications
Condition
Description
SOLID AMBER
NORMAL STATE
RF1 and RF2 optical receive levels are OK.
FLASHING AMBER
(EVEN FLASH)
ERROR STATE
RF2 optical receive level OK, RF1 optical receive level is low.

Real Freedom | Fiber Antenna Extender Product Manual 16 of 28
Condition
Description
FLASHING AMBER
(ODD FLASH)
ERROR STATE
RF1 optical receive level OK, RF2 optical receive level is low.
FAST FLASHING AMBER
ERROR STATE
RF1 and RF2 optical receive levels are both low.
OFF
ERROR STATE
RF1 and RF2 optical receivers have been deactivated.
Fiber remote unit status LEDs
Use the LED indicators on fiber remote to help you to determine whether the unit is operating correctly.
FRX
The FRX LED indicates the status of optical receive level.
Table 9: Remote unit FRX LED indications
Condition
Description
SOLID AMBER
SDI/ASI fiber Tx ON.
FLASHING AMBER
SDI/ASI fiber Tx Alarm.
OFF
SDI/ASI fiber Tx OFF.
ATTN
The ATTN LED indicates whether remote attenuation is activated.
Table 10: Remote unit ATTN LED indications
Condition
Description
GREEN
Remote attenuation OFF (0 dB).
RED
Remote attenuation ON (15 dB).
SDI
The SDI LED indicates whether a valid SDI signal is being output.
Table 11: Remote unit SDI LED indications
Condition
Description
GREEN
Valid SDI/ASI output.
SOLID AMBER
SDI/ASI output ON.
OFF
SDI/ASI power OFF.
DC1/DC2
The DC1/DC2 LEDs indicate whether the downconverter on RF1/RF2 has power and a comms link with the
remote unit.
Table 12: Remote unit DC1 and DC2 LED indications
Condition
Description
BLUE
NORMAL STATE
Downconverter power ON, comms OK.

Real Freedom | Fiber Antenna Extender Product Manual 17 of 28
Condition
Description
SLOW FLASHING BLUE
ERROR STATE
Downconverter power ON, no comms.
FAST FLASHING BLUE
ERROR STATE
Downconverter power alarm.
OFF
ERROR STATE
Downconverter power OFF.
PWR
The PWR LED indicates whether the remote unit has DC power and has detected a fiber base unit.
Table 13: Remote unit PWR LED indications
Condition
Description
SOLID GREEN
NORMAL STATE
DC power levels are OK, and the remote unit has detected the fiber base
unit.
SLOW FLASHING GREEN
ERROR STATE
DC power levels are OK, but the remote unit has not detected the fiber
base unit.
SOLID RED
ERROR STATE
DC power alarm, although the remote unit has detected the fiber base
unit.
SLOW FLASHING RED
ERROR STATE
DC power alarm, and the remote unit has not detected the fiber base unit.
OFF
ERROR STATE
No DC power present on 1036 V DC input or from SMPTE fiber
connection.
FTX
The FTX LED indicates the state of the optical fiber transmitters.
Table 14: Remote unit FTX LED indications
Condition
Description
SOLID AMBER
NORMAL STATE
RF1 and RF2 optical fiber transmitters are on and OK.
FLASHING AMBER (EVEN
FLASH)
ERROR STATE
RF2 OK, RF1 optical transmitter has an alarm.
FLASHING AMBER (ODD
FLASH)
ERROR STATE
RF1 OK, RF2 optical transmitter has an alarm.
FAST FLASHING AMBER
ERROR STATE
RF1 and RF2 optical transmitters both have alarms.
OFF
ERROR STATE
RF1 and RF2 optical transmitters have been deactivated.

Real Freedom | Fiber Antenna Extender Product Manual 18 of 28
4
Troubleshooting
This chapter provides troubleshooting information for the Real Freedom Fiber Antenna Extender.
Use this information to help you to solve some of the problems that you may encounter when using a fiber
antenna extender in a Real Freedom system.
Fiber issues
Use the information in the following table to help you troubleshoot fiber issues when using a Real Freedom
Fiber Antenna Extender.
Table 15: Troubleshooting fiber issues
Symptom
Possible cause
Actions
Poor fiber signal.
Loose or dirty fiber
connections.
•Check that all fiber connectors on the base
and remote units are securely fastened.
•Remove the fiber connection and clean the
glass tip. Reconnect and verify the signal.
No fiber signal.
Fiber incorrectly connected
or faulty fiber cable.
•Check that fiber is connected to the correct
ports (S to S and D to D).
•Turn off power to the receiver RF ports
carrying fiber.
•Change the fiber cable.
RF issues
Use the information in the following table to help you troubleshoot RF issues when using a Real Freedom
Fiber Antenna Extender.
Table 16: Troubleshooting RF issues
Symptom
Possible cause
Actions
Poor RF signal.
Cable runs too long.
•Ensure that you minimize the required cable
lengths and RF signal loss by installing the
fiber base unit close to the receivers.
•Minimize the cable length between the fiber
remote unit and attached downconverters.
RF levels too low.
•Use the receiveFiber & Splitter menu to
add a gain boost into the Splitter system.
Note that if you add a boost when RF levels
are not too low you can overload/saturate the
system.

Real Freedom | Fiber Antenna Extender Product Manual 19 of 28
Symptom
Possible cause
Actions
Issues with the
downconverters connected to
the fiber remote unit.
•Check the placement of downconverters
attached to the fiber remote unit.
•Verify there is no mismatch of antennas. All
downconverter and transmitter antennas
should match your band of operations.
•Check downconverters are powered.
Poor or no fiber signal from
the remote unit to the base
unit.
•Check that all fiber connectors are securely
fastened.
•Remove the fiber connections and clean the
glass tip. Reconnect and verify the signal.
•Check that fiber is connected to the correct
ports on both the fiber remote and fiber base
units (S to S and D to D).
•Turn off power to the receiver RF ports
carrying fiber.

Real Freedom | Fiber Antenna Extender Product Manual 20 of 28
5
Maintenance
This chapter describes the maintenance, cleaning, and storage procedures for Real Freedom Fiber Antenna
Extenders.
Routine maintenance procedures
You should perform the following maintenance procedures on a regular basis.
WARNING: The Real Freedom Fiber Base and Real Freedom Fiber Remote units do not
contain user serviceable parts. Warranty is void if the device is opened. Refer servicing to
qualified BSI personnel only.
Performance monitoring
It is recommended that you periodically monitor the overall performance of the fiber antenna extender and
system. If you experience failure or deterioration in the performance of the system, check cables and
adapters, input, and output connectors for damage.
Visual inspection
Depending on operating environments and use, periodically inspect the fiber antenna extender components
for signs of damage, dirt, or corrosion. Check that all markings and warning labels are in good condition.
Cleaning
If necessary, use low-pressure compressed air cleaning to remove small particles and debris from the
surface of the fiber antenna extender components.
Clean connector surfaces with a cotton swab moistened with a small quantity of alcohol. Use a lint-free cloth
to wipe connector surfaces after cleaning.
CAUTION: Do not use abrasive cleaners.
Storage
Store Real Freedom Fiber Antenna Extender units in a safe location where they are unlikely to be disturbed.
If pole or surface mounted, detach the unit before storage.
IMPORTANT: Ensure that you attach the fiber connector cover if there is no attached fiber cable.
For long term storage:
1. Disconnect all cables from the fiber base or fiber remote unit.
2. Cover the connectors with suitable dust covers.
3. Place the unit in protective packaging and store in a cool, dry environment.
Other manuals for Real Freedom
2
Table of contents