BudCam BC-Series User guide

Birdhouse / birdfeeder with built-in IP camera
BC-xx / KC-xx series
Instructions for installation and operation
Before putting the system into operation, first carefully read this manual.

Birdhouse / birdfeeder with built-in IP camera Instructions for installation and operation
Content
Safety precautions............................................................................................................................3
Properties.........................................................................................................................................3
Content of delivery...........................................................................................................................4
Parts description...............................................................................................................................5
Where to install the birdhouse..........................................................................................................6
When to install the birdhouse...........................................................................................................6
Mounting the birdhouse....................................................................................................................6
Mounting the feeder.........................................................................................................................6
Connection.......................................................................................................................................7
BC-01 P, BC-02P, KC-01 P models.............................................................................................7
BC-01 W, BC-02 W, KC-01 W models.......................................................................................9
Operation........................................................................................................................................10
Access to camera in LAN...........................................................................................................10
WiFi parameters configuration (BC-xx W, KC-xx W models)...................................................16
Video recording.........................................................................................................................18
Video playback..........................................................................................................................18
Camera configuration.....................................................................................................................18
Access from OS Android / iOS mobile devices...............................................................................21
Maintenance...................................................................................................................................24
Technical specification...................................................................................................................24
- 2 -

Birdhouse / birdfeeder with built-in IP camera Instructions for installation and operation
Dear customer, We thank you for having bought our product. This is a birdhouse / feeder with built-
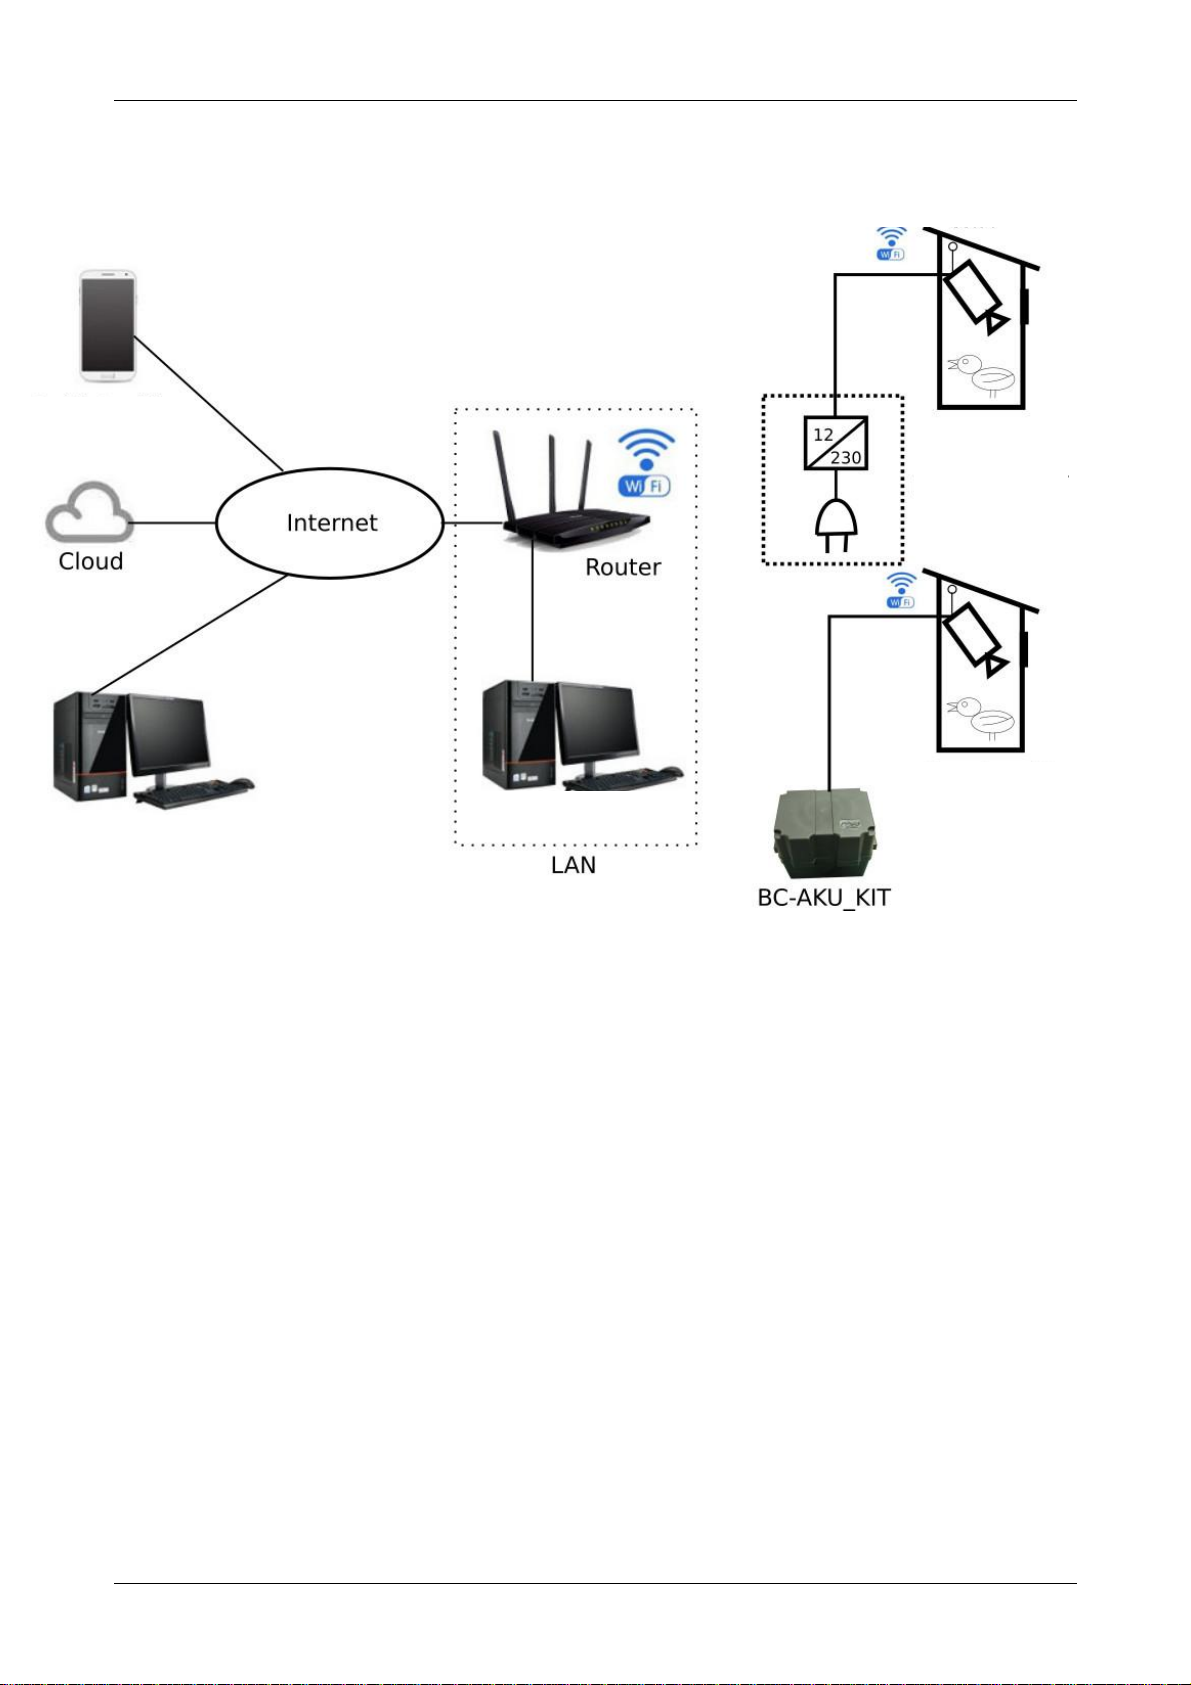
in IP camera allowing the remote monitoring the events in the birdhouse / feeder on your PC
(laptop) or from the mobile devices (mobile phone, tablet, etc.). Different ways of video recording
are also available. We hope that our product will bring you a lot of fun and education.
Safety precautions
·Before putting the system into operation first read this manual.
·Store the instructions carefully for the later use.
·Keep the specified operating conditions (see "Specifications").
·Protect your device from the impacts.
·Do not allow water or foreign object to get into the camera.
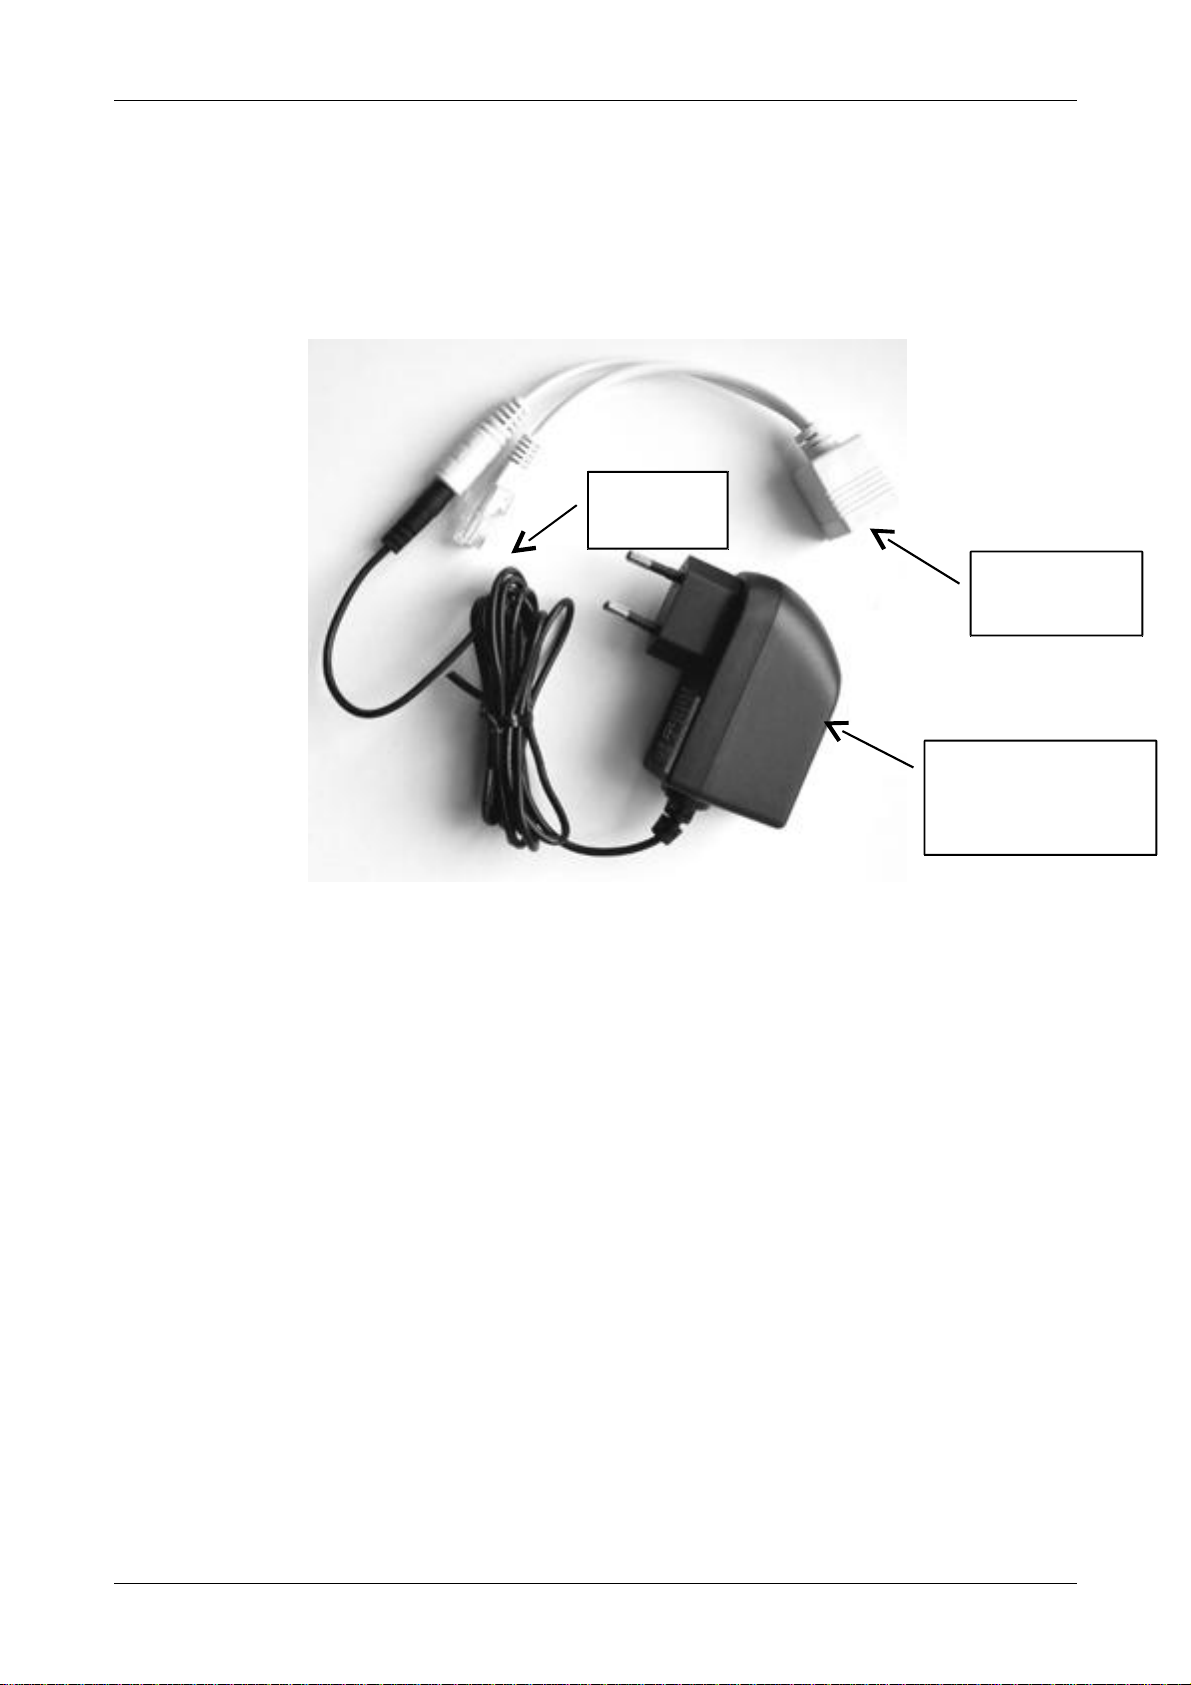
·Use only the specified power supply (see "Specifications"). Using the wrong power supply may
result in injury, fire and damage the unit.
·Do not disassemble the camera. In case of failure contact your dealer or authorized service.
·Protect the camera from the effects of a storm or lightning by using an adequate surge protection.
·Electrical installation of the device must meet applicable electrical standards and regulations.
Old electrical and electronic equipment waste handling (applicable in Europe Union
and other european countries with separate collection systems)
This symbol on the product or its packaging indicates that the product shall not be treated
as an ordinary household waste. Instead it should be handed over to a collection point for the
recycling of electrical and electronic equipment. Following these guidelines can prevent negative
impacts on the environment and human health, which could otherwise be caused by improper
handling. Recycling of the materials which it is made from will help to conserve the natural
resources. For further information on recycling this product please contact your local government,
local company providing the household waste disposal service or the shop where you purchased the
product.
The symbol of a figure with the basket means that the used packaging should be thrown
into the appropriate recycling bins.
This device is equipped with the European CE conformity mark.
This device is in conformity with relevant european directives.
Note for WiFi models (BC-xx W, KC-xx W):
ESCAD Trade Ltd. declares that the type of radio equipment BC-W xx, xx KC-W is in accordance
with 2014/53/EU Directive. A full declaration of conformity can be found bellow.
This radio equipment can be operated in Czech republic on the basis of general authorization ČTÚ
No. VO-R12/09.2010-12 under the conditions specified in the general authorization.
The device can be operated in Czech republic only with an antenna supplied by the manufacturer.
BC -XX series birdhouse was favourably assessed by Czech Society for Ornithology (CSO) and is
provided with the logo "CSO recommended."
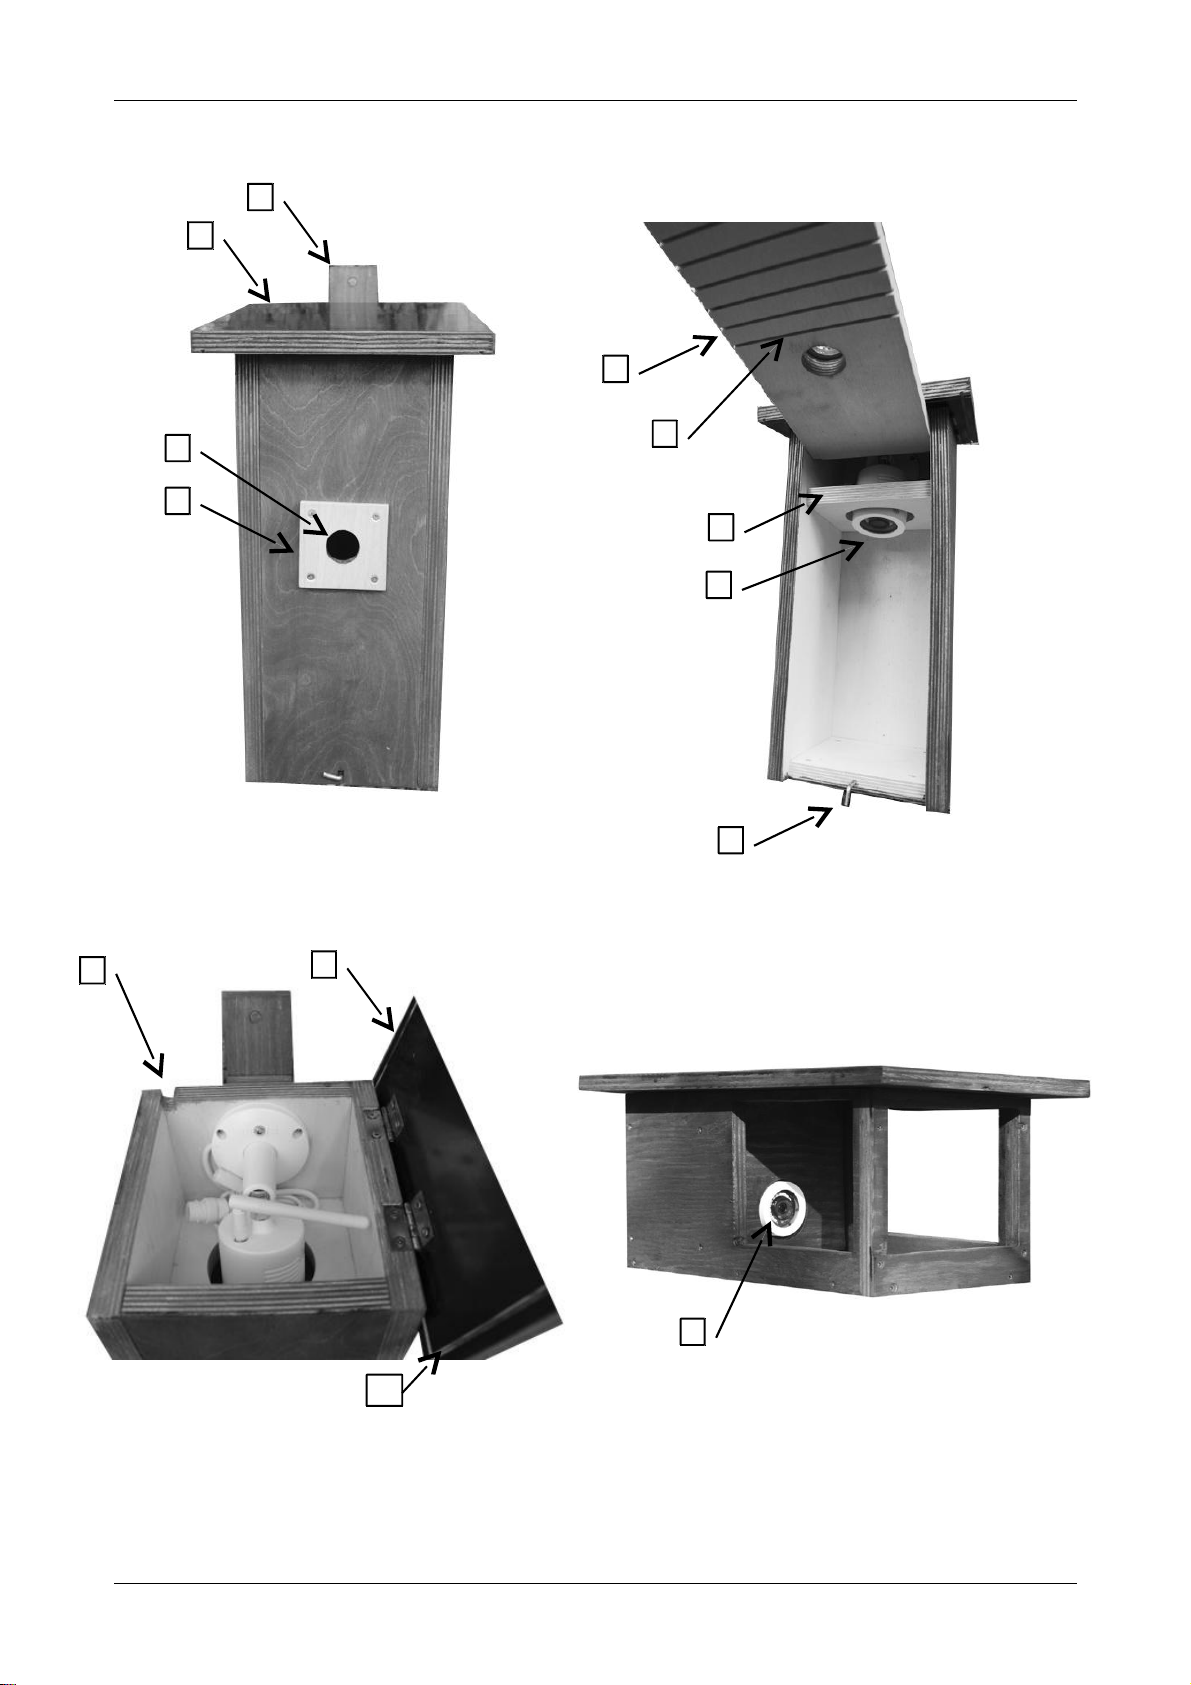
Properties
The birdhouse / feeder is made from quality natural material and is coated for protection against the
weather. Hinged front panel allows easy cleaning of the inside of the box, hinged roof provides
comfort access to the camera. The roof is also provided with a gutter groove to prevent
- 3 -

Birdhouse / birdfeeder with built-in IP camera Instructions for installation and operation
leakage into the box. In the bottom of the birdhouse the ventilation holes are made for the box
ventilation. The inlet hole is reinforced by a hardwood plate for a protection against a spotted
woodpecker or a marten.
Following birdhouse types are available:
Tithouse (inlet hole Æ34 mm) - the box designed for small and large species of tits. Also flycatcher,
redstart, nuthatch, sparrow, wryneck and other species can settle this box type.
Starlinghouse (inlet hole Æ45mm) - the box designed for starling, but also other bird species (the
larger species of tits, nuthatch, woodpecker, wryneck, pied, black redstart etc.) can use it.
The built-in IP camera provides high quality images in high definition (Full HD) and is equipped
with IR LEDs allowing monitoring in the dark (incl. automatic day / night mode switching). The
camera is also equipped with a built-in microphone allowing to monitor both picture and sound. The
image from the camera can be remotely viewed on a PC, laptop or mobile device (Android / iOS).
Video recording to your computer, cloud server, NAS or on a specialized NVR recorder is also
available (for details see instructions below).
The models both for wired and for wireless LAN connection are available.
Models overview:
BC-01 P: The tithouse with IP camera for wired LAN connection and with PoE power supply
support.
BC-01 W: The tithouse with WiFi IP camera for wireless connection.
BC-02 P: The starlinghouse with IP camera for wired LAN connection and with PoE power supply
support.
BC-02 W: The starlinghouse with WiFi IP camera for wireless connection.
KC-01 P: The birdfeeder with IP camera for wired LAN connection and with PoE power supply
support.
KC-01 W: The birdfeeder with WiFi IP camera for wireless connection.
Content of delivery
After unpacking check the completeness and perfection of the delivery according the
list below:
·Birdhouse / birdfeeder with built-in camera (1pc)
·CD with user manual and „IP Searcher“ utility (1pc)
·User manual (1pc)
·Production label with QR code (1pc)
- 4 -

Birdhouse / birdfeeder with built-in IP camera Instructions for installation and operation
Parts description
- 5 -
1
2
2
3
4
5
7
6
8
9
10
11
11

Birdhouse / birdfeeder with built-in IP camera Instructions for installation and operation
1. Mounting lath
2. Hinged roof
3. Inlet hole
4. Hardwood plate for protection against the predators
5. Hinged front panel
6. Grooves for easier exit of the box by birds
7. Handle for locking the front panel
8. Partition separating the camera space
9. Groove for cable entry
10. Gutter groove
11. IP camera
Where to install the birdhouse
It is recommended to hang up the birdhouse in the places where there is a lack of suitable
natural cavities, i.e. where the healthy trees prevail. Birds need peace; a suitable tree therefore
should not be located in a noisy environment. Do not place the boxes in the sunny places, the full
midday sun is not convenient for the birds, moreover there could be a risk of the youngs
overheating. The inlet hole should not be in the direction of the prevailing rainfall. The birds prefer
clear bright places. In a dense vegetation an orientation towards the clearings and openings is
therefore important. In sloping terrain the orientation down the slope is important. Different bird
species prefer different nest heights above ground. Generally, the bigger the bird species, the greater
height. The most commonly used height for the small songbirds is about 2-3 meters.
When to install the birdhouse
The best time for installing the birdhouse is autumn for the box to catch to wash by rain and to
merge with the surroundings till the spring. Additionally, species of birds remaining through the
winter look for their future homes for the spring nesting already in autumn. It is possible to install
the birdhouse also in early spring and thereby the migratory bird species can be preferenced.
Mounting the birdhouse
Note:
Before placing the birdhouse to the field, configure the IP camera and verify your LAN
functionality first (see in the manual below)!
The box is equipped with a fastening lath with predrilled holes for nailing the box to a tree by nails.
At this attachment method the nails ingrowing due to tree trunk thickening has to be expected. This
problem can be solved by placing sheet metal washers under the nails to avoid pulling out the
ingrown nails from the mounting lath. Another possibility is to use the beer bottle caps under the
nail heads. Or at least do not hammer the nails fully till the head, but leave them approx 0.5 – 1 cm
pulled out.
Alternatively the box can be attached to a tree by the mounting lath using some tightening belts etc.
In any case the box must be properly secured so as not to endanger the safety of nesting birds or
people passing under the box.
Mounting the feeder
The feeder is supplied with 2 mounting laths: the shorter one serves as a spacer for the roof overlap
aligning; the longer one is used for mounting the feeder to a tree, pole etc. First attach the shorter
lath (spacer) to a rear feeder panel and then attach the longer mounting lath to shorter lath (see fig.
below). After that attach the feeder to a tree or slope using the prepared holes in the mounting lath.
Alternatively it is possible to hang up the feeder in appropriate manner.
- 6 -

Birdhouse / birdfeeder with built-in IP camera Instructions for installation and operation
Fig: Feeder with spacing and mounting lath attached
Connection
BC-01 P, BC-02P, KC-01 P (PoE models)
Connection diagram
BC-01 P , BC-02 P and KC-01 P models are equipped with an Ethernet connector RJ45 for
connecting the IP camera to your LAN via UTP cable. The cameras support power supply over
UTP cable (PoE - "Power over Ethernet", IEEE 803.af), so any additional cable is not reguired for
the camera power supply. Use suitable PoE injector (e.g. BC-POE-KIT from our offer) for camera
power supply.
- 7 -
C
o
m
p
u
t
e
r
i
n
I
n
t
e
r
n
e
t
Computer in local
network
PoE Birdhouse / feeder
Mobile phone /
tablet

Birdhouse / birdfeeder with built-in IP camera Instructions for installation and operation
Procedure:
1. The network connector at the camera (RJ45) is fitted with a special weatherproof cover.
First slide the cover onto the UTP cable and then crimp RJ45 connector onto the UTP cable.
Then screw the cap onto the connector at the camera.
2. Connect the other end of the UTP cable to a router which provides an Internet connection of
your LAN; connect PoE injector (e.g. BC-POE-KIT) between the router and the camera for
the camera power supply over UTP cable. See the connection scheme at the figure bellow.
Note:
Use the corresponding groove in the birdhouse / feeder body for bringing the connection cable into
the box / feeder. Lead the connection cable to the box from below in order to prevent water flowing
down the cable into the box / feeder. If you lead the connecting cable from above make a sag on the
cable at the box for the cable to come from below to the box in order to prevent water flowing down
the cable into the box / feeder. Use a plastic clamp attached to the outside of the box / feeder for
attaching the cable to box / feeder.
- 8 -
to router
to camera
to 230VAC el.
socket

Birdhouse / birdfeeder with built-in IP camera Instructions for installation and operation
BC-01 W, BC-02 W, KC-01 W (WiFi models)
Connection diagram
BC-01 W, BC-02 W, and KC-01 W models are equipped with a built-in WiFi module for
wireless connection to your WiFi router or WiFi access point (AP). In this case it is only necessary
to ensure 12VDC / 1A for the camera power supply. We recommend to use e.g. BC-PS12 INT
indoor power adaptor for camera power supply. Use appropriate power cable with power connectors
(DC jack / plug 5.5 / 2.1 mm) for connectiong the power adaptor with the camera in the birdhouse /
feeder (eg. BC-DC KAB from our offer).
In the places without electrical connections you can use the battery set BC-AKU KIT xx for WiFi
camera power supply. Inside the weatherproof plastic box there is placed the battery provided with
connecting cable, fuse and protection against deep discharge. The batteries with different capacity,
and intelligent battery charger (BC-AKU NAB) are also available.
Note:
Use the corresponding groove in the birdhouse / feeder body for bringing the connection cable into
the box / feeder. Lead the connection cable to the box from below in order to prevent water flowing
down the cable into the box / feeder. If you lead the connecting cable from above make a sag on the
cable at the box for the cable to come from below to the box in order to prevent water flowing down
the cable into the box / feeder. Use a plastic clamp attached to the outside of the box / feeder for
attaching the cable to box / feeder.
- 9 -
Mobile phone /
tablete
C
o
m
p
u
t
e
r
i
n
I
n
t
e
r
n
e
t
Computer in local
network (LAN)
WiFi Birdhouse /
feeder
WiFi Birdhouse /
feeder
Power
adaptor
Battery set

Birdhouse / birdfeeder with built-in IP camera Instructions for installation and operation
Operation
Access to camera in LAN
Note:
Before placing the birdhouse to the field, configure the IP camera and verify your LAN
functionality first (see in the manual bellow)!
Connect the built-in camera to your router / switch using the Ethernet cable. Ensure the camera
power supply (see the instructions above).
The camera is configured as DHCP client by default. It means the camera IP address is set by your
router which is enabled as DHCP server by default.
Note:
If DHCP client is not enabled in the camera the IP address of the camera is set to 192. 168.1.168 by
factory default.
You can enable the DHCP for camera wired LAN port in „IP Searcher“ utility (see below).
Searching the camera in the network
Download to your PC the „IP Searcher“ utility either from enclosed CD or from www.budcam.cz.
Run the „IP Searcher“ utility. Click on "Search" at the bottom. "IP Searcher" searches for
compatible IP cameras connected to your LAN and their network parameters are displayed. Select
the camera from your birdhouse / feeder and remember or note somewhere its IP address. Close "IP
Searcher".
Note:
·For DHCP to be enabled the box "DHCP Enable” in „IP Searcher“ must be checked. If it is not
so, check the "DHCP Enable", enter the Username ("admin" by default) and the Password
("admin" by default). Then click "Modify". Wait a while and then click on "Search". "IP
Searcher" searches for your camera with a new IP address assigned to it by the DHCP server
(router) in your network. Note the IP address of the camera.
- 10 -

Birdhouse / birdfeeder with built-in IP camera Instructions for installation and operation
·Assigning the new address to a camera by a router may take some time (about 2 min.). If „IP
Searcher“ cannot find your camera with the new IP address try to click „Search“ once more.
·Note for WiFi models (BC-xx W, KC-xx W): Thus obtained IP address is an address of „wired“
Ethernet port and differs from the IP address of wireless WiFi port of the camera (WLAN
address). You can find the instructions for wireless WiFi interface configuration in the manual
below (chapter „WiFi parameters configuration“).
Note:
For smooth installation of plug-in components and for smooth access to the camera it is required to
perform the following settings in Internet Explorer. Please uncheck the "Enable Protected Mode" in
the setting safety of "Internet options" and enter the "Custom level". Perform ActiveX control
Settings as shown in figure bellow.
Plug-in installation
Start your web browser (Internet Explorer) and enter the IP address of your camera into the address
line. When connecting to the camera from your PC for the first time a window with a prompt for
plug-in installation is displayed (see below).
Click “Download”.
You will be asked whether you want to run or save the file. Select "Run".
- 11 -

Birdhouse / birdfeeder with built-in IP camera Instructions for installation and operation
Below window appears.
Select "Yes". A prompt for the browser closing is displayed.
Close your web browser (IE) and click "Retry" in the above window.
The wizard for plug-in installation appears.
- 12 -

Birdhouse / birdfeeder with built-in IP camera Instructions for installation and operation
Click on "Next".
You will be asked for the location of plugin in your PC.
Click „Next“ if the location is ok. The below window appears.
- 13 -

Birdhouse / birdfeeder with built-in IP camera Instructions for installation and operation
Click "Next". The below window appears.
- 14 -

Birdhouse / birdfeeder with built-in IP camera Instructions for installation and operation
To run plugin installation click „Install". After successful installation a window below appears.
After the installation is finished click "Finish".
·Open your web browser (Internet Explorer) after successful plug-in installation and enter the IP
address of your camera. Camera login page is displayed (see below).
Enter your username and password. Factory settings: username: "admin", password: „admin". Then
click "Login". The home page with a live image from the birdhouse is displayed.
- 15 -

Birdhouse / birdfeeder with built-in IP camera Instructions for installation and operation
WiFi parameters configuration (BC-xx W, KC-xx W models)
Click on "Configuration" tab in camera home page. Then select "Network Settings" / "Advanced
Settings" / "WiFi".
- 16 -

Birdhouse / birdfeeder with built-in IP camera Instructions for installation and operation
Click on "Scan" to search for all available WiFi networks. Check that your WiFi network is stated
in the list of detected networks and that it has sufficient signal strength.
Enter your WiFi network name into the „SSID“ window.
Select the encryption type in your network (window "Encryption") and then enter a valid encryption
key (window “Key“).
Check the "DHCP" box and then click on "Save".
After the settings are saved disconnect the Ethernet network cable from the camera and restart the
camera by disconnecting and reconnecting the power cord.
Now the camera should be available in your WiFi network.
Run "IP Searcher" on your PC and click "Search" to search for cameras.
If it finds the Wifi camera from your birdhouse the camera is successfully connected to your WiFi
network.
Note:
This IP address detected by “IP Searcher” is the address of the wireless WiFi interface of the
camera (WLAN address) and it differs from the address of "wired" Ethernet interface of the camera.
When you access the camera via WiFi network you have to enter the IP address of the wireless
interface of the camera in the web browser (Internet Explorer)
Live view
For displaying the live image from the camera click "Live View" tab on the home page. When this
tab is selected the live image is displayed in the main window. In addition the following controls are
available:
Upper right:
: Current logged-in user.
: Help.
: Logout from the systém.
Upper bar:
: Aspect ratio 4: 3.
: Aspect ratio 16: 9.
: Real image size.
: Image size is adapted to image window.
“Main Stream”: Main video stream. 1920x1080 resolution.
“Sub Stream”: Substream. Max. resolution 720x576 (resp. 720x480).
“Tri Stream”: The third video stream (only available at BC-xx / P models). Max. resolution
352x288.
Bottom bar:
: Stop the video stream (ie. stop the image refreshing).
- 17 -

Birdhouse / birdfeeder with built-in IP camera Instructions for installation and operation
: Start the video recording. The path for saving the recording file can be set in
"Configuration" tab / "Local Configuration" / "Save record files to" (see below).
: Snapshot: Capturing and saving the still image. The path for saving the snapshot file
can be set in "Configuration" tab / "Local Configuration" / "Save capturefiles in live view to" (see
below).
: Digital zoom.
: Audio turn on / off.
Video recording
1. First, specify where you want to store the video recording files. Click the "Configuration"
menu, select "Local Configuration" and using the "Save record files to" select the folder you
want to store video recording.
2. Click the "Live View" tab. To start the recording click the icon bottom left. The icon
turns red and REC appears in the image upper right. To stop the recording click again the
icon bottom left.
Video playback
VLC Player or Windows Media Player are recommended for the video playback. In the player enter
the path to recorded video file and start the playback.
Camera configuration
Click „Configuration“ to enter the configuration menu.
Menu "Local Configuration"
"Save record files to": Enter the path for storing the video recording files. Use the button "Browse"
for browsing the folders in your PC.
"Save capturefiles in live view to": Enter the path for storing the still images (snapshot). Use the
button "Browse" for browsing the folders in your PC.
"Log export save path": Enter the path for the logbook export. Use the button "Browse" for
browsing the folders in your PC.
Click "Save" for saving the settings.
Note:
Storing the files on system drive C: may be blocked by Windows.
Menu "System"
Submenu "System Configuration"
"Device Information" tab: System information (name, version of hardware, software, plugin
etc.).
- 18 -

Birdhouse / birdfeeder with built-in IP camera Instructions for installation and operation
"Setting time" tab: Setting the date and time, incl. time zone or synchronization by NTP
server or PC.
“DST”: Daylight saving time setting.
"Maintenance" tab: Camera restart, return to factory settings, firmware upgrade.
Submenu "Scheduled reboot": Timer setting for periodic reboot of the camera to enhance the system
stability.
Submenu "Log Search“: Searching the logs in operating logbook. Filtering the logs by date and
time.
Submenu „Security“: User menagement.
Menu „Network"
Submenu "Basic setup"
„TCP/IP“ tab: Network parameters configuration (camera IP address, netmask, default gateway,
DNS server etc.).
"Enable DHCP" box (only BC-xx / P models): If this box is checked the network parameters of
the camera are assigned by a DHCP server in your network (typically by a router that provides
the Internet connection). In this case you do not need to care for setting the camera network
parameters.
If the „Enable DHCP“ box is not checked you have to set the camera network parameters
manually. Camera IP address must be from the same subnet as the other devices on your LAN.
Please consult the network parameters configuration with your network administrator.
„Port“ tab
„Port“ section: Setting the different port numbers (HTTP, RTSP, HTTPS). Setting these ports
is important for the remote access to the camera via Internet (see the instructions below).
„Protocol Port“ section: Different IP camera manufacturers use different transfer protocols. In
this section you can enable different protocols or set their numbers. Setting these ports is
important eg. for ensuring compatibility with other network video devices (NVR recorders,
etc.).
Submenu "Advanced Setup"
„DDNS“ tab: DDNS service configuration.
„FTP“ tab: Setting the FTP server parameters.
„SMTP“ tab: Setting the SMTP server parameters.
„P2P“tab: Configuration of the cloud service for the remote access to the camera from your mobile
device. The detailed description see in the manual below.
„Cloud“ tab: Cloud storage configuration.
“Other“ tab“: If you want live video not to be password-protected, check the box "Show video
without password".
„WiFi“ tab (only BC-xx/W, KC-xx/W models): WiFi parameters configuration (details see above).
Menu "Video"
Submenu "Video"
"Device Name": Enter the name for your camera.
"Stream type": Select whether you want the camera to provide only the main stream ( "Single") or
all three streams ("Tri-Stream").
"Codec": Select the desired compression format of the video stream.
Next, set the parameters of the individual streams ( "stream1" / "stream2" / "stream3").
Submenu "Audio"
"Audio Configuration": To enable the audio, check this box.
If audio is turned on, you can adjust the input volume using the slider "Input Level".
- 19 -

Birdhouse / birdfeeder with built-in IP camera Instructions for installation and operation
Menu “Image”
Submenu “Image”
“Brightness“ / „Contrast“ / „Saturation“ / „Sharpness“: You can input the value manually to set
brightness,contrast,saturation,sharpness. These parameters shall be set
according to the actual environment. The scope of valid values are from 0 to 255,
you can drag the slider to set, and the default value is 128.
„Exposure Settings”: It have automatic mode and manual mode, the manual mode when
the click, "Gain Control" is active, valid values are (0-255) and the default value
is 128.
Click „Save”to complete the setting.
„White Balance”: It have automatic mode and manual mode, the manual mode when the
click, "Red gain" and "green gain", "Blue Gain" is active, valid values are (0-255)
and the default value is 128.
Click “Save to complete the setting.
Submenu „OSD“
Click into the overlay setting interface.
„Overlay Setting”: It allows you to set the Data Format,OSD Position and OSD
Text, and will be displayed in the preview screen.
Menu: „Events“
Submenu „Motion Detection“
Click into the motion detection setting interface.
„Select All”: Motion detection range to monitor all of the area, which consists of 396(22*18) small
squares. Of course you can choose a combination of several small squares among them as motion
detecting area.
„Clear All”: Clearing all the motion detecting area that selected currentlly.
“Sensitivity”: Can be selected 0 to 10, and the higher the value, the greater the sensitivity.
Submenu „Privacy“
Click“Privacy”into the privacy setting interface.
Pressing the left mouse button and drag to select area in the region. Region1、Region 2、Region 3
bellow will show the corresponding coordinates, width, and height of the region .If you want to
delete a region, click on the corresponding „Delete” button.
Click „Save”to complete the setting.
Submenu "Exception"
Setting actions upon the occurrence of an abnormal condition (disconnected the network, etc.).
Submenu "ROI"
You can set up three special-interest portion of the image that are transmitted at a higher resolution
than the rest of the image. This can reduce the data stream, which may be advantageous for
networks with a low bandwith.
- 20 -
This manual suits for next models
1
Table of contents
Popular Lawn And Garden Equipment manuals by other brands

Toro
Toro 100 Series Z Master installation instructions

Everbloom
Everbloom T334517K2 installation guide

EBM TRADING
EBM TRADING Flystopper GB36 operating instructions

ABSCO SHEDS
ABSCO SHEDS 30152SK Assembly & instruction manual

Horizont
Horizont insect-o-kill 360 instruction manual

Parkside
Parkside 282463 Operation and safety notes