THE 56-INCH MOON UNIT™ FOUNDATION PACKAGE:
The 56-inch Moon Unit™ is specifically configured to augment our AlienBees™ ABR800 and
Zeus™ ZRM1 RingMaster ringflash systems. The MU56 Moon Unit™ Foundation Package
arrives ready to assemble with the following components:
•
• The Reversible Silver / White Backing allows you to build your Moon Unit™ with either the
silver or white surface facing the inside of the unit.
• The Fiberglass Assembly Rods are used to construct the frame of the Moon Unit™. Eight rods
fit inside the triangular rod posts on the speedring and inside the rod pockets on the reversible
silver / white backing. Two extra rods are provided for replacement needs.
•
• The Rotating Speedring is used to attach the Moon Unit™ to your ringflash using the outside
locking ledges on the unit (fitting in place of the standard ring reflector).
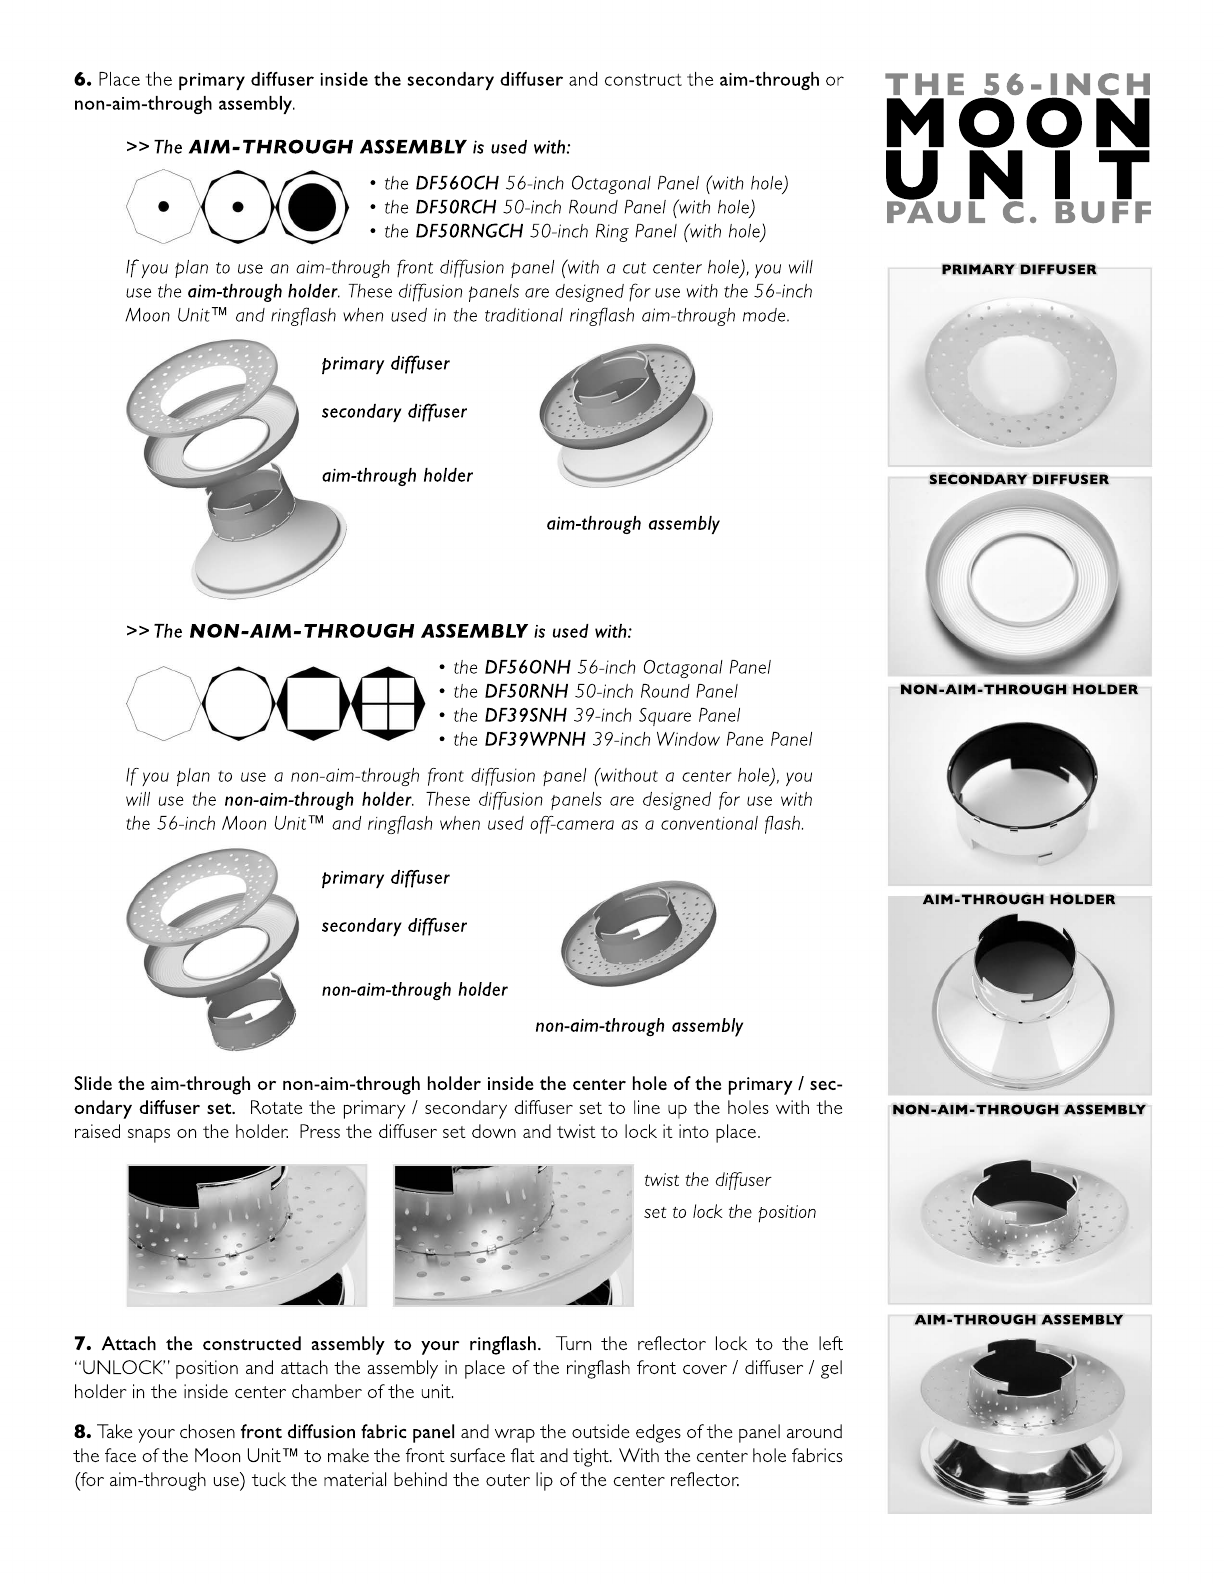
• The MU56 Aim-Through Assembly includes the primary diffuser, the secondary diffuser and
the aim-through diffuser / reflector holder. The aim-through assembly is used with front diffusion
fabric panels having center holes for traditional on-camera ringflash use.
•
• The MU56 Non-Aim-Through Assembly includes the primary diffuser, the secondary diffuser
and the non-aim-through diffuser / reflector holder. The non-aim-through assembly is used with
front diffusion fabric panels without center holes for use off-camera as conventional flash units.
ASSEMBLING THE 56-INCH MOON UNIT™:
Be
Before attaching the Moon Unit™ to your ringflash unit, ensure that the ringflash / power pack
is TURNED OFF and unplugged from the power source. Both the ring reflector and the front
cover / diffuser / gel holder must be removed in order to mount the Moon Unit™.
1. Begin with the reversible silver / white backing. Choose the surface that you wish to have
facing the inside for the internal bounce. Place the reversible backing on the floor in front of you
with the chosen interior surface facing upwards, allowing the edges of the backing to curl inside.
2. Take the rotating speedring and position it over the center hole of the reversible backing with
the larger, flat side of the speedring facing down. You will notice that there are sixteen triangular
posts equally distanced around the speedring’s inner circle – line up every other triangular post
with the eight stitched seams on the inside of the reversible backing.
3.
3. Take one fiberglass rod and place it inside one triangular rod post on the speedring. Take the
opposite end of the rod and slide it into the corresponding fabric rod pocket on the inside edge
of the reversible backing.
4.
4. On the opposite side of the speedring, insert the next rod into the opposite speedring rod
post and its corresponding fabric pocket. The flexible rods will bend, bowing to create the
arched shape of the Moon Unit™. The rods will fit snugly inside the speedring posts and the
fabric pockets, resting against the reversible backing. It is easiest to begin in one corner and then
move to the opposite side to place your next rod. Attach the remaining rods, working in oppo-
sites, until the frame is constructed.
5. With the frame constructed, you are ready to attach the Moon Unit™ frame to your ring-
flash. The speedring attaches to the outside face of the ringflash unit, attaching in place of the
standard ring reflector using the same rotating connection method.
Note: Care should be taken when attaching / removing any Moon Unit™ components to avoid
damage or breakage to the ringflash flashtubes or modeling lamps.
Turn the reflector lock on the ringflash back panel to the left “UNLOCK” position. Line up the
speedring with the circular face of the ringflash and slide it over the ringflash housing. Facing the
ringflash, rotate the speedring clockwise while pressing it in toward the housing until you find a
position where the speedring snaps further onto the housing. Rotate a final quarter-turn to set
the position. Return to the reflector lock and turn the knob to the right “LOCK” position.
v. 10/2013
THE 56-INCH
MOON
U N IT
PAUL C. BUFF