Buffalo Y067 User manual

Stoomoven
Handleiding
Étuve
Mode d'emploi
Dampfgarer
Bedienungsanleitung
Forno a vapore
Manuale di istruzioni
Horno de vapor
Manual de instrucciones
Forno a vapor
Manual de instruções
Ångugn
Bruksanvisning
Dampovn
Instruktionsvejledning
Dampovn
Brukerhåndbok
Höyryuuni
Ohjekirja
NL
FR
DE
IT
ES
PT
S
DK
N
FIN
Steam Oven
Instruction manual
Model •Modèle •Modell •Modello •Modelo •Malli:
Y067

Table of Contents
Safety Tips . . . . . . . . . . . . . . . . . . . . . . . . . . . . . . . . . . . . . . . . . . . . . . . . . . . . . . . . . . 1
Introduction . . . . . . . . . . . . . . . . . . . . . . . . . . . . . . . . . . . . . . . . . . . . . . . . . . . . . . . . 1
Pack Contents . . . . . . . . . . . . . . . . . . . . . . . . . . . . . . . . . . . . . . . . . . . . . . . . . . . . . . 1
Layout of Controls . . . . . . . . . . . . . . . . . . . . . . . . . . . . . . . . . . . . . . . . . . . . . . . . . . . 2
Operation . . . . . . . . . . . . . . . . . . . . . . . . . . . . . . . . . . . . . . . . . . . . . . . . . . . . . . . . . . 2
Using the Oven . . . . . . . . . . . . . . . . . . . . . . . . . . . . . . . . . . . . . . . . . . . . . . . . 2
When Cooking is Finished . . . . . . . . . . . . . . . . . . . . . . . . . . . . . . . . . . . . . . . 2
Cleaning, Care & Maintenance . . . . . . . . . . . . . . . . . . . . . . . . . . . . . . . . . . . . . . . . . . 3
Replacing Water Dispensing Tube . . . . . . . . . . . . . . . . . . . . . . . . . . . . . . . . . 3
Troubleshooting . . . . . . . . . . . . . . . . . . . . . . . . . . . . . . . . . . . . . . . . . . . . . . . . . . . . . 5
Technical Specifications . . . . . . . . . . . . . . . . . . . . . . . . . . . . . . . . . . . . . . . . . . . . . . . 5
Electrical Wiring . . . . . . . . . . . . . . . . . . . . . . . . . . . . . . . . . . . . . . . . . . . . . . . . . . . . . 6
Compliance . . . . . . . . . . . . . . . . . . . . . . . . . . . . . . . . . . . . . . . . . . . . . . . . . . . . . . . . . 6
Inhoudsopgave
Veiligheidstips . . . . . . . . . . . . . . . . . . . . . . . . . . . . . . . . . . . . . . . . . . . . . . . . . . . . . . . 6
Inleiding . . . . . . . . . . . . . . . . . . . . . . . . . . . . . . . . . . . . . . . . . . . . . . . . . . . . . . . . . . . . 6
Verpakkingsinhoud . . . . . . . . . . . . . . . . . . . . . . . . . . . . . . . . . . . . . . . . . . . . . . . . . . . 6
Indeling van de bedieningsknoppen . . . . . . . . . . . . . . . . . . . . . . . . . . . . . . . . . . . . . . 7
Bediening . . . . . . . . . . . . . . . . . . . . . . . . . . . . . . . . . . . . . . . . . . . . . . . . . . . . . . . . . . . 7
Oven gebruiken . . . . . . . . . . . . . . . . . . . . . . . . . . . . . . . . . . . . . . . . . . . . . . . . 7
Reiniging, zorg & onderhoud . . . . . . . . . . . . . . . . . . . . . . . . . . . . . . . . . . . . . . . . . . . 8
Vervanging van de waterdispenserslang . . . . . . . . . . . . . . . . . . . . . . . . . . . . . 9
Oplossen van problemen . . . . . . . . . . . . . . . . . . . . . . . . . . . . . . . . . . . . . . . . . . . . . . 9
Technische specificaties . . . . . . . . . . . . . . . . . . . . . . . . . . . . . . . . . . . . . . . . . . . . . . . 10
Elektrische bedrading . . . . . . . . . . . . . . . . . . . . . . . . . . . . . . . . . . . . . . . . . . . . . . . . . 10
Productconformiteit . . . . . . . . . . . . . . . . . . . . . . . . . . . . . . . . . . . . . . . . . . . . . . . . . . 10
Sommaire
Conseils de sécurité . . . . . . . . . . . . . . . . . . . . . . . . . . . . . . . . . . . . . . . . . . . . . . . . . . 11
Introduction . . . . . . . . . . . . . . . . . . . . . . . . . . . . . . . . . . . . . . . . . . . . . . . . . . . . . . . . 11
Contenu de l'emballage . . . . . . . . . . . . . . . . . . . . . . . . . . . . . . . . . . . . . . . . . . . . . . . 11
Agencement des commandes . . . . . . . . . . . . . . . . . . . . . . . . . . . . . . . . . . . . . . . . . . . 12
Fonctionnement . . . . . . . . . . . . . . . . . . . . . . . . . . . . . . . . . . . . . . . . . . . . . . . . . . . . . 12
Utilisation de l'étuve . . . . . . . . . . . . . . . . . . . . . . . . . . . . . . . . . . . . . . . . . . . . 12
Nettoyage, entretien et maintenance . . . . . . . . . . . . . . . . . . . . . . . . . . . . . . . . . . . . . 13
Remplacement du tube distributeur d’eau . . . . . . . . . . . . . . . . . . . . . . . . . . . 14
Dépannage . . . . . . . . . . . . . . . . . . . . . . . . . . . . . . . . . . . . . . . . . . . . . . . . . . . . . . . . . 14
Spécifications techniques . . . . . . . . . . . . . . . . . . . . . . . . . . . . . . . . . . . . . . . . . . . . . . 15
Raccordement électrique . . . . . . . . . . . . . . . . . . . . . . . . . . . . . . . . . . . . . . . . . . . . . . 15
Conformité . . . . . . . . . . . . . . . . . . . . . . . . . . . . . . . . . . . . . . . . . . . . . . . . . . . . . . . . . 15
UK
NL
FR

Inhalt
Sicherheitshinweise . . . . . . . . . . . . . . . . . . . . . . . . . . . . . . . . . . . . . . . . . . . . . . . . . . 16
Einführung . . . . . . . . . . . . . . . . . . . . . . . . . . . . . . . . . . . . . . . . . . . . . . . . . . . . . . . . . . 16
Packungsinhalt . . . . . . . . . . . . . . . . . . . . . . . . . . . . . . . . . . . . . . . . . . . . . . . . . . . . . . . 16
Bedienelemente . . . . . . . . . . . . . . . . . . . . . . . . . . . . . . . . . . . . . . . . . . . . . . . . . . . . . . 17
Betrieb . . . . . . . . . . . . . . . . . . . . . . . . . . . . . . . . . . . . . . . . . . . . . . . . . . . . . . . . . . . . 17
Verwendung des Garers . . . . . . . . . . . . . . . . . . . . . . . . . . . . . . . . . . . . . . . . . 17
Reinigung, Pflege und Wartung . . . . . . . . . . . . . . . . . . . . . . . . . . . . . . . . . . . . . . . . . . 18
Wasserzuleitung auswechseln . . . . . . . . . . . . . . . . . . . . . . . . . . . . . . . . . . . . 19
Fehlersuche . . . . . . . . . . . . . . . . . . . . . . . . . . . . . . . . . . . . . . . . . . . . . . . . . . . . . . . . . 19
Technische Spezifikationen . . . . . . . . . . . . . . . . . . . . . . . . . . . . . . . . . . . . . . . . . . . . . 20
Elektroanschlüsse . . . . . . . . . . . . . . . . . . . . . . . . . . . . . . . . . . . . . . . . . . . . . . . . . . . . 20
Konformität . . . . . . . . . . . . . . . . . . . . . . . . . . . . . . . . . . . . . . . . . . . . . . . . . . . . . . . . 20
Indice
Suggerimenti per la sicurezza . . . . . . . . . . . . . . . . . . . . . . . . . . . . . . . . . . . . . . . . . . . 21
Introduzione . . . . . . . . . . . . . . . . . . . . . . . . . . . . . . . . . . . . . . . . . . . . . . . . . . . . . . . . 21
Contenuto dell'imballaggio . . . . . . . . . . . . . . . . . . . . . . . . . . . . . . . . . . . . . . . . . . . . . 21
Disposizione dei comandi . . . . . . . . . . . . . . . . . . . . . . . . . . . . . . . . . . . . . . . . . . . . . . 22
Funzionamento . . . . . . . . . . . . . . . . . . . . . . . . . . . . . . . . . . . . . . . . . . . . . . . . . . . . . . 22
Utilizzo del forno . . . . . . . . . . . . . . . . . . . . . . . . . . . . . . . . . . . . . . . . . . . . . . 22
Al termine della cottura . . . . . . . . . . . . . . . . . . . . . . . . . . . . . . . . . . . . . . . . . 22
Pulizia e manutenzione . . . . . . . . . . . . . . . . . . . . . . . . . . . . . . . . . . . . . . . . . . . . . . . . 23
Sostituzione del tubo di erogazione acqua . . . . . . . . . . . . . . . . . . . . . . . . . . . 23
Risoluzione dei problemi . . . . . . . . . . . . . . . . . . . . . . . . . . . . . . . . . . . . . . . . . . . . . . 24
Specifiche tecniche . . . . . . . . . . . . . . . . . . . . . . . . . . . . . . . . . . . . . . . . . . . . . . . . . . . 25
Cablaggi elettrici . . . . . . . . . . . . . . . . . . . . . . . . . . . . . . . . . . . . . . . . . . . . . . . . . . . . . 25
Conformità . . . . . . . . . . . . . . . . . . . . . . . . . . . . . . . . . . . . . . . . . . . . . . . . . . . . . . . . . 25
Índice
Consejos de Seguridad . . . . . . . . . . . . . . . . . . . . . . . . . . . . . . . . . . . . . . . . . . . . . . . . 26
Introducción . . . . . . . . . . . . . . . . . . . . . . . . . . . . . . . . . . . . . . . . . . . . . . . . . . . . . . . . 26
Contenido del Conjunto . . . . . . . . . . . . . . . . . . . . . . . . . . . . . . . . . . . . . . . . . . . . . . 26
Disposición de los mandos . . . . . . . . . . . . . . . . . . . . . . . . . . . . . . . . . . . . . . . . . . . . . 27
Funcionamiento . . . . . . . . . . . . . . . . . . . . . . . . . . . . . . . . . . . . . . . . . . . . . . . . . . . . . 27
Utilización del horno . . . . . . . . . . . . . . . . . . . . . . . . . . . . . . . . . . . . . . . . . . . . 27
Limpieza, cuidados y mantenimiento . . . . . . . . . . . . . . . . . . . . . . . . . . . . . . . . . . . . . 28
Cómo cambiar el tubo dispensador de agua . . . . . . . . . . . . . . . . . . . . . . . . . 29
Resolución de problemas . . . . . . . . . . . . . . . . . . . . . . . . . . . . . . . . . . . . . . . . . . . . . . 29
Especificaciones Técnicas . . . . . . . . . . . . . . . . . . . . . . . . . . . . . . . . . . . . . . . . . . . . . . 30
Cableado Eléctrico . . . . . . . . . . . . . . . . . . . . . . . . . . . . . . . . . . . . . . . . . . . . . . . . . . . 30
Cumplimiento . . . . . . . . . . . . . . . . . . . . . . . . . . . . . . . . . . . . . . . . . . . . . . . . . . . . . . . 30
DE
IT
ES

Índice
Conselhos de segurança . . . . . . . . . . . . . . . . . . . . . . . . . . . . . . . . . . . . . . . . . . . . . . . 31
Introdução . . . . . . . . . . . . . . . . . . . . . . . . . . . . . . . . . . . . . . . . . . . . . . . . . . . . . . . . . 31
Conteúdo da embalagem . . . . . . . . . . . . . . . . . . . . . . . . . . . . . . . . . . . . . . . . . . . . . . 31
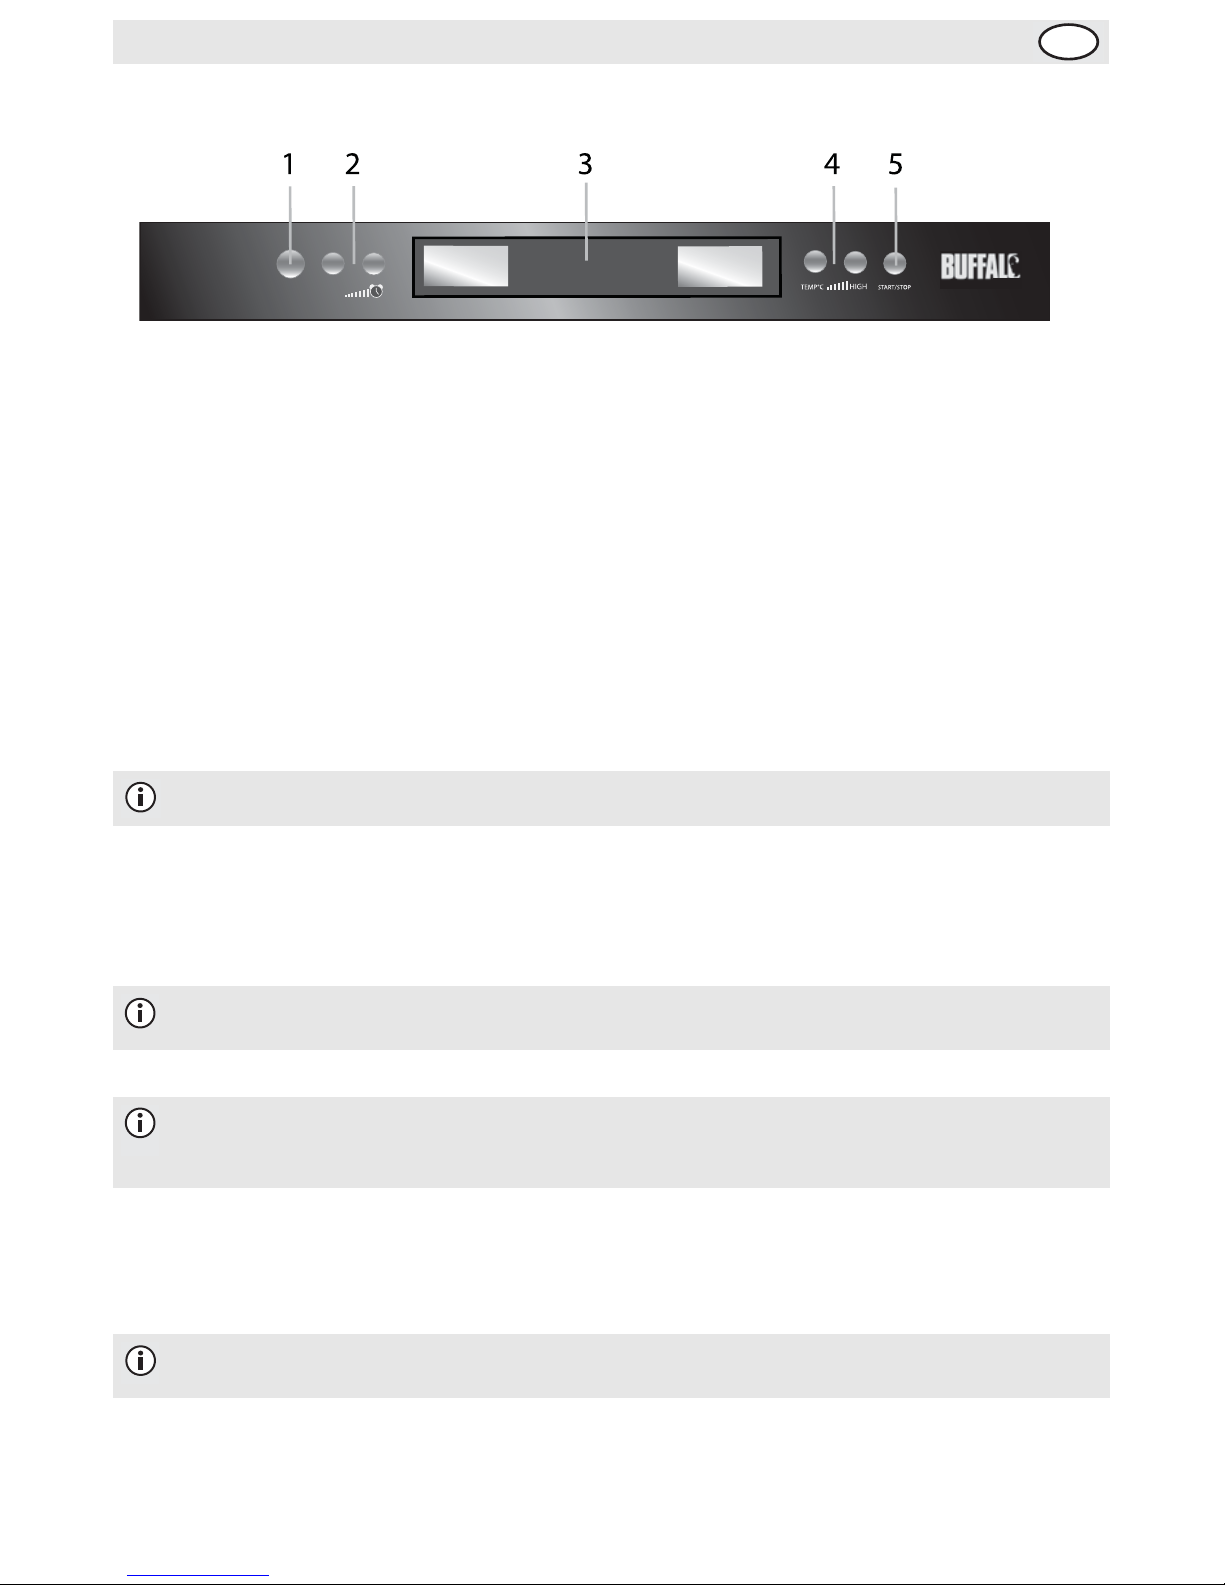
Esquema dos controles . . . . . . . . . . . . . . . . . . . . . . . . . . . . . . . . . . . . . . . . . . . . . . . 32
Funcionamento . . . . . . . . . . . . . . . . . . . . . . . . . . . . . . . . . . . . . . . . . . . . . . . . . . . . . . 32
Usar o forno . . . . . . . . . . . . . . . . . . . . . . . . . . . . . . . . . . . . . . . . . . . . . . . . . . 32
Depois de concluir o processo de cozedura . . . . . . . . . . . . . . . . . . . . . . . . . 32
Limpeza, cuidados & manutenção . . . . . . . . . . . . . . . . . . . . . . . . . . . . . . . . . . . . . . . 33
Substituir o tubo dispensador . . . . . . . . . . . . . . . . . . . . . . . . . . . . . . . . . . . . . 33
Resolução de problemas . . . . . . . . . . . . . . . . . . . . . . . . . . . . . . . . . . . . . . . . . . . . . . 34
Especificações técnicas . . . . . . . . . . . . . . . . . . . . . . . . . . . . . . . . . . . . . . . . . . . . . . . . 35
Cablagem eléctrica . . . . . . . . . . . . . . . . . . . . . . . . . . . . . . . . . . . . . . . . . . . . . . . . . . . 35
Conformidade . . . . . . . . . . . . . . . . . . . . . . . . . . . . . . . . . . . . . . . . . . . . . . . . . . . . . . . 35
Innehållsförteckning
Säkerhetsråd . . . . . . . . . . . . . . . . . . . . . . . . . . . . . . . . . . . . . . . . . . . . . . . . . . . . . . . . 36
Inledning . . . . . . . . . . . . . . . . . . . . . . . . . . . . . . . . . . . . . . . . . . . . . . . . . . . . . . . . . . . 36
Förpackningsinnehåll . . . . . . . . . . . . . . . . . . . . . . . . . . . . . . . . . . . . . . . . . . . . . . . . . . 36
Reglagens placering . . . . . . . . . . . . . . . . . . . . . . . . . . . . . . . . . . . . . . . . . . . . . . . . . . . 37
Användning . . . . . . . . . . . . . . . . . . . . . . . . . . . . . . . . . . . . . . . . . . . . . . . . . . . . . . . . . 37
Använda ugnen . . . . . . . . . . . . . . . . . . . . . . . . . . . . . . . . . . . . . . . . . . . . . . . . 37
Rengöring, omvårdnad och underhåll . . . . . . . . . . . . . . . . . . . . . . . . . . . . . . . . . . . . 38
Byta ut vattendispenserröret . . . . . . . . . . . . . . . . . . . . . . . . . . . . . . . . . . . . . 39
Felsökning . . . . . . . . . . . . . . . . . . . . . . . . . . . . . . . . . . . . . . . . . . . . . . . . . . . . . . . . . . 39
Tekniska specifikationer . . . . . . . . . . . . . . . . . . . . . . . . . . . . . . . . . . . . . . . . . . . . . . . 40
Elektriska kablar . . . . . . . . . . . . . . . . . . . . . . . . . . . . . . . . . . . . . . . . . . . . . . . . . . . . . 40
Tillmötesgående . . . . . . . . . . . . . . . . . . . . . . . . . . . . . . . . . . . . . . . . . . . . . . . . . . . . . 40
Indholdsfortegnelse
Sikkerhedstips . . . . . . . . . . . . . . . . . . . . . . . . . . . . . . . . . . . . . . . . . . . . . . . . . . . . . . . 41
Introduktion . . . . . . . . . . . . . . . . . . . . . . . . . . . . . . . . . . . . . . . . . . . . . . . . . . . . . . . . 41
Emballagens indhold . . . . . . . . . . . . . . . . . . . . . . . . . . . . . . . . . . . . . . . . . . . . . . . . . . 41
Arrangement af betjeningsanordninger . . . . . . . . . . . . . . . . . . . . . . . . . . . . . . . . . . . 42
Brug . . . . . . . . . . . . . . . . . . . . . . . . . . . . . . . . . . . . . . . . . . . . . . . . . . . . . . . . . . . . . . . 42
Sådan anvendes ovnen . . . . . . . . . . . . . . . . . . . . . . . . . . . . . . . . . . . . . . . . . . 42
Når tilberedningen er færdig . . . . . . . . . . . . . . . . . . . . . . . . . . . . . . . . . . . . . 42
Regnøring, pleje og vedligeholdelse . . . . . . . . . . . . . . . . . . . . . . . . . . . . . . . . . . . . . . 43
Udskiftning af vanddispenserslangen . . . . . . . . . . . . . . . . . . . . . . . . . . . . . . . . 43
Fejlfinding . . . . . . . . . . . . . . . . . . . . . . . . . . . . . . . . . . . . . . . . . . . . . . . . . . . . . . . . . . 44
Tekniske specifikationer . . . . . . . . . . . . . . . . . . . . . . . . . . . . . . . . . . . . . . . . . . . . . . . 45
El-kabler . . . . . . . . . . . . . . . . . . . . . . . . . . . . . . . . . . . . . . . . . . . . . . . . . . . . . . . . . . . 45
Overensstemmelse . . . . . . . . . . . . . . . . . . . . . . . . . . . . . . . . . . . . . . . . . . . . . . . . . . . 45
PT
S
DK

Innhold
Sikkerhetstips . . . . . . . . . . . . . . . . . . . . . . . . . . . . . . . . . . . . . . . . . . . . . . . . . . . . . . . 46
Innledning . . . . . . . . . . . . . . . . . . . . . . . . . . . . . . . . . . . . . . . . . . . . . . . . . . . . . . . . . . 46
Pakkeinnhold . . . . . . . . . . . . . . . . . . . . . . . . . . . . . . . . . . . . . . . . . . . . . . . . . . . . . . . . 46
Layout av kontroller . . . . . . . . . . . . . . . . . . . . . . . . . . . . . . . . . . . . . . . . . . . . . . . . . . 47
Bruk . . . . . . . . . . . . . . . . . . . . . . . . . . . . . . . . . . . . . . . . . . . . . . . . . . . . . . . . . . . . . . 47
Bruk av ovnen . . . . . . . . . . . . . . . . . . . . . . . . . . . . . . . . . . . . . . . . . . . . . . . . . 47
Når matlagingen er ferdig . . . . . . . . . . . . . . . . . . . . . . . . . . . . . . . . . . . . . . . . 47
Rengjøring, vedlikehold og stell . . . . . . . . . . . . . . . . . . . . . . . . . . . . . . . . . . . . . . . . . 48
Utskifting av vannfordelingsslange . . . . . . . . . . . . . . . . . . . . . . . . . . . . . . . . . 48
Feilsøking . . . . . . . . . . . . . . . . . . . . . . . . . . . . . . . . . . . . . . . . . . . . . . . . . . . . . . . . . . 49
Tekniske spesifikasjoner . . . . . . . . . . . . . . . . . . . . . . . . . . . . . . . . . . . . . . . . . . . . . . . 50
Elektrisk tilkopling . . . . . . . . . . . . . . . . . . . . . . . . . . . . . . . . . . . . . . . . . . . . . . . . . . . 50
Samsvar . . . . . . . . . . . . . . . . . . . . . . . . . . . . . . . . . . . . . . . . . . . . . . . . . . . . . . . . . . . . 50
Sisällysluettelo
Turvallisuusvihjeitä . . . . . . . . . . . . . . . . . . . . . . . . . . . . . . . . . . . . . . . . . . . . . . . . . . . 51
Johdanto . . . . . . . . . . . . . . . . . . . . . . . . . . . . . . . . . . . . . . . . . . . . . . . . . . . . . . . . . . . 51
Pakkauksen sisältö . . . . . . . . . . . . . . . . . . . . . . . . . . . . . . . . . . . . . . . . . . . . . . . . . . . 51
Ohjauslaitteiden sijainti . . . . . . . . . . . . . . . . . . . . . . . . . . . . . . . . . . . . . . . . . . . . . . . . 52
Käyttö . . . . . . . . . . . . . . . . . . . . . . . . . . . . . . . . . . . . . . . . . . . . . . . . . . . . . . . . . . . . . 52
Uunin käyttö . . . . . . . . . . . . . . . . . . . . . . . . . . . . . . . . . . . . . . . . . . . . . . . . . . 52
Kun kypsentäminen on päättynyt . . . . . . . . . . . . . . . . . . . . . . . . . . . . . . . . . . 52
Puhdistus, hoito & huolto . . . . . . . . . . . . . . . . . . . . . . . . . . . . . . . . . . . . . . . . . . . . . . 53
Veden jakeluputken vaihtaminen uuteen . . . . . . . . . . . . . . . . . . . . . . . . . . . . 53
Vianetsintä . . . . . . . . . . . . . . . . . . . . . . . . . . . . . . . . . . . . . . . . . . . . . . . . . . . . . . . . . 54
Tekniset tiedot . . . . . . . . . . . . . . . . . . . . . . . . . . . . . . . . . . . . . . . . . . . . . . . . . . . . . . 55
Sähköjohdot . . . . . . . . . . . . . . . . . . . . . . . . . . . . . . . . . . . . . . . . . . . . . . . . . . . . . . . . 55
Vaatimustenmukaisuus . . . . . . . . . . . . . . . . . . . . . . . . . . . . . . . . . . . . . . . . . . . . . . . . 55
N
FIN

1
UK
Safety Tips
• Position on a flat, stable surface.
• A service agent/qualified technician should carry out installation and any repairs if required. Do not
remove any components or service panels on this product.
• Consult Local and National Standards to comply with the following:
• Health and Safety at Work Legislation
• BS EN Codes of Practice
• Fire Precautions
• IEE Wiring Regulations
• Building Regulations
• DO NOT immerse in water or use steam washers to clean the unit.
• DO NOT switch on the appliance when empty of water.
• DO NOT overfill the water container.
• When replacing the water container, make sure the exterior is dry to prevent possible failure of the
appliance.
• Do not allow the water in the container to run out while the appliance is in use.
• Stand back when opening the door to avoid the expulsion of steam.
• Ensure any objects used within the oven are sufficiently heat resistant.
• Do not let children near this appliance as some parts become hot during use.
• Keep all packaging away from children. Dispose of the packaging in accordance to the regulations of
local authorities.
• If the power cord is damaged, it must be replaced by an BUFFALO agent or a recommended qualified
technician in order to avoid a hazard.
Introduction
Please take a few moments to carefully read through this manual. Correct maintenance and operation of
this unit will give the best possible performance from your BUFFALO product.
Pack Contents
The following is included:
• Buffalo Steam Oven
• Water Container
•WaterDispensingTubex3
•WireRack
•UnperforatedTray
•PerforatedTray
• Instruction Manual
BUFFALO prides itself on quality and service, ensuring that at the time of packaging the contents are
supplied fully functional and free of damage.
Should you find any damage as a result of transit, please contact your BUFFALO dealer immediately.

2
UK
Telephone Helpline: 0845 146 2887 (United Kingdom)
Layout of Controls
Operation
Using the Oven
To use the steam oven, perform the following:
1. Fill the container to the required level. The container displays the water levels by cooking time.
2. Replace the water container. Wipe up any spillages within the appliance and close the door.
3. Press the Power button to turn on the appliance.
4. Press the Time Up and Time Down buttons to set the desired cooking time.
5. Press the Temperature Up and Temperature Down buttons to set the desired temperature.
6. Press the Start button to commence cooking.
When Cooking is Finished
1. Once cooking is complete, the appliance will sound a short alarm.
2. Remove the food from the oven. Take care to avoid the release of steam.
3. Leave the door of the appliance open to allow the steam to escape completely, and to let the appliance
cool down.
4. When cool, close the door. Press and hold the Power button to turn off the cooker.
Note: Use fresh water each time the appliance is used. Do not overfill.
Note: It is not possible to alter these settings once cooking has commenced. To alter the
settings, the appliance must be restarted.
Note: Opening the door during cooking will pause the cooking process and a Safety Lock
symbol will flash on the temperature display.
The appliance will not operate with the door open. Close the door to resume cooking.
Note: The contents of the oven will be very hot. Remember to wear suitable protective
gloves.
POWER CLOCK
1. Power button
2. Time Up/Down buttons
3. Display panel
4. Temperature Low/High buttons
5. Start/Stop button

3
UK
Cleaning, Care & Maintenance
• Always switch off the appliance and disconnect from the power supply before cleaning.
• Do not use any abrasive cleaning agents on the appliance, use warm soapy water.
• After use, residue may develop within the appliance. Use 10 parts water to 1 part vinegar to remove it.
• A BUFFALO agent or qualified technician should carry out repairs if required.
• Take care when cleaning and handling the hot plate within the appliance.
• Periodically, limescale develops on the hot plate. Remove it with a suitable descaling solution.
For ease of cleaning, the guide rails can be removed from the appliance:
1. Unscrew the securing nuts from either side of the inside of the
appliance.
2. The guide rails will then drop down and can be removed.
3. The guide rails, liquid plate and cooking vessel can all be cleaned in
a dishwasher.
To replace the rails:
1. Slot the extended guide rail in to the hole at the back of the cooking
chamber.
2. Position the hole over the screw thread and screw on the securing
nut.
3. Repeat for the other side.
Replacing Water Dispensing Tube
If the water dispensing tube becomes blocked by limescale, it can
be replaced with a new tube. To replace the tube:
1. Pull out the blocked tube.
2. Slot a replacement tube (supplied) into the hole.
To clean the water container:
1. Remove the container from the appliance and empty any left over water.
2. Remove the lid from the container and clean both parts with warm water.
3. Thoroughly dry the lid and container.
4. Replace the lid and then insert the container back in to the appliance.
Note: Leave the appliance for at least 8 minutes after cooking before attempting to
clean it.
Note: BUFFALO will not accept any responsibility for
faults caused by the build up of lime scale. In hard
water areas BUFFALO recommends the use of a
water filter to assist in limiting lime scale build up.
Note: Do not fill the container again until it is ready to be used.
Guide rail
Securing nut
Hole
Extended
guide rail
Hot plate Water dispensing tube
Inner compartment

4
UK
Telephone Helpline: 0845 146 2887 (United Kingdom)
Troubleshooting
If your BUFFALO appliance develops a fault, please check the following points before calling the Helpline.
Technical Specifications
Fault Probable Cause Action
The unit is not working The unit is not switched on Check the unit is plugged in correctly and
switched on
Plug and lead are damaged Call BUFFALO agent or qualified Technician
Fuse in the plug has blown Replace the fuse
Power supply Check power supply
Internal wiring fault Call BUFFALO agent or qualified Technician
The appliance starts
but does not heat up Water container not properly
inserted Check container is pushed all the way in to
the appliance
Large amounts of
steam leaks from the
door seals
The door is not properly closed Close the door firmly
The door lock is broken Call BUFFALO agent or qualified Technician
The Display panel is
blank Cooking information has not
been entered Enter the cooking time and temperature
Door is not closed properly Open and close the door
Water container
symbol is flashing on
the display
No water in the container Remove the container and fill
Reinsert container and wait 2 minutes for the
appliance to reset
The water container symbol will dissapear
Water container is not properly
fixed in the appliance Reinsert container and wait 2 minutes for the
appliance to reset
The water container symbol will dissapear
Water not reaching hot
plate Water dispensing tube blocked
by limescale Clean the tube with a suitable descaling
solution
If this fails to clear the blockage replace with
spare tube (supplied)
Security Lock symbol is
flashing on the display Door not closed properly Open the door and shut it again
Model Voltage Power Current Max. Cooking
Temperature Capacity Dimensions
W x H x D mm Weight
Y067 230V 50 Hz 1950W 8.5A 100°C 25 litres 490 x 380 x 324 18kg

5
UK
Electrical Wiring
BUFFALO appliances are supplied with a 3 pin, moulded, BS1363 plug and lead, with a 13 amp fuse as
standard.
The plug is to be connected to a suitable mains socket.
BUFFALO appliances are wired as follows:
• Live wire (coloured brown) to terminal marked L
• Neutral wire (coloured blue) to terminal marked N
• Earth wire (coloured green/yellow) to terminal marked E
All BUFFALO appliances must be earthed, using a dedicated earthing circuit.
If in doubt consult a qualified electrician.
Electrical isolation points must be kept clear of any obstructions. In the event of any emergency
disconnection being required they must be readily accessible.
Compliance
BUFFALO parts have undergone strict product testing in order to comply with regulatory standards and
specifications set by international, independent, and federal authorities.
BUFFALO products have been approved to carry the following symbol:
All rights reserved. No part of these instructions may be produced or transmitted in any form or by any means,
electronic, mechanical, photocopying, recording or otherwise, without the prior written permission of BUFFALO.
Every effort is made to ensure all details are correct at the time of going to press, however, BUFFALO reserve the
right to change specifications without notice.

6
NL
Klantenondersteuning: 040 – 2628080 (Nederland)
Veiligheidstips
• Plaatsen op een vlakke en stabiele ondergrond.
• De installatie en eventuele reparaties zijn door een servicetechnicus/vaktechnicus uit te voeren.
Verwijder geen componenten of servicepanelen van dit product.
• Raadpleeg en volg de plaatselijke en nationale regelgeving op m.b.t. tot het volgende:
• Wetgeving van gezondheid en veiligheid op de werkplaats
• Werkregels
• Brandpreventie
• IEE bekabelingsnormen
• Bouwverordeningen
• Het apparaat NIET in water onderdompelen of met stoomreinigers reinigen.
• Het apparaat NIET inschakelen met een leeg waterreservoir.
• Het waterreservoir niet met teveel water vullen.
• Zorg bij de herplaatsing van het waterreservoir dat de buitenkant droog is zodat mogelijke storingen
van dit apparaat worden vermeden.
• Laat tijdens gebruik het water niet uit het waterreservoir lopen.
• Sta niet te dicht bij de oven bij het openen van de ovendeur om aanraking met de uittredende stoom
te voorkomen.
• Controleer alle objecten die u voor de oven gaat gebruiken of ze voldoende hittebestendig zijn.
• Laat kinderen niet in de nabijheid van dit apparaat komen aangezien bepaalde ovendelen tijdens
gebruik warm worden.
• Laat verpakkingsmateriaal niet binnen handbereik van kinderen. Verpakkingsmateriaal in
overeenstemming met de regelgeving van de plaatselijke overheden als afval laten verwerken.
• Indien de stroomkabel beschadigd raakt, dient men deze door een BUFFALO technicus of aanbevolen
vaktechnicus te laten vervangen om gevaarlijke situaties te verhinderen.
Inleiding
Neem de tijd en lees deze handleiding aandachtig door. Een correct gebruik en onderhoud van deze
machine waarborgt de beste prestatie van uw BUFFALO product.
Verpakkingsinhoud
De verpakking bevat het volgend:
BUFFALO is trots op de haar productkwaliteit en dienstverlening en controleer de inhoud van de
verpakkingen, tijdens de verpakkingsfase, op functionaliteit en schade.
Mocht u product door transport zijn beschadigd, neem dan onmiddellijk contact op met uw BUFFALO dealer.
• Buffalo Stoomoven
•Waterreservoir
• Waterdispenserslang x 3
•Rooster
• Ongeperforeerde lade
• Geperforeerde lade
• Handleiding

7
NL Klantenondersteuning: 050 – 609999 (België)
Indeling van de bedieningsknoppen
Bediening
Oven gebruiken
Ga als volgt te werk bij het gebruik van de stoomoven:
1. Vul het reservoir tot aan het vereiste niveau. Het reservoir geeft het waterniveau aan de hand van de
kooktijd aan.
2. Het waterreservoir vervangen. Gemorst water in het apparaat verwijderen en ovendeur sluiten.
3. Druk op de Power-knop om het apparaat aan te zetten.
4. Druk op de Time Up- en Time Down-knoppen om de gewenste kooktijd in te stellen.
5. Druk op de Temperature Up- en Temperature Down-knoppen om de gewenste temperatuur in te
stellen.
6. Druk op de START-knop om het kookproces te starten.
Opmerking: altijd vers water voor dit apparaat gebruiken. Het apparaat niet teveel
vullen.
Opmerking: na aanvang van het kookproces is het niet mogelijk om deze instellingen te
veranderen. Om de instellingen te veranderen dient men het apparaat te herstarten.
Opmerking: bij het openen van de deur tijdens gebruik wordt het kookproces
onderbroken en begint het Safety Lock-symbool van het temperatuurdisplay te
knipperen.
Het apparaat werkt niet bij een openstaande ovendeur. Sluit de ovendeur om het
kookproces te hervatten.
POWER CLOCK
1. Power-knop
2. Time Up/Down-knoppen
3. Displaypaneel
4. Temperatuur laag/hoog-knoppen
5. Start/stop-knop

8
NL
Klantenondersteuning: 040 – 2628080 (Nederland)
Na beëindiging van het kookproces
1. Na beëindiging van het kookproces geeft de oven een kort geluidsalarm.
2. Haal het voedsel uit de oven. Vermijd enig contact met de uittredende stroom.
3. Laat de deur van de oven open zodat de stoom volledig kan ontsnappen en laat het apparaat
afkoelen.
4. Sluit de ovendeur wanneer de oven is afgekoeld. Druk en houd de Power-knop ingedrukt om de oven
uit te schakelen.
Reiniging, zorg & onderhoud
• Alvorens het apparaat te reinigen dient men altijd de stroomvoorziening uit te schakelen.
• Gebruik géén schurende reinigingsmiddelen voor dit apparaat, gebruik warm zeepwater.
• Na gebruik kunnen er resten in het apparaat voorkomen. Gebruik een geschikt reinigingsmiddel om
deze resten te verwijderen.
• Eventuele reparaties moeten door een BUFFALO technicus of een vaktechnicus worden uitgevoerd.
• Wees voorzichtig bij reiniging en handling van de hete plaat in dit apparaat.
• Periodiek kan er zich kalkafzetting op de hete plaat vormen. Gebruik een geschikt ontkalkingsmiddel
om kalkafzetting te verwijderen.
Voor reinigingsgemak zijn de geleidingsrails van het apparaat te
demonteren:
1. schroef beide bevestigingsbouten aan weerszijde van het apparaat
los.
2. De geleidingsrails komen los en zijn dan te verwijderen.
3. De geleidingsrails, de vloeistofplaat en de kookbak kunnen in een
vaatwasmachine wordt schoon gemaakt.
Geleidingsrails plaatsen:
1. plaats de verlengde geleidingsrail in het gat aan de achterzijde van
de kookkamer.
2. Plaats het gat over de schroefdraad en schroef de bevestigingmoer
vast.
3. Herhaal deze handeling aan de andere zijde.
Opmerking: de inhoud van de oven zal zeer heet zijn. Vergeet niet om altijd geschikte
ovenwanten te gebruiken.
Opmerking: Wacht na gebruik minimaal 8 minuten alvorens de oven te reinigen.
Geleidingsrails
Bevestigingsmoer
Gat
Verlengde
geleidings
rail

9
NL Klantenondersteuning: 050 – 609999 (België)
Vervanging van de waterdispenserslang
Wanneer de waterdispenserslang geblokkeerd raakt door
kalkafzetting, kan men deze vervangen door een nieuwe slang.
Om de slang te vervangen:
1. Verwijder de geblokkeerde slang.
2. Plaats een (meegeleverde) vervangingsslang in de opening.
Reinigen van het waterreservoir:
1. haal het reservoir uit het apparaat en gooi eventueel achtergebleven water weg.
2. Haal de deksel van het reservoir en reinig beide delen met warm water.
3. Deksel en reservoir grondig drogen.
4. Bevestig de deksel en plaats het reservoir terug in het apparaat.
Oplossen van problemen
Indien er een storing van uw BUFFALO product optreedt, dient u de onderstaande tabel te raadplegen
alvorens contact op te nemen met uw BUFFALO dealer of de Hulplijn te bellen.
Opmerking: BUFFALO aanvaardt géén enkele
verantwoordelijkheid voor storingen als gevolg van
kalkafzetting. Bij gebruik van hardwater raadt
BUFFALO u aan om een waterfilter te gebruiken om
de kalkafzetting te beperken.
Opmerking: reservoir alleen vullen wanneer klaar voor gebruik.
Probleem Mogelijke oorzaak Handeling
Het apparaat werkt
niet Het apparaat staat uit Controleer of de stroomkabel van het
apparaat is aangesloten en of het apparaat is
ingeschakeld
Steker en kabel zijn beschadigd Laat een BUFFALO technicus of een
vaktechnicus komen
De zekering in de steker is
gesprongen Vervang de zekering in de steker
Stroomvoorziening Controleer de stroomvoorziening
Storing interne bedrading Laat een BUFFALO technicus of een
vaktechnicus komen
Het apparaat start
maar warmt niet op. Waterreservoir niet correct
geplaatst Controleer of het reservoir volledig in het
apparaat zit.
Er komt een grote
hoeveelheid stoom
langs de
deurafdichtingen
De deur is niet goed dicht Sluit de deur
Er komt een grote hoeveelheid
stoom langs de deurafdichtingen Sluit de deur goed
De deurvergrendeling is defect Laat een BUFFALO technicus of een
vaktechnicus komen
Hetdisplaypaneelgeeft
niets aan Er zijn géén kookinstellingen
ingevoerd Voer de kooktijd en temperatuur in
De deur is niet goed dicht Open en sluit de deur
Het waterreservoir-
symbool op het display
knippert
Er zit géén water in het reservoir Verwijder en vul het reservoir.
Plaats het reservoir opnieuw en wacht 2
minuten totdat het apparaat is gereset.
Het waterreservoir-symbool verdwijnt
Hete plaat Waterdispenserslang
Binnencompartiment

10
NL
Klantenondersteuning: 040 – 2628080 (Nederland)
Technische specificaties
Elektrische bedrading
Men dient de steker op een geschikt stopcontact aan te sluiten.
De bedrading van dit apparaat is als volgt:
• Stroomkabel (bruin) naar de aansluitklem gemarkeerd met L
• Neutraalkabel (blauw) naar de aansluitklem gemarkeerd met N
• Aardekabel (groen/geel) naar de aansluitklem gemarkeerd met E
Dit apparaat moet worden geaard met behulp van een adequaat aardingscircuit.
Bij twijfels raadpleeg een vakkundige elektricien.
De elektrische isolatiepunten mogen niet worden geblokkeerd. In geval van een nooduitschakeling moeten
de isolatiepunten direct toegankelijk zijn.
Productconformiteit
De onderdelen van BUFFALO producten hebben strenge producttesten ondergaan om te voldoen aan
wettelijke regels en specificaties die door internationale, onafhankelijke en landelijke overheden worden
voorgeschreven.
BUFFALO producten zijn goedgekeurd en voorzien van het volgende symbool:
le rechten voorbehouden. Het is verboden om deze handleiding, hetzij volledig of gedeeltelijk, elektronisch of
mechanisch te reproduceren, kopiëren, op opslagmedia op te slaan of op enigerlei wijze over te dragen, zonder
voorafgaande goedkeuring van BUFFALO.
Wij hebben er alles aan gedaan om er zeker van te zijn dat op publicatiedatum van de handleiding alle details correct
zijn, desondanks, behoudt BUFFALO het recht voor om specificaties zonder aankondiging te wijzigen.
Probleem Mogelijke oorzaak Handeling
Het waterreservoir is niet goed
in het apparaat geplaatst Plaats het reservoir opnieuw en wacht 2
minuten totdat het apparaat is gereset.
Het waterreservoir-symbool verdwijnt
Water bereikt niet de
hete plaat De waterdispenserslang is door
kalkafzetting geblokkeerd Reinig de slang met een geschikt
ontkalkingsmiddel
Vervang de slang met de (meegeleverde)
reserveslang wanneer de reiniging van de
geblokkeerde slang niet lukt
Het Security Lock-
symbool op het display
knippert
De deur is niet goed gesloten Open en sluit de deur opnieuw
Model Voltage Vermogen Stroom Max.
kooktemperatuur Inhoud Afmetingen
h x b x d mm Gewicht
Y067 230V 50 Hz 1950W 8,5A 100°C 25 liters 490 x 380 x 324 18kg

11
FR Standard d'assistance téléphonique: 050 – 600006 (Belgique)
Conseils de sécurité
• Placez l'appareil sur une surface plane, stable.
• L'installation et les éventuelles réparations doivent être confiées à un dépanneur / technicien qualifié.
Ne retirez aucun composant ou cache de ce produit.
• Consultez les normes locales et nationales pour vous conformer aux :
• lois sur l'hygiène et la sécurité au travail ;
• codes de bonnes pratiques BS EN ;
• précautions contre le risque d'incendie ;
• réglementations sur les branchements électriques IEE ;
• règlements sur la construction.
• NE PAS immerger l'appareil ou le nettoyer à l'aide d'un nettoyeur à vapeur.
• NE PAS mettre en service une étuve vide.
• NE PAS remplir excessivement le bac d'eau.
• Avant de l'insérer, vérifiez que l'extérieur du bac d'eau est sec pour éviter un éventuel
dysfonctionnement de l'appareil.
• Ne laissez pas l'eau du bac sécher complètement pendant l'utilisation de l'appareil.
• Tenez vous en retrait à l'ouverture de la porte, pour éviter la vapeur évacuée.
• N'utilisez dans l'étuve que des objets suffisamment résistants à la chaleur.
• Ne laissez pas les enfants s'approcher de cet appareil, dont certaines parties peuvent chauffer en
service.
• Eloignez des enfants les matériaux d'emballage. La mise au rebut des emballages doit s'effectuer
conformément aux règlements stipulés par les autorités locales.
• Tout cordon d'alimentation endommagé doit être remplacé par un agent BUFFALO ou par un
technicien qualifié recommandé, pour éviter tout danger.
Introduction
Nous vous invitons à consacrer quelques instants à la lecture attentive de ce manuel. L'entretien et
l'utilisation appropriés de cet appareil vous permettront de tirer le meilleur de votre produit BUFFALO.
Contenu de l'emballage
Eléments fournis de série :
BUFFALO attache une grande importance à la qualité et au service et veille à fournir des produits en parfait
état opérationnel, parfaitement intacts au moment de l'emballage.
Nous vous prions de contacter votre revendeur BUFFALO immédiatement si vous constatez un dommage
quelconque survenu pendant le transport du produit.
• Étuve Buffalo
• Bac à eau
•Clayette
• Tube distributeur d’eau x 3
•Plateaunontroué
•Plateautroué
• Mode d'emploi

12
FR
Standard d'assistance téléphonique: 01 64 89 73 61 (Français)
Agencement des commandes
Fonctionnement
Utilisation de l'étuve
Procédez comme suit pour utiliser l'étuve :
1. Remplissez le bac jusqu'au niveau requis. Le bac indique les niveaux d'eau correspondant aux temps
de cuisson.
2. Réinsérez le bac à eau. Essuyez les éventuels débordements à l'intérieur de l'étuve et refermez la
porte.
3. Appuyez sur le bouton de mise sous tension Power.
4. Appuyez sur les boutons Time Up (Plus longtemps) et Time Down (Moins longtemps) pour régler le
temps de cuisson voulu.
5. Appuyez sur les boutons Temperature Up (Plus chaud) et Temperature Down (Moins chaud) pour
régler la température voulue.
6. Appuyez sur le bouton Start (Démarrer) pour faire débuter la cuisson.
Remarque : Utilisez de l'eau fraîche à chaque utilisation de l'appareil. Ne remplissez pas
le bac excessivement.
Remarque : Ces paramètres ne peuvent plus être changés après le démarrage de la
cuisson. Pour les modifier, vous devrez refaire démarrer l'appareil.
Remarque : L'ouverture de la porte pendant la cuisson interrompt le processus de
cuisson ; un symbole Safety Lock (Verrouillage de sécurité) clignote sur l'affichage de
température.
L'appareil ne fonctionne pas porte ouverte. Refermez la porte pour faire redémarrer la
cuisson.
POWER CLOCK
1. Bouton de mise sous tension
2. Boutons Plus/Moins longtemps
3. Panneau d'affichage
4. Boutons Moins/Plus chaud
5. Bouton marche/arrêt

13
FR Standard d'assistance téléphonique: 050 – 600006 (Belgique)
À la fin de la cuisson
1. Une fois la cuisson terminée, l'appareil émet un bref signal audible.
2. Retirez les aliments de l'étuve. Veillez à ne pas vous laisser surprendre par la vapeur en sortie d'étuve.
3. Laissez ouverte la porte de l'étuve, pour permettre à la vapeur de s'évacuer complètement et donner
le temps à l'appareil de se refroidir.
4. Une fois l'appareil refroidi, refermez la porte. Appuyez sur et maintenez enfoncé le bouton de mise
sous tension Power pour éteindre l'appareil.
Nettoyage, entretien et maintenance
• N'oubliez jamais d'éteindre l'étuve et d'en débrancher le cordon d'alimentation avant de la nettoyer.
• N'utilisez aucun produit de nettoyage abrasif sur l'appareil ; nettoyez-le à l'eau tiède savonneuse.
• Après la cuisson, des résidus peuvent se former à l'intérieur de l'étuve. Retirez-les à l'aide du produit
de nettoyage qui convient.
• Toute réparation éventuellement nécessaire doit être confiée à un agent BUFFALO ou à un technicien
qualifié.
• Prenez les précautions qui s'imposent pour nettoyer et manipuler la plaque chauffante à l'intérieur de
l'étuve.
• Des résidus se forment régulièrement sur la plaque chauffante. Eliminez-les à l’aide de la solution de
détartrage qui convient.
Pour faciliter le nettoyage, les glissières peuvent être extraites de l'étuve :
1. Dévissez les écrous de fixation de part et d'autre de l'intérieur de
l'étuve.
2. Les glissières tombent et peuvent être retirées.
3. Les glissières, la plaque collectrice et la cuve de cuisson se lavent
au lave-vaisselle.
Pour remonter les glissières :
1. Faites coulisser la rallonge de glissière dans le trou situé à l'arrière
de la chambre de cuisson.
2. Placez le trou sur le filetage de la vis et vissez l'écrou de fixation.
3. Répétez cette procédure de l'autre côté.
Remarque : Immédiatement après la cuisson, le contenu de l'étuve est très chaud.
N'oubliez pas de porter les gants de protection qui conviennent.
Remarque : Attendez au moins huit minutes après la cuisson avant de procéder au
nettoyage de l'étuve.
Glissières
Ecrou de fixation
Trou
Rallonge
de
glissière

14
FR
Standard d'assistance téléphonique: 01 64 89 73 61 (Français)
Remplacement du tube distributeur d’eau
Un tube distributeur d’eau bouché par le calcaire peut être
remplacé par un neuf. Pour remplacer le tube :
1. Sortez le tube bouché.
2. Insérez un tube de rechange (fourni) dans l’orifice.
Nettoyage du bac à eau :
1. Retirez le bac de l'appareil et videz le trop-plein d'eau, le cas échéant.
2. Retirez le couvercle du bac et nettoyez les deux éléments à l'eau tiède.
3. Séchez bien le couvercle et le bac.
4. Remontez le couvercle, puis réintroduisez le bac dans l'étuve.
Dépannage
En cas de dysfonctionnement de votre appareil BUFFALO, vérifiez les données du tableau ci-dessous avant
d'appeler notre standard d'assistance ou votre revendeur BUFFALO.
Remarque : BUFFALO décline toute responsabilité
en cas de panne causée par l'accumulation de
dépôts calcaires. Dans les régions où l'eau est très
calcaire, BUFFALO préconise l'utilisation d'un filtre
à eau pour ralentir l'accumulation des dépôts
calcaires.
Remarque : Ne remplissez pas le bac avant la prochaine utilisation de l'étuve.
Dysfonctionnement Cause probable Intervention
L'appareil ne
fonctionne pas L'appareil n'est pas allumé Vérifier que l'appareil est bien branché et
allumé
La prise et le cordon sont
endommagés Appeler un agent BUFFALO ou un technicien
qualifié
Alimentation Vérifier l'alimentation
Problème de branchement
interne Appeler un agent BUFFALO ou un technicien
qualifié
L’appareil démarre,
mais ne chauffe pas. Bac à eau mal inséré Vérifier si le bac a bien été inséré à fond
dans l’étuve
De grosses quantités
de vapeur s’échappent
par les joints de porte
Porte mal fermée Bien fermer la porte
Verrou de porte défectueux Appeler un agent BUFFALO ou un technicien
qualifié
Le panneau d’affichage
reste vierge Récipient vide Retirer le récipient et le remplir
Réinsérer le récipient et patienter deux
minutes, pendant la réinitialisation de
l'appareil
Le symbole du récipient d'eau s'éteint
Le récipient est mal installé sur
l'appareil Réinsérer le récipient et patienter deux
minutes, pendant la réinitialisation de
l'appareil
Le symbole du récipient d'eau s'éteint
Plaque
chauffante Tube distributeur
d’eau
Compartiment interne

15
FR Standard d'assistance téléphonique: 050 – 600006 (Belgique)
Spécifications techniques
Raccordement électrique
La prise doit être reliée à la prise secteur qui convient.
Cet appareil est câblé comme suit :
• Fil conducteur (brun) à la borne marquée L
• Fil neutre (bleu) à la borne marquée N
• Fil de terre (vert / jaune) à la borne marquée E
Cet appareil doit être raccordé à la terre, par le biais d'un circuit de mise à la terre dédié.
En cas de doute, consultez un électricien qualifié.
Les points d'isolation électrique doivent être libres de toute obstruction. En cas de débranchement requis
en urgence, ils doivent être facilement accessibles.
Conformité
Les pièces BUFFALO ont été soumises à des tests rigoureux pour pouvoir être déclarées conformes aux
normes et spécifications réglementaires définies par les autorités internationales, indépendantes et
fédérales.
Les produits BUFFALO ont été déclarés aptes à porter le symbole suivant :
Tous droits réservés. La production ou transmission, partielles ou intégrales, sous quelque forme que ce soit ou par
n'importe quel moyen, tant électronique que mécanique, sous forme de photocopie, d'enregistrement ou autre de
ce mode d'emploi sont interdites sans l'autorisation préalablement accordée par BUFFALO.
Nous nous efforçons, par tous les moyens dont nous disposons, de faire en sorte que les détails contenus dans le
présent mode d'emploi soient corrects en date d'impression. Toutefois, BUFFALO se réserve le droit de changer les
spécifications de ses produits sans préavis.
Dysfonctionnement Cause probable Intervention
Le symbole du Bac à
eau clignote Le bac n’est pas suffisamment
rempli Retirer le bac et le remplir
Bac à eau mal calé dans l’étuve Réinsérer le bac à eau
L’eau n’arrive pas à la
plaque chauffante Le tube distributeur d’eau est
bouché par le calcaire Détartrer le tube à l’aide de la solution de
détartrage qui convient
Si le tube reste bouché, remonter un tube de
rechange (fourni)
Le symbole Verrou de
sécurité clignote Porte mal fermée Ouvrir la porte, puis la refermer
Modèle Tension Puissance Courant Température
maximale de
cuisson Contenance Dimensions
h x l x p mm Poids
Y067 230V
50 Hz 1950W 8,5A 100°C 25 litres 490 x 380 x 324 18kg
Table of contents
Languages:
Other Buffalo Oven manuals
Popular Oven manuals by other brands

GE
GE Profile PT920SRSS Dimensions and installation information

Ariston
Ariston DK 892 CX AUS Instructions for installation and use

Wood Stone
Wood Stone BISTRO 3030 Installation and operation manual

Bosch
Bosch HEA20B2 0 Series instruction manual

GEAppliances
GEAppliances JRP24 owner's manual

Rinnai
Rinnai RBO-7MSO Installation - use - maintenance

Unox
Unox ChefTop XVC 2005 instruction manual

Bosch
Bosch HBB 43D2.0 B Instructions for use

Thetford
Thetford Mk4 Midi Prima User and installation instructions

KitchenAid
KitchenAid KODC304ESS User instructions

Blodgett
Blodgett HV-100E Installation operation & maintenance

Ariston
Ariston FB 21 A.2 operating instructions