Bullard SceneCatcher User manual

SceneCatcher™ Digital Video Recorder
Version 2.0 User Manual
for the Bullard T3 series, T4 and TacSight Series Thermal Imagers
www.bullard.com
Attaching the SceneCatcher
The Bullard Thermal Imager (TI) can be equipped with
an optional SceneCatcher digital video recorder. The
SceneCatcher is housed in a convenient handle. To
attach the handle to the TI, simply align the handle so
the handle brackets cradle the TI just under the display
and the electrical contacts on the handle align with
corresponding contacts on the TI (Figure 1). Turn the
thumbscrew until it is tightened and the handle is fully
secure. To disconnect the SceneCatcher handle, loosen
the thumbscrew and remove the handle from the thermal
image.
NOTE
The electrical contacts on the TI that connect with
the SceneCatcher may require periodic cleaning.
To clean these contacts, use soapy water and a
non-abrasive cloth or a cotton swab and isopropyl
alcohol. Rubbing a pencil eraser on the contacts is
another effective, non-abrasive means to clean the
contacts.
Using the SceneCatcher
The SceneCatcher is powered via the TI’s 10-Volt NiMH
rechargeable battery, while the TI is powered on. It
functions through the use of one button only. The button,
or Momentary Switch, located on the left outer circle
of the pistol grip handle controls both image and video
capture (Figure 2). The download feature, which allows
image and video to be downloaded to a computer, is
functional only when the SceneCatcher is powered on and
connected through a USB cable. The USB port is located
on the front right side of the handle (Figure 3).
SceneCatcher Only Mode: When the SceneCatcher
is attached to the TI and powered on, the unit will
perform a six second calibration sequence after which
the LED indicator will illuminate green. No function of the
SceneCatcher has yet been initiated. The solid green LED
indicates the Standby/Ready mode.
To engage the Image Capture Mode, begin with a
solid green LED. Depress the Momentary Switch for less
than one second. The green SceneCatcher LED will turn
red while the image is being generated, and then it will
return to green (ready mode) when the SceneCatcher has
completed generating the image.
To engage the Video Capture Mode, begin with
a solid green LED. Depress the Momentary Switch for
more than two seconds. The green SceneCatcher LED will
produce an alternating green/red flash (approximately
one flash per second) while the video is being generated.
Press the Momentary Switch again to disable the video
capture mode. The SceneCatcher LED will return to green
(ready mode) when the SceneCatcher has completed
capturing the video.
SceneCatcher Low Memory Mode: When the
SceneCatcher memory storage capacity is low, the LED
indicator will flash red. No function of the SceneCatcher
has yet been initiated. The flashing red LED indicates
the standby/ready mode with low memory. To free up
additional space on the SceneCatcher, copy images and
videos to a PC and delete them from the SceneCatcher.
When memory capacity has been reached, the
SceneCatcher LED will illuminate solid red to indicate the
memory is full.
Figure 1
Figure 3
USB port
The SceneCatcher 2.0
is compatible with the
following operating
systems:
Windows 7
Windows 7 x64
Windows Vista
Windows Vista x64
Windows XP
Windows XP x64
Momentary Switch
Figure 2

www.bullard.com
Installing the SceneCatcher Software
With the SceneCatcher powered on, connect the USB cable to the port on the
SceneCatcher and to a PC.
Upon connection, after a few seconds a window will appear as seen in
Figure 10 or Figure 11.
Windows XP Users:
Double-click Launch Bullard SceneCatcher Setup. You will be prompted
with a “Run As” window as seen below. Confirm that the checkbox below
‘Current user’ is unchecked and then click “OK”. When complete, move on
to Figure 6 - Welcome.
Figure 4
Windows Vista Users:
Double-click Launch Bullard SceneCatcher Setup. You may then be
prompted with a message confirmation to run the program “Setup.exe”.
If so, select “Run Setup.exe” and continue. When complete, move on to
Figure 6 - Welcome.
Windows 7 Users:
Double-Click “Open folder to view files” as seen in Figure 11. Then
double-click “BullardSceneCatcher” as seen in Figure 5. You may then be
prompted with a message confirmation to run the program “Setup.exe”. If
so, select “Run Setup.exe” and move on to Figure 6 - Welcome.
Figure 6 - Welcome
Click “Next”.
Figure 7 - License Agreement
To accept the license agreement terms and conditions, click “I agree”.
NOTE
If you do not click “I agree”, the SceneCatcher software installation
will abort, and you will not be able to access images and videos.
Figure 5

www.bullard.com
Figure 8 - Choose Components
By default, the SceneCatcher program will install. You can deselect the
Bullard Media Player skin if you do not want to install it. When the options
you want are selected, click “Next” (Figure 8).
Figure 9 - Choose Location
You can use the default directory for the SceneCatcher software or change
the location by selecting “Browse” and navigating to another directory.
When the location you want is selected, click “Install” (Figure 9). When
installation is complete, click “Finish”.
Using the SceneCatcher software
If not already connected, with the SceneCatcher powered on, connect the
USB cable to the port on the SceneCatcher and to a PC. Upon connection, a
Windows selection menu prompt appears.
Figure 10 - Windows XP and Vista Selection Menus
Figure 11 - Windows 7 Selection Menu
SceneCatcher™ Digital Video Recorder
Version 2.0 User Manual
for the Bullard T3 series, T4 and TacSight Series Thermal Imagers

Americas:
E.D. Bullard Company
1898 Safety Way
Cynthiana, KY 41031-9303
Toll free: 877-BULLARD (285-5273)
Tel: 859-234-6616
Fax: 859-234-8987
www.bullard.com
Europe:
Bullard GmbH
Lilienthalstrasse 12
53424 Remagen • Germany
Tel: +49-2642 999980
Fax : +49-2642 9999829
www.bullardextrem.com
Asia-Pacific:
Bullard Asia Pacific Pte. Ltd.
LHK Building
701, Sims Drive, #04-03
Singapore 387383
Tel: +65-6745-0556
Fax: +65-6745-5176
www.bullard.com 6050048302 (1110)
ISO 9001
certified
Using and managing files
From this menu, you can open the folder containing the videos and images,
play or view files using the default media player or editor, and transfer
files. You can copy, cut, and/or paste files located on the SceneCatcher to
your PC for archiving. Consult your PC’s Windows documentation for further
information on how to view, play, and manage image and video files.
Additional software features:
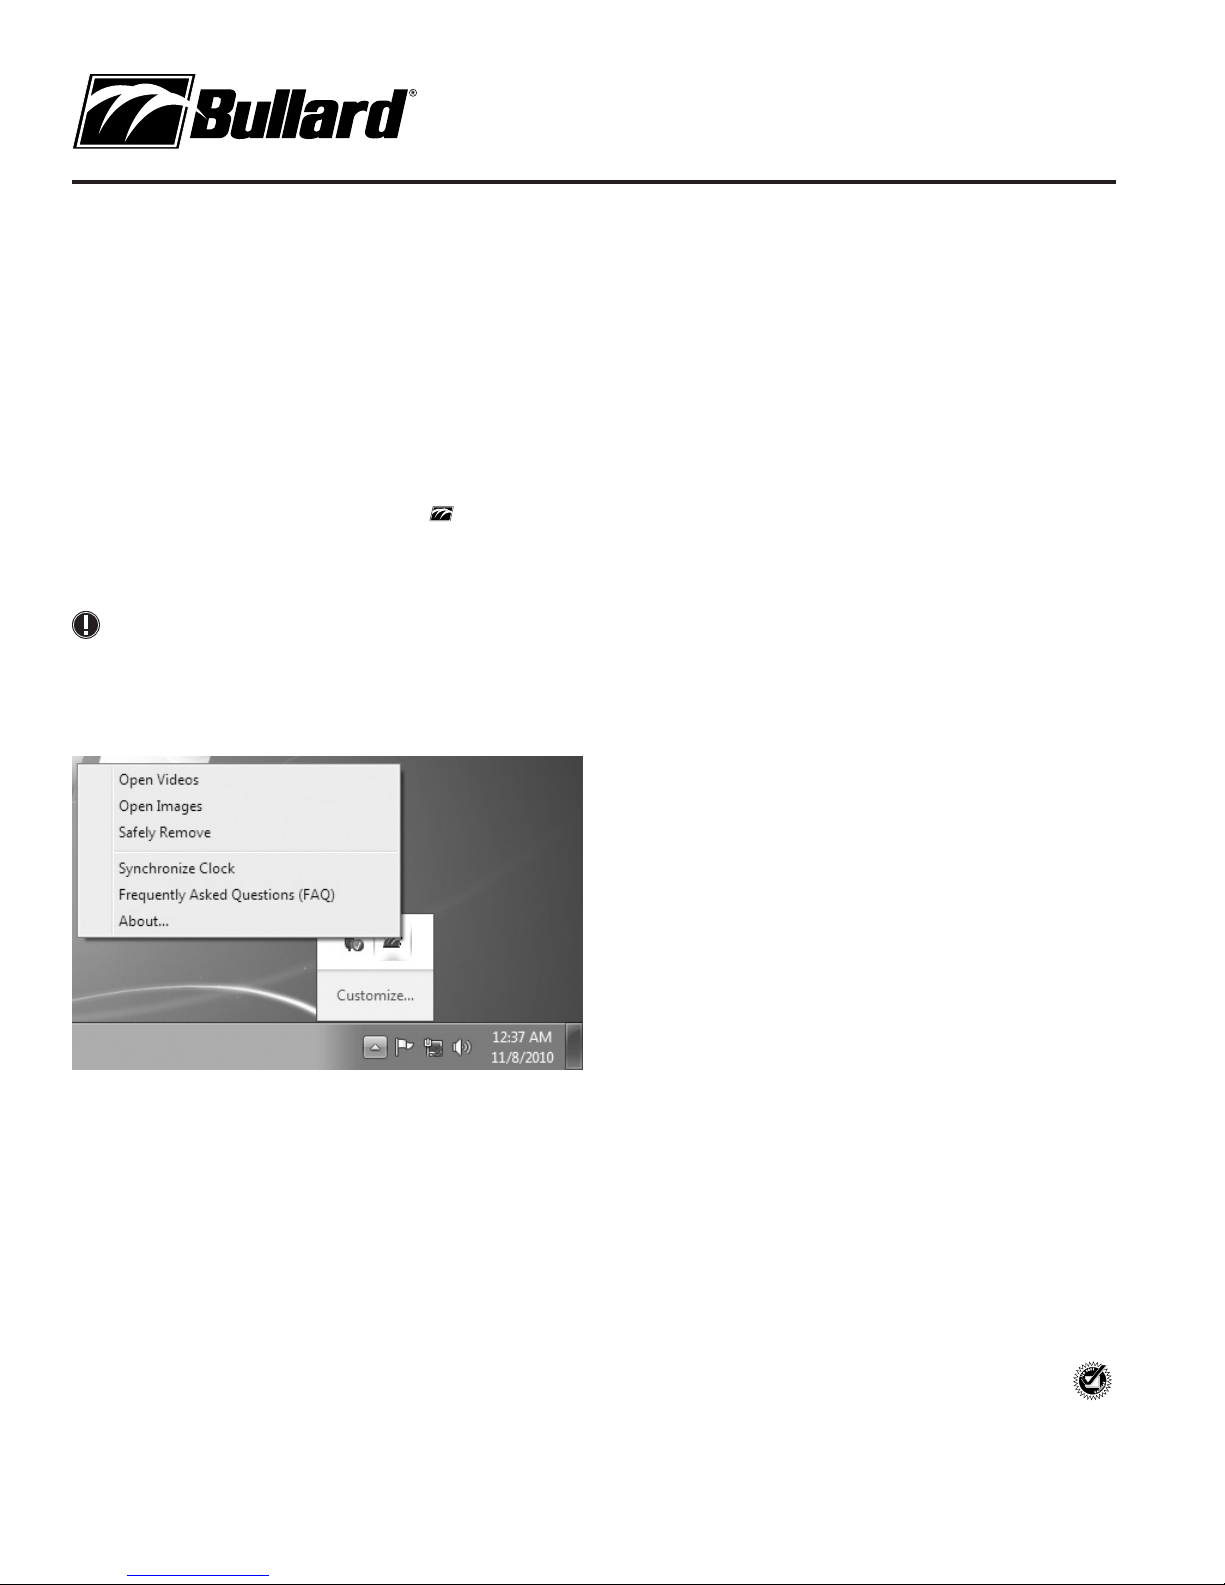
The SceneCatcher software installs in the system tray in Windows. The
system tray is usually located in the bottom right corner of your PC’s display
and contains an assortment of system and software icons. The SceneCatcher
software will be shown as a green Bullard logo icon “ ” and will display
“Bullard SceneCatcher” when rolling over the icon with your mouse. To
access software features, right click the icon and select the feature from the
SceneCatcher menu.
NOTE
You may need to expand the system tray to see the Bullard icon. To do
this, click “Show hidden icons” in your Windows system tray.
Figure 12 - Bullard Icon Right Click Menu
From the SceneCatcher Menu, you can:
• Open Videos
• Open Images
• Safely Remove the SceneCatcher
• Synchronize Clock
• Read Frequently Asked Questions (FAQs)
• Access Device Information
Open videos: Opens the directory on the SceneCatcher containing videos.
Open Images: Opens the directory on the SceneCatcher containing images.
Safety Remove: Enables safe removal of the SceneCatcher from the PC in
order to protect against data loss.
Synchronize Clock: Updates the SceneCatcher internal clock by
synchronizing it to the PC’s clock.
Frequently Asked Questions (FAQs): Provides answers to frequently
asked SceneCatcher questions.
About: Displays SceneCatcher Version information.
Warranty
Bullard warrants to the original purchaser that the SceneCatcher Digital
Video Recorder is free of defects in materials and workmanship under
normal use and service for a period of one year from the date of purchase.
Bullard’s obligation under this warranty is limited to repairing or replacing,
at Bullard’s option, articles that are returned within the warranty period and
that, after examination, are shown to Bullard’s satisfaction to be defective,
subject to the following limitations:
a. Article must be returned to Bullard with shipping charges prepaid.
b. Article must not be altered from its original configuration.
In no event shall Bullard be responsible for damages, loss of use, or other
indirect incidental, consequential or special costs, expenses, or damages
incurred by the purchaser, notwithstanding that Bullard has been advised of
the possibility of such damages.
ANY IMPLIED WARRANTIES, INCLUDING WARRANTIES OF
MERCHANTABILITY AND FITNESS FOR A PARTICULAR PURPOSE, ARE
LIMITED IN DURATION TO TWO YEARS FROM THE DATE OF PURCHASE OF
THIS PRODUCT.
Service
Should your SceneCatcher require service, simply call Bullard Customer
Service at 877-BULLARD (877-285-5273) to request a return authorization.
Please have the SceneCatcher serial number available. The serial number is
located on the top of the handle between the electrical contacts.
©2010 Bullard. All rights reserved.
Bullard® is a registered trademark of Bullard.
Windows XP, Windows Vista and Windows 7 are
trademarks of Microsoft®.
Other Bullard Camera Accessories manuals