manuals.online logo
Brands
  1. Home
  2. •
  3. Brands
  4. •
  5. Burg Wächter
  6. •
  7. Extender
  8. •
  9. Burg Wächter secuENTRY pro 7074 User manual

Burg Wächter secuENTRY pro 7074 User manual

• Shortly thereafter, another beep sounds, and the prole cylinder
engages. The Transponder Extender is now registered to the
prolecylinder.
• Please repeat this process if the registration process fails.
• Hold the transponder that is authorised to open directly on the
BURG-WÄCHTER label on the Extender until a short signal tone sounds.
• After a brief moment, one or more beeps will follow that will indicate
to you the opening authorisation or the battery status of the prole
cylinder and the Extender.
Transponder has been recognised 1 beep
Opening process successful 1 beep
Permanent opening ends 2 beeps
Value not achieved 3 beeps
Permanent opening 4 beeps
Replace battery 5 beeps
No opening authorisation 8 beeps
Unit has not been found Continuous beeping
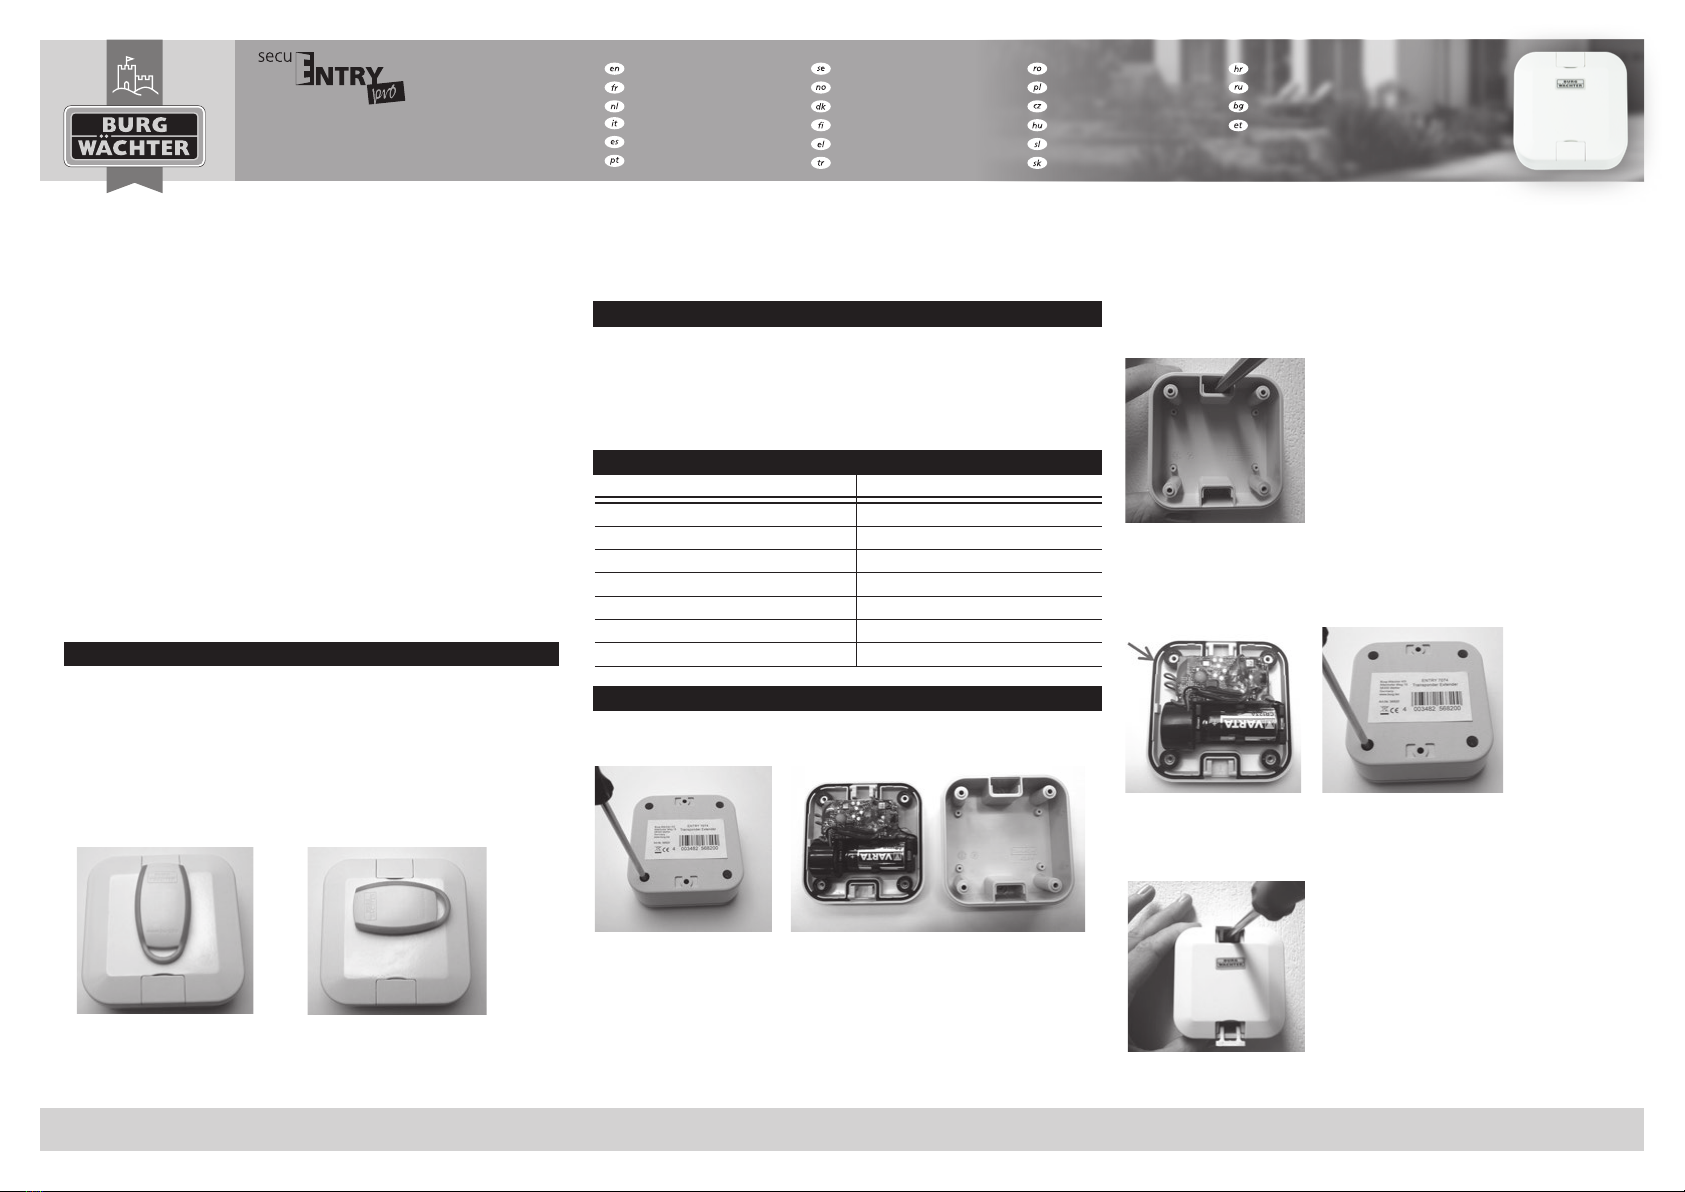
• Remove the four housing screws on the bottom of the Extender and
open the housing cover.
• Place the housing base in the desired position on the wall. Depending
on the surrounding conditions, the Extender can be positioned within
a radius of a maximum of 4 m from the lock.
Operating Instructions
Dear customer,
Thank you very much for deciding on the electronic secuENTRY lock
system from BURG-WÄCHTER.
The secuENTRY Transponder Extender allows you to easily open locks of
the secuENTRY family using a transponder. It can also be used to allow
an opening from a maximum distance of 4m to the lock (depending on
the surrounding physical conditions).
Note: If the QR code is lost or damaged, a rmware update of the
Transponder Extender is no longer possible. The QR code can, however,
be scanned in electronic form as a le, for example, or saved as a photo
on a protected data carrier.
The secuENTRY Transponder Extender can be used as of the following
versions:
• secuENTRY and secuENTRY pro as of software version 1.7
• secuENTRY easy / secuENTRY pro 7100 and secuENTRY easy plus as of
software version 1.3
• secuENTRY pro 7071 Relay as of software version 1.4
In order to be able to use the secuENTRY Transponder Extender,
a Transponder must be registered to the prole cylinder with the
secuENTRY software or via a keypad.
• Bring the Transponder Extender in the vicinity of the prole cylinder
and hold the registered transponder on the Extender until a signal
tone sounds. Make sure that you position the transponder on the
BURG-WÄCHTER label.
Electronic Door Lock
secuENTRY pro 7074 Transponder Extender
Registration process
Operation
Download: www.burg.biz
Descarga: www.burg.biz
Download: www.burg.biz
Ladattava tiedosto: www.burg.biz
λήψη: www.burg.biz
İndir: www.burg.biz
Descărcare: www.burg.biz
Pobieranie pliku: www.burg.biz
Stáhnout: www.burg.biz
Letölthető: www.burg.biz
Download: www.burg.biz
загрузка: www.burg.biz
Download (зареди): www.burg.biz
Download: www.burg.biz
BW_sE_TransponderExtender_BA_sE_020100,
2018-08-10 kfs
BURG-WÄCHTER KG ·Altenhofer Weg 15 ·58300 Wetter ·Germany ·www.burg.biz English I 1
Signal tones
Installation
Important: Before installation, check the response between the
Transponder Extender at its planned installation position and the
prolecylinder!
CAUTION: Note alignment; both drill holes must be at the top and bottom!
• Mark the two drill holes and drill.
• Close the housing using the housing screws.
CAUTION: The housing gasket must be in the groove and must not
bedamaged.
• Open the clips on the front of the Transponder Extender and attach it to
the wall with anchors and screws.
Fig. 1: Read area of the Transponder Extender
Fig. 2: Opening the Transponder Extender
Fig. 3: Mark drilling position
Fig. 4: Closing the Transponder Extender
Fig. 5: Fastening the Transponder Extender
• Finally, close the clips of the Transponder Extender.
• Open the clips and remove the Transponder Extender from the wall.
• Remove the four housing screws and open the housing cover.
• Replace battery.
Electronic Door Lock
secuENTRY pro 7074 Transponder Extender
Battery replacement
In order to provide you with a awless and high-quality product and to
helpyou in the event of service or repair, it is necessary that faulty or
defective devices be presented to your dealer together with the original
proof ofpurchase.
For returns, all device parts must furthermore be in the factory setting
dueto your right of revocation. Failure to comply with this will invalidate
the warranty.
Dear Customer, please help us avoid unnecessary waste. Should you
intend to dispose of this device at any time, please remember that many
components of this device contain valuable materials that can be recycled.
Please note that electrical and electronic devices as well as
batteries must not be disposed of with household waste but
rather apart from it or separately. Please obtain information on
the collecting points for electrical waste from the responsible
authority of your city/municipality.
Please contact [email protected] if you have questions about the
ECconformity declaration.
Printing and typesetting errors as well as technical changes reserved.
Warranty
Disposal of the device
Download: www.burg.biz
Descarga: www.burg.biz
Download: www.burg.biz
Ladattava tiedosto: www.burg.biz
λήψη: www.burg.biz
İndir: www.burg.biz
Descărcare: www.burg.biz
Pobieranie pliku: www.burg.biz
Stáhnout: www.burg.biz
Letölthető: www.burg.biz
Download: www.burg.biz
загрузка: www.burg.biz
Download (зареди): www.burg.biz
Download: www.burg.biz
BW_sE_TransponderExtender_BA_sE_020100,
2018-08-10 kfs
BURG-WÄCHTER KG ·Altenhofer Weg 15 ·58300 Wetter ·Germany ·www.burg.biz English I 2
• Close the housing with the four housing screws.
• CAUTION: Housing gasket must be in the groove and not be damaged!
• Install the housing on the wall again and close the clips.
Fig. 6: Transponder Extender installed
Fig. 7: Removing the Transponder Extender
Fig. 8: Opening the Transponder Extender
Fig. 9: Closing the Transponder Extender
Fig. 10: Install the Transponder Extender

Popular Extender manuals by other brands

URC Total Control MRX-4SEN Specifications

URC

URC Total Control MRX-4SEN Specifications

CIT 33dBm quick start guide

CIT

CIT 33dBm quick start guide

LINK-MI LM-EW53 Operation manual

LINK-MI

LINK-MI LM-EW53 Operation manual

DirectConnect DCC5HCXIR user manual

DirectConnect

DirectConnect DCC5HCXIR user manual

Woxcon CE-EX50 user manual

Woxcon

Woxcon CE-EX50 user manual

GYS NOMAD POWER PRO 90 Safety and operating instructions

GYS

GYS NOMAD POWER PRO 90 Safety and operating instructions

Lindy 39382 user manual

Lindy

Lindy 39382 user manual

Allnet ALL168211 Easy start guide

Allnet

Allnet ALL168211 Easy start guide

ESP T568A quick start guide

ESP

ESP T568A quick start guide

O2 WAP5884 user manual

O2

O2 WAP5884 user manual

Aztech WL556E Easy start guide

Aztech

Aztech WL556E Easy start guide

ADDER AdderLink Infinity 1002 user guide

ADDER

ADDER AdderLink Infinity 1002 user guide

AirTies Air 4420 user manual

AirTies

AirTies Air 4420 user manual

LINOVISION POE-Extender02 user manual

LINOVISION

LINOVISION POE-Extender02 user manual

PROLiNK PEN1201 Quick installation guide

PROLiNK

PROLiNK PEN1201 Quick installation guide

Keith McMillen Instruments 12 Step Reference manual

Keith McMillen Instruments

Keith McMillen Instruments 12 Step Reference manual

Juice Booster 2 user manual

Juice

Juice Booster 2 user manual

Fortinet FortiExtender 211E quick start guide

Fortinet

Fortinet FortiExtender 211E quick start guide

manuals.online logo
manuals.online logoBrands
  • About & Mission
  • Contact us
  • Privacy Policy
  • Terms and Conditions

Copyright 2025 Manuals.Online. All Rights Reserved.