Burnout R-1050-B User manual

1
R-1050-B (BURNOUT) PROGRAMMABLE ELECTRIC MUFFLE KILN USER MANUAL
PRODUCT INTRODUCTION:
THIS R-1050-B (BURNOUT) ELECTRIC MUFFLE KILN WITH A PROGRAMMABLE 32-SEGMENT TEMPERA-
TURE/TIME CONTROLLER HAS A SPACIOUS 11.5 CUBIC LITRE CHAMBER WITH A FORCED AIR-
EXTRACTION SYSTEM (1 m3/min). THIS KILN IS ESPECIALLY DESIGNED TO BE USED FOR ALL BURNOUT
PROCESSES (WITH OR WITHOUT FLASKS) USING ANY TYPE OF WAX, MOULD-MAKING AND DENTAL MA-
TERIAL (INCLUDING ALL MATERIALS USED IN INVESTMENT CASTING) THAT REQUIRE TEMPERATURES
OF UP TO 1,050°C/1,922°F. FOR YOUR SAFETY THIS KILN HAS A SAFETY MECHANISM THAT WILL DISCON-
NECT THE KILN'S POWER SUPPLY FROM ITS HEATING ELEMENT(S) IF THE KILN DOOR IS OPEN OR HAS
NOT BEEN PROPERLY CLOSED. THIS KILN ALSO HAS A HOLE WITH A STAINLESS STEEL SHUTTER ON
THE DOOR TO ALLOW YOU TO SEE YOUR ITEM(S) DURING THE ENTIRE FIRING PROCESS AND A DIGITAL
OVER/UNDER TEMPERATURE DETECTION SAFETY SYSTEM TO HELP MAINTAIN A CONSTANT TEMPERA-
TURE DURING THE ENTIRE SOAKING PROCESS. THIS KILN ALSO HAS A SMOOTHING CIRCUIT TO ALLOW
THE PROGRAMMABLE CONTROLLER TO CORRECTLY READ AND STABILISE ELECTRICITY FLUCTUA-
TIONS.
Pic. 1 FRONT VIEW: Pic. 2 BACK VIEW:
MODEL: R-1050-BCALIBRATION: YES
INPUT ON REQUEST: 115, 220 or 240 V SOAKING PROCESS ACCURACY: +/- 1°C
POWER: 2,700 WATT SAFETY MECHANISM: Yes
ESTIMATED MAXIMUM
HEATING TEMPERATURE:
1,050°C / 1,922°F TEMPERATURE RANGE: ROOM TEMPERATURE -
1,050°C / 1,922°F
ESTIMATED HEATING TIME
TO 1,050°C:
90 MINUTES VENTILATION SYSTEM: FORCED, AIR
1 M3/MINUTE
CONTROLLER TYPE: PROGRAMMABLE
32 SEGMENT
CHAMBER’S DIMENSIONS MM
(INCH):
200(w) x 290(d) x 200(h)
8” x 11.5” x 8”
CONTINUOUS WORKING
TIME AT 1,050°C:
12 HOURS KILN’S DIMENSIONS MM (INCH): 360(w) X 450 (d) X 360(h)
(14” x 18” x 14”)
CONTINUOUS WORKING
TIME BELOW 1,000°C:
24 HOURS WEIGHT: 35 KG

2
Pic. 3 Pic. 4
PREPARATION:
- Remove the kiln from its original box.
- Put the kiln on a heat-resistant worktop such as a stand, stone plate, metal sheet or ceramic
tiles. Please note that the worktop should be very stable and be able to hold 40 kg of weight for
your safety.
- Open the kiln door and carefully remove all the accessories and packing materials from the
chamber.
- Now start assembling the kiln by attaching the electrical box to the kiln’s body (see Pic. 3). To
do this:
Take the electrical box with 3 stainless steel brackets (Pic. 5) and attach all of them to the kiln’s
body as shown in Pics. 3, 7 and 8, using the screws supplied.
Pic. 5 Pic. 6
If your kiln does not already have a lock
attached to the door, find the two-part
metal spring lock in the pack and attach
it to the kiln door and body as shown in
Pic. 6.
Pic. 7 Pic. 8
Now you can connect the electrical box to your kiln’s heating element(s) and fume-extraction system using
the red cables, and then attach the safety-switch mechanism. To do this:

3
Pic. 9 Pic. 10 Pic. 11
Fix the blower (with two stainless steel tubes) onto the metal plate on your kiln’s back wall (Pics. 11
and 12).
Connect the red cables (Pic. 9) for the heating element and air extractor to their terminals (sockets)
on the electrical box (Pic. 10).
Now you need to attach the safety-switch mechanism to the kiln. This mechanism is important for
your safety as it will disconnect all the heating elements inside the chamber if the door of your kiln is
open or has not been properly closed. This decreases the risk of an electric shock arising from acci-
dentally touching the elements using metal tongs, tweezers, accessories or your firing object(s). To
do this:
Take the ready-to-use mechanism from its pack and attach it to the kiln as shown in Pic. 13, using
the two small screws supplied.
Pic. 12 Pic. 13
Pic. 14 Pic. 15 Pic. 16
Now connect one end of the tension spring (supplied) to the safety-switch’s pressing finger (Pic. 15) and
the other to the fixing screw on the electrical box wall that is facing the kiln, as shown in Pic. 14.
IMPORTANT! After assembling this safety-switch mechanism, ensure the finger firmly PRESSES
on the SAFETY SWITCH when the door is OPEN (Pic. 16) and completely RELEASES the SAFETY
SWITCH when the door is CLOSED (Pic. 15), otherwise the heating elements will not heat up.

4
Your kiln door has a small ventilation hole with a stainless-steel shutter (Pic. 17).
To assemble your kiln’s extraction system (Pic. 18), please connect the main and internal
tubes, then attach the blower’s metal stand with the blower and these tubes to the metal
plate on the back of the kiln using the four screws. Next, connect the RED blower cable to
the appropriate socket on the back of the electrical box. Once assembled, please check that
the pipes fit together properly and that the main tube has been properly inserted into the
blower to ensure it works effectively.
Your kiln is now assembled. Close the door shutter (Pic. 17) to prevent heat leaking out
from inside the chamber. Connect the mains cable to a power supply, set the controller and
start your project.
When using the kiln for the first time, it must be heated up for approximately 70 minutes
(factory setting) to allow any water to evaporate from the chamber. Please do not be
alarmed if light smoke and/or a smell appears (when using the kiln for the FIRST time). This
is normal for new kilns as any water, grease or oils burn out from the heating element(s),
shelves, chamber and from inside the kiln. It should not happen again after the first time it is
heated. If your kiln is used less than once a month then please repeat this process each
time you use it.
Please also note that the temperature shown on the controller is the temperature around the
thermocouple(s) inside the kiln’s chamber. You may have to wait up to two hours for the in-
side of your kiln to heat up fully and reach the same temperature everywhere inside the
chamber.
USEABLE CHAMBER DIMENSIONS: Pic. 19 shows FRONT AND TOP VIEW drawings of the
kiln’s chamber.
Pic. 19
Pic. 17: Pic. 18:

5
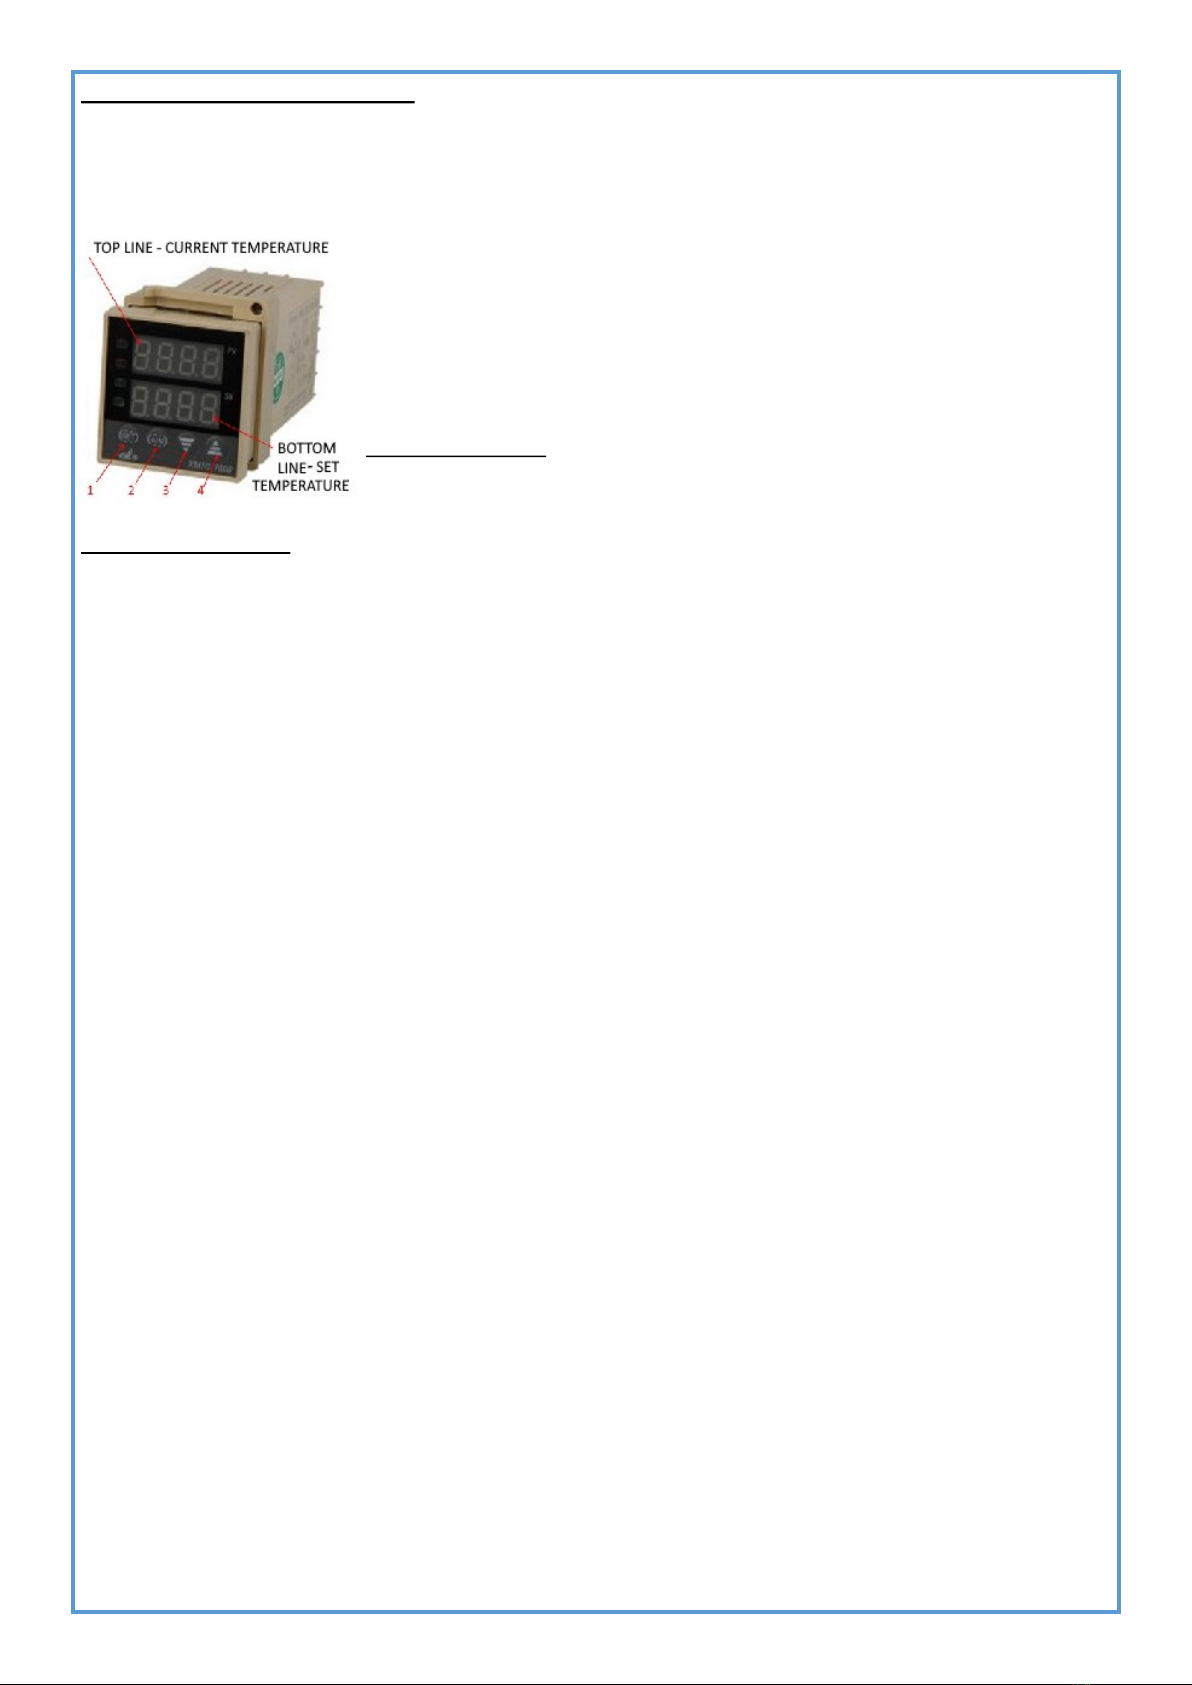
TEMPERATURE CONTROLLER:
The programmable temperature controller (XMTG-7000) has already been set up for chamber drying by
the manufacturer (if you have not requested a different setting). If you want to re-program this controller,
please refer to the controller’s user manual or contact us for help on Skype. Below are some useful tips
for using this controller:
1. “SET” – setting/confirmation button (used for setting all of the controller’s
parameters).
2. “Arrow Left” or “A/M” – segment selector (to choose from four segments).
3. “Arrow Down” – decrease (used to set the required temperature).
4. “Arrow Up” – increase (used to set the required temperature).
Example program: Increase from room temperature up to 450°C within 99
minutes, soak at 450°C for 4 minutes and then decrease to room tempera-
ture within 145 minutes.
Example instructions:
1.Open your kiln’s door to trigger the safety-switch mechanism, which will disconnect the power supply from the
heating element(s) and prevent the kiln from heating up while you program the temperature controller. Alternative-
ly, simply press button 4 for 3 seconds until you see “STOP” on the bottom display. Now you can start program-
ming your controller.
2. Each of the following steps consists of first setting the temperature and then setting the time period in which the
NEXT temperature should be reached. There are 32 available input slots each consisting of a pair of temperature
and time inputs, i.e. there are a total of 32 temperature inputs alternating with 32 time inputs. To start program-
ming, short-press the ‘SET’ button.
3. After you have pressed the ‘SET’ button, you will set the starting temperature (“C1” on the top display). In this
case, input the desired room temperature (usually 20°C), i.e. “0020”, into the BOTTOM display using buttons 2, 3
and 4. Now press ‘SET’ to confirm this initial temperature and to proceed to the next input (“Г1”). This input is the
required TIME to reach the NEXT required temperature. For this example, insert “0099” (99 minutes) into the
BOTTOM display, and then press ‘SET’ again to set this input and to proceed to the next step.
4. The next step begins by setting the second required temperature (“C2”). To set this, insert “0450” (450°C) into the
bottom display. Next, press ‘SET’ again to proceed to the next input (“Г2”), where you will set the required time to
the NEXT temperature. In this case, this is our soaking time of 4 minutes - “0004”. Press ‘SET’ again to confirm
this time and to proceed to the next step.
5. The next step begins by setting the third required temperature (“C3”), in this case the required soaking tempera-
ture. Enter “0450” (450°C) into the bottom display again. Next press ‘SET’ once more to proceed to the next time
input (“Г3”), which in this case will be 145 minutes. Input “0145” into the bottom display, then press ‘SET’ again.
6. For the next step, set the fourth and final required temperature (“C4”) – “0020” (20°C).
7. To indicate the end of the program, press the ‘SET’ button again, insert “0000” into the bottom display and press
the ‘SET’ button once more. Your program will automatically finish when it reaches this last input.
A. When you have finished programming the controller, short-press the ‘SET’ button or simply leave the
controller for about 30 seconds for your new setting to be remembered and for your job to start.
B. Close the kiln door to disconnect the safety-switch mechanism, allowing your kiln to start heating up.
Alternatively, if you pressed button 4 in step 1 above, now press button 3 for 3 seconds until the word
“RUN” appears on the bottom display.
C. Important: you’ll have about 20-30 seconds to change EACH temperature/time setting. Please do not
worry if you take too much time and the controller resets and starts displaying the current temperature
inside the chamber again. Simply restart the programming process by short-pressing the ‘SET’ button
again. If you are a beginner and are having difficulty programming your controller, please feel free to
contact the manufacturer or agent/shop for free help with this matter during the warranty period.

6
SAFETY INSTRUCTIONS and USEFUL TIPS FOR BEGINNERS:
Please make sure that any item(s) you place inside the chamber are not touching the heat-
ing element(s).
It is always best to conduct some tests on a small quantity of your firing material before you
fire your item(s).
Re-programming this kiln to use it for temperatures higher than 1,050°C may cause a prob-
lem with the heating element(s) and/or with the kiln’s metal body that are NOT under war-
ranty.
This kiln should be positioned on a level surface that will not be damaged by heat. A mason-
ry or concrete floor is recommended, but other protective material like a metal or ceramic
(tile) sheet may be used. For a small additional charge this kiln can also be supplied with a
set of two shelves and a metal stand for placing it on a heat-sensitive worktop.
Always make sure that the door is closed properly in order for the heating element(s) to turn
on and for the highest possible temperatures to be reached inside the chamber. Only open/
close the door with gloves on.
Always use heat-resistant gloves and long metal tweezers to remove or place item(s) from/
into the kiln.
This kiln should be kept away from all inflammable materials and other heating devices.
When the door is open at temperatures higher than 300°C (572°F), always maintain as
much distance as possible between you and the hot chamber. Please also wear dark glass-
es to avoid any problems with your eyes.
Because of the high temperatures that this kiln can reach, you should never leave it unat-
tended when it is in use.
Never touch the kiln’s metal body, ventilation tube or shutter on the door without gloves on
as these can burn your hands.
KEEP OUT OF REACH OF CHILDREN.
Disconnect the kiln from its power supply when not in use.
The manufacturer reserves the right to make changes to this kiln that improve furnace per-
formance without notification.
WARNING: This is an electrical, often extremely hot piece of equipment: always follow any
applicable health and safety rules and regulations for electrical equipment and hot work in
your country.
MADE IN THE UK
Table of contents
Popular Ventilation Hood manuals by other brands

Galvamet
Galvamet Aura Installation, operating and maintenance instructions

AEG
AEG 511 D/561 Instructions for installation and use

Electrolux
Electrolux EFP 629 user manual

Gaggenau
Gaggenau AI540122 Operating and assembly instructions

Miele
Miele DA 3590 EXT Operating and installation instructions

Futuro Futuro
Futuro Futuro WL48SHADE Instruction booklet