BUTURE BR700 User manual

User Manual
BR700 Jump Starter& Air Compressor
123
123
EN
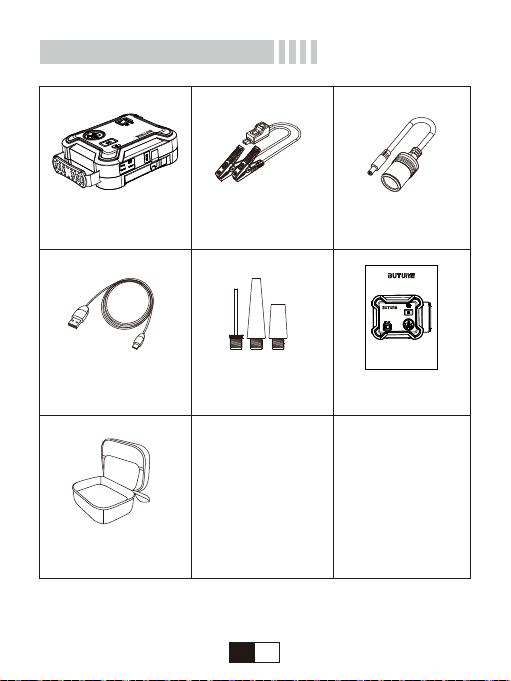
Package Content
Storage Box
BR700 Jump Starter
& Air Compressor Smart Clamps DC Cigarette
Lighter Adapter
Valve Adapter x 3 User ManualUSB To Type-C Cable
User Manual
BR700 Jump Starter& Air Compressor
01
ENEN

Introduction
Thank you for purchasing BUTURE BR700 car jump starter kit.Please
read the user manual carefully before you start to use the product.
Key Features
★A Powerful Jump Starter: Car Jump Starter with 2500 amps peak
current can jump start your flat battery (All Gas or 8.0L Diesel) in 1-3
seconds up to 30 times on a single charge.
★A Powerful Tire Inflator: Auto start aid and 150PSI tire inflator 2 in 1.
You can inflate your car tires anytime and anywhere.
★A Compact Power Station: The massive 23800mAh capacity can
fast charge your phone with dual USB ports and can also power your
other car accessories using the 12V 10A DC port.
★Safety Protection: The high quality and spray gold clamps with a
built-in protection circuit provide over-current protection, short circuit
protection, over-load protection, over-voltage protection, over-charge
protection. Provide ultimate protection for your safety.
★5W Emergency LED Light: The latest 5W LED camping light to help
you start your car in the dark or during night time emergencies.
02
EN

Know Your Product
03
EN

Press the Power Button to turn ON/OFF the device
and show the remaining capacity.
(The device will automatically switch off after
stopping operation or output for 10 minutes.)
Long press the button to turn ON/OFF the LED Light
Show the charging process and remaining power
Activate the LCD Air Pressure Indicator.
Switch the unit of output air pressure.
Display the air pressure of the connected tire.
Display the output air pressure.Pressurize
Pressurize
Decompress
Illumination
Connect car tires
Charge your phone, tablet, camera, etc.
Charge your phone. tablet, camera, etc.75% faster
than a standard charge
power your other devices
Recharge the jump starter
Insert the plug of the clamp completely
Show the work status of the battery clamp
Connect to the positive terminal of the car battery
Connect to the negative terminal of the car battery
Insert the plug of the clamp completelyInsert the
plug of the clamp completely
Turn ON / Turn OFF the air compressor(Use after
setting the output air pressure)
LCD Power Indicator
Power Button
R Button
LCD
Air Pressure Display
- Button
LED Light
ON/OFF Button
Air Hose
USB Output Port 2
USB Output Port 1
DC 12V-16V/10A
Output Port
Type-C Input
EC5 Output Port
Battery Clamp Plug
LED Indicator
Red Battery Clamp
Black Battery Clamp
+ Button
04
EN

Recharge the Jump starter
NOTE: The wall charger or car charger is not included in the package, you can use
a universal USB charger to recharge the unit, such as your phone or pad charger(2A
above is suggested)
At Home:
1.Plug the USB cable into any USB wall adaptor (5V 2A above, not included)
2.Connect the USB C cable(included)to the unit
05
EN
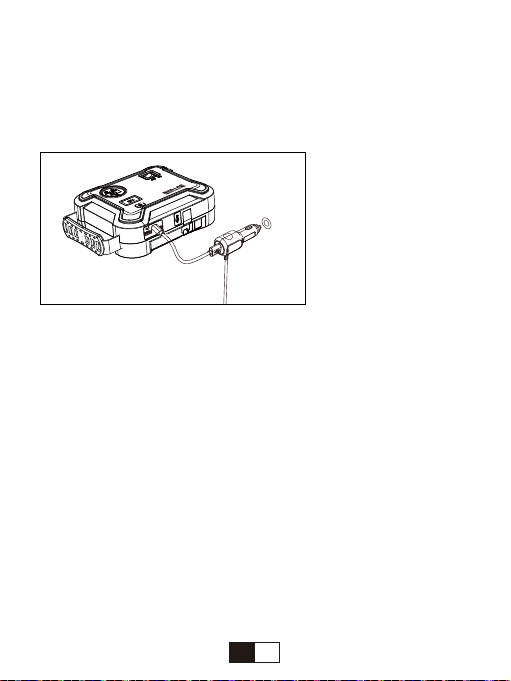
In Car:
1.plug the USB car adapter(not included)into the car socket
2.connect the USB C cable (included ) to the unit.
Note: It is recommended to recharge the Jump starter every 3-4months to maintain
the efficiency and prolong the service life of the internal battery even if the unit has
not been used.
Charging your devices from the USB output
Use the original manufacturer's USB cable that came with your device and plug it
into one of the USB output ports.You can charge two devices at the same time.One
of the ports has a maximum output of 12V/1.5A while the other has a maximum
output of 5V/2.1A.Press the power button once to begin charging your device.The
power level indicator will show the battery level.To check the power capacity again,
simply press the power button once.
LED Light
Please press&hold Power Button for 3 seconds to turn on / off the LED light.
Safety Precautions
By owning a Jump Starter, you have everything you need to jump start a vehicle-no
need to wait for help. BR700 to the rescue!
We know you're excited, but before jumping your vehicle, please be sure to take
some precautionary steps:
-Read your vehicle owner's manual first as the manufacturer may have specific
steps and precautions that pertain to your vehicle.
06
EN

- Be sure to turn off all electronics in your car (radio, lights, etc.) before jump starting.
- Make sure you are in a dry, well-ventilated area. Never jump start a vehicle in an
enclosed area.
- Remove any moisture from your jump starter unit, accessories, and your vehicle's
battery. Never attempt to jump start a vehicle when moisture is present. Check that
the vehicle's battery terminals are dean to ensure the best conductivity.
- Properly identify the vehicle battery's positive (+, red) and negative (-, black
terminals before connecting the clamps.
- When using the damps, do not allow the metal teeth of the black clamp to touch the
metal teeth of the red damp.
- When using the damps, DO NOT connect the RED damp to the vehicle battery
negative (-) terminal, or the BLACK damp to the vehicle battery's positive (+)terminal.
- When connecting smart damps to the battery terminals, ensure the copper teeth on
each side of the clamp make good contact with the terminal. The better the
connection, the easier it will be to start your vehicle.
NOTE: When adjusting the clamps please be sure to disconnect your Jump Starter
first. This will prevent the occurrence of minor sparks.
Step 1: Insert the plug of the battery damps completely into the jump starter, the red
and green lights flashing alternately.
To Jump Start Your Car
07
EN

Step 3: Start the vehicle.
If the engine does not start on the first try, disconnect it from the car battery and wait
for at least 20 seconds before reconnecting.
Step 4: When the vehicle is started, remove the battery clamp from the car battery
and the jump starter within 30 seconds.
NOTE: After the green light of the smart clip is always on (work status), do not
disconnected or change the connection between the clip and the car battery to avoid
short circuits or reverse connection.
Step 2: Connect the red damp to the positive electrode (+) of the car battery and the
black clamp to negative one (-)
08
EN

Please read safety instructions carefully before use:
- For safety reasons, the device should be KEPT OUT OF REACH OF CHILDREN.
- Inspect the BUTURE BR700 Jump Starter before each inflates, ensuring the
valve and the air hose are not damaged.
- Do not bend or restrict the air hose while the compressor is in use.
- Avoid using in rainy or wet conditions as water entering the unit can cause internal
damage and premature failure.
- In case of an electrical or mechanical fault, immediately switch off and unplug the
compressor.
- Only use on tires and inflatable items.
- Take extra care not to over-inflate when inflating other inflatable items such as
sports ball, bike tires, air bed, etc
- Please refer to your vehicle handbook for the correct tire pressure required for
your vehicle.
Step 1: Press the Power Button to activate the device. Then press the R Button to
activate the LCD Air Pressure Display and choose your preferred pressure type in
psi, bar, kPa or kg/c㎡.
Inflating the Vehicle Tire
09
EN
Table of contents
Other BUTURE Remote Starter manuals


