C. Crane QuickCharger User manual

Operating Instructions

IMPORTANT SAFETY INFORMATION
READ BEFORE USE
The following precautions must be observed when operating the QuickCharger.To reduce
the risk of electric shock, fire or injury, please read the points below before using the unit,
and follow the rules during use. Failure to observe these safety rules will render the warran-
ty void.
USING THE QUICKCHARGER
•
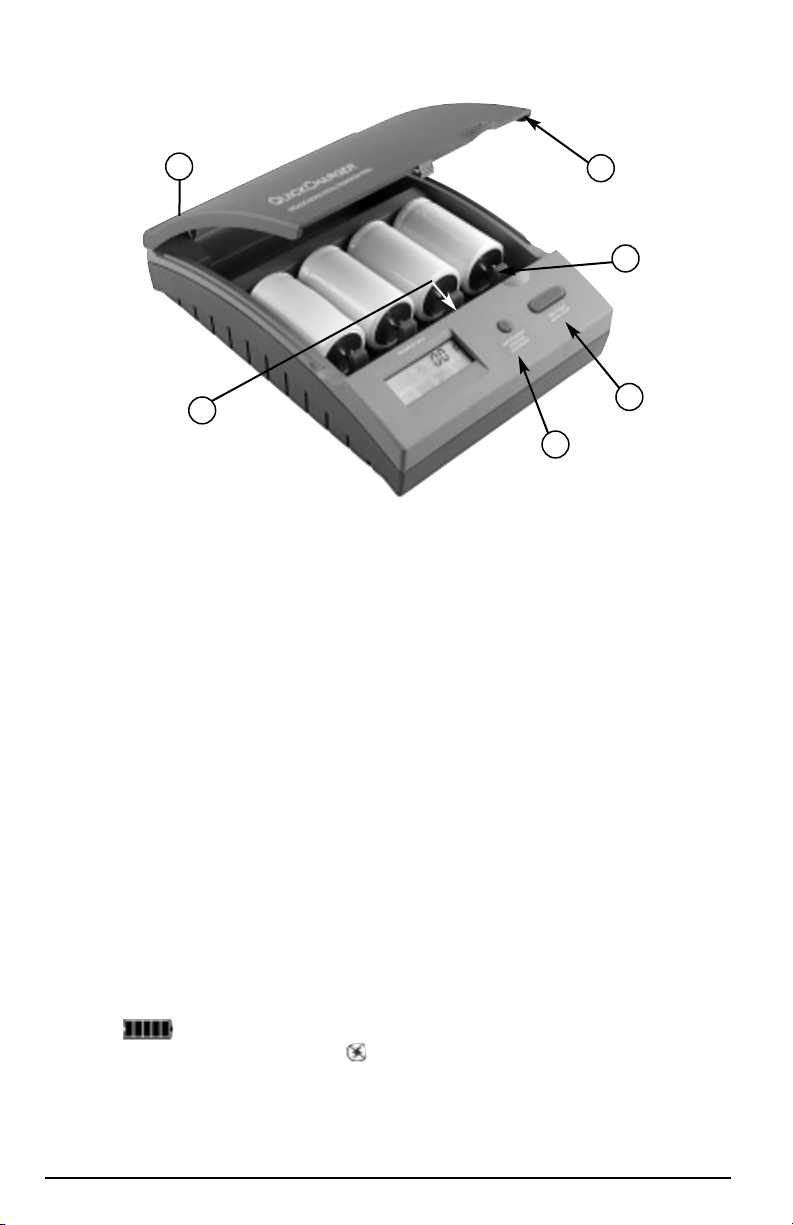
Place the QuickCharger on a dry, stable surface. Do not position the unit above a heater
or a heating vent. Do not place the unit where it can fall into or come into contact with
water. Do not place the unit on a vibrating surface such as a washing machine.
•
If the unit comes into contact with water or any other liquids, immediately unplug your
QuickCharger. Do not remove the unit from the liquid until you have done so.
•
Do not place anything over the QuickCharger during use. Never drop anything on the
unit.
•
Do not use any adapter other than the one supplied by the manufacturer.The use of any
other adapter renders the warranty void.
•
Do not use extension cords or plug adapters with this unit.
•
The use of any attachments not intended for this battery charger may involve the risk of
fire, electric shock or other personal injury.
•
Do not disassemble the charger. It should be serviced or repaired by qualified service
personnel only. Incorrect assembly may result in an electric shock or fire.
•
Do not alter the provided AC-DC adapter in any way. If it does not fit into an AC outlet,
have a qualified technician install the proper outlet. An improper connection may result
in an electric shock.
•
Never use the charger as a DC power source for any electrical equipment.
•
The QuickCharger is for indoor use only. Do not expose it to rain or excessive moisture.
•
Do not use chemical agents to clean the QuickCharger or adapter. Before cleaning the
charger, disconnect the charger from the AC-DC outlet. Clean the metal contact with a
soft cloth only.
•
Check the QuickCharger and the AC-DC adapter regularly. Do not use the unit if there is
any sign of damage.
BATTERY SAFETY RULES
•
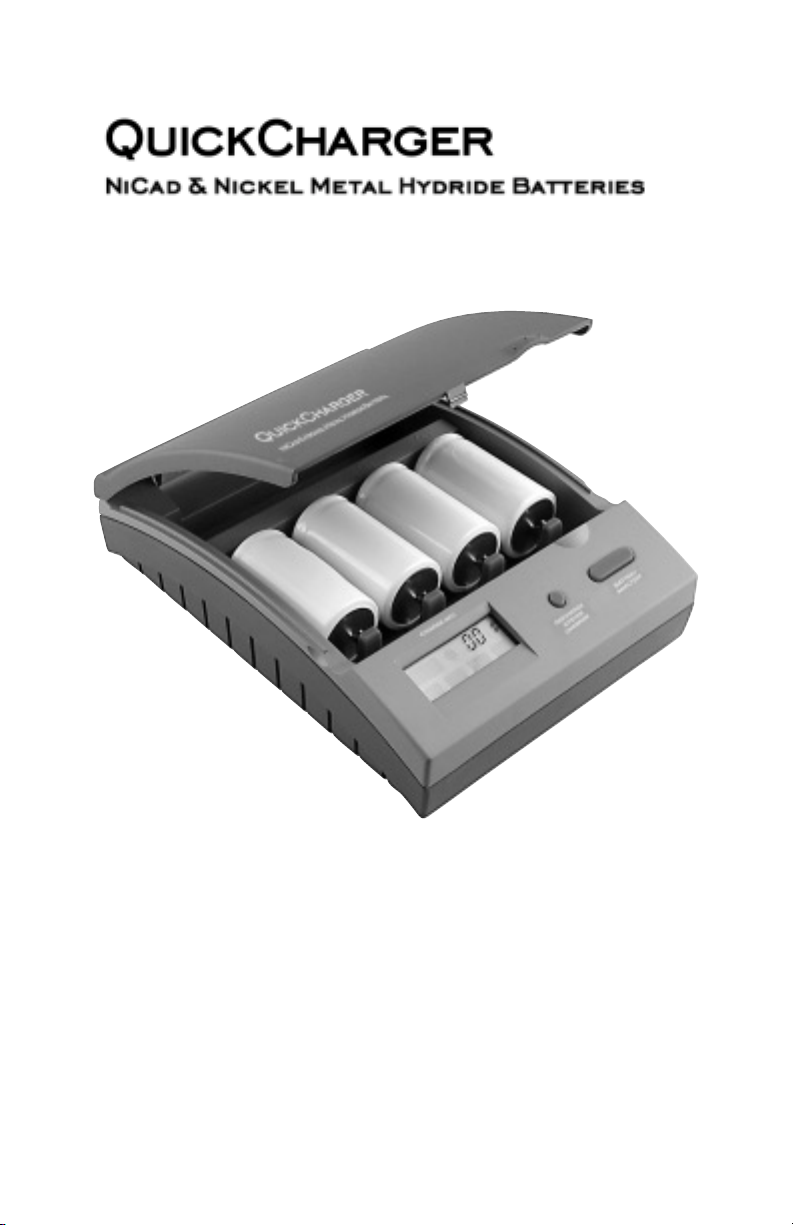
Only recharge AAA, AA, C & D size Nickel Cadmium or Nickel Metal Hydride bat-
teries. DO NOT ATTEMPTTO RECHARGE ALKALINE BATTERIES OR ANY OTHER
TYPE OF BATTERY.
•
Do not try to recharge batteries that are rusty, corroded, damaged or leaking.
•
Remove rechargeable batteries from electrical equipment before charging them.
•
Make sure the polarity marked on the rechargeable battery matches the polarity marked
in the QuickCharger compartment.
2

Table of Contents
Safety Instructions ....................... 2
Introduction ................................... 3
Quick Start .................................... 4
Button Identification/Function .....5
Charge Info Display ...................... 6
Display Information ...................... 7
Typical Charging Sequence .........8
Typical Charging Times ................8
Revitalizing NiCad Batteries ........8
Troubleshooting Guide ................ 9
Specifications .............................. 11
Introduction
Thank you for purchasing the C. Crane QuickCharger. The QuickCharger is the
most advanced and versatile battery charger made. Its highly sophisticated
microprocessor-controlled system quickly charges batteries without creating
damaging heat. Its discharge circuit conditions batteries to improve capacity and
life.The QuickCharger will charge up to four "AAA", "AA", "C" and "D" size Nickel
Cadmium (NiCad) or Nickel Metal Hydride (NiMH) batteries. It will fully charge the
new high capacity rechargeable batteries.
SAVE THIS INFORMATION FOR FUTURE REFERENCE
NOTE: PLEASE CHECK ALL PACKAGING BEFORE THROWING AWAY.
ENCLOSED YOU SHOULD FIND:
1 charger unit
1 AC-DC adapter
1 instruction manual
3

Quick Start
Before powering your charger be sure to read the Safety Instructions on page 2.
4
1.
Make sure there are no batteries installed in the
charger.
2.
Plug the small end of the AC-DC adapter into the
back of the charger. Then plug the larger end of the
adapter into a wall socket.
3.
The QuickCharger will perform a short self-test and
then the Loading symbol will flash indicating the
Charger is ready to use.
4.
Open the lid using both hands. Install up to four
batteries of the same size and type as indicated,
with the negative side toward the buttons.
5.
Close the lid and the QuickCharger will evaluate
your batteries and charging will begin.
Note:The charger start switch is activated only when the
charger's lid is closed.
Do not charge NiCad and NiMH batteries at the same time.
Do not mix battery sizes. For best results, charge batteries
of the same brand and condition.

Button Function Information
Battery Analyzer Button
Use the Battery Analyzer to check a battery’s charge and suitability for recharging.
If you have several batteries to recharge at once, analyze each one separately first.
You should then recharge the batteries in groupings of similar voltages.
The charger will only analyze the battery while the lid is open.
Insert only one
battery at a time. If you press the Battery Analyzer Button with more than one bat-
tery in the charger the display will give you the average voltage and capacity of all
of the batteries.
Insert one battery in the charger.With the lid open, press the Battery Analyzer
Button.Within ten seconds the QuickCharger will display the battery capacity and
voltage. The number of bars displayed in the battery icon will indicate the battery
capacity (five bars equal full capacity). If the battery is not suitable for
recharging, the Bad Battery symbol will appear. Do not attempt to recharge any
battery that has been identified as a Bad Battery.
Note: Some NiCad batteries may display a full charge when analyzed, but may still
not be fully charged. Such batteries need to be revitalized as indicated on page 8.
5
1
54
3
2
6
1) Discharge System Override
2) Battery Analyzer
3) Spring Loaded
Negative Battery Contact
Charger / Button Identification
4) Charger Lid
5) AC/DC Power Jack
6) Lid Activated Charger Switch

6
1
5
6
7
8
234
Charge Info Display
1) Battery Symbol
2) Charged Battery Indicator
3) Battery Voltage
4) No Batteries in Charger/Lid Open
5) Top-Off/Trickle Charge Indicator
6) Fast Charge
7) Soft Start
8) Intelligent Discharge System
Discharge System Override Button
You can use the Discharge System Override button to either discharge a battery
“on command” or to skip the discharge cycle.
When NiCad batteries are loaded in the Charger the Intelligent Discharge System
(I.D.S.), symbol on the display, it may start to discharge the batteries in
preparation for recharging. If you wish to skip this step and charge the batteries
quicker, press and hold the Discharge System Override button until the Charger
switches to the Soft Start mode.
If you are unsure of the condition of your batteries, it is best not to skip the dis-
charge step when recharging Nicad batteries as the battery capacity may be
reduced over time due to the "memory effect".
Theoretically, you do not need to discharge NiMH batteries although it seems to
bring them up to full performance faster when they are brand new. Therefore, you
may override the Discharge System to speed up charging when NiMH batteries
are used.
You may wish to condition older NiCad batteries or newer batteries that have
been sitting around a long time but still seem to have a relatively high voltage.You
can use the Discharge System Override button to force a discharge cycle on this
type of battery to increase capacity.When placing this type of battery in the
charger wait until the Charger goes into the Soft Start mode, then press and hold
the Discharge System Override button for about three seconds until the I.D.S.
symbol is displayed.The batteries will be discharged and then recharged. If the
voltage is too low, it will go into the discharge cycle automatically. For more infor-
mation on conditioning batteries with low capacity see the section on revitalizing
NiCad batteries on page 8
.

Display Information
Intelligent Discharge System: When the I.D.S. symbol is
displayed, this shows that the Intelligent Discharge System is
active and the batteries are being discharged.
Soft Start Charging: The Soft Start symbol will be displayed
as the Charger starts to charge the batteries.
Fast Charging: The Fast symbol will be displayed after the Soft
Start cycle.
Battery Symbol: This displays the capacity of an analyzed
battery or a charged battery. It will also indicate the battery’s
charge or discharge mode. During I.D.S. the bars in the battery
symbol will move from the right to left. During Soft Start the
bars will move from the left and right toward the center. During
Fast Start the bars will move from left to right.
Top-Off/Trickle Charge Symbol: During the Top-Off charge
mode the Top-Off/ Trickle Charge symbol will be displayed. Four
Battery Symbol
bars on the left will remain on and the fifth bar
will flash as the Top-Off/ Trickle Charge symbol flashes from left
to right.The batteries are 85% to 90% charged at this point.
When the batteries are fully charged the charger will enter the
Trickle Charge mode. All five of the bars in the Battery Symbol
will remain on and the Charged Battery Indicator symbol will
appear and the Top-Off/ Trickle Charge symbol will continue to
flash from left to right at a slower speed.The batteries may
remain in the charger in the Trickle Charge mode until needed.
Charged Battery Indicator: The Charged Battery symbol
appears when the charging is complete.You can leave the
batteries in the charger indefinitely.
Battery Voltage: Displays the voltage of the batteries in the
charger.
Bad Battery: The Bad Battery symbol will appear if the battery
is bad and cannot be recharged.
No Batteries: The No Battery symbol will flash when there are
no batteries in the Charger, or when batteries have been
inserted and the Charger cover is still open.
7

8
Revitalizing NiCad Batteries
Used batteries that have acquired a "memory effect" or new batteries that have
been stored for a long time may not be able to be brought up to their full capacity in
one charge cycle.The batteries’ chemistry can cause the QuickCharger's micro-
processor to think that the batteries are fully charged when they are only partially
charged. If this condition exists you will need to go through several charging and
discharging cycles to get the batteries to their full capacity.
Charge three or four batteries with the same capacity, size, type, and brand at one
time until the charger indicates the batteries are fully charged. Open the Charger's
lid, and then close the lid.When the charger enters the Soft Start mode, press the
Discharge System Override button for about three seconds to force the charger into
the Discharge mode (I.D.S.). Repeat the charge and discharge cycle several times.
The batteries should then be charged to their full capacity and will be able to be
charged normally.
Battery
Type Battery
Size Capacity
mAh Approximate Charging Times
2 Batteries 4 Batteries
NiMH
(charging
without IDS
)
AAA
AA
C
D
600
1600
4500
9000
1 Hr. 20 Min.
2 Hrs. 27 Min.
4 Hrs. 33 Min.
8 Hrs.
2 Hrs. 40 Min.
4 Hrs. 54 Min.
9 Hrs. 6 Min.
16 Hrs.
AAA
AA
C
D
240
850
2400
4400
55 Min.
1 Hr. 55 Min.
3 Hrs. 8 Min.
10 Hrs. 45 Min.
1 Hr. 50 Min.
3 Hrs. 50 Min.
6 Hrs. 16 Min.
21 Hrs. 30 Min.
The above charging times are for fresh, new batteries. A battery’s charging time
may vary depending on the brand, capacity and condition of the battery.
NiCad
(charging
with IDS)
Typical Charging Sequence
Open the Charger Lid using two hands, install the batteries and close the lid.The
Charger will analyze the batteries and will either start discharging, or enter Soft
Start. After Soft Start the charger will begin Fast Charge.When the batteries are
80-90% charged the Charger will start Top Off. When the batteries are fully
charged the charged battery symbol will be displayed.The QuickCharger will con-
tinue to apply a Trickle Charge to maintain the batteries voltage until you are ready
to use them.
Note:Voltage readings during “Fast Charge” may exceed 1.60v.When the battery
has finished charging, it is normal for the voltage to drop down to between 1.30
and 1.40v.
Typical Charging Times

9
TROUBLESHOOTING GUIDE
SYMPTOMS POSSIBLE CAUSES SOLUTIONS
The unit doesn’t work.
Wrong AC adapter.
Use with supplied adapter
only.
Defective AC-DC
adapter.
Replace it with a new
adapter.
A battery is inserted
and the ANALYZE
button is pressed, but
the charger does not
analyze.
Loose or bad contact.
Reinsert the battery and
secure it firmly. Press the
ANALYZE button again.
Lid closed.
Open the lid and press
the ANALYZE button
again.
The charger does not
leave the “analyze”
mode after 10 seconds
(i.e., the display anima-
tion is still running).
ANALYZE button held.
Release the ANALYZE
button.
Defective unit.
Contact your dealer.
Battery short circuit.
Remove the bad battery
and insert another battery.
Press the ANALYZE but-
ton again.
Defective unit.
Contact your dealer.
The charger does not
start to charge even
though the battery is
inserted and the lid is
closed.
Bad battery connection.
Reinsert the battery,
making sure it is properly
connected.
Lid will not close.
Make sure the lid is
closed and locked in
place by pressing just
above the lid button.
Battery inserted with
wrong polarity.
Correct the polarity
Dirty contacts.
Clean the contacts with a
soft cloth.

10
TROUBLESHOOTING GUIDE
SYMPTOMS POSSIBLE CAUSES SOLUTIONS
The LCD display is
faulty when the power
is first turned on.
Static hangup.
Remove all batteries.
Unplug the jack and wait
5 seconds before
plugging the unit in again.
Battery charging starts
before the lid is closed.
Pressing the
DISCHARGE OVER-
RIDE button does not
stop the discharge
cycle.
Pressing and holding
the DISCHARGE
OVERRIDE button for
3 seconds does not
switch to IDS mode.
Defective unit.
Contact your dealer.
Defective unit.
Contact your dealer.
Some of the recharged
batteries have a low
battery life or no output
at all.
Display shows
More than one battery
being recharged at the
same time. Some are
loose or have bad
contact.
Put those batteries back
into the charger and close
the lid to recharge again.
See Revitalizing NiCad
Batteries on page 8.
Bad battery
Properly dispose of the
faulty battery.
Charger is not in Soft-
Start Charging mode.
Press and hold
DISCHARGE OVERRIDE
button for 3 seconds to
switch to IDS mode only
in Soft-Start mode.
Bad battery
Properly dispose of the
faulty battery.

Storing The QuickCharger
•
Remove all the batteries before disconnecting the adapter from the unit.
•
Check the AC-DC adapter regularly. Replace the adapter if damaged.
•
Always unplug the QuickCharger after use and store the unit in a dry place.
•
Disconnect the charger by pulling the plug rather than the cord to reduce the
risk of damage to the AC-DC adapter.
Specifications
Battery Sizes and Types: Charges one to four AAA, AA, C, or D size
Nickel Cadmium or Nickel Metal Hydride
batteries. DO NOT CHARGE ALKALINE OR
LITHIUM BATTERIES.
Adapter: DC 12V 500mA, center positive with barrel jack.
Use supplied adapter only.
We reserve the right to make technical changes without notice.
11
C. Crane Company Inc.
1001 Main Street
Fortuna, CA 95540
800-522-8863
Copyright © 2001 C. Crane Company Inc. All rights reserved.
ONEYEAR LIMITED WARRANTY
C. Crane Company Inc. warrants this product to be free from defects in material and workmanship under normal use
and conditions for a period of one year from the date of original purchase on parts an labor.
Should service be necessary for any reason due to manufacturing defect or malfunction during the warranty period
C. Crane Company Inc. will repair or replace at its discretion, the defective merchandise at no charge (except for your
packing and shipping cost), upon delivery of this item to C. Crane Company’s service center with a copy of proof of
purchase date.
Should service be required:
1) Remove the batteries (if applicable) and carefully pack the unit along with the AC power cord in original packing
cartons or a suitable well padded corrugated box.
2) Enclose a copy of proof of date of purchase and a note describing your specific problem or call 1-800-522-8863
and we will take care of the paperwork.
3) Ship the unit insured via UPS, Parcel Post or Priority Mail.
NOTE: Please read these instructions thoroughly and use this product only as directed.This warranty does not
cover:
A) Damage by accident, misuse, abuse, negligence, or damage caused by attempting to charge alkaline batteries.
B) Units that have been repaired or altered by persons other than C. Crane Company Inc.
C) Damages caused by leaking batteries.
This warranty is valid only in the United States of America and and does not extend to owners of the products subse-
quent to the original purchase. Any applicable implied warranties, including the warranty of merchantability, are limit-
ed in duration to a period of one year from the date of original purchase at the retail and no warranties, whether
expressed or implied, shall apply to this product thereafter. Under no circumstances shall C. Crane Company Inc. be
liable for any loss or damage, direct or consequential arising out of the us of, or inability to use this product, (Some
states do not allow limitation or implied warranties or exclusion of consequential damage, therefore, these restrictions
may not apply to you).
This warranty gives you specific legal rights and you may also have other rights which may vary from state to state.
Table of contents
Other C. Crane Batteries Charger manuals