manuals.online logo
Brands
  1. Home
  2. •
  3. Brands
  4. •
  5. Scanstrut
  6. •
  7. Batteries Charger
  8. •
  9. Scanstrut ROKK SC-CW-04E User manual

Scanstrut ROKK SC-CW-04E User manual

1
4a
7
Input voltage range : 10-30V DC (12/24V system)
Input current max: 1.5A
Output power: 5W (5V, 1A)
Standby current draw: < 0.03W
Waterproof rating: IPX6 front and back
Certications: Qi, CE, FCC, ROHS,
UNECE R10 E24
5
6
Retain installation jig to use in step 2.
Insert the installation jig.
Ensure there is sufcient clearance in chosen
installation area.
205mm
(8”)
- Feed cable through the hole.
- Apply sealant to x4 screws.
- Screw product in place.
- Remove installation jig.
Connect wires to 12/24V supply,
ensuring a waterproof connection. Fuse
according to input voltage and current.
4b Ensure ROKK Active is vertical.
Use drilling template to drill ø6mm (0.24”)
cable hole and x4 pilot holes
(see tools required table).
Ensure installation area is at.
ROKK ACTIVE TOP
ROKK ACTIVE TOP
ROKK ACTIVE TOP
Tools required.
Pozi screwdriver
6mm (0.24”) drill bit
Drill bit (for pilot hole)
DRILLING TEMPLATE
SCALE 1:1
ø6mm
ø 2
m
m
TOP
(0.07”)
(0.24”)
ø 2
m
m
(0.07”)
ø 2
m
m
(0.07”)
ø 2
m
m
(0.07”)
37mm
(1.5”)
37mm
(1.5”)
31mm
(1.2”)
Material No. 4 Screw
Soft Material
E.g plywood
2mm
(5/64”)
Hard Material
E.g Fiberglass
acrylic, hardwood
2.5mm
(3/32”)
Check Scale 50mm
Parts list.
ROKK Wireless
Active
x1
x4
No. 4 x 3/4” (18mm)
self-tapping screw
x1
Installation jig
Installation instructions.
ROKK Wireless - Active (SC-CW-04E)
18-01-2020 (Issue 8)
Technical information.
READ IMPORTANT SAFETY INFORMATION
LEAFLET BEFORE INSTALLING.
2
3
For latest tech info visit: www.scanstrut.com/rokk-wireless
This product is designed to securely mount phones under normal usage conditions. The end-
user is entirely responsible for conditions in which their device is used. See WARRANTY section
for further details.
Scanstrut recommends installation is carried out by a
incorrect installation.
WARNING:
This product is to be connected to a 12V DC or 24V DC battery power source only.
The power supply must be switched off before installation.
An appropriate fuse or circuit breaker must be used between the battery / power source and
this product. Check for correct polarity of all wiring before switching the power on.
This product may contain high voltages. Do not tamper with the product.
Before drilling any holes, ensure the area behind the mounting location is clear of wires, fuel and
all other hazardous objects.
If the product needs to be mounted outside, it must be mounted in a location safely above the
waterline, where it is not at risk of being submerged.
Smart LED light guide:
Solid red
Product has power and ready to charge.
Solid green
Product charging.
Flashing red
1. Foreign object detection:
metallic object placed on top
that is not Qi compatible.
or
2. Thermal cutout:
internal temperature is too high/ low.
Wait for product to return to operating temperature.
Flashing green/red
Input current is too low.
IN EXTREME USAGE ENVIRONMENTS
PERFORMANCE MAY VARY.
CAUTION:
compatible devices.
The cable must be retained and not interfere with mechanical systems.
This product contains no user serviceable components. Do NOT attempt to repair or alter the product
in any way.
This product will charge through non-metallic phone cases up to ~3mm thick. Phone cases may alter
overall charge performance.
When used in a very high/low ambient temperature/direct or prolonged sunlight the product may
temporarily shut down, this is a safety feature of the electronics.
porous, smooth surface.
When selecting a mounting location, avoid places exposed to heat-radiating appliances and poorly
ventilated areas.
EMC INSTALLATION GUIDELINES:
Scanstrut products conform to Electromagnetic Compatibility (EMC) regulations, to ensure that
electromagnetic interference between equipment is minimised.
Correct installation is required to ensure that electromagnetic
interference is kept to a minimum.
WIRING:
When extending the cable from battery/power source to the product, ensure there is consistently a
minimum of 10V being provided to the product. A wire gauge of 18AWG (0.82mm2) is recommended
for any length of cable extension.
The schematic in step 7 is to illustrate how the product should be connected to a 12V DC or 24V DC
battery/power supply.
ENVIRONMENTAL PROTECTION:
Waste electrical products should not be disposed of with household waste. Please recycle where
facilities exist. Check with your Local Authority or retailer for recycling advice.
IMPORTANT:
Scanstrut Ltd. accepts no responsibility for any injuries or other damages arising from the use of their
products in any circumstances.
WARRANTY:
A 2 year, non-transferrable warranty covers this Scanstrut product only and not any devices that
are mounted in it or on it. No warranty is given for users’ devices and users expose their devices to
hazards, known or unknown, at their own risk.
USER GUIDE:
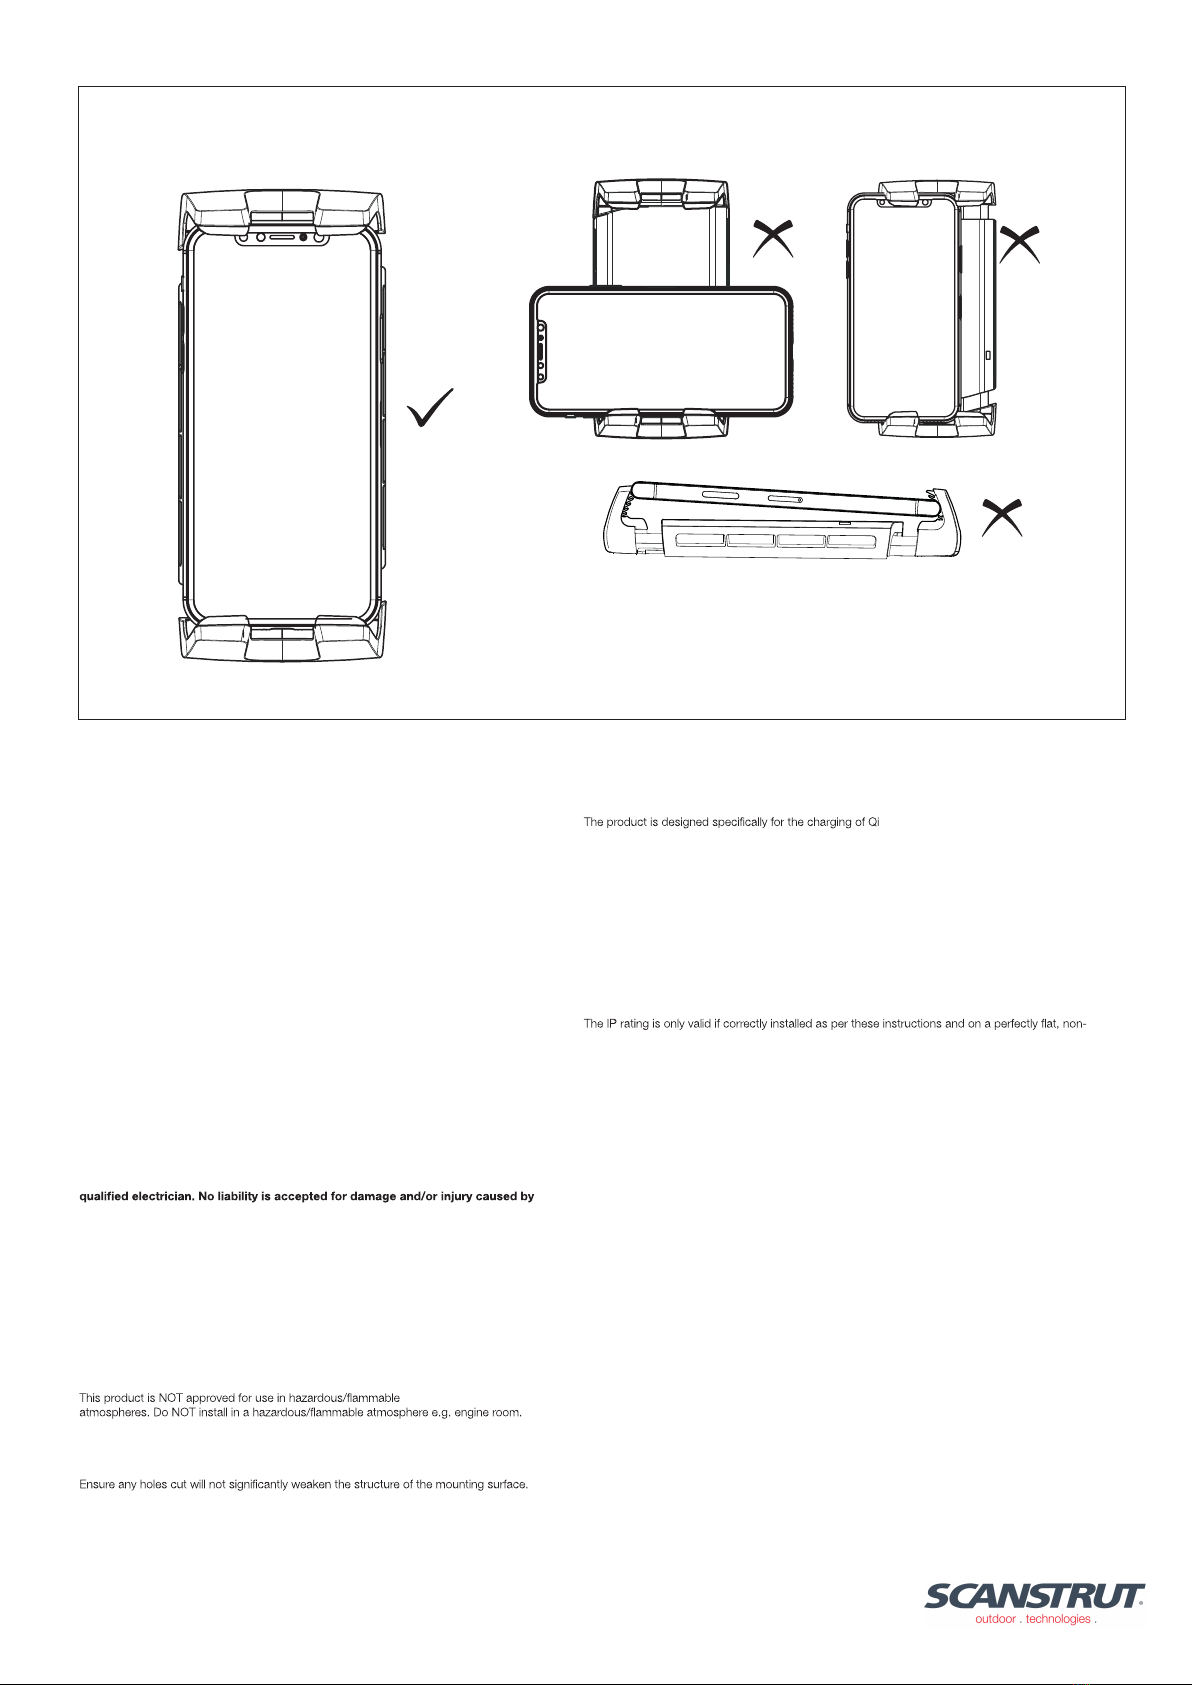
Place device centrally within the ROKK Wireless Edge jaws.
CARE: wash down carefully with fresh water.

Other Scanstrut Batteries Charger manuals

Scanstrut ROKK Bezel User manual

Scanstrut

Scanstrut ROKK Bezel User manual

Scanstrut ROKK SC-CW-01 E User manual

Scanstrut

Scanstrut ROKK SC-CW-01 E User manual

Scanstrut ROKK Wireless Edge User manual

Scanstrut

Scanstrut ROKK Wireless Edge User manual

Scanstrut ROKK User manual

Scanstrut

Scanstrut ROKK User manual

Scanstrut FLIP PRO MAX-DUAL User manual

Scanstrut

Scanstrut FLIP PRO MAX-DUAL User manual

Scanstrut ROKK Charge Pro User manual

Scanstrut

Scanstrut ROKK Charge Pro User manual

Scanstrut SC-CW-09F User manual

Scanstrut

Scanstrut SC-CW-09F User manual

Scanstrut ROKK Wireless Nano User manual

Scanstrut

Scanstrut ROKK Wireless Nano User manual

Scanstrut ROKK Wireless - Active User manual

Scanstrut

Scanstrut ROKK Wireless - Active User manual

Scanstrut ROKK Wireless Edge 10W User manual

Scanstrut

Scanstrut ROKK Wireless Edge 10W User manual

Popular Batteries Charger manuals by other brands

Bosch 0 275 007 907 Original instructions

Bosch

Bosch 0 275 007 907 Original instructions

Fiamm Premium HF flex Technical manual

Fiamm

Fiamm Premium HF flex Technical manual

ArSilicii DCC-530 manual

ArSilicii

ArSilicii DCC-530 manual

ABB HT842280 Operation manual

ABB

ABB HT842280 Operation manual

Tronic T4X SE Operation manual

Tronic

Tronic T4X SE Operation manual

DazeTechnology Dynamic Power Manager installation manual

DazeTechnology

DazeTechnology Dynamic Power Manager installation manual

Humanscale M/Power MP-AXY user guide

Humanscale

Humanscale M/Power MP-AXY user guide

VOLTCRAFT UC-1XCX001 operating instructions

VOLTCRAFT

VOLTCRAFT UC-1XCX001 operating instructions

Jamara Lipo 20 Instruction

Jamara

Jamara Lipo 20 Instruction

Tekkeon myPower MP1280 user guide

Tekkeon

Tekkeon myPower MP1280 user guide

Schumacher FARM & RANCH FR01335 owner's manual

Schumacher

Schumacher FARM & RANCH FR01335 owner's manual

ABB Terra DC wallbox User's operation manual

ABB

ABB Terra DC wallbox User's operation manual

Autel MaxiCharger Installation and operation manual

Autel

Autel MaxiCharger Installation and operation manual

BATTERY LINK MCU080 manual

BATTERY LINK

BATTERY LINK MCU080 manual

CAMBRIONIX MC14-2.4A user manual

CAMBRIONIX

CAMBRIONIX MC14-2.4A user manual

EPS EPS 600 Series operating instructions

EPS

EPS EPS 600 Series operating instructions

HIMO DPLC084V42 user manual

HIMO

HIMO DPLC084V42 user manual

Hama 00052190 operating instructions

Hama

Hama 00052190 operating instructions

manuals.online logo
manuals.online logoBrands
  • About & Mission
  • Contact us
  • Privacy Policy
  • Terms and Conditions

Copyright 2025 Manuals.Online. All Rights Reserved.