C INVERTER BP300-UL User manual
Model: BP300-UL
PORTABLE POWER STATION
User Manual
AC DC USB

-1-
ABOUT THE PRODUCT
SAFETY INSTRUCTIONS (IMPORTANT)
Remove all outer packing and uncoil cables before using the machine.
This product is not suitable for children.
If other people use the machine, make sure they are fully aware of how to use it
safely and have read and understood the instructions.
Do not use near flammable gases or flammable liquids.
Do not expose machine to temperatures exceeding 40℃(104℉).
Do not operate the unit with a damaged power cord or plug.(Please replace the
power cord or plug immediately)
Do not charge the unit with a damaged extension cord.
Do not operate the unit if it is severely hit, dropped or otherwise damaged in
any way; give it to a qualified service person.
Do not disassemble the machine. If it needs repair, please contact customer
service for help.
To reduce the risk of electric shock, unplug the unit from the outlet and turn off
controls before performing any maintenance or cleaning.
The machine will get hot during use, and must be properly ventilated. Please
make sure there is at least 7.5 cm(3 in.) of air space around.
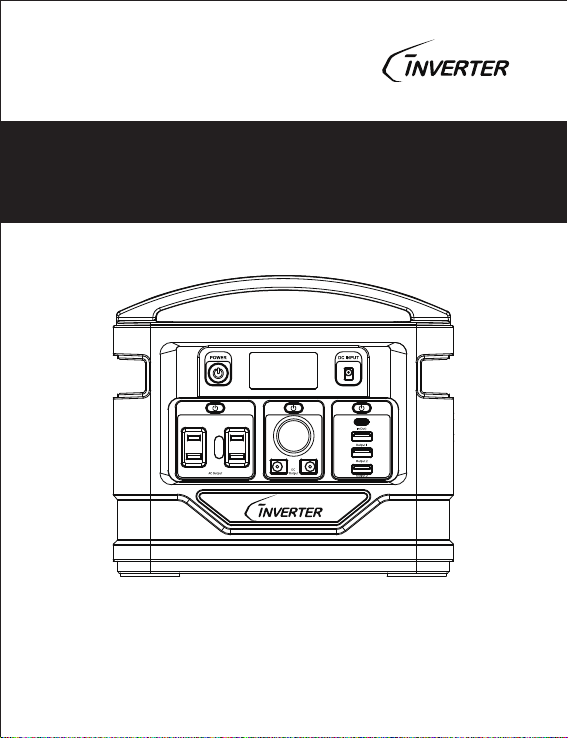
Thank you for using the multi-functional portable Power Station developed and
produced by C INVERTER. This product has the function of a AC output and
multi-interface DC output, which can meet the power supply requirements of
mobile phones, projectors, juicers, small fridges, subwoofers, laptops, video
cameras, CD players, various chargers, game consoles, fans, mini-drones, lights,
and other equipments. It also has a built-in LED light. Suitable for home emergen-
cy standby power, outdoor travel, emergency rescue, field work and other
applications.

-2-
SPECIFICATION
Model
Capacity
Size(LWH)
Weight
Internal battery type
DC Input
Input/Output
BP300-UL
296Wh
230 x 140 x 203mm
3.4kg/7.5lb
lithium polymer battery
18V/3A (Note: PV/solar panels/car charger input 11V~30V)
5V/3A, 9V/3A, 12V/3A, 15V/3A, 20V/2.25A
6.5Hrs with 18V/3A adapter; 6.5Hrs with PV/solar panels 60W
9.5Hrs with car charger; 7.5Hrs with PD 45W adapter
3.5Hrs with DC input and Type-C PD adapter simultaneously
5V/3A, 9V/2A, 12V/1.5A
5V/3.1A total (single port 2.4A Max)
110V/60Hz/300W (pure sine wave)
LCD display
0~50℃(32~122ºF)
-20~60℃(-4~140ºF)
Short-circuit protection, over-current protection,
Over-voltage protection, under-voltage protection,
Over-load protection, temperature protection.
Protection functions
Charging time
DC Output
USB QC 3.0 Output 1
USB dual Output 2/3
AC dual Output
Battery indicator
Charging temperature
Discharge temperature
12V-16.8V/12A (single port 10A Max)
Do not place the machine on flammable objects such as carpets, upholstery,
paper, cardboard, etc. When the machine is in operation, please stay away from
items easily affected by high temperature, such as blankets, pillows, sleeping
bags, etc.

3. DC input 3.5mm
4. AC switch
7. Cigarette lighter output
8. DC output 5.5mm
11. QC 3.0 output 1
12. USB dual output 2/3
Be careful!! This AC power socket and voltage on product are different according to
different countries or regions, please refer to the actual product.
-3-
PRODUCT OVERVIEW
1
4
5
12
11
13
14
9
3
2
10
6 8 7
DISPLAY SCREEN SYMBOL DESCRIPTION
1
2
3
10
11
4 65 7 8 9
1. Charging indicator
2. Electric quantity indicator
3. USB output
4. Type-C output
5. QC3.0 output
6. 12V DC output
7. Cigarette lighter output
8. LED light
9. AC output
10. Output indicator
11. Warning
1. Master switch
2. LCD display
5. AC output
6. DC switch
9. USB switch
10. Type-C PD ~In(Out)
13. LED switch
14. LED light
For any functions to work, please make sure the ‘Master Switch’ is turn on.
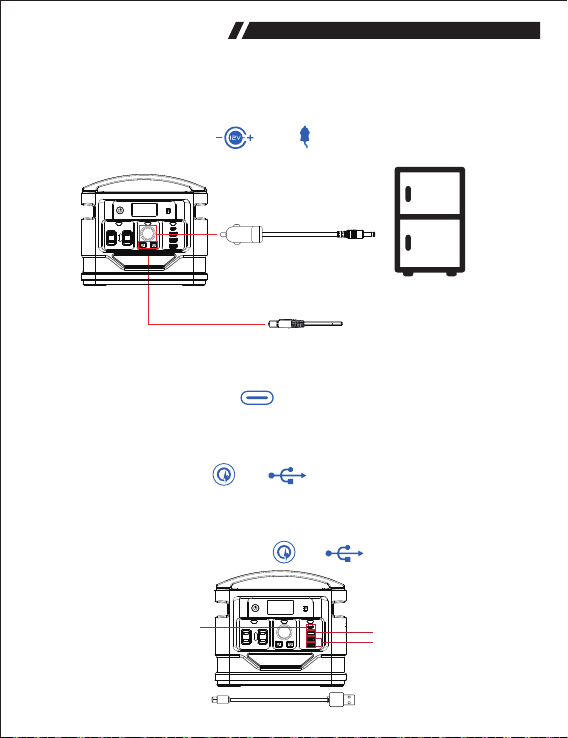
1) How to supply power from DC 5.5mm output and cigarette output?
Connect your product to this DC 5.5mm port or cigarette port. Press ‘DC’ switch to
turn on, LCD screen will show ‘ ’ and ‘ ’ . Press ‘DC’ switch again and it will
shut down.
-4-
GUIDE TO OPERATE
2) How to use USB ports?
A: when you need to connect Type-C PD connection, locate the proper port on
panel, the LCD screen will show ‘ ’ . When cable is disconnected, the power
will shut down automatically.
B: when you connect a ‘USB QC 3.0’ connection, locate the proper port on panel.
Press ‘USB’switch, the LCD ‘ ’ + ‘ ’ are on. Press ‘USB’ switch again to
shut down.
C: when you connect regular USB connections, locate the proper port on the right
of panel. Press ‘USB’ switch, the LCD ‘ ’ + ‘ ’ are on. Press ‘USB’ switch
again, it will turn off.
A. Type-C PD In(Out)
C. USB (5V/3.1A Max)
5.5mm DC 12V~16.8V products
Cigarette 12V~16.8V products
B. USB QC 3.0
-
condition.
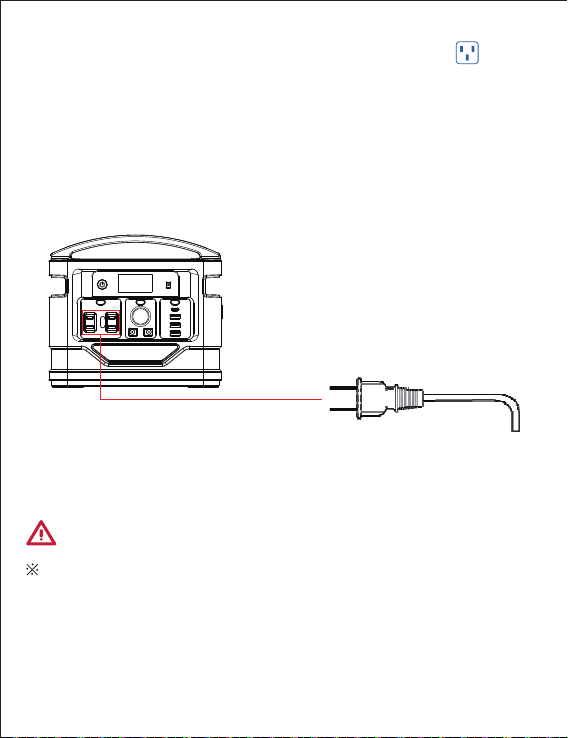
3) How to use AC ports?
Press the ‘AC’ switch to turn on, and connect AC devices, the icon ‘ ’ will light
up on LCD screen. Press ‘AC’ switch again to turn off.
Pay attention to AC power for the appliances. Make sure the total power consump
tion for all appliances is less than 300W.
Warning: The interface specifications and voltage standards in different countries
are different. Before use, please carefully check whether the product specifications
are consistent with the usage specifications of electrical appliances, otherwise it
may lead to dangerous conditions.
If AC device has short circuit or more power required than the rated output on
power station, will trigger the device to protect itself on short circuit or over load
When the product is not in used, please press corresponding key or long press
the ‘POWER’ key for 2s to conserve power.
AC load shall not exceed 300W rated power, otherwise it will self-protect.
-5-
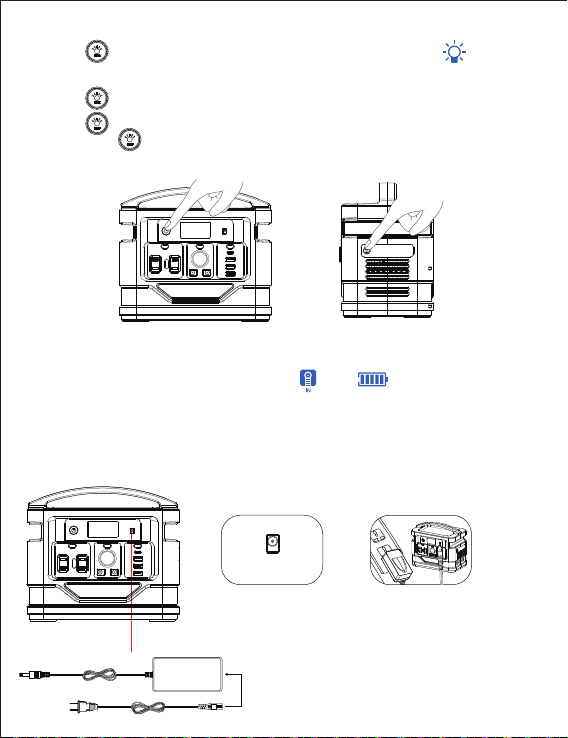
1. Press ‘ ’
2. Press ‘ ’
3. Press ‘ ’
4. Long press
-6-
5) How to charge this product?
A. When using the 18V/3A adapter, plug 3.5mm port to the product, then
insert AC adapter to wall outlet.
4) How to use flashlight?
button again to SOS mode;
button once more time to rapid flash;
‘ ’ button for 2 seconds to turn off the LED light.
‘ ’
When the product is normally charging, the ‘ ’ and ‘ ’ will flash on LCD screen.
After fully charged offen 10 seconds, it will turn off automatically.
The other end is connected to the
AC power source for charging
through the power adapter.
Step1: Step2:
DC Input
Connect the output line of
the charger to the DC input
port of the front panel of
the unit.
button for 2 seconds to turn on the LED light, the icon
will light up on LCD screen;


C. How to charge this product with solar panels?
1. Place the solar panel in a direct sunlight. Do not expose the power station to
direct sunlight or wet condition.
2. Connect your 3.5mm output of solar panel with the DC input port of the product.
-7-
The other end is connected to the
AC power source for charging
through the power adapter.
Step1: Step2:
B. How to charge with Type-C PD?
Insert the ‘Type-C’ connection to the proper port, plug the AC adapter to wall outlet.
In(Out)
Plug the charging cable
into the In(Out) port.
D. How to charge with DC input and Type-C PD-In?

-8-
E. How to use a car charger to charge this product?
Plug the car charger cable into the 3.5mm DC input. Plug one end into the 12V
cigarette lighter socket of the vehicle.
PRODUCT ACCESSORIES
When there is a failure, corresponding icon and ‘ ’ will flash on LCD screen.
Support charging with DC and Type-C input simultaneously.
AC Adapter User Manual
USB Cable Car charging cable Solar charging cable
BP300-UL Portable
power station

-9-
EXCEPTION - LCD WARNING SYMBOL
Charging fault(high and
low temperature protection)
Unplug the charger, after the
battery temperature returns to
normal, reconnect the charger
for charging.
Discharge high temperature
protection
DC output fault (over-current
or short circuit protection)
USB output fault (over-current
or short circuit protection)
AC output fault (high tem-
perature, overload or short
circuit protection)
Symbol flashing SolutionCauseAlarm way
TROUBLESHOOTING
After the battery temperature
returns to normal, press the main
power button to restore.
Press the DC button to restore
after the load is removed.
Press the USB button to restore
after the load is removed.
Press the AC button to restore
after the load is removed.
Probable cause
Charge the unit.
Remove the load and recharge the unit.
Contact customer service.
Use the charger that comes with the machine.
Contact customer service for replacement.
Power fault
Charger fault
Use of photovoltaic
solar panels
charging fault
Problem Solution
Under voltage protection
Load anomaly protection
Machine damage
Charger mismatches
Charger damaged
Abnormal power supply or connection
Over-current
Weak sunlight
Solar panel damage
Wire harness connection is abnormal
Reconnect the charger; If the problem
persists, replace the charger.
Use only solar panels of recommended
specifications.
Place the solar panels in a sunny place.
(Do not expose the machine to the hot sun)
Reconnect wiring harness; If the problem
persists, replace the solar panels.
Replacement of solar panels.
Keeps flashing once
per second.
Flashing once per
second, goes to
sleep mode after
10 seconds.
Flashing once per
second, and will stop
after 10 seconds.
-10-
Probable cause
Charge the unit.
Make sure loads are within allowed range.
Turn unit off, allow to cool down and then restart.
Contact customer service.
Remove the load.
Contact customer service.
Contact customer service.
Problem Solution
Battery under-voltage protection
Discharge overcurrent protection
Overheating protection
Machine damage
Abnormal load
Hardware failure
LCD screen damage
Symbol display
exception or LCD
screen malfunction
AC output fault
OPERATION METHOD
It is recommended to charge the unit immediately after purchase when the
battery power is less than 20% to maintain the best performance and extend
the service life.
Press the main power button, the device is initialized, and all ICONS on the
LCD screen are activated. After the self-test, the function is normal and the
screen will be displayed normally. If there is no operation within 30 seconds,
the device will enter the standby sleep mode.
Each small bar on the electric quantity indicator symbol on the LCD screen
represents a 20% battery level.
SupportUSB, DC, LED light and charging working simultaneously, but does not
support AC output and charging working simultaneously. When AC is working,
charging the device will automatically turn off the AC output.
Never completely discharge the internal battery.
1.
2.
3.
4.
5.
Notes before Use

This device is not intended for use by unsupervised children.
Do not use as a toy.
Do not let the equipment get wet.
Do not immerse the device in water.
Do not expose the device to high temperatures.
If battery leakage occurs, and if skin or eye accidentally get in contact, rinse immediately with
water and seek medical advice.
!
!
If the product is stored for more than 3 months, please recharge the product for maximum
performance.
Using a charger produced by non-OEM manufacturing, may cause damage to this power
station.
This product is not allowed to be near a heated source.
Please use approved accessories from factory.
Do not use this product beyond the rated load.
Use this product in a well-ventilated environment.
Do not store or use it in a place exposed to direct sunlight or near heating appliances.
Do not attempt to open the device to avoid the danger of electric shock and fire.
USAGE AND HANDLING GUIDELINES
(1)
(2)
(3)
(4)
(5)
(6)
(7)
(8)
WARNINGS
DISCLAIMER
The company does not assume any responsibility for problems caused by improper operation.
The company does not assume any responsibility for the damage caused by self-disassembly
and instinstallation.
If the use of a non OEM chargers causes problems, the company will not bear any responsi-
bility.
The company does not assume any responsibility for products that exceed the warranty period.
(1)
(2)
(3)
(4)
-11-

-12-
Our company warrants that each device 1) is free from defects in materials and
workmanship and 2) conforms to our company’s official Published Specificationsv
which are available on request. The warranty period for the device starts on original
date of purchased; one (1) year parts and labor for the entire unit. The date on your
invoice or sales receipt is the date of purchased unless our company or your
reseller informs your otherwise. Unless our company specifies otherwise, these
warranties apply only in the country or region in which you purchased the
device.
THESE WARRANTIES ARE YOUR EXCLUSIVE WARRANTIES AND REPLACE
ALL OTHER WARRANTIES OR CONDITIONS. EXPRESS OR IMPLIED,
INCLUDING BUT NOT LIMITED TO. THE IMPLIED WARRANTIES OR CONDI-
TIONS OF MERCHANTABILITY AND FITNESS FOR A PARTICULAR
PURPOSE, SOME STATES OR JURISDICTIONS DO NOT ALLOW THE EXCLU-
SION OF EXPRESS OR IMPLIED WARRANTIES, SO THE ABOVE EXCLUSION
MAY APPLY TO YOU. IN THE EVENT, SUCH WARRANTIES ARE LIMITED IN
THE DURATION TO THE WARRANTY PERIOD. NO WARRANTIES APPLY
AFTER THAT PERIOD. SOME STATES OR JURISDICTIONS DO NOT ALLOW
LIMITATIONS ON HOW LONG AN IMPLIED WARRANTY LASTS, SO THE
ABOVE LIMITATION MAY NOT APPLY TO YOU.
STATEMENT OF LIMITED WARRANTY
This warranty does not cover the following:
Failure resulting from misuse, accident, modification, unsuitable physical or
operating environment, or improper maintenance by you.
Failure caused by a product for which our company is not responsible; and any
non our company approved products.
The warranty is voided by removal or alternation of identifications labels on the
device or its parts.
For warranty claims or repair. please contact your local reseller or authorized
distributor for further information.
Any manufacture detects that are under normal operation circumstance.
Table of contents
Popular Power Supply manuals by other brands


Ametek
Ametek Sorensen XTR Series Quick Reference Quide

EGS
EGS Appleton JBR Series Instruction for installation and maintenance

Unicont SPb
Unicont SPb PS-103-20A Technical documentation

Honeywell
Honeywell HPR2416CBUL quick start guide

Elektro-Automatik
Elektro-Automatik PSI 9000 DT Series operating manual

hakel
hakel V Series quick start guide


