Caarrier ComfortChoice Edge User manual

ComfortChoice Edge®
Owner’s Manual

2
This document is the property of Carrier Corporation and is delivered on
the express condition that it is not to be disclosed, reproduced in whole or
in part, or used for manufacture by anyone other than Carrier Corporation
without its written consent, and that no right is granted to disclose or so
use any information contained in said document.
Carrier reserves the right to change or modify the information or product
described without prior notice and without incurring any liability.
© 2008, Carrier Corporation

1
You have the Edge®thermostat. This unique device's state-of-the-art
technology makes it easier than ever for you to keep your home comfortable.
Designed to be as smart - and smart-looking - as any of the other electronics in
your home, your new Edge thermostat offers programming options to fit your
lifestyle - not anybody else's. The Edge thermostat can be set for 7-day, 5/2-
day, or 1-day programmable operation. Different heating and cooling set points
and times are programmable for 4 periods per day. The thermostat has no need
for batteries to store user-configured settings in memory. During power loss its
internal memory saves settings for unlimited time, and the clock continues to
run for at least 24 hours. Let this manual show you how easy it is to enjoy the
newest experience in home comfort.
You will love this thermostat.

22
Thermostat display ................................................................................ 4
Thermostat buttons ............................................................................... 6
Setting the time and date ....................................................................... 8
Setting or changing heating/cooling temperature setpoints ................... 10
Holding the temperature ....................................................................... 12
Programming the Thermostat ............................................................... 13
To Set up a different schedule when all days of the week will follow
the same schedule ...................................................................... 14
To Set up a schedule when all days of the week will not follow
the same schedule ...................................................................... 16
Programming a vacation schedule ................................................ 19
Overriding a Utility Curtailment ............................................................. 21
Turning heating/cooling system off/ Using fan ..................................... 22
Using the thermostat to turn the heating and cooling system off ... 22
Using the fan ............................................................................... 22
Using Emergency Heat ........................................................................ 23
Advanced Programming ...................................................................... 24
Advanced programming display codes ........................................ 25
Reset reminders .......................................................................... 26
Contents

3
Adjusting backlighting .................................................................. 27
Keypad lockout ............................................................................ 28
Real-time pricing .......................................................................... 30
Time-of-use/peak pricing ............................................................. 33
Special Features
Hybrid heat (heat pump systems only) ......................................... 36
Service reminders ....................................................................... 36
Auto changeover......................................................................... 36
Smart Recovery........................................................................... 37
Troubleshooting .................................................................................. 37
What If . . .
"Auxiliary heat on" is displayed (heat pump systems only) ....... 37
"Em heat" is displayed (heat pump systems only) ..................... 37
There is a power outage.......................................................... 38
A service reminder message is displayed ................................ 38
Thermostat Error Codes ....................................................... 39
Contents

44
The thermostat display is shown in Figure 1. The following information can be
displayed on the screen:
• Day of the week
• Programming option - indicates which settings are being adjusted (clock,
calendar, daily schedule, vacation settings
• Filter reminder
• Current temperature
• Current program routine - follow scheduled programming, hold current
settings, or run vacation program
• Fan mode - on or auto
• Current system mode - heating, cooling, emergency heat, heat/cool (auto),
off
• FC - Fahrenheit display
• Advanced programming indicators
• Keypad is locked (no padlock means unlocked)
• System is in auxiliary (supplemental) mode
• Cooling set point; cooling on
• Heating set point; heating on (the 2 indicates second stage of heating or
cooling is active)
• Heating setpoint
• Year
• Vacation schedule return date
• Day
Thermostat display

5
• Length of time for temporary temperature hold
• Time left in utility curtailment/real-time pricing (temperature adjustment) events
• Month
• Time period start
• Period of the day
Thermostat display
Figure 1
Thermostat Display

66
holidayholidayoccunoccocc3occ2a
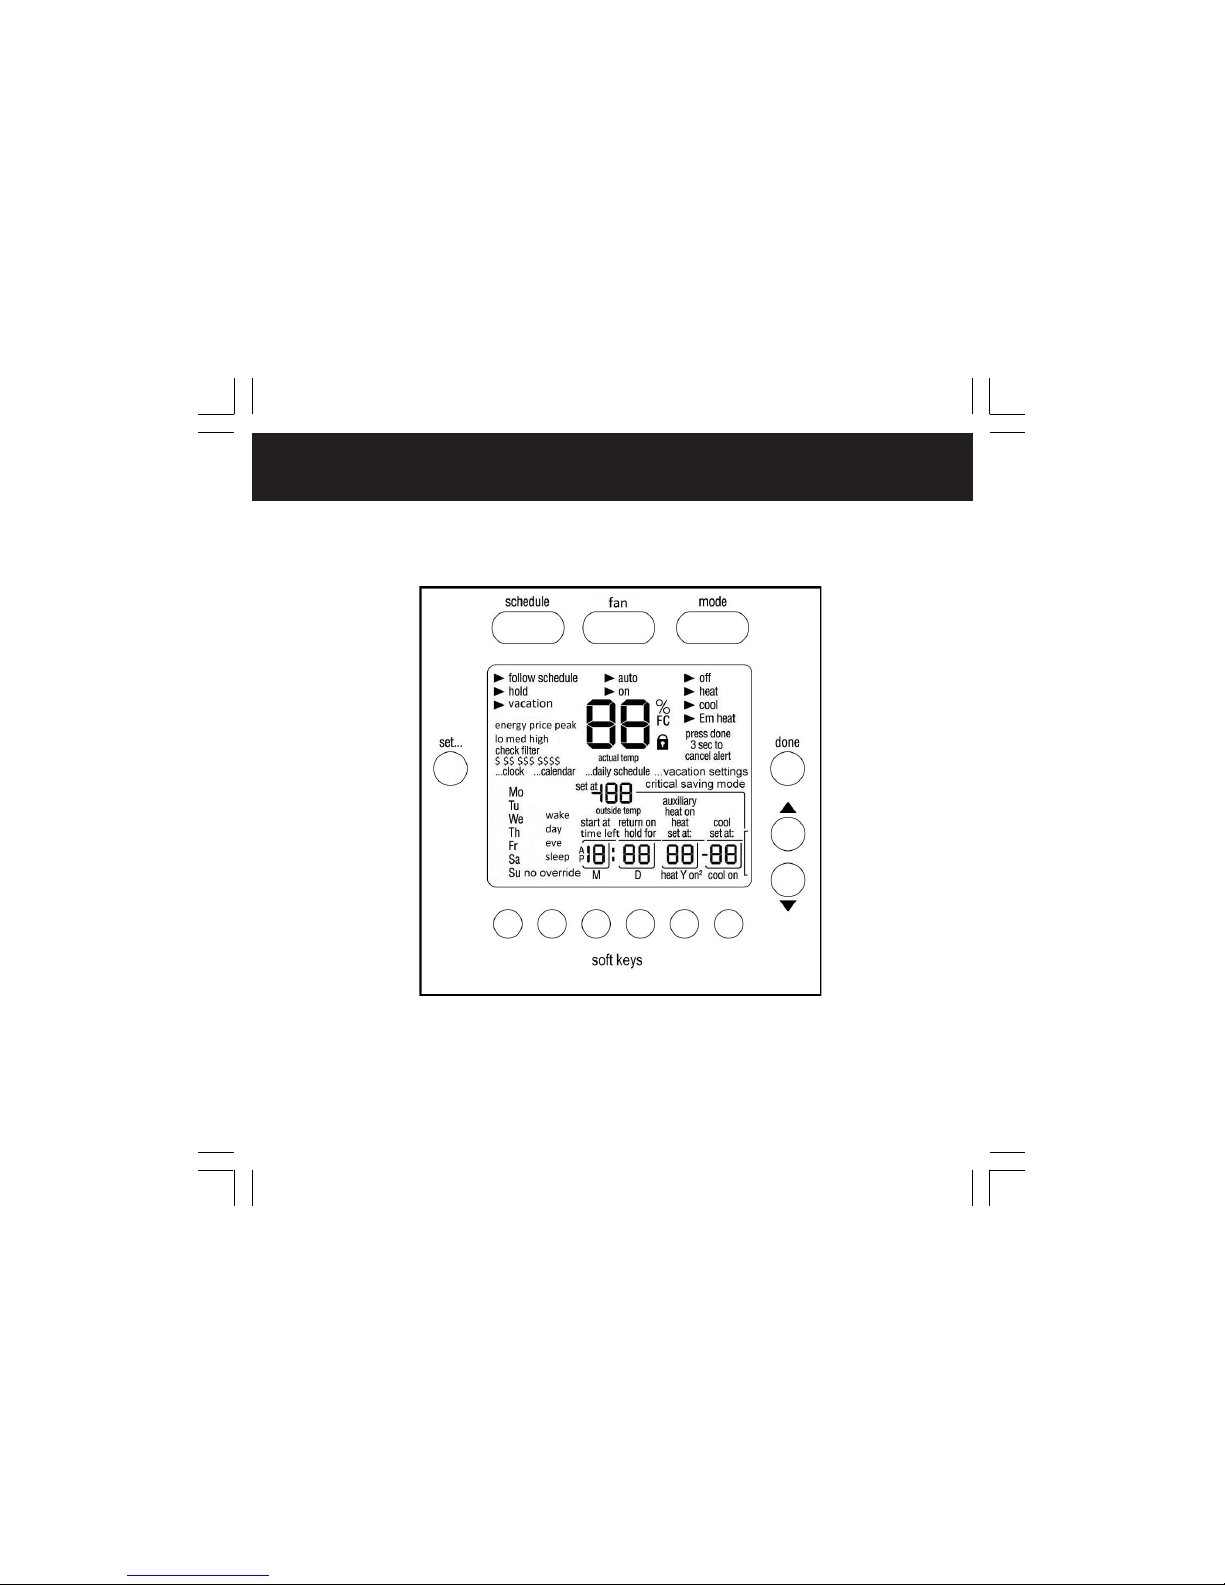
Thermostat buttons
The thermostat has buttons that are accessible on the front panel when you
open the front cover. These buttons are used for various functions such as
raising or lower the desired setpoint and changing the current mode. See
Figure 2. Button functionality is summarized below.
SET BUTTON — Enters the thermostat programming schedule and allows you to
adjust the clock and vacation settings.
SCHEDULE BUTTON —Allows you to choose to follow a schedule, hold the
current set points, or go into vacation mode.
FAN BUTTON — Selects whether the fan operates continuously (on) or only
when needed for heating or cooling (auto)
MODE BUTTON — Selects whether the thermostat is set for heating, cooling,
emergency heat, auto (heat and cool as needed), or off modes.
DONE BUTTON — Saves the settings when completing a setup or programming
step.
UP BUTTON — Increments the currently chosen value (temperature, clock,
calendar, etc.).
DOWN BUTTON — Decrements the currently chosen value (temperature, clock,
calendar, etc.).
“SOFT” BUTTON — There are 6 soft buttons. The soft buttons are used to
select the onscreen indicator directly above the specific button. These
indicators can change based on user actions.

7
Thermostat buttons
Figure 2
Thermostat Buttons

88
This thermostat communicates wirelessly with a communication network. It
automatically obtains the current time and date from the communication
network.
In the event of loss of network communication, you can manually set the
time and date by following the instructions below. If you notice that the time is
not adjusted for daylight saving time you can adjust the hour at any time by
following Steps 1,2, and 3 below.
1. Open the door.
2. Press the set button on the left. The screen will show the word clock on
the left of the display and the time will be shown on the bottom.
3. To set the hour, press the soft button below the hour, and then press
the up or down button to adjust the value.
4. To set the minutes, press the soft button below the minutes, and then
press the up or down button to adjust the value.
5. To set the date, press the set button until the screen displays the word
calendar and the date is shown on the bottom of the screen.
Setting time and date

9
6. To set the month, press the soft button below the letter M (month), then
press the up or down button to adjust the value. Stop at the desired month.
7. To set the day of the month, press the soft button below the letter D
(day), then press the up or down button to adjust the value. Stop at the
desired date.
8. To set the year, press the soft button below the letter Y (year), then
press the up or down button on the right. Stop at the desired year.
9. Close the door.
Setting time and date

1010
Setting or changing heating/cooling setpoints
Your thermostat is installed with pre-set heating and cooling temperature
setpoints. You can use these or change them so your home is as warm or as
cool as you would like it to be. You can also temporarily change the tempera-
ture after you've programmed your thermostat according to your specific
schedule needs.
Follow the steps below to temporarily hold the temperature where you set it for
two hours until the next programmed cycle begins.
1. Open the thermostat door. You will see an arrow next to the word off, heat
or cool in the upper right corner on the screen, depending on the mode your
system is in. (If it's the first time you've used the thermostat, it will say
heat.) The pre-programmed heating or cooling temperature is displayed in a
box at the bottom of the screen.
2. To change the displayed temperature, press the up or down button located
on the right side of the display until you reach the desired setting.
3. To change the other temperature setpoint, press the mode button above
the screen. The arrow will move to the word cool or heat and the screen
will show that temperature in a box in the lower right corner

11
4. Press the up or down button, located to the right of the display, to change
the displayed setpoint. Stop on the desired setting.
5. When there are arrow indicators next to both the wordsheat and cool at
the top right of the screen, the heating and cooling temperatures are also
displayed at the bottom of the screen. You can change either one by
pressing the soft button below the setpoint temperature you want to
change, then pressing the up or down button to adjust the temperature.
Repeat the process for the other setpoint if necessary. Press the done
button when you are finished.
6. The thermostat will hold these changes for two hours or until the next
programmed cycle begins. The words hold for 2:00 will be displayed while
this temporary hold is in effect. To change the amount of time the tempera-
ture is on hold, press the soft button under the hold hours or
minutes. Then press the up or down button to adjust the hold time.
7. Close the thermostat door when done.
Setting or changing heating/cooling setpoints

1212
Follow the steps below to change your programmed temperature settings and
hold the temperature at a specific setting without the temperature changing
during the next programmed period.
1. Open the thermostat door.
2. Press the schedule button located at the top of the display. The arrow will
move to the word hold under the button.
3. The screen will display the setpoint temperature in the lower right. To
change the setpoint temperature, press the up or down button. The
temperature will stay at the new setting until you release the hold.
4. To change the heating setpoint temperature when the cooling temperature
is displayed - and vice versa - press the mode button located at the top
of the screen until the arrow moves to the desired mode - heat or cool.
Then press the up or down button to change the setpoint temperature.
5. To return the temperature to the pre-set level for that time period, press the
schedule button until the arrow moves to follow schedule.
6. Close the door.
Holding the temperature

13
Programming the thermostat
Unlike many thermostats, this one gives you the option of programming
every day of the week differently. It is pre-programmed at the factory with the
same settings for all seven days. See the table below.
Table 1
Schedule Factory Settings
YADNOM
URHT
YADNUS
EMIT GNITAEH
TNIOPTES
GNILOOC
TNIOPTES
ekaWMA68667
yaDMA80658
gninevEMP58667
peelSMP010628

1414
To setup a different schedule where all seven days of the week are
the same:
1. Open the thermostat door.
2. Press and release the set button repeatedly until the screen displays the
words daily schedule in the center of the screen. The list of the days of the
week will be displayed on the left.All seven days of the week will be
displayed, indicating that you can program all seven days the same way
now.
3. Look at the column to the right of the days of the week. This column
displays the time period (day, eve, sleep, or wake). To set the wake time,
press the button under the time period until wake is displayed. To set
the wake time, press the button under the hour or minute and then
press the up or down button to set the desired wake time.
4. Next, set the heating temperature setpoint for that time period by pressing
the soft button under the heat set at: temperature on the right and
then pressing the up or down button to set the desired heating setpoint
temperature. (continued)
Programming the thermostat

15
5. Set the cooling temperature setpoint for that time period by pressing the
soft button under the cool set at: temperature on the right and then
pressing the up or down button until you reach the desired cooling
setpoint temperature.
6. Repeat this process for each of the three remaining time periods - day,
evening and sleep - for all days of the week by first pressing the soft
button under the time period to select it with the arrow. Then use the
soft keys to change the start time, heating setpoint, and the cooling setpoint
temperature.
7. Press the done button when complete.
8. Close the thermostat door.
Programming the thermostat

1616
To setup a schedule where all days of the week will not follow the
same schedule.
Fill in Table 2, which follows this procedure, with the desired times and
setpoints for each day. Use this table as a guide during programming and for
future reference. (continued)
1. Open the thermostat door.
2. Press and release the set button repeatedly until the screen displays daily
schedule in the center of the screen. The list of the days of the week will
be displayed on the left.
3. Press the soft button under the days of the week until the day or days
you want to program are displayed.
4. Look at the column to the right of the days of the week. This column
displays the time period (day, eve, sleep, or wake). To set the wake time,
press the soft button under the time period until wake is displayed,
press the soft button under the hour orminute, and then press the up
or down button to change the time. (continued)
Programming the thermostat

17
5. Set the heating setpoint temperature for that time period by pressing the
soft button under the heat set at: temperature. Then press the up or
down button until the desired heat setpoint temperature is displayed.
6. Set the cooling setpoint temperature for that time period by pressing the
soft button under the cool set at: temperature. Then press the up or
down button until the desired cooling setpoint temperature is displayed.
7. Repeat this process for each of the three remaining time periods - day,
evening and sleep - by first pressing the soft button under the time period
to select it. Then use the soft buttons to change the start time, the heating
setpoint, and the cooling setpoint.
8. To set the schedule for another day, press the soft button under the days
of the week until the day or days you want to program are displayed.
9. Repeat steps 4 through 7 to program each day.
10. Press the done button when complete.
11. Close the thermostat door.
Programming the thermostat

1818
Evening
StartTime/Heat/Cool
EveningEvening
StartTime/Heat/Cool
StartTime/Heat/Cool
Table 2
Daily Schedule Planner
Note: The cooling temperature setpoint must be higher than the heating
temperature setpoint. (The temperature difference can be changed by
the installer using the Advanced setup configuration.)
Programming the thermostat
foyaD
keeW
ekaW
looC/taeH/emiT
yaD
tratS
looC/taeH/emiT
gninevE
tratS
looC/taeH/emiT
tratSpeelS
looC/taeH/emiT
no
M
seuT
deW
sruhT
irF
taS
nuS
Table of contents
Popular Thermostat manuals by other brands

First
First DTC 100/2 TDG Installation and maintenance instructions

Hunter
Hunter 40120 Manuel d’installation et d’utilisation

Carrier
Carrier 53DFST2-NP installation instructions

Mohlenhoff
Mohlenhoff R 40203 instructions

Honeywell
Honeywell LR-HWLV-HVAC installation guide

Aprilaire
Aprilaire 8537 Specifications