Cablematic 720P User manual

Megapixel IP Camera User manual V2.0.0
Megapixel IP Camera
User manual
2013.9.16
V2.0.0

Megapixel IP Camera User manual V2.0.0
Introduction
Productions are embedded s stem software and 38 special high definition IP camera
modules, own compression, video data processing functions, are formed b video
compression encoder, input and output channel, network interface, video interface,
RS422 serial interface, protocol interface and software interface and so on, also offer
video processing function, finish image data collection, H.264 image data
compression, internet transmission data, transmit real time image through wired
network.
Production adopts arithmetic speed more fast digital processing unit, compress size to
get more clear image, use advanced operating s stem, video compression algorithms,
let image transmission more smoothl and show more clearl , uses embedded server,
break awa from PC platform completel , s stem scheduling efficienc , code solidif
in Flash, s stem running is stable and reliable. It supports remote image visit through
Internet Explorer, support d namic IP address, achieve image network transmission
easil .
Features:
Support two channels video; two channels independentl , 60 FPS activit video p
er second.
H.264 video compression standard.
Embedded Web Server, support Internet Explore monitoring, configuration and u
pdate.
Video frame can adjust owing to bandwidth.
Support variable bit rate, can restrict video image qualit and compression bit stre
am at the same time.
Support two level domain names; achieve d namic IP address (ADSL dial).
Video code rate can adjust continuousl (50Kbps-8Mbps) and frame (1-25).
Support snapshot, local recording.
D namic detection support (set area and sensitivit ).
Alarm pre-record function.
10/100M Ethernet interface support.
Support IO interface to connect other equipments.
RS485 interface, network transparent channel connection, client can control
RS485 through device’s transparent channel.
Support multi users visit at the same time.
Alarm signal input and output.
Support time-based maintenance function.
Support store after network breaking and snapshot function.
Support WEB configuration.

Megapixel IP Camera User manual V2.0.0
Support OSD.
Support client remote monitor software.
Support Platform.
Support mobile monitor.
Support cross service.
Our suggestions to customer PC basic configuration as follow:
CPU four core 3.0GHz, 4G memor , 512 M independent video memor , 2.1 audio,
audio output, Mic input, Windows2000/XP/2003/7, Microsoft IE 6.0~9.0.
The user manual is edited based on present issued software, there ma be some
inaccurate and incomplete places on user manual technolog problem owing to
software update, modif and upgrade, please understand our work. Our user manual
will update periodicall without notice.

Megapixel IP Camera User manual V2.0.0
CONTENT
INTRODUCTION....................................................................................................................................
CONTENT................................................................................................................................................3
DEVICE AND INSTALLATION.........................................................................................................
1.1 SPECIFICATIONS.......................................................................................................................1
1.2 APPEARANCE AND DIMENSION............................................................................................2
1.3 DEVICE CONNECTION.............................................................................................................3
1.4 CONTROLS INSTALLATION....................................................................................................5
1.5 VIDEO BROWSING....................................................................................................................7
2 NETWORK..........................................................................................................................................
2.1 NETWORK STATUS.................................................................................................................11
2.2 ETHERNET SETUP...................................................................................................................11
2.3 WIFI SETUP...............................................................................................................................12
2.4 ADSL SETUP.............................................................................................................................15
2.5 DDNS SETUP............................................................................................................................15
2.6 UPNP SETUP.............................................................................................................................16
2.7 FTP ACCOUNT SETUP.............................................................................................................16
2.8 SMTP ACCOUNT SETUP.........................................................................................................17
2.9 MEDIA STREAM SETUP.........................................................................................................18
2.10 PLATFORM SETUP................................................................................................................18
2.11 PPTP SETUP.............................................................................................................................18
3 MEDIA.................................................................................................................................................20
3.1 VIDEO CAPTURE.....................................................................................................................20
3.2 TIME AND TITLE SETUP........................................................................................................21
3.3 VIDEO ENCODE.......................................................................................................................21
3.4 PICTURE CAPTURE.................................................................................................................22
3.5 PRIVACY MASK.......................................................................................................................23
3.6 MEDIA INFO.............................................................................................................................23
4 STORAGE...........................................................................................................................................25
4.1 STORAGE MANAGE................................................................................................................25
4.1.1 UNINSTALL OF STORAGE DEVICE..............................................................................25
4.1.2 FORMATTING OF STORAGE DEVICE.........................................................................25
4.2 STORAGE SETTING.................................................................................................................26
4.2.1 BASIC SETUP..................................................................................................................26
4.2.2 MOTION ALARM RECORD............................................................................................26
4.2.3 MOTION ALARM SNAP..................................................................................................27

Megapixel IP Camera User manual V2.0.0
4.2.4 LINK DOWN RECORD....................................................................................................28
4.2.5 LINK DOWN CAPTURE..................................................................................................29
4.2.6 SC EDULE RECORD.....................................................................................................29
4.3 STORAGE DEVICE INFORMATION......................................................................................31
5 ALARM................................................................................................................................................32
5.1 MOTION ALARM.....................................................................................................................32
5.2 VIDEO LOST ALARM..............................................................................................................33
5.3 STORAGE FULL ALARM........................................................................................................34
6 SYSTEM SETUP................................................................................................................................35
6.1 ACCOUNT MANAGE...............................................................................................................35
6.1.1 ADD USER.......................................................................................................................35
6.1.2 MODIFY USER................................................................................................................36
6.1.3 DELETE USER.................................................................................................................36
6.2 TIME SETUP..............................................................................................................................37
6.3 LOG SETUP...............................................................................................................................37
6.4 LOG FILE MANAGE................................................................................................................38
6.5 SYSTEM MAINTENANCE......................................................................................................38
6.6 REGULAR MAINTENANCE...................................................................................................41
6.7 DEVICES LANGUAGE............................................................................................................41
6.8 VERSION INFO.........................................................................................................................42
7 PLAYBACK.........................................................................................................................................43
7.1 THE SEARCH OF FILE.............................................................................................................43
7.2 PLAYBACK OF FILE................................................................................................................44
7.2.1 PLAYBACK OF RECORD FILE......................................................................................44
7.2.2 PLAYBACK OF PICTURE...............................................................................................45
7.3 THE DOWNLOAD OF FILE.....................................................................................................46
7.4 THE DELETE OF FILE.............................................................................................................48

Megapixel IP Camera User manual V2.0.0
Device and installation
. Specifications
Model 720P 960P 1080P
System Structure Embedded LINUX RTOS ,dua core
32 bits DSP (TI Davinci DM365)
Embedded LINUX RTOS
,dua core 32 bits DSP (TI Davinci
DM368)
Pure hardware compression,
watchdog, Flash, DDR2.
Pure hardware compression
, watchdog, 32M Flash,128M DDR2.
Image ensor 1/4’ 1.0 Megapixel
CMO Image
sensor.
1/3’ 1.3 Megapixel
CMO Image
sensor.
1/2.5’’ 5.0 Megapixel CMO Image
sensor.
Auto Iris upport, DC drive auto iris lens, 1 auto Iris interface.
Photoresistance Linkage upport linkage between photoresistance input sign, image, IR-Cut and IR lamp.1
photoresistance interface.
Day & Night IR cut filter with auto switch, IR sensor. 1 IR lamp control interface ,algorithm
control IR lamp open and close
Video compression H.264 compression ,dual stream ( -6Mpbs adjustable)
Frame Rate 1.0Megapixel
@25FP
1.3Megapixel
@25FP
5.0 Megapixel@10FP ,
3.0 Megapixel@15FP ,
2.0 Megapixel@25FP .
Image Output Main
tream:1280×720
Main tream:
1280×960,
1280×720
Main tream: 2592×1920,
2048×1536,
1920×1080,
1280×960, 1280×768
ub tream: 704×576,640×360,480×270,352×288,
320×240,352×192, 320×192,288×192
Remarks : Without sub stream (5.0
Megapixel)
1

Megapixel IP Camera User manual V2.0.0
Analog Output 1 analog video output ,CVB supported, PAL/NT C (configurable)
Audio Interface 1 CH audio input(Level: 2Vp-p, Impedance: 1kΩ) ,
sound pickup supported
1 CH audio output (Impedance:16Ω,power output : 30mw),
headphone connection or amplifier supported
Audio Process tandard AAC encoding and decoding,
two-way voice talkback, audio and videosynchronization.
torage Function 1 U B interface ( Max: ) ,
front storage supported, or WIFI extend supported
1 TF/ D storage extend interface
(Remarks: need D storage card plug)
Alarm Interface 1 CH switch input , alarm input ,
recording and background linkage supported
1CH switch output, sound and light alarm supported.
Alarm Function Motion detection and IO alarm linkage ip camera storage supported
Center warning and picture pop-up linkage supported
( after motion detection and IO alarm)
Network Interface 1RJ45 Ethernet interface, 10/100M adaptation
Protocols : RT P/FTP/PPPOE/DHCP/DDN /NTP/UPnP
Network Function WEB configure and O D supported, real time recording, transmission and
playback, download.
Free UC2 client software supported, VM6000 platform supported, DK for
customer software development;
/POE/WIFI optional/2-way-audio optional;
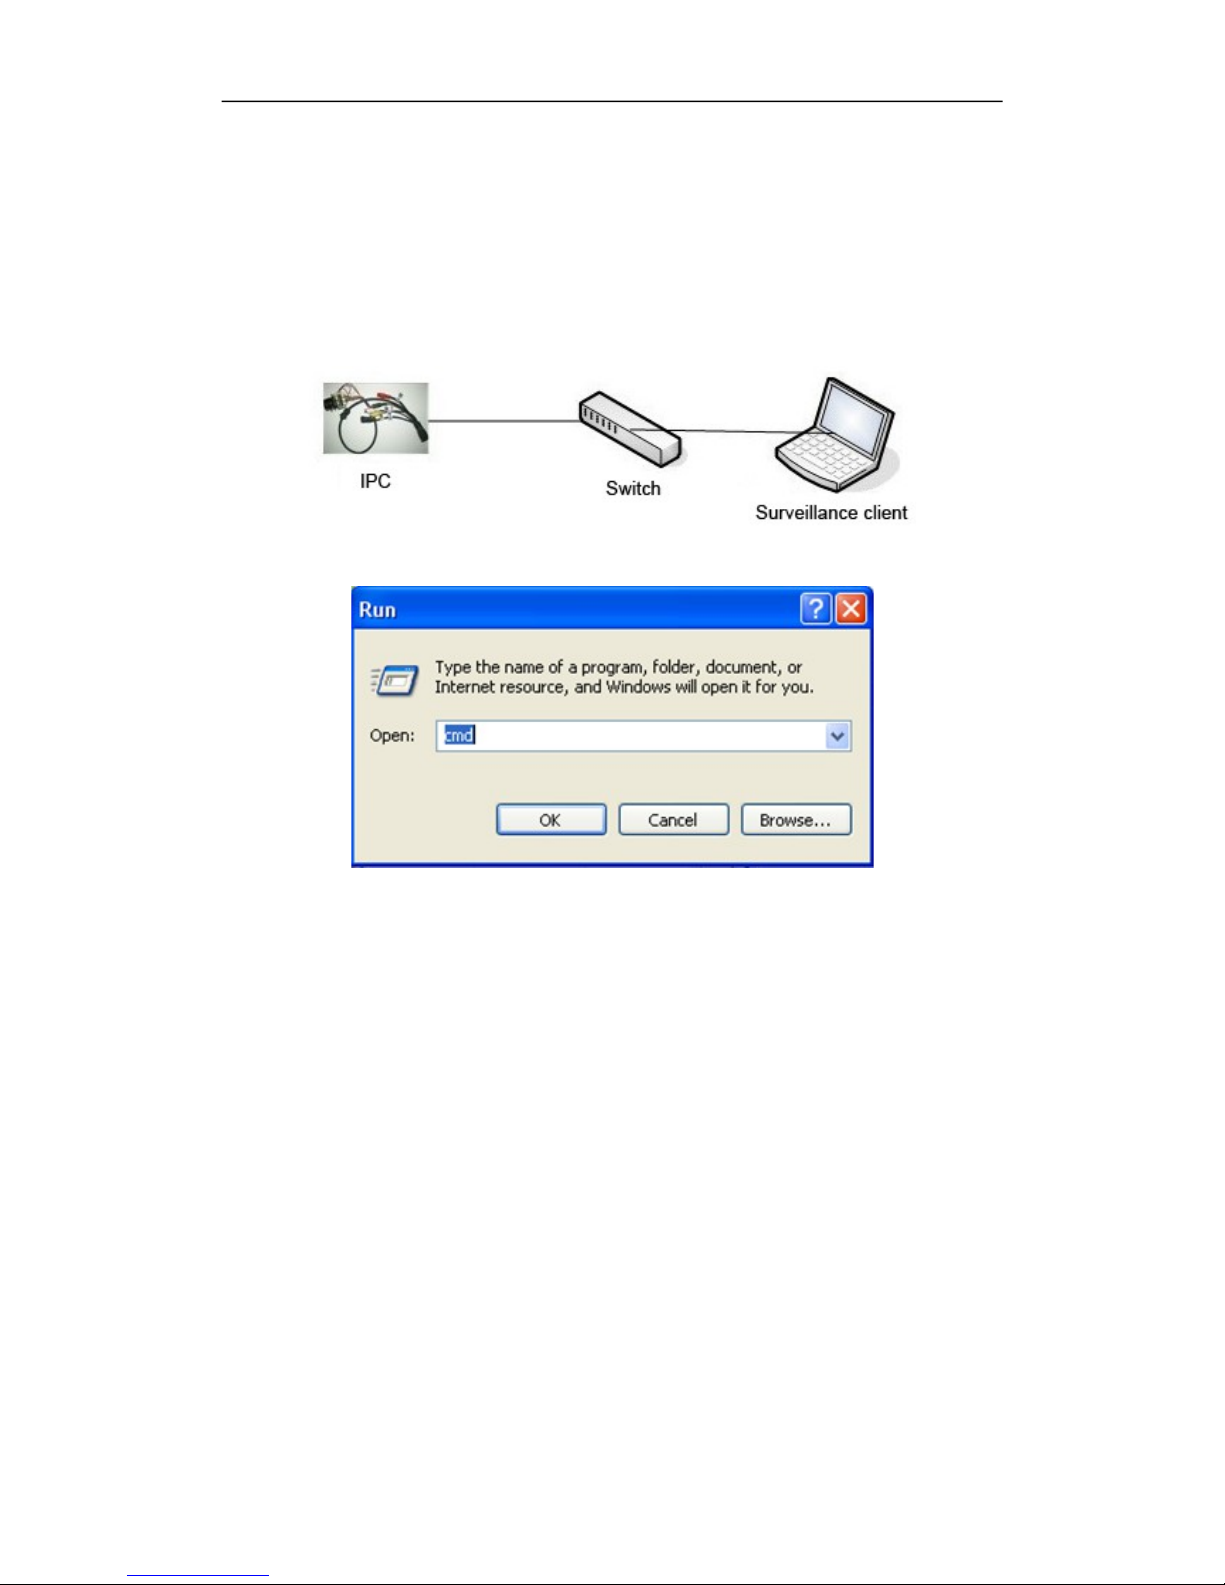
.2 Appearance and Dimension
.3 Device connection
The connection schematic diagram for entire s stem frame of device is as figure 1.1.
Connect the computer and device directl b switch or a network cable and configure
network parameter as follow: First, the default IP address of device is 192.168.0.123,
2
Megapixel IP Camera User manual V2.0.0
net mask is 255.255.255.0, accessing the device, ou must make sure our computer
and the device in the same network segment. If not, add a network segment for our
computer. Second, the net mask of the computer and the device must be the same.
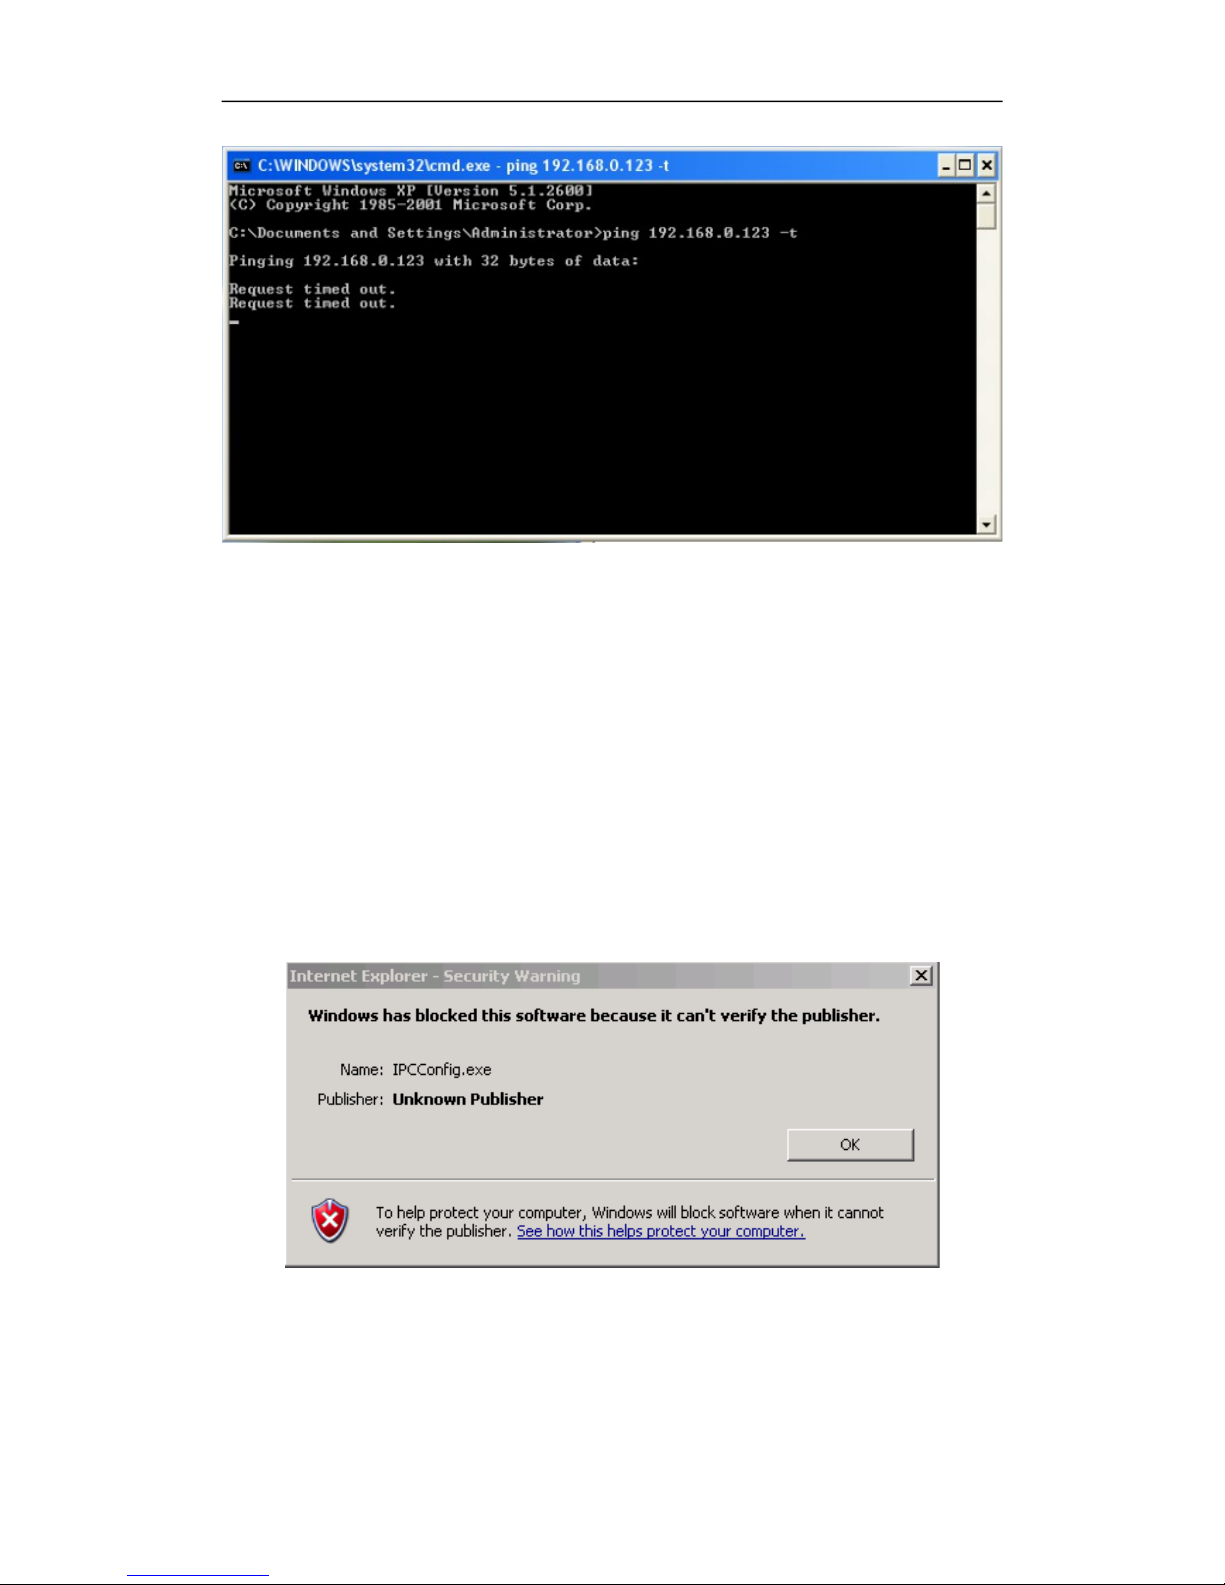
Last, make sure the direct network is open, operating as follow: “Start”-“Run”-enter
“cmd”, then enter “ping 192.168.0.123” and press “enter” on the ke board. As figure
1.3, 1.4, and1.5. While the network is not open, please check the network connection
and the network configuration.
Figure1.1 network connection diagram
Figure1.2 enter “cmd”
3

Megapixel IP Camera User manual V2.0.0
Fiure1.3 enter “ping 192.168.0.123 –t”
Figure1.4 network is open
4
Megapixel IP Camera User manual V2.0.0
Figure 1.5 network is not open
.4 Controls installation
After connected device and finished configuration network parameter, connect the
power, one minute later, open the IE browser, and enter IP address, press “Enter”,
then come out the login interface as figure 1.9. If this is the first time to access device
b browser, it will prompt that ou need install controls first. Steps are as follows:
a. After entering IP address, ma be come out the interface as figure1.6, this is
because our controls has not legalized b IE, but it makes no difference. Click
the button of “OK”.
Figure 1.6 Securit Warning
b. Then come out the message sa s that: “Please install the plug!”.
5
This manual suits for next models
2
Table of contents


