Cables to Go 28652 User manual

USB 2.0
Laptop Docking Station
with Video
User Manual

1
Index
1. INTRODUCTION..............................................................................................................................2
1.1 FEATURES AND SPECIFICATIONS…..……………………………………………………………… 2
1.2 SYSTEM REQUIREMENTS…………………………………………………………………………..3
1.3 PACKAGE CONTENTS…………………………………...…………………………………………3
1.4 CONNECTORS………………………………………...…………………………………………...3
1.5AVAILABLE FUNCTIONS……………………………………………………………………………4
1.6 LED INDICATOR………………………………………………………………………………….4
2. INSTALLING USB 2.0 LAPTOPDOCKING STATION ...............................................................5
2.0 HARDWARE INSTALLATION………………………………………………………………….5
2.1 DRIVER INSTALLATION………………………………………………………….………….……...6
2.1.1 WinXP/Vista Driver Installation……………………………...……..…...…….…..……..6
2.1.2Win2000DriverInstallation……..……………………………………………………..…….8
2.1.3 WinME Driver Installation…………………………………………………………….....11
2.1.4 Win98 Driver Installation………………………………………………………...….……14
2.2 IMPORTANT SET UP INFORMATION..…………………………………………………………………24
2.2.1 Checking for Proper Set Up………………………………………………………………25
2.3 SET UP THE PRINTER DEVICE…………………………………………………………………….26
2.3.1 For Windows 98/SE/ME…………………………………………………………………...26
2.3.2 For Windows 2000/XP……………………………………………………………………..28
2.4 SET UP THE HYPERTERMINAL WITH USBTO SERIAL PORT……………..…………….……….…….29
3. UNINSTALLING USB 2.0 LAPTOP DOCKING STATION........................................................31
3.1 REMOVE THE DEVICE…………………………………………………………………………….31
3.2 UNINSTALL THE DRIVER……………………...………………………………...………………...31
3.2.1 For Windows 98/SE/ME…….……..…………………...………………………………….31
3.2.2 For Windows 2000/XP……….…….………………………………………………………32
4. TROUBLE SHOOTING…………………………………………………………………………….33
5. DISCLAIMER/FCC STATEMENT................................................................................................35

2
1. Introduction
The USB 2.0 Laptop Docking Station with Video allows you to easily connect all of
your desktop peripherals to almost any laptop or desktop with one single connection.
Now you can enjoy the convenience of your laptop when you’re NOT on the road.
The USB 2.0 Laptop Docking Station lets you come and go as you please without the
hassle of connecting your monitor, mouse, keyboard, printer, and other devices to
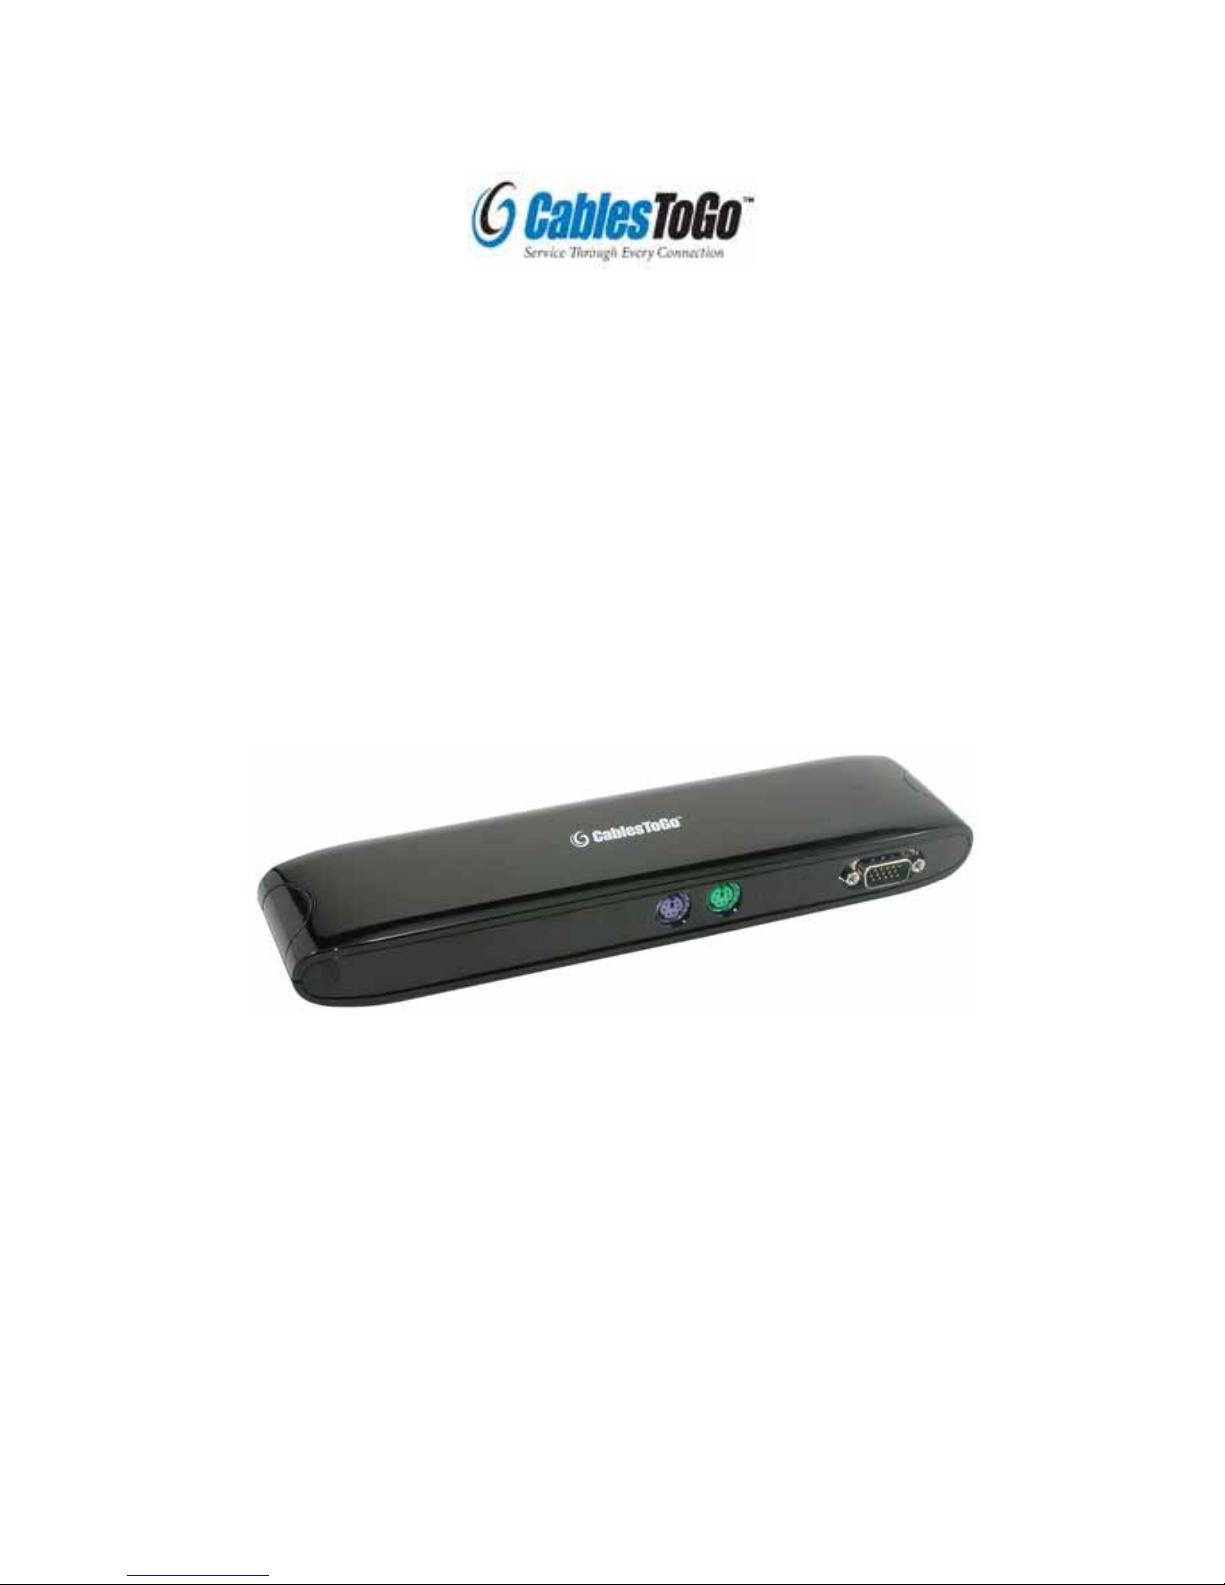
your Laptop each time. The USB 2.0 Laptop Docking Station contains a three port
USB 2.0 Hub, one serial DB9 port, one parallel printer port, one 10/100 RJ45
Ethernet port, PS/2 mouse and keyboard ports, and a VGApass-through port- all in a
single unit!
Connect your monitor, mouse, keyboard, printer, USB 2.0 devices, network and
modem to the USB 2.0 Docking Station for a convenient all-in-one connectivity
solution. The USB 2.0 Laptop Docking Station with Video eliminates the clutter of
cables connecting to your computer as it requires only a single VGA/USB combo
cable. Additional USB hubs can be attached to connect up to 127 devices. No
complex installation and no re-booting your PC. The USB 2.0 Laptop Docking Station
with Video makes desktop use of your Laptop amazingly simple, convenient and,
most importantly, inexpensive.
1.1 Features and Specifications
•Perfect for laptop users who also like to use their Laptop in the office but don’t
like the hassle of connecting each device every time
•Connect all peripherals to the docking station then connect the laptop to the
dock. All of your peripherals are now connected, with just one cable!
•Economical alternative to expensive proprietary docking stations
•Full compliance with USB 2.0 specification
•Compliance with IEEE802.3u 100BASE-TX and with IEEE802.3 10BASE-T
standards
•Multiple devices can be connected simultaneously
•Plug-and-play functionality eliminates the need to reboot during installation
•Approvals: FCC; CE
•Supports Windows 98SE/ME/2000/XP/Vista

3
1.2 System Requirements
•A minimum of 16M bytes of RAM available
•One available USB type A Female downstream port (UHCI, OHCI, or EHCI).
•Windows 98 or later
1.3 Package Contents
The product you purchased should contain the equipment and accessories shown
as follows:
•USB 2.0 Laptop Docking Station with Video
•3ft VGA/USB combo cable
•5V, 2A DC power adapter
•CD Driver
•User Manual
1.4 Connectors (Ref. Fig.1.1 , Fig.1.2)
oOne DB-9 RS-232 serial connector supports baud rates from 1,200 to 115.2K
oOne DB-25 parallel connector supports IEEE-1284 bi-directional printers
oOne Mini-din for PS/2 keyboard, One Mini-din for PS/2 mouse
oOne 10/100 Ethernet LAN port
oThree USB 2.0 female type A downstream ports (three port USB 2.0 Hub)
oOne VGAFemale output port (included VGA/USB combo cable connects the
dock to your Laptop)
oOne VGAMale input port
oPower connector port

4
Fig.1.1
1.5 Available Functions
The available functions of USB 2.0 Laptop Docking Station depend on the status
of power supplied:
zBus powered
1. Connect the USB/VGA combo Y cable to your PC to provide bus power.
2. When you provide bus power only, the PS/2 mouse & keyboard, RS232,
printer and Ethernet ports will be enabled. However, the USB2.0 Hub will
only work in low power mode. Use of the external power adapter is
recommended for full use of functions.
zExternally powered
1. Connect the power adapter to provide external power.
2. When you provide external power, the USB Downstream Ports can support
all USB devices, and full functionality of the device is enabled.
1.6 LED Indicator (Ref. Fig.2)
zPower Indicator
The Power Indicator will turn BLUE as either bus power or external power is
supplied.
zLAN Indicator
USB 2.0 Hub
RJ45 Ethernet
PS/2 Keyboard PS/2 Mouse
Printer Port
Serial Port
VGA outPower Connector
VGA in
in

5
1. Link/Act (BLUE): This LED emits a steady light if the 10/100Mbps
(100BASE-TX) Ethernet is connected.
2. Transmission (BLUE): The LED will blink to indicate that the data is being
received or transmitted through the RJ-45 port.
Fig.2
2. Installing USB 2.0 Laptop Docking
Station with Video
2.0 Hardware Installation
1. Power on your computer and make sure that the USB and VGA ports are
enabled and working properly.
2. Put the Driver CD into CD-ROM drive of your PC or Notebook.
3. Connect the power adapter to the USB 2.0 Laptop Docking Station. (to
utilize full functionality)
4. Connect USB 2.0 Laptop Dock to the USB and VGAport on your computer
with the VGA/USB combo Y cable provided. (see Fig.3)
5. Windows will start detecting USB devices. Please follow the section below
that supports your particular operating system to install your USB 2.0 Laptop
Docking Station.
Power Indicator
LAN Indicator

6
Fig.3
2.1 Driver Installation
2.1.1 Windows XP/Vista Driver Installation
The driver installation is divided into two steps (A to B). Please install USB 2.0
Laptop Docking Station for Windows XP/Vista by following the instructions
below:
A. Serial Port Installation
Fig. WinXP-A1
Fig. WinXP-A2
A1. Please insert the
“USB 2.0 Laptop
Docking Station” CD
into your CD-ROM
drive. Click “Install the
software automatically”
and press “Next” to
continue
(Ref Fig. WinXP-A1)
A2. You will receive a
message stating that the
software you are
installing has not passed
Windows Logo testing.
But this driver is fully
compatible with
Windows XP/Vista, so
just press “Continue
Anyway” to continue.
(Ref. Fig. WinXP-A2)
Insert VGA/USB Combo cable here then
attach to your computer

7
Fig. WinXP-A3
B. Ethernet Port Installation
Fig. WinXP-B1
Fig.WinXP-B2
A3. Press “Finish” to
complete the installation
of USB-to-Serial Port.
(Ref Fig. WinXP-A3)
B1. Click “Install the
software automatically”
and press “Next” to
continue
(Ref Fig. WinXP-B1)
B2. Press “Finish” to
complete the installation
of Ethernet Port.
(Ref Fig. WinXP-B2)

8
2.1.2 Win2000 Driver Installation
The driver installation for Win2000 is divided into two steps (A-B).
Please install USB 2.0 Laptop Docking Station for Win2000 by following the
instructions below:
A. USB-to-Serial Port Installation
Fig. Win2k-A1
Fig. Win2k-A2
Fig. Win2k-A3
A1. Please insert the
“USB 2.0 Laptop
Docking Station” CD
into your CD-ROM drive
and press “Next” to
continue.
A2. Click “Search for a
suitable driver for my
device” and press “Next”
to continue.
(Ref Fig. Win2k-A2)
A3. Please insert “USB
2.0 Laptop Docking
Station” CD into your
CD-ROM drive and
press “Next” to start the
searching process.
(
Ref Fi
g
.Win2
k
-A3
)

9
Fig. Win2k-A4
Fig. Win2k-A5
B. Ethernet Port Installation
Fig. Win2k-B1
A4. Press “Next” to start
the installation process.
(Ref Fig. Win2k-A4)
A5. Press “Finish” to
complete the installation
of USB-to-Serial Port.
(Ref Fig. Win2k-A5)
B1. Press “ Next” to
continue.
(Ref Fig. Win2k-B1)

10
Fig.Win2k-B2
Fig.Win2k-B3
Fig. Win2k-B4
B3. Click “CD-ROM
drives” and press “Next”
to start the searching
process.
(Ref Fig. Win2k-B3)
B2. Click “Search for a
suitable driver for my
device” and press “Next”
to continue.
(Ref Fig. Win2k-B2)
B4. Press “Next” to start
the installation process.
(Ref Fig. Win2k-B4)

11
Fig.Win2k-B5
Fig.Win2k-B6
2.1.3 WinME Driver Installation
The driver installation for WinME is divided into three steps (A to C).
Please install USB 2.0 Laptop Docking Station under WinME by following the
instructions below:
A. USB-to-Parallel Port Installation
Fig. WinME-A1
B6. Press “Finish” to
complete the installation
of Ethernet port.
(Ref. Win2k-B6)
B5. You will receive a
message stating that the
software you are
installing has not passed
Windows Logo testing.
But this driver is fully
compatible with
Windows 2000, so just
press “Yes” to continue.
(Ref. Fig. Win2k-B5)
A1 Please insert the “USB
2.0 Laptop Docking
Station” CD into your
CD-ROM drive. Click
“Automatic search for a
better driver” and press
“Next” to continue.
(Ref. Fig. WinME-A1)

12
Fig. WinME-A2
B. USB-to-Serial Port Installation
Fig. WinME-B1
Fig. WinME-B2
A2. Press “Finish” to
complete the installation
USB-to-Parallel Port.
(Ref. Fig. WinME-A2)
B1. Click “Automatic
search for a better
driver” and press “Next”
to continue.
(Ref. Fig. WinME-B1)
B2. Press “Finish” to
complete the installation
of USB-to-Serial Port.
(Ref. Fig. WinME-B2)

13
C. Ethernet Port Installation
Fig. WinME-C1
Fig. WinME-C2
Fig. WinME-C3
C1. Click “Specify the
location for a better
driver” and press “Next”
to continue.
(Ref. Fig. WinME-C1)
C2. Click “Search for the
best driver for your
device” and then choose
“Specify a location”.
Click “Browse” to select
the location of the driver
folder in the “USB 2.0
Laptop Docking Station”
CD. Press “Next” to
continue.
C3. Press “Next” to start
the installation process.
(Ref. Fig. WinME-C3)

14
Fig. WinME-C4
2.1.4 Win98/98SE Driver Installation
The driver installation is divided into six steps (A to F). Please install USB 2.0 Laptop
Docking Station for Win98/SE by following the instructions below:
A. USB Hub Installation
Fig. Win98-A1
Fig. Win98-A2
A1. Please insert the
“Windows 98” CD into
your CD-ROM drive and
press “Next” to continue.
(Ref. Fig. Win98-A1)
A2. Click “Search for the
best driver for your
device” and press “Next”
to continue.
(Ref. Fig. Win98-A2)
C4. Press “Finish” to
complete the installation
of Ethernet Port.
(Ref. Fig. WinME-C4)

15
Fig. Win98-A3
Fig. Win98-A4
Fig. Win98-A5
B. IEEE-1284 Controller Installation
Fig.Win98-B1
A3. Click “CD-ROM
drive” and press “Next”
to start the searching
process.
(Ref. Fig. Win98-A3)
A5. Press “Finish” to
complete the installation
of USB HUB.
(Ref Fig. Win98-A5)
B1. Please insert the
“USB 2.0 Laptop Docking
Station” CD into your
CD-ROM drive and press
“Next” to continue.
(Ref. Fig. Win98-B1)
A4. Press “Next” to start
the installation process.
(Ref Fig. Win98-A4)

16
Fig.Win98-B2
Fig. Win98-B3
Fig. Win98-B4
B2. Click “Search for the
best driver for your
device” and press “Next”
to continue.
(Ref. Fig. Win98-B2).
B3. Click “Specify a
location” and click
“Browse” to select the
location of the driver
folder in the “USB 2.0
Laptop Docking Station”
CD. Press “Next” to start
the searching process.
(Ref. Fig. Win98-B3).
B4. Press “Next” to start
the installation process.
(Ref. Fig. Win98-B4)

17
Fig. Win98-B5
C. USB-to-Serial Port Installation
Fig. Win98-C1
Fig. Win98-C2
C1. Please insert the “USB
2.0 Laptop Docking
Station” CD into your
CD-ROM drive and press
“Next” to continue.
(Ref. Fig. Win98-C1)
B5. Press “Finish” to
complete the installation
of USB-to-Parallel Port.
(Ref. Fig. Win98-B5)
C2. Click “Search for the
best driver for your
device” and press “Next”
to continue.
(Ref. Fig. Win98-C2)

18
Fig. Win98-C3
Fig. Win98-C4
Fig. Win98-C5
C3. Click “Specify a
location” and click
“Browse” to select the
location of the driver folder
in the “USB 2.0 Laptop
Docking Station” CD.
Click “Next” to start the
searching process.
(Ref. Fig. Win98-C3)
C5. Press “Finish” to
complete the installation
of USB-to-Serial Port.
(Ref. Fig. Win98-C5)
C4. Press “Next” to start
the installation process.
(Ref. Fig. Win98-C4)

19
D1. Please insert the
“Windows 98” CD into
your CD-ROM drive and
press “Next” to continue
(Ref. Fig. Win98-D1)
D. USB Composite Device Installation
Fig. Win98-D1
Fig. Win98-D2
Fig. Win98-D3
D2. Click “Search for the
best driver for your
device” and press “Next”
to continue.
(Ref. Fig. Win98-D2)
D3. Click “CD-ROM
drive” and press “Next”
to start the searching
process.
(Ref. Fig. Win98-D3)
Other manuals for 28652
1
Table of contents
Other Cables to Go Computer Accessories manuals