Cadco VARIKWIK VK-VH1 User manual

USER MANUAL- VK-VH1 & VK-VH2
IMPORTANT: DO NOT DISCARD THIS MANUAL
This manual is considered to be part of the appliance and is to be given to the OWNER of MANAGER, or to
the person responsible for training operators of this appliance.
THIS MANUAL IS TO BE UNDERSTOOD BY ALL PERSONS USING OR INSTALLING THIS APPLIANCE.
Contact Cadco if you have quesons regarding installaon, operaon or maintenance of this equipment.
Address
Cadco Ltd.
200 Internaonal Way
Winsted, CT 06098
Hours
8:30am - 5:00pm (Eastern)
Monday through Friday
Phone
(860) 738-2500
Fax
(860) 738-9772
Email
READ THIS MANUAL COMPLETELY BEFORE OPERATING THIS APPLIANCE
VARIKWIK HOOD
TM

Table Of Contents
SAFETY PRECAUTIONS…………………………………….................................................
UNPACKING & INSPECTION, FREIGHT DAMAGE.……….............................................
GROUNDING INSTRUCTIONS……………………………….............................................
INSTALLATION & START-UP………………………………….............................................
SPECIFICATIONS…………..…………….…..……...…………..........................................
CLEANING & CARE……………………………...………….……......................................
DIAGRAM/SCHEMATICS.………...................................................................................
SERVICE EXPECTATIONS…………………………………….............................................
WARRANTYSTATEMENT……………………………………...............................................
Knowledge of proper installaon, operaon and maintenance procedures is essenal to
ensure the safe operaon of this oven.
1. Always have dry hands when operang.
2. If an electrical shock is felt when touching the hood, disconnect the power immediately and call
Cadco Technical Service for assistance or service.
3. If the power cord is frayed or the plug damaged, DO NOT PLUG INTO THE ELECTRICAL
POWER RECEPTACLE. IF IT IS ALREADY PLUGGED IN, SHUT OFF THE MAIN CIRCUIT BREAKER,
LOCATED IN THE BREAKER BOX, THEN DISCONNECT THE PLUG.
4. DISCONNECT THE POWER CORD BEFORE ATTEMPTING ANY REPAIRS TO THE
HOOD AND/OR CLEANING THE UNIT.
(REPAIRS TO THIS UNIT MUST BE PERFORMED BY QUALIFIED PERSONNEL.)
5. DO NOT SPRAY WITH WATER HOSE OR SUBMERGE THE HOOD. ELECTRICAL
COMPONENTS AND WIRING PRESENT A HIGH SHOCK HAZARD WHEN WET.
6. NEVER USE THE HOOD WITHOUT FRONT FILTERS
3
4
5
5
8
9
11
12
13

Safety Precautions
When using electrical appliances basic safety precauons should be adhered to, including
the following:
1. Read all the instrucons before use.
2. To avoid electric shock, do not immerse the power cord, or any part of the unit, in any liquid.
3. Unplug appliance from the electrical outlet when not in use, and before cleaning. Allow ap-
pliance to cool before installing or removing any parts or accessories, and before cleaning.
4. Do not operate any appliance with a damaged cord or plug, or if appliance should sustain
damage, or malfuncon in any way. (Please see warranty on page 13 for service and repair)
5. Do not allow the power cord to hang over the edge of a table or counter, or to be exposed
to hot surfaces, as damage may occur.
6. To disconnect an appliance, rst turn all controls to the ‘o’ posion then unplug the pow-
er cord from the wall outlet.
7. Do not use appliance other than for its intended use.
SAVE THESE INSTRUCTIONS
IMPORTANT SAFETY INSTRUCTIONS
3
CAUTION: BURN HAZARD
Exposed metal surfaces can be hot to the touch and may cause burns.
WARNING: ELECTRIC SHOCK HAZARD
All servicing requiring access to non-insulated components must be performed by
qualied service personnel. DO NOT open any access panel that requires the use of
tools. Failure to heed this warning may result in severe electric shock.
Disconnect this appliance from electrical power before performing any maintenance or
servicing.
WARNING: RISK OF FIRE
Before using the appliance make sure that there aren’t any non-compliant object (in-
strucon manuals, plasc bags or other) in the oven cavity; likewise, make sure that the
smoke exhaust is free of obstrucons and that no ammable materials are in its vicinity.

4
FREIGHT DAMAGE PROCEDURE
IF SHIPMENT ARRIVES DAMAGED:
1. VISIBLE LOSS OR DAMAGE: . If the unit gets damaged during shipment and Cadco is
picked the carrier Cadco will le the claim. If the dealer picks a 3rd party carrier you will need
to le a claim.
2. CONTACT CADCO OR DEALER CLAIM FOR DAMAGE IMMEDIATELY
3. CONCEALED DAMAGE: If the outside packaging looks damaged you need to sign con-
cealed damage on the bill of lading. If the shipment looks like it was damaged you will need to
sign refuse shipment on the bill of lading. If you nd concealed damage report within 48 hours
to Cadco pictures of what was damaged.
For your protecon, please note that equipment in this shipment was carefully inspected
and packaged by skilled personnel before leaving the factory. Upon acceptance of this
shipment, the transportaon company assumes full responsibility for its safe delivery.
*NOTE*
UNPACKING AND INSPECTION
1. Remove the hood from shipping carton, ensuring that all packing materials and
protecve plasc have been removed from the unit.
2. If the unit shows signs of damage please read our FREIGHT DAMAGE PROCEDURE
3. Read operaon instrucons completely.
4. Vent Hood should be cleaned before use. See CLEANING INSTRUCTIONS on page 9 of
this manual.
DO NOT DISCARD the carton or other packing materials unl you have inspected the
appliance for hidden damage and checked it for proper operaon.
IMPORTANT NOTES
Cadco strives to ensure the appliance is received in good working condion. To prevent ship-
ping damage, the appliance is shipped from the factory and must only be transported using
pallets supplied by Cadco. Each unit has been carefully inspected before it was packaged and
consigned to a shipper/installer.

GROUNDING INSTRUCTIONS
This appliance must be grounded. In the event of an electrical short circuit, ground-
ing reduces the risk of electric shock by providing an escape wire for the electric cur-
rent. This hood is equipped with a cord that has a grounding wire with a ground-
ing plug, which must be plugged into an outlet that is properly installed and grounded.
DO NOT use an extension cord.
WARNING—Improper use of the grounding can result in a risk of electric shock.
Consult a qualied electrician or service agent if the grounding instrucons are not completely
understood, or if doubt exists as to whether the appliance is properly grounded.
Power Cord Replacement or Removal
If the power cord is damaged, it must be replaced by the manufacturer, or its approved
service agent.
5
Installation & Start- Up
NOTE:
The technical content of this manual, including any wiring diagrams, schemacs, parts
breakdown illustraons and/or adjustment procedures, is intended for use ONLY by qual-
ied technical personnel. If your unit came factory installed please proceed to the next
secon.
The air ltering system consists of the following three lters.
• Washable grease lter
• Disposable electrostac parculate lter
• Disposable acvated charcoal smoke lter
The VarikwikTM Ventless hood (VK-VH1 & VK-VH2) is designed to improve the environment
for kitchen sta and patrons by removing parculates and odors from the air. It only works
with VarikwikTM models. The VK-VH1 operates from a 115V outlet, and draws .61A. It comes
with a preinstalled NEMA 5-15P cord. The VK-VH2 operates from a 230V outlet, and draws
.30A. It comes with a preinstalled NEMA 6-20P cord.

6
Installaon:
The VK Hood is shipped fully assembled. Remove from packing materials and make sure
the unit is complete and undamaged. The VarikwikTM Oven with Hood must be installed on
a level surface, away from sources of excessive heat and moisture. Insure that nothing is
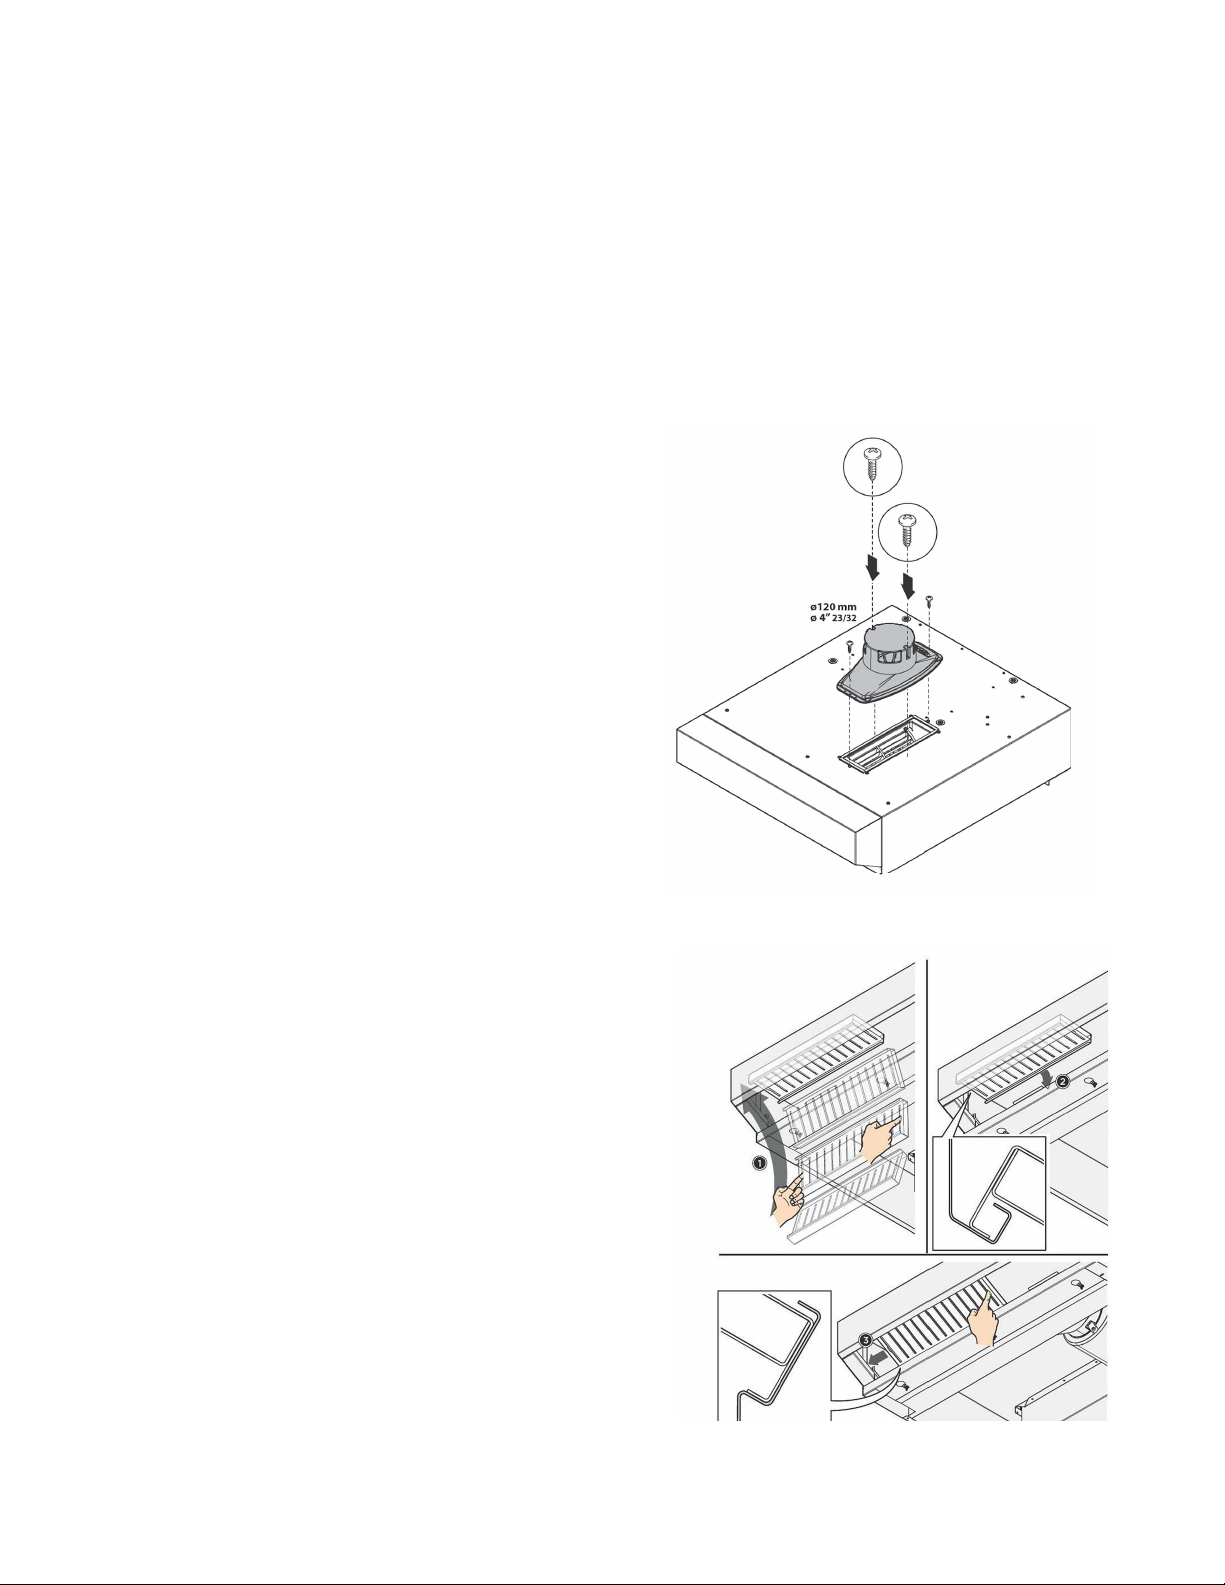
blocking the air exhaust ports.
REMOVING THE PROTECTIVE FILM
Slowly remove the protecve lms from the appliance. Clean any glue residue with appro-
priate solvents without using tools, abrasive detergents or acids that could spoil the sur-
faces. The lm is potenally dangerous and must be kept out of the reach of children
and animals, and correctly disposed of in compliance with local regulaons.
INSTALLATION CODES AND STANDARDS
Installaons within the United States, must follow:
1.State and local codes.
2.Naonal Electrical Code (ANSI/NFPA No.70, latest edion) available
from the Naonal Fire Protecon Associaon, Baerymarch Park, Quincy, MA 02269.
3.Vapor Removal from Cooking Equipment, (NFPA-96, latest edion)
available from NFPA.
Installaons within Canada, must follow:
1. Local codes.
2.Canadian Electrical Code (CSA C22.2 No.3, latest edion) available
from the Canadian Standards Associaon, 5060 Spectrum Way, Mississauga, Ontario, Canada
L4W5N6.
The appliance is very heavy and may require the use of moving equipment. Do not li or
move the appliance without adequate help. Heavy liing, over 51 pounds (23 kg), may
result in personal injury. Make sure the appliance is not in danger of pping over during
transportaon.
Before posioning the appliance, check the measurements and the exact posion of the
electrical, plumbing, and exhaust connecons. Check for proper clearance with shut o
valves and drain line hook ups.
The installaon site must be able to withstand the maximum weight of the fully loaded ap-
pliance. Make sure the unit ts through all doors, corridors, passageways, or other openings
required to reach the installaon site.

7
� FITTING THE FLUE COVER
A
18
FITTING THE FLUE COVER
We recommend a ue cover be installed
on top of the external end of the ue, to
prevent rainwater from geng into the oven
and to minimise pressure drops caused by
the Venturi eect, which can occur during
strong air currents.
Smoke and odours coming from the oven cavity are evacuated through
the hood smoke ues. External evacuaon can be performed in 1 of 2 manners:
1. Direct evacuaon in the oven installaon area.
Make sure that there are no objects or materials obstrucng the ue or which may be damaged by
the temperature or fumes. Do not leave ammable materials near the smoke exhausts.
2. Evacuaon through an ecient venlaon ue.
The Cadco smoke ue. available as an oponal. must be installed. The ue must preferably have
the same diameter (0 4” 23/32 inches - 120mm) throughout the enre length of the oven’s exhaust
pipe connecon.
33
INSTALLING THE FILTERS
Make sure lters are correctly posioned du-
ring installaon (the lter with slots on both
sides must be placed in correspondence with
the oven handle, so that the steam is aspi-
rated as soon as the oven door is opened).
EXTERNAL FRONT FILTERS
Wait for the lters to cool o. The front l-
ters must be removed from me to me as
shown in the gure and washed with soapy
water or in the dishwasher. Make sure that
they are completely dry before re-mounng
them.
Never use the hood without the front lters.

Construction
Material: Stainless Steel
Finish: Charcoal
Filters Removable from Front Filter
1. Bae grease lter, cleanable and reusable
2. Electrostac material parculate lter to remove smaller parcles in the air – disposable
3. Acvated charcoal lter to treat odors – disposable
All warranty informaon listed on page 13-14.
Specications
Ship wt: 46.75 lbs
Ship dims: W27.5’’ x H 15’’ x D35.5’’
Cu. Ft: 4.3 3
Unit wt: 36.75 lb
Unit dims: W 22.6’’ x H 12’’ x D 30.34’’
Voltage: 115V
Was: 70W
Amps: .61A
VK-VH1 - 654796-54430-1
NEMA 5-15P
Ship wt: 46.75 lbs
Ship dims: W27.5’’ x H 15’’ x D35.5’’
Cu. Ft: 4.3 3
Unit wt: 36.75 lb
Unit dims: W 22.6’’ x H 12’’ x D 30.34’’
Voltage: 230V
Was: 70W
Amps: .30A
VK-VH2 - 654796-54431-8
NEMA 6-20P
8

Daily Cleaning:
1. Inspect grease cup; empty and wash with soap and water as necessary; reinstall.
2. Clean exterior of vent with soap and water or equivalent.
Weekly Cleaning:
1. Remove the front lter and the other lters. (Can be seen behind it)
2. Visually inspect lters.
3. If grease lter has accumulated grease, remove it and wash in pot sink or dishwasher.
4. Never expose the carbon lter to water!
5. Wipe any visible residue from the lter area, with a cloth dampened with soap and water or equiv-
alent.
6. Be sure lters are dry before replacing them in the unit.
7. Reinstall front panel by reversing the above procedure.
Exposed surfaces can be hot to the touch and may cause burns.
Allow appliance to cool before cleaning.
DO NOT spill or pour water into controls, control panel
or wiring. Water damage is not covered by warranty.
Disconnect appliance from electric power before cleaning.
Cleaning & Care
CAUTION: Unplug equipment and allow to cool before cleaning.
9

Periodically:
1. Unplug unit from power source.
2. Remove front lters as explained above.
3. Replace carbon and parculate lters when contaminant level impairs eciency.
4. Replace lters.
CAUTION: Cleansers, detergents, degreasers, sanizers, or bleaching agents that contain
chlorides or phosphates will cause permanent damage to stainless steel products. The
damage appears as pits, erupons, voids, small holes, severe discoloraon or dulling of the
metal nish.
Water with high chloride content can also damage stainless steel. If unsure of your water
quality, we recommend you have it tested. THIS DAMAGE IS PERMANENT, COSTLY TO
REPAIR, AND IS NOT COVERED BY THE WARRANTY.
See the following page for ps on cleaning stainless steel.
Purpose Frequency Cleaning Agent Method of Application
RECOMMENDED TIPS FOR CLEANING STAINLESS STEEL
Roune
Smears/
Fingerprints
Daily
As needed
Soap, Ammonia
cleaning deteregent
and water
Stainless steel cleaner
or similar products
Sponge with cloth, rinse
with clear water and
wipe dry.
Rub with so cloth as
directed on packages.
Rub in direcon of grain
of stainless steel. Do not
use in vinyl trim.
(CONTINUED ON THE NEXT PAGE)
10
Stubborn spots
and stains
Daily
as needed
Any chloride - free or
phosphate cleaner
Apply with damp sponge
or cloth. Rub in driecon
of grain of stainless steel.
Rinse thorughly,
especially if cleaner
contains chlorine bleach;
do not use on vinyl trim.

Hard water
spots
Daily
as needed
Vinegar Rub with so cloth as
directed on packages. Rub
in direcon of grain of
stainless steel. Do not use
in vinyl trim.
(CONTINUED)
Diagram/Schematics
Schematics for VK-VH1
Schematics for VK-VH2
11

Service Philosophy
For over twenty years, Cadco has earned a reputaon for manufacturing dependable
foodservice equipment that permits foodservice professionals serve beer food
products to more people, and thus, grow their business.
Our goal is not only to provide the best food service equipment for the price, but also to
back it up with aer-sale service that is fast, and professional. Cadco products are innovave
and ecient. Although our products are reliable, they are designed to easily be repaired, if
necessary.
We believe that a malfuncon to a Cadco product should cause as lile inconvenience to the
customer as possible. Our goal is to provide the same day support response and strive to x it
the rst me. We are dedicated to making every aspect of our customer service the standard
by which others are judged.
End-User Responsibilities
While we all strive to serve our mutual customers as well as possible, we remind
the end-user (and their employees) that they also have some responsibilities.
Service Expectations
1. All shipping damage must be noted on the freight bill when the shipment is received. Any
freight damages must be collected from the Freight Company, NOT Cadco.
2. The end-user should be advised beforehand to carefully unpack and inspect all products
when they are received BEFORE SIGNING THE SHIPPER’S RECEIPT OF DELIVERY.
3. The end-user must provide a safe, dry, level surface for the equipment to be placed upon.
4. The end-user must provide the proper electrical supply. All in-wall electrical modicaons
are to be completed by a licensed electrician. All building modicaons are the responsibility
of the end-user. Specicaon literature changes frequently, please verify proper installaon
is possible.
5. The end-user must operate, clean and maintain the equipment in accordance with the
procedures described in this Operaon Manual.
12

6. Cadco is NOT responsible for any loss of the customer’s income, loss of food product,
extra labor charges, or any other incidental or consequenal costs as a result of the malfunc-
on of our product.
7. The end-user shall allow for on-premises repair of the equipment to be completed at a
mutually convenient place and me.
CONFIDENTIALITY
1. The end user and all his employees and sub-agents shall protect and keep condenal
Cadco’s proprietary designs, informaon, and knowledge.
2. All literature and informaonal materials provided by Cadco are to be considered
condenal; they remain Cadco’s property; and are not to be reproduced without our
prior approval.
Warranty Statement
WARRANTY SERVICE
1. This product has:
• 1 year parts and labor
• 1 year motor and fan
2. All service is to be iniated by authorized Cadco personnel only. The service provider is
NOT authorized to change or extend any of the terms or condions of our warranty.
3. This product was designed to be a hood for VarikwikTM Ovens only. Any other use will
void your warranty.
13

NOTE:
The technical content of this manual, including any wiring diagrams, schemacs, parts
breakdown illustraons and/or adjustment procedures, is intended for use ONLY by qualied
technical personnel.
Cadco Warranty:
Unless otherwise noted, Cadco, Ltd. warrants all products (in the U.S only) to be free from
defects in material and workmanship for a period of one year from date of purchase.
(See product descripons and warranty table for other warranty periods on specic mo-
dels / parts) Warranty does not apply in cases of misuse, abuse, or damage from external
service or repair aempts by unauthorized personnel.
Cadco naonal service number 877-603-7393 MUST be called rst for authorizaon of
any Warranty Service at any service locaon.
Service centers available throughout the U.S. can be found by vising :
Cadco Service Locaons page at www.cadco-ltd.com.
For Canadian service contact Cadco’ number directly.
If returning a unit directly to Cadco, Ltd. for warranty repair, please call us rst for a Return
Authorizaon Number, which MUST be wrien on the outside of the carton to track the unit
and avoid service delays.
The customer is responsible to ship or deliver carry-in service items to a Cadco authorized service
center, or directly to Cadco. If shipping the unit, be sure to pack it securely and insure it for its orig-
inal purchase price. Cadco is not responsible for damage or loss of unit in transit to us or a service
center.
WARRANTY PROCEDURES:
For the Cadco authorized US service agent nearest you, please contact:
Cadco, Ltd., 200 Internaonal Way, Winsted, CT 06098
Tel. (860) 738-2500 | Fax (860) 738-9772
www.cadco-ltd.com
Please do not return units to the store where purchased for warranty repair.
14
This manual suits for next models
3
Table of contents
Other Cadco Ventilation Hood manuals
Popular Ventilation Hood manuals by other brands

Pkm
Pkm 9878LZ instruction manual

Westinghouse
Westinghouse QR061W owner's manual

AEG
AEG DM 8700 Operating and installation instructions

ILVE
ILVE Majestic AM70 Use and Maintenance Installation manual

CONSTRUCTA
CONSTRUCTA CD30637 User manual and assembly instructions

Zanussi
Zanussi ZHP615X installation manual

Miele
Miele TX3587 Operating and installation instructions

ROBLIN
ROBLIN MELODIE 600 INOX user manual

ROBLIN
ROBLIN LINEAR 1500 MURALE Dimensions

Siemens
Siemens LD97DBM60B instruction manual

KOBE
KOBE IS2036GS Installation instructions and operation manual

Miele
Miele DA 403 Operating and installation instructions