Cajun Grill CBGReg User manual
1
Operating Manual
Cajun Bayou Griddle
Models
CBGReg & CBGLg
WARNING
READ AND FOLLOW ALL WARNINGS
AND INSTRUCTIONS IN THIS MANUAL
TO AVOID PERSONAL INJURY OR
PROPERTY DAMAGE.
2
Table of Contents
1. IMPORTANT SAFEGUARDS .......................................3
2. PROPER CARE AND MAINTENANCE.........................5
3. CLEANING THE GRIDDLE...........................................5
4. OPERATING INSTRUCTIONS......................................5
5. FREQUENTLY ASKED QUESTIONS ...........................6
6. LIGHTING INSTRUCTIONS ………………….………… 7
7. ASSEMBLY INSTRUCTIONS .......................................8
A. SKID ASSEMBLY..................................................8
B. CBG-REG ..............................................................9
C. CGB-LG.................................................................11
8. LIMITED WARRANTY................................................17
R & V Works
304 Fincher Creek Rd.
Homer, LA 71040
Office - (318)258-3037
Fax - (318)258-5340
Toll Free - 1(800)908-3037
After Hours - (318)393-8162
E-mail - [email protected]

3
IMPORTANT SAFEGUARDS
WE WANT YOU TO ASSEMBLE AND USE YOUR “Cajun Bayou Griddle”
AS SAFELY AS POSSIBLE.
PLEASE READ AND FOLLOW ALL SAFETY WARNINGS AND INSTRUC-
TIONS CAREFULLY BEFORE ASSEMBLING AND OPERATING YOUR
GRIDDLE.
• Always use caution when lighting griddle. Crack open the needle valve and
ignite through the oblong hole in the face with a long stem trigger propane
lighter. Do not allow the gas to build up in the griddle head. If griddle does
not ignite within 3 seconds, close needle valve and wait 1 minute before
attempting to light the griddle. Not doing this may cause an explosion and
may lead to personal injury or property damage.
• Always use caution when placing food on griddle. Be careful to never touch
cooking surfaces or any other part of the griddle head. Do not drop food on
griddle.
• Only use this griddle on a hard, level, noncombustible, stable surface
(concrete, ground, etc.) capable of supporting the weight of the griddle.
• Do not use this griddle for other than its intended purpose.
• For outdoor use only. Do not operate griddle indoors or in an enclosed ar-
ea. In windy weather, place griddle in an outdoor area that is protected
from the wind, with the griddle’s back facing the wind.
• The griddle side will be extremely hot during use. Use caution when work-
ing around your hot griddle. Always wear oven mitts or gloves to protect
your hands from burns. Avoid touching hot surfaces.
• Use caution and protective clothing when cleaning a hot griddle to avoid
burns from hot surfaces.
• Never operate this appliance within 10 feet (3.05m) of any structure, com-
bustible material or other gas cylinder
!
Warning
Warning !

4
• Never operate this appliance within 25 feet (7.5m) of any flammable liquid.
• If a fire should occur, keep away from the appliance and immediately call
your fire department. Do not attempt to extinguish an oil or grease fire with
water. Failure to follow there instructions could result in a fire or explosion
that could cause property damage, personal injury or death.
• Place griddle in an area where children and pets cannot come into contact
with unit. Close supervision is necessary when griddle is in use. Do not
leave griddle unattended when in use. Heated liquids remain at scalding
temperatures long after the cooking process. Never touch cooking appli-
ance until liquids have cooled to 115°F or less.
• Never move griddle when it is in use.
• Use caution when assembling and operating your griddle to avoid scrapes
or cuts from sharp edges of metal parts.
• After each use, Cover the griddle to protect it from the weather.
• Use caution when lifting or moving griddle to prevent strains and back
injuries. Moving griddle may require the help of an additional person.
• We advise that a fire extinguisher be on hand. Refer to your local authority
to determine proper size and type of fire extinguisher.
• Accessory attachments not manufactured by R & V Works for these
products are not recommended and may lead to personal injury or
property damage.
• Store the griddle out of reach of children and in a safe location when not in
use.
• Do not attempt to service griddle other than normal maintenance as ex-
plained in the "Proper Care & Maintenance" section of this manual. Major
repairs can be authorized by R & V Works only.
• Properly dispose of all packaging material.
• Use caution when transporting the griddle. Make sure you tie down the
griddle so it will not move. Unit is top heavy.
USE CAUTION AND COMMON SENSE WHEN OPERATING YOUR
GRIDDLE.
FAILURE TO ADHERE TO SAFETY WARNINGS AND GUIDELINES IN THIS
MANUAL COULD RESULT IN BODILY INJURY OR PROPERTY DAMAGE.
SAVE THIS MANUAL FOR FUTURE REFERENCE.
Warning !

5
PROPER CARE AND MAINTENANCE
The current propane tanks are equipped with a safety valve (OPD Valve)
that restricts the output of the propane in case the hose is cut or burned. If
this valve closes you will only get a small yellow flame.
To reset the OPD Valve;
• Close the tank valve.
• Remove the POL nut.
• Close the needle valve.
• Reattach the POL nut.
• Open the tank valve very slowly, approximately 1 1/2 to 2 turns.
• Open the needle valve and relight the “Cajun Bayou Griddle”.
Cleaning the Cajun Bayou Griddle
Your Cajun Bayou Griddle should be easy to clean and take care of. The
Cooking surface of this griddle is stainless steel and can be cleaned similar to
institutional griddles. Griddle Bricks can be purchased to aid in the cleaning
process. The recommended cleaning methods is: heat the griddle to a
medium\ low temperature. Place a small amount of vegetable oil on the
cooking surface, Work griddle brick over surface until all cooking residue is
scraped clean. Wipe griddle top with a clean damp rag, turning often to keep
a clean edge on the griddle surface.
OPERATING INSTRUCTIONS
1. Hook up regulator to a propane tank.
2. Close needle valve on either on the face plate (CBG LG) or on the right
side (CBG Reg). Open valve on propane tank.
3. Always use caution when lighting griddle. Crack open the needle valve and
ignite through the oblong hole with a long stem trigger propane lighter. Do not
allow the gas to build up in griddle head. If grill does not ignite within 3 sec-
onds, close needle valve and wait 1 minute before attempting to light the
griddle.
4. Open the needle valve to increase temperature. Some adjustments may be
required if equipped with an adjustable regulator.
Warning !

6
Frequently Asked Questions
About The
“ Cajun Bayou Griddle ”
1. How do I clean my griddle? The recommended cleaning methods is heat
the griddle to a medium\ low temperature. Place a small amount of vegetable
oil on the cooking surface, Work griddle brick over surface until all cooking
residue is scraped clean. Wipe griddle top with a clean damp rag, turning often
to keep a clean edge on the griddle surface.
2. What is the weight on the Griddle? The weight of the CBG Lg is approx.
150.lbs The weight of the CBG Reg is about 100 lbs.
3. What do I do to touch-up my Cajun Bayou Griddle? The Cooking Surface
of the griddle is Stainless Steel so other than general cleaning there is nothing
you should have to do. The Carbon Steel Parts: the face plate, dripping bucket
and skid/pedestal assembly can be scuffed down and repainted. R&V Works
does carry Touch-up paint in 12 oz. spray cans. These can be used to refinish
the steel parts to a new condition.
4. What is the surface of my bayou griddle made from? The CBG Lg cook-
ing surface is 3/8” Stainless Steel, the CGB Reg, because is quite a bit smaller
is 1/4” Stainless Steel.
5. Do you have to season my bayou griddle? No because it is made from
Stainless Steel you can cook directly on a clean surface. In fact institutional
griddles are kept clean and clear of any “seasoned coatings.”
6. How often should I clean the griddle? Clean the griddle before and after
every use. By cleaning the griddle after every use, you are promoting healthy
habits. This reduces the chances of getting any food-borne illness.
7. What is the recommended cooking temperature? In the beginning do not
start too hot. Eggs for instance is usually cooked between 350° and 400°. This
temp is where a drop of water starts to dance on the cooking surface. But
hamburgers and Steaks will cook at higher temperature, We try to max the
Cajun Bayou Griddle at about 450° to 500°
8. How long can you cook on a 5 gallon tank? 5 - 8 hours
9. Do I need to put the grill inside the garage or dry place when not in
use? That is preferable. The cooking surface of the Griddle is stainless steel
but there are other parts that are not. With this in mind care should be taken
similar to the other grilling products on the market. There are covers for gas
grills and they should at least be put over the griddle when not in use. This pre-
vents rusting and other forms of damage that may be caused to the griddle.
10. How do I change from Propane to Natural Gas? Contact R & V Works
where you can purchase the natural gas jet and valve assembly—instruction
will be included. You will need to contact your natural gas supplier to find out
what type of plumbing and regulator you will need in your area. Natural gas
regulators and propane regulators are different. They will not interchange.
7
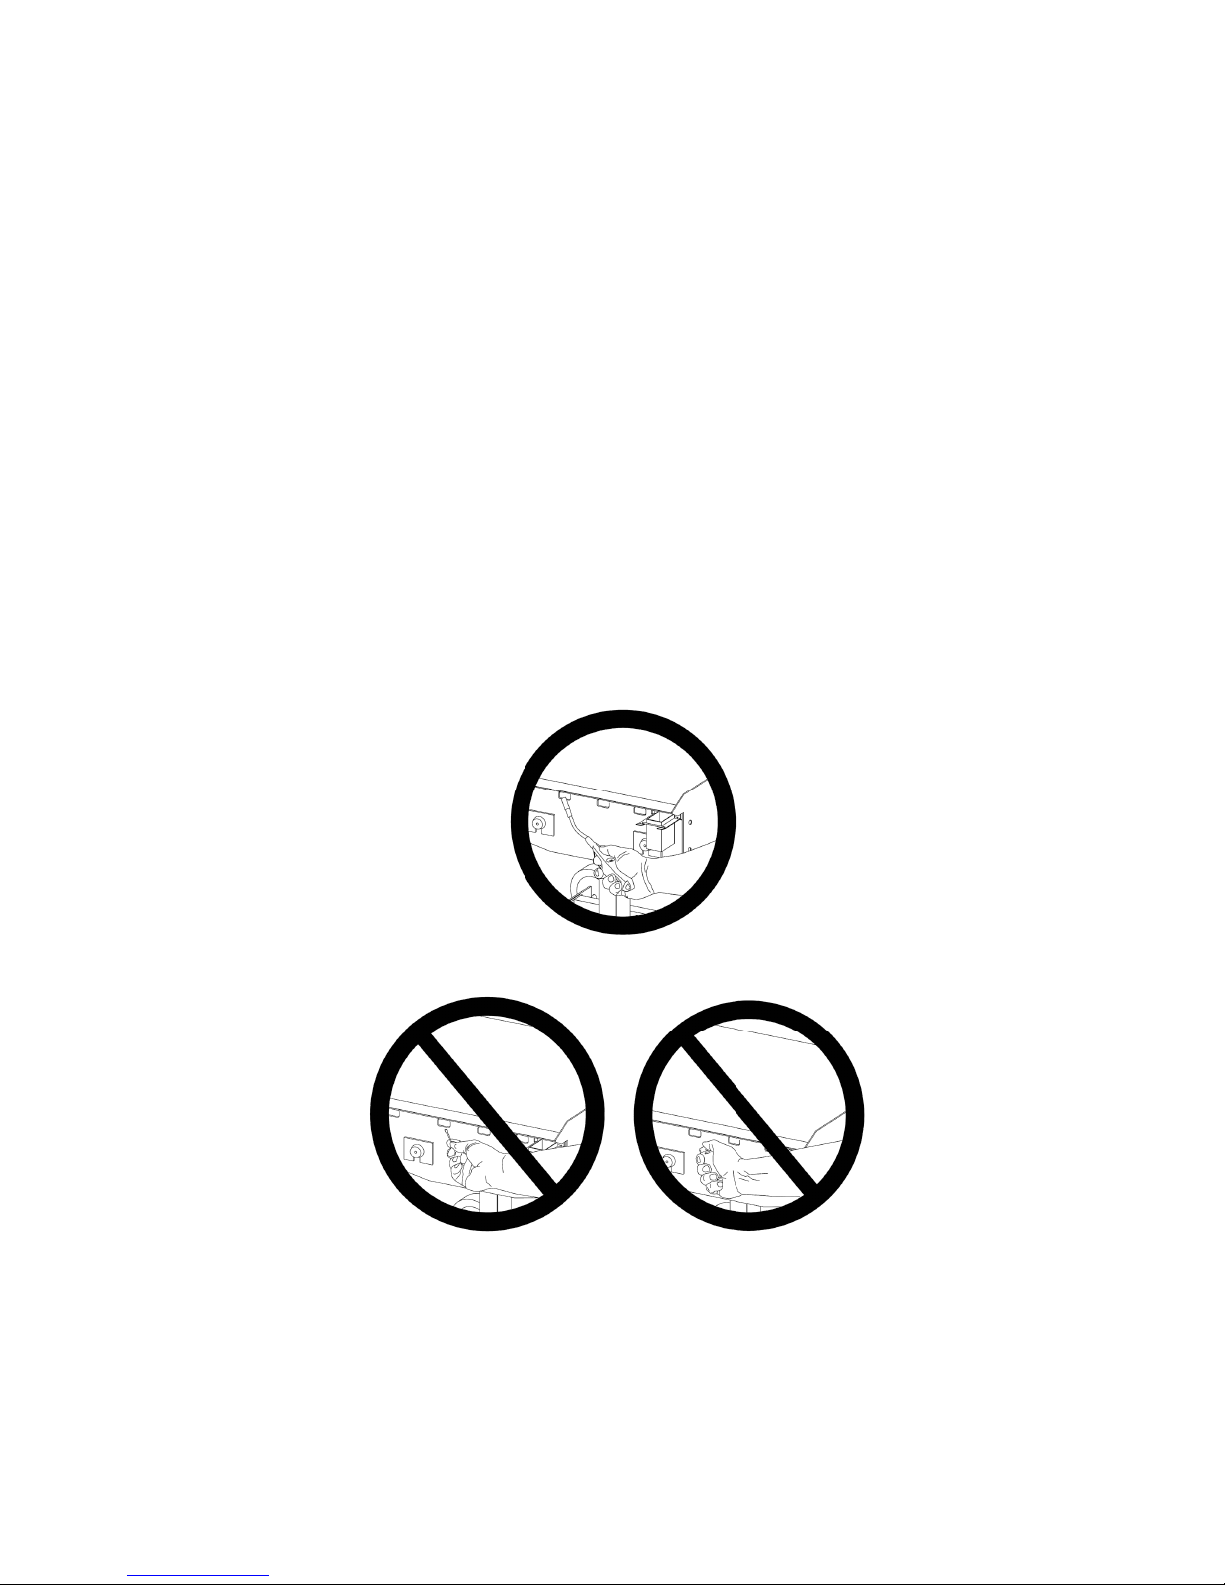
NEVER USE A CIGARETTE LIGHTER
OR A LITCHEN MATCH!
ALWAYS USE A LONG STEM LIGHTER
WHEN LIGHTING THIS GRIDDLE!
PROPER LIGHTING INSTRUCTIONS
As with any gas appliance, care should be given when lighting your
Griddle. Never use a standard kitchen match of cigarette lighter to light
the burners. Always use a long stem lighter or a long fireplace match,
this will allow you to keep your hands completely clear and also reach the
first line on gas ports for safe lighting.
Always use caution when lighting the griddle. Crack open the needle
valve and ignite through the oblong holes in the face plate with a long
stem trigger lighter. Do not allow the gas to build up in the griddle head.
If the griddle does not ignite within 3 seconds, close needle valve and
wait 1 minute before attempting to light the griddle.

8
Step 1
1) Attach front castor weldment to the skid weldment using 1/4” x
4” Screws (2 ea.), 1/4” flat washers (4 ea.) and 1/4” nuts (2 ea.).
Note: The axle must rest behind the lower flange of the skid
weldment. Also the bolt should be completely vertical, if it is
not turn axle end for end. (See Figure A) Tighten the front axle
bolts securely. note: the flat washers should be two on top of
the skid and two under the front castor
2) Install the rear axle weldment onto the skid weldment using
5/16” x 1/2” screws (2 ea.) and 5/16” nuts (2 ea.)
Step 2
1) Slide 8” Wheels onto the Axle Studs. Using the (2
ea.) 1/2” Nylock Nuts, secure the wheels to the
Skid Assembly. Tighten the wheel nuts until the
wheels do not wobble but will spin freely.
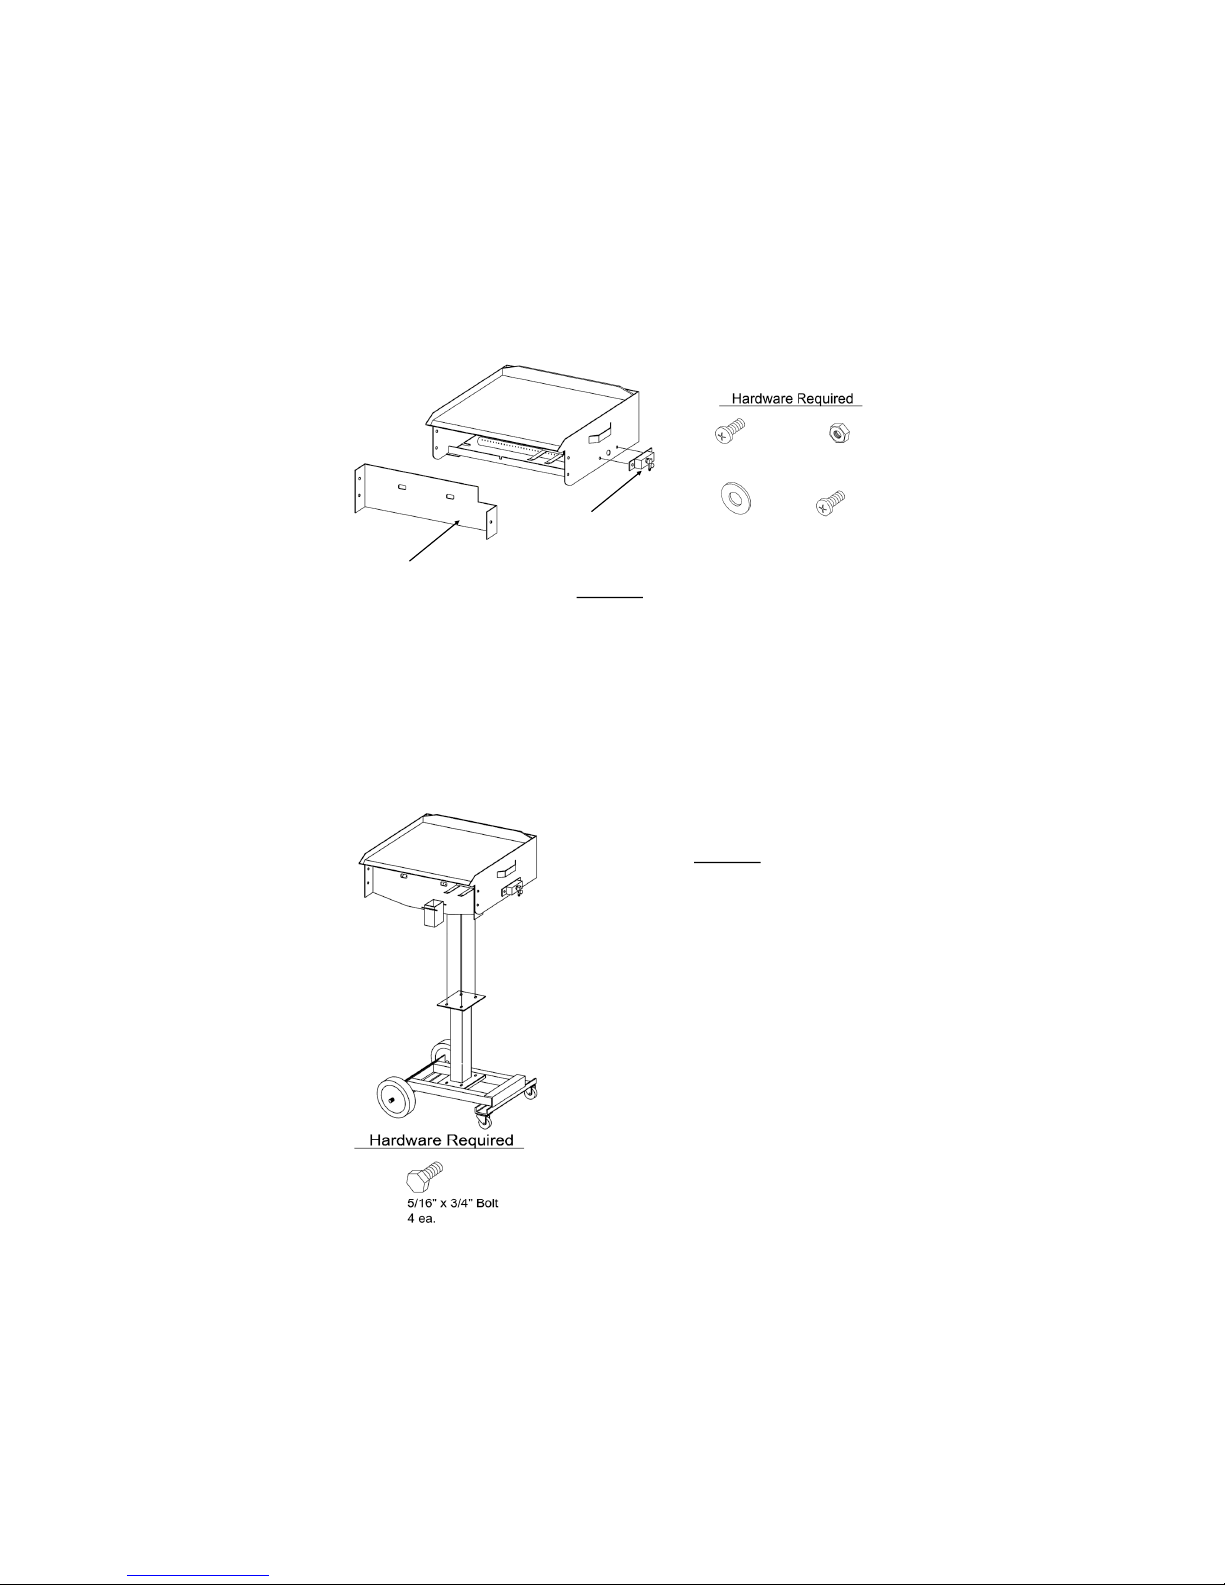
2) Place Pedestal Column onto the Skid Weldment.
Align the holes in the Lower Plate of the Pedestal
with the hole in the Center Plate of the Skid
Weldment.
3) Secure the Pedestal to the Skid using (4 ea.)
5/16” x 1/2” Screws. Tread screws into the
threaded holes provided and tighten all screws
firmly.
For Regular Griddle continue to next
page. For Large Griddle Skip to Page
11.
Pedestal
Figure A
Correct
incorrect

9
Step 3
Note: This step is completed at the factory. It is only shown to illustrate
how to complete the unit assembly.
1) Place Base plate into the Griddle Head Weldment and secure using
5/16” x 1/2” Screws (4 ea.), 5/16” Flat Washers (4 ea.) and 5/16” Nuts (4
ea.)
Step 4
Note: This step is completed at the factory. It is only shown to illustrate
how to complete the unit assembly.
1) Using 4 ea. Burner Brackets place the Burner inside the Griddle
Head. Be sure to place the open end of the burner through the hole
provided in the side of the Griddle Head until it is flush with the
outside surface of the Griddle Head. Align the Burner with the series
of double holes in the Burner Base Plate.
2) Place the 1/4” U-Bolts over the Burner and through the Base Plate.
Secure the U-Bolts using the 1/4” Flat Washers (8 ea.) and 1/4” Nuts
8 (ea.). Tighten the U-Bolt Securely.
Burner Brackets
Griddle Head Weldment
Burner
Burner Base Plate
10
Step 5
Note: This step is completed at the factory. It is only shown to illustrate
how to complete the unit assembly.
1) Attach Valve Control Box to the side of the Griddle Head using 5/16”
x 1/2” Screws (2 ea.) and 5/16” nuts (2 ea.). Screws should be posi-
tioned to the outside of the Griddle Head. Tighten Screws securely.
2) Place the Face Plate onto the Griddle Head as shown. Bolt to the
Griddle Head using 5/16” x 3/4” Screws (3 ea.), 5/16” Washers (6 ea.)
and 5/16” Nuts (3 ea.). The Screws should be placed the to outside
of the Griddle Head with the washers and nut to the inside. Tighten
the fasteners to finish this step.
Step 6
Note: The previous 3 steps should
have been completed at the factory.
For general assembly this step should
be the final step after step 2.
1) Place the completed Griddle Head
Assembly on to the top on the Skid
and Pedestal Assembly. Align the
hole in the top of the pedestal with
the threaded hole in to bottom of
the Griddle Head and fasten using
5/16” x 3/4” Bolts. Tighten Bolts to
complete the assembly.
2) Slide the Grease Box onto the
Mounting Forks located on the
right hand front below the grease
channel.
Face Plate
Control Box
5/16” x 3/4” Screw
3 ea.
5/16” Large Washer
6 ea.
5/16” x 1/2” Screw
2 ea.
5/16” Nut
5 ea.
This manual suits for next models
1
Table of contents
Popular Griddle manuals by other brands


Keating Of Chicago
Keating Of Chicago MIRACLEAN PRE-2000 manual

Nexgrill
Nexgrill 720-0786A owner's guide

Outwell
Outwell FH-3047C instruction manual

Rankam
Rankam Member's Mark GR2298901-MM-02 Assembly & operating instructions

Black Stone
Black Stone 1972 owner's manual

Star
Star Ultra Max 760TA Installation and operation instructions