Caliber BITHIA User manual

20110101
Per una corretta installazione del prodotto seguire accuratamente le seguenti istruzioni.
Utensili necessari: trapano, punta per muro Ø 6 mm, cacciavite a stella, chiavi a brugola mm. 2,5 e 3,
silicone neutro trasparente.
For correct installation please follow the instructions below.
You will need: a drill, a Ø 6 mm wall bit, a philips head screwdriver, 2,5 and 3 mm allen wrenches,
neutral and transparent silicone.
Pour un montage correct, suivre attentivement les instructions suivantes.
Outils nécessaires: perceuse, mèche à béton Ø 6 mm, tournevis cruciforme, vis à six pans mm. 2,5, mm
3, silicone neutre transparente.
Calibe S.r.l 40050 Monteveglio (Bo) Italy
08
EN14428
Parete doccia realizzata in
acciaio inox e cristallo temperato
Pulibilità : Passa
Resistenza agli urti/
proprietà di frammentazione : Passa
Durabilità : Passa
BITHIA PARETE
con lato fisso
istruzioni di montaggio
setting up instructions
instructions de montage

Prima di procedere all’installazione, verificare che il modello ricevuto sia conforme a quello ordinato, controllando
l’etichetta sulla confezione. (1.1)
Before you start installing, check the label to make sure the model you have received is the one you ordered.
(1.1)
Avant d’installer, contrôlez l’étiquette afin de vérifier que le modèle reçu soit conforme au modèle ordonné
(1.1).
versione destra (maniglia e lato fisso a destra)
right version (handle and fixed side on the right)
version droite (poignée et côté fixe à droite)
versione sinistra (maniglia e lato fisso a sinistra)
left version (handle and fixed side on the left)
version gauche (poignée et côté fixe à gauche)
Prima di procedere all’installazione, verificare che il piatto doccia dove si andrà a montare la cabina sia in
bolla (orizzontale, planare).
In caso di montaggio su piatti storti o non planari Calibe non garantisce il corretto funzionamento della
cabina.
Before installing, check that the shower tray is perfectly levelled, (horizontal, even).
In case of installation on irregular or uneven trays, Calibe does not guarantee the correct functioning of
the enclosure.
Avant d’installer, vérifier que le receveur qui sera la base de la cabine soit à niveau (horizontal, planaire).
En cas de montage sur des receveurs irréguliers ou pas planaires, Calibe ne garantit pas le fonctionnement
correct de la cabine.
Manovrare con cautela le parti vetrate poiché trattandosi di cristalli temperati l’urto con una superficie
dura potrebbe causare la frantumazione del cristallo (secondo le norme UNI EN 14428).
The glass panels are to be handled with caution, since bumping with hard parts may cause the tempered
glass to break (as per UNI EN 14428 norms).
Manipuler avec cautèle les parts en verre car en s’agissant de verre trempé tout heurt contre une partie
dure pourrait causer la rupture du verre (d’après normes UNI EN 14428).
Prima di procedere al montaggio della cabina accertarsi che non siano state richieste modifiche all’installazione
standard (come sostituzione di braccetti, misure particolari, profili particolari, ecc.ecc). Qualora non si fosse
certi di ciò, contattare chi ha inviato l’ordine.
Before installing the enclosure, make sure there have been no requests for modification with respect to
standard procedures (such as replacement of arms, specific sizes or profiles, etc.). If you are uncertain about
such specifications, contact the person who sent the order.
Avant de monter la cabine s’assurer qu’il n’y a aucune requête de modification par rapport à l’installation
standard (par exemple substitution de bras, mesures particulières, profilés différents etc.). En cas de doutes,
contacter la personne qui a envoyé la commande.
1
1.1
B
C
F
BC
F

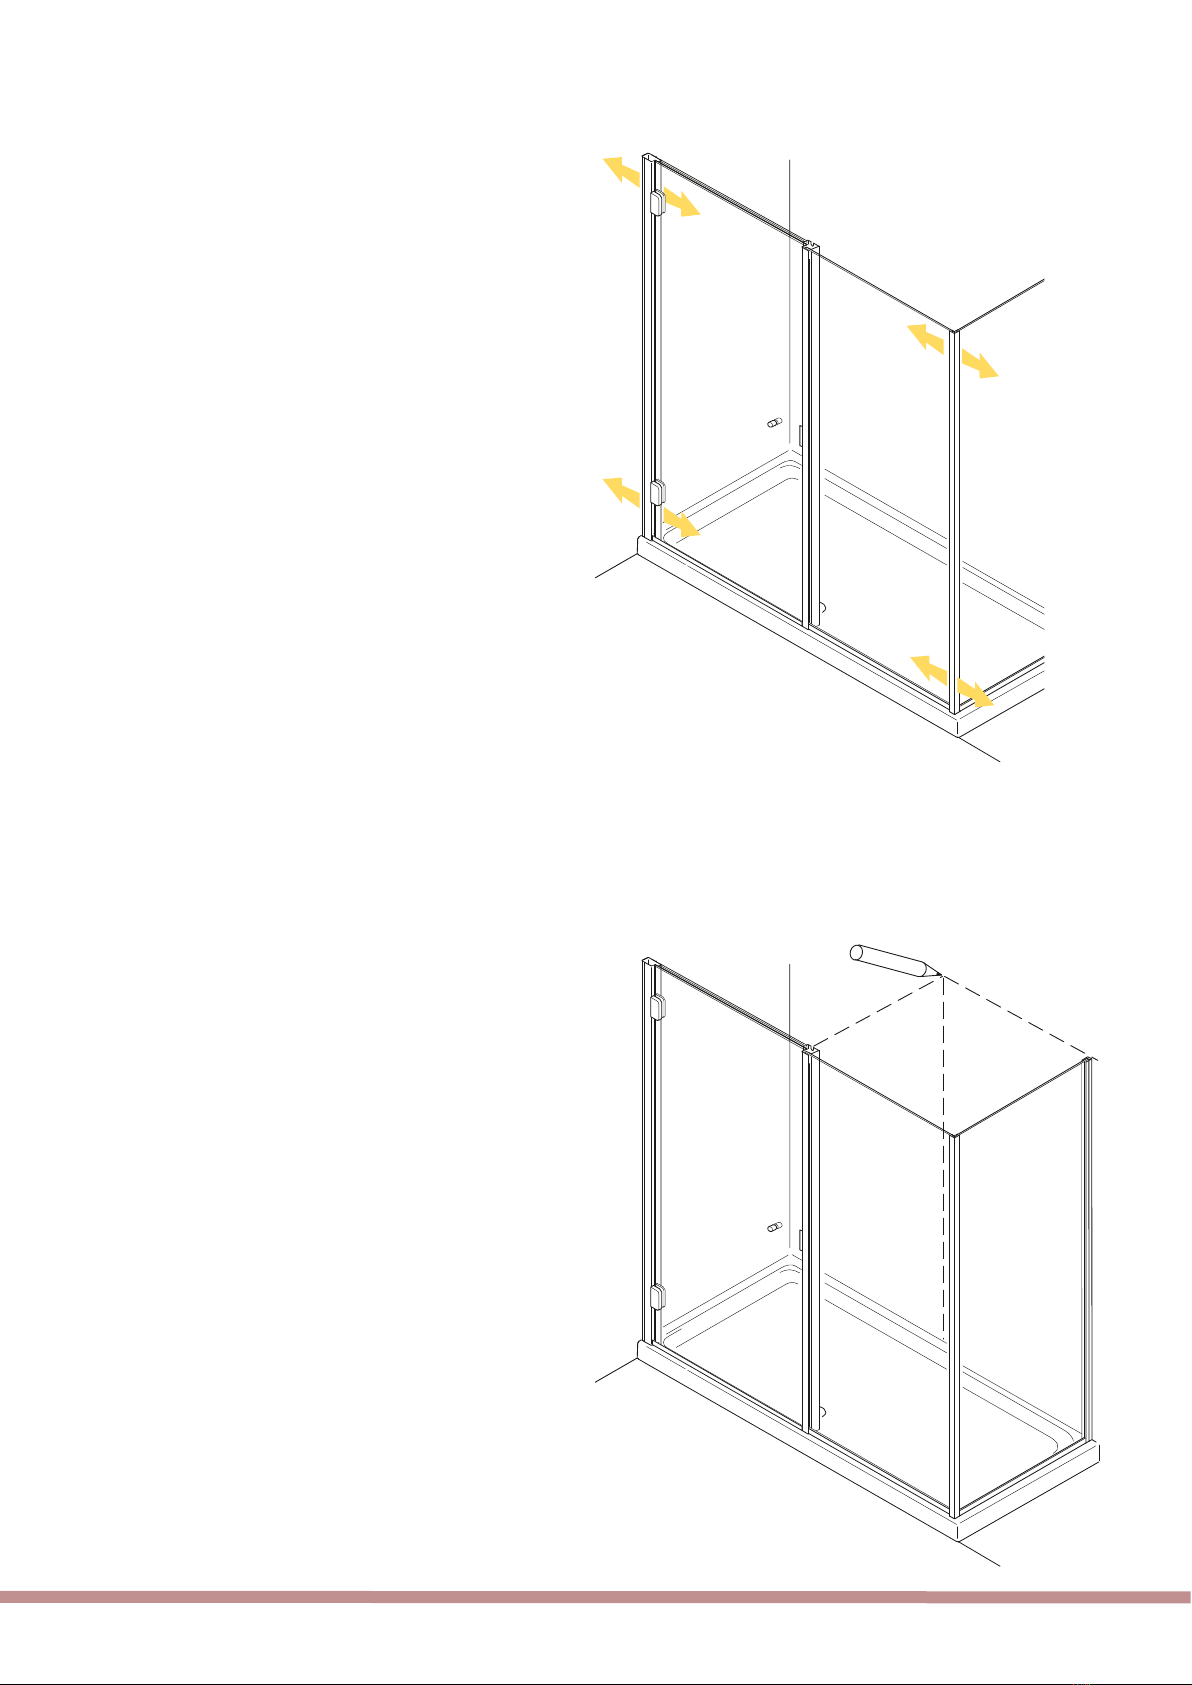
Qualora si tratti di un piatto doccia
tradizionale (nel caso di piatti a filo
pavimento, Tatami o altre situazioni
particolari, contattare chi ha inviato
l’ordine per sapere in che punto si è deciso
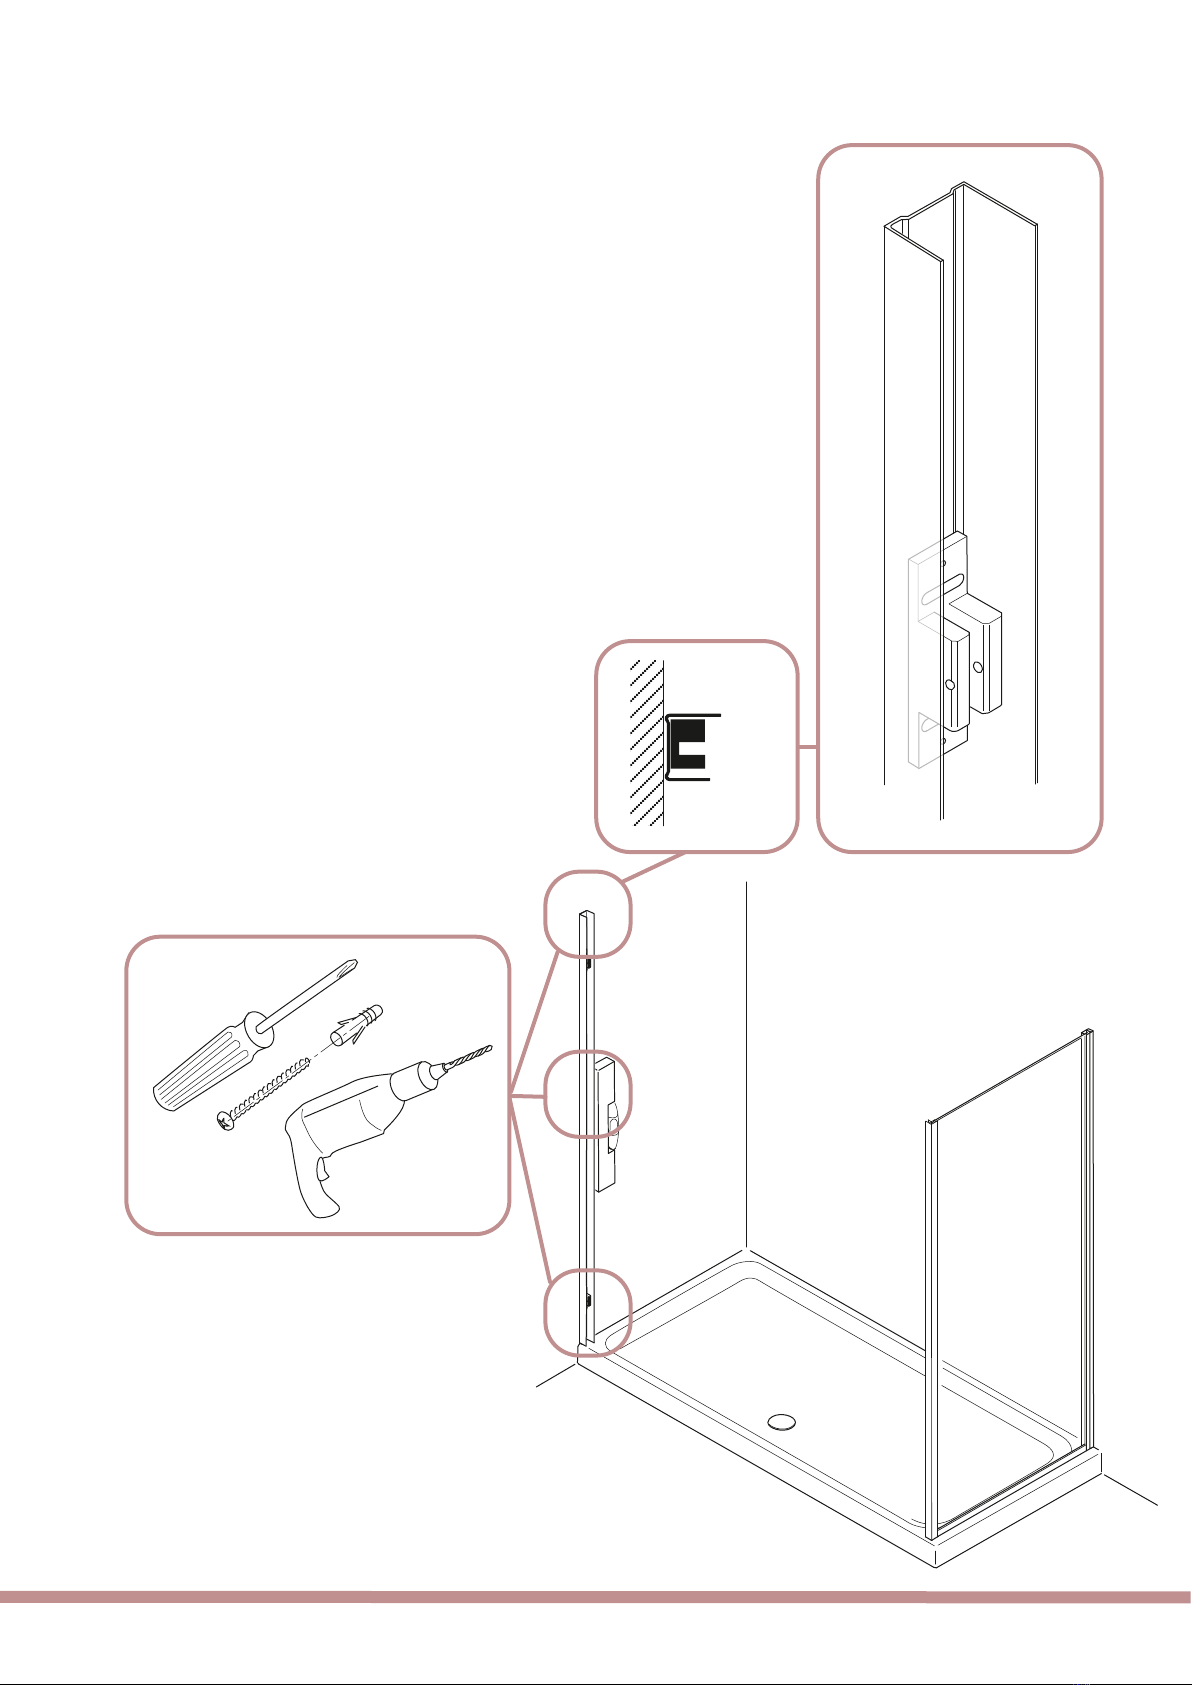
di posizionare la cabina) posizionare il
montante H a circa 1-1,5 cm dal filo esterno
del piatto doccia e fissarlo perfettamente
verticale con i tasselli e le viti fornite (1.1).
If the shower tray is of a traditional type,
(in case of trays levelled with the floor,
Tatami or other specific cases, contact the
person who sent the order so as to get
information on the precise position of the
enclosure), place upright H at
approximately 1-1,5 cm from the external
border of the shower tray and fix it in a
perfectly vertical position by means of the
supplied plugs and screws (1.1).
S’il s’agit d’un receveur traditionnel (en
cas de receveur à niveau du carrelage,
Tatami ou d’autres situations spécifiques,
contacter la personne qui a envoyé l’ordre
afin de savoir le point précis où l’on veut
placer la cabine), positionner le montant
H à environ 1-1,5 cm du bord extérieur du
receveur et le fixer parfaitement à la
verticale au moyen des fiches et des vis
fournies (1.1).
11.1
H
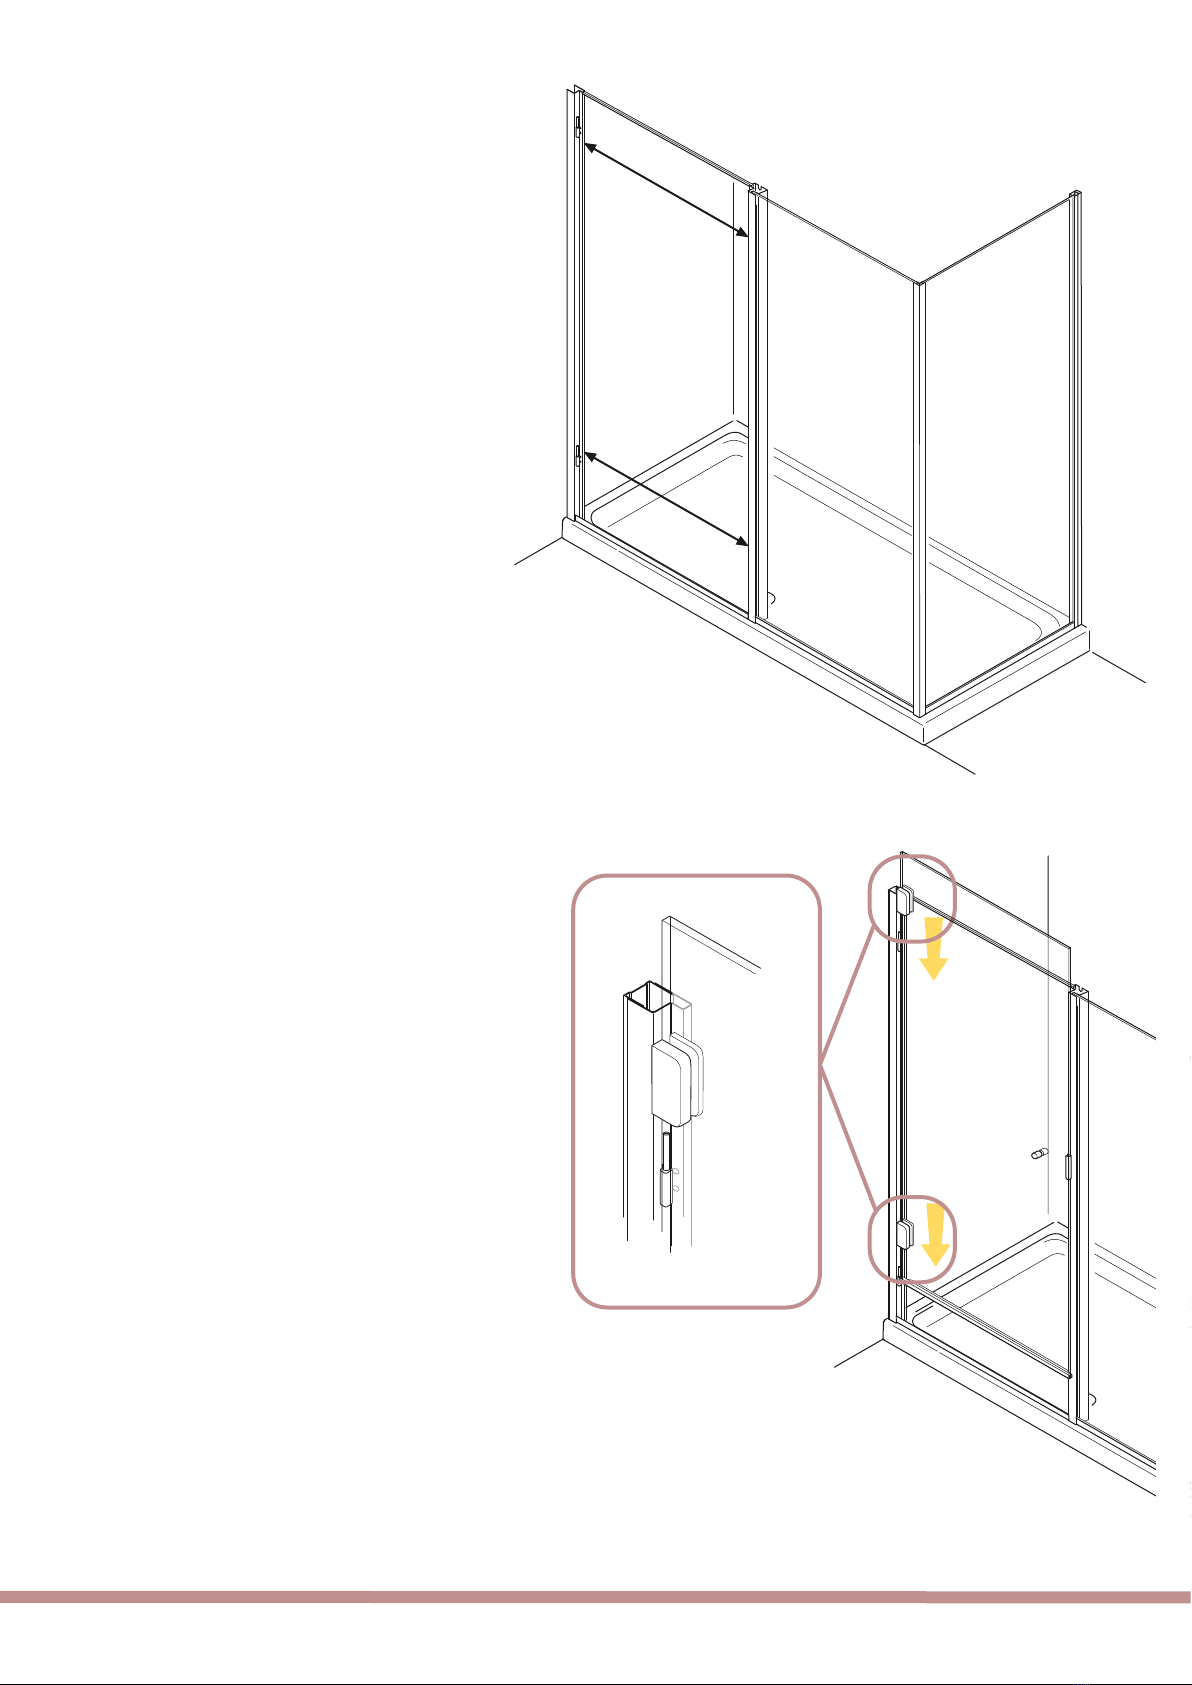
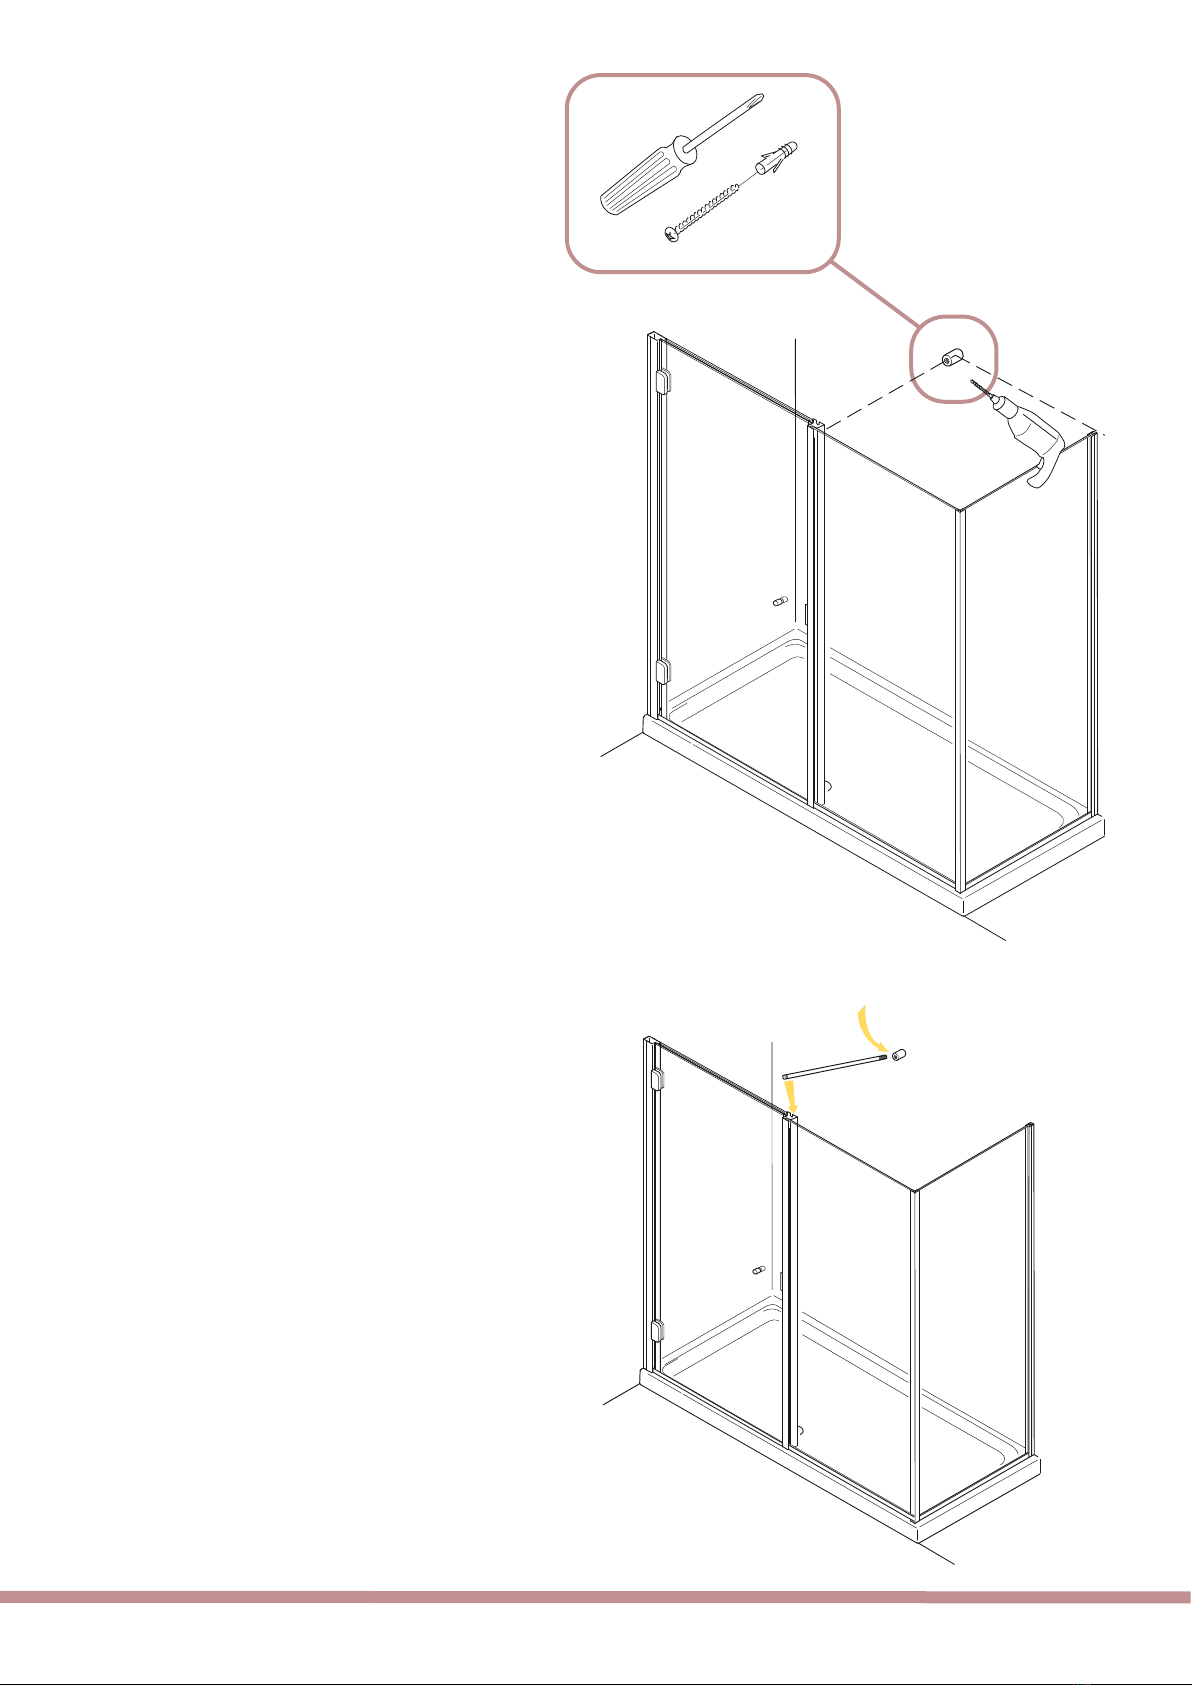
2Inserire nel montante H il fisso laterale F
e inserire le viti bombate M5. Utilizzando
le asole presenti sul montante a muro,
portare il montante ad angolo W a circa 1
cm dal filo esterno del piatto doccia,
verificare che sia verticale e stringere le viti
sul montante a muro, facendo attenzione
a non danneggiare il filetto sul montante
(2.1).
Insert fixed panel F into upright H and add
curved screws M5. Use the holes of the
wall upright to bring corner upright W at
around 1 cm from the external border of
the tray. Check that it is vertical and
tighten the screws on the wall upright,
taking care not to damage the upright
thread (2.1).
Insérer dans le montant H le côté fixe
latéral F et insérer les vis arrondies M5. En
utilisant les perforations du montant à mur,
placer le montant en angle W à environ 1
cm du bord extérieur du receveur, vérifier
qu’il soit vertical et serrer la vis sur le
montant à mur; prendre soin de ne pas
abimer le filet du montant (2.1).
2.1
F
W

Posizionare il montante A a circa 1 cm dal
bordo esterno del piatto doccia e fissarlo
perfettamente verticale (3.1).
Position upright A at around 1 cm to the
external border of the shower tray and fix
it in a perfectly vertical position (3.1).
Positionner le montant A à environ 1 cm
du bord extérieur du receveur et le fixer
parfaitement à la verticale (3.1).
33.1
F
A

Inserire il fisso frontale D ed inserire le viti
bombate M5. Controllare che il montante
di battuta della porta sia verticale (4.1).
Insert front panel D and add curved screws
M5. Check that the hinged upright of the
door is vertical (4.1).
Insérer le côté fixe frontal D et insérer les
vis arrondies M5. S’assurer que le montant
de la partie battante de la porte soit
vertical (4.1).
vertical.
F
D
44.1
Inserire il profilo di tenuta L nell'apposito
scasso presente nel montante centrale di
battuta (5.1). Una volta completata
l'installazione, il profilo dovrà trovarsi nella
posizione indicata nella figura 5.2.
Insert seal profile L in the notch found on
the central closing upright (5.1). Once you
have finished installing, the profile will
have to be in the position shown at fig.
5.2.
Insérer le profilé d'étancheité L dans la
rainure du montant central de fermeture
(5.1). Une fois l'installation terminée, le
profilé doit se trouver dans la position
indiquée en 5.2.
5
5.1
L
5.2

6
Inserire sul montante a muro A il montante
D, sul quale sono fissati i cardini delle
cerniere (6.1). Inserire il profilo di tenuta
L nell'apposita fessura presente sul
montante A (6.2).
Insert upright D complete with hinge pivots
(6.1) onto wall upright A. Insert tightness
profile L into the notch found in upright
A (6.2).
Insérer le montant D - déjà incluant les
pivots des charnières- (6.1) dans le montant
à mur A. Insérer le profilé d’étanchéité L
dans la fissure située dans le montant A
(6.2 ).
6.1
6.2
7
Incastrare il tirante V nei due scassi presenti
nella parte superiore dei montanti ai lati
della porta (7.1).
Wedge tie-rod V into the two grooves on
the upper side of the uprights at the door
sides (7.1).
Emboîtez le tirant V dans les deux rainures
de la partie supérieure des montants aux
côtés de la porte (7.1).
D
V
7.1

8.1
8
9.1
9
Utilizzando le asole presenti sul montante
D, accostare i montanti verticali al profilo
di tenuta L. Verificare che le distanze X tra
i montanti (8.1) siano uguali. In questo
modo si preparerà lo spazio giusto per il
cristallo apribile.
Through the holes found on upright D,
couple vertical uprights to profile L. Make
sure distances X between uprights (7.1) are
the same. Like this, it will be possible to
set the correct gap for the opening panel.
Par moyen des trous situés sur le montant
D, approcher les montants verticaux au
profilé d’étanchéité L. Vérifier que les
distances X entre les montants (7.1) soient
les mêmes. Cela vous permettra d’obtenir
l’espace approprié pour la vitre battante.
Infilare le cerniere fissate al cristallo
apribile sui cardini del montante A (9.1).
Se è stata eseguita correttamente
l'operazione descritta al punto 8, il cristallo
apribile sarà già posizionato correttamente
nei montanti, altrimenti è possibile
registrare la battuta del cristallo sul
montante con le asole presenti nel
montante D.
ATTENZIONE: NON MODIFICARE IL
POSIZIONAMENTO DELLE CERNIERE SUL
CRISTALLO PER REGISTRARE LA PORTA.
Insert the hinges (that have been fitted in
the opening panel) into upright A pivots
(9.1). If step 8 has been carried out
correctly, the opening panel will already
be in the right position in the uprights:
otherwise, it is possible to adjust panel
closing with respect to the upright through
the holes found in upright D.
IMPORTANT: DO NOT MODIFY HINGE
POSITIONING ON THE PANEL TO ADJUST
THE DOOR LINING-UP.
Insérer les charnières (installées dans le
panneau battant) dans les pivots du
montant A (9.1). Si la phase illustrée au
point 8 a été complétée correctement, le
panneau battant occupe déjà une position
correcte dans les montants: autrement, il
est possible d’enregistrer la fermeture de
la vitre sur le montant avec les trous du
montant D.
ATTENTION: NE PAS MODIFIER LE
POSITIONNEMENT DES CHARNIERES SUR
LA VITRE POUR ENREGISTER LA PORTE.
X
X

10 Qualora la porta non fosse perfettamente
allineata con il montante di battuta, è
possibile regolarla agendo sulle asole
presenti sul montante D ed eventualmente
su quelle presenti sul montante ad angolo.
If the door is not perfectly aligned to the
closing upright, it can be adjusted by using
the eyelets found on upright D and - if
necessary - on those found on the corner
upright.
Si la porte n'est pas parfaitement en ligne
avec le montant de fermeture, on peut la
regler en agissant sur les oeillets du
montant D et eventuellement sur celles qui
se trouvent sur le montant en angle.
11 Procedere al montaggio del tirante
centrale: segnare in corrispondenza del
montante centrale dove posizionare la
boccola a muro.
Mount the central tie-rod: mark in the
central upright the point where the wall
bushing will be positioned.
Monter le tirant central: marquer en
correspondence du montant central la
position de la bague sur le mur.

12 Fissare la boccola a muro N con il tassello
e la vite fornite (12.1).
Inserire il tirante M nella boccola (il tirante
si può tagliare a misura se necessario) e
fissarlo con il grano (12.2). Incastrare il
tirante M nel montante centrale di battuta.
Fit the N bushing to the wall through the
plug and the screw supplied (12.1).
Insert the M tie-rod into the bushing (the
tie-rod can becut to measure if required)
and fix it through the key (12.2). Wedge
the tie-rod in the central closing upright.
Fixer la bague au mur N à l'aide de la
cheville et des vis fournies (12.1).
Insérer le tirant M dans la bague (le tirant
peut etre taillé sur mesure si necéssaire) et
le fixer à l'aide de la vis sans bout (12.2).
Encaisser le tirant dans le montant central
de fermeture.
N
MN
12.1
12.2

G
Per siliconare correttamente il profilo
applicato sulla parte INFERIORE dei cristalli
fissi, è possibile sollevarlo leggermente,
applicare il silicone tra profilo e piatto,
ABBASSARE il profilo. Rimuovere il silicone
in eccedenza.
To correctly silicone-seal the profile in the
LOWER part of the fixed glass panel, this
can be slightly lifted, so as to be able to
seal between profile and tray; then, LAY
the profile back DOWN. Remove excess
silicone.
Afin de siliconer correctement le profilé
appliqué à la partie INFERIEURE de la vitre
fixe, on peut soulever la vitre, et appliquer
la silicone entre profilé et receveur; ensuite,
ABAISSER le profilé. Eliminer la silicone
excédante.
ATTENZIONE: Per garantire una buona tenuta
dell'acqua e una sicura stabilità della struttura, è molto
importante eseguire la siliconatura come indicato.
WARNING: to guarantee optimal water-tightness and
a secure structure stability, it is very important to apply
the silicone as indicated.
ATTENTION: Afin de garantir la parfaite étanchéité et
la stabilité de la structure, il faut poser la silicone
d'après les indications ci-dessous.
13

Completare la siliconatura all'esterno della
struttura (sia verticale che orizzontale).
Sigillare ogni fessura dalla quale potrebbe
uscire l'acqua.
Complete by silicone-sealing outside the
structure (both vertically and horizontally).
Seal any crack that may cause water to
leak.
Compléter en siliconant l’extérieur de la
structure (soit en vertical et en horizontal).
Reboucher toute fissure qui puisse causer
une perte d’eau.
14
Popular Bathroom Fixture manuals by other brands

Clou
Clou first toilet CL/04.50010 installation instructions

Samo
Samo CEE ART SP B0780 Assembly instruction

Franke
Franke RODAN RODX607TT Installation and operating instructions

eisl
eisl DX1005CS-A installation instructions

Toto
Toto TTSH301A Installation and owner's manual

Fleurco
Fleurco Trella AUTR3636 Installation and user guide

Glacier bay
Glacier bay 35603HBHD Use and care guide

Southern Enterprises
Southern Enterprises BT7808A0TX Assembly instructions

Sanela
Sanela SLU 23DB Instructions for use

Hans Grohe
Hans Grohe Croma Showerpipe 220 Instructions for use/assembly instructions

EZee Life
EZee Life CRP0929 quick start guide

Nero
Nero MECCA YSW2219-05C manual