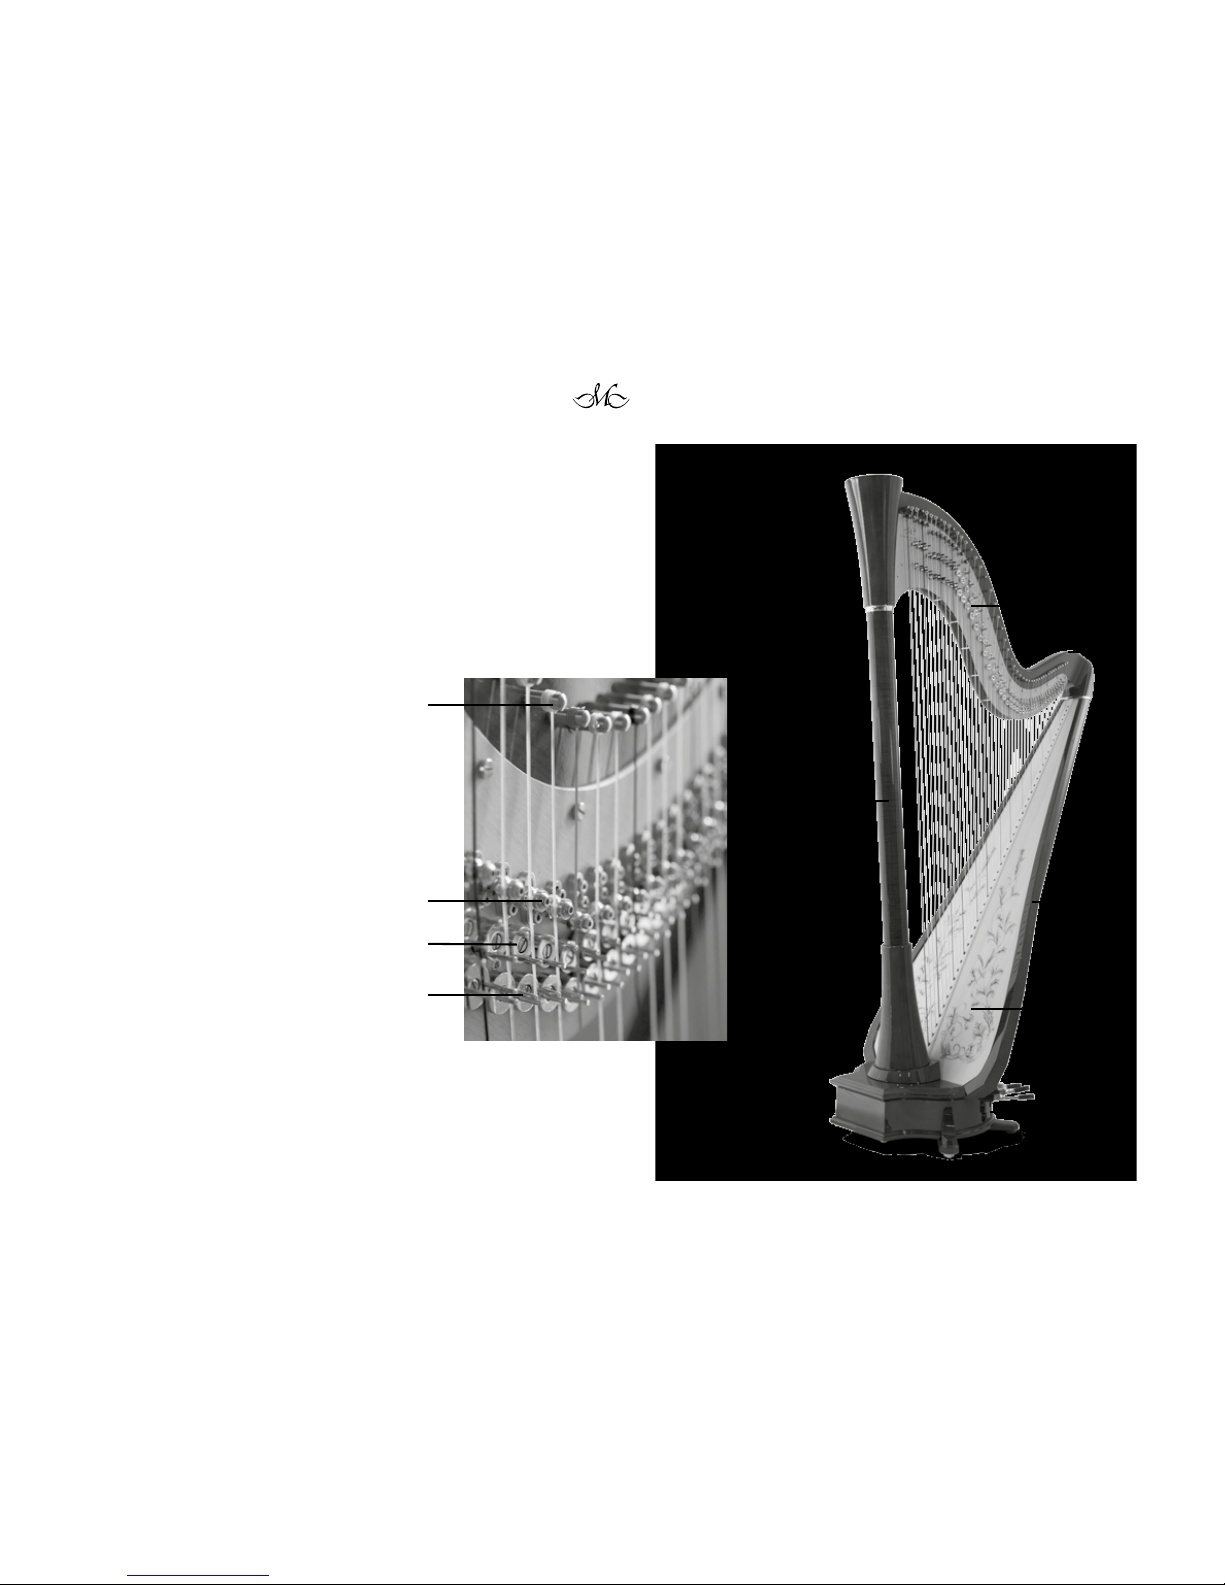
Camac Harps Camac pedal harp User manual

Manuel d’Entretien
Owner’s Manual

Vous venez de prendre possession de votre nouvelle harpe à pédales
Camac, et nous espérons qu’elle saura combler vos aspirations musicales.
Nous vous remercions d’avoir choisi cette harpe fabriquée avec le plus
grand soin dans nos ateliers dans le respect des traditions françaises
d’excellence. C’est une marque de confiance dont nous sommes fiers et
que nous veillerons à honorer de notre mieux.
Nous vous rappelons que toutes nos harpes à pédales bénéficient d’une
garantie pièces et main-d’œuvre de 5 ans, la date de la facture faisant foi.
Cette garantie s’applique à l’ensemble de l’instrument exception faite des
cordes. Elle ne saurait cependant couvrir les éventuels dommages subis
par votre harpe à la suite d’une exposition à des conditions extrêmes de
température et d’humidité.
Afin de préserver la finition de votre harpe, nous vous conseillons de la
dépoussiérer régulièrement à l’aide d’un simple chiffon doux et d’un
pinceau large pour les fourchettes, en veillant à n’utiliser aucun produit à
base d’huile ou de cire.
Pour les réglages courants ne nécessitant pas l’intervention de nos
techniciens, nous vous invitons à suivre les indications de ce manuel
d’entretien qui, nous l’espérons, vous aidera à maintenir votre harpe en
parfait état de fonctionnement.
Pour toute autre intervention sur votre harpe, ou pour un simple conseil,
veuillez nous contacter directement à l’adresse suivante :
You have recently received your new Camac pedal harp, and we
hope this instrument will fulfil your musical aspirations. We would
like to thank you for choosing this harp which has been crafted
with great care in our workshops in respect of the French tradition
of excellence. This is a mark of confidence of which we are proud
and we will do our utmost to honour it.
We would like to remind you that all our pedal harps come with a
five-year parts and labour guarantee from the date of invoice. This
guarantee applies to the entire instrument except the strings.
However, it does not cover any eventual damage to your harp
following exposure to extreme conditions of temperature and
humidity.
In order to preserve the finish of your harp, we advise you to dust
it regularly with a soft cloth and with a wide brush for the forks,
taking care not to use any oil or wax based products.
For everyday regulation which does not require the intervention
of our technicians, please follow the instructions in this
maintenance manual which, we hope, will help you keep your
harp in perfect working order.
For any other interventions to your harp, or simply for advice,
please contact us directly at the following address:
Les Harpes Camac
La Richerais - BP 15
44850 Mouzeil
France
Tél : +33 (0) 2 40 97 24 97
Fax : +33 (0) 2 40 97 79 31

An Owner’s Manual for Camac Pedal Harps
Manuel d’Entretien pour les Harpes Camac
1
Major Components of the Harp
About Strings
Tools provided with your harp
Troubleshooting
String replacement
If a string doesn’t stay in tune
Cable length adjustment (“dead point”), or eliminating “overmotion”
A natural or a sharp is not in tune
Disk adjustment
The string buzzes on the disk
Buzzes in the string nut
Changing Pedal Cushions
Attachment of the column top
Electric Harps:
Connexions
Troubleshooting
Nomenclature des pièces de la harpe
À propos des cordes
Nécessaire d’entretien fourni avec votre harpe
Guide des symptômes
I. . . . . . . . . . . . . . . . . . . . . . . . . . . Remplacement d’une corde
II. . . . . . . . . . . . . . . . . . . . . . . . . . La corde ne tient pas l’accord
III. . . . . . . . Réglage des longueurs de câbles (« point mort »)
IV. . . . . . . . . . . . . . . . . . . . . . Les altérations ne sont pas justes
V. . . . . . . . . . . . . . . . . . . . . . . . . . . . . Réglage d’une fourchette
VI. . . . . . . . . . . . . . . . . . . . . . . . . . . . . . . . . . . . . . La corde frise
VII. . . . . . . . . . . . . . . . . . . . . . . . . . . . . . . . . . Vibration de sillet
VIII. . . . . . . . . . . . . . . . Changement des enrobages de pédales
IX. . . . . . . . . . . . . . . . . . . . . . . . . . Serrage du haut de colonne
Les harpes électriques :
X. . . . . . . . . . . . . . . . . . . . . . . . . . . . . . . . . . . . . . . . . Connexions
XI. . . . . . . . . . . . . . . . . . . . . . . . . . . . . . . . Recherche de pannes
pages
2
3
5
6
7
10
11
14
16
21
24
24
26
27
28
29
English text by John Pratt
TABLE DES MATIERES : TABLE OF CONTENTS:

Nomenclature des pièces de la harpe :
Colonne
Mécanique
Console
Sellette
Caisse de résonance
Table d’harmonie
Socle et pédales
Major Components of the Harp:
Column
Action
Neck
Neck plate
Body
Soundboard
Base and Pedals
Cheville
Sillet
Fourchette bécarre
Fourchette dièse
Tuning Pin
String Nut
Natural Disk
Sharp Disk
2
1
2
3
4
5
6
7
A
B
C
D
A
B
C
D
2
3
4
1
5
6
7

À propos des cordes
Nomenclature des cordes :
Le nombre des cordes d’une harpe à pédales varie d’une quarantaine
pour les plus petites harpes, à 47 qui est le standard des harpes Grand
Concert. Les cordes Do sont repérées par la couleur rouge, tandis que les
cordes Fa sont de couleur foncée, noires ou bleues.
Les cordes sont référencées de deux façons :
1. Par leur note et leur numéro d’ordre, en commençant à compter par les
plus petites. Attention, les deux premières cordes sont numérotées Sol 00
et Fa 0, le numéro 1 étant la corde Mi. Ceci pour des raisons historiques :
avant la harpe moderne que nous connaissons aujourd’hui, les harpes
commençaient par un Mi, la tonalité de ces harpes (à Simple Mouvement)
étant alors Mi bémol majeur.
Exemples : Sol 00, Ré 2, Do 10, Si 18, La 26, Sol 34, Fa 42, Do 45.
2. Par leur numéro d’octave. Attention : pour la même raison historique,
les octaves de la harpe commencent par la note Mi en descendant
jusqu’au Fa, l’octave suivante commençant au Mi. En conséquence, les
deux plus petites cordes constituent l’octave 0 (Sol 00 et Fa 0), puis les
octaves s’enchaînent de Mi à Fa en descendant vers les cordes graves.
Octaves 1, 2, 3, 4, 5 (passage des cordes en boyau aux cordes filées), 6, et
7 (cette dernière n’étant composée que des 3 notes Mi, Ré et Do pour les
harpes à 47 cordes).
Exemples : Sol Oct. 0, Ré Oct. 1, Do Oct. 2, Si Oct. 3, La Oct. 4, Sol Oct. 5,
Fa Oct. 6, Do Oct. 7.
About Strings
Naming the different strings:
The number of strings on a pedal harp varies from about forty for the
smallest harps, up to 47, which is the standard for full sized concert harps.
All “C” strings are recognized by their red color, while all “F” strings are
of a darker color, either blue or black.
Strings may be referred to in two ways:
1. By note and number, counting down from the highest strings.
Important note: the two highest strings are numbered “00 G” and “0 F”
according to this system. The number 1 indicates the highest “E” string.
The reasons for this apparent anomaly are historical: on older harps
before the era of the modern harp that we are familiar with today, the
highest note available was “E”, and was designated “E 1”. These old
harps (single action) were tuned to the key of E flat major.
Examples of this type of string nomenclature: G 00, D 2, B 18, A 26, F 42,
and C 45.
2. Strings may also be designated by the number of the octave. Important
note: for the same historical reasons referred to above, a particular
octave number includes a range of strings with the “E” being the highest
note in a particular numbered octave. The two highest strings on a
concert harp (F and G) are considered to be “0 Octave” according to this
manner of referencing. The numbering then begins with the number 1
for the octave of strings including the high “E,” down to the “F” below
that, and then so forth for octaves 2, 3, 4, 5 (where gut strings transition
into wire strings), 6, and finally octave 7, which includes only three notes,
“E”, “D”, and “C”, for harps with 47 strings.
Examples of this type of nomenclature: “0 Octave G”, “First Octave D”,
“Second Octave C”, “Third Octave B”, “Fourth Octave A”, “Fifth Octave G”.
3

Il peut être utile de rappeler la notation internationale des notes de la
gamme. Cette information peut vous être utile pour éviter les erreurs
d’interprétation sur des sachets de cordes où les noms des cordes seraient
indiqués en anglais. On retrouve également cette notation sur les
accordeurs électroniques, voire aussi pour les indications de changements
de pédales sur certaines partitions.
Français : Anglais :
Do C
Ré D
Mi E
Fa F
Sol G
La A
Si B
Afin d’éviter tout risque d’erreur lors de vos commandes de cordes, nous
recommandons l’usage de la première méthode (par nom de note et
numéro d’ordre).
Les harpes à pédales Camac sont habituellement équipées des cordes
suivantes :
Octaves 0 et 1 (Sol 00 à Fa 7) : cordes Nylon pour harpe à pédales.
Octaves 2 à 5 (Mi 8 à La 33) : cordes boyau Camac Classique, calibre
standard.
Octaves 5 à 7 (Sol 34 à Do 45) : cordes filées Galli calibre standard.
Il vous est naturellement possible de modifier le type de cordage de votre
harpe, par exemple en équipant la première octave de cordes boyau, ou
en choisissant de remplacer des cordes boyau de calibre standard par un
calibre plus fort, ou encore d’utiliser des cordes filées de calibre light,
voire enfin de choisir une autre marque de corde. Sauf exceptions, cela ne
causera aucun dommage à votre harpe, mais il faudra toutefois revoir le
réglage de votre mécanique afin d’adapter l’intonation des fourchettes.
At this point it might be useful to compare the American or English
nomenclature used for the notes of the musical scale with the traditional
European nomenclature. This information will be useful when reading
the string envelopes of some European harp string manufacturers, or
even when reading musical scores where the verbiage is written in a
language other than English. See the comparison below:
English: European:
C Do
D Ré
E Mi
F Fa
G Sol
A La
B Si
In order to avoid any confusion in ordering replacement harp strings, we
recommend using the first method of referring to strings (by note and
number).
New Camac pedal harps are always strung as follows:
Octaves 0 and 1: (G 00 to F 7): Nylon strings for pedal harps.
Octaves 2 to 5: (E 8 to A 33): Camac Classic gut strings, standard gauge.
Octaves 5 to 7: (G 34 to C 45): Galli wire Strings, standard gauge.
You may certainly use other types of strings on your harp, for example, by
using gut strings in the first octave, or in choosing the replace some gut
strings of standard diameter with strings a bit heavier gauge, or again to
use wire strings of a bit lighter gauge. With some exceptions, this will not
cause any damage to your harp, but you should nonetheless verify the
regulation after changing to a different string gauge or type, to make
sure that correct regulation is maintained.
4

Nécessaire d’entretien fourni avec votre harpe.
1 - Clé Allen de 5mm (serrage du haut de colonne)
2 - Tournevis plat de 2,5mm (réglage des fourchettes de taille moyenne)
3 - Tournevis plat de 2mm (réglage des fourchettes de petite taille)
4 - Clé Allen de 2mm (réglage des petits sillets)
5 - Clé d'accord
6 - Clé Allen de 2,5mm (réglage des
longueurs de câbles, réglage des
grands sillets)
7 - Pince coupante
8 - Tournevis plat de 4mm (réglage
des fourchettes de grande taille)
9 - “Rod-tuner”
Tools provided with your harp
1 - Allen key, 5.0 mm (for the column top attachment screws)
2 - Slot Screwdriver, 2.5 mm (to adjust medium disks)
3 - Slot Screwdriver, 2.0 mm (to adjust small disks)
4 - Allen key, 2.0 mm (to adjust the small string nuts)
5 - Tuning key
6 - Allen key, 2.5 mm (to adjust
pedal cable length, and to adjust
the large string nuts)
7 - Wire cutter, or string cutter
8 - Slot Screwdriver, 4 mm (to adjust
large disks)
9 - “Rod-tuner”
5
1
2
3
4
9
5
6
7
8

GUIDE DES SYMPTÔMES
Dans tous les cas, sans exception, et quel que soit le symptôme,
commencez toujours par vérifier le réglage de la longueur de câble (point
mort) de la pédale correspondant à la note fautive : la plupart des petits
problèmes viennent d’un allongement de la longueur du câble.
(voir chapitre à ce sujet page 11).
Et dans le cas d’une vibration qui n’est pas localisée sur une note précise,
vérifiez d’abord la longueur des câbles de l’ensemble des pédales.
• Une corde s’est cassée ...................Voir chapitre I page 7
• Une corde ne tient pas l’accord............Voir chapitre II page 10
• Une pédale est dure à passer :
- Vérifier la longueur du câble ............Voir chapitre III page 11
- Une fourchette dièse
pince un peu trop une corde.............Voir chapitre IV page 14
• Une altération n’est pas tout à fait juste ....Voir chapitre V page 16
• Une corde frise :
- Car elle n’est pas assez pincée
par la fourchette .......................Voir chapitre V page 16
- Bien qu’elle soit correctement pincée
par la fourchette .......................Voir chapitre VI page 23
- Car elle touche une autre fourchette
en vibrant.............................Voir chapitre VI page 21
• Il y a une vibration de corde en bémol : ....Voir chapitre VII page 24
• Il y a une vibration, quelle que soit
la position des pédales : ..................Voir chapitre I, 5. et 6, page 9.
Voir chapitre IX page 26
• Les enrobages de pédales sont usés ........Voir chapitre VIII page 24
TROUBLESHOOTING
In every case, without exception, no matter what the symptom may be,
always start by checking the cable length (overmotion adjustment) of the
pedal corresponding to the note you are having a problem with. Most
little problems stem from some small elongation of the pedal cable.
(See the chapter on this subject, page 11).
In the case of a buzz that is not related to a specific string, first check the
cable length for all of the pedals.
• Broken string: .........................See chapter I, page 7.
• A String won’t stay in tune:..............See chapter II, page 10.
• A pedal doesn’t move freely:
- Check cable length ....................See chapter III, page 11.
- A sharp disk grabs the string a bit
too much ............................See chapter IV, page 14.
• A natural or a sharp is not quite in tune:...See Chapter V, page 16.
• A string buzzes:
- Because it is not held firmly
enough by the disk ....................See chapter V, page 16.
- Even if it is properly
held by the disk .......................See chapter VI page 23.
- Because it touches another
disk as it is sounding ...................See chapter VI page 21.
• A string buzzes in flat: .................. See chapter VII, page 24.
• There is a buzz
in any pedal position: See chapter I, 5 and 6, page 9.
See chapter IX, page 26.
• The pedal cushions are worn: ............ See chapter VIII, page 24.
6

7
I. Remplacement d’une corde.
La casse de corde est un problème courant de harpiste, et nous vous
recommandons de vous exercer à leur remplacement. Il est toujours bon
de savoir changer une corde, car c’est bien souvent au mauvais moment
que la casse se produit…
Peut-être aurez-vous remarqué que les cordes cassent moins souvent sur
votre harpe Camac ? En effet, la composition des cordes, leurs longueurs
et leurs calibres ont été étudiés individuellement pour chaque note de
façon à obtenir la meilleure tension, ce qui, en plus de limiter la casse,
contribue à améliorer le son et le toucher.
1. Récupérez le petit tourillon de bois qui servait de support au nœud de
la corde cassée. Assurez-vous que ce tourillon ne reste pas dans la caisse
de résonance, car il pourrait être source de vibration. Vous pouvez aussi,
comme dans la tradition, utiliser un morceau de corde de gros diamètre.
Mais, sur votre harpe Camac, le dégagement du trou de l’œillet (dans la
caisse de résonance) est conique. Ceci a pour avantage de créer un vide
où le nœud ira se loger, évitant ainsi tout risque de vibration ou de son
parasite causé par l’appui du nœud sur la table d’harmonie. Par contre, si
vous utilisiez un morceau de corde trop fin, celui-ci risquerait de plier et
de se coincer dans le trou. Nous vous recommandons de continuer à uti-
liser les tourillons en bois qui assurent un bon blocage.
2. Prenez la nouvelle corde. Naturellement, nous vous conseillons d’uti-
liser le même type de cordes que celui d’origine, et en fonction duquel le
réglage de votre harpe a été réalisé. Ainsi, vous équiperez toujours votre
harpe des mêmes cordes, ce qui contribue à la stabilité des réglages. Vous
pouvez parfaitement choisir une autre qualité de cordes : dans ce cas, un
réglage adapté de la harpe devra être envisagé.
I. Replacing a String
String breakage is a common problem for harpists, and we recommend
that you replace strings yourself. It is always good to know how to
change a string, as it is often at the worst moment that a string breaks…
Perhaps you have noticed that strings break less often on your Camac
harp. Actually, the composition of the strings, string length, and string
gauge were individually studied for each note to obtain the best tension,
and in addition to reducing breakage, contributes to overall sound and
feel.
1. From the broken string, recover the little length of dowel that is
knotted to the end of the string. This dowel serves as a support for the
knot. Be sure that little dowel doesn’t remain or lie freely inside the harp
body, as this could cause a buzz. You might also, as is the common custom,
use a short length of heavy harp string in place of the dowel. Under the
soundboard inside the harp body, the opening for the string hole is
conical. This has the advantage of creating an empty space where the
string knot can reside, in order to eliminate any risk of a sympathetic buzz
from the string knot touching the soundboard. On the other hand, if you
use a short stub of harp string which is too light, this might bend, and
become tightly wedged in the hole. We recommend that you continue to
use the little wooden dowels to secure the strings to prevent the string
knot from becoming tightly wedged in the bottom of the string hole.
2. Take the new string. Of course we recommend that you always use the
same type of strings as were originally installed, and which the original regu-
lation of your harp was based upon. Thus, if you continue to keep the same
strings on your harp, this will contribute to the stability of the regulation.
You may certainly choose another quality or gauge of strings, but in this case
you should consider having the regulation adjusted to the new strings.

3. Voici un exemple de nœud que vous pouvez réaliser au bout de la
corde. Passez le tourillon dans la boucle, et serrez fortement. Pour les
cordes fines, vous pouvez au préalable
faire un nœud simple au bout de la
corde, ce qui assurera un meilleur blo-
cage du nœud. Vous pouvez aussi, en
plus du nœud indiqué, renforcer le ser-
rage d’une boucle supplémentaire.
4. Passez la corde dans l’œillet (par l’intérieur de la caisse), puis dans la
cheville. Tendez la corde en tournant la cheville avec la clé d’accord tout
en poussant pour bien bloquer la cheville. Assurez-vous que la corde fasse
au moins deux tours de cheville avant de commencer à se tendre. L’incli-
naison ainsi donnée à la corde contribuera à bloquer la
cheville dans la console au lieu de la dérouler, et la
corde ne sera pas en tension sur l’une des arêtes du
trou de la cheville, ce qui est une cause fréquente de
casse.
3. Here is a description of how to knot the end of the string. Pass the
wooden dowel into the loop of an overhand knot in the end of the
string, and then tighten strongly. For
the higher strings, you can make an
overhand knot with an extra initial
loop, which will make the knot hold
tighter. You can also make an additional
loop around the dowel for the highest
strings, which prevents unravelling until
the string is under tension.
4. Pass the string through the eyelet, and then through the hole in the
tuning pin. Tighten the string by turning the tuning pin with the tuning
key while pushing firmly to insure the tuning pin holds. Make sure that
the string wraps at least two times around the tuning pin before starting
to tighten. The angle that the string will thus assume
will also help hold the tuning pin in the neck, instead
of trying to unwind the string. The wraps will also
insure that the string will not tighten over the crests of
the tuning pin hole, which might lead to early string
breakage.
8

5. Très important : veuillez à ce qu’il ne reste pas de bout de corde libre
après le nœud. En effet, si l’extrémité de la corde est assez longue pour
être en contact avec la table d’harmonie, vous
pouvez être assuré que cela causera une vibra-
tion très désagréable. Nous vous recommandons
fortement de couper ce qui reste de corde après
le nœud afin d’éviter tout désagrément.
6. De la même façon, nous vous invitons à ne pas
laisser de longueur de corde inutile après la che-
ville. Il est parfois dans les habitudes des har-
pistes qui, pensant faire des économies,
enroulent le restant de corde autour des che-
villes. Ceci a pour effet de créer une source de
vibrations potentielles extraordinaire. De plus, le
fait de laisser une corde enroulée ainsi autour des chevilles pendant des
mois altère tellement sa qualité qu’elle en devient souvent inutilisable. Il
est beaucoup plus économique de couper l’excédent de corde et de le
ranger dans son sachet s’il y a assez de longueur pour une deuxième
corde.
5. Very important: Make sure that there is not any significant string
length extending from the knot on the dowel. If the string length is long
enough to contact the soundboard, you will be
sure to have a very disagreeable buzz. We
strongly recommend that you cut off the end of
the string very close to the knot, in order to
avoid any possibility of such a buzz.
6. Similarly, we invite you to not leave any signi-
ficant length of unused string extending from
the end of the tuning pin. Sometimes harpists
have the habit, thinking to save money, of win-
ding the long excess string length around the
other tuning pins. This has the effect of creating
an extraordinary source of buzzes. What is more,
leaving a string all twisted around the tuning pins for months at a time
will reduce the quality of the string so much as to become unusable. It is
much more economical to cut the excess string, and to replace it in its ori-
ginal envelope, if there is sufficient left over for another string.
9

II. Une corde ne tient pas l’accord.
Si une corde ne tient pas l’accord, il peut y avoir plu-
sieurs raisons à cela.
- Vous venez de changer cette corde. Il faut compter au
moins une semaine pour qu’une corde en boyau tienne
correctement l’accord, et un peu plus pour une corde
en Nylon. Vous pouvez accélérer le processus de stabili-
sation de la corde : tendez-la et travaillez-la en la tor-
dant un peu partout sur sa longueur, comme indiqué
sur cette illustration.
- La corde n’est pas spécialement neuve, mais peut-être
que le nœud qui l’attache n’est pas assez solide, et il se
détend petit à petit. Vérifiez la qualité de votre nœud,
et au besoin refaites-le (voir page 7, remplacement d’une corde).
- La corde n’est pas neuve, et le nœud tient très bien. Alors il faut proba-
blement mettre en cause la cheville, qui n’est pas bien bloquée.
Bloquer la cheville.
La cheville est une pièce métallique de forme conique, qui se bloque dans
le bois par friction. Ce procédé est commun à quasiment tous les instru-
ments à cordes, du violon au piano. Sa forme conique fait qu’elle se
bloque quand la corde est bien tendue. Si la cheville n’est pas correcte-
ment enfoncée dans le bois, la traction de la corde fera qu’elle se dérou-
lera.
Si c’est le cas, il y a trois façons de remédier à cela. Assurez-vous tout
d’abord que la corde fait au moins deux tours de cheville lorsqu’elle est
en tension : l’angle ainsi formé participera du blocage de la cheville.
1. Détendez la corde, et retendez-la tout en poussant fortement sur la
cheville avec la clé d’accord – comme si vous vouliez enfoncer un tire-bou-
chon. Ainsi, elle pénètrera plus profondément dans le bois.
II. If a string doesn’t stay in tune.
If a string doesn’t stay in tune, there might be several
reasons.
- If you have just changed a string, you must count on
at least one week for a gut string to hold proper pitch,
and maybe even more for a nylon string. You can
speed up the stabilization process of the string by tigh-
tening it and working it by twisting it (in the same
direction as the fiber twist for a gut string) a bit all
along its length, as indicated in the illustration.
- If the string isn’t particularly new, perhaps the attach-
ment knot is not tight, or well tied, and loosens bit by
bit. Check the knot, and if necessary, retie it (see page
7, on how to change a string).
- If the string isn’t new, and the knot is properly tied, the problem is pro-
bably a slipping tuning pin.
Tightening the tuning pin.
The tuning pin is a round, tapered metal part, which keeps its tightness in
the neck by friction. This is similar to nearly all string instruments, from
the violin to the piano. The round tapered shape of the tuning pin wedges
tightly in the neck when the string is properly tightened. If the tuning pin
is not sufficiently pushed or tightened into the wood of the neck, the ten-
sion of the string will rotate the tuning pin, and the string will unwind.
If this is the case, there are three ways to remedy this. Make sure first of all
that the string winds around the tuning pin at least twice when the string
is under tension: the angle thus formed will help hold the tuning pin.
1. Loosen the string, and then re-tighten it while pushing the tuning pin
strongly into the neck with the tuning key—as if you were screwing in a
cork screw. In this manner, the tuning pin will be set a bit deeper into the
wood, and will grip better.
10

11
2. Si ce n’est pas suffisant, prenez un petit maillet ou marteau et tapez
par petits coups sur la cheville du côté de la clé d’accord.
3. Si ce n’est toujours pas suffisant, détendez et enlevez la corde de la
cheville. Ôtez la cheville de la console en la dévissant tout en poussant du
côté où il y avait la corde. Frottez légèrement le corps de la cheville avec
de la colophane, ou faites-y simplement quelques traits de craie, et
remettez la cheville en place. Rappelez-vous de pousser sur la cheville en
accordant.
III. Réglage des longueurs de câbles
- les « Points Morts ».
Voici le réglage à réaliser avant et après toute intervention technique sur
votre harpe : vérifiez toujours le bon réglage des points morts.
Qu’appelle-t-on « point mort » ?
Lorsque vous passez une pédale de bémol à bécarre, les fourchettes bécarre
tournent. Ensuite, si vous passez cette pédale de bécarre à dièse, il n’y a plus
que les fourchettes dièses qui tournent. On appelle « point mort » le
moment précis où les fourchettes bécarres arrêtent de tourner et atteignent
leur maximum de torsion des cordes. Il est primordial que ce point mort
coïncide exactement avec le mouvement de la pédale dans les encoches du
socle, car de cette position dépend le réglage général de la mécanique.
La position du point mort dépend directement de la longueur des câbles
qui passent dans la colonne et transmettent le mouvement des pédales à
la mécanique. L’allongement de cette longueur se traduit par un retarde-
ment du passage du point mort : ceci signifie que la fin de rotation des
fourchettes bécarres n’interviendra plus au moment précis où la pédale
atteint la position intermédiaire du socle, mais légèrement en dessous,
c’est-à-dire en passant la pédale du bécarre vers le dièse. Ainsi, lorsque la
pédale sera en position bécarre, il manquera une certaine proportion de
rotation aux fourchettes, ce qui aura pour conséquence une mauvaise
intonation, voire des vibrations causées par un manque de torsion de la
corde.
2. If this isn’t sufficient, use a small mallet or hammer and tap lightly on
the tuning pin, on the side where you place the tuning key.
3. If that still isn’t enough, loosen the string, and remove it from the
tuning pin. Remove the tuning pin from the neck, by rotating it back and
forth with the key, while pushing it from the side where the string
attaches. Rub the shaft of the tuning pin with violin rosin, or else simply
rub it with common chalkboard chalk, and replace the tuning pin.
Remember to push firmly on the tuning pin as you tune the string.
III. Cable length adjustment (dead point),
or eliminating “overmotion”.
This is the adjustment to make before and after all other technical adjust-
ments on your harp: always check the “overmotion.”
What is the “dead point” or “overmotion?”
When you move a pedal from flat to natural, the natural disks turn. Next,
as you continue to move the pedal from natural to sharp, only the sharp
disks turn. The “dead point” is the precise moment where the natural
disks stop turning, and reach their maximum grip on the strings. It is
absolutely essential that this precise “dead point” natural disk position
coincide exactly with the natural pedal position in the base, as the overall
proper regulation of the action depends on this position.
The position of the “dead point” is dependent upon the relative length of
the pedal cables which pass through the column and transmit the pedal
movement to the action. Any stretching of the cable (or on the other hand
even any slight compression of the structure of the harp) effects a delay in
the position of the “dead point.” We refer to any delay of the “dead point”
as “overmotion.” This means that the end of the rotation of the natural
disks no longer happens precisely when the pedal is in the middle or natural
position in the base, but slightly under, that is, as the pedal begins to move
from the natural position to the sharp position. Thus, when the pedal is in
the natural position, the natural disks will lack a certain amount of neces-
sary rotation, which can result in bad intonation, and also buzzes from the
disks not grabbing the strings sufficiently (“open disk” buzz).

Utilisation du « Rod-tuner ».
Le Rod-tuner est l’outil de réglage des longueurs de câbles, qui ne peut
être utilisé exclusivement que sur les harpes Camac construites après 1996.
La tige en laiton est composée de 7 bagues, chacune correspondant à la
position de la mécanique lors du réglage idéal de la
pédale correspondante. Il devra être utilisé de la
manière suivante :
1. Placez les sept pédales de la harpe en position dièse
(en bas). Ceci ouvre un trou à l’arrière de la harpe près
de la colonne.
2. Vérifiez l’état de la batterie du Rod-tuner en déga-
geant le tube de protection plastique sur la fiche et en
la mettant en contact avec la tige laiton. L’appareil
devrait émettre un son.
3. Insérez la tige laiton dans le trou de la plaque arrière
de la mécanique.
4. La fiche devra être insérée dans une des deux vis
situées sur le dessus de la colonne. Si elle ne rentre pas
dans l’une, essayez la deuxième.
5. En commençant par les pédales de droite, remontez
la pédale de La en position bécarre (au centre). Veuillez
à bouger la pédale à une vitesse de jeu normale, et ne la
laissez pas remonter violemment car cela pourrait
donner une mauvaise indication.
Using the “Rod-tuner”
The Rod-tuner is the tool to adjust the cable length, and may only be
used on Camac harps constructed since 1996. The brass stem has 7 rings,
each of which corresponds to the proper position of the respective action
linkages when at proper adjustment. It should be used
as follows:
1. Place all seven pedals in the sharp (lowest) position.
This opens a hole on the back action plate near the
column.
2. Check the battery of the Rod-tuner by sliding back the
plastic protection tube on the jack at the end of the
wire, and by touching the jack to the brass stem. The
tool should give off a high-pitched sound.
3. Insert the brass stem in the hole on the back action
plate. Make sure that the brass stem of the tool is fully
seated in the hole.
4. The jack must be inserted into one of the two screws
which are on the very top surface of the column. If it
doesn’t go into one, try the other screw.
5. Starting on the right side, bring the “A” pedal up to
the natural (center) position. Move the pedal as you
would during normal play, but do not move it up vio-
lently, as this might give a bad reading.
12

6. Si le Rod-tuner se met à sonner quand la pédale de
La est en position bécarre, le câble doit être raccourci.
Pour avoir accès au dessous du socle, penchez la harpe
en arrière et faites-la reposer sur un support doux,
comme un fauteuil ou une banquette.
7. Prenez la clé Allen à manche rouge en T et mettez-la
dans la tête de vis de la pédale concernée.
8. Vissez doucement avec la clé (sens horaire) jusqu’à
l’arrêt du signal sonore.
9. Remettez la harpe en position normale, et vérifiez
qu’il n’y a plus de bruit lorsque la pédale est mouve-
mentée de dièse à bécarre à vitesse normale. Lorsque
le réglage est correct, remettez la pédale en position
dièse.
10. Répétez la manœuvre avec les autres pédales. Il
sera un peu plus difficile d’atteindre les têtes de vis des
pédales de gauche (ré, do, si) car elles sont plus proches
de la harpe.
11. Quand vous avez vérifié et réglé toutes les pédales, assurez-vous
qu’elles sont toutes en position dièse (basse), et retirez le Rod-tuner. Si
vous avez laissé une pédale en position bécarre, vous ne pourriez pas
enlever l’appareil.
Note : il est virtuellement impossible que vous ayez besoin de rallonger
les câbles. Ceux-ci ne peuvent que s’allonger avec le temps. Si le Rod-
tuner ne fait pas de bruit lorsque vous contrôlez votre harpe, vous pouvez
considérer que le réglage est correct, il est inutile de rallonger le câble
pour déclencher le bruit.
6. If the Rod-tuner gives off the high-pitched sound in
natural, the cable must be shortened. To gain access to
thae area under the base, lay the harp in its side on a
soft support, like a sofa or a padded bench, insuring
that the Rod-tuner is not touching anything, or bea-
ring any of the weight of the instrument.
7. Take the Allen key with the red handle in the form
of a “T”, and insert it into the screw head of the pedal,
where the cable is attached.
8. Turn gently the screw (clockwise) until the high-pit-
ched sound stops.
9. Bring the harp back up to normal position, and
check that the high-pitched sound does not reoccur
when the pedal is moved at normal velocity back and
forth from sharp to natural. When the adjustment is
correct, place the pedal back in sharp.
10. Repeat the adjustment for the other pedals. It will be a
bit more difficult to reach the screw heads for the left-side
pedals, as they are closer to the main body of the harp.
11. When you have checked and adjusted all of the pedals, make sure
that they are all in sharp (bottom) position, and take out the Rod-tuner. If
you have left any of the pedals in natural, you will not be able to remove
the tool.
Note: It is virtually impossible that you should need to lengthen the
cables. These can only be stretched longer over time. If the Rod-tuner
emits no sound as you check the adjustment, you may consider the regu-
lation of that cable to be correct; it would serve no use to lengthen the
cable to cause the tool to emit the tone.
13

IV. Les altérations ne sont pas justes.
Lorsque la note est correctement accordée en position bémol, la note
obtenue en position bécarre ou dièse n’est pas juste. Il peut y avoir plu-
sieurs origines à ce problème, et donc plusieurs façons d’y remédier.
- La première vérification à opérer est le contrôle des longueurs de câbles.
En effet, si le câble s’est allongé, alors les rotations de fourchettes ne
coïncident plus exactement avec les positions des pédales dans les enco-
ches, et cela affecte directement la justesse des notes obtenues. Pour
cette opération, reportez-vous au paragraphe précédent.
- Vous venez de changer cette corde, et le diamètre de la nouvelle corde
est peut-être trop fort, ou trop faible. Vérifiez soigneusement la réfé-
rence de la corde que vous avez changée, et remplacez-la si nécessaire
pour que tout rentre dans l’ordre.
- La corde en place est la bonne, mais les altérations sont toujours fausses.
Le « centrage » de la corde a peut-être bougé : la corde à vide (en posi-
tion bémol) passe-t-elle exactement au centre de la fourchette bécarre ?
Si ce n’est pas le cas, voyez page 21 le paragraphe concernant ce réglage.
- La corde en place est la bonne, elle est correctement centrée, mais les
altérations sont toujours fausses. Il vous faut alors revoir le réglage des
fourchettes.
Principe de base :
La longueur de référence d’une corde est celle obtenue en position bémol
(de l’œillet de la table au sillet en haut de la mécanique). Chaque four-
chette bécarre puis dièse diminue cette longueur d’une proportion cor-
respondant à un demi-ton, ce qui a pour effet de faire monter la note.
Plus la longueur d’une corde diminue, plus la note est aiguë.
En plus du paramètre de la longueur intervient également la torsion de la
corde par la fourchette, nécessaire pour maintenir la corde lors de sa mise
IV. A natural or a sharp is not in tune.
When a string is in tune in flat, but not in natural or sharp, there may be
several reasons for this problem, and therefore several ways to correct it.
- The first thing to check is the cable length. As we have discussed, if the
cable is stretched, the rotation of the disks no longer coincides with the
pedal positions in the slots in the base. This directly affects the intonation
of the resulting notes. For this procedure, we refer you to the preceding
paragraph.
- You just changed a string, and the gauge of the new string is possibly
too thick, or too thin. Check carefully the designation of the string that
you have changed, and replace it if necessary, for all to be in order.
- The string in place is good, but the naturals and sharps are still out of
tune. The “centering” of the string might have moved. Does the string in
flat position pass directly over the center of the natural disk? If not, see
page 21 for the paragraph concerning this adjustment.
- The string in place is good, it is correctly centered, but the naturals and
sharps are still out of tune. In this case, the regulation of the disks must
be checked and adjusted.
Basic principle:
The reference length of a string is obtained by measuring the string (in
flat) from the eyelet on the soundboard to the string nut on the action.
Each natural disk and then also each sharp disk shortens this length, thus
progressively increasing the note played by the string one half step.
In addition to the length parameter, the amount of twisting or grip of
the disk against the string contributes equally to maintaining the correct
14

15
en vibration.
Suivant les cas, le réglage consiste à modifier l’un où l’autre de ces deux
paramètres afin d’ajuster au mieux les notes obtenues.
En résumé, on peut considérer qu’une altération est trop basse si la four-
chette ne pince pas assez la corde (cas a.). Dans cette situation, il faut
décaler la rotation de la fourchette pour
qu’elle pince plus la corde.
Inversement, une altération est trop
haute si la fourchette pince trop la
corde (cas c.). Il convient alors de décaler
la rotation de la fourchette pour qu’elle
donne moins de torsion à la corde.
Le but du réglage est d’obtenir une
torsion de la corde se rapprochant du
cas b.
Fixation des fourchettes.
Les fourchettes sont fixées sur leur axe selon un système de cône blo-
quant. L’extrémité conique de l’axe qui dépasse par le trou de la plaque
de mécanique s’insère dans la fourchette, et la vis de serrage a pour rôle
de bloquer l’ensemble par friction. Ce blocage par friction est tellement
puissant que le fait de desserrer la vis n’entraîne pas la libération de la
fourchette, assurant ainsi une très grande fiabilité du réglage de la méca-
nique. Il est donc très improbable que la
position de la fourchette puisse varier.
En conséquence, le réglage d’une four-
chette nécessite une opération particu-
lière expliquée plus bas, qui consiste à
chasser le cône de la fourchette afin de
la libérer de la friction qui la maintient
en place.
pitch when the string is played.
Depending on the situation, disk regulation consists of modifying one or
the other of these two parameters, in order to best adjust the pitch.
In review, we might feel that the pitch adjustment of a natural or a sharp
is too low if the disk does not grip sufficiently the string (case a). In this
situation, one must adjust the disk rota-
tion to grip the string more firmly.
On the other hand, the pitch adjust-
ment of a natural or sharp is too high if
the disk grips the string too much (case
c.). In this case, the disk rotation must
be adjusted to grip the string a bit less.
The goal of regulation is to obtain a
grip on the string which approaches
case b.
Disk Attachment.
The disks are attached to their spindles with a friction cone system. The
conical end of the spindle which extends out from the front action plate is
inserted into the disk, and the tightening screw wedges the disk onto the
spindle, locking the two together by friction. This friction locking is so strong
that even removing the tightening screw (after being tightened) will not
loosen the disk. This results in good reliability and confidence in maintaining
a constant regulation. It is therefore very
unlikely that the disk position could vary,
once it is set, and the screw tightened.
Therefore, disk adjustment requires a
particular operation explained a bit later,
which separates the conical end of the
spindle from the disk, in order to elimi-
nate the friction, which keeps it in place.
Serrer la fourchette
Tighten the disk
Desserrer la fourchette
Loosen the disk

V. Réglage d’une fourchette.
Comme vous le constatez en observant la mécanique de votre harpe, il y a
une multitude de tailles de fourchettes, chacune ayant été optimisée en
fonction de son environnement (longueur et calibre de la corde, distance
avec les cordes voisines). Mais il est possible de regrouper ces fourchettes
en grandes familles correspondant à des types de réglages. Repérez à
quel groupe correspond la note que vous voulez régler, puis reportez-
vous au paragraphe correspondant.
1. Notes bécarres de Mi 43 à Mi 8.
2. Notes dièses de Mi 43 à Mi 8.
3. Notes bécarres de Fa 7 à Fa 0.
4. Notes dièses de Fa 7 à Fa 0.
1. Notes bécarres de Mi 43 à Mi 8 :
- Détendez la corde, dégagez-la des fourchettes afin de ne
pas l’endommager lors du réglage, puis passez la pédale cor-
respondante en position dièse (position basse).
- À l’aide du tournevis plat de la taille adaptée, dévissez de
deux tours la vis centrale de la fourchette.
- Pour libérer la fourchette, passez le tournevis entre les dents
de la fourchette tel qu’illustré par le schéma ci-dessous.
Entraînez ensuite la fourchette dans n’importe quel sens, ce
qui va la libérer de son axe.
- Lorsque la fourchette est libre, placez-la en position verticale (une dent en
haut, l’autre en bas) et serrez modérément la vis de façon à remettre la
fourchette légèrement en friction sur son axe. Attention : la pédale doit
toujours être en position dièse jusqu’à ce moment.
- Ramenez la pédale en position bémol (position haute), puis remettez la
corde en place et accordez-la.
V. Disk regulation.
As you have no doubt seen from observing your harp, there are a multi-
tude of sizes of disks, each one being optimized for its own environment
(length and gauge of the string, and distance to adjacent strings). But it is
possible to group these disks into large families depending on the type of
regulation needed. Note the group in which a particular note you need
to regulate may be found, then refer to the corresponding paragraph.
1. Natural notes from E 43 to E 8.
2. Sharp notes from E 43 to E 8.
3. Natural notes from F 7 to F 0.
4. Sharp notes from F 7 to F 0.
1. Natural notes from E 43 to E 8.
- Loosen the string, remove it from the disk prongs so as not
to damage it during regulation, then place the correspon-
ding pedal into the sharp (lowest) position.
- Using a screwdriver of the proper size, loosen the tighte-
ning screw in the center of the disk two full turns.
- To separate the disk from the spindle, place the screwdriver
between the disk prongs as illustrated in the sketch below. Then
rotate the disk with the screwdriver bearing on the prongs in
either direction, which will free the disk from the spindle.
- When the disk is free, place it in vertical position (one prong up, the
other down) and tighten the screw moderately—just enough to give the
disk some friction on the spindle. Make sure the pedal is still in the sharp
position.
- Bring the pedal back up to flat (top position), then place the string back
in position, and tune it.
16

- Passez la pédale, et laissez-là en position altérée pour le réglage final :
vous constaterez que la fourchette donne un petit peu trop de torsion à la
corde (voir position c. du schéma page 15). À l’aide du
tournevis que vous aurez à nouveau passé entre les
dents de la fourchette, mais sous la corde, ramenez
doucement la fourchette dans le sens de diminuer la
torsion, jusqu’à ce que la note obtenue soit juste.
- Revenez en position bémol pour contrôler l’accord de
la note, puis passez à nouveau la pédale pour contrôler
la justesse de l’altération. Si le résultat vous convient,
serrez fortement la vis afin d’assurer le blocage de la
fourchette.
2. Notes dièses de Mi 43 à Mi 8 :
- Attention : les vis de blocage des fourchettes dièse ont un pas inversé,
car ces fourchettes tournent dans le sens opposé des fourchettes bécarre.
Pour les dévisser, il faut manœuvrer votre tournevis dans le sens des
aiguilles d’une montre, et inversement pour visser.
- Détendez la corde, dégagez-la des fourchettes afin de ne pas l’endom-
mage lors du réglage, puis passez la pédale correspondante en position
dièse (position basse).
- À l’aide du tournevis plat de la taille adaptée, dévissez de
deux tours la vis centrale de la fourchette. N’oubliez pas que
la vis a un pas inversé : faites le mouvement habituel de vis-
sage pour dévisser.
- Pour libérer la fourchette, passez le tournevis entre les
dents de la fourchette tel qu’illustré par le schéma ci-dessous.
Entraînez ensuite la fourchette dans n’importe quel sens, ce
qui va la libérer de son axe.
- Move the pedal, and leave it in position with the disk engaged on the
string for the final regulation. You will notice here that the disk will grip
the string a bit too much (see position c. on the sketch
on page 15). With a screwdriver that you again use
between the prongs of the disk, but under the string,
bring the disk position gently back to lessen the grip,
until the note is correctly in tune.
- Raise the pedal back to the flat position and check
the tuning of the string, then move the pedal again to
the note being regulated. If the resulting pitch is satis-
factory, then tighten the screw firmly to insure the disk
is properly locked in place by friction against the
spindle.
2. Sharp notes from E 43 to E 8:
- Important note: the blocking screws for the sharp disks have left hand
threads, as these disks rotate in the opposite direction from the natural
disks. To loosen them, turn the screwdriver in a clockwise direction, and
the reverse to tighten them.
- Loosen the string, remove it from the disk prongs so as not to damage
it during regulation, then place the corresponding pedal into the sharp
(lowest) position.
- Using a screwdriver of the proper size, loosen the tightening
screw in the center of the disk two full turns. Do not forget that
the screw has left hand threads; turn the screw in the usual
direction that you would to tighten it, in order to loosen it.
- To separate the disk from the spindle, place the screwdriver
between the disk prongs as illustrated in the sketch below.
Then rotate the disk with the screwdriver bearing on the
prongs in either direction, which will free the disk from the
spindle.
17

- Lorsque la fourchette est libre, placez-la en position verticale (une dent en
haut, l’autre en bas) et serrez modérément la vis (rappelez-vous le pas
inversé) de façon à remettre la fourchette légèrement en friction sur son axe.
Attention : la pédale doit toujours être en position dièse jusqu’à ce moment.
- Ramenez la pédale en position bémol (position haute), puis remettez la
corde en place et accordez-la.
- Passez la pédale, et laissez-là en position altérée pour
le réglage final : vous constaterez que la fourchette
donne un petit peu trop de torsion à la corde (voir
position c. du schéma page 15). À l’aide du tournevis
que vous aurez à nouveau passé entre les dents de la
fourchette, mais sous la corde, ramenez doucement la
fourchette dans le sens de diminuer la torsion, jusqu’à
ce que la note obtenue soit juste.
- Revenez en position bémol pour contrôler l’accord de
la note, puis passez à nouveau la pédale pour contrôler
la justesse de l’altération. Si le résultat vous convient,
serrez fortement la vis afin d’assurer le blocage de la fourchette.
3. Notes bécarres de Fa 7 à Fa 0 :
Compte tenu de la promiscuité dans cette partie de la mécanique, les
fourchettes n’ont qu’une dent. La marche à suivre pour leur réglage est
donc légèrement différente.
- Détendez la corde et dégagez-la des fourchettes et du sillet afin de ne
pas l’endommager lors du réglage.
- À l’aide du tournevis plat de la taille adaptée, dévissez de deux tours la
vis centrale de la fourchette.
- When the disk is free, place it in vertical position (one prong up, the
other down) and tighten the screw moderately (remember the left hand
threads)—just enough to give the disk some friction on the spindle. Make
sure the pedal is still in the sharp position.
- Bring the pedal back up to flat (top position), then place the string back
in position, and tune it.
- Move the pedal, and leave it in position with the disk
engaged on the string for the final regulation. You will
notice here that the disk will grip the string a bit too
much (see position c. on the sketch on page 15). With a
screwdriver that you again use between the prongs of
the disk, but under the string, bring the disk position
gently back to lessen the grip, until the note is correctly
in tune.
- Raise the pedal back to the flat position and check the
tuning of the string, then move the pedal again to the
note being regulated. If the resulting pitch is satisfac-
tory, then tighten the screw firmly to insure the disk is properly locked in
place by friction against the spindle.
3. Natural notes from F 7 to F 0.
Because of the restricted space in this part of the action, the disks have
only one prong. The method to regulate these is therefore slightly dif-
ferent.
- Loosen the string; remove it from the disk prongs so as to not damage it
during regulation.
- Using a screwdriver of the proper size, loosen the tightening screw in the
center of the disk two full turns.
18