CamDiscovery A1 User manual

~ 1 ~
A1 User Manual
Please read the user manual clearly for avoiding any wrong opeartion, current manual is not the newest
and not complete, please contact us if any query.

~ 2 ~
Catalog
Main Feature ................................................................................................................................. 4
Install and Use ............................................................................................................................... 5
1. Camera buttons.................................................................................................................. 5
2. Install Memory Card ........................................................................................................... 6
3. Install the Mounts............................................................................................................... 6
4. Connect to cigar lighter ...................................................................................................... 7
5. Video record and Capture................................................................................................... 7
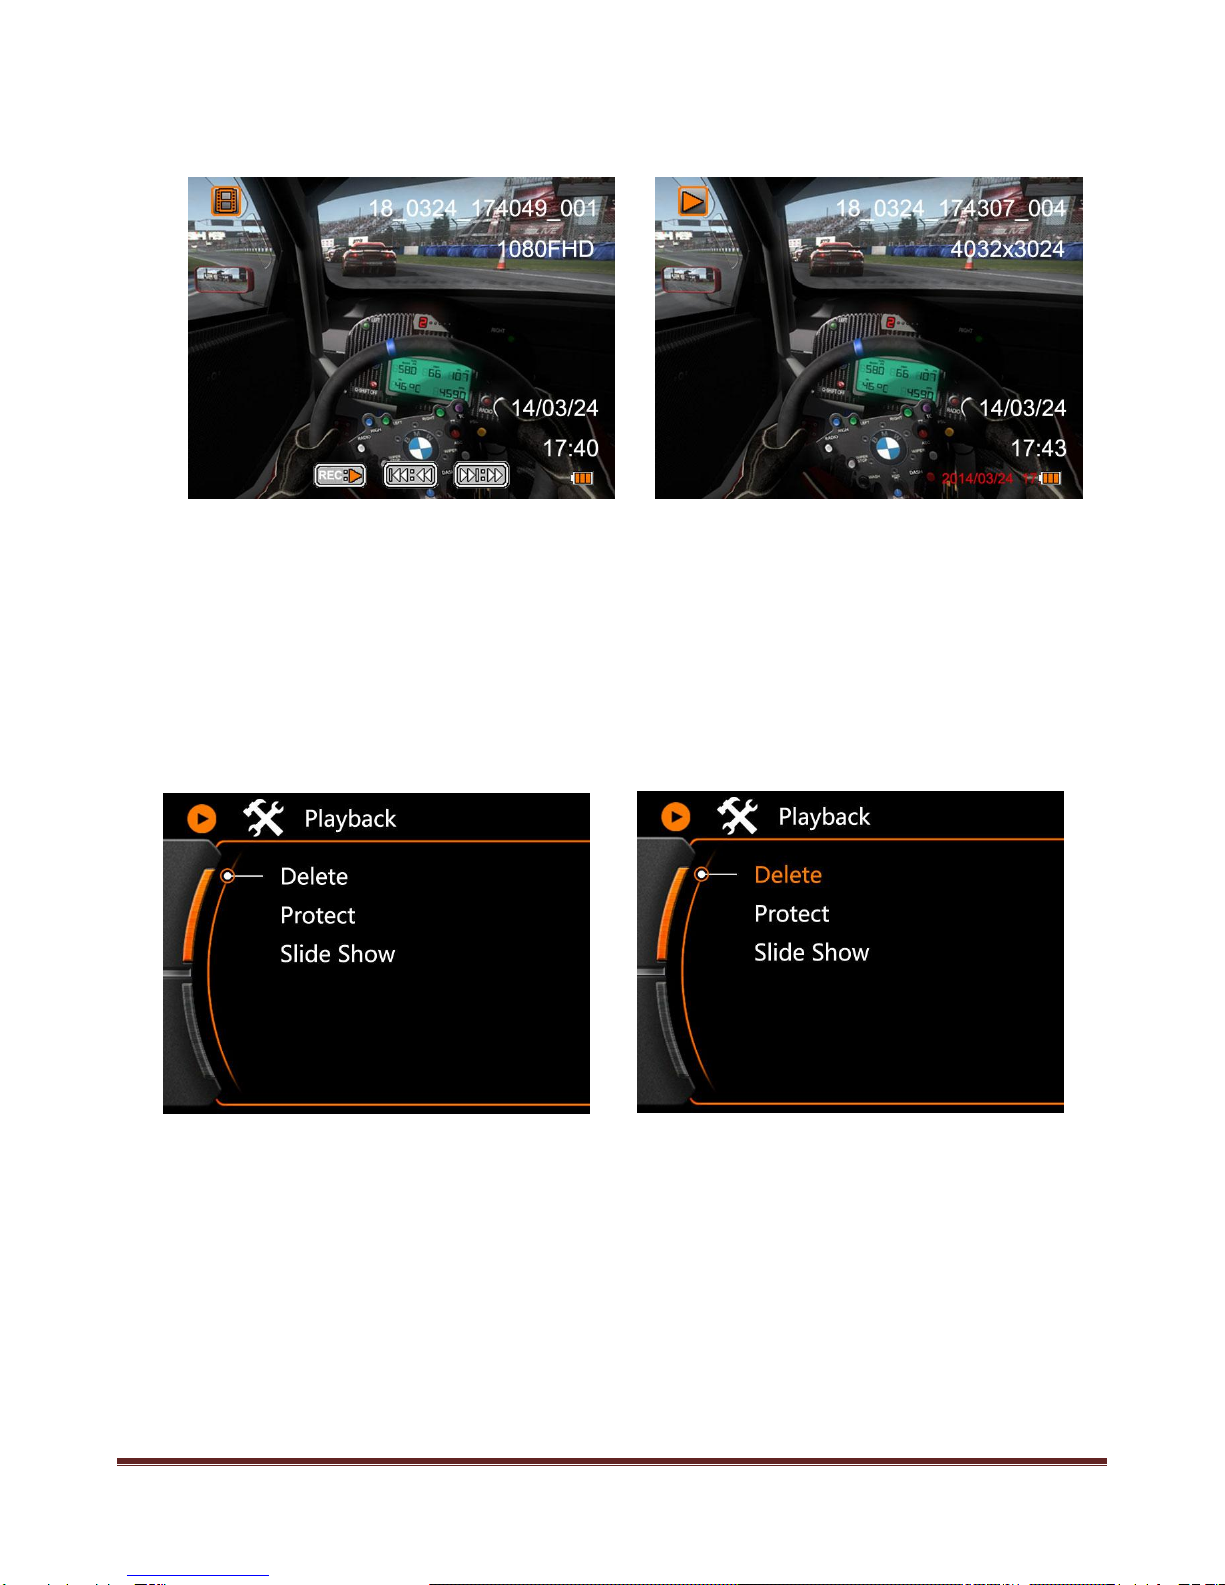
6. Video Playback ................................................................................................................... 8
7. Delete files ......................................................................................................................... 8
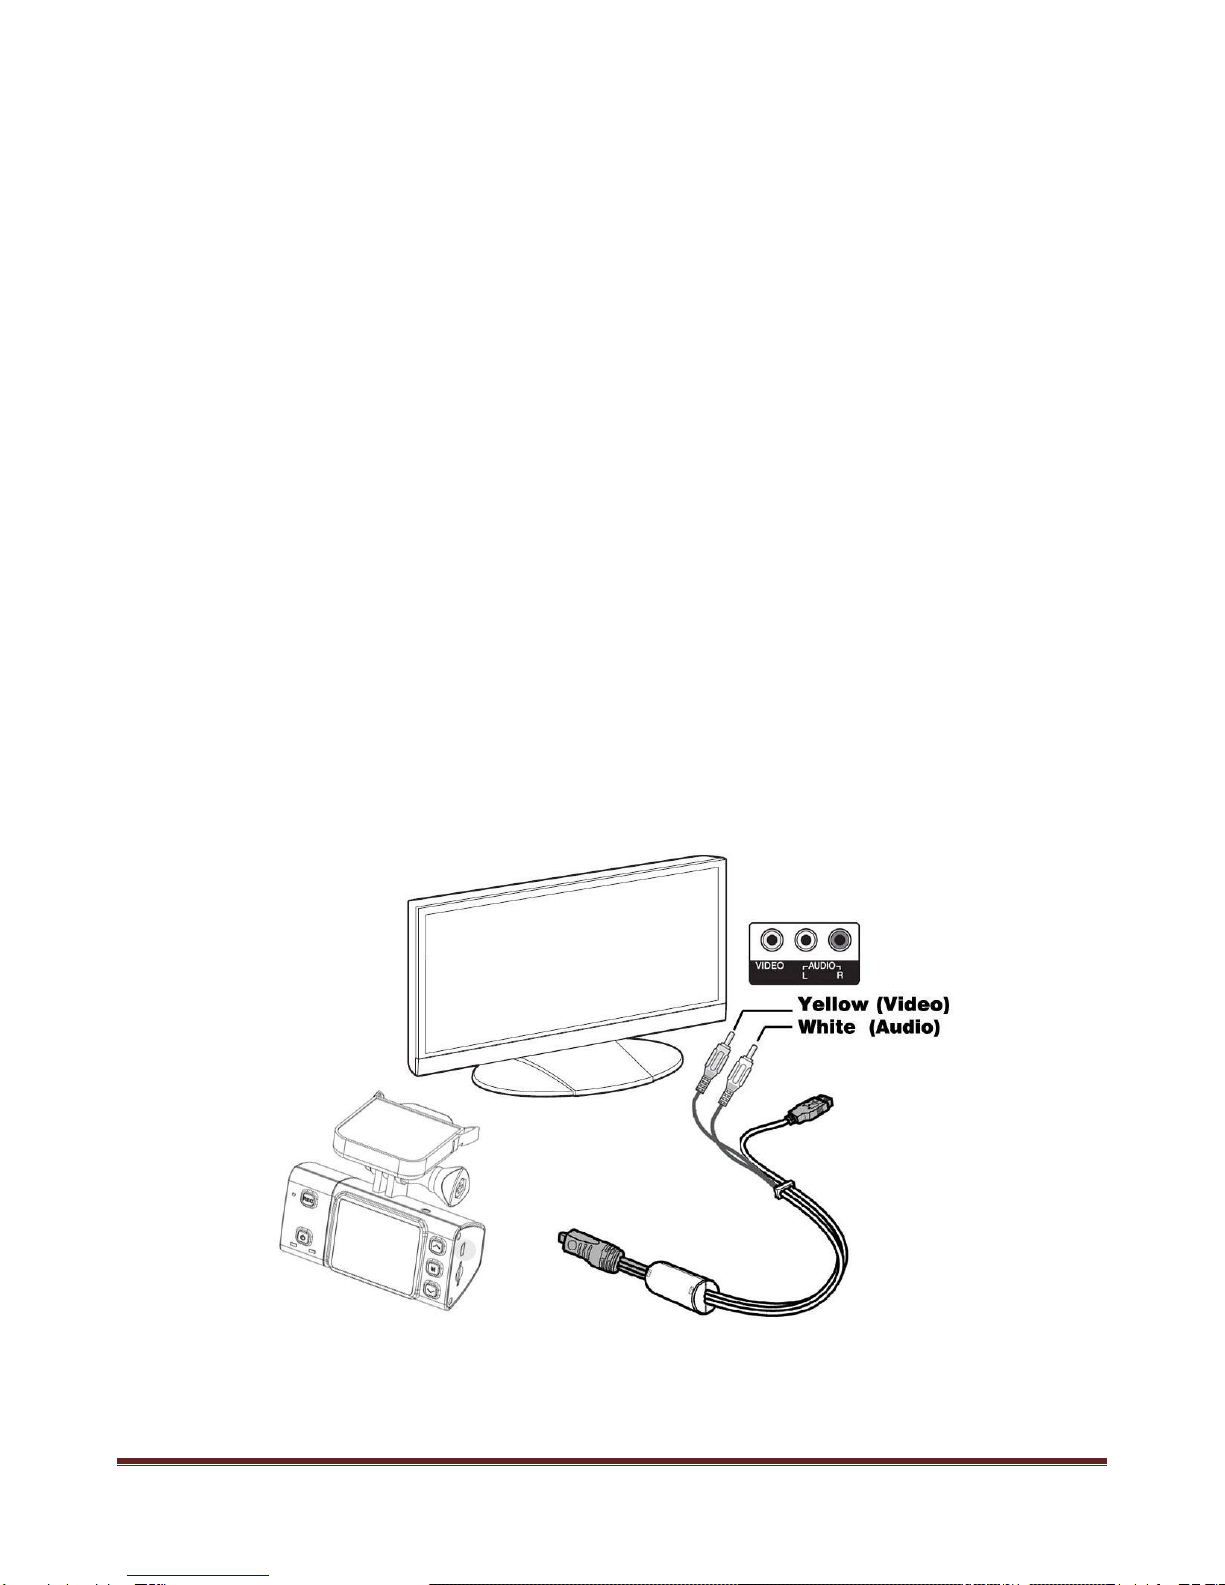
8. Connect to Television ......................................................................................................... 9
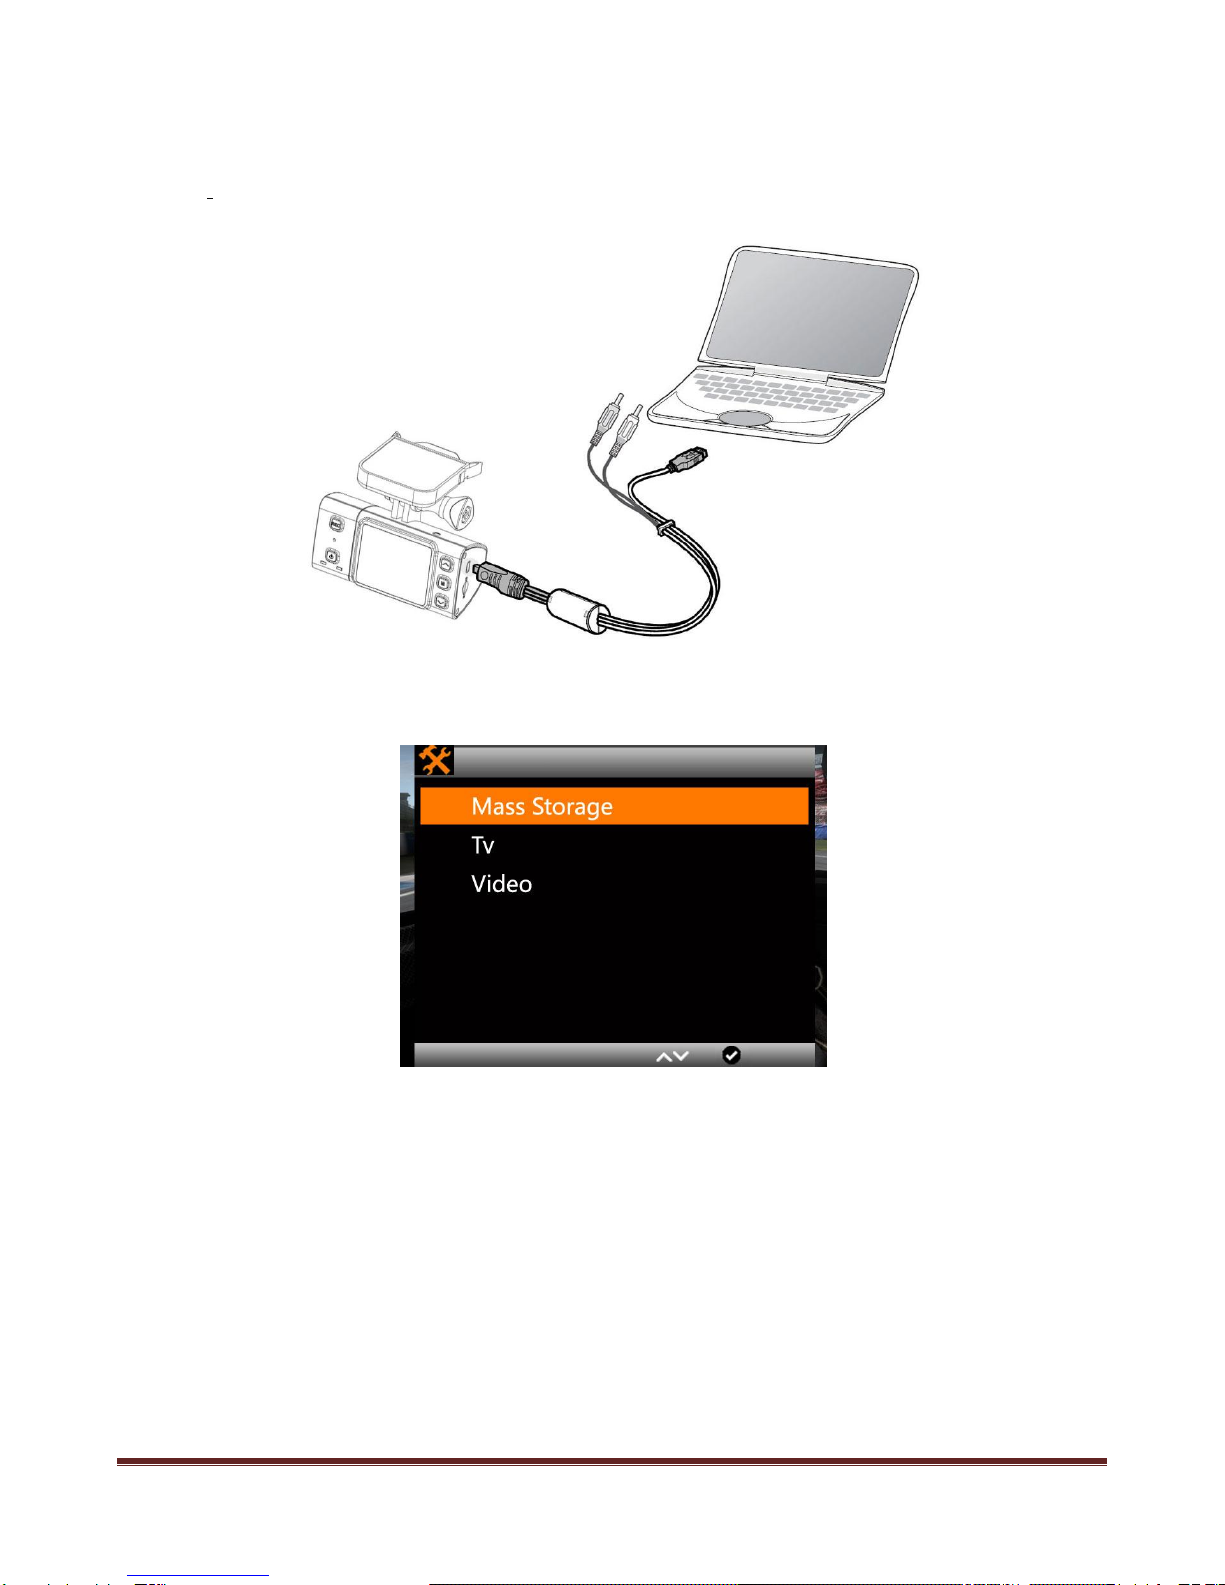
9. Connect with Computer.................................................................................................. 10
System Icons................................................................................................................................ 11
REC Setting .................................................................................................................................. 12
REC Mode .............................................................................................................................. 12
1. Video Resolution : ............................................................................................................ 12
2. Loop record setting .......................................................................................................... 12
3. Motion Detection ............................................................................................................. 13
4. Record Audio ................................................................................................................... 13
5. Date & Time stamp .......................................................................................................... 14
6. G-Sensor .......................................................................................................................... 14
7. Fatigue driving Warning ................................................................................................. 15
Video & Picture Setting............................................................................................................... 16
1. Picture Capture Mode....................................................................................................... 16
2. Image size ........................................................................................................................ 17
3. Still Picture Quality ........................................................................................................... 17

~ 3 ~
4. Sharpness......................................................................................................................... 18
5. Color Effect....................................................................................................................... 18
6. ISO Setting ....................................................................................................................... 19
7. Anti-Shaking of Hands...................................................................................................... 19
8. Date & Time stamp .......................................................................................................... 20
System Setting ...................................................................................................................... 21
1. Exposure Setting .............................................................................................................. 21
2. White balance .................................................................................................................. 21
3. Date/Time Setting ............................................................................................................ 22
4. Beep Sound...................................................................................................................... 23
5. Language ......................................................................................................................... 23
6. TV mode output ............................................................................................................... 24
7. Frequency......................................................................................................................... 24
11. Format .......................................................................................................................... 26
12. Default setting............................................................................................................... 27
13. Version.......................................................................................................................... 27
14. Firmware Update........................................................................................................... 28

~ 4 ~
Main Feature
480 x 240,1.5”TFT LCD Screen
3MP HD COMS Sensor
135ºWide angle
FHD 1080p ; H.264 Compression into MOV Video format
G-Sensor reaction, Save the current video compulsively when the accident occurred.
Zero second leakage REC function, save all datum .
Auto REC: Camera will turn on and start video record automatically after launch the vehicle.
Loop REC: Set up in different REC time.
Support photo shot
Video resolution option in setting:
16:9Full HD 1920 x 1080p 30FPS
16:9 HD 1280 x 720p 60FPS
16:9 HD 1280 x 720p 30FPS
4:3 WVGA 848 x 480 30FPS
Picture resolution option in setting:
4000 x 3000 12MP
3200 x 2400 8MP
2592 x 1944 5MP
Video & Picture playback
Support 1GB~32GB High speed TF memory card
High speed USB2.0 interface for Power charge and Data transfer
USB & RCA output optional

~ 5 ~
Install and Use
1. Camera buttons
1, REC/Confirm
2,Reset
3,Power/Mode
4, Power indicator
5, REC indicator
6, LCD Screen
7, Up
8,Menu
9,Down
10,MIC
11,Lens
12,USB Port / Video output
13,TF card slot
14-15,Mount /3M adhesive

~ 6 ~
2. Install Memory Card
a ,Please install the TF Card according the graphic:
b ,This camera without build in storage, support 1GB~32GB TF Card external memory expand. c ,
After install the TF card ,rest available memory could be checked on the screen.
Attention:
Please use the original TF card for good using experience. Bad or phony TF card would happen the
problem like “can not read”or “file damaged”. Please format the TF card in this camera
before use it at first time.
3. Install the Mounts
+ =

~ 7 ~
4. Connect to cigar lighter
Mini 8pin side insert to camera , car charger side insert to cigar lighter.
5. Video record and Capture
a ,Camera will power on and start video record automatically while starting the car or connecting
the power source, a red icon will flash on left corner of screen during this time.
b , Press POWER button transfer to picture shot mode, press REC to take a photo, press< and >
to zoom in/out.

~ 8 ~
6. Video Playback
Press POWER button to enter the video file, press < or > to browse the videos and photos
Press REC to play or pause the video, press < or > to fast forward or fast rewind.
Press < or > to browse next photo
7. Delete files
Press MENU under playing or browsing state, delete option menu will display on the screen.
Press < > to choose
Choose Delete:Press REC button to confirm delete and the delete option menu will appear, or
press MENU to quit.
Delete Current:Press RECto delete current file, or press MENU to cancel operation.
Delete All: Press REC to delete all video & picture files, or press MENU to cancel operation.
Choose Protect : Press REC button to confirm and protect option menu will appear, or press
MENU to quit.

~ 9 ~
Lock Current : Current file will not effected by loop record and will not be deleted.
Unlock Current: Current file would be deleted if the memory card is full under loop record mode.
Lock All: All video and picture files will not effected by loop record and will not be deleted.
Unlock All : All video and picture files would be deleted if the memory card is full under loop
record mode.
Slide Show: Press REC to enter in 2 seconds slide show mode
Press REC to confirm operation and quit
Attention:
The files will not be recovered after deleted, recommend to backup before do this operation.
8. Connect to Television
A,USB-RCA cable connect with TV
RCA side insert to TV (Yellow for Video, White for Audio); 8 pin USB side insert to camera.

~ 10 ~
9. Connect with Computer
Connect the camera with computer via USB cable, available for data transfer, update the camera
firmware and charge.
After connect with the computer, option menu will be display on the screen, press < or > to make
a choice.
Press REC to confirm operation.
Mass Storage : Connect with computer to browse , copy or playback in the computer.
TV:Connect to TV , could play the video clips and pictures in the camera memory card.
Video : Connect with computer to charge the power and it is also available to operate the camera
and do recording.

~ 11 ~
System Icons
REC Mode
Capture Mode
Scan Mode
REC setting
Capture setting
System setting
HDR
MIC on
Loop REC / 5 Minutes per video clip
Exposure Value
Full HD 1080p 30FPS
Anti-Shaking ON
White Balance
ISO
Photo pixel
Photo quality
TF Card condition
Battery
Charging
No SD card installed ( Use internal memory)
Protected file while G-sensor active

~ 12 ~
REC Setting
REC Mode
Press MENU under REC mode to enter main menu, press < > to select setting content, press REC
to confirm operation.
1. Video Resolution :
Press < > to select suitable resolution , press REC to confirm , save and quit.
2. Loop record setting
Press < > to select loop recording under REC mode , press REC to confirm operation and quit.
Press < > to select suitable loop time , press REC to confirm , save and quit 6
First time default loop time is 5 minutes
OFF : Loop record is not activated , the camera will continue record till the SD card full or the
vehicle turned off, the system will not save the video in part.

~ 13 ~
3. Motion Detection
Press < > to select motion detection under REC mode , press REC to confirm operation .
Press < > to select off or on, press REC to confirm setting , save and quit.
ON: REC mode will turn to motion detection mode directly and Auto Record model will not
available any more.
Motion detection : Active to start video record only when detect movement.
The default Recording time will continue 10 Seconds if there without 2nd movement detected.
Camera will record continuously if movement always detected.
4. Record Audio
Press < > to select “Record audio”under REC mode , press REC to confirm and enter.
Press < > to select ,press REC to confirm and quit.
Off: Video clip without sound
On:Video clip with sound

~ 14 ~
5. Date & Time stamp
Press MENU to enter the main menu of the camera , press < > to select time stamp
Press REC to confirm and enter to select menu, press < > to select , press REC to save and quit.
OFF: Video clip without Date & Time stamp
On : Video clip with Date & Time stamp
6. G-Sensor
Press MENU to enter main menu, press < > to select G-Sensor.
Press < > to select
Off: Turn OFF G-Sensor
High : High sensitive respond to active G-sensor
Middle : Middle sensitive respond to active G-sensor
Low : Low sensitive respond to active G-sensor

~ 15 ~
Note: This function is useful for saving current file when vehicle suddenly stop or traffic accident
happen.
7. Fatigue driving Warning
Press MENU to enter main menu, press < > to select Fatigue driving Warning
Press < > to select
Warning icon:
Note:
Off: Close warning
1Hour:Warning per hour 2Hour:Warning per 2 hours
3Hour:Warning per 3 hours 4Hour:Warning per 4 hours

~ 16 ~
Video & Picture Setting
1. Picture Capture Mode
Press POWER to select Capture Mode, press MENU to enter main menu ,press < > to select
Press < > to select capture mode, press REC to confirm and enter select menu
Single : Press REC button once to take one picture immediately
2S / 5S / 10S timer : Delay 2s/5s/10s to take picture after press REC button

~ 17 ~
2. Image size
Press < > to select the image size , press REC to enter the select menu.
Press < > to select suitable image size according to personal need, press REC to save and quit .
3. Still Picture Quality
Press < >to select image quality, press REC to enter select menu.
Press < > to select image quality.
Press REC to save setting and quit.
Note: Default setting is High quality .

~ 18 ~
4. Sharpness
Press < > to select sharpness ,press REC to enter select menu
Press < > to select suitable sharpness option, press REC to save and quit.
Remark: Default setting is Normal.
5. Color Effect
Press < > to select the effect of color
Press REC to enter setting
Press < > to select to select suitable photo effect, press REC to save option and quit.
Normal : Normal color picture
Black & White: Black and white picture
Sepia: Retro special efficiency picture
Remark: Default setting is Normal color picture.

~ 19 ~
6. ISO Setting
Press < > to select ISO under capture mode, press REC to confirm and enter option menu.
Press < > to select suitable ISO according to different enviroment
Press REC to save selection and quit.
Remark: Default Setting is Auto
7. Anti-Shaking of Hands
Press < > to select Anti-Shaking ,press REC to enter the option menu.
Press < > to select OFF or ON
Press REC to save option and quit
Remark : Default setting is ON, recommend to turn on.

~ 20 ~
8. Date & Time stamp
Press < > to select date stamp ,press REC to enter the option menu.
Press < > to select turn on or turn of the date stamp.
Press REC to confirm , save and quit.
Off: Picture without date display
Date : Picture with date display
Date / Time : Picture with time and date display
Remark: Default setting is Date & Time displayed in the picture.
Table of contents