CamRanger MINI User manual

!
iOS User’s Manual for the CamRanger Mini"
© CamRanger
US Patent 9712688
09/07/18
1

CamRanger Mini Hardware 3...........................................................................
Setup 3...............................................................................................................
CamRanger Mini App 5....................................................................................
Connection Screen$5!.......................................................................................
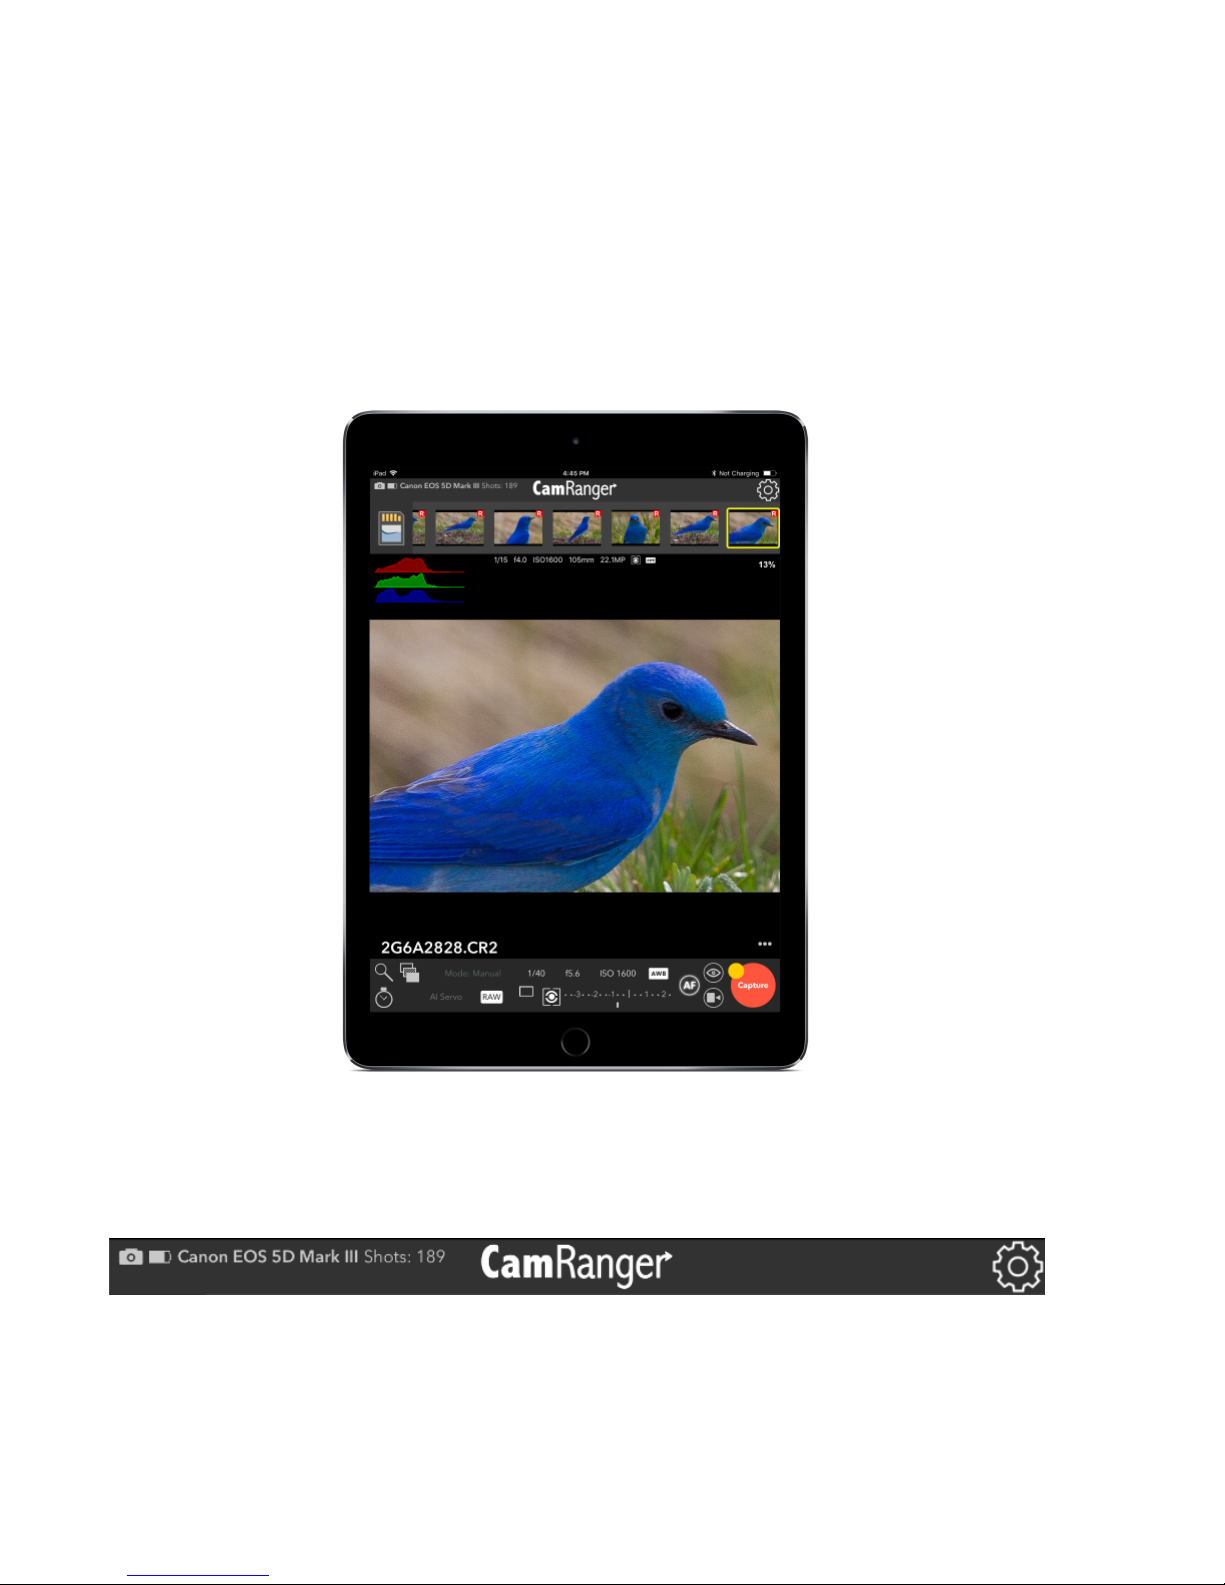
Main Screen$6!..................................................................................................
Status Bar$6!.....................................................................................................
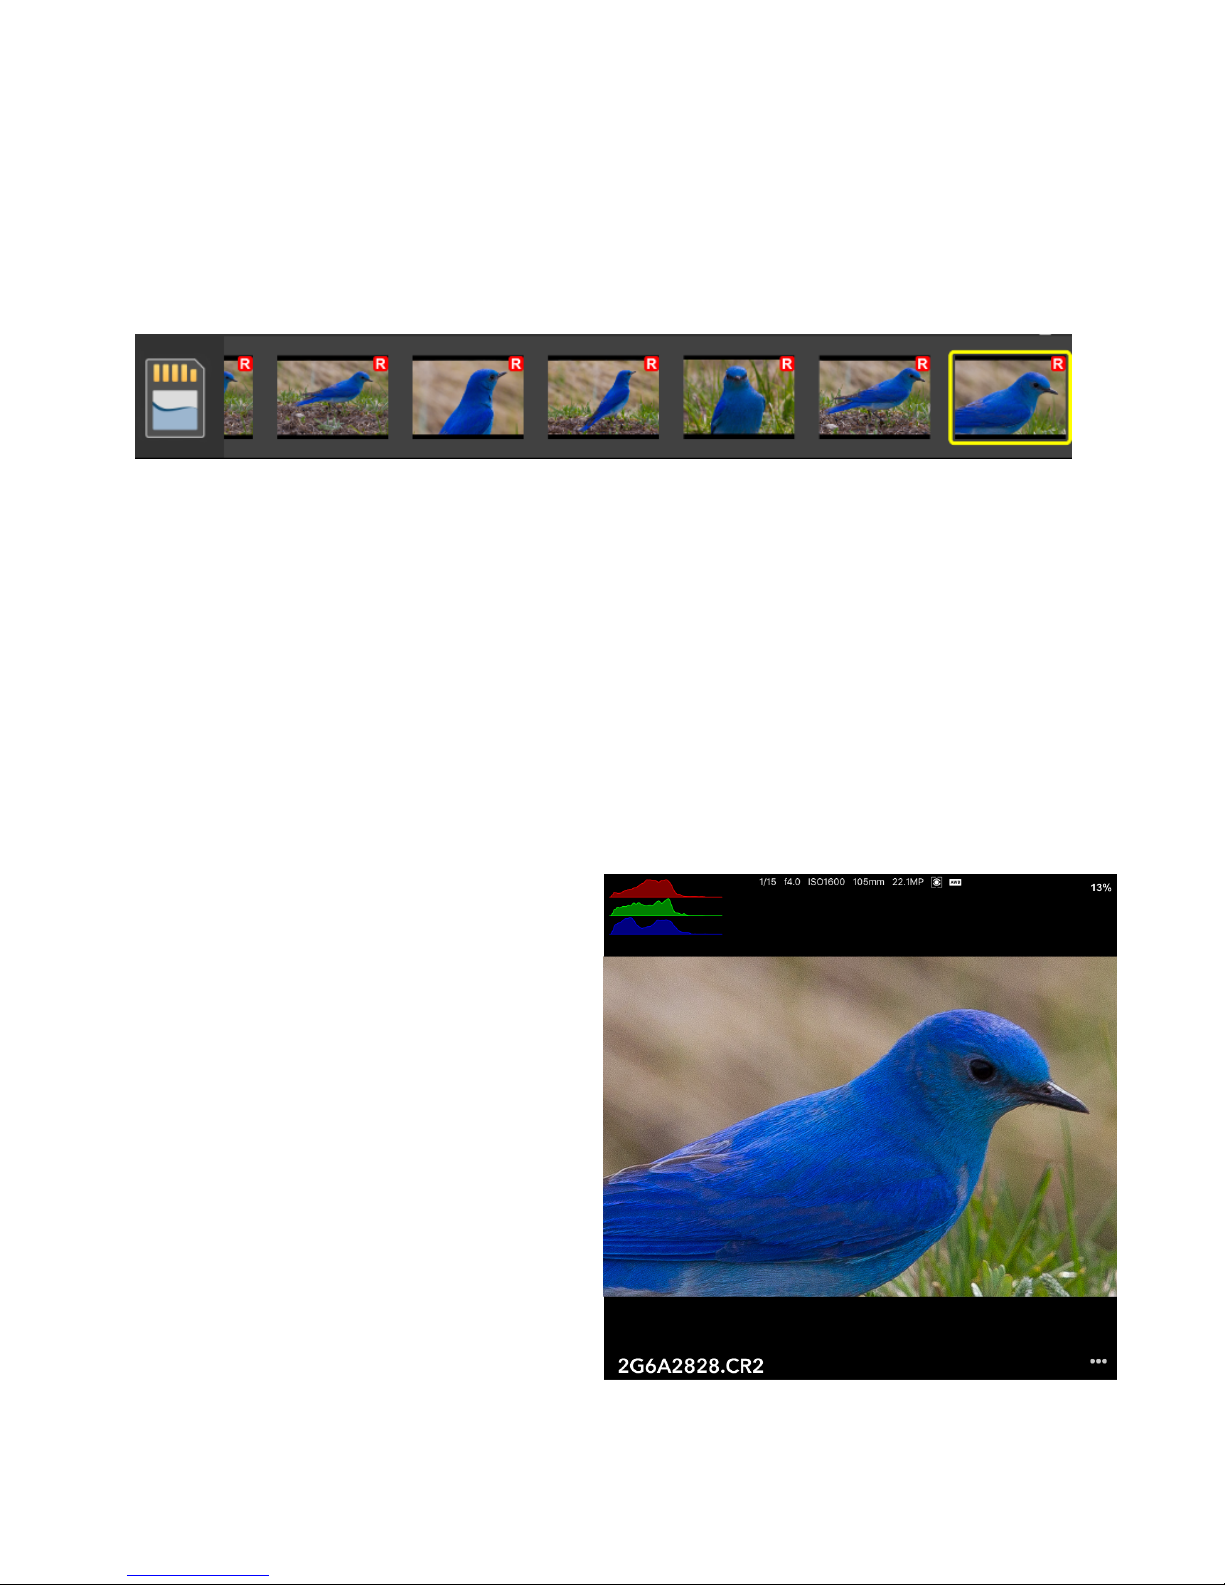
Recent Thumbnails$7!.......................................................................................
Main Image View$7!..........................................................................................
Captured Image$7!................................................................................................
Live View Stream$8!...............................................................................................
Camera Properties$9!............................................................................................
Camera Actions$9!.................................................................................................
HDR/Advanced Bracketing Tab$10!..................................................................
Timer Tab$12!....................................................................................................
Focus Tab$13!...................................................................................................
Focus Adjustments$13!.........................................................................................
Focus Stacking$14!...............................................................................................
Advanced Focus Stacking$15!..............................................................................
Card Contents$15!............................................................................................
Settings$16!.......................................................................................................
Image and Live View Overlays$16!........................................................................
PT Hub & MP-360 Tripod Head 18...................................................................
PT Hub Hardware$18!.......................................................................................
MP-360 Motorized Tripod Head Hardware$18!................................................
Specifications$19!..................................................................................................
Setup$19!..........................................................................................................
App Additions with the PT Hub and Tripod Head$20!......................................
Tips & Troubleshooting 22................................................................................
Connection$22!.................................................................................................
Performance$22!...............................................................................................
Images$22!........................................................................................................
Important Information 24.................................................................................
© CamRanger
US Patent 9712688
09/07/18
2

CamRanger Mini Hardware
1. Ethernet Port!
2. Reset Button - Press and hold to reset device to factory settings.!
3. Battery LEDs - 4 LEDs that show approximate battery life when Battery Button (4) is
pressed.!
4. Battery Button - Press to show approximate battery life on Battery Indicator LEDs (3).!
5. Power Switch - Push all the way to the right to turn on and all the way to the left to turn
off.!
6. Power/WiFi LEDs - Red LED shows power is on. Blue LED shows WiFi is on. The blue LED
will blink during data transmission.!
7. USB Port - Connect the camera here.!
8. Charging Port - Charge with a USB micro cable.!
The CamRanger Mini is not water resistant and should not get wet. The CamRanger Mini
should not be allowed to hang from the camera by the USB cable. The USB cable
connections should not be stressed. Besides the included pouch, attachment methods could
include attaching the CamRanger Mini to an L-bracket or hot shoe attachments.!
Setup
•Charge CamRanger Mini
Connect a USB micro cable to the CamRanger Mini charging port to charge. The device can
be charged from a powered USB port or any standard 1V/5A USB AC adapter.!
© CamRanger
US Patent 9712688
09/07/18
3

A blue LED next to the charging port will turn on while charging and turn offwhen the battery
is fully charged. Fully charging the battery should take about 2-3 hours.!
!
•Download the CamRanger Mini App
The CamRanger Mini App is downloaded from the Apple App Store on your
iPad/iPhone. The easiest way to find it is to search “CamRanger Mini”
within the App Store app.!
The CamRanger mini app requires iOS 9+.!
•Connect the camera to the CamRanger Mini
Connect the camera to the CamRanger Mini using the appropriate type of USB cable. An
angled USB mini cable is provided, which works for most cameras. However, some cameras
use different cable types. The camera came with the correct cable, or another cable can be
purchased.!
•Connect to the CamRanger Mini WiFi network
Turn on the CamRanger Mini and wait about 30-45 seconds for the device to initialize. When
it is ready the blue WiFi LED will turn on.!
Go to the Settings on the iPad/iPhone and select the WiFi section. Select and join the WiFi
network “CamRanger-___” where the last three characters
are the last three characters in the CamRanger Mini serial
code. The WiFi password is the CamRanger Mini serial
code in all CAPS.!
•Launch app
Ensure the camera is turned on and awake and launch the CamRanger Mini app.!
© CamRanger
US Patent 9712688
09/07/18
4

CamRanger Mini App
Note: the CamRanger Mini app supports the iPad, iPhone, and iPod Touch running iOS
version 9+. The layout of the app will vary slightly based on the device and orientation.
However, only a single device and orientation will be displayed here.!
Connection Screen!
The connection screen appears after launching the application. The current WiFi network is
displayed below the Connect button. The iOS device must be connected to the CamRanger
WiFi network, so the network must be listed as the CamRanger-XXX.!
At the bottom of the screen are two buttons: Cached Images and Settings.!
The Settings button will bring up the Settings screen (see the Settings section for more
details). Note that a connection has not been made with the CamRanger at this point so some
settings will not be available.!
The Cached Images button will show the user thumbnails for all images that are currently
saved in the temporary cache. The thumbnails can be double tapped to view the full
resolution image. Viewing cached images should not be relied upon for viewing old images.
However, it can be useful for quickly viewing recent images without being connected to the
CamRanger and camera. It should be noted that if an image was not viewed previously then it
will not be available in the cache.!
© CamRanger
US Patent 9712688
09/07/18
5

After ensuring the camera is on, awake, and connected to the CamRanger with a USB cable,
press "Connect" to connect to the CamRanger and begin a session. Please see the
troubleshooting appendix if there are difficulties connecting.!
Main Screen
After successfully connecting in the app, the main camera control screen will be displayed.!
Status Bar!
The status bar shows the camera’s battery life, camera name, and number of shots available
on the camera’s removable media using the current settings. Note that not all cameras will
provide the number of shots remaining.!
© CamRanger
US Patent 9712688
09/07/18
6

The gear button the right will open the app settings. The settings are covered in depth in
Settings section.!
Recent Thumbnails!
As images are captured, the thumbnails are automatically displayed along the top of the
screen. RAW images will have a small red R icon at the top right. Video files will have a small
blue video icon. JPG images will have no icon. If an image is captured in both RAW and JPG
format, only the JPG thumbnail will be displayed.!
Selecting a thumbnail will download the image to be displayed at full resolution. Selecting a
RAW file will the download and display the JPG version embedded in the RAW. The resolution
is the same, but it is compressed compared to the RAW. Video files cannot be downloaded.!
!
Main Image View!
The main image view displays both
captured images and the live view stream.!
Captured Image!
The picture to the right shows a captured
image with a number of overlays. These
and other overlays can be toggled on or off
from within the the settings. Images first
display at a "fit to window" size. The
image's scale percentage is shown at the
top right. Images may be zoomed in and
out with a two finger pinch or by double
© CamRanger
US Patent 9712688
09/07/18
7

tapping. The maximum zoom is 200%.!
The “…” button at the bottom right displays options based on the context. When viewing a
captured image, the options will be: Toggle Full Screen, Share, and Delete. Toggling full
screen will expand and shrink the image view to take up the full screen or resume its normal
position. Selecting Delete will prompt the user to confirm the deletion of the image from the
camera’s memory card. Selecting Share will bring up the iOS file sharing dialog allowing a
number of options, including saving the image to the device’s photo library.!
Images are oriented as the camera orients them. Typically the camera will have the option to
configure the orientation of portrait images.!
Live View Stream!
When live view is on, the image in the main image view is automatically updated as new live
view frames are received. The frame rate can vary greatly based on a number of parameters
such as the signal strength and camera model. However, assuming a good connection, 10-15
fps would be typical.!
During live view the image
may be single tapped to
focus on that point, also
known as “touch focus”.
For cameras that support
it, the focus box that is
displayed will temporarily
turn green if focus is
acquired and turn red if
focusing failed. Note that
the CamRanger does not
© CamRanger
US Patent 9712688
09/07/18
8

actually do any focusing, but simply tells the camera to try to focus at the selected area.!
Double tapping on the image during live view will zoom in at that point, and then alternatively
zoom back out. When zoomed in, arrow buttons will appear at the edges enabling small
adjustments to the zoom positioning.!
A variety of overlays are available in live view and are turned on or offfrom within the settings.
Note that overlays such as histogram or focus peaking can reduce the live view frame rate.!
Camera Properties!
The camera properties will look slightly different depending on the device, orientation, and
camera model.!
Auto exposure mode, shutter speed, ISO, white balance, focus mode, image format, drive/
capture mode, and metering are displayed as shown. The exposure meter has a different
meanings. It shows exposure bracketing and then either exposure compensation or exposure
metering depending on the context. If the property can be changed, then it will be white.
Disabled properties are grey. The values displayed are the values that are currently set on the
camera.!
The shutter speed, aperture and ISO are set with a
slider that can be scrolled left and right. The value
is set automatically after the slider has paused for a
moment.!
Other camera properties are set by selecting the
value from a list of options.!
Camera Actions!
The red capture button initiates the camera trigger.
The exact camera behavior is dependent on the
© CamRanger
US Patent 9712688
09/07/18
9

camera and camera properties, most importantly the
capture mode. The continuous capture mode operates
differently for Nikon and Canon. For Canon, the capture
button operates like the camera’s trigger, shots are taken as
long as the capture button is pressed. Nikon is different in
that if a continuous shooting mode is selected, a burst number must also be set. With each
single capture press that number of shots will then be taken.!
For Canon cameras, a yellow button will appear at the top left of the Capture button. This
button is the equivalent of performing a “half-press” of the camera’s shutter button. This is
useful for getting auto focus and determining the camera’s exposure metering. If the camera’s
exposure mode is set to manual, the exposure meter will briefly show the exposure level. If
set to an automated exposure mode, the exposure parameters calculated by the camera will
be shown for a few seconds. For example, if in aperture priority, the shutter speed calculated
by the camera will be shown briefly.!
The auto / manual focus toggle button shows if the camera will attempt to focus as part of
capture. Depending on the camera and configuration the user may or may not be able to
change this.!
The live view button toggles live view on and off. Live view must be controlled from the
CamRanger and not from the camera.!
The movie button toggles movie mode on and off. When movie mode is on, the Capture
button changes to “Record” and pressing this button will start and stop movie recording.!
HDR/Advanced Bracketing Tab!
The HDR tab is accessed by pressing the HDR button shown highlighted in blue below. The
HDR bracketing works by actually adjusting the camera’s exposure parameters between
shots. The only limitations to the bracketing is the camera’s possible exposure parameters.!
© CamRanger
US Patent 9712688
09/07/18
10

The property field specifies the camera property to be changed. The three options are Shutter
Speed, Aperture, and ISO. The Mid-Point indicates the middle exposure of the sequence. The
step size sets the number of steps to adjust the exposure between each shot. The number of
shots specifies the number of shots in the sequence. The maximum number of shots is
dynamically calculated based on the mid-point and the possible camera values.!
The minimum and maximum exposure values for the sequence will be displayed above the
Start button. Press the Start button to begin the sequence.!
Because the CamRanger is actually changing the camera’s exposure parameters, the camera
must be set to Manual exposure mode to perform HDR bracketing.!
HDR sequences can also be performed when the camera is set to bulb mode. The settings
are similar, except that the property is shutter speed/bulb duration and the mid-point is set in
seconds. The minimum bulb duration is 100 ms. The Advanced Bracketing tab will
automatically change to bulb settings when the camera is set to bulb mode.!
© CamRanger
US Patent 9712688
09/07/18
11

Timer Tab!
The Timer tab is accessed by pressing the stopwatch button and is used to configure the
CamRanger as an intervalometer and specify exposure times when the camera is bulb mode.!
The initial delay is the amount of time to delay before the sequence is started. This can be
useful for making a custom timer mode with a set delay. The number of shots to take must be
entered as well as the time between shots. Note that depending on the camera, the time
between shots may be longer than entered if the time is less than a few seconds.!
The estimated duration for the time lapse to complete is automatically calculated and
displayed, as well as the length of a 24 fps video if one was created from the resulting
captures.!
If the camera is in manual mode, the HDR switch may be toggled on. Each capture will then
be an HDR sequence of captures. The HDR parameters are those that are set in the HDR tab.!
Press “Start” to begin the sequence. After started, the iOS device does not need to remain
connected to the CamRanger. So there is no need to remain close by during a long time lapse
sequence.!
© CamRanger
US Patent 9712688
09/07/18
12

When the camera is in bulb mode, the timer tab can also be used to perform bulb shots with a
specified duration. The Start button in the Bulb section will only take a single shot. However,
time-lapse can be combined with bulb mode to perform a time-lapse with each bulb duration
set by the shot duration.!
Focus Tab!
The Focus tab is accessed by pressing the magnifying glass button. Live view must be turned
on to use the focus tab.!
Focus Adjustments!
The Focus Adjust section of the tab is for performing incremental adjustments to the focus.
The arrow buttons will perform a large, medium, or small focus adjustment depending on the
© CamRanger
US Patent 9712688
09/07/18
13

button selected. The arrows pointing down move the focus in closer while the arrows pointing
up move the focus further away.!
Focus Stacking!
A new focus stacking method is available which automates more of the process. Changing to
the previous focus stacking method is still possible by turning on “Classic Focus Stacking” in
the settings. The new focus stacking method requires to user to specify the nearest and
furthest focus points and then the CamRanger automates the step size and number of shots
based on the camera, lens, and aperture. Because the aperture affects the depth of field, this
focus stacking method can only be used when the camera is in manual or aperture priority
exposure modes.!
Point 1 is the nearest focus point and point 2 is the furthest away. The points are set by
pressing the respective “Set” button when the focus is at the desired point. To set the first
focus point any focus adjustment method can be used. However, after a point has been set
only incremental focus adjustments can be used. Touch focus or manual lens cannot be used
as there is then no way to track the focus changes that have been made. If one of these
methods is used to change focus then any focus points that were set may be automatically
cleared.!
Once the two focus points are set, pressing the bullseye button will move the focus to that
position. It will not be able to achieve a cinematic quality follow focus, but can be useful to
return the lens to a particular focus point. Pressing clear with clear that focus point so it can
be reset. !
After the focus points are set, the Start button will enable and pressing it will start the focus
stacking process.!
© CamRanger
US Patent 9712688
09/07/18
14

For Canon cameras, the CamRanger can only know the lens focal length by downloading an
image. If an image has not been downloaded in that session yet, the focus stacking section
will be disabled and instead a button will be shown to take a configuration shot. Pressing the
button will result in the camera capturing an image, downloading the image to determine the
lens focal length and then immediately deleting the image.!
Advanced Focus Stacking!
Pressing the plus button will reveal the advanced focus stacking options and provide
additional feedback.!
Card Contents!
Pressing the SD Card at the top left will open a new window that displays all the
thumbnails for the images on the camera’s memory card.!
The thumbnails can be filtered by type by selecting the filter option at the bottom
right. The filter options are All, JPG, RAW, and Video.!
© CamRanger
US Patent 9712688
09/07/18
15

To view an individual image, double tap on the thumbnail. Multiple images can be selected by
tapping on the thumbnails. The images can then be deleted or shared with the Delete and
Share buttons on the bottom right.!
Settings!
The settings menu is accessed from the gear button on
the top right of the main screen or the lower right of the
connection screen. The image shows the top level
categories.!
The Camera connection mode is a Nikon only setting
and will not be displayed for Canon cameras. When set
to PC, the camera is physically locked but the
CamRanger can control more camera settings. In
Camera mode shooting from the camera is possible,
but changing certain settings with the CamRanger is
not.!
Image and Live View Overlays!
•Show Gridlines - overlays gridlines over both live view
and captured images!
•Grid Layout - the number of gridlines horizontally and
vertically !
•Gridlines Color - the color of the gridlines!
•Other Overlays!
•File Name - shows the captured image file name at
the bottom left of the image!
•Exif Data - displays basic meta data for captured images at the top of the image!
•Histogram - shows an RGB histogram at the top left for both live view and captured
images!
© CamRanger
US Patent 9712688
09/07/18
16

•Rotate Live View - for select cameras the live view
will automatically rotate when the camera is in
portrait orientation!
•Electronic Level - an electronic level is shown over
live view for select cameras!
•Focus Peaking - a red outline is drawn on in-focus
edges (this is only an approximation of relative
focus)!
Note that the histogram and focus peaking overlay will
reduce the live view frame rate or time for a captured
image to display.!
•Controls & Workflows!
•Auto View Images - Three possible settings for
automatically viewing images!
•OFF - Captured images are not automatically
displayed and must be individually selected to
be viewed.!
•ON - Captured images are automatically
displayed as they are taken!
•Camera - Images are not automatically
displayed, but can be displayed as controlled by
the photographer at the camera. To display an
image it must be modified on the camera. this
can be done a few ways, but theses methods
may work well:!
•Canon - Give the image a rating!
•Nikon - “lock” the image!
Note that for both of these methods, the change
can immediately be reversed.!
•Other Controls!
© CamRanger
US Patent 9712688
09/07/18
17

•HDR/Focus Stack Delay - add an additional delay between captures during focus
stacking and HDR. This can be useful for things such as allowing flashes to recharge.!
•200% Live View Zoom - adds a 200% live view zoom level in addition to fit to window
and 100%, if the camera supports 200% zoom!
•Classic Focus Stacking - configure focus stacking with the original CamRanger
method where the user selects the step size and number of shots!
•System!
•Cache Size - sets the maximum storage size for recently viewed images!
•Clear Cache - deletes all caches images!
•Firmware Update - only visible when a firmware update is available!
•User Manual - view this document!
•Email Support - Opens a newly created email addressed to email CamRanger support!
•Legal - Display terms, conditions, warning information, and licenses!
•CamRanger Version - the first digits are the software/app version and the digits after the
final period is the CamRanger firmware version!
•Exit - closes the current session and returns to the connection screen!
PT Hub & MP-360 Tripod Head!
To use the PT Hub and motorized tripod head a CamRanger and supported camera are
required.!
PT Hub Hardware
1. USB A Connector - Connects to CamRanger!
2. Serial Connector - Connects to PT Hub!
3. USB B Connector - Connections to camera!
MP-360 Motorized Tripod Head Hardware
•Threaded Mounting Point - 1/4 20 threaded female opening for mounting to an existing
tripod head (does NOT mount directly onto tripod legs)!
© CamRanger
US Patent 9712688
09/07/18
18

•Battery Compartment - Open the battery compartment by sliding the cover downward and
then lifting it outward. Insert 4 AA batteries oriented according to the markings in the battery
compartment. The MP-360 may also be powered by an AC adapter.!
•Power LED - Green when power is on (cannot be used to determine battery level)!
•Power Switch - To turn on, set to “M”!
•Camera Mounting Screw - 1/4 20 mounting screw!
Specifications!
•Power Source: 4 AA batteries or A/C adapter (neither included)!
•Vertical Tilt: +/- 15 degrees!
•Horizontal Pan: 360 degrees with unlimited rotation!
•Maximum Camera Weight: 6 lb (2.7 kg)!
•Size (LxHxW): 5.75 x 4.5 x 4 inches (145 x 115 x 103 mm)!
•Weight: 1.75 lb (800 g) !
Setup
Required Parts:!
•CamRanger Mini!
© CamRanger
US Patent 9712688
09/07/18
19

•PT Hub!
•Motorized Tripod Head (MP-360, Bescor, or Hague)!
•USB cable for camera connection!
•Serial Cable (included with PT Hub)!
•USB A to B cable (included with PT Hub)!
•Camera!
•Mobile Device (iOS/Android)!
•Connect the CamRanger Mini, PT Hub, tripod head, and camera as shown in the above
diagram.!
•Set the tripod head power switch to “M” to turn on the tripod head!
•Setup and start the rest of the equipment as normally done!
App Additions with the PT Hub and Tripod Head
© CamRanger
US Patent 9712688
09/07/18
20
Table of contents
Other CamRanger Camera Accessories manuals

CamRanger
CamRanger PT Hub User manual

CamRanger
CamRanger CamRanger User manual

CamRanger
CamRanger CamRanger User manual

CamRanger
CamRanger Share User manual

CamRanger
CamRanger CamRanger User manual

CamRanger
CamRanger device User manual

CamRanger
CamRanger CamRanger User manual

CamRanger
CamRanger CamRanger User manual

CamRanger
CamRanger Camerahardware device User manual