Camtrol Video Camera Stabilizing Quadpod User manual

Please Read Carefully BEFORE Operation
• Detailed Setup Instructions
• Shooting Configurations
• Warranty and Warnings
Camtrol Video Camera Stabilizing Quadpod
Date:
December 09
Camtrol, Inc.
USER’S MANUAL

CONTENTS
A Introduction …………………………………………………………………….…
B About Your New Camtrol Video Camera Stabilizing Quadpod ……
C Camtrol Features ………………………………………………………………..
D Camtrol Acronyms and Information ……………………………………...
E Set Up Instructions For Installing Wired Remote Controllers …..
F Shooting Configuration-Camtrol Prime Position ……………………..
G Shooting Configuration-Ground Up Shooting ………………………….
H Shooting Configuration-Above the Crowd …………………………..….
I Shooting Configuration-Double Whammy ………………………….…..
J Shooting Configuration-Round the Corner ……………………..……...
K Warranty and Warnings ……………………………………………..………..
L Ordering Parts and Accessories …………………………………..………..
Camtrol Video Camera Stabilizing Quadpod
Camtrol, Inc.
USER’S MANUAL
1
2
4
4
5
8
8
9
9
10
10
11
Camtrol Video Camera Stabilizing Quadpod User’s Manual
NOTE: It is VERY IMPORTANT that you read the complete manual
BEFORE you attempt to assemble or operate this equipment.

Congratulations on the purchase of your Camtrol Video Camera Stabilizing
Quadpod. We are sure you will be as delighted to use it as we are proud of producing it.
Your Camtrol Video Camera Stabilizing Quadpod is a major step forward in providing the
quality of photography and cinematography that you would expect from a unit costing
thousands of dollars.
Camtrol has been developed with the two major principles that video camera stabilizers
work on: Center of Gravity and Moment of Inertia. By controlling these two forces, the
shooter prevents unwanted jerking and shaking (AKA Tilt, Pan, and Roll) . Camtrol
increases the mass of the camera by adding weight under the camera. With increased
mass the moment of inertia is now increased, thus reducing minor and medium shakes
and controlling the stabilization of the camera.
We also have moved the Center of Gravity to a point below the camera. This gives more
control of the camera in the hands of the shooter for smoother, more stable, and more
controllable moving shots.
A—Introduction
Camtrol Video Camera Stabilizing Quadpod User’s Manual
2

B —About Your New Camtrol Video Camera Stabilizing Quadpod
Camtrol Video Camera Stabilizing Quadpod User’s Manual
Camtrol is the latest and most modern stabilizing platform for all types of video cameras (camcorders, HD,
mini DV, and high eight) and new DSLR’s/video cameras with adjustable LCD screens. Its uniquely engi-
neered features combine to form a versatile tool that allows the user to capture images from any angle.
Featuring a fully channeled landing platform, Camtrol allows for all video and DSLR’s with tilt LCD screens
cameras to be secured in accordance with their individual centers of balance. The platform is cushioned to
absorb vibration and prevent slippage. Its sturdy T-6 aluminum body provides additional protection and sup-
port if the camera is dropped. The thumb screw design allows Camtrol to be mounted onto any tripod or
monopod head. The platform is compatible with quick release tripod/monopod mounts.
With its landing gear extended, Camtrol acts as a safe landing to set your camera down for changing your
camera configurations. It also becomes a stable editing station so you can play, edit and dub you footage
without having to transfer anything from your camera. Whether on asphalt or on your desk, no longer will
you need to precariously balance your expensive camera.
By collapsing the rear legs with the front legs extended, the platform becomes its own angled shooting de-
vice, perfect for self-imaging in sports, dance, or any activity that could benefit from instant video feedback.
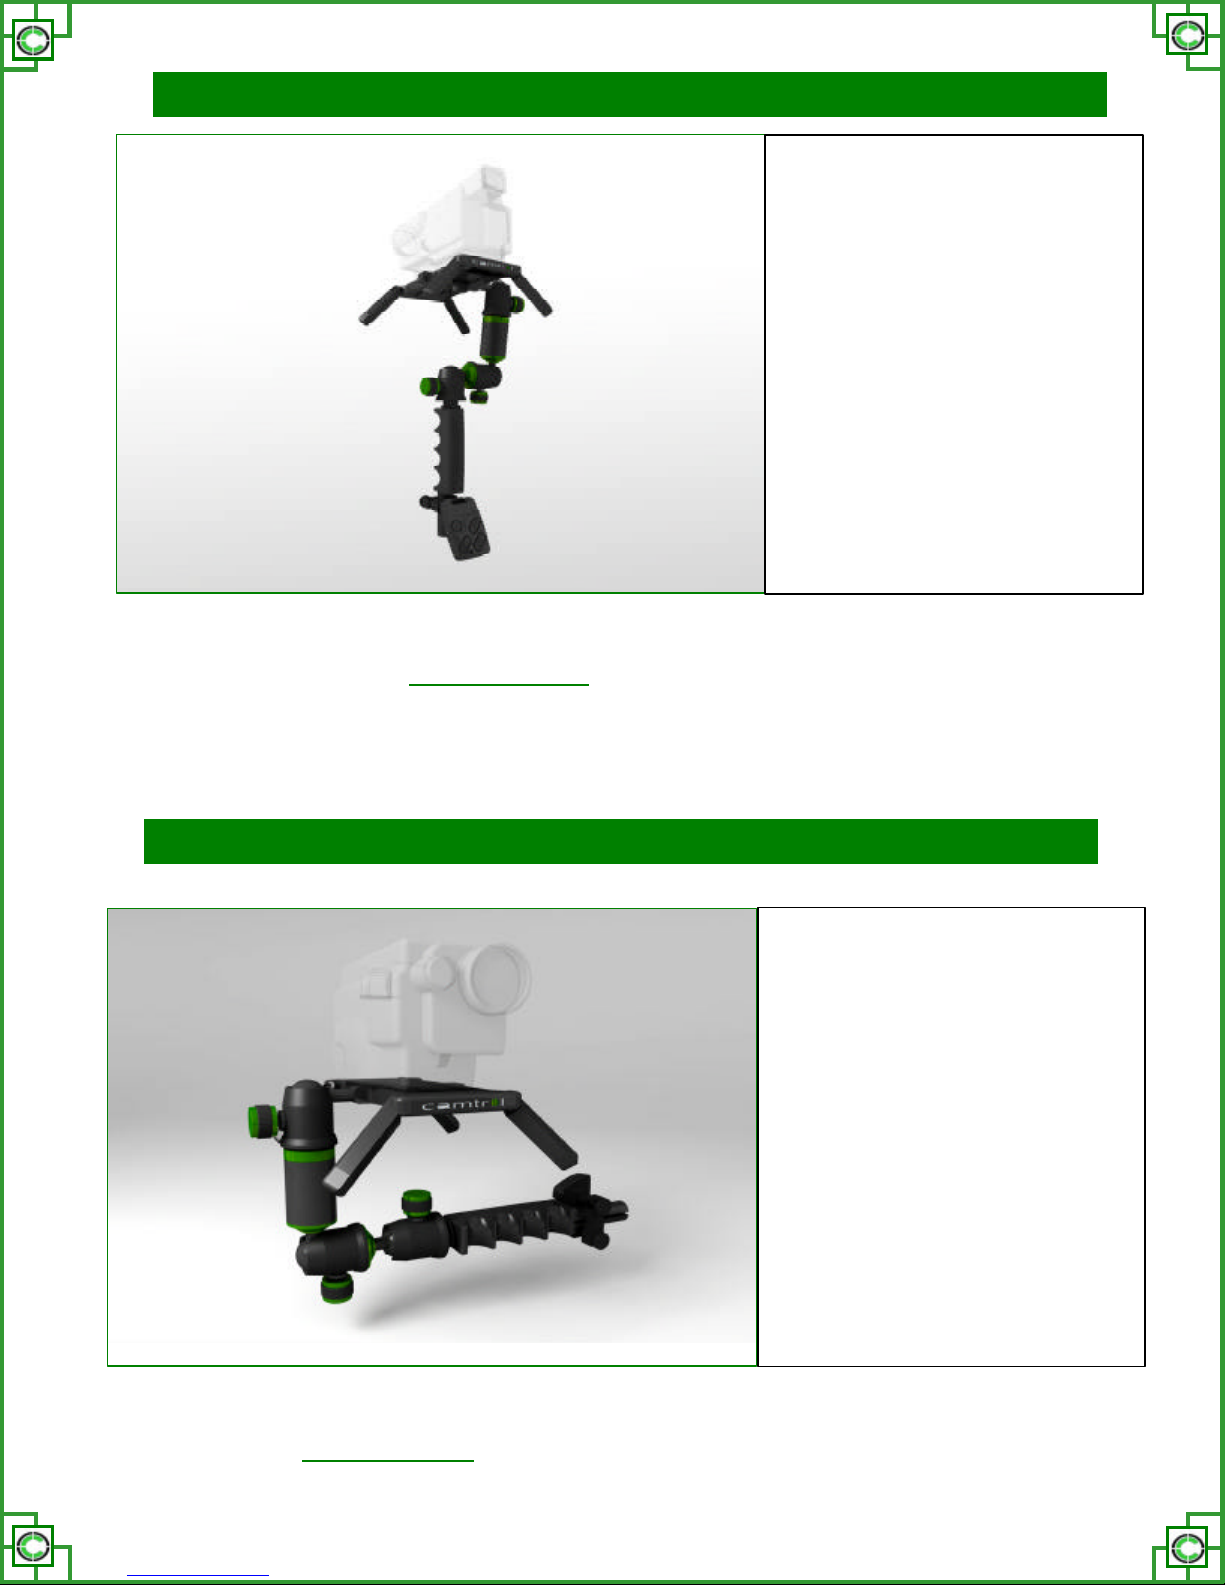
With its three degree rotating ball joints and vertical stabilizer bar, the Camtrol can be customized to the
shooters personal preferences. It can be set to any of the three primary configurations that allow the user to
remain standing upright while capturing ground level shots, overhead shots, and around-corner shots. Its
special ball joints allow for both right and left single-handed operation.
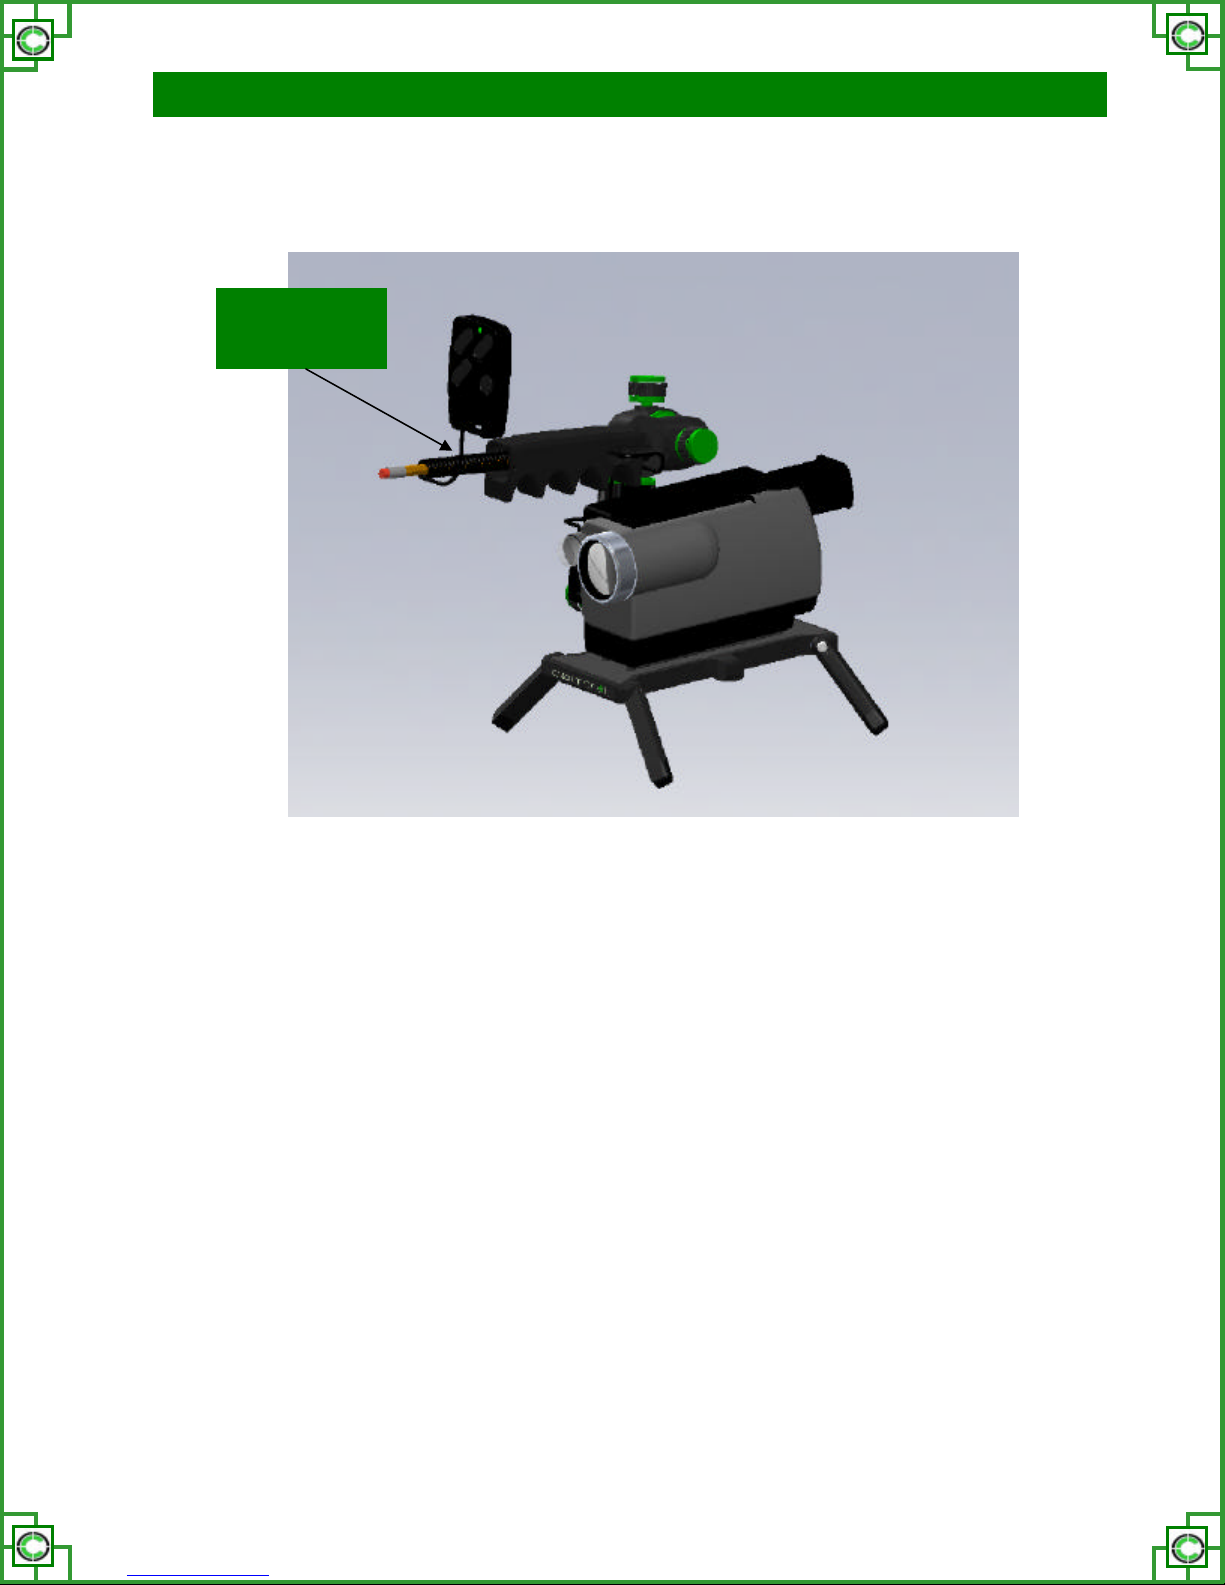
Camtrol used in conjunction with our V Bracket accessory gives the shooter additional stability with a resting
place for his thumb, even if not using a remote device on the V Bracket. The user now has a natural hand
body positioning with unrestricted mobility.
Camtrol’s anatomical grip provides easy handling and a slip-proof hold, minimizing the exertion required to
manipulate your rig. With Camtrol, the user doesn’t need to stoop, stretch, or stand on shaky platforms to
obtain extreme angle shots. Shooting over crowds and walls has never been easier, and shooting around
corners is simple, even when the user cannot fit into the space available. Camtrol allows shifting” on the fly
“so you can change shooting configurations in the field without have to take your camera off its stabilizing
device and without having to use special tools to change your configuration.
Camtrol’s remote receiver post allows controllers to be bolted to the handle, with wires running through the
hollow grip and plugged into LANC ports on video cameras and model specific direct remote hookups for
Nikon, Canon, Sony, Panasonic, and Olympus DSLR’s with tilt screens.
Camtrol is travel friendly for getting all the shots you need on the go, both inside and outside shots and al-
lows shooting low (in tight corners), over or around crowds at famous sites where shoulder mounted cam-
eras are restricted from getting these shots.
The standard size stabilizer bas on the Camtrol Prime allows for cameras measuring up to 3.75 inches in
height while the Camtrol Grand in the prime position allows for cameras measuring up to 6 inches in height.
The compact size of the Camtrol in its collapsed position are ( 12 ¾”L x 7”W x 2 ½”T) for the Camtrol Grand
version and (10”L x 7”W x 2 ½”T) for the Camtrol Prime. This allows easy storage in your camera bag while
giving you the advantage of having ready access and quick setup for stabilized shooting under all circum-
stances. Each Camtrol model will accommodate 7lbs of camera and lens.
3

ACG (Action Control Grip) ACG allows for an Anatomical True Feel. ACG provides controlled maneuverability and
camera handling while maintaining that natural and unrestricted Grab n Shoot sensation.
RP/RA (Receiver Post for Remotes and Accessories) The RP/RA has a slot for feeding the cable through to hide
the excess cable on the inside of the handle. RP/RA is designed to work with a large range of Lanc remotes and keeps
wires away from moving parts. RP/RA accepts other remotes with built is clamps, accessories with clamps, and the V
slope block 45 deg mounting plate for ultimate accessibility and mounting options.
VSB ( Vertical Stabilizer Bar) Short and long VSB helps Camtrol operator to find the perfect balance point. VSB
also acts as a secondary grip for two handed ultimate control. Use of VSB gives operator a second handle for shots on
Camtrol where two handed use is recommended.
VLBJ (Variable Locking Ball Joints) Guides and supports Camtrol into limitless camera grip configurations providing
the freedom to easily readjust by turning knobs counter clockwise to release and clockwise to tighten. Create new
shooting angles and unleashes unlimited creativity and adjustability
QPSP (Quad Pod Skid Plate) QSP contains anti vibration no skid camera mounting traction pad that securely grips
the camera when mounted. QPSP also contains Centering and Balance channels allows for easy adjustment. The QPSP
can also functions as an editing dock for desktop editing or dubbing and provides a safe stable platform to help
protect camera from dents scratches and drops.
QPRL (Quad Pod Retractable Legs) QRL also known as landing gear with shock absorbing feet consists of four
independent legs with traction and shock absorbing feet for safe stable QRL landings and take-offs (Grab-n-shoot).
Allows the operator to shoot on the fly in stealth mode with landing gear retracted flush or deployed for safe landings.
PCC (Protective Cable Cover) The PCC covers the exit port for the cable Camtroller cable. It can be easily removed
and reinstalled after the cable is in place.
CMT (Camera Mounting Thumbscrew) The CMT is used attach the camera to the QPSP and has a port to allow
mounting to a tripod.
Camtroller LANV remote controller working with most Sony and Canon video cameras. (Sold separately from
Camtrol)
C –Camtrol Features
Camtrol Video Camera Stabilizing Quadpod User’s Manual
Camtroller
VSB
ACG
RP/RA
VLBJ
(Qty 3)
QPS
QPRL
(Qty 4)
Figure 1 Camtrol Feature Acronyms and Information
4
D –Camtrol Acronyms and Information

Follow set up instructions #1-12 if using a wired LANC or other manufacturer’s
wired remote controller. If not using a wired remote controller, go to step #13.
Set Up Instructions
1) Using a Phillips screw driver, remove two screws on either side of ACG. Set aside
for use in a later step.
2) After screws are removed, slide out RP/RA. Set aside for use in a later step.
3) With your finger, or small blunt object carefully remove Protective Cable Cover
(PCC) by peeling out from the bottom. Set aside for use in a later step.
Camtrol Video Camera Stabilizing Quadpod User’s Manual
5
Figure 2 Removal of Camtrol Remote/Accessory Receiver Post
E-Set Up Instructions For Installing Wired Remote Controllers
Continued on next page….
2. Remove
RP/RA
1. Remove 2 screws
3. Carefully peel
PCC from this end

4) Slide Camtroller Lanc connector through the ACG and out the hole in the side of
the ACG
Camtrol Video Camera Stabilizing Quadpod User’s Manual
6
Figure 3 Installation of Camtroller Cable
Slide connector
and cable in the
opening of the
ACG
Slide connector
out the opening
in the side of
the ACG
E-Set Up Instructions For Installing Wired Remote ( Continued )
5) Install Camera onto Camtrol Landing Pad by installing thumb screw into tri-pod mount
on camera.
6) Ensure thumb screw is finger tight so camera does not slip
7) Plug Connector into camera Lanc port
8) Feed cable back into handle but leave enough excess so that camera can easily be
rotated to the positions listed below.
7. Install Cam-
troller cable into
LANC port on
8. Route cable
approximately
as shown
6. Install thumb
screw into tripod
mount
Figure 4 Connecting Camtroller cable to camera
Continued on next page….

9) Wrap remaining Camtroller Cable around a pencil or Pen to coil as shown
10) Feed into handle as shown, remove pencil and push coiled cable into handle.
Camtrol Video Camera Stabilizing Quadpod User’s Manual
Figure 5 Camtrol Cable Installation
7
E-Set Up Instructions For Installing Wired Remote ( Continued )
9 & 10. Excess
cable wrapped
on pencil
11) Re-install handle top
12) Re-install two screws.
13) Decide which shooting configuration you want to use.
14) Warning: Before setting up desired shooting configuration, turn all three VLBJs(Variable
Locking Ball Joints) ¼ turn to the left(counter clockwise) and insure they are loose.
Holding the Camtrol in your left hand, place the camera over the CMT(Camera Mounting
Thumbscrew) with your right hand, Mount camera on CMT(Camera Mounting
Thumbscrew) loosely and move camera on QPSP (Quad Pod Skid Plate) in the mounting
channels until camera feels it is properly balanced and centered. Fully tighten down all
three VLBJ(Variable Locking Ball Joints). When properly centered and balanced, the
Camera on the Camtrol will sit level to the ground and feel comfortable to the operator.
15) Adjust to your desired configuration.
16) Launch and Have Fun!

Camtrol Video Camera Stabilizing Quadpod User’s Manual
8
Figure 7 Camtrol Prime Position
Mid to Low angle shooting
F- Shooting Configuration-Camtrol Prime Position Controllers
Freedom to Create
This prime position allow you to
shoot mid low angle shots, low angle
shots, moving low angle shots, tail
way shots, following shots, and dolly
shots.
You can use multiple camera mount-
ing options creating unlimited angles.
This position also permits moving the
ACG(Action Control Grip) to arrive at
the perfect center of gravity for sta-
ble and effortless shooting.
G -Shooting Configuration-Ground Up Shooting
ELAM-Extreme Low
Angle Moving.
By using this configuration of your
Camtrol and shooting ground level
up you’ll get bigger than life shots.
Follow Cam works beautifully for
capturing all action sports-ie skate-
board, snowboarding, soccer, foot-
ball, etc.
Best way to capture shots of kids
and pets.
Delivers great self analysis sports
Figure 8 Ground UpShooting
Extreme Low Angle

Camtrol Video Camera Stabilizing Quadpod User’s Manual
9
Figure 9 Above the Crowd Shot
Over the head shooting/ use two hands with this configuration. Practice at home be-
fore using elsewhere.. Before setting down, release the VLBJs(Variable Locking Ball
Joints) and extend the VSB(Vertical Stabilizing Bar) outward from the base so your set
down is unobstructed.
H -Shooting Configuration-Above the Crowd
I -Shooting Configuration-Double Whammy
Figure 10 Double Whammy
Ultimate control shooting of objects or self filming. The VSB position is key in centering the grip
under the base.. Use Two Hands with this configuration.
Extreme High Mount-
ing Angle(EHMA)
Use left hand under QPSP(Quad
Pod Skid Plate) to support while
positioning grip and VSB(Vertical
Stabilizing Bar) for centering
weight in hand so it is easy to
control and maneuver.
This configuration is for those ex-
treme high moving angle shots
over obstacles.
Double Whammy
Called the mirror mode, or self
video journalism mode.
This chest/shoulder level setting
gives you high angle moving ca-
pacity
Multiple camera mount options.

Camtrol Video Camera Stabilizing Quadpod User’s Manual
10
Figure 11 Around the Corner
Used for shooting around an obstacle or object. Use two hands.
J -Shooting Configuration-Round the Corner
Warnings
♦Ensure Camera is securely mounted to plate prior to lift off
♦Loosen VLBJs ¼ turn prior to setting Camtrol configuration or
reconfiguration. Failure to do so could damage ball joints and
void warranty.
♦Once configuration is finalized ,insure all Variable Locking Ball
Joints(VLBJ) are fully secured prior to lift off
♦Do not use Camtrol as a step or other uses it is not intended
for.
Warranty Information Continued On The Next Page...
Corner Shots?
Around obstacles for stealth
shooting /:paparazzi?
Use multiple camera mount
options and ACG(Action
Control Grip) remote op-
tions.
When feel heaviness re-
lease legs and set down or
switch hands on grip.
Use second hand to support
plate to provide stability.
K -Warranty and Warnings

Camtrol Video Camera Stabilizing Quadpod User’s Manual
11
Camtrol, LLC(Camtrol) warrants solely to the original purchaser that its Camtrol stabiliz-
ing unit will be free from defects in materials and workmanship ,under normal conditions
of use and service, for one year and 6 six months for labor based on the date of original
purchase. The original invoice shipped with the product must be retained as proof of pur-
chase and will be required to process any and all warranty claims.
Failure to follow the warnings regarding the proper method of releasing tension in the
ball joints of the unit before moving any arms or handles will be cause for voiding the
warranty.
Camtrol may at its option, under the warranty program, repair or replace the defective
unit. Camtrol shall not be liable for any consequential damages, expenses, or losses re-
sulting from a defect in the unit. This warranty gives you specific legal rights. You may
have other rights that vary from state to state.
Notify Camtrol of a defect in the unit by contacting Camtrol Customer Service at 1-888-7
CAMTROL (1-888-226-87650) OR [email protected]. You will be provided with in-
structions for returning the unit to Camtrol’s Customer Service Center for repair or re-
placement. When calling, please have ready your dated sales receipt with the order num-
ber as proof of purchase.
K -Warranty and Warnings (Continued)
L -Ordering Parts and Accessories
To order parts and accessories, visit www.camtrol.com or call Camtrol Customer Service
at 1-888-7 CAMTROL (1-888-226-87650).
Table of contents