Candy CDI 2L952-80 User manual

Instruction
Manual
Jasmine Lodge

Instruction ManualInstruction Manual
CDI 2L952-80
DishwasherDishwasher
9 place settings
10 place settings

Check the rinse aid level
(On models with water softener system only.)
Electric indicator on control panel (if provided).
If there is no salt warning light in the control panel
(for some models), you can estimate when to fill the salt into
the softener by the number of cycles the dishwasher has run.
Check the regeneration
salt level
Load the baskets
Select a programme
T urn on the water tap ,close the door . The machine will start working after about 1 seconds.
Running the dishwasher
Switch off the appliance
Turn off the water tap,
unload the baskets
Fill the detergent dispenser
Warning: wait a few minutes (about 15 minutes) before unloading the dishwasher to avoid handling
the dishes and utensils while they are still hot and more susceptible to break.
They will also dry better.Unload the appliance, starting from the lower basket.
Changing the programme
Add forgotten dishes in the
dishwasher.
Scrape off any large amount of leftover food. Soften remnants of burnt food in pans,
then load the baskets. Refer to the dishwasher loading instructions.
Press the Programme Button until the selected programme lights up.
( See the section entitled Operation instruction )
If the appliance is switched
off during a wash cycle.
Open the doorcarefully.
Hot steam mayescape
when the dooris opened!
WARNING!
If the appliance is switched off during a wash cycle, when switched
on again, please re-select the washing cycle and operate the dishwasher
according to the original Power-on state ).
Switch on the appliance
Open the door,press the On/Off button to switch on the appliance .
1.Open the door a little to stop the dishwasher.
2.After the spray arms stop working, you can open the door completely.
3.Add the forgotten dishes.
4.Close the door, the dishwasher will start running again after 10 seconds.
Quick operation guideQuick operation guide
For detailed operating method read the corresponding content on the instruction manual.
1. A running cycle can only be modified if it has been running for a short time. Otherwise the detergent
may have already been released and the water already drained. If this is the case, the detergent
dispenser must be refilled.
2. Open the door.
3. Press the Programme Button for more than 3 seconds to cancel the running programme.
4. Select a new programme.
5. Restart the dishwasher.
4
When the working cycle has finished, the buzzer of the
dishwasher will sound 8 times, then stop.
Turn off the appliance using the ON/OFF button.
Since the appliance is standing by, it will power off automaticly after 30 minutes without any operation
Mechanical indicator B.Mechanical indicator B.
The detergent containeris inside thedoor.
If the lidof the containeris closed, press
the button (A) to open.
At the endof every washcycle the lidis
always open andready for thenext time
the dishwasher isused.
B.B.
It is alwaysadvisable to userinse aid thatis specifically designedfor dishwasher.
Check the rinseaid level through the indicator eye (B) which is locatedon the dispenser.

Back ViewFront view
5
Dishwasher FeaturesDishwasher Features
11
Adjuster
11
910
Dispenser
Cup Shelf
Spray arms
Filter assembly
Inlet pipe connector
Drain pipe
Lower Basket
Inner pipe
Upper Basket
1Salt Container
5
6
7
8
9
10
3
2
4
3.Operation Instruction3.Operation Instruction
Control PanelControl Panel
before using it for the first time.
To get the best performance from your dishwasher, read all operating instructions
IMPORTANTIMPORTANT
1
2
3
4
5
6
7
8
99
667788
1155
223344

6
The water softener must be set manually, using the water hardness dial.
The water softener is designedto remove mineralsand salts fromthe water,which would have
a detrimental or adverse effect on the operation of the appliance.
The higher thecontent of these minerals and salts, the harder your wateris.
The softener shouldbe adjusted accordingto the hardnessof the waterin your area. Your local Water Authority
can advise you on the hardness of the water in your area.
Adjusting Salt Consumption
The dishwasher is designed to allow for adjustment in the amount of salt consumed based on the hardness of
the water used.This is intended to optimiseand customise thelevel o f salt consumption.
1. Open the door ,Switch on the appliance;
2. Press theProgram button for more than 5 seconds to start the water softener
set model within 60seconds after the appliance was switched on( The Salt and
Rinse aid warninglightswill be onperiodically when itget in the set model );
3. Press theProgram button to select the proper set according to your local environment,
the sets will change in the following sequence: H1->H2->H3->H4->H5->H6;
4. Press the Power button to end the set up model.
WATER SOFTENER
The hardness of the water varies from place to place. If hard water is used in the dishwasher, deposits will
form on the dishes and utensils.
The appliance is equipped with a special softener that uses a salt container specifically designed to eliminate
lime and minerals from the water.
4.Prior using for the first time4.Prior using for the first time
Contact your local water board for information on the hardness of your water supply.
Please follow the steps below for adjustment in salt consumption.
A. Water SoftenerA. Water Softener
NOTE:NOTE:
If your model does not have any water softener, you may skip this section.
¡ã
Clark: British degree
¡ã
fH: French degree
¡ã
DH: German degree
Note:1Note:1 dH=1.25 Clark=1.78 fH=0.178mmol/l
¡ã ¡ã
¡ã
1
Note:2Note:2
The manufactory setting: H4 (EN 50242)
Before using your dishwasher for the first time:
A. Set the water softener
B. Add 1.5Kgdishwasher salt andthen full fillthe salt containerwith water
C. Fill the rinse aid dispenser
D. Fill in detergent
dH
mmol/l
0~90~5 0~0.94 H1( Rapid Light bright) 0
10-20
6-11
1.0-2.0 H2(90 Min Light bright) 9
21-30
12-17 2.1-3.0
*H3(90 Min Rapid Light bright)
12
H4(Glass Light bright) 20
fH
0~6
7-14
15-21
Clark
WATER HARDNESS
Selector Position Salt consumption
(gram/cycle)
18-22 31-40 22-28 3.1-4.0
41-60
23-34 4.1-6.0 H5(Glass Rapid Light bright) 30
H6(Glass 90 Min Light bright) 60
29-42
35-55 61-98 43-69 6.1-9.8

8
C. LOADING THE DETERGENTC. LOADING THE DETERGENT
IMPORTANT
It is essential to use a detergent that is specifically designed for dishwashers either in powder, liquid or tablet form.
FINISH gives very good results and can be easily obtained.Unsuitable detergents (like those for washing up by hand)
do not contain the proper ingredients for use in a dishwasher and stop the dishwasher from working correctly.
The detergent
Filling the detergent container
The detergent container is inside the door (fig. A 2 ). If the lid of the container is closed, press the button (A) to open.
At the end of every wash cycle the lid is always open and ready for the next time the dishwasher is used.
The amount of detergent to be used varies according to how dirty the dishes are and on the type of dishes to be washed.
We advise using 20/30 g of detergent in the wash section of detergent compartment (B).
After pouring the detergent into the container,close the lid, firstly pushing (1) and then pressing on it (2) until you hear the click.
Since not all detergents are the same the instructions on the boxes of detergent can vary. We should just like to remind users
that too little detergent does not clean the dishes properly whilst too much detergent will not produce better results and is
also a waste.

13
6.Starting a washing program6.Starting a washing program
Wash Cycle TableWash Cycle Table
NOTE:NOTE:
Means: need to fill rinse into the Rinse-Aid Dispenser.
( )
Turning On the ApplianceTurning On the Appliance
NOTE:NOTE:
*EN 50242 : This program is the test cycle. The information for comparability test
in accordance withEN 50242, asfollows:
Capacity: 9 setting
Position Upper basket: upper wheels on rails
Rinse aid setting: 6
PI:0.45W; P :0.3W.
o
Left-on mode duration 30Min
Starting a cyclewash
Draw out thelower and upper basket, load the dishes and pushthem back.
It is commendedto load thelower basket first, then the upper one (see the section entitled
Loading the Dishwasher ).
Pour in thedetergent (see thesection entitled Salt, Detergent and Rinse Aid ).
Insert the pluginto the socket.The power supply is 220-240 VAC /50 HZ, the specification
of the socketis 10A 250VAC. Make sure thatthe water supply is turned on to full pressure.
Close the door, press the Power button, to switch on the machine.
Press the program button , the wash program will be changed as follows direction:
Intensive->Normal->ECO->Glass->Daily->Rapid;
If a programis selected, the response light willlight. Then press the Start/Pause button, the
dishwasher begins tostart.
1
2
3
4
5
Detergent
pre/main
Detergent
pre/main
Cycle Selection
Information
Cycle Selection
Information
ECO
ProgramProgram
Intensive
Normal
(*EN 5 0242)
Running
time(min)
Running
time(min) Water
(L)
Water
(L)
Energy
(Kwh)
Energy
(Kwh)
Rinse
Aid
Rinse
Aid
Rapid
Description
of Cycle
Description
of Cycle
Glass
For normally soiled loads,
such as pots, plates,glasses
and lightly soiled pans.
For heaviest soiled crockery,
and normally soiled pots
pans dishes etc with dried
on soiling.
For lightly soiled loads that
do not need excellent drying
efficiency.
A shorter wash for lightly
soiled loads and quick wash.
For lightly soiled crockery
and glass
5/22g
1 piece
5/22g
1piece
5/22g
1piece
Wash (55 )
Rinse(50 )
Rinse (55 )
175
205
165
30
1.1
0.69
1.4
0.7
16.5
13
9
10
Wash(65 )
Rinse
Rinse (66 )
Drying
90 11. 5
1.15
20g
5/22g
1piece
Pre-wash
wash(40 )
Rinse
Rinse(62 )
Drying
125
0.75 13.5
27g
1piece
Prewash 50
Wash 60
Rinse
Rinse
Rinse 69
Drying
Prewash(45 )
Wash (55 )
Rinse
Rinse (66 )
Drying
Prewash
Wash (45 )
Rinse(62 )
Drying
This is standard programme, it is
suitable to clean normally soiled
tableware and it is the most efficient
programme in terms of its combined
energy and water consumption for
that type of tableware.
Daily

When the workingcycle has finished,the buzzer of the dishwasher will sound for 8 seconds, then stop. Turn off
the appliance using the ON/OFF button, shut off the water supply and open the door of the dishwasher.
Wait for a few minutes before unloading the dishwasher to avoid handling the dishes and utensils while they
are still hot and more susceptible to breakage. They will also dry better.
Switch Off the Dishwasher
The program light is on but is not blinking, only in this case the programme has ended.
1.Open thedoor.Switch off the dishwasherby pressing the ON/OFF button.
2.Turn off the water tap!
Open the door carefully.
Hot dishes aresensitive to knocks. The dishes should therefore be allowed to cooldown around 15minutes
before removing from the appliance.
Open the dishwasher'sdoor, leave it ajar and wait a few minutes before removing the dishes. Inthis way they
will be cooler and the drying will be improved.
Unloading the dishwasher
It is normal that the dishwasher is wet inside.
Empty the lowerbasket first andthen the upperone. This will avoid water dripping from the upper Basket onto
the dishes in the lower one.
Change the Program...Change the Program...
Forgot to Add a Dish?Forgot to Add a Dish?
If you open the door during a wash cycle , the machine will pause. The program light will
stop blinking and the buzzer will mooing every minute unless you close the door . After
you close the door ,the machine will keep on working after 1 seconds.
NOTE:NOTE:
At the End of the Wash CycleAt the End of the Wash Cycle
Premise:
A cyclethat is underwaycan only bemodified if it has only been running for ashort time. Otherwise,the
detergent may have already been released, and the appliance may have already drained the wash water.
If this is the case, the detergent dispenser must be refilled(see the section entitled " Loading the
Detergent " ).
Open the door,press the Programbutton more than3 seconds ,the machine will be in standby state,
then you canchange the programto the desired cycle setting (see the section entitled " Starting a
wash cycle. . ." ).
1
2
A forgotten dish can be added any time before the detergent cup opens.
Add forgotten dishes.
Close the door
After the spray arms stop working, you can open the door
completely.
2
3
Open the door a little .
14
5The dishwasher will run after 1 seconds.
WARNING!WARNING!
It is dangerous to open the door when washing,
because the hot water may scald you.
14

Washing Machine
User Manual
WTIK72111
2820528913_EN/ 22-07-20.(8:58)
Document Number :

12 / EN Washing Machine / User’s Manual
4.2.6 Using detergent and softener
Choosing the detergent type
Detergent type to be used depends on the
washing programme, fabric type and color.
• Use different detergents for coloured and
white laundry.
• Wash your delicate clothes only with special
detergents (liquid detergent, wool shampoo,
etc.) intended solely for delicate clothes and
at suggested programmes.
• When washing dark coloured clothes and
quilts, it is recommended to use liquid
detergent.
• Wash woolens at suggested programme with
special detergent made specifically for woolens
• Please review the program descriptions part
for suggested program for different textiles.
• All recommendations about detergents are
valid for selectable temperature range of
programmes.
A
WARNING
• Use only detergents manufactured
specifically for washing machines.
• Do not use soap powder.
C
INFORMATION
• When using detergent, softener, starch, fabric
dye, bleach or limescale remover read the
manufacturer’s instructions on the package
carefully and follow the suggested dosage
values. Use measuring cup if available.
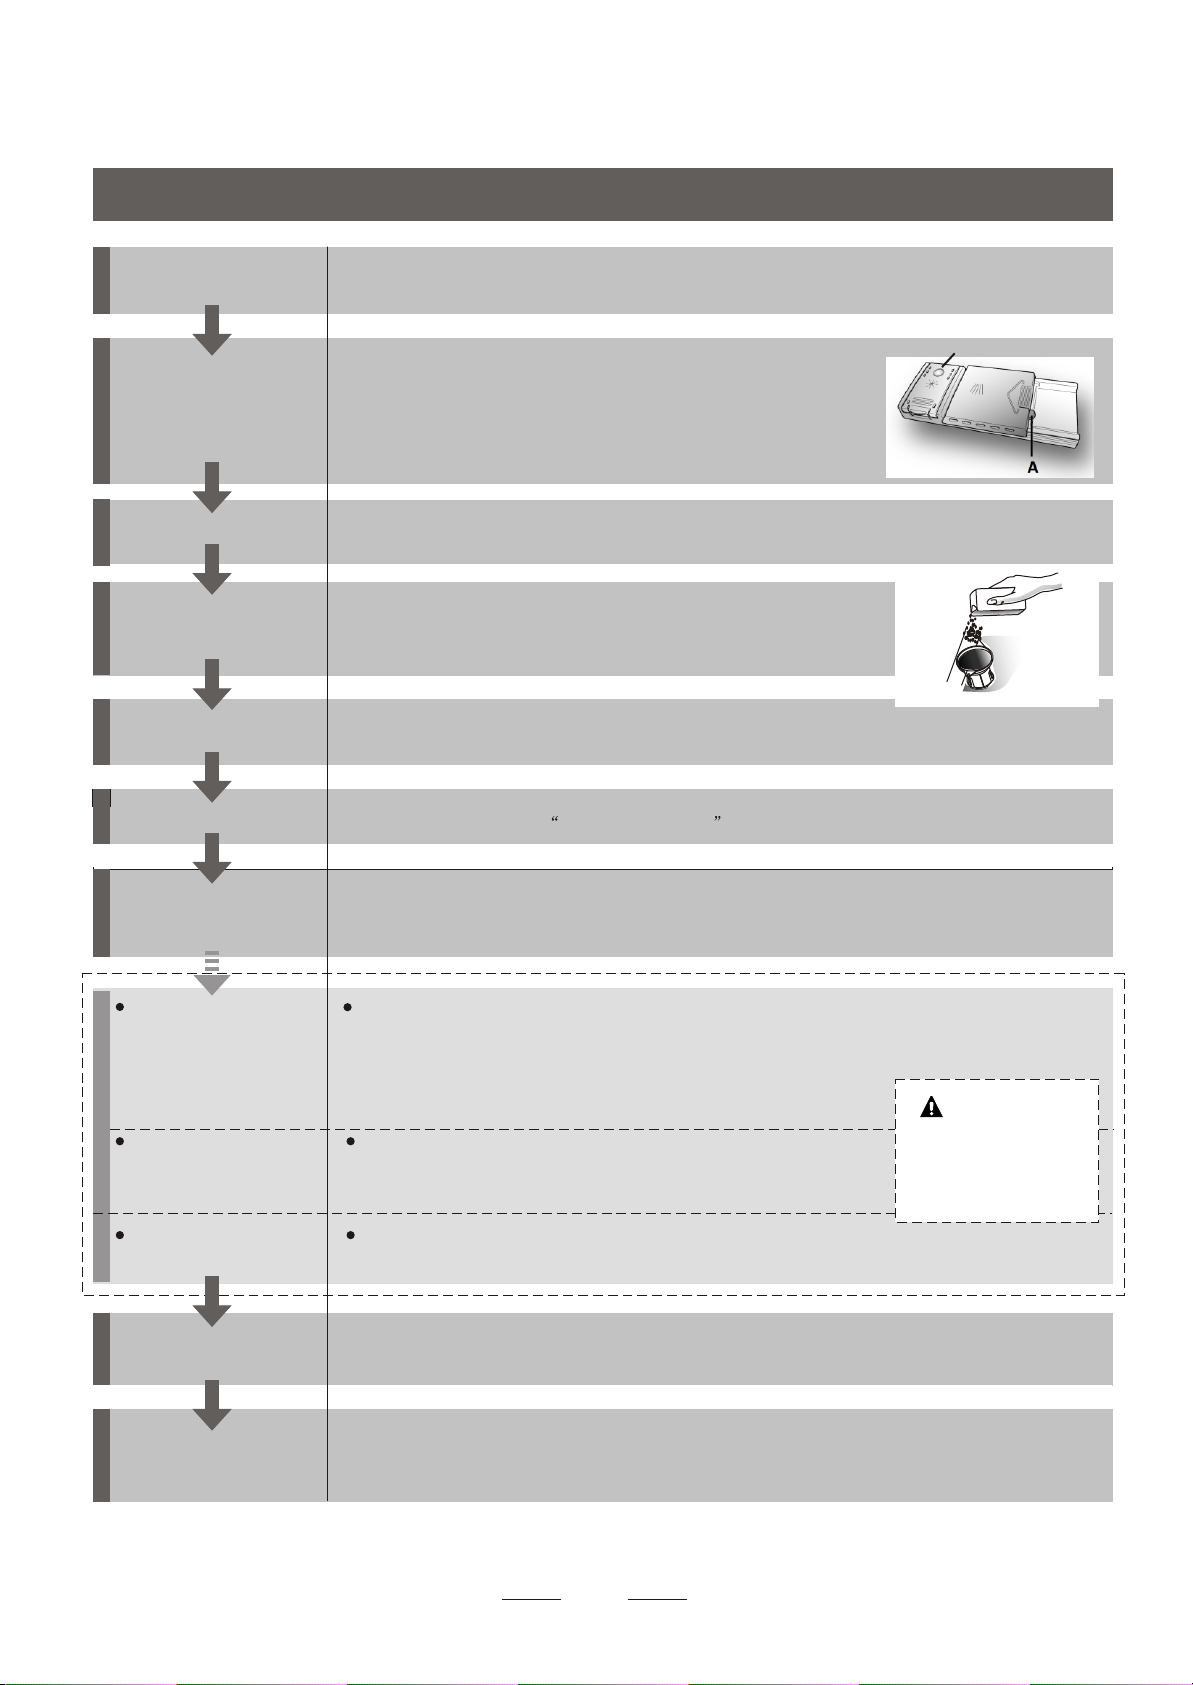
Detergent Drawer
Detergent drawer of your washing machine
consists of four different compartments for
powder main wash detergent, liquid main
wash detergent, liquid softener and powder
pre-wash detergent. Each of these laundry
additives are dispensed automatically in the
relevant time during the washing Programme.
Do not place the laundry additives directly into
the drum. Always use the detergent drawer.
Do not close the drawer too fast after putting the
laundry additives. This may cause the additives
be dispensed early, creating unsatisfactory
washing results and fabric damage.
C
INFORMATION
• Do not open the drawer during
washing Programme.
The detergent drawer compartments are
indicated below:
1) Left compartment with number “II” (Main
wash compartment for powder detergent or
powder bleach/stain remover)
2) Left compartment with number “II ” (Main
wash compartment for liquid detergent or
liquid stain remover)
3) Middle compartment with number “I” (pre-
wash compartment for powder detergent,
powder stain remover or liquid bleach -
liquid bleach must be added either during
the pre-wash or during the first rinsing step
of the washing Programme). Liquid bleach
must be added manually while the machine
takes in water.
4) Right compartment with “ ” symbol (liquid
softener compartment)
(II) Main Wash Compartment
Before starting the washing Programme, put
powder detergent into the left compartment
with number “II”. Use the detergent
manufacturer’s measuring cup and follow the
instructions on the package. Powder bleach/
stain remover must also be put into this
compartment.
Put the liquid detergent into the main wash
compartment with number “II ” before starting
the washing Programme. Liquid stain remover
must be put into this compartment.
Put the suggested amount of liquid detergent
into the left compartment with “II ” symbol
and dilute it to the maximum filling level line
(max. II ) with warm water.
Particularly the concentrated detergents must
be diluted with warm water; otherwise, the
siphon may get clogged in time.

13 / EN Washing Machine / User’s Manual
Do not fill the detergent above the maximum
filling level line; otherwise the excess amount of
detergent will reach the laundry without water
and may cause stains on the garments.In this
case you will need to refill the compartment.
Do not pour the detergent onto the laundry
directly since this may cause stains on the
garments.
Liquid Softener Compartment
Put the suggested amount of liquid softener
into the right compartment with “ ” symbol
and dilute it to the maximum filling level line
(max. ) with warm water.
Particularly the concentrated softeners must be
diluted with warm water; otherwise, the siphon
may get clogged in time.
Do not fill the softener above the maximum
filling level line; otherwise the excess amount of
softener will get mixed with the washing water
and you will need to refill the compartment. Do
not pour the softener onto the laundry directly
since this may cause stains on the garments.
Liquid softener will be dispensed automatically
at the final rinsing step of the washing
Programme.
(I) Pre-Wash Compartment
Put the powder pre-wash detergent or powder
stain remover into the middle compartment
with number “I”.
You can also put liquid bleach into this
compartment while the machine takes in water
during pre-wash or first rinsing step. Adding
the liquid bleach while the machine takes in
water allows it to be diluted before it is poured
onto the laundry.
You must select extra rinsing option if you use
liquid bleach in a washing Programme. Bleach
must be removed from the laundry with rinsing;
otherwise it may cause itching on the skin.
C
INFORMATION
• Read the dosage instructions and
label of your garments carefully
before using the liquid bleach.
Starch
• Add liquid starch, powder starch or the
dyestuff into the softener compartment as
instructed on the package.
• Never use fabric softener and starch
together in the same washing cycle.
• Wipe the inside of the drum after using
starch.
Bleaches
If you are going to use regular bleach in
your machine, it is suggested to select a
Programme with pre-wash step and add
the bleach at the beginning of the pre-wash
without putting detergent into the pre-wash
compartment. Alternatively, it is suggested
to select a Programme with extra rinsing and
add the bleach while the machine takes in
water from the detergent drawer in the first
rinsing step. Bleach should not be mixed
with detergent. Since the bleach may cause
irritation on skin, little amounts must be used
and rinsed thoroughly. Do not pour bleach
directly onto the laundry and do not use it with
colour laundry.
When using oxygen based bleach, follow
the instructions on the package and select
a Programme at low temperature. Oxygen
based bleach can be used together with the
detergent. However, if it is not at the same
thickness with the detergent, then it must be
added from the compartment number “II” right
after the detergent foams with water.
Eliminating lime formation
• When required, use only appropriate lime
removers developed specifically for washing
machines and always follow the instructions
on the package.

14 / EN Washing Machine / User’s Manual
4.2.7 Tips for efficient washing
Clothes
Light colours and whites Colours Dark colours Delicates/
Woolens/Silks
(Recommended temperature
range based on soiling level:
40-90ºC)
(Recommended temperature
range based on soiling level:
cold-40ºC)
(Recommended
temperature range
based on soiling level:
cold-40ºC)
(Recommended
temperature range
based on soiling level:
cold-30ºC)
Soiling Level
Heavily
Soiled
(difficult
stains such
as grass,
coffee, fruits
and blood.)
It may be necessary to pre-
treat the stains or perform
prewash. Powder and liquid
detergents recommended for
whites can be used at dosages
recommended for heavily soiled
clothes. It is recommended
to use powder detergents to
clean clay and soil stains and
the stains that are sensitive to
bleaches.
Powder and liquid
detergents recommended
for colours can be used at
dosages recommended
for heavily soiled clothes.
It is recommended to use
powder detergents to clean
clay and soil stains and the
stains that are sensitive to
bleaches. Use detergents
without bleach.
Liquid detergents
suitable for colours
and dark colours can
be used at dosages
recommended for
heavily soiled clothes.
Prefer liquid detergents
produced for delicate
clothes. Woolen and
silk clothes must be
washed with special
woolen detergents.
Normally
Soiled
(For
example,
stains
caused by
body on
collars and
cuffs)
Powder and liquid detergents
recommended for whites
can be used at dosages
recommended for normally
soiled clothes.
Powder and liquid detergents
recommended for colours
can be used at dosages
recommended for normally
soiled clothes. Use
detergents without bleach.
Liquid detergents
suitable for colours
and dark colours can
be used at dosages
recommended for
normally soiled
clothes.
Prefer liquid detergents
produced for delicate
clothes. Woolen and
silk clothes must be
washed with special
woolen detergents.
Lightly
Soiled
(No visible
stains exist.)
Powder and liquid detergents
recommended for whites
can be used at dosages
recommended for lightly soiled
clothes.
Powder and liquid
detergents recommended
for colours can be used at
dosages recommended for
lightly soiled clothes. Use
detergents without bleach.
Liquid detergents
suitable for colours
and dark colours can
be used at dosages
recommended for
lightly soiled clothes.
Prefer liquid detergents
produced for delicate
clothes. Woolen and
silk clothes must be
washed with special
woolen detergents.
4.2.8 Displayed Programme Time
You can see the programme duration on the
display of your machine while selecting a
programme. Depending on the amount of laundry
you have loaded into your machine, foaming,
unbalanced load conditions, fluctuations in power
supply, water pressure and programme settings,
the programme duration is automatically adjusted
while the programme is running.
SPECIAL CASE: At programme start of Cottons
and Cotton Eco programmes, display shows the
duration of half load, which is the most common
use case. After programme starts, in 20-25
minutes actual load is detected by the machine.
And if the detected load is higher than half load;
washing programme will be adjusted accordingly
and programme duration increased automatically.
You may follow this change on the display.

15 / EN Washing Machine / User’s Manual
4.3 Operating the product
4.3.1 Control panel
1 - Programme Selection Knob (Uppermost
position On / Off)
2 - Display
3 - End Time Adjustment Button
4 - Programme Follow-up Indicator
5 - Start/Pause Button
6 - Auxiliary Function Button 3
7 - Auxiliary Function Button 2
8 - Auxiliary Function Button 1
9 - Spin Speed Adjustment Button
10 - Temperature Adjustment Button
1 2 3
4
578910 6
4.3.2 Preparing the machine
1. Make sure that the hoses are connected
tightly.
2. Plug in your machine.
3. Turn the tap on completely.
4. Place the laundry in the machine.
5. Add detergent and fabric softener.
4.3.4 Programme and consumption table
4.3.3 Programme selection and
tips for efficient washing
1. Select the programme suitable for the type,
quantity and soiling degree of the laundry
in accordance with the "Programme and
consumption table" and the temperature
table below.
2. Use the Programme Selection knob to
select the desired programme.
EN 2Auxiliary functions
Programme
Max. Load (kg)
Water Consumption
(l)
Energy Consumption
(kWh)
Max. Speed
Prewash
Fast+
Extra Rinse
AntiCrease+
Temperature
Cottons
90 7 95 2,40 1200 •••• Cold-90
60 7 95 1,80 1200 •••• Cold-90
40 7 93 0,97 1200 •••• Cold-90
Eco 40-60
40 *** 7 52,0 0,840 1200 40-60
40 **,*** 3,5 38,0 0,540 1200 40-60
40 *** 2 28,0 0,290 1200 40-60
60 ** 7 52,0 0,865 1200 40-60
60 ** 3,5 38,0 0,550 1200 40-60
Synthetics 60 3 75 1,35 1200 •••• Cold-60
40 3 70 0,85 1200 •••• Cold-60
Quick / Super Quick
90 7 66 2,20 1200 ••• Cold-90
60 7 66 1,20 1200 ••• Cold-90
30 7 66 0,20 1200 ••• Cold-90
Quick / Super Quick + Fast+ 30 2 40 0,15 1200 ••• Cold-30
Mixed Fabrics 40 3,5 83 1,00 800 • • • Cold-40
Hand Wash 40 1,5 62 0,55 1200 •Cold-40
Delicates 40 3,5 60 0,79 800 •Cold-40
Down Wear 60 2 95 1,40 1000 •Cold-60
Sports 40 3,5 58 0,60 1200 •Cold-40
Dark Care 40 3 88 1,05 1200 • • *•Cold-40
StainExpert 60 3,5 85 1,70 1200 • • 30-60
Shirts 60 3 65 1,40 800 •••• Cold-60
Anti Allergy 90 7 129 2,90 1200 *20-90
Drum Clean 90 - 80 2,70 600 90

16 / EN Washing Machine / User’s Manual
• : Selectable
* : Automatically selected, cannot be cancelled.
** : Eco 40-60 ( ) is the test programme in accordance with EN 60456:2016 and energy
label with Commission Delegated Regulation (EU) 1061/2010)
***: Eco 40-60 with 40 °C temperature selection is the test programme in accordance with
EN 60456:2016/prA:2020 and energy label with Commission Delegated Regulation (EU) 2019/2014
- : See the programme description for maximum load.
C
INFORMATION
• Water and power consumption may vary subject to the changes in water pressure, water
hardness and water temperature, ambient temperature, type and amount of laundry,
selection of auxiliary functions and spin speed, and changes in the mains voltage.
• When selecting a programme, you can see the washing duration on the display
of your machine. Depending on the amount of laundry you have loaded into the
machine, there might be a difference of 1 to 1.5 hours between the duration shown
on the display and the actual duration of the washing programme. The duration will
be corrected automatically right after the washing programme has started.
• The auxiliary functions in the table may vary according to the model of your machine.
• Auxiliary function selection modes can be changed by the manufacturing company.
Existing selection modes can be removed or new selection modes can be added.
• Always select the lowest appropriate temperature. The most efficient programmes in terms of
energy consumption are generally those that perform at lower temperatures and longer duration.
• Noise and remaining moisture content are influenced by the spinning speed: the higher the spinning
speed in the spinning phase, the higher the noise and the lower the remaining moisture content.
Consumption Values (EN)
Temperature
Selection (°C)
Spin Speed (rpm)
Capacity (kg)
Program Duration
(hh:mm)
Energy Consumption
(kWh/cycle)
Water
Consumption(L/
cycle)
Laundry
Temperature (°C)
Remaining Moisture
Content (%)
Eco 40-60
40 1200 7 03:27 0,840 52,0 34 52
40 1200 3,5 02:41 0,540 38,0 34 53
40 1200 2 02:41 0,290 28,0 24 56
Cottons 20 1200 7 03:40 0,600 93,0 20 53
Cottons 60 1200 7 03:40 1,800 95,0 60 53
Synthetics 40 1200 3 02:25 0,850 70,0 40 40
Quick / Super Quick 30 1200 7 00:28 0,200 66,0 23 62

17 / EN Washing Machine / User’s Manual
4.3.5 Main programmes
Depending on the type of fabric, use the
following main programmes.
• Cottons
You can wash your durable cotton laundry
(sheets, bedlinen, towels, bathrobes, underwear
etc.) in this programme. When you press the
quick wash function key, programme duration
becomes notably shorter but effective washing is
ensured thanks to intense washing movements.
If the quick wash function is not selected,
superior washing and rinsing performance is
ensured for your heavily soiled laundry.
• Synthetics
You can use this programme to wash t-shirts,
synthetic/cotton mix fabrics etc. Programme
duration is notably shorter and efficient
washing performance is ensured. If the
quick wash function is not selected, superior
washing and rinsing performance is ensured
for your heavily soiled laundry.
• Hand Wash
Use this programme to wash your woollen/
delicate clothes. Select the appropriate
temperature complying with the tag of your
clothes. Your laundry will be washed with very
delicate movements to avoid any damage.
4.3.6 Additional programmes
For special cases, additional programmes are
available in the machine.
C
INFORMATION
• Additional programmes may differ
according to the model of the machine.
•
Eco 40-60
The eco 40-60 programme is able to clean
normally soiled cotton laundry declared to be
washable at 40 °C or 60 °C, together in the same
cycle, and that this programme is used to assess
the compliance with the EU ecodesign legislation.
Although it washes longer than all other
programmes, it provides high energy and water
savings. Actual water temperature may be
different from the stated wash temperature. When
you load the machine with less laundry (e.g. ½
capacity or less), periods in programme stages
may automatically get shorter. In this case, energy
and water consumption will decrease.
• Anti Allergy
Use this programme for laundry that requires
an intense, long, anti-allergic and hygienic
washing cycle at high temperature. A high
level of hygiene is ensured thanks to the long
heating and additional rinsing step.
• The programme was tested by the "VDE"
institute while the temperature was 20°C,
and its efficiency in bacteria and mould
elimination was certified.
• The programme has been tested by “The
British Allergy Foundation - Allergy UK”
while the temperature was 60°C, and its
efficiency in eliminating bacteria and mould,
as well as allergens, was certified.
Allergy UK is the trademark of the
British Allergy Foundation. The Seal
of Approval has been designed to
provide guidance to persons who
want information whether the
product significantly decreases the
amount of allergens in the environment it is
installed or whether it limits/reduces/eliminates the
allergens. Its purpose is to provide evidence that
the products have been tested scientifically or
reviewed to provide measurable results.
• Delicates
You can use this programme to wash delicate
laundry such as cotton/synthetic mix knitted
clothes or socks. Washing movements in this
programme are more delicate. Set the temperature
to 20 degrees or use the Cold Wash option for
clothes whose colour you wish to preserve.
•
Quick / Super Quick
Use this programme to wash your lightly soiled
cotton clothes in a short time. The programme
duration can be reduced down to 14 minutes
when the quick wash function is selected. When
the quick wash function is selected, maximum 2
(two) kg of laundry must be washed.
•Dark Care
Use this programme to preserve the colour
of your dark-coloured clothes and jeans. This
programme provides high efficiency in washing,
thanks to a special drum movement, even at low
temperatures. It is recommended to use liquid
detergent or woollen shampoo for dark coloured
laundry. Do not wash your delicate clothes that
contain wool etc. in this programme.

18 / EN Washing Machine / User’s Manual
•
Mixed Fabrics
You can use this programme to wash cottons and
synthetics together without the need to sort them.
•
Shirts
Use this programme to wash shirts made of
cotton, synthetic and synthetic blended fabrics
together. This programme ensures that your
clothes wrinkle less. When the quick wash function
is selected, the Pre-treatment algorithm is used.
• Apply the pre-treatment chemical directly onto
the clothes, or add it together with the detergent
when the machine starts to take in water from
the main wash compartment. This way, it will
take you much shorter to get the performance
you would normally get with a regular washing
cycle. Life of your shirts will be longer.
•
Sports
Use this programme to wash outdoor/sports
clothes that contain cotton/synthetic mix, as
well as waterproof cloths like gore-tex. This
programme washes your laundry delicately
thanks to its special turning movements.
•
StainExpert
Your washing machine has a special stain
programme ensuring that different types of
stains are removed in the most efficient way. Use
this programme only to use durable, colourfast
cottons. Do not wash delicate or non-colourfast
clothes in this programme. You should check the
tags of clothing before washing (recommended
for shirts, trousers, shorts, t-shirts, baby clothes,
pyjamas, aprons, table cloths, bedding, duvet
covers, sheets, bath/brach towels, regular towels,
socks, and cotton underwear suitable for long
washing cycles at a high temperature). With the
auto stain programme, you can remove 24 types
of stains grouped into two categories according
to quick function selection. Here you can see the
stain groups based on quick function selection.
Below you will find the stain groups based on
the quick function.
When the quick function is selected:
Blood Fruit juice
Chocolate Ketchup
Pudding Red Wine
Egg Curry
Tea Jam
Coffee Coal
When the quick function is not selected:
Butter Food
Grass Mayonnaise
Mud Salad Dressing
Coke Make-up
Sweat Machine Oil
Collar Soil Baby food
• Select the stain programme.
• In the stain groups stated above, find the
type of stain you want to remove and select
the quick auxiliary function selection key to
select the relevant group.
• Carefully read the tag of the clothing and
make sure that the temperature and spin
speed selected are suitable.
• Down Wear
Use this programme to wash down coats,
vests, jackets etc. that bear a “machine-
washable” tag. Thanks to special spin profiles,
it is ensured that water reaches the air gaps
between feathers.
4.3.7 Special programmes
For specific applications, select any of the
following programmes.
• Rinse
Use when you want to rinse or starch separately.
• Spin&Drain
Use this programme to remove the water on
the clothes/in the machine.
Before selecting this programme, select the
desired spin speed and press Start/Pause
button. First, the machine will drain the water
inside of it. Then, it will spin the laundry at
the selected spin speed, and drain the water
coming off of the laundry.
If you only want to drain the water without
spinning the laundry, select the “Spin+Pump
programme, and use the Spin Speed
Adjustment button to select the No Spin
function. Press the Start/Pause button.
C
INFORMATION
• Use a lower spin speed for
delicate laundries.

19 / EN Washing Machine / User’s Manual
4.3.8 Temperature selection
Whenever a new programme is selected, the
recommended temperature for the selected
programme appears on the temperature indicator.
To decrease the temperature, press the
Temperature Adjustment button. Temperature
will decrease gradually. When the cold level is
selected, temperature level lights will not be on.
C
INFORMATION
• If the programme has not reached
the heating step, you can change
the temperature without switching
the machine to Pause mode.
4.3.9 Spin speed selection
Whenever a new programme is selected, the
recommended spin speed of the selected
programme is displayed on the spin speed indicator.
To decrease the spin speed, press the Spin
Speed Adjustment button. Spin speed decreases
gradually. Then, depending on the model of the
product, "Rinse Hold" and "No Spin" options
appear on the display. When the “No Spin” function
is selected, rinse level indicator lights will not be on.
Rinse hold
If you are not going to unload your clothes
immediately after the programme ends, you can use
rinse hold function to keep your laundry in the final
rinsing water in order to prevent them from getting
wrinkled when there is no water in the machine.
Press Start/Pause button after this process if you
want to drain the water without spinning your
laundry. Programme will resume where it left off,
drain the water and then it will be complete.
If you want to spin the laundry held in water, adjust
the Spin Speed and press Start/Pause button.
Programme will resume. Water will be drained,
laundry will be spun and the programme will end.
C
INFORMATION
• If the programme has not reached the spin
step, you can change the spin speed without
switching the machine to Pause mode.
4.3.10 Auxiliary function selection
Select the desired auxiliary functions before
starting the programme. You can also select
or cancel auxiliary functions suitable for the
running programme without pressing the Start/
Pause button while the machine is operating.
To do this, the machine must be in a step
before the auxiliary function you are going to
select or cancel. If the auxiliary function cannot
be selected or cancelled, light of the relevant
function will flash 3 times to warn the user.
C
INFORMATION
• If a second auxiliary function conflicting
with the first one is selected before starting
the machine, the function selected first
will be cancelled and the second auxiliary
function selection will remain active.
• An auxiliary function which is not compatible
with the programme cannot be selected.
(See "Programme and consumption table")
• Auxiliary Function buttons may vary
according to the model of the machine.
4.3.10.1 Auxiliary functions
•
Prewash
A Prewash is only worthwhile for heavily soiled
laundry. Not using the Prewash will save
energy, water, detergent and time.
C
INFORMATION
• Prewash without detergent is
recommended for tulle and curtains.
• Fast+
When this function is selected, durations of
relevant programmes get shorter by 50%.
Thanks to the optimised washing steps,
high mechanic activity and optimum water
consumption, high washing performance is
achieved in spite of the reduced duration.
• Extra Rinse
This function enables the machine to carry
out another rinsing cycle in addition to the
one carried out after the main wash. Thus, the
risk for sensitive skins (babies, allergic skins,
etc.) to be effected by the minimal detergent
remnants on the laundrwy can be reduced.

20 / EN Washing Machine / User’s Manual
4.3.10.2 Functions/Programmes
Selected by Pressing the Function
Buttons for 3 Seconds
• Drum Clean
To select this programme, press and hold the
auxiliary function button 1 for 3 seconds.
Use it regularly (every 1-2 months) to clean
the drum and ensure the required hygiene is
provided. Run the programme while the machine
is totally empty. To obtain better results, put
powder lime-scale remover for washing machines
into the detergent compartment no. “2”. When
the programme is over, leave the loading door
ajar so that the inside of the machine gets dry.
C
INFORMATION
• This is not a washing programme.
It is a maintenance programme.
• Do not run this programme when there are
any objects in the machine. If you try to do
so, the machine will automatically detect that
there is load inside and abort the programme.
• Child Lock
You can prevent children from tampering with
the machine by using the Child Lock feature.
Thus you can avoid any changes in a running
programme.
C
INFORMATION
• If the Programme Selection knob is turned
when the Child Lock is enabled, "Con"
appears on the display. While the Child Lock
is enabled, you cannot make any change in
the programmes, the selected temperature,
the speed or the auxiliary functions.
• Even if another programme is selected
with the Programme Selection knob while
the Child Lock is enabled, previously
selected programme will continue running.
To enable Child Lock:
Press and hold the Auxiliary Function button 2
for 3 seconds. While you’re holding the button
pressed for 3 seconds, C03, C02 and C01
will be displayed respectively.Then, “Con” will
be displayed to warn the user that child lock
is enabled.If you press any button or turn the
Programme Selection knob while the Child Lock
is enabled, the same warning will be displayed.
To disable Child Lock:
Press and hold the Auxiliary Function button 2
for 3 seconds while the programme is running.
While you’re holding the button pressed for 3
seconds, C03, C02 and C01 will be displayed
respectively. Then, “COF” will be displayed to
warn the user that child lock is disabled.
C
INFORMATION
• In addition to the method above, to deactivate
the Child Lock, switch the Programme Selection
knob to On/Off position when no programme
is running, and select another programme.
• Child Lock will not be disabled after
a power failure or unplugging.
•
AntiCrease+
If you press and hold the auxiliary function button
3 for 3 seconds, this function will be selected
and the programme follow-up light of the relevant
programme will turn on. When this function is
selected, the drum will rotate for up to eight hours
to ensure that the clothes do not crease at the end
of the programme. At any time during these eight
hours, you can cancel the programme and unload
the machine. Just press any button or turn the
programme selection knob to end the function. The
programme follow-up light will remain on even if you
end the function by pressing any button. If you end
the function by turning the programme selection
knob, the programme follow-up light will remain on
or go off depending on the selected programme.
If you do not cancel the function by pressing the
Auxiliary Function button 3 for 3 seconds, it will be
used in the next washing cycles as well.

21 / EN Washing Machine / User’s Manual
4.3.11 End Time Adjustment
The End Time Adjustment function allows you to
set the end time of the programme up to 19 hours.
You can increase this time by 1-hour intervals.
C
INFORMATION
• Please do not use liquid detergent if you
have selected the End Time Adjustment
function. Stains might remain on the clothes.
1. Open the loading door, place the laundry
and add detergent, etc.
2. Select the washing programme,
temperature, spin speed and, if required,
the auxiliary functions.
3. Press the
End Time Adjustment
button and
select the desired time.
4. Press the Start/Pause button. The delayed end
time you have set will be displayed. Countdown
will start for delayed end. On the display, “_” will
move up and down next to the delayed end time.
C
INFORMATION
• If the programme has not started,
you can add laundry into the machine
during the delayed end time.
5. At the end of the countdown, duration of
the selected programme will be displayed.
“_” will disappear and the selected
programme will start.
Changing the delayed end time
If you want to change the time during countdown:
Turn the programme selection knob to cancel the
delayed end time function, and then set the desired
time again.
1. Press the
End Time Adjustment
button. When
pressed for the first time, the programme
duration will be rounded up to the closest
whole number time. Each following press will
increase the time by an hour.
2. If you want to decrease the delayed end
time, press the
End Time Adjustment
button
consecutively until the desired time is displayed.
Cancelling the delayed end function
If you want to cancel the delayed end time
countdown and start the programme immediately:
1. Set the Programme Selection knob to any
programme. This way, the Delayed End time
will be cancelled. The End/Cancel light will
flash continuously.
2. Then, select the programme you want to run
again.
3.
Press Start/Pause button to start the programme.
4.3.12 Starting the programme
1. Press Start/Pause button to start the programme.
2. Programme follow-up light showing the
startup of the programme will turn on.
C
INFORMATION
• If no programme is started or no key is
pressed within 10 minutes during the
programme selection process, the display
lights will go off. Once the Programme
Selection knob is turned or any button is
pressed, display lights will turn on again.
4.3.13 Progress of programme
Progress of a running programme can be
followed from the Programme Follow-up
indicator. At the beginning of each programme
step, the relevant indicator light will turn on.
C
INFORMATION
• If the “Anti-crease+” auxiliary function
has been selected, “End” LED and “Anti-
crease+” LED will be on at the same
time while this step is continuing.
• To end the programme while the “Anti-
crease+” step is running, simply press any
button or turn the programme selection knob.
You can change the auxiliary functions, speed
and temperature settings without stopping the
programme flow while the programme is running.
To do this, the change you are going to make
must be something that will be carried out after
the programme step that is running. If the change
is not suitable, relevant lights will flash 3 times.
C
INFORMATION
• If the machine does not proceed to the
spinning step, the Rinse Hold function
might be active or the automatic
unbalanced load detection system might
be activated due to the unbalanced
distribution of the laundry in the machine.

22 / EN Washing Machine / User’s Manual
4.3.14 Loading door lock
There is a locking system on the loading door of
the machine that prevents opening of the loading
door in cases when the water level is unsuitable.
Loading door light will start flashing when the
machine is switched to Pause mode. The machine
checks the level of the water inside. If the level is
suitable, the loading door light will turn off and the
loading door can be opened within 1-2 minutes.
If the level is unsuitable, the loading door light
will remain on and the loading door cannot be
opened. If you are obliged to open the loading
door while the Loading Door light is on, you
must cancel the current programme. See
"Cancelling the programme"
Opening the loading door in case of power
failure:
C
INFORMATION
• In case of a power failure, you can use the
loading door emergency handle under the pump
filter lid to manually open the loading door.
A
WARNING!
• Before opening the loading door, make sure that
there is no water in the machine to avoid flooding.
Water may be hot and could cause scalding.
•
Turn off and unplug the appliance.
•
Open the loading door by pulling the loading
door emergency handle downwards.
•
Try to pull the handle downwards again
if the loading door is not opened.
4.3.15 Changing the selections
after programme has started
Switching the machine to pause mode
Press the Start/Pause to switch the machine
to pause mode while a programme is running.
The light of the current programme will flash on
the Programme Follow-up indicator, indicating
that the machine has switched to pause mode.
Also, when the loading door is ready to be
opened, the Loading Door light will turn off in
addition to the programme step light.
Changing the auxiliary function, speed and
temperature
Depending on the step the programme has
reached, you can cancel or select auxiliary
functions. See “Auxiliary function selection”.
You can also change the speed and
temperature settings. See "Spin speed
selection" and "Temperature selection".
C
INFORMATION
• If no change is allowed, the
relevant light will flash 3 times.
Adding and removing laundry
1. Press the “Start/Pause” button to pause the
machine. The programme follow-up light of
the relevant step during which the machine
was switched into the pause mode will flash.
2. Wait until the Loading Door can be opened.
3. Open the loading door and add or take out
laundry.
4. Close the loading door.
5. Make changes in auxiliary functions,
temperature and speed settings if necessary.
6. Press the “Start/Pause” button to start the
machine.
Other manuals for CDI 2L952-80
1
Table of contents
Other Candy Dishwasher manuals

Candy
Candy LP2 140 User manual

Candy
Candy CDI 3015 User manual

Candy
Candy CDPE 6320 User manual

Candy
Candy CDI 3615 User manual

Candy
Candy CDF 718 T Specification sheet

Candy
Candy CDIM 4615 User manual

Candy
Candy CDI 2212 E10 User manual

Candy
Candy CDI 1010 User manual

Candy
Candy CDIM 6215 User manual

Candy
Candy CDS 120 User manual

Candy
Candy CDP 6350 User manual

Candy
Candy CDIM 5756 User manual

Candy
Candy CDI 3530 User manual

Candy
Candy CDPM 65720 X User manual

Candy
Candy CDP 6753 X User manual

Candy
Candy CDS 220 User manual

Candy
Candy CDF 322 User manual

Candy
Candy CDI 4015 User manual

Candy
Candy CDF 622 X User manual

Candy
Candy CDS 155 User manual