Candy FCDNE808VX User manual

USER INSTRUCTIONS
OVENS
MANUALE D’ISTRUZIONI
FORNO
NOTICE D'EMPLOI ET D'INSTALLATION
DES FOURS ENCASTRABLES
GB
IT
02
18
FR 34
CANDY HOOVER GROUP S.R.L. • Via Comolli 16 • 20861 Brugherio (MB) Italy
GB - FR - IT
Questo manuale d’istruzione è fornito da trovaprezzi.it. Scopri tutte le offerte per Candy FCDNE808VX o
cerca il tuo prodotto tra le migliori offerte di Forni

Safety Indications
• During cooking, moisture may condense inside the oven cavity or
on the glass of the door. This is a normal condition. To reduce this
effect, wait 10-15 minutes after turning on the power before putting
food inside the oven. ln any case, the condensation disappears when
the oven reaches the cooking temperature.
• Cook the vegetables in a container with a lid instead of an open tray.
• Avoid leaving food inside the oven after cooking for more than
15/20 minutes.
• WARNING: the appliance and accessible parts become hot during
use. Be careful not to touch any hot parts.
• WARNING: the accessible parts can become hot when the grill is in
use. Children should be kept at a safe distance.
• WARNING: ensure that the appliance is switched off before
replacing the bulb, to avoid the possibility of electric shocks.
• WARNING: in order to avoid any danger caused by the accidental
resetting of the thermal interruption device, the appliance should
not be powered by an external switching device, such as a timer, or
be connected to a circuit that is regularly switched on and off.
• Children under 8 should be kept at a safe distance from the
appliance if not continuously supervised.
• Children should not play with the appliance.
• The appliance can be used by those aged 8 or over and by those
with limited physical, sensorial or mental capacities, without
experience or knowledge of the product, only if supervised or
provided with instruction as to the operation of the appliance, in a
safe way with awareness of the possible risks.
• Cleaning and maintenance should not be carried out by
unsupervised children.
• Do not use rough or abrasive materials or sharp metal scrapers to
clean the oven door glasses, as they can scratch the surface and
cause the glass to shatter.
• The oven must be switched off before removing the removable
parts. After cleaning, reassemble them according the instructions.
• Only use the meat probe recommended for this oven.
• Do not use a steam cleaner for cleaning operations.
GB 02
GB - FR - IT

• Connect a plug to the supply cable that is able to bear the voltage,
current and load indicated on the tag and having the earth contact.
The socket must be suitable for the load indicated on the tag and
must have ground contact connected and in operation. The earth
conductor is yellow-green in colour. This operation should be carried
out by a suitably qualified professional. ln case of incompatibility
between the socket and the appliance plug, ask a qualified electrician
to substitute the socket with another suitable type. The plug and the
socket must be conformed to the current norms of the installation
country. Connection to the power source can also be made by placing
an omnipolar breaker between the appliance and the power source
that can bear the maximum connected load and that is in line with
current legislation. The yellow-green earth cable should not be
interrupted by the breaker. The socket or omnipolar breaker used for
the connection should be easily accessible when the appliance is
installed.
• The disconnection may be achieved by having the plug accessible or
by incorporating a switch in the fixed wiring in accordance with the
wiring rules.
• lf the power cable is damaged, it should be substituted with a cable
or special bundle available from the manufacturer or by contacting
the customer service department. The type of power cable must be
H05V2V2-F. This operation should be carried out by a suitably
qualified professional. The earth conductor (yellow-green) must be
approximately 10 mm longer than the other conductors. For any
repairs, refer only to the Customer Care Department and request the
use of original spare parts.
• Failure to comply with the above can compromise the safety of the
appliance and invalidate the guarantee.
• Any excess of spilled material should be removed before cleaning.
• A long power supply failure during an occurring cooking phase may
cause a malfunction of the monitor. ln this case contact customer
service.
• The appliance must not be installed behind a decorative door in
order to avoid overheating.
• When you place the shelf inside, make sure that the stop is directed
GB 03
GB - FR - IT

upwards and in the back of the cavity. The shelf must be inserted
completely into the cavity.
• WARNING: Do not line the oven walls with aluminium foil or single-
use protection available from stores. Aluminium foil or any other
protection, in direct contact with the hot enamel, risk melting and
deteriorating the enamel of the insides.
• WARNING: Never remove the oven door seal.
• CAUTION: Do not refill the cavity bottom with water during cooking
or when the oven is hot.
• No additional operation/setting is required in order to operate the
appliance at the rated frequencies.
GB 04

Summary
GB 05
General Instructions
6
1.1 Safety indications
1.2 Electrical safety
1.3 Recommendations
1.4 Installation
1.5 Waste management
1.6 Conformity declaration
2.1 Overview
2.2 Accessories
2.3 First use
Product Description
8
3.1 Display description
3.2 Cooking modes
Use of the Oven
10
4.1 General notes on cleaning
4.2 Maintenance
• Removal and cleaning of the sidi racks
• Removal of the oven windows
• Removal and cleaning of the glass
door
Oven Cleaning and Maintenance
15
5.1 F.A.Q.
Troubleshooting
17
GB - FR - IT

1. General Instructions
We thank you for choosing one of our products. For the
best results with your oven, you should read this
manual carefully and retain it for future reference.
Before installing the oven, take note of the serial
number so that you can give it to customer service staff
if any repairs are required. Having removed the oven
from its packaging, check that it has not been damaged
during transportation. If you have doubts, do not use
the oven and refer to a qualified technician for advice.
Keep all of the packaging material (plastic bags,
polystyrene, nails) out of the reach of children. When
the oven is switched on for the first time, strong
smelling smoke can develop, which is caused by the glue on the insulation panels surrounding the oven
heating for the first time. This is absolutely normal and, if it occurs, you should wait for the smoke to
dissipate before putting food in the oven. The manufacturer accepts no responsibility in cases where
the instructions contained in this document are not observed.
NOTE: The oven functions, properties and accessories cited in this manual will vary, depending on the
model you have purchased.
1.1 Safety Indications
Only use the oven for its intended purpose, that is only for the cooking of foods; any other use, for
example as a heat source, is considered improper and therefore dangerous. The manufacturer cannot
be held responsible for any damage resulting from improper, incorrect or unreasonable usage.
The use of any electrical appliance implies the observance of some fundamental rules:
- Do not pull on the power cable to disconnect the plug from the socket;
- Do not touch the appliance with wet or damp hands or feet;
- In general the use of adaptors, multiple sockets and extension cables is not recommended;
- In case of malfunction and/or poor operation, switch off the appliance and do not tamper with it.
1.2 Electrical Safety
ENSURE THAT AN ELECTRICIAN OR QUALIFIED TECHNICIAN MAKES THE ELECTRICAL CONNECTIONS.
The power supply to which the oven is connected must conform with the laws in force in the country of
installation. The manufacturer accepts no responsibility for any damage caused by the failure to observe
these instructions. The oven must be connected to an electrical supply with an earthed wall outlet or a
disconnector with multiple poles, depending on the laws in force in the country of installation. The
electrical supply should be protected with suitable fuses and the cables used must have a transverse
section that can ensure correct supply to the oven.
CONNECTION
The oven is supplied with a power cable that should only be connected to an electrical supply with 220-
240 Vac power between the phases or between the phase and neutral. Before the oven is connected to
the electrical supply, it is important to check:
- Power voltage indicated on the gauge;
- The setting of the disconnector.
The grounding wire connected to the oven's earth terminal must be connected to the earth terminal of
the power supply.
WARNING
Before connecting the oven to the power supply, ask a qualified electrician to check the continuity of the
power supply's earth terminal. The manufacturer accepts no responsibility for any accidents or other
problems caused by failure to connect the oven to the earth terminal or by an earth connection that has
defective continuity.
GB 06
GB - FR - IT

1.3 Recommendations
After each use of the oven, a minimum of cleaning will help keep the oven perfectly clean.
Do not line the oven walls with aluminium foil or single-use protection available from stores. Aluminium
foil or any other protection, in direct contact with the hot enamel, risks melting and deteriorating the
enamel of the insides. In order to prevent excessive dirtying of your oven and the resulting strong
smokey smells, we recommend not using the oven at very high temperature. It is better to extend the
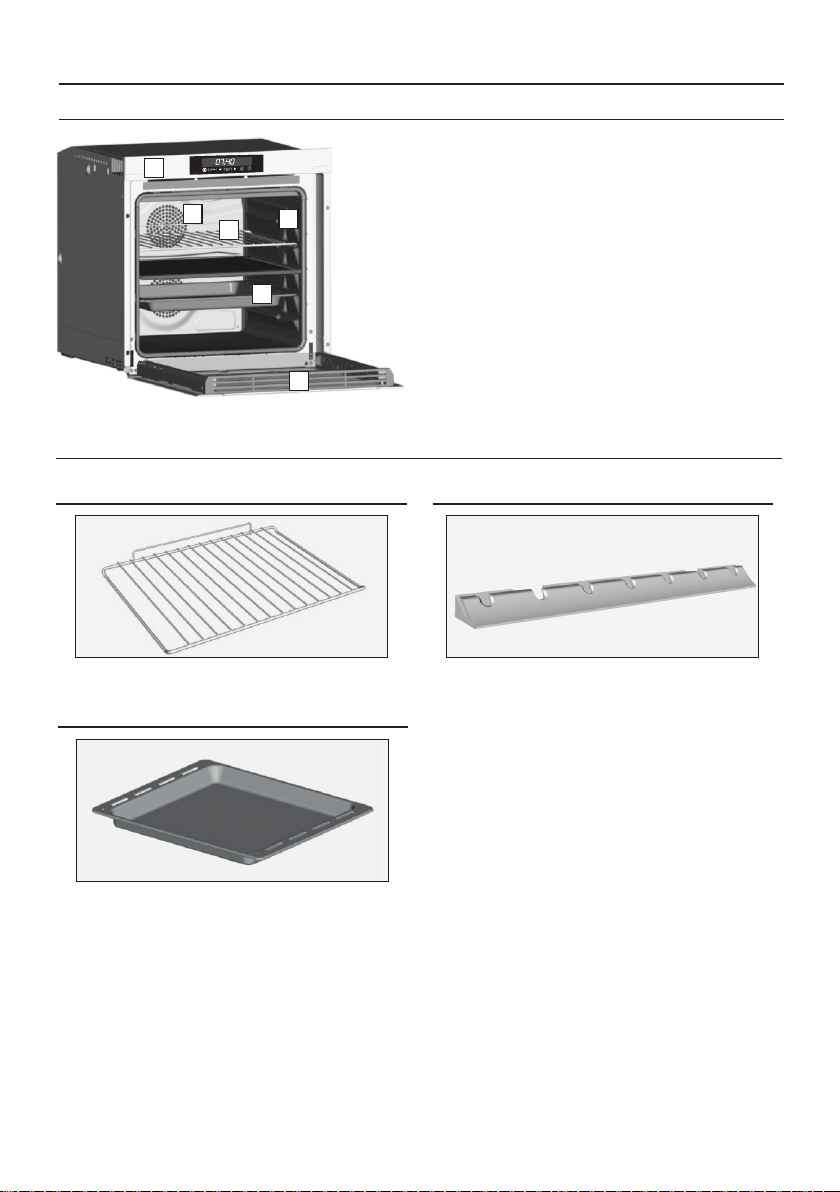
cooking time and lower the temperature a little. In addition to the accessories supplied with the oven,
we advise you only use dishes and baking moulds resistant to very high temperatures.
1.4 Installation
The manufacturers have no obligation to carry this out. If the assistance of the manufacturer is required
to rectify faults arising from incorrect installation, this assistance is not covered by the guarantee. The
installation instructions for professionally qualified personnel must be followed. Incorrect installation
may cause harm or injury to people, animals or belongings. The manufacturer cannot be held
responsible for such harm or injury.
The oven can be located high in a column or under a worktop. Before fixing, you must ensure good
ventilation in the oven space to allow proper circulation of the fresh air required for cooling and
protecting the internal parts. Make the openings specified on last page according to the type of fitting.
NOTE: As the oven could require maintenance work, it is advisable to keep another wall socket available
so that the oven can be connected to this if it is removed from the space in which it is installed. The
power cable must only be substituted by technical service staff or by technicians with equivalent
qualifications.
1.5 Waste management and environmental protection
This appliance is labelled in accordance with European Directive 2012/19/EU regarding
electric and electronic appliances (WEEE). The WEEE contain both polluting substances
(that can have a negative effect on the environment) and base elements (that can be
reused). It is important that the WEEE undergo specific treatments to correctly remove and
dispose of the pollutants and recover all the materials. Individuals can play an important
role in ensuring that the WEEE do not become an environmental problem; it is essential to
follow a few basic rules:
- The WEEE should not be treated as domestic waste;
- The WEEE should be taken to dedicated collection areas managed by the town council or a registered
company.
In many countries, domestic collections may be available for large WEEEs. When you buy a new
appliance, the old one can be returned to the vendor who must accept it free of charge as a one-off, as
long as the appliance is of an equivalent type and has the same functions as the purchased appliance.
SAVING AND RESPECTING THE ENVIRONMENT
Where possible, avoid pre-heating the oven and always try to fill it. Open the oven door as infrequently
as possible, because heat from the cavity disperses every time it is opened. For a significant energy
saving, switch off the oven between 5 and 10 minutes before the planned end of the cooking time, and
use the residual heat that the oven continues to generate. Keep the seals clean and in order, to avoid any
heat dispersal outside of the cavity. If you have an electric contract with an hourly tariff, the "delayed
cooking" programme makes energy saving more simple, moving the cooking process to start at the
reduced tariff time slot.
1.6 Declaration of compliance
By placing the mark on the appliance, we are confirming compliance to all relevant European
safety, health and environmental requirements which are applicable in legislation for this product.
GB 07
GB - FR - IT

1
2
3
4
5
6
2. Product Description
2.1 Overview
2.2 Accessories (According to model)
Metal grill
1
Drip pan
2
Holds baking trays and plates.
Collects the residues that drip during the cooking
of foods on the grills.
GB 08
1. Control panel
2. Shelf positions
(lateral wire grid if included)
3. Metal grill
4. Drip pan
5. Fan (behind the steel plate)
6. Oven door
Led vision
3
Is an illumination system which replaces the
traditional « light bulb ». 14 LED (for non-pyrolitic
versions) or 10 High Power LED (for pyrolitic
versions) lights are integrated within the door.
These produce white high quality illumination
which enables to view the inside of the oven with
clarity without any shadows on all the shelves.
Advantages:
This system, besides providing excellent illumination
inside the oven, lasts longer than the traditional light
bulb its easier and to maintain and most of all saves
energy.
-Optimum view
-Long life illumination
-Very low energy consumption, -95% in
comparison with the traditional illumination High.
GB - FR - IT

GB 09
2.3 First Use
PRELIMINARY CLEANING
Clean the oven before using for the first time. Wipe over external surfaces with a damp soft cloth. Wash
all accessories and wipe inside the oven with a solution of hot water and washing up liquid. Set the
empty oven to the maximum temperature and leave on for about 1 hour, this will remove any lingering
smells of newness.
The separator divides oven into two cavities. It
separates upper and lower cavity when you want
to use oven in dual mode. It must be used in third
shelf.
Never leave the separator inside the oven when
the Pyrolytic mode is on.
Separator
4
Our technology and experience have brought a
feature typical of professional kitchens into the
home. A Multijet lateral ventilation system emit
microflows of hot air directly onto the food, at low
speeds, enveloping it completely.
This enables uniform cooking, reduced loss of
food moisture and simultaneous cooking on
different levels.
6Pro/Exp'r Technology
Lateral Wire Grids
5
It located at both sides of the oven cavity. It holds
metal grills and drip pans.
GB - FR - IT

3. Use of the Oven
3.1 Display description (full touch double cavıty)
1. On/Off
2. Extra Functions
3. Arrow (-)
4. Select/Stop
5. Arrow (+)
6. Cavity
7. Cooking functions
CAVITY: When the separator is placed inside the oven, you can select the lower or upper cavity by
pressing the button.
When you select a cavity, you need to set the desired cooking function by pressing the F key and
then press SELECT to confirm the choice.
It is now possible to set the cooking temperature by pressing the " <" and ">" keys, confirming your
selection by pressing SELECT. Following this procedure the oven starts to cook.
If you want to use the oven as a single cavity one, you have to remove the separator.
Press F to select the desired cooking function and confirm by pressing SELECT. Set the temperature
by pressing the "<" and ">" keys and confirm the selection by pressing SELECT. Following this
procedure the oven starts to cook.
NOTE: when a cavity is selected, all the information relating to cooking functions, temperature and
time refer to the cavity that was selected previously.
ON/OFF: The oven is switched on and off with this button
EXTRA: If the oven is switched off, the display shows the clock. When the oven is inactive, all
the functions are available except the cooking duration and end of cooking.
If the clock is not set, the oven does not work: the display flashes, showing "12:00"
and the only functioning key is Extra. From the Extra key, the following functions can be set:
GB 10
1 2 3 4 5 6 7
GB - FR - IT

GB 11
FUNCTION HOW TO ACTIVATE HOW TO
DEACTIVATE WHAT IT DOES WHY IT IS NEEDED
COOKING
DURATION
NB: can only be set with an
active cooking programme.
Press EXTRA twice and set
the time using the “+” and
“-” keys, confirming by
pressing "SELECT".
The display shows “00:00”
if no cooking duration has
been inserted, otherwise
the display shows the time
remaining.
•To modify cooking
before the set time, press
EXTRA twice and regulate
the cooking time as
required using the “<”
and “>” keys, before
pressing SELECT" once
more.
•To cancel the cooking
duration, reset the display
to “00:00”.
When a cooking programme
terminates , the oven
switches off while the
display shows "END" (the
cooking programme icon
remains on) until the On/Off
button, the only functioning
key, is pressed. When a c o o
k i n g p r o g r amme
terminates, an alarm will
sound.
When the cooking time
has f i n i s h e d , t h e o v e n
automatically switches off
and the alarm sounds for a
few seconds.
NB: can only be set with an
active cooking programme.
Press EXTRA enough times
to illuminate the icon, set
the end of cooking time
using the “<” and “>” keys
and confirm by pressing
"SELECT".
Press EXTRA enough times
to illuminate the icon, set
the end of cooking time
using the “<” and “>” keys
and confirm by pressing
"SELECT".
The cooking duration is
automatically calculated.
END OF
COOKING
•This function is also used for
cooking that can be scheduled
in advance.
•If a cooking programme is
set, it will be lost if the "F" key
is pressed.
•If delayed cooking is set, the
oven switches off and the
display shows the current time
while the cooking programme,
cooking duration and end of
cooking icons are illuminated.
•If a cooking programme is
set, by pressing the “<” and “>”
keys you can see and modify
the temperature set: at the
first t o u c h , t h e o p e r a t i n g
temperature is shown while
another touch will allow you to
modify said temperature.
To modify the end of
cooking before the set
time, press EXTRA enough
times to illuminate the
icon, regulate the end of
cooking time as required
using the “<” and “>” keys
and confirm by pressing
"SELECT".
To cancel the end of
cooking time, reset the
display to “00:00”.
TIMER
•To modify the timer,
press EXTRA enough times
to
ill u mi n ate t he ico n ,
regulate the cooking time
as required using the “<”
and “>” keys and confirm
by pressing "SELECT".
•This function activates an
alarm that sounds for a
few seconds when the set
time
expires (this function does
not switch the oven off).
You can select a time
between 00:00 and 23:59.
• The display shows
“00:00” if no time has
been inserted or the time
remaining if this has
already been set.
Press EXTRA enough times
to illuminate the icon and
use the “<” and “>” keys to
set the time, confirming by
pressing SELECT.
• The t imer funct ions
regardless of whether the
oven is switched on.
SETTING
THE CLOCK
•The alarm functions
regardless of whether the
oven is switched on.
•Switched on for the first
time, the display
illuminates and sh ows
"12:00".
•To modify the time, press
EXTRA enough times to
illuminate the icon and use
the “<” and “>” keys to set
the time, confirming it by
pressing SELECT.
•It allows you to set the
time that appears on the
display.
•This function is useful
when there are children in
the house.
•Press the EXTRA key
enough times to illuminate
the icon and then either
the “<” or “>” key to
activate this function: the
display will show ON; to
confirm press SELECT.
•Press the EXTRA key
enough times to illuminate
the icon and then either
the “<” or “>” key to
deactivate this function:
the display will show OFF;
to confirm press SELECT.
•If the function is active
only the "Extra" button, to
deactivate the function,
and "On/Off" button can
be used.
CHILD
SAFETY
LOCK
W h e n a c o o k i n g
programme terminates,
the oven switches off while
the display shows "END"
(the cooking programme
icon remains on) until the
On/Off button, the only
functioning key, is pressed.
W h e n a c o o k i n g
programme terminates, an
alarm will sound.
GB - FR - IT

GB 12
LANGUAGE SETTING: The language can be set when the oven is switched off by pressing the Extra and
Select buttons simultaneously and for 3". The current language is shown on the display and can be
changed by pressing the “<” or “>” keys, confirming it by pressing SELECT. Available languages are:
Italian, English, French and German.
SELECT: Any selection must be confirmed. If not confirmed within 15 seconds, the selection is
cancelled. By changing menu, any unconfirmed selection is lost.
“HOT” ICON: When a cooking programme finishes or when the oven switches off, if the oven is still hot,
the display shows the current time alternating with the message “HOT” .
GB - FR - IT

GB 13
3.2 Cooking Modes
*Tested in accordance with the EN 60350-1 for the purpose of energy consumption declaration and energy class.
-
220
210
180
210
L3
200
Off
Bottom+Fans
Bottom+Top
Bottom+Top
+Fans
Circular Heating
Element +Fans
Grill
Grill+Fans
Pre-set
tempe-
rature °C
Function Dial Function
(Depends on to the oven model)
Both top and bottom heating elements are in use. This method is ideal for all
traditional roasting and baking.When cooking red meat, roast beef, leg of lamb,
game, bread or foil wrapped foods.
Both top and bottom heating elements are used in conjunction with the fan, which
circulates hot air throughout the oven.We recommend this method for poultry,
pastries, fish and vegetables. By using this method better heat penetration is
achieved and cooking and preheating times are also reduced. The fan cooking
option allows you to cook different foods together at different positions in the oven
all at the same time, providing even heat distribution but without the risk of
mingling tastes and smells. When cooking different foods at the same time allow a
further 10 minutes.
Air that has been heated is blown by the fan onto the different levels. It is ideal for
cooking different types of food at the same time (e.g. meat and fish) without mixing
tastes and smell. It cooks very gently and is ideal for sponge cakes, pasties, etc.
The combination of the bottom heating element and fan is ideal for fruit flans, tarts,
quiches and pastries. It prevents food from becoming too dry and encourages
bread dough to rise. Place the shelf in the bottom position in the oven.
Using the top heating element. Success is guaranteed for mixed grills, kebabs and
gratin dishes. The grill should be pre-heated to a high temperature for 5 minutes.
White meats should always beplaced at some distance from the grill element, the
cooking time is slightly longer but the meat will be more succulent. Red meat and
fish fillets can be placed directly onto the shelf with the drip tray placed beneath on
lower shelf position.
The top heating element is used in conjunction with the fan which circulates the
hot air around the oven. Pre heating is recommended for red meats but is not
necessary for white meats. Grilling is ideal for cooking thicker food items such as
pork or poultry. Food to be grilled should be placed directly at the centre of the
middle shelf. By sliding the drip tray underneath the shelf it will ensure that any
juices are collected. For best results always make sure that the food is not too close
to the grill element and turn the food over half way through the cooking time.
*
160
Bottom
Using the lower element. Ideal for cooking all pastry based dishes. Use this for flans,
quiches, tarts, pâté and any cooking that needs more heat from below.
*
GB - FR - IT

Upper Cavity
Lower Cavity
GB 14
1 2 3 4 5 6 7
1 2 3 4 5 6 7
Pre-set
tempe-
rature °C
Function Dial Function
(Depends on to the oven model)
Air that has been heated is blown by the fan onto the different levels. It is ideal for
cooking different types of food at the same time (e.g. meat and fish) without mixing
tastes and smell. It cooks very gently and is ideal for sponge cakes, pasties, etc.
Circular Heating
Element +
Upper Fan
Grill
Using the top heating element. Success is guaranteed for mixed grills, kebabs and
gratin dishes. The grill should be pre-heated to a high temperature for 5 minutes.
White meats should always beplaced at some distance from the grill element, the
cooking time is slightly longer but the meat will be more succulent. Red meat and
fish fillets can be placed directly onto the shelf with the drip tray placed beneath on
lower shelf position.
The top heating element is used in conjunction with the fan which circulates the
hot air around the oven. Pre heating is recommended for red meats but is not
necessary for white meats. Grilling is ideal for cooking thicker food items such as
pork or poultry. Food to be grilled should be placed directly at the centre of the
middle shelf. By sliding the drip tray underneath the shelf it will ensure that any
juices are collected. For best results always make sure that the food is not too close
to the grill element and turn the food over half way through the cooking time.
Grill+Fan
180
L3
190
160
Pre-set
tempe-
rature °C
Function Dial Function
(Depends on to the oven model)
160
160
Circular Heating
Element +
Lower Fan
Air that has been heated is blown by the fan onto the different levels. It is ideal for
cooking different types of food at the same time (e.g. meat and fish) without mixing
tastes and smell. It cooks very gently and is ideal for sponge cakes, pasties, etc.
Bottom
Using the lower element. Ideal for cooking all pastry based dishes. Use this for flans,
quiches, tarts, pâté and any cooking that needs more heat and radiation from
below.
The combination of the bottom heating element and fan is ideal for fruit flans, tarts,
quiches and pastries. It prevents food from becoming too dry and encourages
bread dough to rise. Place the shelf in the bottom position in the oven.
Bottom+
Lower Fan
GB - FR - IT

GB 15
4. Oven cleaning and maintenance
4.1 General notes on cleaning
The lifecycle of the appliance can be extended through regular cleaning. Wait for the oven to cool before
carrying out manual cleaning operations. Never use abrasive detergents, steel wool or sharp objects for
cleaning, so as to not irreparably damage the enamelled parts. Use only water, soap or bleach-based
detergents (ammonia).
GLASS PARTS
It is advisable to clean the glass window with absorbent kitchen towel after every use of the oven. To
remove more obstinate stains, you can use a detergent-soaked sponge, well wrung out, and then rinse
with water.
OVEN WINDOW SEAL
If dirty, the seal can be cleaned with a slightly damp sponge.
ACCESSORIES
Clean accessories with a wet, soapy sponge before rinsing and drying them: avoid using abrasive
detergents.
DRIP PAN
After using the grill, remove the pan from the oven. Pour the hot fat into a container and wash the pan in
hot water, using a sponge and washing-up liquid.
If greasy residues remain, immerse the pan in water and detergent. Alternatively, you can wash the pan
in the dishwasher or use a commercial oven detergent. Never put a dirty pan back into the oven.
REMOVAL OF THE OVEN WINDOW
1. Open the front window.
2. Open the clamps of the hinge housing on the right and left side of the front window by pushing them
downwards.
3. Replace the window by carrying out the procedure in reverse.
4.2 Maintenance
REMOVAL AND CLEANING OF THE SIDI RACKS
1- Remove the wire racks by pulling them in the direction of the arrows (see below)
2- To clean the wire racks either put them in the dishwasher or use a wet sponge, ensuring that they are
dried afterwards.
3- After the cleaning process install the wire racks in reverse order.
GB - FR - IT

LOW-E
1
2
3
1.
2.
3.
4.
5.
6.
7.
REMOVAL AND CLEANING OF THE GLASS DOOR
1. Open the oven door.
2.3.4. Lock the hinges, remove the screws and remove the upper metal cover by pulling it upwards.
5.6. Remove the glass, carefully extracting it from the oven door (NB: in pyrolytic ovens, also remove the
second and third glass (if present)).
7. At the end of cleaning or substitution, reassemble the parts in reverse order.
On all glass, the indication "Pyro" must be legible and positioned on the left side of the door, close to the
left-hand lateral hinge. In this way, the printed label of the first glass will be inside the door.
GB 16
GB - FR - IT

5. Troubleshooting
5.1 FAQ
PROBLEM POSSIBLE CAUSE SOLUTION
The oven does not heat up The clock is not set Set the clock
The child lock is on
A cooking function and
temperature has not been set
Deactivate the child lock
Ensure that the necessary
settings are correct
The oven does not heat up
GB 17
Steam and condensation on
the user interface panel
Clean with a microfiber
cloth the user interface
panel to remove the
condensation layer
No reaction of the touch
user interface
GB - FR - IT

• Durante la cottura, l'umidità può condensarsi all'interno del vano
cottura o sul vetro della porta. Questa è una condizione normale. Per
ridurre questo effetto, attendere 10-15 minuti dopo l'accensione
prima di mettere gli alimenti all'interno del forno. In ogni caso, la
condensa scompare quando il forno raggiunge la temperatura di
cottura.
• Cuocere le verdure in un contenitore con coperchio invece che in
un vassoio aperto.
• Evitare di lasciare gli alimenti all'interno del forno dopo la cottura
per più di 15/20 minuti.
• AVVERTENZA: l'elettrodomestico e le sue parti accessibili
diventano calde durante l’uso.
Fare attenzione a non entrare in contatto con componenti
surriscaldati.
• AVVERTENZA: le parti accessibili possono diventare calde quando si
utilizza il grill. I bambini devono rimanere a distanza di sicurezza.
• AVVERTENZA: assicurarsi che l'elettrodomestico sia spento prima
di sostituire la lampadina per evitare ogni possibilità di folgorazione.
• AVVERTENZA: per evitare rischi causati da un involontario ripristino
dell'interruttore automatico, l'elettrodomestico non deve essere
alimentato da un dispositivo di commutazione esterno, quale ad
esempio un
contaminuti, oppure essere collegato ad un circuito che viene
regolarmente acceso e spento.
• Mantenere lontano dall'elettrodomestico i bambini di età inferiore
agli 8 anni, a meno che non siano continuamente supervisionati.
• I bambini non devono giocare con l’elettrodomestico.
L'elettrodomestico può essere utilizzato da bambini di età superiore
a 8 anni e da persone con ridotte capacità fisiche, sensoriali o
mentali, oppure prive di esperienza e conoscenza, che siano state
supervisionate o istruite riguardo all’uso dell’elettrodomestico in
sicurezza, comprendendo i rischi che derivano dall'uso dello stesso.
• Le operazioni di pulizia e manutenzione non devono essere
effettuate dai bambini senza sorveglianza.
Indicazioni di Sicurezza
IT 18
GB - FR - IT

IT 19
• Non utilizzare materiali ruvidi, abrasivi o raschietti metallici affilati
per pulire le porte in vetro del forno, dato che possono graffiare la
superficie e causare la frantumazione del vetro.
• Il forno deve essere spento prima di rimuovere le parti rimovibili.
• Dopo la pulizia, rimontarle secondo le istruzioni.
• Utilizzare solo la sonda carne consigliata per questo forno.
• Non utilizzare un getto di vapore per pulire l’elettrodomestico.
• Collegare al cavo di alimentazione una spina dimensionata per la
tensione, la corrente e la potenza indicate nella targhetta e dotata del
contatto di terra. La presa deve essere adatta al carico indicato sulla
targhetta e deve avere il contatto di terra collegato e in funzione. Il
conduttore di terra è di colore giallo-verde.
Questa operazione deve essere eseguita solo da un tecnico
adeguatamente addestrato. In caso di incompatibilità tra presa e
spina dell'elettrodomestico, richiedere ad un tecnico specializzato di
sostituire la presa con un'altra di tipo compatibile. La spina e la presa
devono essere conformi alle normative attuali del paese di
installazione.
Il collegamento alla rete di alimentazione può essere effettuato
anche collocando un interruttore automatico onnipolare tra
l'elettrodomestico e la rete di alimentazione, in grado di supportare il
carico massimo collegato, in linea con la legislazione corrente.
Il cavo di terra giallo-verde non deve essere interrotto
dall'interruttore automatico. La presa o l'interruttore automatico
onnipolare utilizzati per il collegamento devono essere facilmente
accessibili al momento del montaggio dell'elettrodomestico.
• La disconnessione può essere eseguita con la spina accessibile o
aggiungendo un interruttore sul cablaggio fisso, nel rispetto delle
normative relative ai cablaggi.
• Se il cavo di alimentazione si danneggia, deve essere sostituito con
un cavo o uno speciale fascio di cavi disponibile presso il produttore o
contattando il reparto assistenza al cliente.
• Il cavo di alimentazione deve essere di tipo H05V2V2-F
• Questa operazione deve essere eseguita solo da un tecnico
adeguatamente addestrato. Il conduttore di terra (giallo-verde) deve
essere circa 10 mm più lungo degli altri conduttori. Per qualsiasi tipo
GB - FR - IT

di riparazione, fare riferimento unicamente al Reparto di Assistenza
Cliente e richiedere l'utilizzo di ricambi originali.
• Il mancato rispetto di quanto indicato sopra può compromettere la
sicurezza dell'elettrodomestico e rendere nulla la garanzia.
• Qualsiasi materiale fuoriuscito in eccesso deve essere tolto prima
della pulizia.
• L’interruzione prolungata dell’alimentazione durante una fase di
cottura potrebbe causare un guasto del monitor. In tal caso
contattare il servizio clienti.
• L’elettrodomestico non deve essere installato dietro a una porta a
scopo ornamentale per evitarne il surriscaldamento.
• Quando si posiziona uno scaffale all’interno, accertarsi che il blocco
sia rivolto verso l’alto e nella parte posteriore della guida. Lo scaffale
deve essere inserito completamente nella guida
• AVVERTENZA: Non rivestire le pareti del forno con fogli di alluminio
o protezioni monouso disponibili nei negozi. I fogli di
alluminio o qualsiasi altra protezione, a diretto
contatto con lo smalto caldo, rischiano di
fondere e deteriorare lo smalto degli interni.
• AVVERTENZA: Non togliere mai la guarnizione della porta del forno.
• ATTENZIONE: Non riempire il fondo della cavità con acqua durante
la cottura o quando il forno è caldo.
• Per far funzionare l'apparecchio alle frequenze nominali non sono
necessarie ulteriori operazioni o regolazioni.
IT 20
Table of contents
Languages:
Other Candy Oven manuals

Candy
Candy CFSX516/4U User manual

Candy
Candy FCP615XL/E1 User manual

Candy
Candy FL856X User manual

Candy
Candy FPE6096X User manual

Candy
Candy FXIDC X615 User manual

Candy
Candy FUS 100-40 W User manual

Candy
Candy 93963789 FORNO V.W User manual

Candy
Candy FCTS886X User manual

Candy
Candy FCT615WXL User manual

Candy
Candy FCP600X User manual

Candy
Candy R 340/6 TF User manual

Candy
Candy HOFZ7170IN User manual

Candy
Candy POP EVO FCP52X/E User manual

Candy
Candy FPP678W BLANC User manual

Candy
Candy FCP815X E0/E User manual

Candy
Candy FCPX615 User manual

Candy
Candy CFSX518/4U User manual

Candy
Candy FCC614BAE User manual

Candy
Candy FP815 User manual

Candy
Candy CVE662SEEW/E User manual