Car Navi PRO TV User manual

carNAVi
Hardware Manual
carNAVi PRO TV

Table of content
1.Notice
1.1 Information Instruction…………………………………………………………01
1.2 Safety Information………………………………………………………………01
1.3 Safety Caution…………………………………………………………………02
1.4 Special Tips………………………………………………………………………02
2.Brief Introduction……………………………………………………………05
2.1 Function Introduction……………………………………………………………05
2.2 Accessories………………………………………………………………………05
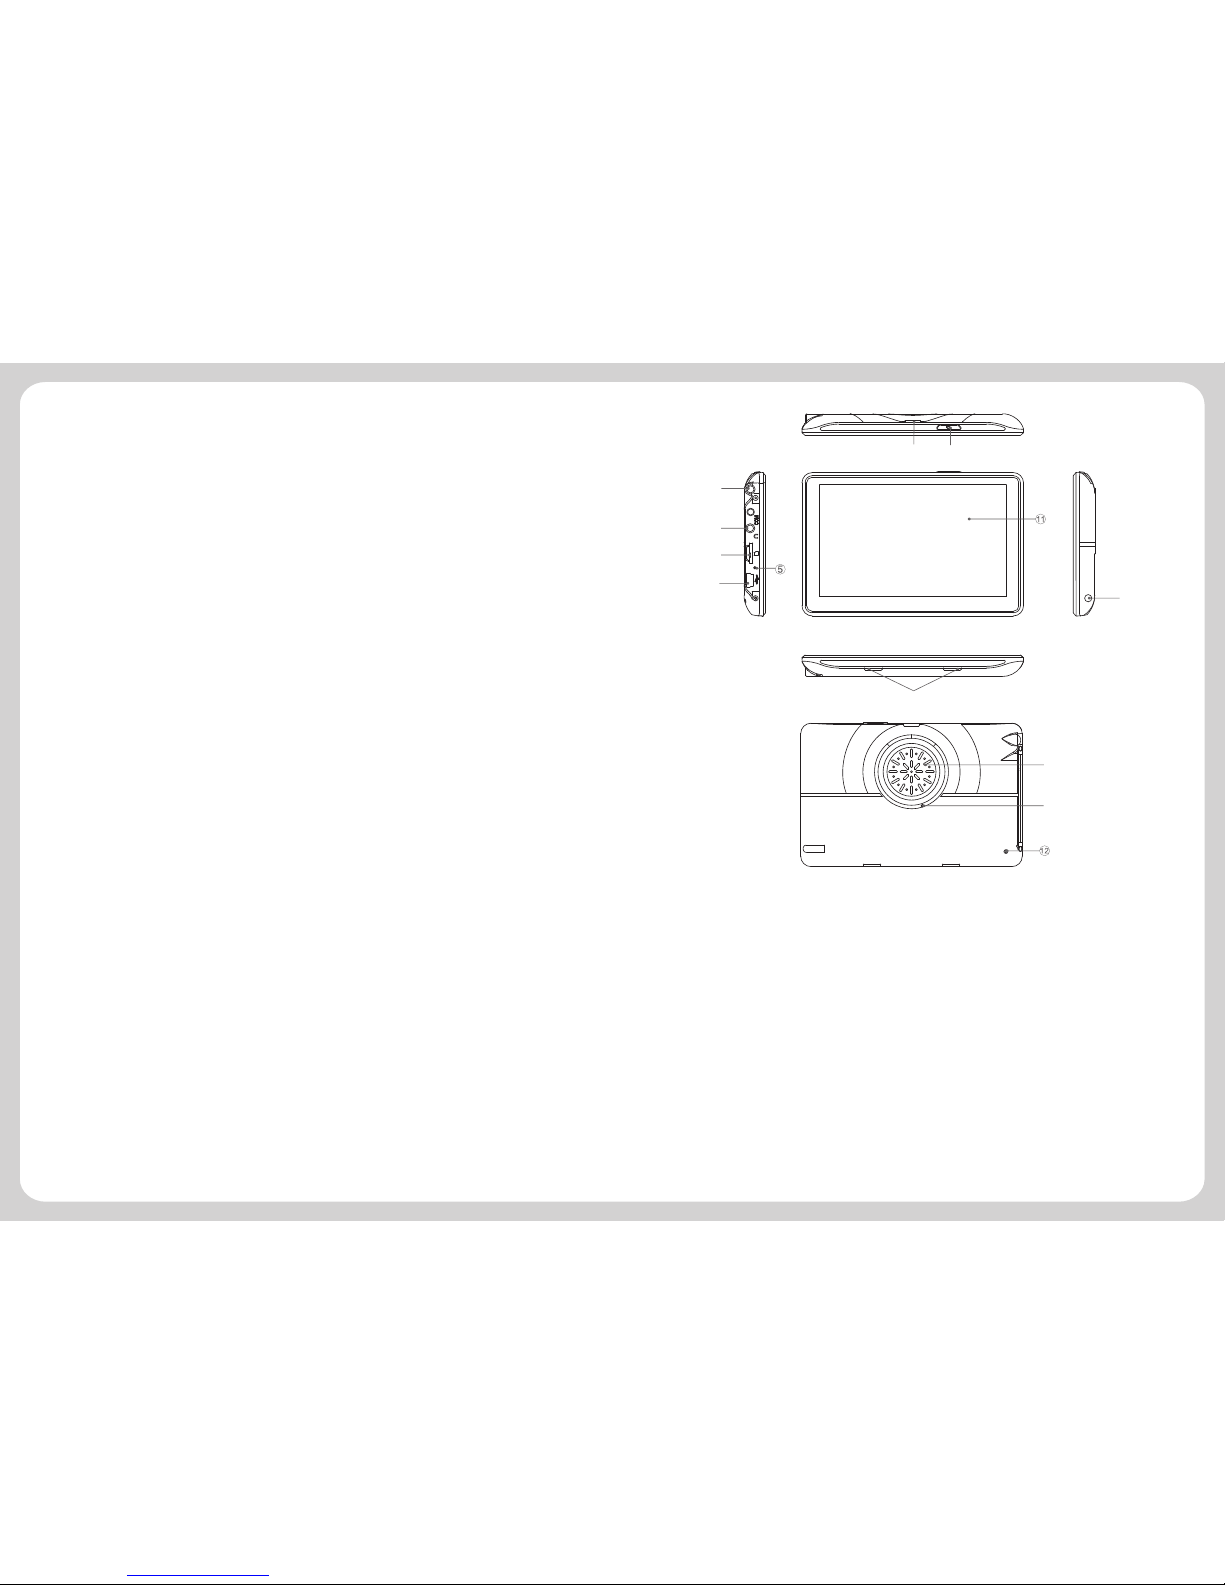
2.3 Illustration…………………………………………………………………………05
3. Basic Operation……………………………………………………………07
3.1 Battery and Charger……………………………………………………………07
3.2 Basic Use…………………………………………………………………………07
3.3 Connection with Computer……………………………………………………08
4.Function operation……………………………………………………………09
4.1 Navigation………………………………………………………………………09
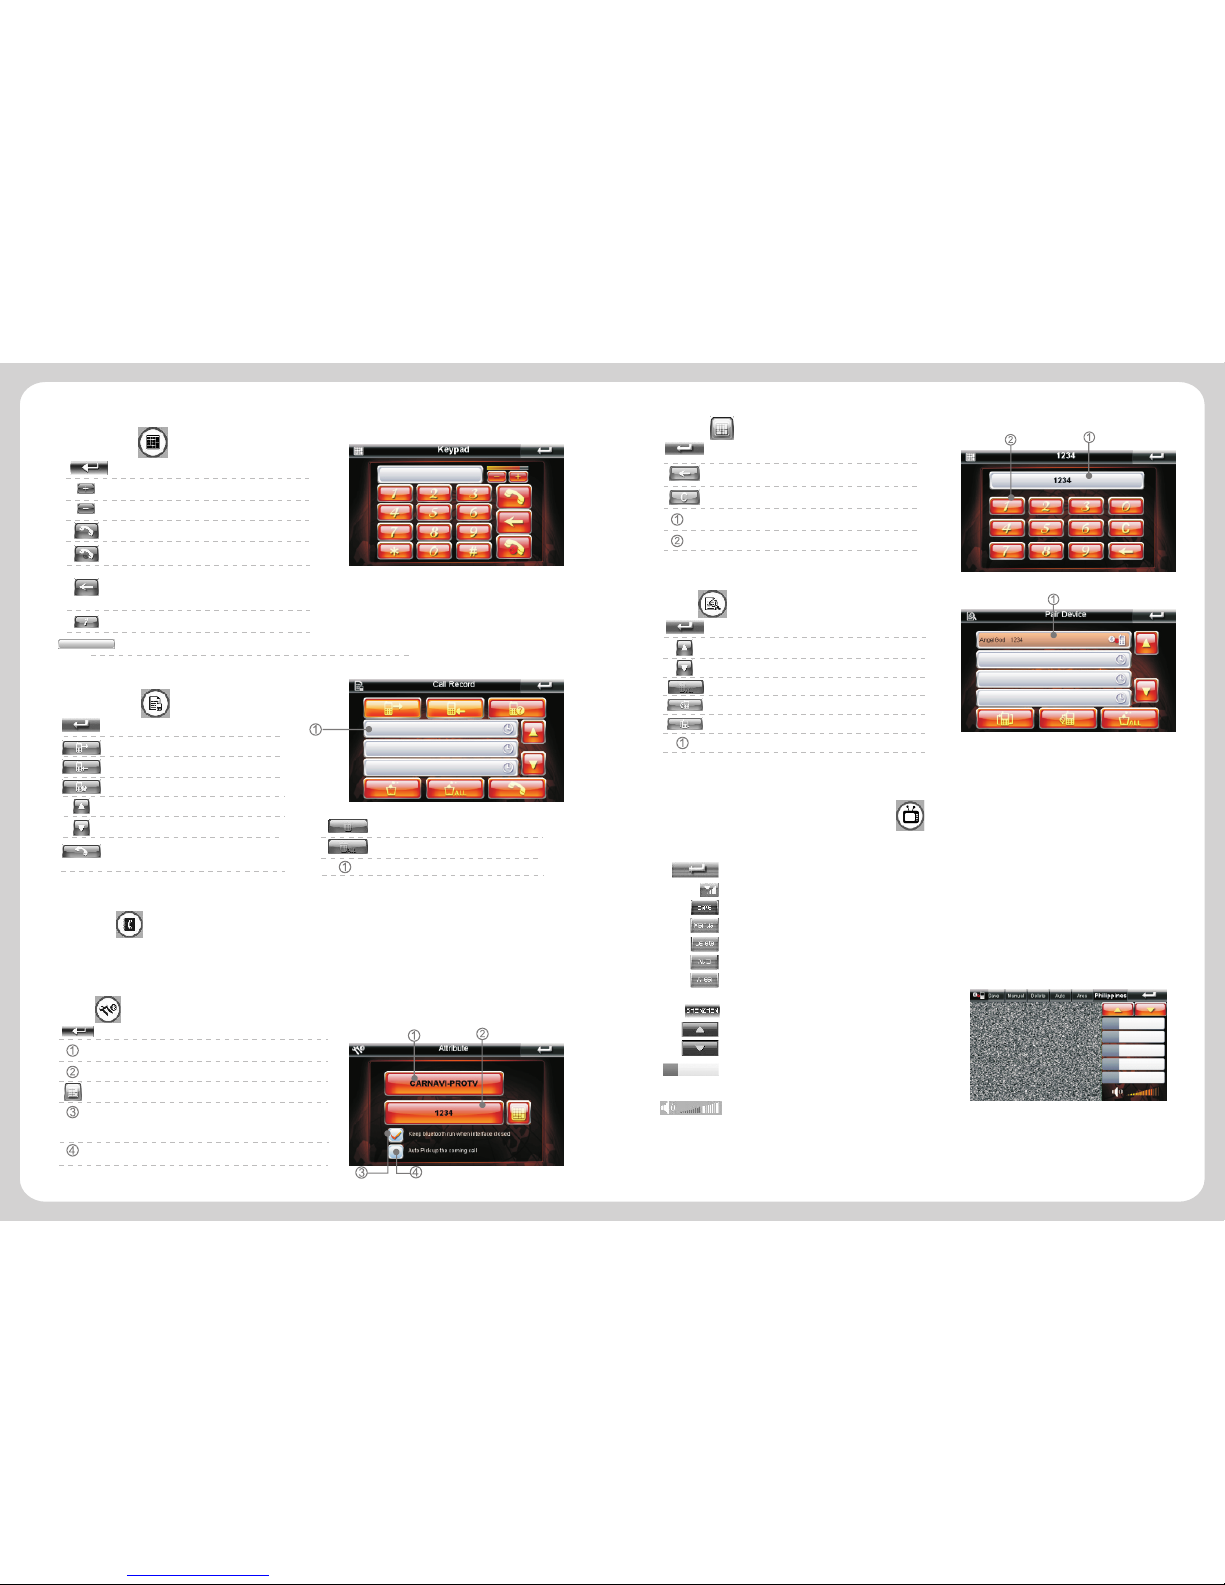
4.2 Bluetooth…………………………………………………………………………10
4.3 Analog TV operation………………………………………………………12
4.4 Player ……………………………………………………………………………13
4.5 Ebook&Photo………………………………………………………………………14
4.6 System Setting………………………………………………………………………16
5.Malfunction Analysis………………………………………………………18
6.Technical Specification……………………………………………………19
…………………………………………………………………………01
We greatly appreciate you choose a carNAVi GPS product. To avoid you unnecessary
troubles, please read this manual carefully.
Please install this product correctly. Do not block the driver's view or safety airbag.
The manufacturer shall not assume any compensation or responsibility to product failure or
other property loss or personal injury due to incorrect installation or usage of this product.
Any use of our hardware, software or maps implies that you agree to the following terms:
1. The carNAVi material is intended to be used as travel aid. It is the user’s
responsibility to use it in a safe and prudent way, including the visual real-time
verification of streets, roads, road-signs and directions as well as traffic conditions.
carNAVi rejects any and all liabilities for any loss, injury or damage, be it direct or
indirect and regardless if carNAVi was aware of the possibility of any such loss,
injury or damage.
2. The map data used in our devices are not endorsed by commercial organizations. We
provide no warranty and bear no responsibility for any damage or loss due to any
consequence of using of these maps. Use at your own risk!
3. Your use of the carNAVi material is limited to non-commercial activities (e.g.,
navigation on a leisure hiking). You may also use the material as an aid, indirectly
supporting your business activity (e.g., as the driver of a transportation business).
4. Any other commercial use of carNAVi hardware or software including maps for
business purposes is explicitly forbidden without the prior written permission of
carNAVi. This includes, among others, including it in commercial products or
commercially operated Websites.
The navigation system, as a high-quality product, contains operating system and software
provided by carNAVi. The manufacturer has spared no efforts in manufacturing the hardware
and developing application software to ensure this product runs perfectly. In case of
malfunction, the manufacturer shall not assume any compensation or responsibility on
property damage or property loss or personal injury except maintenance as specified
according to quality assurance regulation.
carNAVi does not assure or guarantee effectiveness, completeness or accuracy of the
electronic map used in this navigation system, and shall not assume any compensation or
responsibility on personal injury and property loss due to limitation of the electronic map.
The software and partially the maps provided in the navigation systems offered by carNAVi
are protected by copyright laws. We reserved all the rights on the software and digital map
included in our navigation devices. It is illegal to reproduce, store or transmit in any form or
by any means, electronically or otherwise without prior written permission of carNAVi. Some
parts of the maps used in our navigation systems are copyright by openstreetmap.org and
distributed under the CCPL. (http://creativecommons.org/licenses/by/3.0/legalcode).
©2011 carNAVi Corporation www.carnavi.ph
User’s Agreement

1.Notice
1.1 Information Instruction
The navigation system adopts the most advanced satellite navigation technology and detailed
street map so it can direct you to the destination easily. In order to let you obtain the best
capabilities of the new system, please read the instruction before operating.
1.2Safety Information
Global Positioning System is launched and maintained by USA. This system can receive the
satellite signals from Global System. Using these signals, the system can indicate
current location and help you find required destinations.
This navigation system can provide visual map and voice instruction. When you are at the
crossing or near the turnoff, the device will remind
Positioning
you of the driving distance and direction.
1. While driving you must obey all traffic rules and learn how to operate skillfully before using
the system.
2. As the system will distract the drivers' attention, in order to keep safety and prevent from
accidents, drivers shall not operate the system while driving.
3. Shall not only depend on the voice navigation which is only for reference. Because the
roads circs, traffic signs and service information aren't always latest, drivers should update
maps timely.
4. There are shortages of system data, for example, roads circs may change frequently;
-1- -2-
therefore, you must notice traffic circs before following the system information.
5. This navigation system is only used for assisting drivers to make a judgment, and may not
measure any direction, distance, place, or landform precisely.
In order to prevent users or others from injury or property loss, please read and follow the
cautions in below:
1. Read instruction
2. Keep the instruction properly for later reference
3. Obey all operation instructions
4. Accessories
Don't use the accessories from another manufacturer, otherwise it may cause accidents.
5. Power
Please use the stated power. You must cut off the power and pull off the power plug in rainy
days or when you won't use it for a long time.
6. Protect power cord
Make sure the power cord is out of feet touch.
7. Installation and wiring
In order to ensure safety, please consign professionals to carry out the installation and wiring.
8. Maintenance and parts change
Please consign professional technician to maintain and change.
9. Keep away from heat source
Please don't expose the device in sunshine or high temperature. Keep it away from heat, such
as heating machine, heater or any other heating objects.
10. Keep away from water or damp place
Please don't expose this device in rainy or damp conditions.
11. Cleanness
Please wipe the device with dry and soft cloth after power-off, the volatile chemicals, such as
gas or diluting agent.
12. Please cut off power and contact with technician immediately in the following conditions:
Power cord or jack damaged;Liquid or particle enters into the device;The device is damaged
due to falling off from a high place or incorrect operation;
13. LCD
Prevent LCD from being crashed or fallen, don't touch the liquid flowing out of the device;don't
heat LCD or scratch it.
1. Whether the positioning and use of GPS can be affected by the weather or anything
else?
1.3Safety Caution
1.4Special Tips
Warning
Users shall comply with the information provided in case of any
threat to personal safety.
Caution
Users shall comply with the information provided in case of any
damage to this device.
Tips
Additional information provided for user’s reference.
Illustration
Caution
Tip s
War ning

Yes, lightning, climate (overcast, rainy and cloudy) etc., all may affect the signals and use of
GPS.
2. What factors may affect the signals of GPS?
1) SA satellite message is from DOD in USA. The precision of GPS signal is directly
controlled by DOD in USA, in order to ensure security, the signal precision for civilian use is
lower than that for army, so in some sensitive places, military base for example, the signals
can be interfered and the precision of positioning may be reduced.
2) Weather factors (macula, bad weather may reduce the intensity of signals and result in
instable orientation.)
3) Electric, electromagnetism, wireless wave and strong magnetic field all has different certain
interference.
4) Under veils, such as buildings, cars, heat insulation papers, metal veils and trees, they all
may reduce the signals of GPS, therefore, place the device close to the windshield.
3. Why does not GPS receive signals in buildings?
The signals can be obstructed easily by buildings and metals, and they can't penetrate
through the wall of buildings, so the GPS can't be used in buildings.
4. Does the affect the signals of GPS?
It will have certain effect on GPS when the material of sun membrane contains metal.
It supports quick global positioning, stable signals, free of service, detailed map for each city,
voice navigation for the whole journey, intelligent lay out the route, operation system of
Microsoft windows CE.net, 5.0 inch TFT touch screen with 65k colors internal GPS and high
capacity rechargeable LI-polymer battery
vehicle tint
5. How long does the GPS take to position after power on?
About 1 minute the GPS begins to positioning if it is located in wide and non-interference
places, less than or equal to 5 minutes is in accordance with the standard of GB/T 19392-
2003-5.3.
6. What is the maximum navigation time? How long does it take to charge up?
Maximum navigation time: 3-4hrs with volume and brightness at 50%.
Time for charging: 3-3.5hrs under standby mode, the time will be different in different
surroundings, the unit can also be charged when power on, but the time shall be longer, it is
normal that the unit heat while charging.
7. What advantages does our GPS solution have?
.
8. Normally, how many satellites can GPS receiver capture?
Normally, most GPS receivers can capture 8-12 satellites.
9. Will the music be distorted if the volume is too high? Sometimes WMA files can not
be played, why?
Please make sure whether the music is obtained legally? If not it must be of big noise. WMA
files has copyright protecting, it needs to be decoded by decoding software during operation.
10. How to avoid device crashing at the moment of car starting up?
Users must note that do not connect the GPS with the linker until the car is started up.
-3- -4-

-5- -6-
2.Brief Introduction
2.1Function Introduction
>GPS
>Bluetooth
>Support Analog TV
>Video format: support AVI, WMV, MP4, 3GP
>Audio format: support WMA, MP3, WAV
>Support LRC and synchronized lyric displayed
>E-book format: support TXT
>Picture format: support JPEG, BMP, PNG
>Integrated speaker
>Support Micro SD card
2.2Accessories
Before using, please make sure whether the device and accessories are complete, if
there is any lack or damage please contact with the local dealer or agent as soon as
possible.
> 1pcs
>Car Charger 1pcs
>USB Cable 1pcs
> 1pcs
>Software Manual 1pcs
2.3Illustration
Navigation
carNAVi ProTV
Hardware Manual
1.Power Key
2.Reset
3.Anlog TV Antenna
4.MINI USB Port ①Exchange the data with PC by MINI USB cable
②Charge the GPS device by connecting car charger.
5.Power Indicator The light is red during charging, it will turn green when the battery is
fully charged.
6.Earphone Jack
7.Micro SD slot
8.Speaker
9.Touch-pen
10.Bracket block slot
11.Display Screen
12.Mic Hands-free input the voice
Power on /off /sleep
When the device is crashed halt or works abnormally,press this
key to reset the system
①
⑩
⑨
④
⑦
③
⑥
⑩
②
⑧

3.Basic Operation
3.1Battery and Charger
3.1.1 Power Supply
In-vehicle/portable GPS navigation has two ways of power supply: battery supply and power
supply.
When the device doesn't connect with the adaptor, it is supplied by the lithium battery. The
icon at the top right corner on the main interface of system indicates the current
remaining power.
When the device connects with the adaptor, it is supplied by the outer power.
3.1.2 Car charger
1.
2. Connect the other end with the cigarette lighter of the car in order to supply power and
charge up the device at the same time.
3.2Basic Use
3.2.1 Power Key
1. Power on:
When the GPS power is full or after connecting the device with outer power supply, press the
power key for few seconds to start up.
2. Sleep mode:
When the device turns on, press the power key for several seconds to enter into sleep mode,
the GPS will automatically display the last state when next start-up.
Connect one end of the car charger with power input jack of device.
3.2.2 Reset Key / Power-saving Key
When the system has no response,
1. There are delay and stagnation during switch interface;
2. There is no response when click the icons.
3. Power key is unavailable.
3.2.3 Car Mount
The car mount consists of salver and bracket. While using the device in car the device should
be fixed in the proper position of fore-windshield.
3.2.4 Micro SD Memory Card
Correctly insert Micro SD card into the slot, and do not remove the Micro SD card during
operation.
3.3Connection with Computer
Connect the device with computer by the USB cable. One end connects with PC and the
other end connects with the device.
1. Data transmission: There are two new "mobile disk" icons in “my computer” after the
device is successfully connected with computer, the first icon stands for the built-in flash
memory of the device, the second stands for the Micro SD card storage of the device. (If the
Micro SD card is not inserted, the second icon of the disk is unavailable). Then, you can use
them as normal USB flash disk.
Press the reset button and then press Power key to re-
start the system, the performances are as below:
Tips
【Tips】 Under normal condition(volume and backlight at 50%), it
can last about 2.5~3.5 hours after the battery is fully charged. Some
functions need to consume a lot of battery energy, such as
audio/video playing, high backlight and Bluetooth, which may reduce
the using time.
【Caution】 Please insert the car charger after car starting up in order
to avoid the damage of the device while starting up.
Cauti on
【Caution】 Please backup the data before resetting the system.
Cauti on
【Attention】 Please choose the proper position to place the car
mount. Do not block the driver's view and place the device arbitrarily
without fixing; do not fix the device in the area that the airbag
Cauti on
-7- -8-

2.Safely Remove: Please remove the USB line after finishing the data transmission (just
operate it as the USB flash disk).
4.Function operation
4.1Navigation
4.1.1 The Features of Navigation
The device supports navigation, audio/video playing, E-book, Analog TV, Photo browsing, and
Bluetooth for hands-free and system setting functions. The main interface is as follows:
The device adopts intelligent navigation system, which uses GPS satellite signal receiver to
positioning the mobile vehicle precisely and displayed the mobile vehicle's location on the E-
map. The system will automatically calculate the best route when users set the destination, it
will help the users reach their destinations safely and quickly.
The system also can provide the functions of visual maps, instant cartoon, voice and instruction
and so on.
4.2Bluetooth
Press Bluetooth to enter the menu of Bluetooth.
Tips
【Tips】when the icon at the left corner of interface shows
red, it means the Bluetooth is not connected, if it shows green, it
means the Bluetooth has been connected.
Tips
4.2.1 Bluetooth pair
Click the icon to enter into the equipment pair interface.
1. Before using Bluetooth, it should be matched. Click the icon to enter into the pair waiting
interface, and then use mobile phone to search for Bluetooth equipment, after finding out the
Bluetooth equipment, input a pair password in mobile phone, the password can be found in
the pair password setting interface. If connect successfully, “Pair Success” will appear on
the screen, or the interface will go back to main interface after 60 seconds.
Return Return to previous menu
Displaying area for searching time
【Tips】
1. Bluetooth of mobile phone should be opened at the same time.
2. User can enter Bluetooth interface if only the Bluetooth icon is clicked.
-9- -10-
Cauti on
【Caution】 1. Please do not delete and revise the data in the built-in
flash memory of the device, in case some functions of the device are
out of work. 2. Based on Windows 98 operation system, please install
the driver before operating the device. The operation of
communication between GPS and computer are exampled based on
the Windows 98 operation system or above version. 3.When GPS is
connecting with computer by USB line, it can not operate the current
functions.

4.2.3 Call log
Click the icon to open call log.
into dialing key
Record of calls
Return to previous menu
Check dialed numbers
Check received calls
Check missed calls
Check previous record
Check next record
Dial the chose number or switch
Delete the chose records
Delete all records
4.2.4 Direct Dial
Click the icon, it will switch into the last dialed call automatically. After
entering into this interface, please operate other function according to 4.2.2
4.2.5 Bluetooth password
Click icon to enter into the interface of password setting
Return to previous menu
Show the name of current Bluetooth equipment
Show the password of Bluetooth equipment
Revise password
mean t he B luetooth is s till w orking a fter
exiting the B luetooth in terface
mean a nswer t he c all a utomatically
“√”
“√”
1. Click to enter into the password setting interface.
Return to previous
Esc
Clear
Display area of matching password
Number keyboard
Click icon to enter Bluetooth connection record.
Return to previous menu
Select the previous pair
Select next pair
Delete all records
Disconnect Bluetooth device
Connect with the selected Bluetooth device
Displaying area for connecting Bluetooth device
4.2.6 Bluetooth connection
4.2.2 Dial Function
Click the icon to open the dial key.
Return :Return to Bluetooth interface
+ : Volume
- : Volume
Dial key :Click it before calling
Hung-up key :Click it after calling
Back space key :Delete the last
number of inputted phone code
Number keyboard :Input number
Number display area :the current called number
-11-
4.3Analog TV operation
1. Analog TV: click the Analog TV button on the main interface, enter the Analog TV
interface.
-12-
Close: Single click to turn off the Analog TV interface
TV signal: Show the TV signal
Save button Save the current broadcasting station
Manual button Click the button, you may manual get the broadcasting station
Delete button Delete the channel
Auto button Click the button, you will autokinetic get the channel
Area button Click the button ,you will choose the different country and area from
the define range
Show area Show the area that your choose
Last Show the last
Next Show the next
Show the channel This button show the
channel of you search
Click the button volume reduce or volume add

-13- -14-
4.4Player
Click ( ) icon on the main interface to enter into the Music/Movie interface.Player
4.4.1 Music
1.Click (Music) icon to enter audio folder interface. Then you will find an interface shows
“SDMMC ”or“ResidentFlash ” folder, click the related folder to play the related files.
The function of each icon is as below:
Return Return to the player interface
Previous Display the previous file
Next Display the next file
Upward Return to previous folder
2. Click CMF icon to open the Music player,
The function of each icon is as follows:
Return Return to the Main Interface
Play Play songs
Pause Pause
Stop Stop playing
Repeat Repeat all the song
Random shuffle all the song
Previous Play previous song
Next Play next song
Volume Adjust volume by dragging sliding block
Play Schedule Adjust play schedule by dragging sliding block
Folder Return to Audio-Folder interface
Area of Lyric Display Display the information of current LRC lyric and
play state of current song
Area of Song's name Display Display the name of the current song
Time Current Time/Total Time
Tips
【Tips】Audio player contains the function of lyric synchronization.
Please copy both the music and lyric files (LRC format) to the same
folder in the Micro SD card, and make sure their names are the same.
4.4.2 Movie
Click the “ ” icon to enter the folder interface.
The
function of each icon is as follows:
Movie Movie Then you will find an interface shows
“SDMMC”or“ResidentFlash ”folder, click the related folder to play the related files.
ESC Return to the menu interface of video player
Play Play the video file
Pause Pause
Stop Stop playing
Upward Return to previous folder
Volume Drag the slide block to adjust the volume
Rate of Progress Drag the slide block to adjust the progress
Time Current Time/Total Time
Name Display the name of current file
Previous Play previous movie
Next Play next movie
Tips
【Tips】On the playing interface, it will display the full screen when double
click the playing area; then double click again, it will display as normal.
4.5.1 Ebook .
1.Click E-book to enter into E-book folder interface.Then you will find an interface shows
“SDMMC ”or“ResidentFlash ” folder, click the related folder to play the related files.
ESC Return to main menu interface
Previous Display previous page
Next Display next page
Return Return to main interface
4.5Ebook &Picture
Click (Ebook & ) icon on the main interface to
enter into the Ebook / interface.
Picture
Picture

4.6 System Setting
Click “system” icon on the main interface to set your system, including volume, power,
Backlight, Date time,language, system information.
Tips
1. Click the “ ” icon on the main interface to enter the folder.
The function of each icon is as follows:
Picture Picture Then you will
find an interface shows“SDMMC”or“ResidentFlash ”folder, click the related folder to play
the related files.
4.5.2 Pictrue .
ESC Return to main interface
Previous Display previous page
Next Display next page
Back Return to previous folder
ESC Return to main interface
Zoom Out Zoom out the current
Zoom In Zoom in the current
Rotate Rotate the current 90
degree in clockwise
Slide Play Display all the s in the
folder automatically
Picture
Picture
Picture
Picture
Previous browse the previous one
Next browse the next one
Upward Return to previous folder
2.Click folder icon to open the browser
The function of each icon is as below:
Picture Picture
【Tips】
1.Under the full screen, double click the to return to normal
mode;
2. Zooming out the , click the touch screen with touch pen to
play the next .
Picture
Picture
Picture
-15- -16-
3. Click icon on E-book read interface to enter into the page selecting interface.
Number bar Show the page number
Backspace Delete the last inputted number
Clear Clear up all the numbers
Jump Jump to the number displayed page
4.6.1 Power Setting
Click “power” icon to enter the power setting interface. The user can check the
status bar to know the power, at the same time, also can click or to set the
time for automatically power off.
4.6.2 Backlight Setting
Click “Backlight” to enter Backlight setting interface. The user can adjust the
backlight by and ,or can click or to set the time for automatically
screen power off.
2. Click Ebook folder to open the reader
ESC Return to main interface
Previous Display previous page
Next Display next page
Upward Return to Previous folder
Skip Enter into the page selecting interface
File Name Display current file name
Page number Current page number / total page numbers

-17- -18-
Signal-to-Noise data
Channel
Longitude
Latitude
Altitude
Satellite no
Speed
Positioning time
5.Malfunction Analysis
If the device does not work smoothly, please inspect it according to the following method. If
problems still exist, please connect our Service Centre timely.
Problem Reason Method
Can not power on Low power charge the battery
Power off suddenly low power
Touch screen deflected
No sound when
playing
Tool low volume turn on the volume
insert the earphone properly
Can’t connect with PC
Poor connection of the USB cable
Refer to the3.3 chapter, connect the USB cable well.
Calibration is not precise. Refer to 4.6.6 to calibrate your touch screen.
Poor connection between
the earphone and device
Can not receive
GPS signal
Depending on the intensity of the local signals. It will take about 1
minute to receive the signal.
Map data missing
Copy the map data into the SD card again.
Contact with local retailer or distributor.
You need to enter the activated password when you use the device again.
Can not charge AC adapter is not
inserted well
Please check the adapter is inserted well, and
indicator is red.
Power Key invalid,
touch screen and
display abnormal
The system crashes Press the reset key with touch pen to restart.
charge the battery
2. Click “Factory Reset”icon at the right corner of information box, the system will
automatically return to the factory setting.
3. Click “GPS Reset” icon in the middle of information box, the system will automatically
clear up the Signal-to-Noise data received.
4.6.5 System Information
Click “System” icon to view the detailed system information.
1. Click “Calibration”icon at the left corner of information box to adjust the touch screen
. Repeat click the middle
of cursor until the calibration is successful.
Choose to move the cursor through middle, left, right, up,down steps.
4.6.3 Date Time Setting
Click “Date Time” to enter Date Time setting interface. Status bar will show
the current separately time, date and time zone.
Separately click “time”, “date”, “time zone” to set up the time, date and time zone.
Through the GPS signals, the time setting refreshes the current time automatically, it
means that the time will temporarily return to the factory setting time after the system
reset. As soon as the GPS begins to navigate, the time will renew to the standard time.
Please note that the time setting should be compatible with the local time.
4.6.4 Language setting
Click “Language” icon to set the language you need.
Support multi-country languages: English、French、German、Spanlish、Italian、Dutch、
Russian、Chinese、Korean and so on

-19- -20-
6.Technical Specification
Display
Precision
Map Update the map at www.car-navi.ph
Version update
Refreshing rate
Hot start: ≤9 sec, average(Open Sky)
Warm start: ≤18 sec, average(Open Sky)
Cold start: ≤43 sec, average(Open Sky)
Position: < 10 meters
Start-up time
-161dBm
Sensitivity
64 channels
Channels
1575.42MHz
Frequency
GPS Module
480*272(RGB)
Specification
Pixel
INPUT:DC 12-24V,OUTPUT:DC 5V /1.5A
Battery
Car Charger
Power
Languages
TXT
JPEG, BMP, PNG
E-book
MP3、 WMA、 WAV
Picture
AVI、MP4、3GP、WMV
Audio
External Memory
Video
MAX 16G Micro SD
2GB
128MB
NAND Flash
SiRF Atlas IV, CPU 500MHz,ARM11;DSP 250MHz.
SD RAM
CPU Frequency
System
Net Weight
Dimension
Media function
Power Saving
1/second
Automatically standby mode,screen
protection(black screen)
Bluetooth( )Optional Embed Bluetooth Module
Bluetooth V2.0, handfree mobile phone+vanish echo(optional)
Analog TV
Support multi-country
languages
3.7V /1400mAH
Continuous Operation Time
2.5-3.5 hours(voice and background light can
be adjusted to 50%)
5.0 TFT-LCD,+5.0 4-line-flat-panel resistance touch
CE, FCC, ROHS
Certificate
Port
Baud rate
COM7
38400
129.5*83.5*12.5mm
About 180g
Built-in module Support NTSC,PAL,SECAM(48-800MHz)
Sensitivity -96dBm
Mobility support to 430km/h
USB
Operation Temperature
Temperature/humidity
USB 2.0 High speed
Storage Temperature
o
-10 C~55oC
short time storage temperature
Long time storage temperature
o
-20 C~25oC
o
-25 C~75oC
Maximum humidity 80% RH when the temperature should not exceed 40 oC
English、French、German、Spanlish、
Italian、Dutch、Russian、Chinese、Korean
and so on
Table of contents